这篇文章分享的是cesium中高阶功能淹没分析代码实现的思路,以及一些参考代码,希望能给各位在生产中提供一些帮助,话不多说,上效果图:
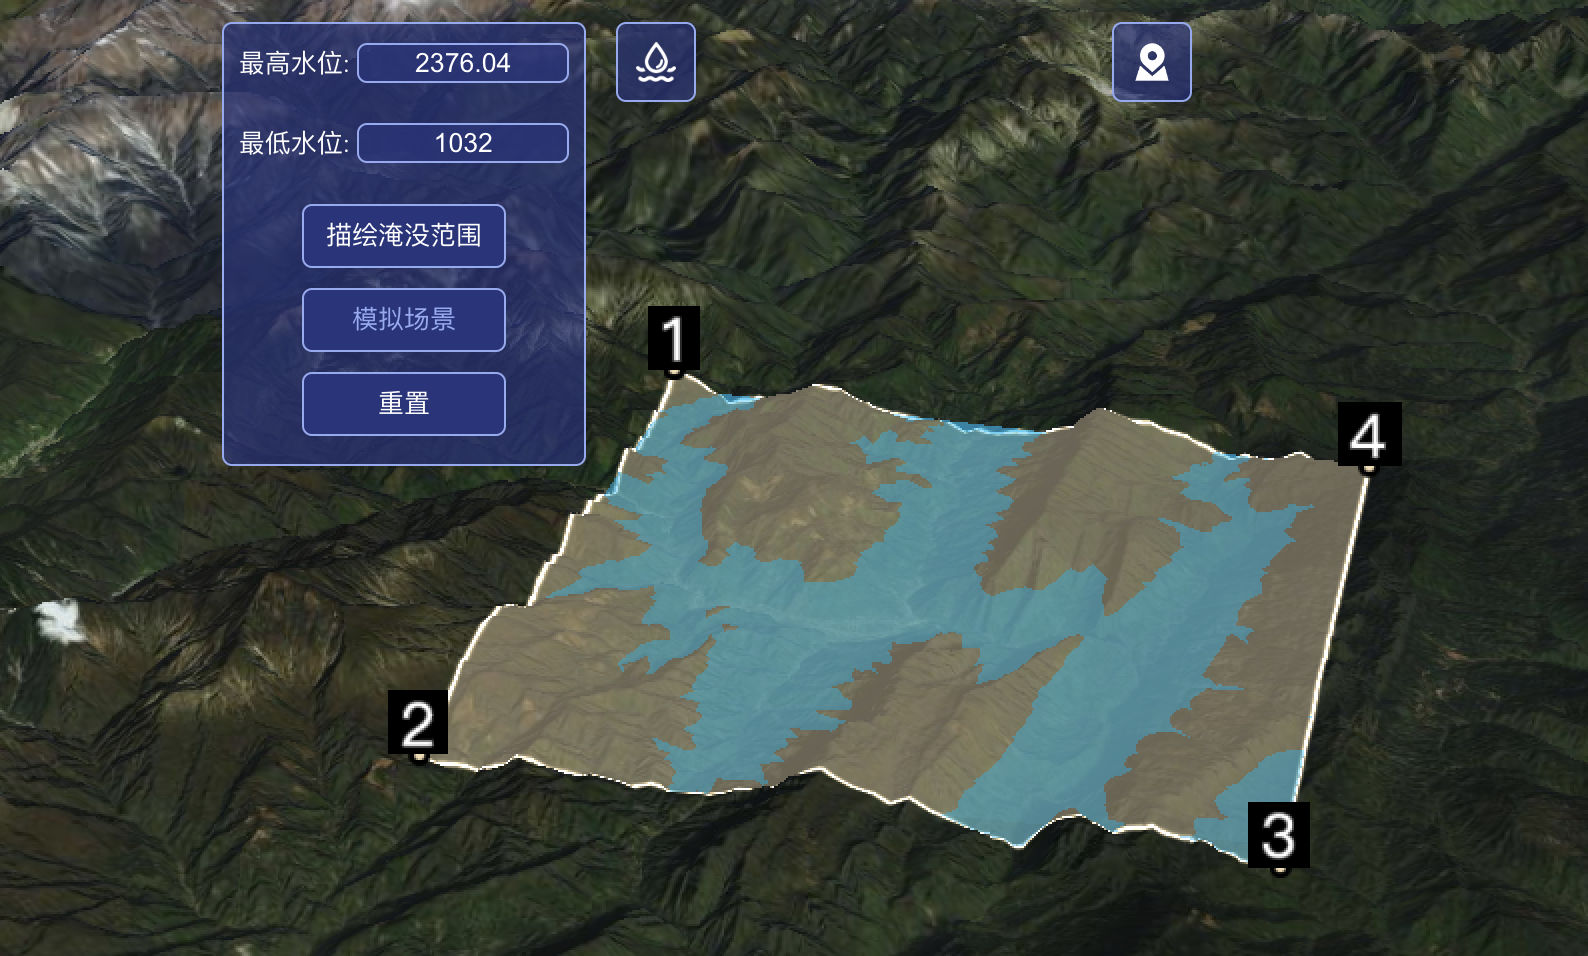
剖面分析的常见应用场景:
1)根据某区域洪水涨势速度,模拟洪水涨到指定高程的淹没过程,为防洪救灾提供一定的参考。
2)淹没分析结果可为河流区域的水利工程或建筑地选址提供依据。
看到了效果图之后,我们就来理一下实现的思路:
先通过鼠标左键点击事件获取四个点的位置,把点的位置传给淹没分析的函数,函数需传入起始水位和终止水位,把四点的坐标去除高度后以数组的形式作为画多边形的位置参数,利用extrudeHeight(拉伸高度)机制和属性回调函数来不断拉高多边形的高度,直到达到终止水位,实现淹没效果
要描绘出淹没范围,首先需要点击添加点位以及范围面,下面的代码是过程中涉及的一些添加entity的函数:
//画广告牌
        drawPointLabel(position, pointNum) {
            let viewer = this.viewer
            let Cesium = this.Cesium
            // 本质上就是添加一个点的实体
            return viewer.entities.add({
                name: '测量点',
                position: position,
                point: {
                    color: Cesium.Color.WHEAT,
                    pixelSize: 5,
                    outlineWidth: 3,
                    disableDepthTestDistance: Number.POSITIVE_INFINITY, //
                    heightReference: Cesium.HeightReference.CLAMP_TO_GROUND // 规定贴地
                },
                label: {
                    text: pointNum,
                    font: '30px sans-serif',
                    fillColor: Cesium.Color.WHITE,
                    outlineWidth: 2,
                    backgroundColor: Cesium.Color.BLACK,
                    showBackground: true,
                    style: Cesium.LabelStyle.FILL,
                    verticalOrigin: Cesium.VerticalOrigin.BOTTOM,
                    horizontalOrigin: Cesium.HorizontalOrigin.CENTER,
                    disableDepthTestDistance: Number.POSITIVE_INFINITY,
                    heightReference: Cesium.HeightReference.CLAMP_TO_GROUND
                }
            })
        },
//画线
        drawPolyline(positions) {
            let viewer = this.viewer
            if (positions.length < 1) return
            viewer.entities.add({
                name: '测量点',
                polyline: {
                    positions: positions,
                    width: 5.0,
                    material: new this.Cesium.PolylineGlowMaterialProperty({
                        // eslint-disable-next-line new-cap
                        color: this.Cesium.Color.WHEAT
                    }),
                    depthFailMaterial: new this.Cesium.PolylineGlowMaterialProperty({
                        // eslint-disable-next-line new-cap
                        color: this.Cesium.Color.WHEAT
                    }),
                    clampToGround: true
                }
            })
        }
// 方向
        Bearing(from, to) {
            let Cesium = this.Cesium
            let fromCartographic = Cesium.Cartographic.fromCartesian(from)
            let toCartographic = Cesium.Cartographic.fromCartesian(to)
            let lat1 = fromCartographic.latitude
            let lon1 = fromCartographic.longitude
            let lat2 = toCartographic.latitude
            let lon2 = toCartographic.longitude
            let angle = -Math.atan2(Math.sin(lon1 - lon2) * Math.cos(lat2), Math.cos(lat1) * Math.sin(lat2) - Math.sin(lat1) * Math.cos(lat2) * Math.cos(lon1 - lon2))
            if (angle < 0) {
                angle += Math.PI * 2.0
            }
            return angle
        },
        // 角度
        pointAngle(point1, point2, point3) {
            let bearing21 = this.Bearing(point2, point1)
            let bearing23 = this.Bearing(point2, point3)
            let angle = bearing21 - bearing23
            if (angle < 0) {
                angle += Math.PI * 2.0
            }
            return angle
        },
/* 计算空间面积 */
        getArea(positions) {
            let res = 0
            for (let i = 0; i < positions.length - 2; i++) {
                let j = (i + 1) % positions.length
                let k = (i + 2) % positions.length
                let totalAngle = this.pointAngle(positions[i], positions[j], positions[k])
                let tempLength1 = this.getLength(positions[j], positions[0])
                let tempLength2 = this.getLength(positions[k], positions[0])
                res += tempLength1 * tempLength2 * Math.sin(totalAngle) / 2
            }
            res = res.toFixed(2)
            // console.log(res)
            res = parseFloat(res)
            // console.log(Math.abs(res))
            return Math.abs(res)
        },
/* 在最后一个点处添加标签,显示面积 */
        addArea(area, positions) {
            let viewer = this.viewer
            let Cesium = this.Cesium
            return viewer.entities.add({
                name: '测量点',
                position: positions[positions.length - 1],
                label: {
                    text: area + '平方公里',
                    font: '20px sans-serif',
                    fillColor: Cesium.Color.WHITE,
                    outlineWidth: 2,
                    backgroundColor: Cesium.Color.BLACK,
                    showBackground: true,
                    style: Cesium.LabelStyle.FILL,
                    pixelOffset: new Cesium.Cartesian2(60, -60),
                    verticalOrigin: Cesium.VerticalOrigin.BOTTOM,
                    horizontalOrigin: Cesium.HorizontalOrigin.CENTER,
                    heightReference: Cesium.HeightReference.CLAMP_TO_GROUND,
                    disableDepthTestDistance: Number.POSITIVE_INFINITY
                }
            })
        },
//画面
        drawPolygon(positions) {
            let viewer = this.viewer
            if (positions.length < 2) return
            return viewer.entities.add({
                name: '测量点',
                polygon: {
                    hierarchy: positions,
                    // eslint-disable-next-line new-cap
                    material: new this.Cesium.ColorMaterialProperty(
                        this.Cesium.Color.WHEAT.withAlpha(0.4)
                    )
                }
            })
},要实现淹没的效果,需要设置水位的最高值和最低值,该值可以直接通过input框输入,但是在实际应用场景中,用户本身并不知到其描述范围的最高值和最低值,如果随便输入,效果并不理想,可能耗费长时间等待水位从0点升高,甚至需要多次尝试才能找到该范围最合适的水位高度,非常的不方便,所以我们需要在描绘出范围的时候,自动计算好该范围内的高程极值并提供给用户,便于用户找到其理想的水位,以下是高程极值算法的实现思路以及代码:
利用四点坐标两两成线,分别迭代求中点得到线上诸多点位,两条线上相同位置点位成线迭代求中点得到点位矩阵,解析矩阵求出每个点的高度,求出高程极值,求出高程极值后可以减少extrudeHeight拉升的距离,减少等待时间且高度更加准确
//求第一条线上的33个点
                                        this.waterArray1.push(tempPoints[0])
                                        this.waterArray1.push(tempPoints[1])
                                        for (let i = 0; i < 5; i++) {
                                            this.waterArray2 = []
                                            for (let i in this.waterArray1) {
                                                if (i == this.waterArray1.length - 1) {
                                                    this.waterArray2.push(this.waterArray1[i])
                                                } else {
                                                    let midpoint = this.getMidpoint(this.waterArray1[i], this.waterArray1[i * 1 + 1])
                                                    this.waterArray2.push(this.waterArray1[i])
                                                    this.waterArray2.push(midpoint)
                                                }
                                            }
                                            this.waterArray1 = this.waterArray2
                                        }
                                        let pointOnline1 = this.waterArray1
                                        this.waterArray1 = []

                                        //求平行线上的33个点
                                        this.waterArray1.push(tempPoints[3])
                                        this.waterArray1.push(tempPoints[2])
                                        for (let i = 0; i < 5; i++) {
                                            this.waterArray2 = []
                                            for (let i in this.waterArray1) {
                                                if (i == this.waterArray1.length - 1) {
                                                    this.waterArray2.push(this.waterArray1[i])
                                                } else {
                                                    let midpoint = this.getMidpoint(this.waterArray1[i], this.waterArray1[i * 1 + 1])
                                                    this.waterArray2.push(this.waterArray1[i])
                                                    this.waterArray2.push(midpoint)
                                                }
                                            }
                                            this.waterArray1 = this.waterArray2
                                        }
                                        let pointOnline2 = this.waterArray1
                                        let heightarr = []
                                        //33*33矩阵
                                        // let matrix = []
                                        for (let i = 0; i < pointOnline1.length; i++) {
                                            this.waterArray1 = []
                                            this.waterArray1.push(pointOnline1[i])
                                            this.waterArray1.push(pointOnline2[i])
                                            for (let i = 0; i < 5; i++) {
                                                this.waterArray2 = []
                                                for (let i in this.waterArray1) {
                                                    if (i == this.waterArray1.length - 1) {
                                                        this.waterArray2.push(this.waterArray1[i])
                                                    } else {
                                                        let midpoint = this.getMidpoint(this.waterArray1[i], this.waterArray1[i * 1 + 1])
                                                        this.waterArray2.push(this.waterArray1[i])
                                                        this.waterArray2.push(midpoint)
                                                    }
                                                }
                                                // this.waterArray1 = this.waterArray2
                                                for (let j in this.waterArray2) {
                                                    let categary = Cesium.Cartographic.fromCartesian(this.waterArray2[j]);
                                                    let height = (viewer.scene.globe.getHeight(categary)).toFixed(2)
                                                    heightarr.push(Number(height))
                                                }
                                            }
                                            // matrix.push(this.waterArray1)
                                        }

                                        //解析矩阵求所有点位高度
                                        // let heightarr = []
                                        // for (let i in matrix) {
                                        //     let matrix1 = matrix[i]
                                        //     for (let j in matrix1) {
                                        //         let categary = Cesium.Cartographic.fromCartesian(matrix1[j]);
                                        //         let height = (viewer.scene.globe.getHeight(categary)).toFixed(2)
                                        //         heightarr.push(Number(height))
                                        //     }
                                        // }
                                        this.maxWaterHeight = Math.max(...heightarr)
this.minWaterHeight = Math.min(...heightarr)淹没效果的实现主要利用多面体的拉升机制,利用回调函数不断提高多面体的高度,实现水位上升的效果,话不多说,上码:
该码用于开始淹没分析的点击事件
//开始淹没分析
        waterAnalysis(targetHeight1, positions, waterHeight1) {
            this.$refs.waterComing.style.color = 'rgb(146, 171, 243)'
            let viewer = this.viewer
            let Cesium = this.Cesium
            let targetHeight = targetHeight1 * 1
            let waterHeight = waterHeight1 * 1
            // console.log(positions)
            let adapCoordi = []
            positions.forEach((item) => {
                let cartographic = this.Cesium.Ellipsoid.WGS84.cartesianToCartographic(item)
                let lon = this.Cesium.Math.toDegrees(cartographic.longitude)
                let lat = this.Cesium.Math.toDegrees(cartographic.latitude)
                let arr = Cesium.Cartesian3.fromDegrees(lon, lat, 0)
                adapCoordi.push(arr)
            })
            // console.log(adapCoordi)
            let entity = viewer.entities.add({
                name: '测量点',
                polygon: {
                    hierarchy: adapCoordi,
                    perPositionHeight: true,
                    extrudedHeight: new Cesium.CallbackProperty(() => {
                        waterHeight += 3;
                        if (waterHeight > targetHeight) {
                            waterHeight = targetHeight;
                            this.$refs.waterComing.style.color = '#ffffff'
                        }
                        return waterHeight
                    }, false),
                    material: new Cesium.Color.fromBytes(0, 191, 255, 100),
                }
})let Cesium = this.Cesium
let that = this
let viewer = this.viewer
// let pointNum = 1
// console.log(pointNum)
let tempEntities = this.tempEntities
let floatingPoint = this.floatingPoint
let activeShape = this.activeShape
let position = []
let tempPoints = []
let activeShapePoints = []
// 开启深度检测
viewer.scene.globe.depthTestAgainstTerrain = true
// 创建场景的HTML canvas元素
let handler = new Cesium.ScreenSpaceEventHandler(viewer.scene.canvas)
// 取消鼠标双击事件
viewer.cesiumWidget.screenSpaceEventHandler.removeInputAction(Cesium.ScreenSpaceEventType.LEFT_CLICK)
viewer.cesiumWidget.screenSpaceEventHandler.removeInputAction(Cesium.ScreenSpaceEventType.LEFT_DOUBLE_CLICK)
// 监听鼠标移动
handler.setInputAction(function (movement) {
if (Cesium.defined(floatingPoint)) {
let newPosition = viewer.scene.pickPosition(movement.endPosition)
if (Cesium.defined(newPosition)) {
floatingPoint.position.setValue(newPosition)
activeShapePoints.pop()
activeShapePoints.push(newPosition)
}
}
}, Cesium.ScreenSpaceEventType.MOUSE_MOVE)
// 左键单击开始画线
handler.setInputAction((click) => {
let earthPosition = viewer.scene.pickPosition(click.position)
if (Cesium.defined(earthPosition)) {
if (activeShapePoints.length === 0) {
floatingPoint = that.drawPoint(earthPosition)
activeShapePoints.push(earthPosition)
const dynamicPositions = new Cesium.CallbackProperty(function () {
return new Cesium.PolygonHierarchy(activeShapePoints)
}, false)
activeShape = that.drawPolygon(dynamicPositions)
}
activeShapePoints.push(earthPosition)
}
// 获取位置信息
let ray = viewer.camera.getPickRay(click.position)
position = viewer.scene.globe.pick(ray, viewer.scene)
tempPoints.push(position) // 记录点位
let tempLength = tempPoints.length // 记录点数
that.pointNum += 1
// 调用绘制点的接口
let point = that.drawPointLabel(tempPoints[tempPoints.length - 1], JSON.stringify(that.pointNum))
tempEntities.push(point)
// 存在超过一个点时
if (tempLength > 1) {
// 绘制线
let pointline = that.drawPolyline([tempPoints[tempPoints.length - 2], tempPoints[tempPoints.length - 1]])
tempEntities.push(pointline) // 保存记录
}
if (tempLength == 4) {
let cartesian = viewer.camera.pickEllipsoid(click.position, viewer.scene.globe.ellipsoid)
if (cartesian) {
// 闭合最后一条线
let pointline = that.drawPolyline([tempPoints[0], tempPoints[tempPoints.length - 1]])
const loading = this.$loading({
lock: true,
text: '正在计算高程极值......',
spinner: 'el-icon-loading',
background: 'rgba(0, 0, 0, 0.7)'
});
setTimeout(() => { // 以服务的方式调用的 Loading 需要异步关闭
//求第一条线上的33个点
this.waterArray1.push(tempPoints[0])
this.waterArray1.push(tempPoints[1])
for (let i = 0; i < 5; i++) {
this.waterArray2 = []
for (let i in this.waterArray1) {
if (i == this.waterArray1.length - 1) {
this.waterArray2.push(this.waterArray1[i])
} else {
let midpoint = this.getMidpoint(this.waterArray1[i], this.waterArray1[i * 1 + 1])
this.waterArray2.push(this.waterArray1[i])
this.waterArray2.push(midpoint)
}
}
this.waterArray1 = this.waterArray2
}
let pointOnline1 = this.waterArray1
this.waterArray1 = []
//求平行线上的33个点
this.waterArray1.push(tempPoints[3])
this.waterArray1.push(tempPoints[2])
for (let i = 0; i < 5; i++) {
this.waterArray2 = []
for (let i in this.waterArray1) {
if (i == this.waterArray1.length - 1) {
this.waterArray2.push(this.waterArray1[i])
} else {
let midpoint = this.getMidpoint(this.waterArray1[i], this.waterArray1[i * 1 + 1])
this.waterArray2.push(this.waterArray1[i])
this.waterArray2.push(midpoint)
}
}
this.waterArray1 = this.waterArray2
}
let pointOnline2 = this.waterArray1
let heightarr = []
//33*33矩阵
// let matrix = []
for (let i = 0; i < pointOnline1.length; i++) {
this.waterArray1 = []
this.waterArray1.push(pointOnline1[i])
this.waterArray1.push(pointOnline2[i])
for (let i = 0; i < 5; i++) {
this.waterArray2 = []
for (let i in this.waterArray1) {
if (i == this.waterArray1.length - 1) {
this.waterArray2.push(this.waterArray1[i])
} else {
let midpoint = this.getMidpoint(this.waterArray1[i], this.waterArray1[i * 1 + 1])
this.waterArray2.push(this.waterArray1[i])
this.waterArray2.push(midpoint)
}
}
// this.waterArray1 = this.waterArray2
for (let j in this.waterArray2) {
let categary = Cesium.Cartographic.fromCartesian(this.waterArray2[j]);
let height = (viewer.scene.globe.getHeight(categary)).toFixed(2)
heightarr.push(Number(height))
}
}
// matrix.push(this.waterArray1)
}
//解析矩阵求所有点位高度
// let heightarr = []
// for (let i in matrix) {
// let matrix1 = matrix[i]
// for (let j in matrix1) {
// let categary = Cesium.Cartographic.fromCartesian(matrix1[j]);
// let height = (viewer.scene.globe.getHeight(categary)).toFixed(2)
// heightarr.push(Number(height))
// }
// }
this.maxWaterHeight = Math.max(...heightarr)
this.minWaterHeight = Math.min(...heightarr)
loading.close();
}, 1000);
tempEntities.push(pointline)
that.drawPolygon(tempPoints)
tempEntities.push(tempPoints)
this.waterArea = tempPoints
handler.destroy()
handler = null
this.$refs.darwWaterRef.style.color = '#ffffff'
}
activeShapePoints.pop()
viewer.entities.remove(activeShapePoints)
viewer.entities.remove(floatingPoint)
floatingPoint = undefined
activeShapePoints = []
this.waterArray1 = []
this.waterArray2 = []
this.pointNum = 0
this.jieliuFlag = true
}
}, Cesium.ScreenSpaceEventType.LEFT_CLICK)
以上内容是我在cesium中淹没分析的实现思路以及一些参考代码,如果伙伴有什么不清楚的地方,欢迎私信,我们共同讨论进步,码字不易,点赞收藏支持一下!!!!
我有一个用户工厂。我希望默认情况下确认用户。但是鉴于unconfirmed特征,我不希望它们被确认。虽然我有一个基于实现细节而不是抽象的工作实现,但我想知道如何正确地做到这一点。factory:userdoafter(:create)do|user,evaluator|#unwantedimplementationdetailshereunlessFactoryGirl.factories[:user].defined_traits.map(&:name).include?(:unconfirmed)user.confirm!endendtrait:unconfirmeddoenden
华为OD机试题本篇题目:明明的随机数题目输入描述输出描述:示例1输入输出说明代码编写思路最近更新的博客华为od2023|什么是华为od,od薪资待遇,od机试题清单华为OD机试真题大全,用Python解华为机试题|机试宝典【华为OD机试】全流程解析+经验分享,题型分享,防作弊指南华为o
C#实现简易绘图工具一.引言实验目的:通过制作窗体应用程序(C#画图软件),熟悉基本的窗体设计过程以及控件设计,事件处理等,熟悉使用C#的winform窗体进行绘图的基本步骤,对于面向对象编程有更加深刻的体会.Tutorial任务设计一个具有基本功能的画图软件**·包括简单的新建文件,保存,重新绘图等功能**·实现一些基本图形的绘制,包括铅笔和基本形状等,学习橡皮工具的创建**·设计一个合理舒适的UI界面**注明:你可能需要先了解一些关于winform窗体应用程序绘图的基本知识,以及关于GDI+类和结构的知识二.实验环境Windows系统下的visualstudio2017C#窗体应用程序三.
MIMO技术的优缺点优点通过下面三个增益来总体概括:阵列增益。阵列增益是指由于接收机通过对接收信号的相干合并而活得的平均SNR的提高。在发射机不知道信道信息的情况下,MIMO系统可以获得的阵列增益与接收天线数成正比复用增益。在采用空间复用方案的MIMO系统中,可以获得复用增益,即信道容量成倍增加。信道容量的增加与min(Nt,Nr)成正比分集增益。在采用空间分集方案的MIMO系统中,可以获得分集增益,即可靠性性能的改善。分集增益用独立衰落支路数来描述,即分集指数。在使用了空时编码的MIMO系统中,由于接收天线或发射天线之间的间距较远,可认为它们各自的大尺度衰落是相互独立的,因此分布式MIMO
遍历文件夹我们通常是使用递归进行操作,这种方式比较简单,也比较容易理解。本文为大家介绍另一种不使用递归的方式,由于没有使用递归,只用到了循环和集合,所以效率更高一些!一、使用递归遍历文件夹整体思路1、使用File封装初始目录,2、打印这个目录3、获取这个目录下所有的子文件和子目录的数组。4、遍历这个数组,取出每个File对象4-1、如果File是否是一个文件,打印4-2、否则就是一个目录,递归调用代码实现publicclassSearchFile{publicstaticvoidmain(String[]args){//初始目录Filedir=newFile("d:/Dev");Datebeg
通常,数组被实现为内存块,集合被实现为HashMap,有序集合被实现为跳跃列表。在Ruby中也是如此吗?我正在尝试从性能和内存占用方面评估Ruby中不同容器的使用情况 最佳答案 数组是Ruby核心库的一部分。每个Ruby实现都有自己的数组实现。Ruby语言规范只规定了Ruby数组的行为,并没有规定任何特定的实现策略。它甚至没有指定任何会强制或至少建议特定实现策略的性能约束。然而,大多数Rubyist对数组的性能特征有一些期望,这会迫使不符合它们的实现变得默默无闻,因为实际上没有人会使用它:插入、前置或追加以及删除元素的最坏情况步骤复
在ruby中,你可以这样做:classThingpublicdeff1puts"f1"endprivatedeff2puts"f2"endpublicdeff3puts"f3"endprivatedeff4puts"f4"endend现在f1和f3是公共(public)的,f2和f4是私有(private)的。内部发生了什么,允许您调用一个类方法,然后更改方法定义?我怎样才能实现相同的功能(表面上是创建我自己的java之类的注释)例如...classThingfundeff1puts"hey"endnotfundeff2puts"hey"endendfun和notfun将更改以下函数定
我目前有一个reddit克隆类型的网站。我正在尝试根据我的用户之前喜欢的帖子推荐帖子。看起来K最近邻或k均值是执行此操作的最佳方法。我似乎无法理解如何实际实现它。我看过一些数学公式(例如k表示维基百科页面),但它们对我来说并没有真正意义。有人可以推荐一些伪代码,或者可以查看的地方,以便我更好地了解如何执行此操作吗? 最佳答案 K最近邻(又名KNN)是一种分类算法。基本上,您采用包含N个项目的训练组并对它们进行分类。如何对它们进行分类完全取决于您的数据,以及您认为该数据的重要分类特征是什么。在您的示例中,这可能是帖子类别、谁发布了该项
我查看了Stripedocumentationonerrors,但我仍然无法正确处理/重定向这些错误。基本上无论发生什么,我都希望他们返回到edit操作(通过edit_profile_path)并向他们显示一条消息(无论成功与否)。我在edit操作上有一个表单,它可以POST到update操作。使用有效的信用卡可以正常工作(费用在Stripe仪表板中)。我正在使用Stripe.js。classExtrasController5000,#amountincents:currency=>"usd",:card=>token,:description=>current_user.email)
虽然1.8.7的构建我似乎有一个向后移植的Shellwords::shellescape版本,但我知道该方法是1.9的一个特性,在1.8的早期版本中绝对不支持.有谁知道我在哪里可以找到(以Gem形式或仅作为片段)针对Ruby转义的Bourne-shell命令的强大独立实现? 最佳答案 您也可以从shellwords.rb中复制您想要的内容。在Ruby的颠覆存储库的主干中(即GPLv2'd):defshellescape(str)#Anemptyargumentwillbeskipped,soreturnemptyquotes.ret
