我们在开发过程中有时需要使用系统属性,例如获取系统软件版本,获取设备名名称等,有时也需要设置自己的属性。本文将基于Android 10(Q)介绍Android系统属性(以下简称prop)使用,下文围绕以下几点展开介绍:
系统属性简单来说是用来存储系统中某些键值对数据,具有全局性、存取灵活方便的特点,因此广泛用于android系统的各个层级。
在终端设备中,可以通过以下命令进行prop调试。
#查看系统所有props
$getprop
...
[persist.sys.timezone]: [Asia/Shanghai]   //时区
[ro.system.build.type]: [userdebug]       //系统编译类型
[vendor.display.lcd_density]: [320]       //屏幕密度
...

#获取时区属性persist.sys.timezone的值
$getprop persist.sys.timezone
Asia/Shanghai

#过滤属性名或属性值含有关键字"timezone"的属性
$getprop | grep timezone
[persist.sys.timezone]: [Asia/Shanghai]

#获取不存在的属性时结果为空
$getprop hello
$getprop my.prop.test    //属性my.prop.test为空
$setprop my.prop.test 123    //设置属性my.prop.test为123
$getprop my.prop.test    //获取属性my.prop.test为123
123
setprop 可以给属性设置int、bool、string等基本类型
显示属性值发生变化的值
$watchprops
[my.prop.test]: [123456]
| Prop | Value | Feature |
|---|---|---|
| persist.sys.boot.reason | “shutdown”:关机 “reboot”: 重启 “shutdown,userrequested”: 用户触发关机 “shutdown,thermal”:过热关机 “shutdown,battery”:低电量关机 “shutdown,themal,battery” “reboot,adb”:adb 触发重启 “reboot,shell”: shell 触发重启 “reboot,bootloader”:bootloader模式触发重启 "reboot,recovery"recovery模式触发重启等 | <reason,subreason,detail>… 记录上一次关机/启动原因 |
| persist.sys.boot.reason.history | [shutdown,userrequested,946684808 reboot,shell,946684808 reboot,ota,1680834107] | 记录多条关机/启动原因 |
| persist.sys.timezone | Asia/Shanghai | 系统时区 |
| ro.boot.serialno | 9212f447 | 设备序列号 |
| ro.product.build.* | date:Fri Apr 7 10:21:42 CST 2023 固件编译时间为2023-4-7 10:21:42 type:userdebug等 | 设备编译相关信息 |
| ro.product.name | xxx | 设备名称 |
| ro.sf.lcd_density | 240 | 设备显示密度 |
| sys.usb.config | mtp,adb | usb连接模式 |
注意:部分系统属性为厂商定制,且不同Android版本属性名称会所有差异,因此不同平台系统属性略有差异
system/core/rootdir/init.rc
...
on property:sys.init_log_level=*			#sys.init_log_level属性有值时,启动设置log级别进程
    loglevel ${sys.init_log_level}
...
on property:sys.boot_completed=1			#开机完成时擦除/data/per_boot文件夹数据
    bootchart stop
    # Setup per_boot directory so other .rc could start to use it on boot_completed
    exec - system system -- /bin/rm -rf /data/per_boot
    mkdir /data/per_boot 0700 system system
...
===================================================
涉及的代码路径汇总如下:
frameworks\base\core\java\android\os\SystemProperties.java
frameworks\base\core\jni\android_os_SystemProperties.cpp
system\core\base\properties.cpp
system\core\init\main.cpp
system\core\init\init.cpp
system\core\init\property_service.cpp
system\core\property_service\libpropertyinfoparser\property_info_parser.cpp
bionic\libc\include\sys\_system_properties.h
bionic\libc\include\sys\system_properties.h
bionic\libc\bionic\system_property_set.cpp
bionic\libc\bionic\system_property_api.cpp
bionic\libc\system_properties\contexts_serialized.cpp
bionic\libc\system_properties\system_properties.cpp
bionic\libc\system_properties\prop_area.cpp
代码流程整体时序图如下:
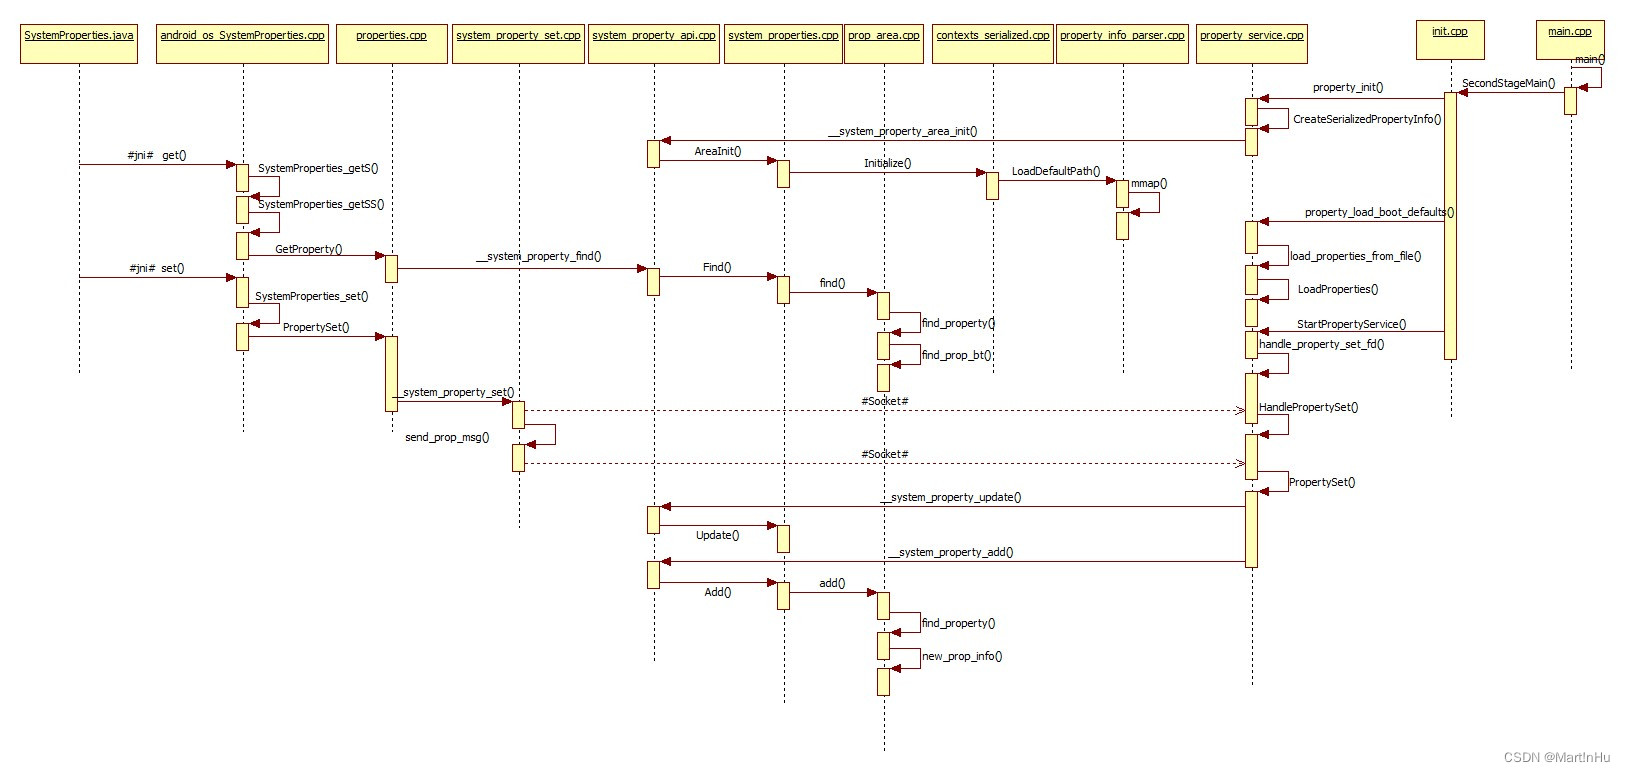
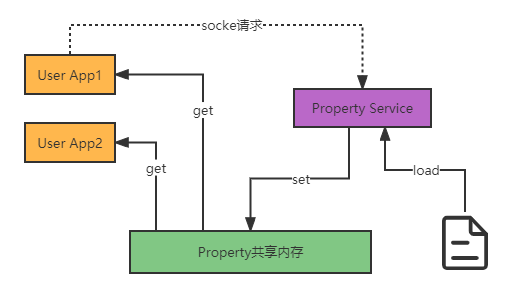
系统属性架构设计如下:
frameworks\base\core\java\android\os\SystemProperties.java
Systemproperties类在android.os包下,因此使用时需要
import android.os.Systemproperties;
SystemProperties提供了setprop和多种返回数据类型的getprop,采用键值对(key-value)的数据格式进行操作,具体如下:
public class SystemProperties {
...
   @UnsupportedAppUsage
   public static final int PROP_NAME_MAX = Integer.MAX_VALUE;//自android 8其取消对属性名长度限制
   public static final int PROP_VALUE_MAX = 91;
   ...
   public static String get(@NonNull String key)
   public static String get(@NonNull String key, @Nullable String def)
   public static int getInt(@NonNull String key, int def)
   public static long getLong(@NonNull String key, long def)
   public static boolean getBoolean(@NonNull String key, boolean def)
   public static void set(@NonNull String key, @Nullable String val)
   public static void addChangeCallback(@NonNull Runnable callback)
...
  //获取属性key的值,如果没有该属性则返回默认值def
   public static String get(@NonNull String key, @Nullable String def) {
       if (TRACK_KEY_ACCESS) onKeyAccess(key);
       return native_get(key, def);
   }
...
   //设置属性key的值为val,其不可为空、不能是"ro."开头的只读属性
   //长度不能超过PROP_VALUE_MAX(91)
   public static void set(@NonNull String key, @Nullable String val) {
       if (val != null && !val.startsWith("ro.") && val.length() > PROP_VALUE_MAX) {
           throw new IllegalArgumentException("value of system property '" + key
                   + "' is longer than " + PROP_VALUE_MAX + " characters: " + val);
       }
       if (TRACK_KEY_ACCESS) onKeyAccess(key);
       native_set(key, val);
   }
}
通过JNI上述 native_set()和native_get()走到
frameworks\base\core\jni\android_os_SystemProperties.cpp
//获取属性的方法最终调用GetProperty()
jstring SystemProperties_getSS(JNIEnv *env, jclass clazz, jstring keyJ,
                               jstring defJ)
{
    auto handler = [&](const std::string& key, jstring defJ) {
        std::string prop_val = android::base::GetProperty(key, "");
        ...
    };
    return ConvertKeyAndForward(env, keyJ, defJ, handler);
}
jstring SystemProperties_getS(JNIEnv *env, jclass clazz, jstring keyJ)
{
    return SystemProperties_getSS(env, clazz, keyJ, nullptr);
}

//设置属性的接口最终调用SetProperty()
void SystemProperties_set(JNIEnv *env, jobject clazz, jstring keyJ,
                          jstring valJ)
{
    auto handler = [&](const std::string& key, bool) {
        ...
        return android::base::SetProperty(key, val);
    };
    ...
}
...
//关联SystemProperties.java与android_os_SystemProperties.cpp的方法
int register_android_os_SystemProperties(JNIEnv *env)
{
    const JNINativeMethod method_table[] = {
        { "native_get", "(Ljava/lang/String;)Ljava/lang/String;",
          (void*) SystemProperties_getS },
        { "native_get",
          "(Ljava/lang/String;Ljava/lang/String;)Ljava/lang/String;",
          (void*) SystemProperties_getSS },
        { "native_set", "(Ljava/lang/String;Ljava/lang/String;)V",
          (void*) SystemProperties_set },
        ...
    };
    return RegisterMethodsOrDie(env, "android/os/SystemProperties",
                                method_table, NELEM(method_table));
}
跟着调用关系,接着进入:
system\core\base\properties.cpp
//调用__system_property_find()查找属性值
std::string GetProperty(const std::string& key, const std::string& default_value) {
  ...
  const prop_info* pi = __system_property_find(key.c_str());
  ...
}
//调用__system_property_set()设置属性值
bool SetProperty(const std::string& key, const std::string& value) {
  return (__system_property_set(key.c_str(), value.c_str()) == 0);
}
观察流程图会发现这里会出现“岔路”,查询和设置属性的接口暂时走向不同文件接口
_system_properties.h头文件定义PROP_SERVICE_NAME
bionic\libc\include\sys_system_properties.h
#define PROP_SERVICE_NAME "property_service"
bionic\libc\bionic\system_property_set.cpp
static const char property_service_socket[] = "/dev/socket/" PROP_SERVICE_NAME;
static const char* kServiceVersionPropertyName = "ro.property_service.version";
...
int __system_property_set(const char* key, const char* value) {
  if (g_propservice_protocol_version == 0) {
    detect_protocol_version();//获取属性服务协议版本
  }
  //旧协议版本限定prop name最大长度为PROP_NAME_MAX,prop val最大长度为PROP_VALUE_MAX
  if (g_propservice_protocol_version == kProtocolVersion1) {
    //在bionic\libc\include\sys\system_properties.h中定义
    //#define PROP_NAME_MAX   32
    //#define PROP_VALUE_MAX  92
    if (strlen(key) >= PROP_NAME_MAX) return -1;
    if (strlen(value) >= PROP_VALUE_MAX) return -1;
    ...
    return send_prop_msg(&msg);//send_prop_msg()也通过Socket与property_service进行通信
  } else {//进入新版本协议,仅对prop val长度有要求,不超过92,且属性不为只读属性
    // New protocol only allows long values for ro. properties only.
    if (strlen(value) >= PROP_VALUE_MAX && strncmp(key, "ro.", 3) != 0) return -1;
    ...
    SocketWriter writer(&connection);//通过Socket与property_service进行通信
    ...
  }
...
static const char* kServiceVersionPropertyName = "ro.property_service.version";
static constexpr uint32_t kProtocolVersion1 = 1;
static constexpr uint32_t kProtocolVersion2 = 2;  // current
static atomic_uint_least32_t g_propservice_protocol_version = 0;
static void detect_protocol_version() {
  //从ro.property_service.version中获取协议版本,可在平台终端getprop ro.property_service.version
  //在后续2.2.5小节中可找到设置该属性的位置
  if (__system_property_get(kServiceVersionPropertyName, value) == 0) {
    g_propservice_protocol_version = kProtocolVersion1;
  } else {
    uint32_t version = static_cast<uint32_t>(atoll(value));
    if (version >= kProtocolVersion2) {
      g_propservice_protocol_version = kProtocolVersion2;
    } else {
      g_propservice_protocol_version = kProtocolVersion1;
    }
  ...
}
流程到了这里会发现,最终需要通过Socket与property_service来通信进行设置属性值,那么问题来了:
system\core\init\init.cpp
int SecondStageMain(int argc, char** argv) {
    ...
    property_init();//属性初始化
    ...
    property_load_boot_defaults(load_debug_prop);//加载开机默认属性配置
    StartPropertyService(&epoll);//启动属性服务
    ...
}
system\core\init\property_service.cpp
void property_init() {
    mkdir("/dev/__properties__", S_IRWXU | S_IXGRP | S_IXOTH);
    CreateSerializedPropertyInfo();//创建属性信息property_info
    if (__system_property_area_init()) {//创建共享内存
        LOG(FATAL) << "Failed to initialize property area";
    }
    if (!property_info_area.LoadDefaultPath()) {
        LOG(FATAL) << "Failed to load serialized property info file";
    }
}
...
...
//读取selinux模块中的property相关文件,解析并加载到property_info中
void CreateSerializedPropertyInfo() {
    auto property_infos = std::vector<PropertyInfoEntry>();
    if (access("/system/etc/selinux/plat_property_contexts", R_OK) != -1) {
        if (!LoadPropertyInfoFromFile("/system/etc/selinux/plat_property_contexts",
                                      &property_infos)) {
            return;
        }
        // Don't check for failure here, so we always have a sane list of properties.
        // E.g. In case of recovery, the vendor partition will not have mounted and we
        // still need the system / platform properties to function.
        if (!LoadPropertyInfoFromFile("/vendor/etc/selinux/vendor_property_contexts",
                                      &property_infos)) {
            // Fallback to nonplat_* if vendor_* doesn't exist.
            LoadPropertyInfoFromFile("/vendor/etc/selinux/nonplat_property_contexts",
                                     &property_infos);
        }
        if (access("/product/etc/selinux/product_property_contexts", R_OK) != -1) {
            LoadPropertyInfoFromFile("/product/etc/selinux/product_property_contexts",
                                     &property_infos);
        }
        if (access("/odm/etc/selinux/odm_property_contexts", R_OK) != -1) {
            LoadPropertyInfoFromFile("/odm/etc/selinux/odm_property_contexts", &property_infos);
        }
    } else {
        if (!LoadPropertyInfoFromFile("/plat_property_contexts", &property_infos)) {
            return;
        }
        if (!LoadPropertyInfoFromFile("/vendor_property_contexts", &property_infos)) {
            // Fallback to nonplat_* if vendor_* doesn't exist.
            LoadPropertyInfoFromFile("/nonplat_property_contexts", &property_infos);
        }
        LoadPropertyInfoFromFile("/product_property_contexts", &property_infos);
        LoadPropertyInfoFromFile("/odm_property_contexts", &property_infos);
    }

    auto serialized_contexts = std::string();
    auto error = std::string();
    if (!BuildTrie(property_infos, "u:object_r:default_prop:s0", "string", &serialized_contexts,
                   &error)) {
        LOG(ERROR) << "Unable to serialize property contexts: " << error;
        return;
    }
    //将序列化属性写入/dev/__properties__/property_info
    constexpr static const char kPropertyInfosPath[] = "/dev/__properties__/property_info";
    if (!WriteStringToFile(serialized_contexts, kPropertyInfosPath, 0444, 0, 0, false)) {
        PLOG(ERROR) << "Unable to write serialized property infos to file";
    }
    selinux_android_restorecon(kPropertyInfosPath, 0);
}
bionic\libc\bionic\system_property_api.cpp
int __system_property_area_init() {
  bool fsetxattr_failed = false;
  return system_properties.AreaInit(PROP_FILENAME, &fsetxattr_failed) && !fsetxattr_failed ? 0 : -1;
}
初始化属性内存共享区域
bionic\libc\system_properties\system_properties.cpp
bool SystemProperties::AreaInit(const char* filename, bool* fsetxattr_failed) {
  if (strlen(filename) >= PROP_FILENAME_MAX) {
    return false;
  }
  strcpy(property_filename_, filename);
  contexts_ = new (contexts_data_) ContextsSerialized();
  if (!contexts_->Initialize(true, property_filename_, fsetxattr_failed)) {
    return false;
  }
  initialized_ = true;
  return true;
}
bionic\libc\system_properties\contexts_serialized.cpp
bool ContextsSerialized::Initialize(bool writable, const char* filename, bool* fsetxattr_failed) {
  filename_ = filename;
  if (!InitializeProperties()) {
    return false;
  }
  ...
}
bool ContextsSerialized::InitializeProperties() {
  if (!property_info_area_file_.LoadDefaultPath()) {
    return false;
  }
  ...
}
system\core\property_service\libpropertyinfoparser\property_info_parser.cpp
bool PropertyInfoAreaFile::LoadDefaultPath() {
  return LoadPath("/dev/__properties__/property_info");
}
bool PropertyInfoAreaFile::LoadPath(const char* filename) {
  int fd = open(filename, O_CLOEXEC | O_NOFOLLOW | O_RDONLY);
  ...
  void* map_result = mmap(nullptr, mmap_size, PROT_READ, MAP_SHARED, fd, 0);
  ...
}
__system_property_area_init()经过一系列的方法调用,最终通过mmap()将/dev/__property __/property_info加载到共享内存。
接着init进程中property_load_boot_defaults(load_debug_prop)函数分析
system\core\init\property_service.cpp
void property_load_boot_defaults(bool load_debug_prop) {
    // TODO(b/117892318): merge prop.default and build.prop files into one
    // We read the properties and their values into a map, in order to always allow properties
    // loaded in the later property files to override the properties in loaded in the earlier
    // property files, regardless of if they are "ro." properties or not.
    std::map<std::string, std::string> properties;
    //加载属性build.prop、default.prop至properties
    if (!load_properties_from_file("/system/etc/prop.default", nullptr, &properties)) {
        // Try recovery path
        if (!load_properties_from_file("/prop.default", nullptr, &properties)) {
            // Try legacy path
            load_properties_from_file("/default.prop", nullptr, &properties);
        }
    }
    load_properties_from_file("/system/build.prop", nullptr, &properties);
    load_properties_from_file("/vendor/default.prop", nullptr, &properties);
    load_properties_from_file("/vendor/build.prop", nullptr, &properties);
    if (SelinuxGetVendorAndroidVersion() >= __ANDROID_API_Q__) {
        load_properties_from_file("/odm/etc/build.prop", nullptr, &properties);
    } else {
        load_properties_from_file("/odm/default.prop", nullptr, &properties);
        load_properties_from_file("/odm/build.prop", nullptr, &properties);
    }
    load_properties_from_file("/product/build.prop", nullptr, &properties);
    load_properties_from_file("/product_services/build.prop", nullptr, &properties);
    load_properties_from_file("/factory/factory.prop", "ro.*", &properties);
    ...
    //将properties中属性通过PropertySet存入属性属性
    for (const auto& [name, value] : properties) {
        std::string error;
        if (PropertySet(name, value, &error) != PROP_SUCCESS) {
            LOG(ERROR) << "Could not set '" << name << "' to '" << value
                       << "' while loading .prop files" << error;
        }
    }
    property_initialize_ro_product_props();//初始化ro_product前缀的只读属性
    property_derive_build_props();//初始化编译相关属性
    update_sys_usb_config();//设置persist.sys.usb.config属性,用于控制USB调试和文件传输功能
}
从上面代码可以看出从多个属性文件.prop中系统属性加载至properties变量,再通过PropertySet()将properties添加到系统中,并初始化只读、编译、usb相关属性值。
PropertySet()流程在2.2.1小节中有介绍,通过Socket与属性服务进行通信,具体过程即将揭晓。
2.2.2小节中提到init进程StartPropertyService(&epoll)启动了属性服务。
system\core\init\property_service.cpp
void StartPropertyService(Epoll* epoll) {
    selinux_callback cb;
    cb.func_audit = SelinuxAuditCallback;
    selinux_set_callback(SELINUX_CB_AUDIT, cb);
    //这里设置了2.2.1小节提到的属性ro.property_service.version
    property_set("ro.property_service.version", "2");
    property_set_fd = CreateSocket(PROP_SERVICE_NAME, SOCK_STREAM | SOCK_CLOEXEC | SOCK_NONBLOCK,
                                   false, 0666, 0, 0, nullptr);
    if (property_set_fd == -1) {
        PLOG(FATAL) << "start_property_service socket creation failed";
    }
    listen(property_set_fd, 8);//设置Socket连接数为8
    //注册epoll,监听property_set_fd改变时调用handle_property_set_fd
    if (auto result = epoll->RegisterHandler(property_set_fd, handle_property_set_fd); !result) {
        PLOG(FATAL) << result.error();
    }
}
static void handle_property_set_fd() {
    ...
    switch (cmd) {
    case PROP_MSG_SETPROP: {//设置属性
        ...
        uint32_t result =
            HandlePropertySet(prop_name, prop_value, socket.source_context(), cr, &error);
        ...
    }
    case PROP_MSG_SETPROP2: {
        ...
        uint32_t result = HandlePropertySet(name, value, socket.source_context(), cr, &error);
        ...
    }
    ...
}
uint32_t HandlePropertySet(const std::string& name, const std::string& value,
                           const std::string& source_context, const ucred& cr, std::string* error) {
    if (auto ret = CheckPermissions(name, value, source_context, cr, error); ret != PROP_SUCCESS) {
        return ret;
    }
    if (StartsWith(name, "ctl.")) {//ctl属性:ctl.start启动服务,ctl.stop关闭服务
        HandleControlMessage(name.c_str() + 4, value, cr.pid);
        return PROP_SUCCESS;
    }
    // sys.powerctl is a special property that is used to make the device reboot.  We want to log
    // any process that sets this property to be able to accurately blame the cause of a shutdown.
    if (name == "sys.powerctl") {//sys.powerctl属性可控制设备重启
        std::string cmdline_path = StringPrintf("proc/%d/cmdline", cr.pid);
        std::string process_cmdline;
        std::string process_log_string;
        if (ReadFileToString(cmdline_path, &process_cmdline)) {
            // Since cmdline is null deliminated, .c_str() conveniently gives us just the process
            // path.
            process_log_string = StringPrintf(" (%s)", process_cmdline.c_str());
        }
        LOG(INFO) << "Received sys.powerctl='" << value << "' from pid: " << cr.pid
                  << process_log_string;
    }
    if (name == "selinux.restorecon_recursive") {
        return PropertySetAsync(name, value, RestoreconRecursiveAsync, error);
    }
    return PropertySet(name, value, error);//设置属性
}
...
static uint32_t PropertySet(const std::string& name, const std::string& value, std::string* error) {
    size_t valuelen = value.size();
    if (!IsLegalPropertyName(name)) {//检测属性合法性
        *error = "Illegal property name";
        return PROP_ERROR_INVALID_NAME;
    }
    if (valuelen >= PROP_VALUE_MAX && !StartsWith(name, "ro.")) {
        *error = "Property value too long";
        return PROP_ERROR_INVALID_VALUE;
    }
    if (mbstowcs(nullptr, value.data(), 0) == static_cast<std::size_t>(-1)) {
        *error = "Value is not a UTF8 encoded string";
        return PROP_ERROR_INVALID_VALUE;
    }
    //检测属性是否已存在
    prop_info* pi = (prop_info*) __system_property_find(name.c_str());
    if (pi != nullptr) {
        // ro.* properties are actually "write-once".
        if (StartsWith(name, "ro.")) {
            *error = "Read-only property was already set";
            return PROP_ERROR_READ_ONLY_PROPERTY;
        }
        //属性已存在,并且非ro只读属性,更新属性值
        __system_property_update(pi, value.c_str(), valuelen);
    } else {
        //属性不存在,添加属性值
        int rc = __system_property_add(name.c_str(), name.size(), value.c_str(), valuelen);
        if (rc < 0) {
            *error = "__system_property_add failed";
            return PROP_ERROR_SET_FAILED;
        }
    }
    // Don't write properties to disk until after we have read all default
    // properties to prevent them from being overwritten by default values.
    if (persistent_properties_loaded && StartsWith(name, "persist.")) {
        WritePersistentProperty(name, value);//将persist属性持久化到disk
    }
    property_changed(name, value);//特殊属性值(如sys.powerctl)改变后系统需要立即处理。
    return PROP_SUCCESS;
}
bionic\libc\bionic\system_property_api.cpp
int __system_property_update(prop_info* pi, const char* value, unsigned int len) {
  return system_properties.Update(pi, value, len);//更新属性值
}
int __system_property_add(const char* name, unsigned int namelen, const char* value,
                          unsigned int valuelen) {
  return system_properties.Add(name, namelen, value, valuelen);//添加属性值
}
bionic\libc\system_properties\system_properties.cpp
int SystemProperties::Update(prop_info* pi, const char* value, unsigned int len) {
  ...
  prop_area* pa = contexts_->GetSerialPropArea();
  uint32_t serial = atomic_load_explicit(&pi->serial, memory_order_relaxed);
  serial |= 1;
  atomic_store_explicit(&pi->serial, serial, memory_order_relaxed);
  atomic_thread_fence(memory_order_release);
  strlcpy(pi->value, value, len + 1);//属性值更新
  ...
  return 0;
}
int SystemProperties::Add(const char* name, unsigned int namelen, const char* value,
                          unsigned int valuelen) {
  ...
  prop_area* serial_pa = contexts_->GetSerialPropArea();
  prop_area* pa = contexts_->GetPropAreaForName(name);
  bool ret = pa->add(name, namelen, value, valuelen);//向共享内存添加新属性
  ...
  return 0;
}
bionic\libc\system_properties\prop_area.cpp
bool prop_area::add(const char* name, unsigned int namelen, const char* value,
unsigned int valuelen) {
return find_property(root_node(), name, namelen, value, valuelen, true);
}
...
const prop_info* prop_area::find_property(prop_bt* const trie, const char* name, uint32_t namelen,
const char* value, uint32_t valuelen,
bool alloc_if_needed) {
...
prop_bt* root = nullptr;
uint_least32_t children_offset = atomic_load_explicit(¤t->children, memory_order_relaxed);
if (children_offset != 0) {//找到属性节点
root = to_prop_bt(¤t->children);
} else if (alloc_if_needed) {//未找到时新建节点
uint_least32_t new_offset;
root = new_prop_bt(remaining_name, substr_size, &new_offset);
if (root) {
atomic_store_explicit(¤t->children, new_offset, memory_order_release);
}
}
...
current = find_prop_bt(root, remaining_name, substr_size, alloc_if_needed);
remaining_name = sep + 1;
}
uint_least32_t prop_offset = atomic_load_explicit(¤t->prop, memory_order_relaxed);
if (prop_offset != 0) {
return to_prop_info(¤t->prop);//返回已存在的prop_info
} else if (alloc_if_needed) {
uint_least32_t new_offset;
//添加新属性
prop_info* new_info = new_prop_info(name, namelen, value, valuelen, &new_offset);
...
}
}
prop_info* prop_area::new_prop_info(const char* name, uint32_t namelen, const char* value,
uint32_t valuelen, uint_least32_t* const off) {
...
prop_info* info;
if (valuelen >= PROP_VALUE_MAX) {
uint32_t long_value_offset = 0;
char* long_location = reinterpret_cast<char*>(allocate_obj(valuelen + 1, &long_value_offset));
if (!long_location) return nullptr;
memcpy(long_location, value, valuelen);
long_location[valuelen] = '\0';
long_value_offset -= new_offset;
info = new (p) prop_info(name, namelen, long_value_offset);
} else {
info = new (p) prop_info(name, namelen, value, valuelen);
}
*off = new_offset;
return info;
}
从上述code可分析出设置属性流程中根据所设置的属性值是否存在分别走update()和add()流程,而add 最后调用查找属性方法,如果不存在则新建共享内存节点,将prop_info存入。自此,set prop流程结束。
承接2.2节system\core\base\properties.cpp中__system_property_find(key.c_str())
bionic\libc\bionic\system_property_api.cpp
const prop_info* __system_property_find(const char* name) {
  return system_properties.Find(name);
}
bionic\libc\system_properties\system_properties.cpp
const prop_info* SystemProperties::Find(const char* name) {
  ...
  prop_area* pa = contexts_->GetPropAreaForName(name);
  ...
  return pa->find(name);
}
bionic\libc\system_properties\prop_area.cpp
const prop_info* prop_area::find(const char* name) {
  return find_property(root_node(), name, strlen(name), nullptr, 0, false);
}
find_property后续流程同2.2.6小节。
在上一章节中详细介绍了获取和设置属性的代码流程,但仍有部分问题仍待解决:
在java代码中使用prop需满足以下两点:
Systemproperties部分源码如下:
frameworks\base\core\java\android\os\SystemProperties.java
...
public class SystemProperties {
...
   //获取属性key的值,如果没有该属性则返回默认值def
   public static String get(@NonNull String key, @Nullable String def) {
       if (TRACK_KEY_ACCESS) onKeyAccess(key);
       return native_get(key, def);
   }
...
   //设置属性key的值为val
   public static void set(@NonNull String key, @Nullable String val) {
       if (val != null && !val.startsWith("ro.") && val.length() > PROP_VALUE_MAX) {
           throw new IllegalArgumentException("value of system property '" + key
                   + "' is longer than " + PROP_VALUE_MAX + " characters: " + val);
       }
       if (TRACK_KEY_ACCESS) onKeyAccess(key);
       native_set(key, val);
   }
....
}
get和set pro以ActivityManagerService.java代码为例:
frameworks\base\services\core\java\com\android\server\am\ActivityManagerService.java
final void finishBooting() {
  ...
  //设置开机完成标志属性sys.boot_completed
  SystemProperties.set("sys.boot_completed", "1");
}
...
private static void maybePruneOldTraces(File tracesDir) {
  ...
  //获取tombstoned.max_anr_count属性值
  final int max = SystemProperties.getInt("tombstoned.max_anr_count", 64);
}
获取属性值可以根据值的类型使用合适返回值类型的方法如getInt()、getBoolean()、getLong(),SystemProperties.get()获取的值为String。
这里以MPEG4Writer.cpp为例
frameworks\av\media\libstagefright\MPEG4Writer.cpp
#include <cutils/properties.h>
    ...
void MPEG4Writer::addDeviceMeta() {
    ...
    if (property_get("ro.build.version.release", val, NULL)
    ...
        if (property_get("ro.product.model", val, NULL)
    ...
}
在C++代码中使用prop需要:
properties.h源码在:
system/core/libcutils/include/cutils/properties.h
int property_get(const char* key, char* value, const char* default_value);
int property_set(const char *key, const char *value);
int property_list(void (*propfn)(const char *key, const char *value, void *cookie), void *cookie);
从2.2.5小节中可以看到有些属性比较特殊,特总结如下:
ro即read only这类属性通常是系统默认属性,在系统编译或初始化时设置的。
$ getprop ro.vendor.build.version.release
10
$ setprop ro.vendor.build.version.release 9
setprop: failed to set property 'ro.vendor.build.version.release' to '9'
设置persist开头的属性,断电后仍能保存,值写入data/property/persistent_properties。
$ getprop persist.hello.test  //属性为空
$ setprop persist.hello.test abc //设置属性persist.hello.test值为abc
$ getprop persist.hello.test abc //属性get正常
abc
$reboot //重启设备
$ getprop persist.hello.test //属性为abc
abc
setprop ctl.start xxx //启动某服务
setprop ctl.stop xxx  //关闭某服务
setprop ctl.restart xxx  //重启某服务
sys.powerctl属性可控制设备重启关机
setprop sys.powerctl shutdown //设备关机
setprop sys.powerctl reboot //设备重启
设置其他格式开头的属性,断电后不能保存
$ getprop hello.test  //属性为空
$ setprop hello.test 123//设置属性persist.hello.test值为abc
$ getprop hello.test 123//属性get正常
123
$reboot //重启设备
$ getprop hello.test //属性为空
从前面的介绍中我们知道系统开机时会load *.prop属性配置文件中的属性,因此开机后就有了默认属性。这里我们可以在device/xxx/xxx/system.prop 中添加
device/google/marlin/system.prop
# 添加自己的系统默认属性
persist.hello.world=hello
注意:这里添加的属性前缀必须是在system/sepolicy/private/property_contexts中被定义过的,否则无效;定制化前缀属性在后面定制prop属性配置中会介绍。
make android后在out/target/product/xxx/system/build.prop 或out/target/product/xxx/vendor/build.prop可找到添加的属性persist.hello.world,则说明基本添加成功,烧录img验证即可。
我们已经知道如何添加系统默认属性,但项目中有许多*.prop配置文件,
本章将围绕上面两个问题进行介绍
build.prop是由代码编译时,build/core/Makefile完成的
//指定编译信息及设备基本信息脚本
BUILDINFO_SH := build/make/tools/buildinfo.sh
BUILDINFO_COMMON_SH := build/make/tools/buildinfo_common.sh

//指定build.prop生成路径
INSTALLED_BUILD_PROP_TARGET := $(TARGET_OUT)/build.prop
INSTALLED_PRODUCT_BUILD_PROP_TARGET := $(TARGET_OUT_PRODUCT)/build.prop
INSTALLED_VENDOR_BUILD_PROP_TARGET := $(TARGET_OUT_VENDOR)/build.prop
...
//生成build.prop
$(intermediate_system_build_prop): $(BUILDINFO_SH) $(BUILDINFO_COMMON_SH) $(INTERNAL_BUILD_ID_MAKEFILE) $(BUILD_SYSTEM)/version_defaults.mk $(system_prop_file) $(INSTALLED_ANDROID_INFO_TXT_TARGET) $(API_FINGERPRINT)
   @echo Target buildinfo: $@
   @mkdir -p $(dir $@)
   $(hide) echo > $@
ifneq ($(PRODUCT_OEM_PROPERTIES),)
   $(hide) echo "#" >> $@; \
           echo "# PRODUCT_OEM_PROPERTIES" >> $@; \
           echo "#" >> $@;
   $(hide) $(foreach prop,$(PRODUCT_OEM_PROPERTIES), \
       echo "import /oem/oem.prop $(prop)" >> $@;)
endif
   $(hide) PRODUCT_BRAND="$(PRODUCT_SYSTEM_BRAND)" \
           ...
           TARGET_CPU_ABI2="$(TARGET_CPU_ABI2)" \
           bash $(BUILDINFO_SH) >> $@//将许多属性追加至out/.../build.prop
build/make/tools/buildinfo.sh中配置了系统编译常见信息,具体如下
...
echo "ro.build.version.incremental=$BUILD_NUMBER"//软件增量版本
echo "ro.build.version.sdk=$PLATFORM_SDK_VERSION"//软件使用的sdk版本
echo "ro.build.version.release=$PLATFORM_VERSION"//系统版本号
echo "ro.build.date=`$DATE`"//软件编译日期
...
经过Makefile,将系统中各种prop配置文件合并生成在out指定路径下。
也是在Makefile中将各路径下build.prop随系统分区一同打包进img,out\target\product\xxx\system\build.prop打包进system.img
out\target\product\xxx\vendor\build.prop打包进vendor.img
涉及的代码路径汇总如下:
device/qcom/qssi/hello.prop
device/qcom/qssi/qssi.mk
device/qcom/sepolicy/generic/private/property_contexts
system/core/rootdir/init.rc
system/core/init/property_service.cpp
为了方便统一管理定制化属性,有时会将定制化属性都写在定制的.prop文件中,下面以添加hello.prop为例说明添加过程。
device/qcom/qssi/hello.prop
#
# system.prop for qssi
#
ro.hello.year=2022    //添加ro属性
persist.hello.month=07    //添加persist属性
hello.day=25    //添加hello属性

ro.product.model=HelloWorld    //定制系统已有ro.product.model属性
修改device下的device.mk来指定hello.prop的预置路径
device/qcom/qssi/qssi.mk
#将hello.prop预置到system/hello.prop
PRODUCT_COPY_FILES += \
    device/qcom/qssi/hello.prop:system/hello.prop
hello.开头的属性是新添加的配置,需要在配置对应的SELinux规则,否则无效,配置方法如下:
device/qcom/sepolicy/generic/private/property_contexts
hello. u:object_r:system_prop:s0
此步骤可省略,若未配置读写权限,默认system/prop为644
这里配置与system/build.prop相同的600权限
system/core/rootdir/init.rc
on fs
   chmod 0600 /system/hello.prop
5.2、小节中仅仅将hello.prop预置到system/hello.prop还不够,系统启动时需要load hello.prop才能使其生效
system/core/init/property_service.cpp
    load_properties_from_file("/system/build.prop", nullptr, &properties);
   load_properties_from_file("/vendor/default.prop", nullptr, &properties);
   load_properties_from_file("/vendor/build.prop", nullptr, &properties);
   if (SelinuxGetVendorAndroidVersion() >= __ANDROID_API_Q__) {
       load_properties_from_file("/odm/etc/build.prop", nullptr, &properties);
   } else {
       load_properties_from_file("/odm/default.prop", nullptr, &properties);
       load_properties_from_file("/odm/build.prop", nullptr, &properties);
   }
   load_properties_from_file("/product/build.prop", nullptr, &properties);
   load_properties_from_file("/product_services/build.prop", nullptr, &properties);
   load_properties_from_file("/factory/factory.prop", "ro.*", &properties);
   //load 预置的hello.prop ,最后load保证其配置属性优先级更高
   load_properties_from_file("/system/hello.prop", nullptr, &properties);
Android全编译后正常情况可找到生成的
out/target/product/qssi/system/hello.prop
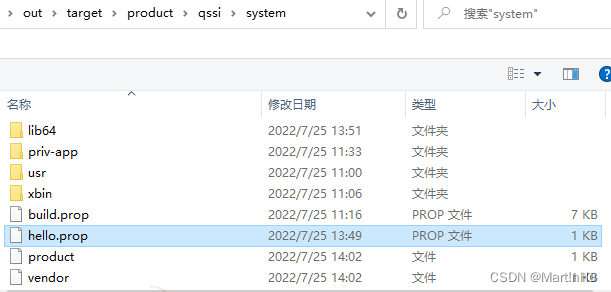
检查其内容应与device/qcom/qssi/hello.prop内容保持一致。
将打包好的img烧录到设备中进行确认
//hello.prop预置成功
$ ls -al system/
-rw-r--r--  1 root root    117 2009-01-01 08:00 hello.prop

//新增属性设置成功
$ getprop | grep hello
[hello.day]: [25]
[persist.hello.month]: [07]
[ro.hello.year]: [2022]

//ro.product.model覆盖了默认值
$ getprop ro.product.model
HelloWorld
我希望我的UserPrice模型的属性在它们为空或不验证数值时默认为0。这些属性是tax_rate、shipping_cost和price。classCreateUserPrices8,:scale=>2t.decimal:tax_rate,:precision=>8,:scale=>2t.decimal:shipping_cost,:precision=>8,:scale=>2endendend起初,我将所有3列的:default=>0放在表格中,但我不想要这样,因为它已经填充了字段,我想使用占位符。这是我的UserPrice模型:classUserPrice回答before_val
我有一个包含模块的模型。我想在模块中覆盖模型的访问器方法。例如:classBlah这显然行不通。有什么想法可以实现吗? 最佳答案 您的代码看起来是正确的。我们正在毫无困难地使用这个确切的模式。如果我没记错的话,Rails使用#method_missing作为属性setter,因此您的模块将优先,阻止ActiveRecord的setter。如果您正在使用ActiveSupport::Concern(参见thisblogpost),那么您的实例方法需要进入一个特殊的模块:classBlah
我有一个具有一些属性的模型:attr1、attr2和attr3。我需要在不执行回调和验证的情况下更新此属性。我找到了update_column方法,但我想同时更新三个属性。我需要这样的东西:update_columns({attr1:val1,attr2:val2,attr3:val3})代替update_column(attr1,val1)update_column(attr2,val2)update_column(attr3,val3) 最佳答案 您可以使用update_columns(attr1:val1,attr2:val2
我有这个html标记:我想得到这个:我如何使用Nokogiri做到这一点? 最佳答案 require'nokogiri'doc=Nokogiri::HTML('')您可以通过xpath删除所有属性:doc.xpath('//@*').remove或者,如果您需要做一些更复杂的事情,有时使用以下方法遍历所有元素会更容易:doc.traversedo|node|node.keys.eachdo|attribute|node.deleteattributeendend 关于ruby-Nokog
对于Rails模型,是否可以/建议让一个类的成员不持久保存到数据库中?我想将用户最后选择的类型存储在session变量中。由于我无法从我的模型中设置session变量,我想将值存储在一个“虚拟”类成员中,该成员只是将值传递回Controller。你能有这样的类(class)成员吗? 最佳答案 将非持久属性添加到Rails模型就像任何其他Ruby类一样:classUser扩展解释:在Ruby中,所有实例变量都是私有(private)的,不需要在赋值前定义。attr_accessor创建一个setter和getter方法:classUs
电脑0x0000001A蓝屏错误怎么U盘重装系统教学分享。有用户电脑开机之后遇到了系统蓝屏的情况。系统蓝屏问题很多时候都是系统bug,只有通过重装系统来进行解决。那么蓝屏问题如何通过U盘重装新系统来解决呢?来看看以下的详细操作方法教学吧。 准备工作: 1、U盘一个(尽量使用8G以上的U盘)。 2、一台正常联网可使用的电脑。 3、ghost或ISO系统镜像文件(Win10系统下载_Win10专业版_windows10正式版下载-系统之家)。 4、在本页面下载U盘启动盘制作工具:系统之家U盘启动工具。 U盘启动盘制作步骤: 注意:制作期间,U盘会被格式化,因此U盘中的重要文件请注
在应用开发中,有时候我们需要获取系统的设备信息,用于数据上报和行为分析。那在鸿蒙系统中,我们应该怎么去获取设备的系统信息呢,比如说获取手机的系统版本号、手机的制造商、手机型号等数据。1、获取方式这里分为两种情况,一种是设备信息的获取,一种是系统信息的获取。1.1、获取设备信息获取设备信息,鸿蒙的SDK包为我们提供了DeviceInfo类,通过该类的一些静态方法,可以获取设备信息,DeviceInfo类的包路径为:ohos.system.DeviceInfo.具体的方法如下:ModifierandTypeMethodDescriptionstatic StringgetAbiList()Obt
?博客主页:https://xiaoy.blog.csdn.net?本文由呆呆敲代码的小Y原创,首发于CSDN??学习专栏推荐:Unity系统学习专栏?游戏制作专栏推荐:游戏制作?Unity实战100例专栏推荐:Unity实战100例教程?欢迎点赞?收藏⭐留言?如有错误敬请指正!?未来很长,值得我们全力奔赴更美好的生活✨------------------❤️分割线❤️-------------------------
需求:要创建虚拟机,就需要给他提供一个虚拟的磁盘,我们就在/opt目录下创建一个10G大小的raw格式的虚拟磁盘CentOS-7-x86_64.raw命令格式:qemu-imgcreate-f磁盘格式磁盘名称磁盘大小qemu-imgcreate-f磁盘格式-o?1.创建磁盘qemu-imgcreate-fraw/opt/CentOS-7-x86_64.raw10G执行效果#ls/opt/CentOS-7-x86_64.raw2.安装虚拟机使用virt-install命令,基于我们提供的系统镜像和虚拟磁盘来创建一个虚拟机,另外在创建虚拟机之前,提前打开vnc客户端,在创建虚拟机的时候,通过vnc
最近因为项目需要,需要将Android手机系统自带的某个系统软件反编译并更改里面某个资源,并重新打包,签名生成新的自定义的apk,下面我来介绍一下我的实现过程。APK修改,分为以下几步:反编译解包,修改,重打包,修改签名等步骤。安卓apk修改准备工作1.系统配置好JavaJDK环境变量2.需要root权限的手机(针对系统自带apk,其他软件免root)3.Auto-Sign签名工具4.apktool工具安卓apk修改开始反编译本文拿Android系统里面的Settings.apk做demo,具体如何将apk获取出来在此就不过多介绍了,直接进入主题:按键win+R输入cmd,打开命令窗口,并将路
