Residual Net论文笔记
残差网络(Residual Net, ResNet)自从2015年面世以来,凭借其优异的性能在ILSVRC中以绝对优势获得第一名,并成功应用于许多领域。
在深度学习或者神经领域的研究中,一般认为,网络越深(层数越多),网络的性能应该会更好,因为更深的网络倾向于有更强大的表示能力,即网络容量越大。
但是在实际过程中,我们发现过深的网络反而会导致性能的下降。在网络结构的设计中似乎存在一种“阈值”,在到达一定的层数之后,训练误差和测试误差都会加大。下图为一个24层网络和一个56层网络在CIFAR10数据集的训练表现。
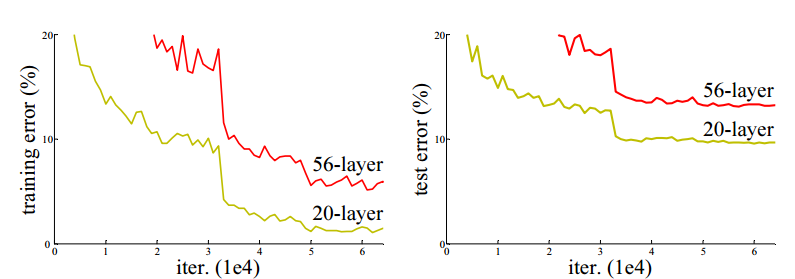
显然,这种性能的下降并不是因为过拟合引起的。因为过拟合意味着训练误差正常减小,而测试误差显著增大。
对这种现象的一种解释是,在网络深度过深的时候,低层参数的细微变动都会引起高层参数的剧烈变化,优化算法没有能力去得到一个最优解。
做这样一个假设,假设有一个50层的网络,但在其优化过程中,最容易优化出最佳解的层数是25,那么这个网络的后25层应当作为一个恒等映射。
x
25
=
f
1
(
x
)
\mathbf{x}_{25}=f_{1}(\mathbf{x})
x25=f1(x)
o
u
t
=
f
2
(
x
25
)
\mathbf{out}=f_{2}(\mathbf{x}_{25})
out=f2(x25)
由于神经网络由非线性层组合而成,学习一个恒等映射是比较困难的。优化算法的局限性使得“冗余”的网络层学习到了不适合恒等映射的参数。
残差的统计学定义:实际观测值和估计值(拟合值)之间的差值。
如果存在某个k层的网络 F F F是当前最优的网络,那么可以构造一个更深的网络,其最后几层仅是网络f第k层输出的恒等映射,就可以取得与 F F F一致的结果
如果k还不是最佳层数,那么更深的网络就可以取得更好的结果。所以,如果深层网络的效果不如浅层网络,那么则说明新加入层不好学。
如果不好学,则可以使用类似“分治法”,分开求解恒等映射和非恒等映射。
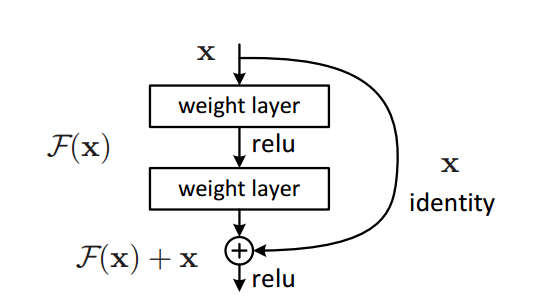
x代表之前浅层网络已经学到的东西
F(x)代表已经学到的东西和要学的东西的之间的残差
现在只学F(x)就能与x组合起来。
H ( x ) = F ( x ) + x F ( x ) = H ( x ) − x H(\mathbf{x})=F(\mathbf{x})+\mathbf{x} \\ F(\mathbf{x})=H(\mathbf{x})-\mathbf{x} H(x)=F(x)+xF(x)=H(x)−x
令
x
x
x成为恒等映射,那么只需要学习残差
F
(
x
)
F(x)
F(x)作为非恒等映射。
残差在这里,指的是直接的映射H(x)与快捷连接x的差值,也就是
F
(
x
)
F(\mathbf{x})
F(x)。
据此,我们设计一个残差模块(Residual Block)的结构如下:
y
l
=
h
(
x
l
)
+
F
(
x
l
,
W
l
)
\mathbf{y}_{l}=h(\mathbf{x}_{l})+\mathcal{F}(\mathbf{x}_{l},\mathcal{W}_{l})
yl=h(xl)+F(xl,Wl)
x
l
+
1
=
f
(
y
l
)
\mathbf{x}_{l+1}=f(\mathbf{y}_{l})
xl+1=f(yl)
在网络实现中:
h
(
x
l
)
=
x
l
f
=
R
e
L
U
h(\mathbf{x}_{l})=\mathbf{x}_{l}\qquad f=\mathrm{ReLU}
h(xl)=xlf=ReLU
x
l
+
1
≡
y
l
\mathbf{x}_{l+1}\equiv\mathbf{y}_{l}
xl+1≡yl
最后得到的残差模块表达式如下:
x
l
+
1
=
x
l
+
F
(
x
l
,
W
l
)
\mathbf{x}_{l+1}=\mathbf{x}_{l}+\mathcal{F}(\mathbf{x}_{l},\mathcal{W}_{l})
xl+1=xl+F(xl,Wl)
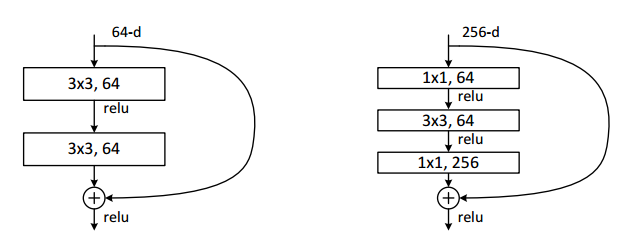
在残差网络中,基本的残差模块由两个3×3的卷积层和ReLU激活函数、BatchNorm层组成。其结构如下(以64个channel的输入为例):
BasicBlock(
    (conv1): Conv2d(64, 64, kernel_size=(3, 3), stride=(1, 1), padding=(1, 1), bias=False)
    (bn1): BatchNorm2d(64, eps=1e-05, momentum=0.1, affine=True, track_running_stats=True)
    (relu): ReLU(inplace=True)
    (conv2): Conv2d(64, 64, kernel_size=(3, 3), stride=(1, 1), padding=(1, 1), bias=False)
    (bn2): BatchNorm2d(64, eps=1e-05, momentum=0.1, affine=True, track_running_stats=True)
)
在网络层数过深的时候,考虑到训练成本,作者提出了一种新的结构设计BottleNeck。将原来的两个3×3的卷积层变为两个1×1的卷积层和一个3×3的卷积层。其中,两个1×1的卷积层负责降低/恢复通道维度,3×3的卷积层负责“真正”的卷积运算。其结构如下图右图所示,BottleNeck的运算具有更小的时间复杂度。
在文中,作者给出了ResNet18、ResNet34、ResNet50、ResNet101、ResNet152等网络设计,分别对应不同层数的卷积运算层。在50层及以上的网络中,都使用BottleNeck结构进行网络构建。
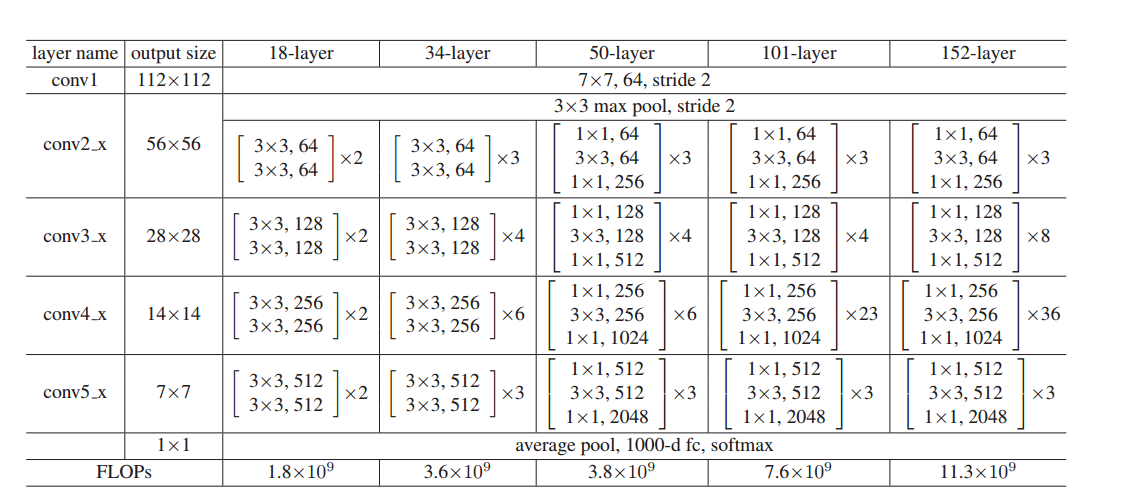
在网络设计中,特别需要注意的是在不同layer之间,例如conv2_x和conv3_x间,输出和输入的尺寸是不一样的,如下图虚线所示。
对于残差运算,这可以很简单的通过卷积进行尺寸的变换,对于恒等映射,作者考虑了如下几个方法进行变换:
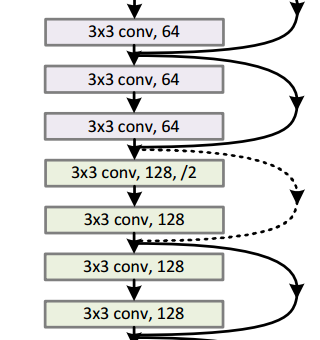
在代码实现中,采用下采样的方法对恒等映射进行变换。
传统网络
F
(
x
,
w
)
=
x
w
F(x,w)=xw
F(x,w)=xw
x
L
=
F
(
x
L
−
1
,
w
L
−
1
)
=
F
(
F
(
x
L
−
2
,
w
L
−
2
)
,
w
L
−
1
)
⋯
=
∏
i
=
1
L
−
1
x
i
w
i
x_{L}=F(x_{L-1},w_{L-1})=F(F(x_{L-2},w_{L-2}),w_{L-1})\cdots=\prod_{i=1}^{L-1}{x_{i}w_{i}}
xL=F(xL−1,wL−1)=F(F(xL−2,wL−2),wL−1)⋯=∏i=1L−1xiwi
残差网络
x
2
=
x
1
+
F
(
x
1
,
w
1
)
x_{2}=x_{1}+F(x_1,w_{1})
x2=x1+F(x1,w1)
x
3
=
x
2
+
F
(
x
2
,
w
2
)
=
x
1
+
F
(
x
1
,
w
1
)
+
F
(
x
2
,
w
2
)
x_{3}=x_{2}+F(x_2,w_{2})=x_{1}+F(x_{1},w_{1})+F(x_{2},w_{2})
x3=x2+F(x2,w2)=x1+F(x1,w1)+F(x2,w2)
⋯
\cdots
⋯
x
L
=
x
1
+
∑
i
=
1
L
−
1
F
(
x
i
,
w
i
)
x_{L}=x_{1}+\sum_{i=1}^{L-1}{F(x_{i},w_{i})}
xL=x1+∑i=1L−1F(xi,wi)
传统网络
浅层网络是
g
(
x
)
g(x)
g(x),加入层以后变成
f
(
g
(
x
)
)
f(g(x))
f(g(x))
∂
f
(
g
(
x
)
)
∂
x
=
∂
f
(
g
(
x
)
)
∂
g
(
x
)
∂
g
(
x
)
∂
x
\frac{\partial{f(g(x))}}{\partial{x}}=\frac{\partial{f(g(x))}}{\partial{{g(x)}}}\frac{\partial{g(x)}}{\partial{x}}
∂x∂f(g(x))=∂g(x)∂f(g(x))∂x∂g(x)
残差网络
∂
(
f
(
g
(
x
)
)
+
g
(
x
)
)
∂
x
=
∂
f
(
g
(
x
)
)
∂
g
(
x
)
∂
g
(
x
)
∂
x
+
∂
g
(
x
)
∂
x
\frac{\partial{(f(g(x))+g(x))}}{\partial{x}}=\frac{\partial{f(g(x))}}{\partial{{g(x)}}}\frac{\partial{g(x)}}{\partial{x}}+\frac{\partial{g(x)}}{\partial{x}}
∂x∂(f(g(x))+g(x))=∂g(x)∂f(g(x))∂x∂g(x)+∂x∂g(x)
可以看到,在求梯度的过程中,残差网络相比传统网络多加了一项,这有利于解决梯度消失,是网络训练的更快
损失函数对网络的第
l
l
l求梯度:
传统网络
∂
L
o
s
s
∂
x
l
=
∂
L
o
s
s
∂
x
L
∂
x
L
∂
x
l
=
∂
L
o
s
s
∂
x
L
∂
∏
i
=
1
L
−
1
x
i
w
i
∂
x
l
\frac{\partial{Loss}}{\partial{x_{l}}}=\frac{\partial{Loss}}{\partial{x_{L}}}\frac{\partial{x_{L}}}{\partial{x_{l}}}=\frac{\partial{Loss}}{\partial{x_{L}}}\frac{\partial{\prod_{i=1}^{L-1}{x_{i}w_{i}}}}{\partial{x_{l}}}
∂xl∂Loss=∂xL∂Loss∂xl∂xL=∂xL∂Loss∂xl∂∏i=1L−1xiwi
残差网络
∂
L
o
s
s
∂
x
l
=
∂
L
o
s
s
∂
x
L
∂
x
L
∂
x
l
=
∂
L
o
s
s
∂
x
L
(
1
+
∂
∑
i
=
l
L
−
1
F
(
x
i
,
w
i
)
∂
x
l
)
\frac{\partial{Loss}}{\partial{x_{l}}}=\frac{\partial{Loss}}{\partial{x_{L}}}\frac{\partial{x_{L}}}{\partial{x_{l}}}=\frac{\partial{Loss}}{\partial{x_{L}}}(1+\frac{\partial{\sum_{i=l}^{L-1}{F(x_{i},w_{i})}}}{\partial{x_{l}}})
∂xl∂Loss=∂xL∂Loss∂xl∂xL=∂xL∂Loss(1+∂xl∂∑i=lL−1F(xi,wi))
可以看到,在残差网络中,梯度由乘法变加法,这可以有效缓解梯度消失和梯度爆炸。
PyTorch现已将ResNet整合为python库,可以直接调用。源码的地址如下:
https://github.com/pytorch/vision/blob/main/torchvision/models/resnet.py
基本的卷积层:
def conv3x3(in_planes, out_planes, stride=1, groups=1, dilation=1):
    """3x3 convolution with padding"""
    return nn.Conv2d(in_planes, out_planes, kernel_size=3, stride=stride,
                     padding=dilation, groups=groups, bias=False, dilation=dilation)


def conv1x1(in_planes, out_planes, stride=1):
    """1x1 convolution"""
    return nn.Conv2d(in_planes, out_planes, kernel_size=1, stride=stride, bias=False)
其中,对输入进行下采样在卷积层中有两种实现方式:
Basic Block
其中,expension代表了经过一个Block之后,channel数量的变化。这里输出channel维度与预设一样,expension为1。
class BasicBlock(nn.Module):
    expansion = 1

    def __init__(self, inplanes, planes, stride=1, downsample=None, groups=1,
                 base_width=64, dilation=1, norm_layer=None):
        super(BasicBlock, self).__init__()
        if norm_layer is None:
            norm_layer = nn.BatchNorm2d
        if groups != 1 or base_width != 64:
            raise ValueError('BasicBlock only supports groups=1 and base_width=64')
        if dilation > 1:
            raise NotImplementedError("Dilation > 1 not supported in BasicBlock")
        # Both self.conv1 and self.downsample layers downsample the input when stride != 1
        self.conv1 = conv3x3(inplanes, planes, stride)
        self.bn1 = norm_layer(planes)
        self.relu = nn.ReLU(inplace=True)
        self.conv2 = conv3x3(planes, planes)
        self.bn2 = norm_layer(planes)
        self.downsample = downsample
        self.stride = stride

    def forward(self, x):
        identity = x

        out = self.conv1(x)
        out = self.bn1(out)
        out = self.relu(out)

        out = self.conv2(out)
        out = self.bn2(out)

        if self.downsample is not None:
            identity = self.downsample(x)

        out += identity
        out = self.relu(out)

        return out
BottleNeck
BottleNeck输出的channel输出是对应BasicBlock的4倍,所以expension=4
class Bottleneck(nn.Module):
    # Bottleneck in torchvision places the stride for downsampling at 3x3 convolution(self.conv2)
    # while original implementation places the stride at the first 1x1 convolution(self.conv1)
    # according to "Deep residual learning for image recognition"https://arxiv.org/abs/1512.03385.
    # This variant is also known as ResNet V1.5 and improves accuracy according to
    # https://ngc.nvidia.com/catalog/model-scripts/nvidia:resnet_50_v1_5_for_pytorch.

    expansion = 4

    def __init__(self, inplanes, planes, stride=1, downsample=None, groups=1,
                 base_width=64, dilation=1, norm_layer=None):
        super(Bottleneck, self).__init__()
        if norm_layer is None:
            norm_layer = nn.BatchNorm2d
        width = int(planes * (base_width / 64.)) * groups
        # Both self.conv2 and self.downsample layers downsample the input when stride != 1
        self.conv1 = conv1x1(inplanes, width)
        self.bn1 = norm_layer(width)
        self.conv2 = conv3x3(width, width, stride, groups, dilation)
        self.bn2 = norm_layer(width)
        self.conv3 = conv1x1(width, planes * self.expansion)
        self.bn3 = norm_layer(planes * self.expansion)
        self.relu = nn.ReLU(inplace=True)
        self.downsample = downsample
        self.stride = stride

    def forward(self, x):
        identity = x

        out = self.conv1(x)
        out = self.bn1(out)
        out = self.relu(out)

        out = self.conv2(out)
        out = self.bn2(out)
        out = self.relu(out)

        out = self.conv3(out)
        out = self.bn3(out)

        if self.downsample is not None:
            identity = self.downsample(x)

        out += identity
        out = self.relu(out)

        return out
ResNet
在构造每个层的时候,要注意在输出通道和输入通道数量不一致的时候,要添加一个下采样层对恒等映射进行下采样
class ResNet(nn.Module):

    def __init__(self, block, layers, num_classes=1000, zero_init_residual=False,
                 groups=1, width_per_group=64, replace_stride_with_dilation=None,
                 norm_layer=None):
        super(ResNet, self).__init__()
        if norm_layer is None:
            norm_layer = nn.BatchNorm2d
        self._norm_layer = norm_layer

        self.inplanes = 64
        self.dilation = 1
        if replace_stride_with_dilation is None:
            # each element in the tuple indicates if we should replace
            # the 2x2 stride with a dilated convolution instead
            replace_stride_with_dilation = [False, False, False]
        if len(replace_stride_with_dilation) != 3:
            raise ValueError("replace_stride_with_dilation should be None "
                             "or a 3-element tuple, got {}".format(replace_stride_with_dilation))
        self.groups = groups
        self.base_width = width_per_group
        self.conv1 = nn.Conv2d(3, self.inplanes, kernel_size=7, stride=2, padding=3,
                               bias=False)
        self.bn1 = norm_layer(self.inplanes)
        self.relu = nn.ReLU(inplace=True)
        self.maxpool = nn.MaxPool2d(kernel_size=3, stride=2, padding=1)
        self.layer1 = self._make_layer(block, 64, layers[0])
        self.layer2 = self._make_layer(block, 128, layers[1], stride=2,
                                       dilate=replace_stride_with_dilation[0])
        self.layer3 = self._make_layer(block, 256, layers[2], stride=2,
                                       dilate=replace_stride_with_dilation[1])
        self.layer4 = self._make_layer(block, 512, layers[3], stride=2,
                                       dilate=replace_stride_with_dilation[2])
        self.avgpool = nn.AdaptiveAvgPool2d((1, 1))
        self.fc = nn.Linear(512 * block.expansion, num_classes)

        for m in self.modules():
            if isinstance(m, nn.Conv2d):
                nn.init.kaiming_normal_(m.weight, mode='fan_out', nonlinearity='relu')
            elif isinstance(m, (nn.BatchNorm2d, nn.GroupNorm)):
                nn.init.constant_(m.weight, 1)
                nn.init.constant_(m.bias, 0)

        # Zero-initialize the last BN in each residual branch,
        # so that the residual branch starts with zeros, and each residual block behaves like an identity.
        # This improves the model by 0.2~0.3% according to https://arxiv.org/abs/1706.02677
        if zero_init_residual:
            for m in self.modules():
                if isinstance(m, Bottleneck):
                    nn.init.constant_(m.bn3.weight, 0)
                elif isinstance(m, BasicBlock):
                    nn.init.constant_(m.bn2.weight, 0)

    def _make_layer(self, block, planes, blocks, stride=1, dilate=False):
        norm_layer = self._norm_layer
        downsample = None
        previous_dilation = self.dilation
        if dilate:
            self.dilation *= stride
            stride = 1
        if stride != 1 or self.inplanes != planes * block.expansion:
            downsample = nn.Sequential(
                conv1x1(self.inplanes, planes * block.expansion, stride),
                norm_layer(planes * block.expansion),
            )

        layers = []
        layers.append(block(self.inplanes, planes, stride, downsample, self.groups,
                            self.base_width, previous_dilation, norm_layer))
        self.inplanes = planes * block.expansion
        for _ in range(1, blocks):
            layers.append(block(self.inplanes, planes, groups=self.groups,
                                base_width=self.base_width, dilation=self.dilation,
                                norm_layer=norm_layer))

        return nn.Sequential(*layers)

    def _forward_impl(self, x):
        # See note [TorchScript super()]
        x = self.conv1(x)
        x = self.bn1(x)
        x = self.relu(x)
        x = self.maxpool(x)

        x = self.layer1(x)
        x = self.layer2(x)
        x = self.layer3(x)
        x = self.layer4(x)

        x = self.avgpool(x)
        x = torch.flatten(x, 1)
        x = self.fc(x)

        return x

    def forward(self, x):
        return self._forward_impl(x)
对残差做一个简单的改进:
x
l
+
1
=
λ
l
x
l
+
F
(
x
l
,
W
l
)
\mathbf{x}_{l+1}=\lambda_{l}\mathbf{x}_{l}+\mathcal{F}(\mathbf{x}_{l},\mathcal{W}_{l})
xl+1=λlxl+F(xl,Wl)
则有:
x
L
=
(
∏
i
=
l
L
−
1
λ
i
)
x
l
+
∑
i
=
l
L
−
1
F
(
x
l
,
W
l
)
\mathbf{x}_{L}=(\prod_{i=l}^{L-1}\lambda_{i})\mathbf{x}_{l}+\sum_{i=l}^{L-1}{\mathcal{F}(\mathbf{x}_{l},\mathcal{W}_{l})}
xL=(i=l∏L−1λi)xl+i=l∑L−1F(xl,Wl)
求梯度,有:
∂
L
o
s
s
∂
x
l
=
∂
L
o
s
s
∂
x
L
∂
x
L
∂
x
l
=
∂
L
o
s
s
∂
x
L
(
∏
i
=
l
L
−
1
λ
i
+
∂
∑
i
=
l
L
−
1
F
(
x
l
,
W
l
)
∂
x
l
)
\frac{\partial{Loss}}{\partial{\mathbf{x}_{l}}}=\frac{\partial{Loss}}{\partial{\mathbf{x}_{L}}}\frac{\partial{\mathbf{x}_{L}}}{\partial{\mathbf{x}_{l}}}=\frac{\partial{Loss}}{\partial{\mathbf{x}_{L}}}(\prod_{i=l}^{L-1}{\lambda_{i}}+\frac{\partial{\sum_{i=l}^{L-1}{\mathcal{F}(\mathbf{x}_{l},\mathcal{W}_{l})}}}{\partial{\mathbf{x}_{l}}})
∂xl∂Loss=∂xL∂Loss∂xl∂xL=∂xL∂Loss(i=l∏L−1λi+∂xl∂∑i=lL−1F(xl,Wl))
可以看到, λ \lambda λ大于1的时候,累乘会造成梯度爆炸;在小于1的时候,累乘会造成梯度消失。
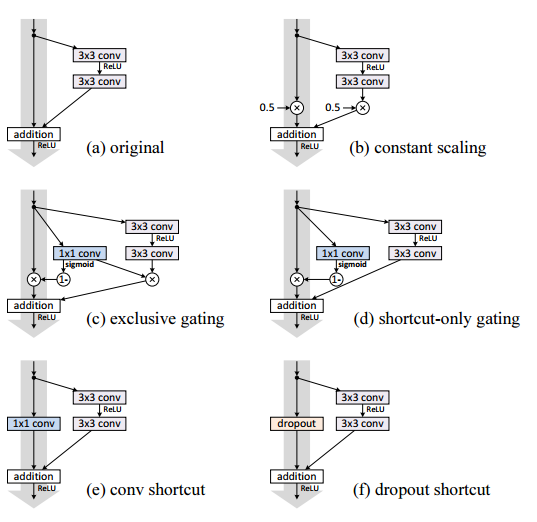
作者给出了一下几种残差连接的变体:
Original
x
l
+
1
=
x
l
+
F
(
x
l
,
W
l
)
\mathbf{x}_{l+1}=\mathbf{x}_{l}+\mathcal{F}(\mathbf{x}_{l},\mathcal{W}_{l})
xl+1=xl+F(xl,Wl)constant
x
l
+
1
=
λ
1
x
l
+
λ
2
F
(
x
l
,
W
l
)
\mathbf{x}_{l+1}=\lambda_{1}\mathbf{x}_{l}+\lambda_{2}\mathcal{F}(\mathbf{x}_{l},\mathcal{W}_{l})
xl+1=λ1xl+λ2F(xl,Wl)exclusive gating
x
l
+
1
=
(
1
−
g
(
x
l
)
)
x
l
+
g
(
x
l
)
F
(
x
l
,
W
l
)
\mathbf{x}_{l+1}=(1-g(\mathbf{x}_{l}))\mathbf{x}_{l}+g(\mathbf{x}_{l})\mathcal{F}(\mathbf{x}_{l},\mathcal{W}_{l})
xl+1=(1−g(xl))xl+g(xl)F(xl,Wl)shortcut-only gating
x
l
+
1
=
(
1
−
g
(
x
l
)
)
x
l
+
F
(
x
l
,
W
l
)
\mathbf{x}_{l+1}=(1-g(\mathbf{x}_{l}))\mathbf{x}_{l}+\mathcal{F}(\mathbf{x}_{l},\mathcal{W}_{l})
xl+1=(1−g(xl))xl+F(xl,Wl)
其余还包括1×1 conv shortcut和dropout shortcut
这几种残差连接的示意图如下所示:
作者给出的实验结果如下:
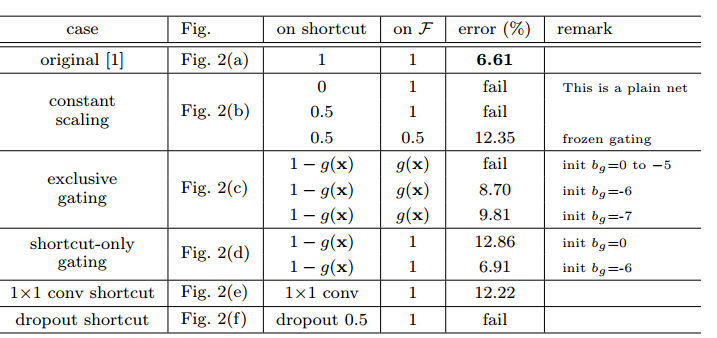
可以看出,原版的残差连接时效果最好的。使用exclusive gate的效果则强烈依赖于偏差的设定。
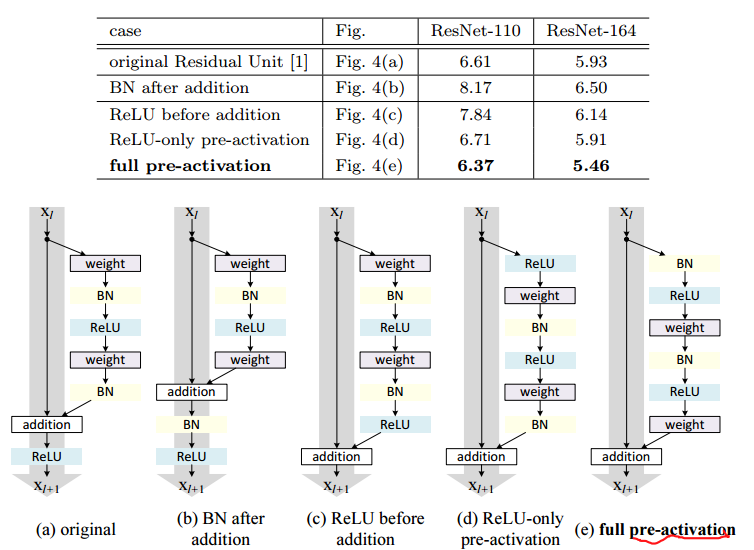
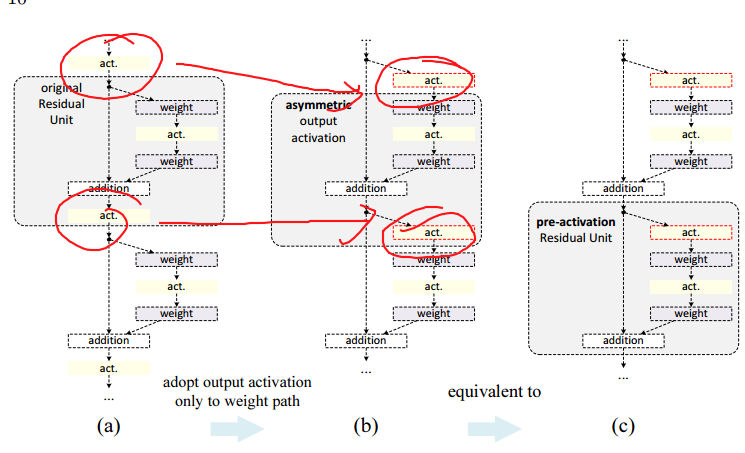
作者接下来分析了不同残差模块的设计带来的影响。
如何在buildr项目中使用Ruby?我在很多不同的项目中使用过Ruby、JRuby、Java和Clojure。我目前正在使用我的标准Ruby开发一个模拟应用程序,我想尝试使用Clojure后端(我确实喜欢功能代码)以及JRubygui和测试套件。我还可以看到在未来的不同项目中使用Scala作为后端。我想我要为我的项目尝试一下buildr(http://buildr.apache.org/),但我注意到buildr似乎没有设置为在项目中使用JRuby代码本身!这看起来有点傻,因为该工具旨在统一通用的JVM语言并且是在ruby中构建的。除了将输出的jar包含在一个独特的、仅限ruby
在rails源中:https://github.com/rails/rails/blob/master/activesupport/lib/active_support/lazy_load_hooks.rb可以看到以下内容@load_hooks=Hash.new{|h,k|h[k]=[]}在IRB中,它只是初始化一个空哈希。和做有什么区别@load_hooks=Hash.new 最佳答案 查看rubydocumentationforHashnew→new_hashclicktotogglesourcenew(obj)→new_has
我的主要目标是能够完全理解我正在使用的库/gem。我尝试在Github上从头到尾阅读源代码,但这真的很难。我认为更有趣、更温和的踏脚石就是在使用时阅读每个库/gem方法的源代码。例如,我想知道RubyonRails中的redirect_to方法是如何工作的:如何查找redirect_to方法的源代码?我知道在pry中我可以执行类似show-methodmethod的操作,但我如何才能对Rails框架中的方法执行此操作?您对我如何更好地理解Gem及其API有什么建议吗?仅仅阅读源代码似乎真的很难,尤其是对于框架。谢谢! 最佳答案 Ru
我的假设是moduleAmoduleBendend和moduleA::Bend是一样的。我能够从thisblog找到解决方案,thisSOthread和andthisSOthread.为什么以及什么时候应该更喜欢紧凑语法A::B而不是另一个,因为它显然有一个缺点?我有一种直觉,它可能与性能有关,因为在更多命名空间中查找常量需要更多计算。但是我无法通过对普通类进行基准测试来验证这一点。 最佳答案 这两种写作方法经常被混淆。首先要说的是,据我所知,没有可衡量的性能差异。(在下面的书面示例中不断查找)最明显的区别,可能也是最著名的,是你的
几个月前,我读了一篇关于rubygem的博客文章,它可以通过阅读代码本身来确定编程语言。对于我的生活,我不记得博客或gem的名称。谷歌搜索“ruby编程语言猜测”及其变体也无济于事。有人碰巧知道相关gem的名称吗? 最佳答案 是这个吗:http://github.com/chrislo/sourceclassifier/tree/master 关于ruby-寻找通过阅读代码确定编程语言的rubygem?,我们在StackOverflow上找到一个类似的问题:
我想在Ruby中创建一个用于开发目的的极其简单的Web服务器(不,不想使用现成的解决方案)。代码如下:#!/usr/bin/rubyrequire'socket'server=TCPServer.new('127.0.0.1',8080)whileconnection=server.acceptheaders=[]length=0whileline=connection.getsheaders想法是从命令行运行这个脚本,提供另一个脚本,它将在其标准输入上获取请求,并在其标准输出上返回完整的响应。到目前为止一切顺利,但事实证明这真的很脆弱,因为它在第二个请求上中断并出现错误:/usr/b
我目前正在使用以下方法获取页面的源代码:Net::HTTP.get(URI.parse(page.url))我还想获取HTTP状态,而无需发出第二个请求。有没有办法用另一种方法做到这一点?我一直在查看文档,但似乎找不到我要找的东西。 最佳答案 在我看来,除非您需要一些真正的低级访问或控制,否则最好使用Ruby的内置Open::URI模块:require'open-uri'io=open('http://www.example.org/')#=>#body=io.read[0,50]#=>"["200","OK"]io.base_ur
前言作为一名程序员,自己的本质工作就是做程序开发,那么程序开发的时候最直接的体现就是代码,检验一个程序员技术水平的一个核心环节就是开发时候的代码能力。众所周知,程序开发的水平提升是一个循序渐进的过程,每一位程序员都是从“菜鸟”变成“大神”的,所以程序员在程序开发过程中的代码能力也是根据平时开发中的业务实践来积累和提升的。提高代码能力核心要素程序员要想提高自身代码能力,尤其是新晋程序员的代码能力有很大的提升空间的时候,需要针对性的去提高自己的代码能力。提高代码能力其实有几个比较关键的点,只要把握住这些方面,就能很好的、快速的提高自己的一部分代码能力。1、多去阅读开源项目,如有机会可以亲自参与开源
嗨~大家好,这里是可莉!今天给大家带来的是7个C语言的经典基础代码~那一起往下看下去把【程序一】打印100到200之间的素数#includeintmain(){ inti; for(i=100;i 【程序二】输出乘法口诀表#includeintmain(){inti;for(i=1;i 【程序三】判断1000年---2000年之间的闰年#includeintmain(){intyear;for(year=1000;year 【程序四】给定两个整形变量的值,将两个值的内容进行交换。这里提供两种方法来进行交换,第一种为创建临时变量来进行交换,第二种是不创建临时变量而直接进行交换。1.创建临时变量来
网络编程套接字网络编程基础知识理解源`IP`地址和目的`IP`地址理解源MAC地址和目的MAC地址认识端口号理解端口号和进程ID理解源端口号和目的端口号认识`TCP`协议认识`UDP`协议网络字节序socket编程接口`sockaddr``UDP`网络程序服务器端代码逻辑:需要用到的接口服务器端代码`udp`客户端代码逻辑`udp`客户端代码`TCP`网络程序服务器代码逻辑多个版本服务器单进程版本多进程版本多线程版本线程池版本服务器端代码客户端代码逻辑客户端代码TCP协议通讯流程TCP协议的客户端/服务器程序流程三次握手(建立连接)数据传输四次挥手(断开连接)TCP和UDP对比网络编程基础知识
