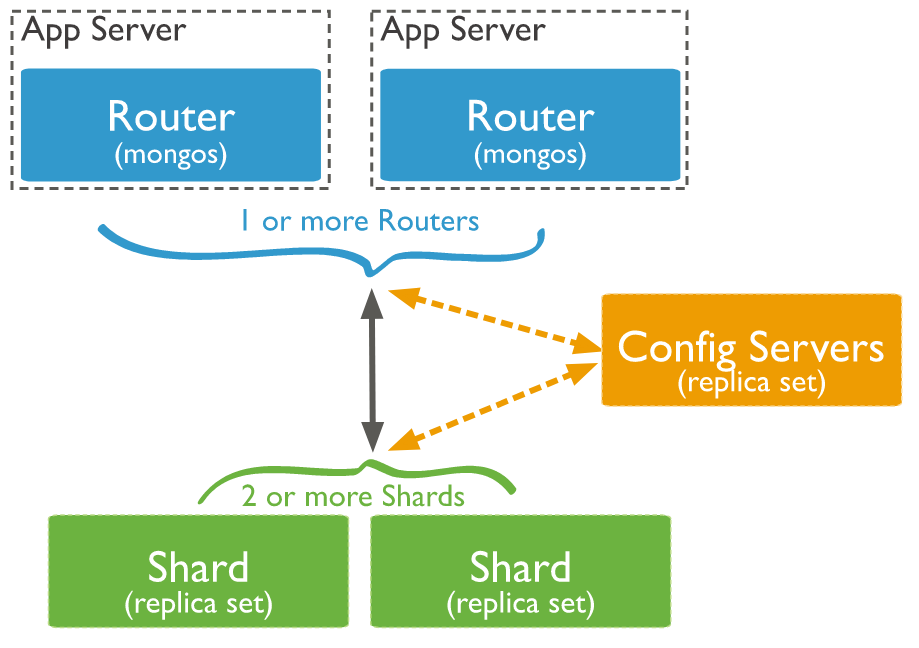
 MongoDB 在 Collection 级别进行分片处理,在集群中的分片之间分发这些 Collection 数据。一个生产环境的集群,请确保数据的冗余性及系统的高可用性。对于一个生产级别的分片集群,需要考虑一下几点:
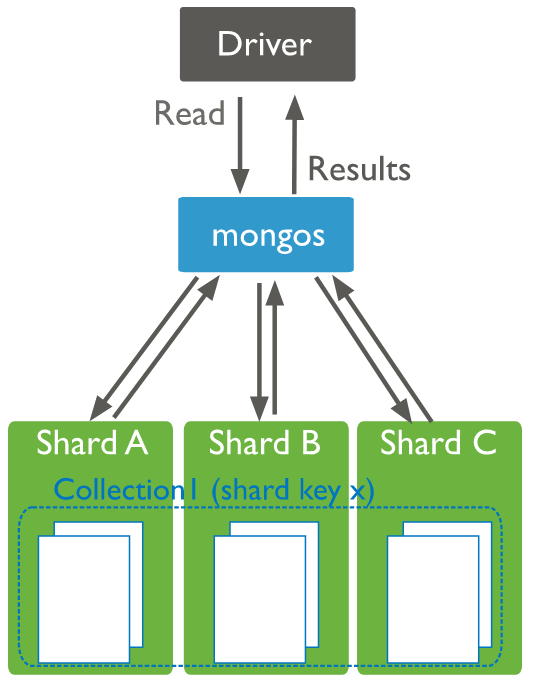
| 主机名 | IP | 角色 |
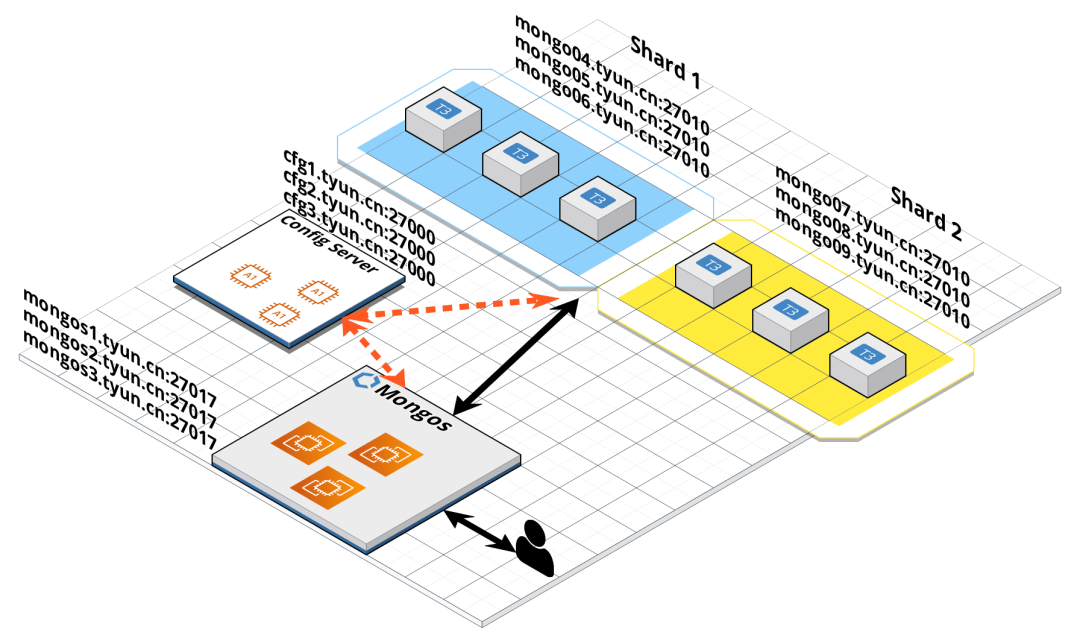
| mongo01.tyun.cn | 10.20.20.19 | mongos1(27017),config1(27000),shard1 primary(27010) |
| mongo02.tyun.cn | 10.20.20.11 | mongos2(27017),config2(27000),shard1 secondary(27010) |
| mongo03.tyun.cn | 10.20.20.41 | mongos3(27017),config3(27000),shard1 secondary(27010) |
| mongo04.tyun.cn | 10.20.20.14 | shard2 primary(27010) |
| mongo05.tyun.cn | 10.20.20.53 | shard2 secondary(27010) |
| mongo06.tyun.cn | 10.20.20.61 | shard2 secondary(27010) |
| mongo07.tyun.cn | 10.20.20.62 | shard3 primary(27010) |
| mongo08.tyun.cn | 10.20.20.89 | shard3 secondary(27010) |
| mongo09.tyun.cn | 10.20.20.99 | shard3 secondary(27010) |
如果大家在演示该文档时,手头上的机器资源不充足的话,可以安排一台多个角色即可(使用不同的端口号),不一定非得一台机器一个角色。
 这里我们使用了静态 DNS 解析,如果有条件,可以用 DNS 服务进行域名的配置解析。/etc/hosts 文件如下:
10.20.20.19 mongo01.tyun.cn cfg1.tyun.cn mongos1.tyun.cn
10.20.20.11 mongo02.tyun.cn cfg2.tyun.cn mongos2.tyun.cn
10.20.20.41 mongo03.tyun.cn cfg3.tyun.cn mongos3.tyun.cn
10.20.20.14 mongo04.tyun.cn
10.20.20.53 mongo05.tyun.cn
10.20.20.61 mongo06.tyun.cn
10.20.20.62 mongo07.tyun.cn
10.20.20.89 mongo08.tyun.cn
10.20.20.99 mongo09.tyun.cn# cfg1.tyun.cn 的配置文件
(venv36) [root@mongo01 ~]# cat /etc/mongo-cfg.conf
systemLog:
destination: file
logAppend: true
path: /var/log/mongodb/mongo-cfg.log
storage:
dbPath: /var/lib/mongocfg
journal:
enabled: true
wiredTiger:
engineConfig:
cacheSizeGB: 1
processManagement:
fork: true # fork and run in background
pidFilePath: /var/run/mongodb/mongo-cfg.pid # location of pidfile
timeZoneInfo: /usr/share/zoneinfo
net:
port: 27000
bindIp: cfg1.tyun.cn
sharding:
clusterRole: configsvr
replication:
replSetName: config
# cfg2.tyun.cn 的配置文件
(venv36) [root@mongo02 ~]# cat /etc/mongo-cfg.conf
systemLog:
destination: file
logAppend: true
path: /var/log/mongodb/mongo-cfg.log
storage:
dbPath: /var/lib/mongocfg
journal:
enabled: true
wiredTiger:
engineConfig:
cacheSizeGB: 1
processManagement:
fork: true # fork and run in background
pidFilePath: /var/run/mongodb/mongo-cfg.pid # location of pidfile
timeZoneInfo: /usr/share/zoneinfo
net:
port: 27000
bindIp: cfg2.tyun.cn
sharding:
clusterRole: configsvr
replication:
replSetName: config
# cfg3.tyun.cn 的配置文件
(venv36) [root@mongo03 ~]# cat /etc/mongo-cfg.conf
systemLog:
destination: file
logAppend: true
path: /var/log/mongodb/mongo-cfg.log
storage:
dbPath: /var/lib/mongocfg
journal:
enabled: true
wiredTiger:
engineConfig:
cacheSizeGB: 1
processManagement:
fork: true # fork and run in background
pidFilePath: /var/run/mongodb/mongo-cfg.pid # location of pidfile
timeZoneInfo: /usr/share/zoneinfo
net:
port: 27000
bindIp: cfg3.tyun.cn
sharding:
clusterRole: configsvr
replication:
replSetName: config[root@mongo01 ~]# systemctl start mongocfg
[root@mongo02 ~]# systemctl start mongocfg
[root@mongo03 ~]# systemctl start mongocfg(venv36) [root@mongo01 ~]# ansible -i hosts 'cfg' -m shell -a "systemctl status mongocfg" |grep "Active: active (running)"
Active: active (running) since Fri 2022-08-05 05:24:56 UTC; 1min 4s ago
Active: active (running) since Fri 2022-08-05 05:25:25 UTC; 35s ago
Active: active (running) since Fri 2022-08-05 05:25:36 UTC; 24s ago(venv36) [root@mongo01 ~]# mongo cfg1.tyun.cn:27000
MongoDB shell version v4.4.15
connecting to: mongodb://cfg1.tyun.cn:27000/test?compressors=disabled&gssapiServiceName=mongodb
Implicit session: session { "id" : UUID("651fb6a5-9e7e-43f9-91ee-1ae6a2b3365f") }
MongoDB server version: 4.4.15
>
> show dbs
> use test
switched to db test
> db.test.insert({a: 1})
WriteCommandError({
"ok" : 0,
"errmsg" : "command insert requires authentication",
"code" : 13,
"codeName" : "Unauthorized"
})> db.createUser({user: "root", pwd: "root123", roles: [{role: "root", db: "admin" }]})(venv36) [root@mongo01 ~]# mongo -u root -p --host cfg1.tyun.cn:27000 --authenticationDatabase admin
MongoDB shell version v4.4.15
Enter password:
connecting to: mongodb://cfg1.tyun.cn:27000/?authSource=admin&compressors=disabled&gssapiServiceName=mongodb
Implicit session: session { "id" : UUID("a1827479-b741-4f8b-be49-5ca0be4852aa") }
MongoDB server version: 4.4.15
---
The server generated these startup warnings when booting:
2022-08-05T06:30:24.135+00:00: Using the XFS filesystem is strongly recommended with the WiredTiger storage engine. See http://dochub.mongodb.org/core/prodnotes-filesystem
---
---
Enable MongoDB's free cloud-based monitoring service, which will then receive and display
metrics about your deployment (disk utilization, CPU, operation statistics, etc).
The monitoring data will be available on a MongoDB website with a unique URL accessible to you
and anyone you share the URL with. MongoDB may use this information to make product
improvements and to suggest MongoDB products and deployment options to you.
To enable free monitoring, run the following command: db.enableFreeMonitoring()
To permanently disable this reminder, run the following command: db.disableFreeMonitoring()
---
>
> rs.initiate({
_id: "config",
"members" : [
{
"_id": 0,
"host" : "cfg1.tyun.cn:27000"
},
{
"_id": 1,
"host" : "cfg2.tyun.cn:27000"
},
{
"_id": 2,
"host" : "cfg3.tyun.cn:27000"
}
]
});
{ "ok" : 1 }config:SECONDARY>
config:PRIMARY>
......
config:PRIMARY> config:PRIMARY> show dbs
admin 0.000GB
config 0.000GB
local 0.000GB
config:PRIMARY> use admin
switched to db admin
config:PRIMARY> show users
{
"_id" : "admin.admin",
"userId" : UUID("0c0d5bc1-062c-4204-963f-bba842ffda7d"),
"user" : "admin",
"db" : "admin",
"roles" : [
{
"role" : "dbAdminAnyDatabase",
"db" : "admin"
},
{
"role" : "userAdminAnyDatabase",
"db" : "admin"
}
],
"mechanisms" : [
"SCRAM-SHA-1",
"SCRAM-SHA-256"
]
}
{
"_id" : "admin.root",
"userId" : UUID("aa54a433-e9a2-452b-bd1d-d6ef54f4a46e"),
"user" : "root",
"db" : "admin",
"roles" : [
{
"role" : "root",
"db" : "admin"
}
],
"mechanisms" : [
"SCRAM-SHA-1",
"SCRAM-SHA-256"
]
}sharding:
configDB: <configReplSetName>/cfg1.example.net:27019,cfg2.example.net:27019
net:
bindIp: localhost,<hostname(s)|ip address(es)>[root@mongo01 ~]# cat /etc/mongos.conf
systemLog:
destination: file
logAppend: true
path: /var/log/mongodb/mongos.log
processManagement:
fork: true
pidFilePath: /var/run/mongodb/mongos.pid
timeZoneInfo: /usr/share/zoneinfo
net:
port: 27017
bindIp: mongos1.tyun.cn
# security:
# authorization: enabled
# keyFile: /etc/mongod.keyfile
sharding:
configDB: config/cfg1.tyun.cn:27000,cfg2.tyun.cn:27000,cfg3.tyun.cn:27000[root@mongo01 ~]# mongos \
--bind_ip mongos1.tyun.cn \
--port 27017 \
--logpath /var/log/mongodb/mongos.log \
--configdb config/cfg1.tyun.cn:27000,cfg2.tyun.cn:27000,cfg3.tyun.cn:27000 \
--fork
[root@mongo02 ~]# mongos \
--bind_ip mongos2.tyun.cn \
--port 27017 \
--logpath /var/log/mongodb/mongos.log \
--configdb config/cfg1.tyun.cn:27000,cfg2.tyun.cn:27000,cfg3.tyun.cn:27000 \
--fork
[root@mongo03 ~]# mongos \
--bind_ip mongos3.tyun.cn \
--port 27017 \
--logpath /var/log/mongodb/mongos.log \
--configdb config/cfg1.tyun.cn:27000,cfg2.tyun.cn:27000,cfg3.tyun.cn:27000 \
--fork[root@mongo01 ~]# cat /etc/mongos.conf
systemLog:
destination: file
logAppend: true
path: /var/log/mongodb/mongos.log
processManagement:
fork: true # fork and run in background
pidFilePath: /var/run/mongodb/mongos.pid # location of pidfile
timeZoneInfo: /usr/share/zoneinfo
net:
port: 27017
bindIp: mongos1.tyun.cn
security:
# authorization: enabled
keyFile: /etc/mongo.keyfile
sharding:
configDB: config/cfg1.tyun.cn:27000,cfg2.tyun.cn:27000,cfg3.tyun.cn:27000[root@mongo01 ~]# mongos -f /etc/mongos.conf[root@mongo01 ~]# mongo --host mongos1.tyun.cn:27017
MongoDB shell version v4.4.15
connecting to: mongodb://mongos1.tyun.cn:27017/?compressors=disabled&gssapiServiceName=mongodb
Implicit session: session { "id" : UUID("f1ade2c4-c071-4e8a-9fbb-f1093e9d9753") }
MongoDB server version: 4.4.15
---
The server generated these startup warnings when booting:
2022-08-05T09:17:59.537+00:00: Access control is not enabled for the database. Read and write access to data and configuration is unrestricted
2022-08-05T09:17:59.537+00:00: You are running this process as the root user, which is not recommended
---
mongos> show dbs
admin 0.000GB
config 0.000GB
mongos>
mongos> sh.addShard("shard1/mongo04.tyun.cn:27010,mongo05.tyun.cn:27010,mongo06.tyun.cn:27010");
{
"shardAdded" : "shard1",
"ok" : 1,
"operationTime" : Timestamp(1659691403, 8),
"$clusterTime" : {
"clusterTime" : Timestamp(1659691403, 8),
"signature" : {
"hash" : BinData(0,"AAAAAAAAAAAAAAAAAAAAAAAAAAA="),
"keyId" : NumberLong(0)
}
}
}
mongos> sh.status()
--- Sharding Status ---
sharding version: {
"_id" : 1,
"minCompatibleVersion" : 5,
"currentVersion" : 6,
"clusterId" : ObjectId("62ecc377dc19b0487fcd62e6")
}
shards:
{ "_id" : "shard1", "host" : "shard1/mongo04.tyun.cn:27010,mongo05.tyun.cn:27010,mongo06.tyun.cn:27010", "state" : 1 }
active mongoses:
"4.4.15" : 3
autosplit:
Currently enabled: yes
balancer:
Currently enabled: yes
Currently running: no
Failed balancer rounds in last 5 attempts: 0
Migration Results for the last 24 hours:
No recent migrations
databases:
{ "_id" : "config", "primary" : "config", "partitioned" : true }mongos> sh.enableSharding("test");
{
"ok" : 1,
"operationTime" : Timestamp(1659755432, 7),
"$clusterTime" : {
"clusterTime" : Timestamp(1659755432, 7),
"signature" : {
"hash" : BinData(0,"AAAAAAAAAAAAAAAAAAAAAAAAAAA="),
"keyId" : NumberLong(0)
}
}
}
mongos> sh.shardCollection("test.shard", {_id: 'hashed'});
{
"collectionsharded" : "test.shard",
"collectionUUID" : UUID("329f4308-bff9-453a-bec2-7f3a757d95dd"),
"ok" : 1,
"operationTime" : Timestamp(1659755452, 13),
"$clusterTime" : {
"clusterTime" : Timestamp(1659755452, 13),
"signature" : {
"hash" : BinData(0,"AAAAAAAAAAAAAAAAAAAAAAAAAAA="),
"keyId" : NumberLong(0)
}
}
}
mongos> sh.status()
--- Sharding Status ---
sharding version: {
"_id" : 1,
"minCompatibleVersion" : 5,
"currentVersion" : 6,
"clusterId" : ObjectId("62ecc377dc19b0487fcd62e6")
}
shards:
{ "_id" : "shard1", "host" : "shard1/mongo04.tyun.cn:27010,mongo05.tyun.cn:27010,mongo06.tyun.cn:27010", "state" : 1 }
active mongoses:
"4.4.15" : 3
autosplit:
Currently enabled: yes
balancer:
Currently enabled: yes
Currently running: no
Failed balancer rounds in last 5 attempts: 0
Migration Results for the last 24 hours:
No recent migrations
databases:
{ "_id" : "config", "primary" : "config", "partitioned" : true }
config.system.sessions
shard key: { "_id" : 1 }
unique: false
balancing: true
chunks:
shard1 1024
too many chunks to print, use verbose if you want to force print
{ "_id" : "test", "primary" : "shard1", "partitioned" : true, "version" : { "uuid" : UUID("8c333889-11b2-4de0-9f54-f0c56b622124"), "lastMod" : 1 } }
test.shard
shard key: { "_id" : "hashed" }
unique: false
balancing: true
chunks:
shard1 2 // 注意这里的输出
{ "_id" : { "$minKey" : 1 } } -->> { "_id" : NumberLong(0) } on : shard1 Timestamp(1, 0)
{ "_id" : NumberLong(0) } -->> { "_id" : { "$maxKey" : 1 } } on : shard1 Timestamp(1, 1)mongos> use test
switched to db test
mongos> for (var i = 0; i < 100000; i++) {
db.shard.insert({i: i});
}
mongos> db.shard.find().limit(10)
{ "_id" : ObjectId("62eddc26f659b8344f42c837"), "i" : 0 }
{ "_id" : ObjectId("62eddc26f659b8344f42c838"), "i" : 1 }
{ "_id" : ObjectId("62eddc26f659b8344f42c839"), "i" : 2 }
{ "_id" : ObjectId("62eddc26f659b8344f42c83a"), "i" : 3 }
{ "_id" : ObjectId("62eddc26f659b8344f42c83b"), "i" : 4 }
{ "_id" : ObjectId("62eddc26f659b8344f42c83c"), "i" : 5 }
{ "_id" : ObjectId("62eddc26f659b8344f42c83d"), "i" : 6 }
{ "_id" : ObjectId("62eddc26f659b8344f42c83e"), "i" : 7 }
{ "_id" : ObjectId("62eddc26f659b8344f42c83f"), "i" : 8 }
{ "_id" : ObjectId("62eddc26f659b8344f42c840"), "i" : 9 }[root@mongo01 ~]# mongo --host mongo05.tyun.cn:27010
MongoDB shell version v4.4.15
connecting to: mongodb://mongo05.tyun.cn:27010/?compressors=disabled&gssapiServiceName=mongodb
Implicit session: session { "id" : UUID("b14a4b9b-f6b9-48d5-980a-a7fd3bbf2d73") }
MongoDB server version: 4.4.15
---
shard1:PRIMARY> show dbs
admin 0.000GB
config 0.000GB
local 0.004GB
test 0.006GB
shard1:PRIMARY> use test
switched to db test
shard1:PRIMARY> db.shard
db.shard
shard1:PRIMARY> db.shard.find().limit(6)
{ "_id" : ObjectId("62eddc26f659b8344f42c837"), "i" : 0 }
{ "_id" : ObjectId("62eddc26f659b8344f42c838"), "i" : 1 }
{ "_id" : ObjectId("62eddc26f659b8344f42c839"), "i" : 2 }
{ "_id" : ObjectId("62eddc26f659b8344f42c83a"), "i" : 3 }
{ "_id" : ObjectId("62eddc26f659b8344f42c83b"), "i" : 4 }
{ "_id" : ObjectId("62eddc26f659b8344f42c83c"), "i" : 5 }
shard1:PRIMARY>[root@mongo01 ~]# mongo --host mongo07.tyun.cn:27010
shard2:PRIMARY> rs.status()
{
"set" : "shard2",
"date" : ISODate("2022-08-06T03:31:26.564Z"),
"myState" : 1,
"term" : NumberLong(1),
"syncSourceHost" : "",
"syncSourceId" : -1,
"heartbeatIntervalMillis" : NumberLong(2000),
"majorityVoteCount" : 2,
"writeMajorityCount" : 2,
"votingMembersCount" : 3,
"writableVotingMembersCount" : 3,
"optimes" : {
"lastCommittedOpTime" : {
"ts" : Timestamp(1659756685, 1),
"t" : NumberLong(1)
},
"lastCommittedWallTime" : ISODate("2022-08-06T03:31:25.927Z"),
"readConcernMajorityOpTime" : {
"ts" : Timestamp(1659756685, 1),
"t" : NumberLong(1)
},
"readConcernMajorityWallTime" : ISODate("2022-08-06T03:31:25.927Z"),
"appliedOpTime" : {
"ts" : Timestamp(1659756685, 1),
"t" : NumberLong(1)
},
"durableOpTime" : {
"ts" : Timestamp(1659756685, 1),
"t" : NumberLong(1)
},
"lastAppliedWallTime" : ISODate("2022-08-06T03:31:25.927Z"),
"lastDurableWallTime" : ISODate("2022-08-06T03:31:25.927Z")
},
"lastStableRecoveryTimestamp" : Timestamp(1659756625, 4),
"electionCandidateMetrics" : {
"lastElectionReason" : "electionTimeout",
"lastElectionDate" : ISODate("2022-08-06T03:30:25.877Z"),
"electionTerm" : NumberLong(1),
"lastCommittedOpTimeAtElection" : {
"ts" : Timestamp(0, 0),
"t" : NumberLong(-1)
},
"lastSeenOpTimeAtElection" : {
"ts" : Timestamp(1659756615, 1),
"t" : NumberLong(-1)
},
"numVotesNeeded" : 2,
"priorityAtElection" : 1,
"electionTimeoutMillis" : NumberLong(10000),
"numCatchUpOps" : NumberLong(0),
"newTermStartDate" : ISODate("2022-08-06T03:30:25.915Z"),
"wMajorityWriteAvailabilityDate" : ISODate("2022-08-06T03:30:26.890Z")
},
"members" : [
{
"_id" : 0,
"name" : "mongo07.tyun.cn:27010",
"health" : 1,
"state" : 1,
"stateStr" : "PRIMARY",
"uptime" : 213,
"optime" : {
"ts" : Timestamp(1659756685, 1),
"t" : NumberLong(1)
},
"optimeDate" : ISODate("2022-08-06T03:31:25Z"),
"lastAppliedWallTime" : ISODate("2022-08-06T03:31:25.927Z"),
"lastDurableWallTime" : ISODate("2022-08-06T03:31:25.927Z"),
"syncSourceHost" : "",
"syncSourceId" : -1,
"infoMessage" : "",
"electionTime" : Timestamp(1659756625, 1),
"electionDate" : ISODate("2022-08-06T03:30:25Z"),
"configVersion" : 1,
"configTerm" : -1,
"self" : true,
"lastHeartbeatMessage" : ""
},
{
"_id" : 1,
"name" : "mongo08.tyun.cn:27010",
"health" : 1,
"state" : 2,
"stateStr" : "SECONDARY",
"uptime" : 71,
"optime" : {
"ts" : Timestamp(1659756675, 1),
"t" : NumberLong(1)
},
"optimeDurable" : {
"ts" : Timestamp(1659756675, 1),
"t" : NumberLong(1)
},
"optimeDate" : ISODate("2022-08-06T03:31:15Z"),
"optimeDurableDate" : ISODate("2022-08-06T03:31:15Z"),
"lastAppliedWallTime" : ISODate("2022-08-06T03:31:25.927Z"),
"lastDurableWallTime" : ISODate("2022-08-06T03:31:25.927Z"),
"lastHeartbeat" : ISODate("2022-08-06T03:31:25.890Z"),
"lastHeartbeatRecv" : ISODate("2022-08-06T03:31:24.933Z"),
"pingMs" : NumberLong(0),
"lastHeartbeatMessage" : "",
"syncSourceHost" : "mongo07.tyun.cn:27010",
"syncSourceId" : 0,
"infoMessage" : "",
"configVersion" : 1,
"configTerm" : -1
},
{
"_id" : 2,
"name" : "mongo09.tyun.cn:27010",
"health" : 1,
"state" : 2,
"stateStr" : "SECONDARY",
"uptime" : 71,
"optime" : {
"ts" : Timestamp(1659756675, 1),
"t" : NumberLong(1)
},
"optimeDurable" : {
"ts" : Timestamp(1659756675, 1),
"t" : NumberLong(1)
},
"optimeDate" : ISODate("2022-08-06T03:31:15Z"),
"optimeDurableDate" : ISODate("2022-08-06T03:31:15Z"),
"lastAppliedWallTime" : ISODate("2022-08-06T03:31:25.927Z"),
"lastDurableWallTime" : ISODate("2022-08-06T03:31:25.927Z"),
"lastHeartbeat" : ISODate("2022-08-06T03:31:25.890Z"),
"lastHeartbeatRecv" : ISODate("2022-08-06T03:31:24.872Z"),
"pingMs" : NumberLong(0),
"lastHeartbeatMessage" : "",
"syncSourceHost" : "mongo07.tyun.cn:27010",
"syncSourceId" : 0,
"infoMessage" : "",
"configVersion" : 1,
"configTerm" : -1
}
],
"ok" : 1,
"$clusterTime" : {
"clusterTime" : Timestamp(1659756685, 1),
"signature" : {
"hash" : BinData(0,"AAAAAAAAAAAAAAAAAAAAAAAAAAA="),
"keyId" : NumberLong(0)
}
},
"operationTime" : Timestamp(1659756685, 1)
}
shard2:PRIMARY>[root@mongo01 ~]# mongo --host mongos1.tyun.cn:27017
MongoDB shell version v4.4.15
connecting to: mongodb://mongos1.tyun.cn:27017/?compressors=disabled&gssapiServiceName=mongodb
Implicit session: session { "id" : UUID("1bb0a6ed-dad1-4440-95cb-2f60e0be506f") }
MongoDB server version: 4.4.15
---
The server generated these startup warnings when booting:
2022-08-05T09:17:59.537+00:00: Access control is not enabled for the database. Read and write access to data and configuration is unrestricted
2022-08-05T09:17:59.537+00:00: You are running this process as the root user, which is not recommended
---
mongos>
mongos> sh.addShard("shard2/mongo07.tyun.cn:27010,mongo08.tyun.cn:27010,mongo09.tyun.cn:27010");
{
"shardAdded" : "shard2",
"ok" : 1,
"operationTime" : Timestamp(1659756859, 4),
"$clusterTime" : {
"clusterTime" : Timestamp(1659756859, 4),
"signature" : {
"hash" : BinData(0,"AAAAAAAAAAAAAAAAAAAAAAAAAAA="),
"keyId" : NumberLong(0)
}
}
}
mongos> sh.status()
--- Sharding Status ---
sharding version: {
"_id" : 1,
"minCompatibleVersion" : 5,
"currentVersion" : 6,
"clusterId" : ObjectId("62ecc377dc19b0487fcd62e6")
}
shards:
{ "_id" : "shard1", "host" : "shard1/mongo04.tyun.cn:27010,mongo05.tyun.cn:27010,mongo06.tyun.cn:27010", "state" : 1 }
{ "_id" : "shard2", "host" : "shard2/mongo07.tyun.cn:27010,mongo08.tyun.cn:27010,mongo09.tyun.cn:27010", "state" : 1 }
active mongoses:
"4.4.15" : 3
autosplit:
Currently enabled: yes
balancer:
Currently enabled: yes
Currently running: no
Failed balancer rounds in last 5 attempts: 0
Migration Results for the last 24 hours:
31 : Success
databases:
{ "_id" : "config", "primary" : "config", "partitioned" : true }
config.system.sessions
shard key: { "_id" : 1 }
unique: false
balancing: true
chunks:
shard1 994
shard2 30
too many chunks to print, use verbose if you want to force print
{ "_id" : "test", "primary" : "shard1", "partitioned" : true, "version" : { "uuid" : UUID("8c333889-11b2-4de0-9f54-f0c56b622124"), "lastMod" : 1 } }
test.shard
shard key: { "_id" : "hashed" }
unique: false
balancing: true
chunks:
shard1 1
shard2 1
{ "_id" : { "$minKey" : 1 } } -->> { "_id" : NumberLong(0) } on : shard2 Timestamp(2, 0)
{ "_id" : NumberLong(0) } -->> { "_id" : { "$maxKey" : 1 } } on : shard1 Timestamp(2, 1)
mongos>mongos> status = db.shard.stats()
// 查看文档数量
mongos> status.shards.shard1.count
50184
// 过一段时间再次查看
mongos> status.shards.shard2.count
49816
// 比较一下两个分片的文档数量
mongos> status.shards.shard1.count - status.shards.shard2.count
368mongos> use admin
switched to db admin
mongos> db.runCommand({listShards: 1})
{
"shards" : [
{
"_id" : "shard1",
"host" : "shard1/mongo04.tyun.cn:27010,mongo05.tyun.cn:27010,mongo06.tyun.cn:27010",
"state" : 1
},
{
"_id" : "shard2",
"host" : "shard2/mongo07.tyun.cn:27010,mongo08.tyun.cn:27010,mongo09.tyun.cn:27010",
"state" : 1
}
],
"ok" : 1,
"operationTime" : Timestamp(1660384940, 3),
"$clusterTime" : {
"clusterTime" : Timestamp(1660384940, 3),
"signature" : {
"hash" : BinData(0,"kAzOU7gYu5MWoNSYPEZanw1KYd4="),
"keyId" : NumberLong("7128287226089177110")
}
}
}mongos> db.adminCommand( { removeShard: "shard2" } )
{
"msg" : "draining started successfully",
"state" : "started",
"shard" : "shard2",
"note" : "you need to drop or movePrimary these databases",
"dbsToMove" : [
"testdb"
],
"ok" : 1,
"operationTime" : Timestamp(1660384982, 2),
"$clusterTime" : {
"clusterTime" : Timestamp(1660384982, 2),
"signature" : {
"hash" : BinData(0,"ToGrQJZSWqSfiFwe/Hop2eykOAM="),
"keyId" : NumberLong("7128287226089177110")
}
}
}mongos> db.adminCommand( { removeShard: "shard2" } )
{
"msg" : "draining ongoing",
"state" : "ongoing", // 进行中
"remaining" : {
"chunks" : NumberLong(406), // 剩余
"dbs" : NumberLong(1),
"jumboChunks" : NumberLong(0)
},
"note" : "you need to drop or movePrimary these databases",
"dbsToMove" : [
"testdb"
],
"ok" : 1,
"operationTime" : Timestamp(1660385198, 21),
"$clusterTime" : {
"clusterTime" : Timestamp(1660385198, 21),
"signature" : {
"hash" : BinData(0,"HVDmppA+MhUor9a72JKDjWErLKo="),
"keyId" : NumberLong("7128287226089177110")
}
}
}
// 再次查看
mongos> db.adminCommand( { removeShard: "shard2" } )
{
"msg" : "draining ongoing",
"state" : "ongoing",
"remaining" : {
"chunks" : NumberLong(345), // 这里
"dbs" : NumberLong(1),
"jumboChunks" : NumberLong(0)
},
"note" : "you need to drop or movePrimary these databases",
"dbsToMove" : [
"testdb"
],
"ok" : 1,
"operationTime" : Timestamp(1660385328, 3),
"$clusterTime" : {
"clusterTime" : Timestamp(1660385328, 3),
"signature" : {
"hash" : BinData(0,"Wi6BxDNErUjsHYTdVpvbiEyGUrw="),
"keyId" : NumberLong("7128287226089177110")
}
}
}
// 一段时间后再次查看
mongos> db.adminCommand( { removeShard: "shard2" } )
{
"msg" : "draining ongoing",
"state" : "ongoing",
"remaining" : {
"chunks" : NumberLong(87), // 这里
"dbs" : NumberLong(1),
"jumboChunks" : NumberLong(0)
},
"note" : "you need to drop or movePrimary these databases",
"dbsToMove" : [
"testdb"
],
"ok" : 1,
"operationTime" : Timestamp(1660385870, 3),
"$clusterTime" : {
"clusterTime" : Timestamp(1660385870, 6),
"signature" : {
"hash" : BinData(0,"R5LJzYTNv+s+aJaiJZVZ9arr+84="),
"keyId" : NumberLong("7128287226089177110")
}
}
}mongos> db.adminCommand( { movePrimary: "testdb", to: "shard0" })
{
"ok" : 1,
"operationTime" : Timestamp(1660386323, 42852),
"$clusterTime" : {
"clusterTime" : Timestamp(1660386323, 42852),
"signature" : {
"hash" : BinData(0,"wpJWCc5pzEghDEgRjXl9NiA9Gxs="),
"keyId" : NumberLong("7128287226089177110")
}
}
}
// 再次查看状态
mongos> db.adminCommand( { removeShard: "shard2" } )
{
"msg" : "removeshard completed successfully",
"state" : "completed",
"shard" : "shard2",
"ok" : 1,
"operationTime" : Timestamp(1660386353, 3),
"$clusterTime" : {
"clusterTime" : Timestamp(1660386353, 3),
"signature" : {
"hash" : BinData(0,"EoqSZ6a4MbSrQcBHH6rVAI1DtyA="),
"keyId" : NumberLong("7128287226089177110")
}
}
}
mongos> db.runCommand({listShards: 1})
{
"shards" : [
{
"_id" : "shard1",
"host" : "shard1/mongo04.tyun.cn:27010,mongo05.tyun.cn:27010,mongo06.tyun.cn:27010",
"state" : 1
},
{
"_id" : "shard0",
"host" : "shard0/mongo01.tyun.cn:27010,mongo02.tyun.cn:27010,mongo03.tyun.cn:27010",
"state" : 1
}
],
"ok" : 1,
"operationTime" : Timestamp(1660386367, 23),
"$clusterTime" : {
"clusterTime" : Timestamp(1660386367, 23),
"signature" : {
"hash" : BinData(0,"yBy7UjBzOh1RIbm4fj/q+Docptg="),
"keyId" : NumberLong("7128287226089177110")
}
}
}很好奇,就使用rubyonrails自动化单元测试而言,你们正在做什么?您是否创建了一个脚本来在cron中运行rake作业并将结果邮寄给您?git中的预提交Hook?只是手动调用?我完全理解测试,但想知道在错误发生之前捕获错误的最佳实践是什么。让我们理所当然地认为测试本身是完美无缺的,并且可以正常工作。下一步是什么以确保他们在正确的时间将可能有害的结果传达给您? 最佳答案 不确定您到底想听什么,但是有几个级别的自动代码库控制:在处理某项功能时,您可以使用类似autotest的内容获得关于哪些有效,哪些无效的即时反馈。要确保您的提
导读:随着叮咚买菜业务的发展,不同的业务场景对数据分析提出了不同的需求,他们希望引入一款实时OLAP数据库,构建一个灵活的多维实时查询和分析的平台,统一数据的接入和查询方案,解决各业务线对数据高效实时查询和精细化运营的需求。经过调研选型,最终引入ApacheDoris作为最终的OLAP分析引擎,Doris作为核心的OLAP引擎支持复杂地分析操作、提供多维的数据视图,在叮咚买菜数十个业务场景中广泛应用。作者|叮咚买菜资深数据工程师韩青叮咚买菜创立于2017年5月,是一家专注美好食物的创业公司。叮咚买菜专注吃的事业,为满足更多人“想吃什么”而努力,通过美好食材的供应、美好滋味的开发以及美食品牌的孵
我认为我的问题最好用一个例子来描述。假设我有一个名为“Thing”的简单模型,它有一些简单数据类型的属性。像...Thing-foo:string-goo:string-bar:int这并不难。数据库表将包含具有这三个属性的三列,我可以使用@thing.foo或@thing.bar之类的东西访问它们。但我要解决的问题是当“foo”或“goo”不再包含在简单数据类型中时会发生什么?假设foo和goo代表相同类型的对象。也就是说,它们都是“Whazit”的实例,只是数据不同。所以现在事情可能看起来像这样......Thing-bar:int但是现在有一个新的模型叫做“Whazit”,看起来
我有一个要在我的Rails3项目中使用的数组扩展方法。它应该住在哪里?我有一个应用程序/类,我最初把它放在(array_extensions.rb)中,在我的config/application.rb中我加载路径:config.autoload_paths+=%W(#{Rails.root}/应用程序/类)。但是,当我转到railsconsole时,未加载扩展。是否有一个预定义的位置可以放置我的Rails3扩展方法?或者,一种预先定义的方式来添加它们?我知道Rails有自己的数组扩展方法。我应该将我的添加到active_support/core_ext/array/conversion
参见下面的示例,我想最好使用第二种方法,但第一种也可以。哪种方法最好,使用另一种的后果是什么?classTestdefstartp"started"endtest=Test.newtest.startendclassTest2defstartp"started"endendtest2=Test2.newtest2.start 最佳答案 我肯定会说第二种变体更有意义。第一个不会导致错误,但对象实例化完全过时且毫无意义。外部变量在类的范围内不可见:var="string"classAvar=A.newendputsvar#=>strin
如果我构建了一个应用程序来访问来自Gmail、Twitter和Facebook的一些数据,并且我希望用户只需输入一次他们的身份验证信息,并且在几天或几周后重置,那会怎样是在Ruby中动态执行此操作的最佳方法吗?我看到很多人只是拥有他们客户/用户凭证的配置文件,如下所示:gmail_account:username:myClientpassword:myClientsPassword这看起来a)非常不安全,b)如果我想为成千上万的用户存储此类信息,它就无法工作。推荐的方法是什么?我希望能够在这些服务之上构建一个界面,因此每次用户进行交易时都必须输入凭据是不可行的。
我正在使用Devise在Rails应用程序中,并希望通过API公开一些模型数据,但应该像应用程序一样限制对API的访问。$curlhttp://myapp.com/api/v1/sales/7.json{"error":"Youneedtosigninorsignupbeforecontinuing."}很明显。在这种情况下是否有访问API的最佳实践?我更喜欢一步验证+获取数据,但这只是为了让客户的工作更轻松。他们将使用JQuery在客户端提取数据。感谢您提供任何信息!凡妮莎 最佳答案 我建议您按照以下帖子中的选项2:使用APIke
我正在开发一个Rails2.3.1网站。在整个网站中,我需要一个用于在各种页面(主页、创建帖子页面、帖子列表页面、评论列表页面等)上创建帖子的表单——只要说这个表单需要在由各种Controller)。这些页面中的每一个都显示在相应的Controller/操作中检索到的各种其他信息。例如,主页列出了最新的10篇文章、从数据库中提取的内容等。因此,我已将帖子创建表单移动到它自己的部分中,并将该部分包含在所有必要的页面中。请注意,部分POST中的表单到/questions(路由到PostsController::create——这是默认的Rails行为)。我遇到的问题是当Posts表单没有正
我正在按照我一直在研究的研讨会实现“服务对象”,我正在构建一个redditAPI应用程序。我需要对象返回一些东西,所以我不能只执行初始化程序中的所有内容。我有这两个选择:选项1:类需要实例化classSubListFromUserdefuser_subscribed_subs(client)@client=client@subreddits=sort_subs_by_name(user_subs_from_reddit)endprivatedefsort_subs_by_name(subreddits)subreddits.sort_by{|sr|sr[:name].downcase}
美团外卖搜索工程团队在Elasticsearch的优化实践中,基于Location-BasedService(LBS)业务场景对Elasticsearch的查询性能进行优化。该优化基于Run-LengthEncoding(RLE)设计了一款高效的倒排索引结构,使检索耗时(TP99)降低了84%。本文从问题分析、技术选型、优化方案等方面进行阐述,并给出最终灰度验证的结论。1.前言最近十年,Elasticsearch已经成为了最受欢迎的开源检索引擎,其作为离线数仓、近线检索、B端检索的经典基建,已沉淀了大量的实践案例及优化总结。然而在高并发、高可用、大数据量的C端场景,目前可参考的资料并不多。因此