版本:elasticsearch7.17,jdk8
<dependencies>
   <!--注意:由于 spring-boot-starter-web 默认替我们引入了核心启动器 spring-boot-starter,
    因此,当 Spring Boot  项目中的 pom.xml 引入了 spring-boot-starter-web 的依赖后,
    就无须在引入 spring-boot-starter 核心启动器的依赖了-->
    <dependency>
        <groupId>org.springframework.boot</groupId>
        <artifactId>spring-boot-starter-web</artifactId>
        <version>2.3.12.RELEASE</version>
    </dependency>
    <dependency>
        <groupId>org.springframework.boot</groupId>
        <artifactId>spring-boot-starter-test</artifactId>
        <version>2.3.12.RELEASE</version>
        <scope>test</scope>
    </dependency>

    <dependency>
        <groupId>com.meng</groupId>
        <artifactId>service</artifactId>
        <version>1.0-SNAPSHOT</version>
    </dependency>
    <dependency>
        <groupId>org.projectlombok</groupId>
        <artifactId>lombok</artifactId>
        <version>1.18.16</version>
        <scope>compile</scope>
    </dependency>
</dependencies>
<dependencies>
    <dependency>
        <groupId>org.springframework.boot</groupId>
        <artifactId>spring-boot-starter-test</artifactId>
        <version>${spring-boot.version}</version>
        <scope>test</scope>
    </dependency>
    <dependency>
        <groupId>org.springframework.boot</groupId>
        <artifactId>spring-boot-starter-data-elasticsearch</artifactId>
        <version>${spring-boot.version}</version>
    </dependency>
</dependencies>
spring:
  elasticsearch:
    rest:
      uris: 192.168.233.134:9200
spring:
  data:
    elasticsearch:
      cluster-nodes: 192.168.233.134:9300
@SpringBootApplication
public class EsApplication {
    public static void main(String[] args) {
        SpringApplication.run(EsApplication.class , args);
    }
}
@Data
@Document(indexName = "goods" , shards = 3 , replicas = 0)
public class Goods {
    @Id
    private Integer id;

    @Field(type = FieldType.Text , analyzer = "ik_max_word")
    private String name;

    @Field(type = FieldType.Keyword)
    private String category;

    @Field(type = FieldType.Keyword)
    private String images;

    @Field(type = FieldType.Integer)
    private Integer price;
}
Spring Data通过注解来声明字段的映射属性,有下面的三个注解:
@Document 作用在类,标记实体类为文档对象,一般有四个属性
indexName:对应索引库名称
type:对应在索引库中的类型
shards:分片数量,默认5
replicas:副本数量,默认1
@Id 作用在成员变量,标记一个字段作为id主键
@Field 作用在成员变量,标记为文档的字段,并指定字段映射属性:
type:字段类型,取值是枚举:FieldType
index:是否索引,布尔类型,默认是true
store:是否存储,布尔类型,默认是false
analyzer:分词器名称:ik_max_word
public interface EsRepository extends ElasticsearchRepository<User, Integer> {
}
ElasticsearchRepository可以做Elasticsearch的相关数据的增删改查,用法和普通的接口是一样的,这样就能统一ElasticSearch和普通的JPA操作,获得和操作mysql一样的代码体验。同时也可以看到ElasticsearchRepository的功能是比较少的,简单查询够用,但复杂查询就稍微显得力不从心了。
ElasticsearchRepository继承自PagingAndSortingRepository,PagingAndSortingRepository又继承CrudRepository
ElasticsearchRepository中的方法基本都过时了
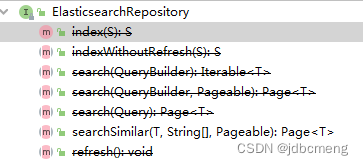
PagingAndSortingRepository中的两个方法,排序和分页
@NoRepositoryBean
public interface PagingAndSortingRepository<T, ID> extends CrudRepository<T, ID> {

	/**
	 * Returns all entities sorted by the given options.
	 *
	 * @param sort
	 * @return all entities sorted by the given options
	 */
	Iterable<T> findAll(Sort sort);

	/**
	 * Returns a {@link Page} of entities meeting the paging restriction provided in the {@code Pageable} object.
	 *
	 * @param pageable
	 * @return a page of entities
	 */
	Page<T> findAll(Pageable pageable);
}
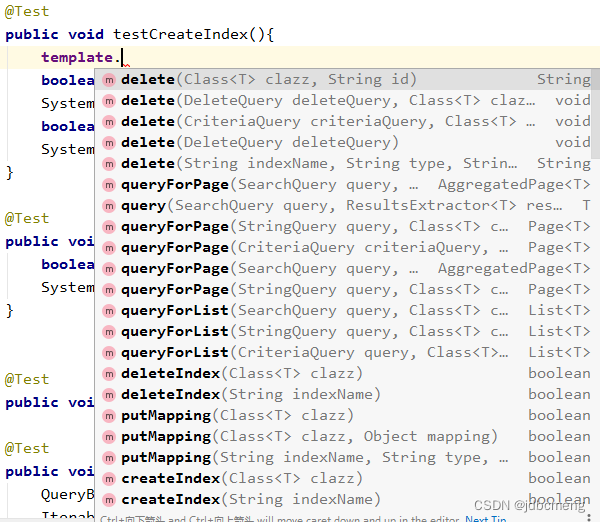
CrudRepository中的方法就是简单的增删查改

详见es中ElasticsearchRepository 的原理和使用
ElasticsearchTemplate 则提供了更多的方法,同时也包括分页之类的,他其实就是一个封装好的ElasticSearch Util功能类,通过直接连接client来完成数据的操作
详见es中ElasticSearchTemplate类的实现原理及使用
ElasticsearchRestTemplate 在新版的SpringBoot项目中,在这个包下,推荐使用的是ElasticsearchRestTemplate这个类(ElasticsearchTemplate不推荐使用了),和之前的用法有些不同。
本文使用springboot版本:2.3.12
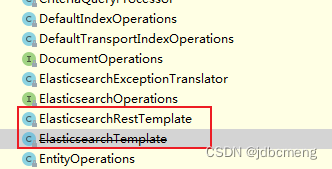
参考:ElasticsearchRestTemplate使用
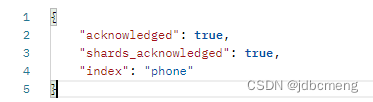
@Test
public void testIndex(){
    boolean goods = template.indexOps(Goods.class).create();//新版本用这个方法
    boolean goods1 = template.createIndex(User.class);  // 此方法已过时
    System.out.println("goods = " + goods);
}
结果
1、插入数据时使用默认生成的mapping(不推荐)

这种方式生成的mapping字段的type并不是和实体类上用@Field声明的一致,而是自己生成的默认的。
2、已创建的索引,设置mapping
 /**
     * 如果已经创建了index,可用此方法设置mapping
     */
    @Test
    public void testCreateIndexWithoutIndex(){
        IndexCoordinates indexCoordinates = IndexCoordinates.of("phone");//已创建的索引
        // 根据索引实体,获取mapping字段
        Document mapping = restTemplate.indexOps(indexCoordinates).createMapping(Phone.class);
        // 创建索引mapping
        restTemplate.indexOps(indexCoordinates).putMapping(mapping);
    }
这种方式生成的mapping就是实体类中用@Field声明的类型了
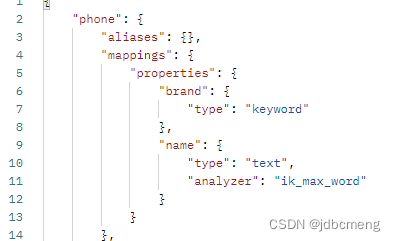
把setting放到项目中的一个文件中
phone_setting.json
{
  "index": {
    "max_result_window": "500000",
    "analysis": {
      "filter": {
        "limit_len": {
          "type": "length",
          "min": "1"
        }
      },
      "analyzer": {
        "ik_max_custom": {
          "filter": [
            "limit_len"
          ],
          "char_filter": [
            "html_strip"
          ],
          "tokenizer": "ik_max_word"
        },
        "ik_smart_custom": {
          "type":      "custom",
          "tokenizer": "ik_smart",
          "char_filter": [],
          "filter": [
            "limit_len"
          ]
        },
        "default_pattern_analyzer": {
          "type":"pattern"
        }
      }
    }
  }
}
根据实际需要进行调整内容
然后读取文件,创建index,再根据实体类,创建mapping
@Autowired
    private ElasticsearchRestTemplate restTemplate;

    @Value("classpath:phone_setting.json")
    private Resource esSetting;

    @Test
    public void testCreateIndex() throws Exception{
        IndexCoordinates indexCoordinates = IndexCoordinates.of("phone");
        // 根据索引实体,获取mapping字段
        Document mapping = restTemplate.indexOps(indexCoordinates).createMapping(Phone.class);
        // 创建索引
        // 读取setting配置文件
       String esSettingStr = IOUtils.toString(esSetting.getInputStream(), Charset.forName("utf-8"));
        // setting
        Document setting = Document.parse(esSettingStr);
        restTemplate.indexOps(indexCoordinates).create(setting);
        // 创建索引mapping
        restTemplate.indexOps(indexCoordinates).putMapping(mapping);
    }
可以参考这里es7创建索引
 @Autowired
    private PhoneRepository phoneRepository;

    //插入数据
    @Test
    public void testSave(){
        Phone phone = new Phone(1 , "诺基亚5300" , "诺基亚");
        restTemplate.save(phone);
    }

    //批量插入数据
    @Test
    public void testBatchSave(){
        List<Phone> list = new ArrayList<>();
        Phone phone2 = new Phone(2 , "小米12pro" , "小米");
        Phone phone3 = new Phone(3 , "iphone12" , "苹果");
        list.add(phone2);
        list.add(phone3);
        phoneRepository.saveAll(list);
    }
再插入一遍,只要id一致,就是修改
    //修改数据
    @Test
    public void testUpdate(){
        Phone phone3 = new Phone(3 , "iphonese 3" , "苹果");
        restTemplate.save(phone3);
    }
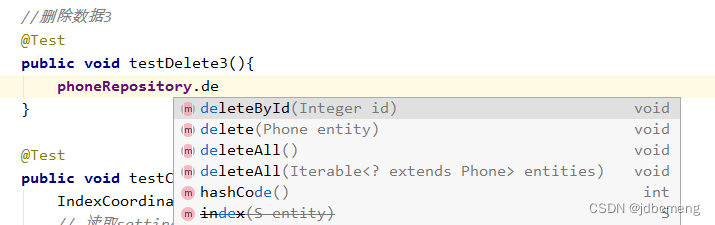
删除数据的方法就比较多了
 	//删除数据
    @Test
    public void testDelete(){
        Phone phone3 = new Phone(3 , "iphonese 3" , "苹果");
        String delete = restTemplate.delete(phone3);
        System.out.println("delete = " + delete);//delete = 3
    }

    //删除数据2
    @Test
    public void testDelete2(){
        String delete = restTemplate.delete("3" , Phone.class);
        System.out.println("delete = " + delete);//delete = 3
    }

    //删除数据3
    @Test
    public void testDelete3(){
        phoneRepository.deleteById(2);
    }

	 //删除id大于20的goods数据
    @Test
    public void test0DeleteByQueryBuilder(){
        RangeQueryBuilder id = QueryBuilders.rangeQuery("id").gt(20);
        NativeSearchQuery query = new NativeSearchQueryBuilder().withQuery(id).build();
        template.delete(query , Goods.class , IndexCoordinates.of("goods"));
    }
重点就在查询了
 	//查询全部
    @Test
    public void testQuery(){
        Iterable<Phone> phones = phoneRepository.findAll();
        phones.forEach(System.out::println);
    }
    //根据id查询
    @Test
    public void testQuery2(){
        Optional<Phone> phone = phoneRepository.findById(3);
        phone.ifPresent(System.out::println);
    }

    //根据ids查询
    @Test
    public void testQuery3(){
        Iterable<Phone> phones = phoneRepository.findAllById(Arrays.asList(1,2,3));
        phones.forEach(System.out::println);
    }
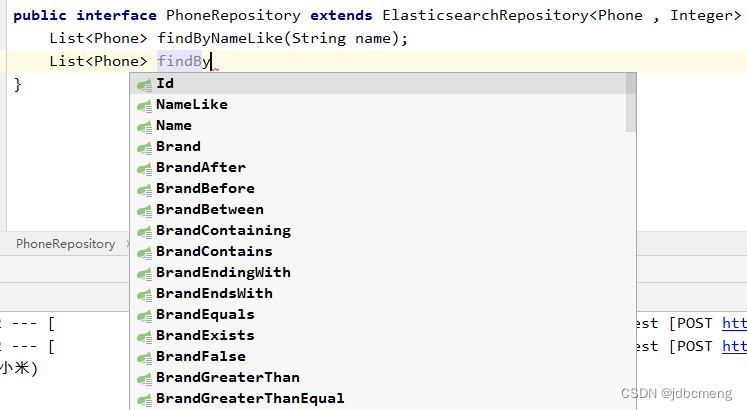
  	//repository自定义方法查询
    @Test
    public void testQuery4(){
        List<Phone> phones = phoneRepository.findByNameLike("小米");
        phones.forEach(System.out::println);
    }
ElasticsearchRepository只能进行简单的查询,复杂的还要靠ElasticsearchRestTemplate
	//查询name中包含“小米”的数据
    @Test
    public void testQuery(){
        NativeSearchQuery nativeSearchQuery = new NativeSearchQueryBuilder()
                .withQuery(QueryBuilders.matchQuery("name", "小米"))
                .build();
        SearchHits<Phone> searchPhone = restTemplate.search(nativeSearchQuery, Phone.class);
        searchPhone.forEach(System.out::println);
        //SearchHit{id='2', score=1.3365866, sortValues=[], content=Phone(id=2, name=小米12pro, brand=小米), highlightFields={}}
    }

 	//分页+排序
    @Test
    public void testQuery3(){
        NativeSearchQuery nativeSearchQuery = new NativeSearchQueryBuilder()
                .withQuery(QueryBuilders.matchQuery("name", "手机"))
                .withPageable(PageRequest.of(0, 10)) // 分页
                .withSort(SortBuilders.fieldSort("id").order(SortOrder.DESC))//排序
                .build();
        SearchHits<Phone> search = template.search(nativeSearchQuery, Phone.class);
        SearchPage<Phone> page = SearchHitSupport.searchPageFor(search, nativeSearchQuery.getPageable());

        System.out.println(page.getTotalElements());
        System.out.println(page.getTotalPages());
        System.out.println(page.getNumber());
        System.out.println(page.getSize());
    }
不知何故,我似乎无法获得包含我的聚合的响应...使用curl它按预期工作:HBZUMB01$curl-XPOST"http://localhost:9200/contents/_search"-d'{"size":0,"aggs":{"sport_count":{"value_count":{"field":"dwid"}}}}'我收到回复:{"took":4,"timed_out":false,"_shards":{"total":5,"successful":5,"failed":0},"hits":{"total":90,"max_score":0.0,"hits":[]},"a
1.回顾.TransportServicepublicclassTransportServiceextendsAbstractLifecycleComponentTransportService:方法:1publicfinalTextendsTransportResponse>voidsendRequest(finalTransport.Connectionconnection,finalStringaction,finalTransportRequestrequest,finalTransportRequestOptionsoptions,TransportResponseHandlerT>
我有一个Rails应用程序,现在设置了ElasticSearch和Tiregem以在模型上进行搜索,我想知道我应该如何设置我的应用程序以对模型中的某些索引进行模糊字符串匹配。我将我的模型设置为索引标题、描述等内容,但我想对其中一些进行模糊字符串匹配,但我不确定在何处进行此操作。如果您想发表评论,我将在下面包含我的代码!谢谢!在Controller中:defsearch@resource=Resource.search(params[:q],:page=>(params[:page]||1),:per_page=>15,load:true)end在模型中:classResource'Us
美团外卖搜索工程团队在Elasticsearch的优化实践中,基于Location-BasedService(LBS)业务场景对Elasticsearch的查询性能进行优化。该优化基于Run-LengthEncoding(RLE)设计了一款高效的倒排索引结构,使检索耗时(TP99)降低了84%。本文从问题分析、技术选型、优化方案等方面进行阐述,并给出最终灰度验证的结论。1.前言最近十年,Elasticsearch已经成为了最受欢迎的开源检索引擎,其作为离线数仓、近线检索、B端检索的经典基建,已沉淀了大量的实践案例及优化总结。然而在高并发、高可用、大数据量的C端场景,目前可参考的资料并不多。因此
开门见山|拉取镜像dockerpullelasticsearch:7.16.1|配置存放的目录#存放配置文件的文件夹mkdir-p/opt/docker/elasticsearch/node-1/config#存放数据的文件夹mkdir-p/opt/docker/elasticsearch/node-1/data#存放运行日志的文件夹mkdir-p/opt/docker/elasticsearch/node-1/log#存放IK分词插件的文件夹mkdir-p/opt/docker/elasticsearch/node-1/plugins若你使用了moba,直接右键新建即可如上图所示依次类推创建
文章目录概念索引相关操作创建索引更新副本查看索引删除索引索引的打开与关闭收缩索引索引别名查询索引别名文档相关操作新建文档查询文档更新文档删除文档映射相关操作查询文档映射创建静态映射创建索引并添加映射概念es中有三个概念要清楚,分别为索引、映射和文档(不用死记硬背,大概有个印象就可以)索引可理解为MySQL数据库;映射可理解为MySQL的表结构;文档可理解为MySQL表中的每行数据静态映射和动态映射上面已经介绍了,映射可理解为MySQL的表结构,在MySQL中,向表中插入数据是需要先创建表结构的;但在es中不必这样,可以直接插入文档,es可以根据插入的文档(数据),动态的创建映射(表结构),这就
如果您希望在Spring中启用定时任务功能,则需要在主类上添加 @EnableScheduling 注解。这样Spring才会扫描 @Scheduled 注解并执行定时任务。在大多数情况下,只需要在主类上添加 @EnableScheduling 注解即可,不需要在Service层或其他类中再次添加。以下是一个示例,演示如何在SpringBoot中启用定时任务功能:@SpringBootApplication@EnableSchedulingpublicclassApplication{publicstaticvoidmain(String[]args){SpringApplication.ru
软件特点部署后能通过浏览器查看线上日志。支持Linux、Windows服务器。采用随机读取的方式,支持大文件的读取。支持实时打印新增的日志(类终端)。支持日志搜索。使用手册基本页面配置路径配置日志所在的目录,配置后按回车键生效,下拉框选择日志名称。选择日志后点击生效,即可加载日志。windows路径E:\java\project\log-view\logslinux路径/usr/local/XX历史模式历史模式下,不会读取新增的日志。针对历史文件可以分页读取,配置分页大小、跳转。历史模式下,支持根据关键词搜索。目前搜索引擎使用的是jdk自带类库,搜索速度相对较低,优点是比较简单。2G日志全文搜
1.依赖导入org.springframework.bootspring-boot-starter-weborg.springframework.bootspring-boot-starter-validation2.validation常用注解@Null被注释的元素必须为null@NotNull被注释的元素不能为null,可以为空字符串@AssertTrue被注释的元素必须为true@AssertFalse被注释的元素必须为false@Min(value)被注释的元素必须是一个数字,其值必须大于等于指定的最小值@Max(value)被注释的元素必须是一个数字,其值必须小于等于指定的最大值@D
我有一个关于配置elasticsearch以连接AWSelasticsearch服务以在生产环境中运行项目的问题。我的gem文件:gem'searchkick'gem'faraday_middleware-aws-signers-v4'gem'aws-sdk','~>2'gem"elasticsearch",">=1.0.15"引用:https://github.com/ankane/searchkick我的config/initializers/elasticsearch.rb文件:require"faraday_middleware/aws_signers_v4"ENV["ELAS