在我之前的文章 “Observability:使用 Elastic Agent 来摄入日志及指标 - Elastic Stack 8.0”, 我详述了如何部署 Elastic Agent 来收集系统日志及指标。在那篇文章的配置中,我选择了 “Quick Start" 来配置 Fleet server 和 Elastic Agent 之前的连接。在实际的生产环境部署中,我们也应该配置为安全的连接。以 Elastic Agent 为基础的数据摄入架构图如下:
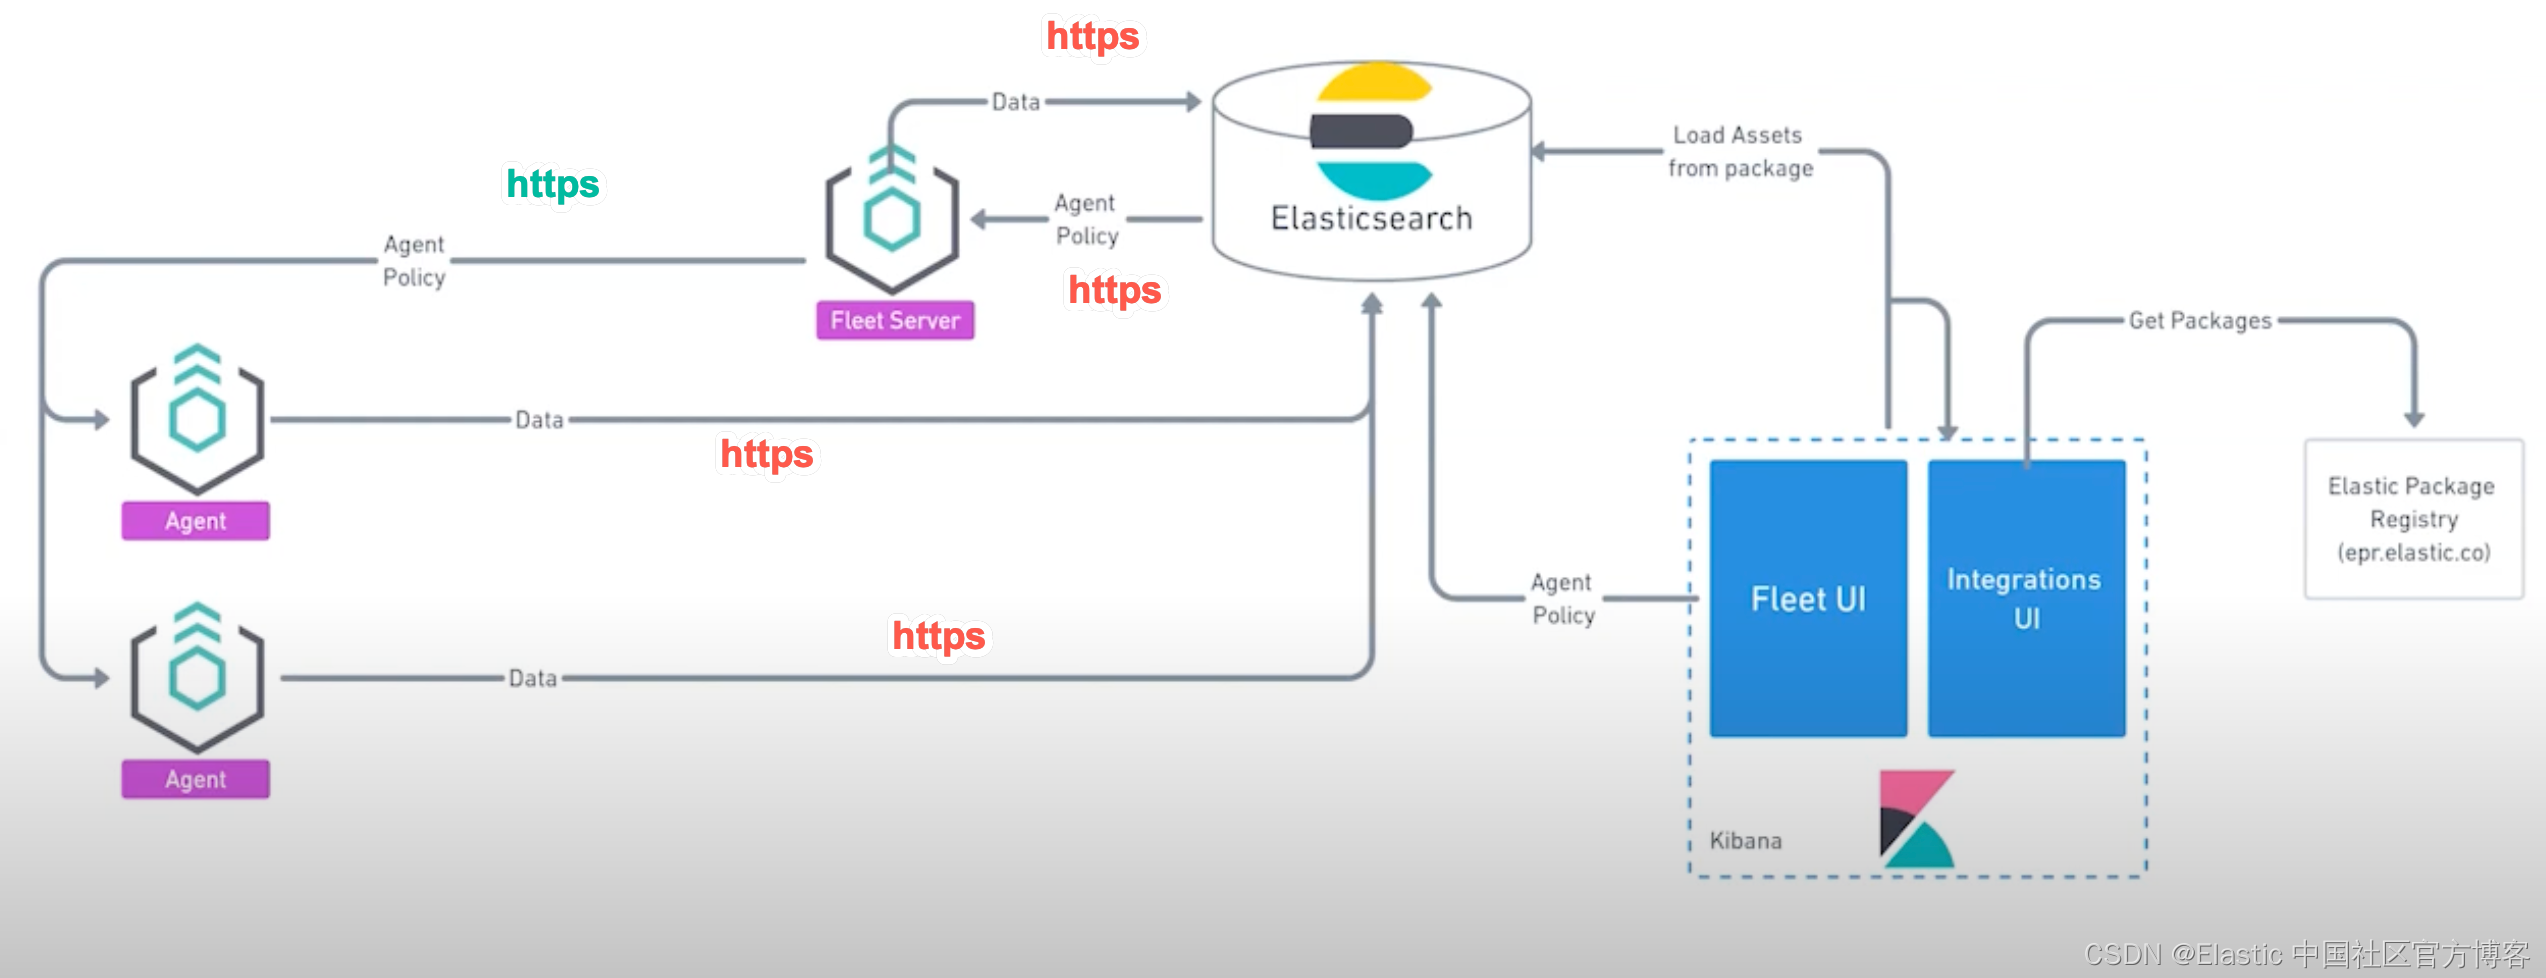
在我们之前的配置中,我们保证所有的连接到 Elasticsearch 都是 https 的连接,但是并没有配置从 Elastic Agent 到 Fleet server 之间的安全连接。在今天的教程中,我将详述如何配置这个安全的连接。
在生产环境中配置 Fleet Server 和 Elastic Agent 之间的安全
在生产环境中配置 Fleet Server 和 Elastic Agent 之间的安全_哔哩哔哩_bilibili
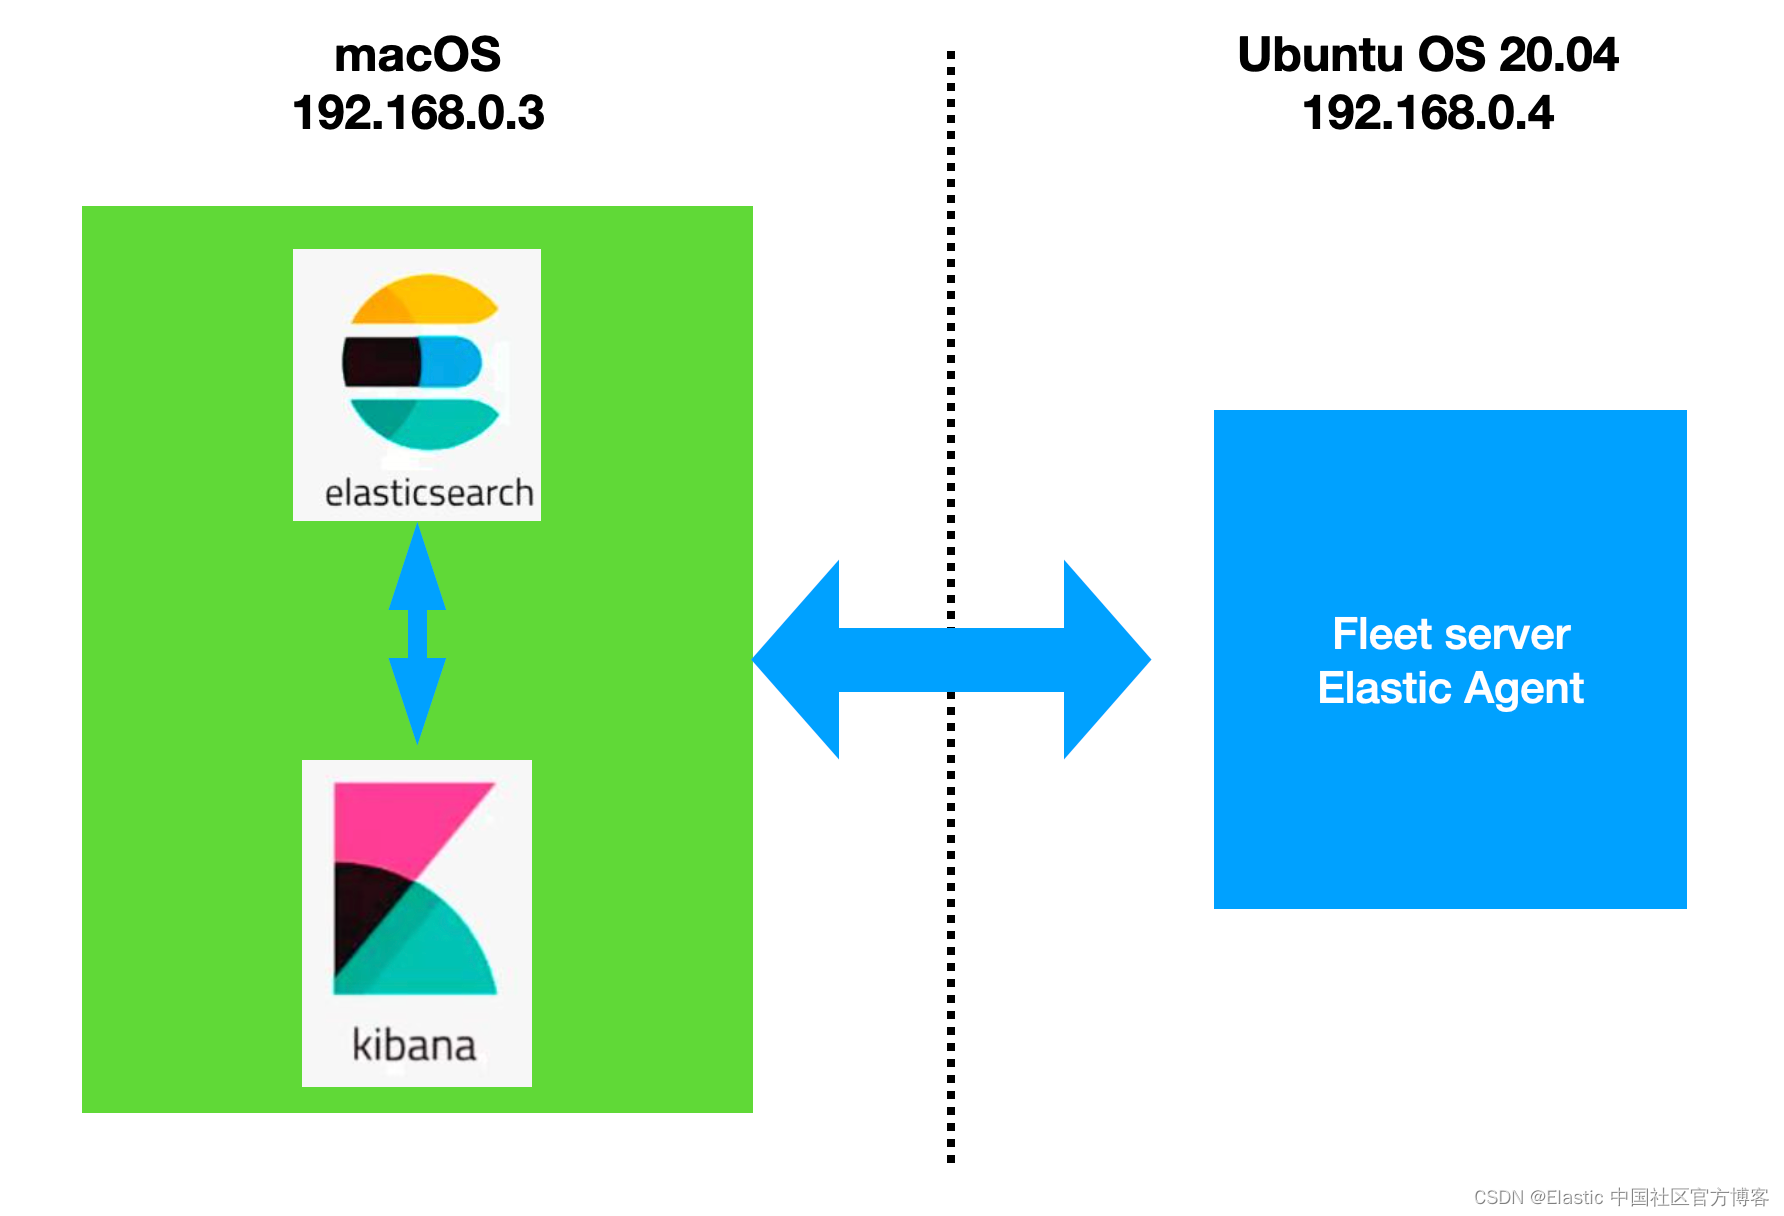
在今天的练习中,我将使用 Elastic Stack 8.1.2 来进行展示。我使用的测试环境如下:
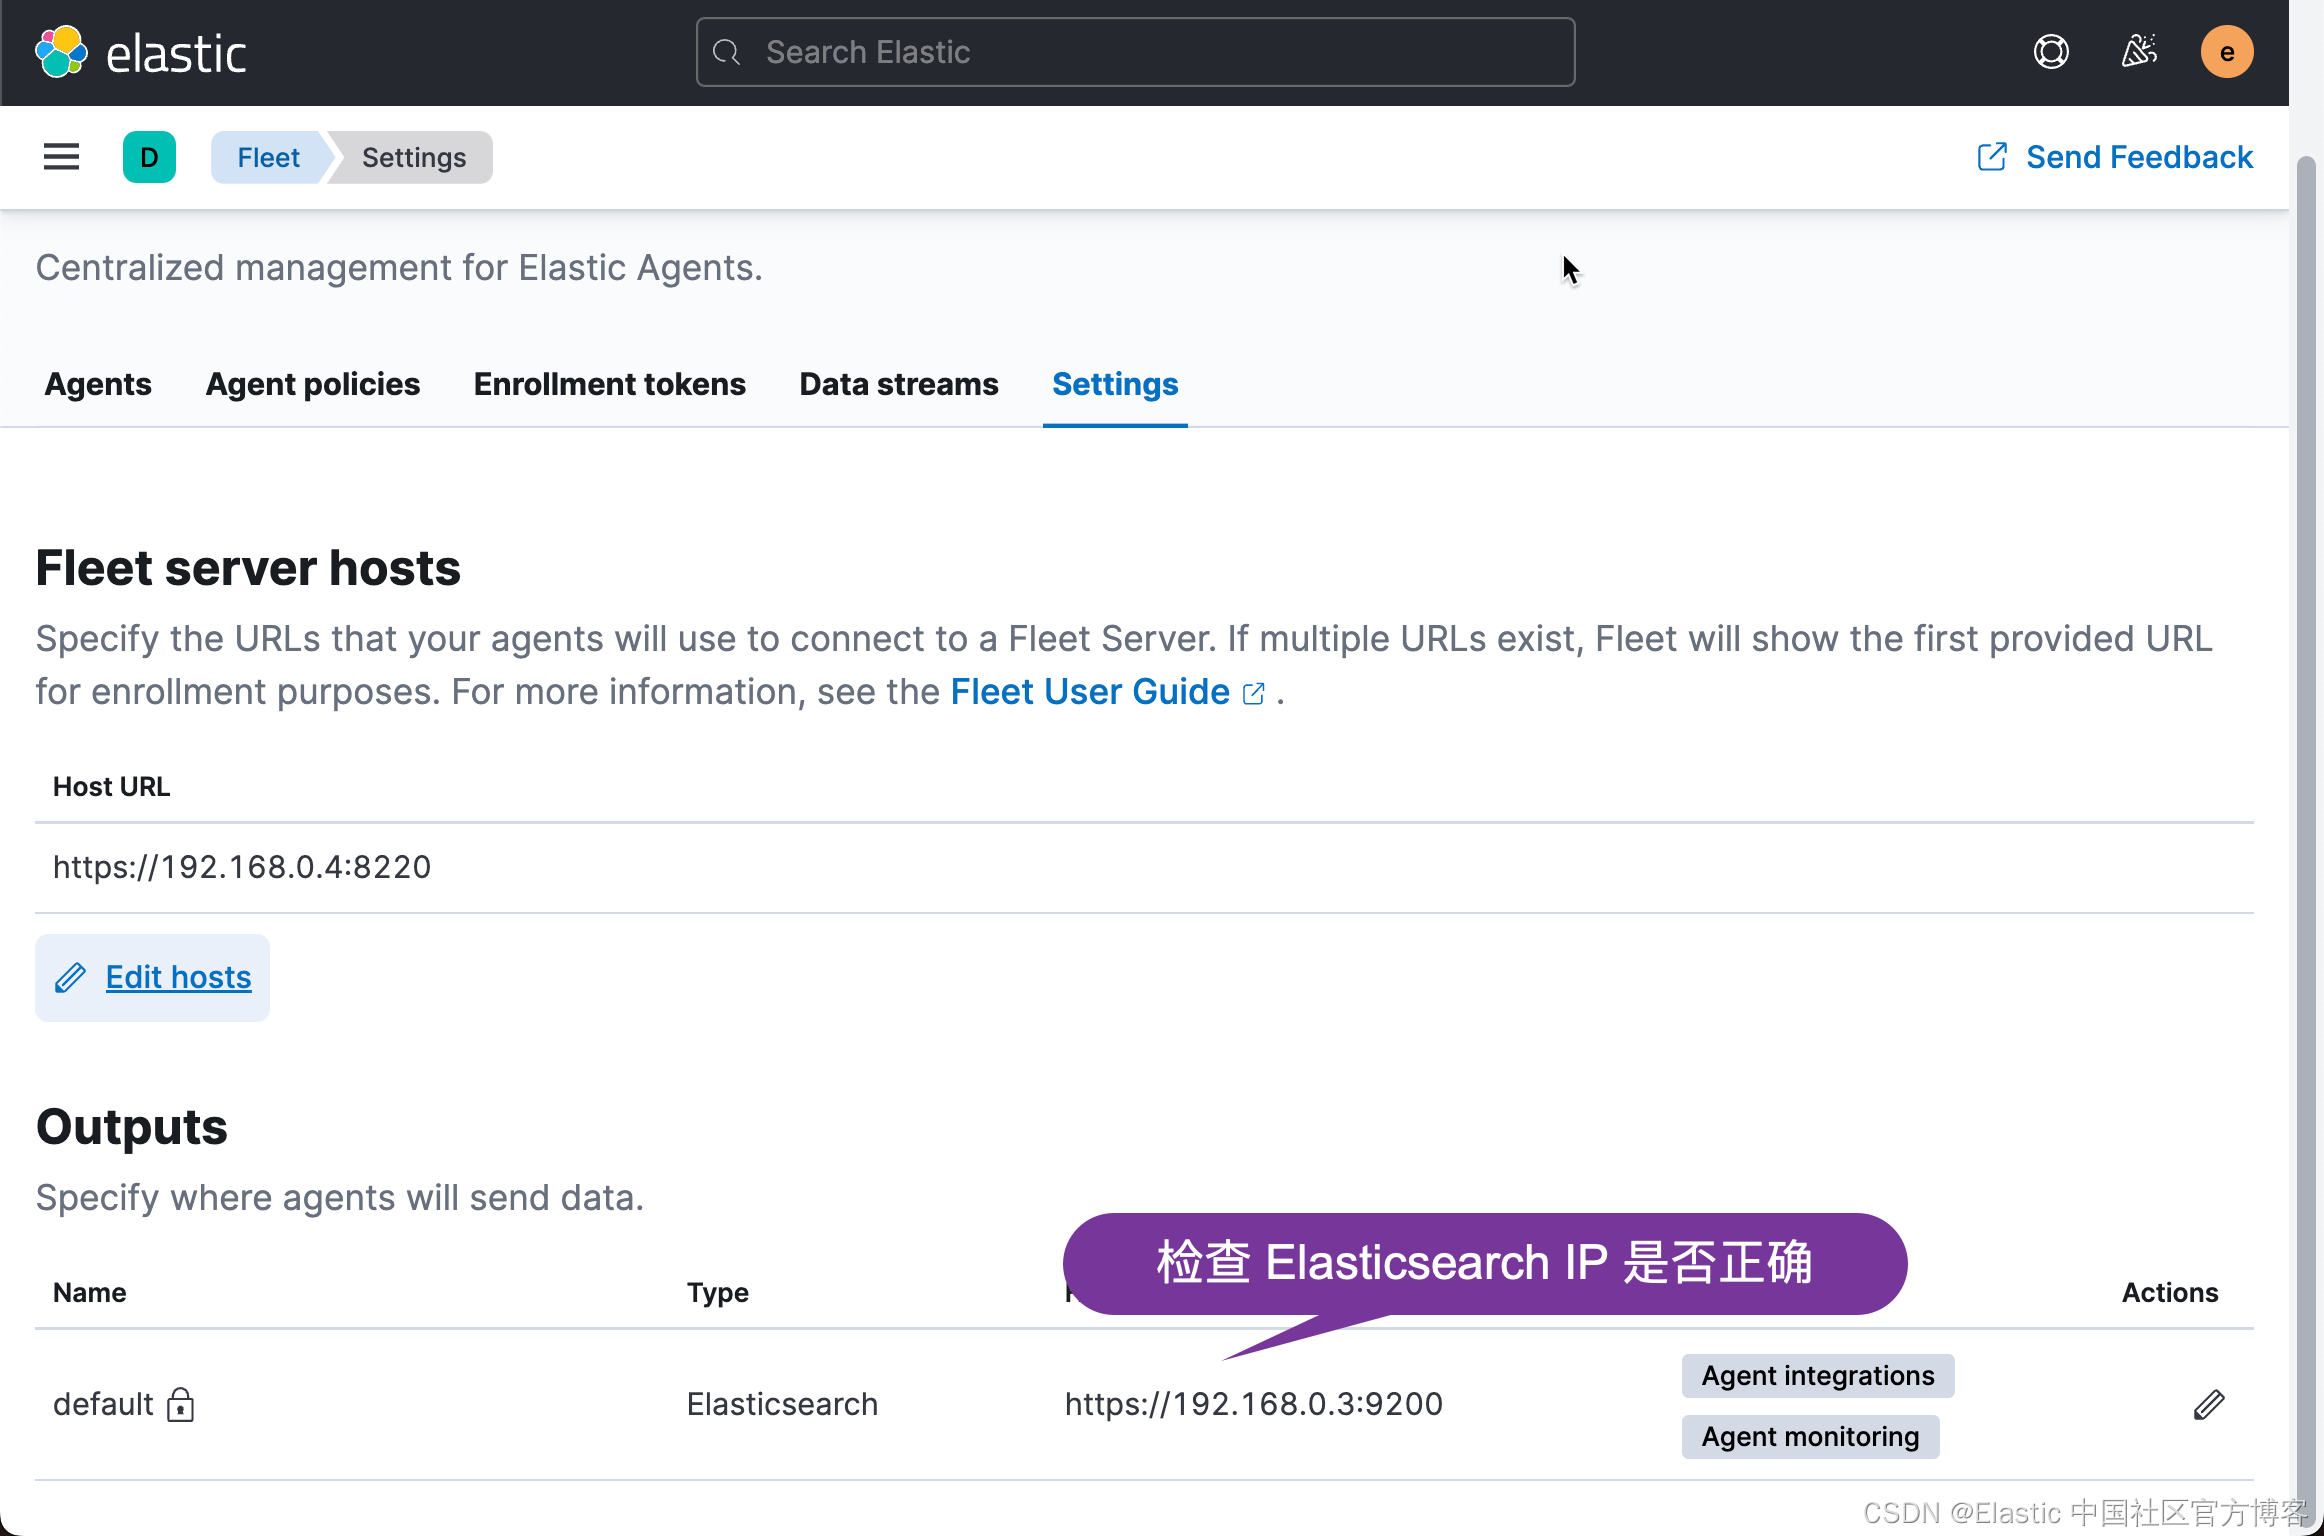
我们参考我之前的文章 “Elastic Stack 8.0 安装 - 保护你的 Elastic Stack 现在比以往任何时候都简单”。我们按照里面的步骤按照好 Elasticsearch 及 Kibana。Elasticsearch 的访问带有 https 安全配置。
为了能够让 fleet 正常工作,内置的 API service 必须启动。我们必须为 Elasticsearch 的配置文件 config/elasticsearch.yml 文件配置:
xpack.security.authc.api_key.enabled: true配置完后,我们再重新启动 Elasticsearch。针对 Kibana,我们也需要做一个额外的配置。我们需要修改 config/kibana.yml 文件。在这个文件的最后面,添加如下的一行:
xpack.encryptedSavedObjects.encryptionKey: 'fhjskloppd678ehkdfdlliverpoolfcr'如果你不想使用上面的这个设置,你可以使用如下的方式来获得:
./bin/kibana-encryption-keys generate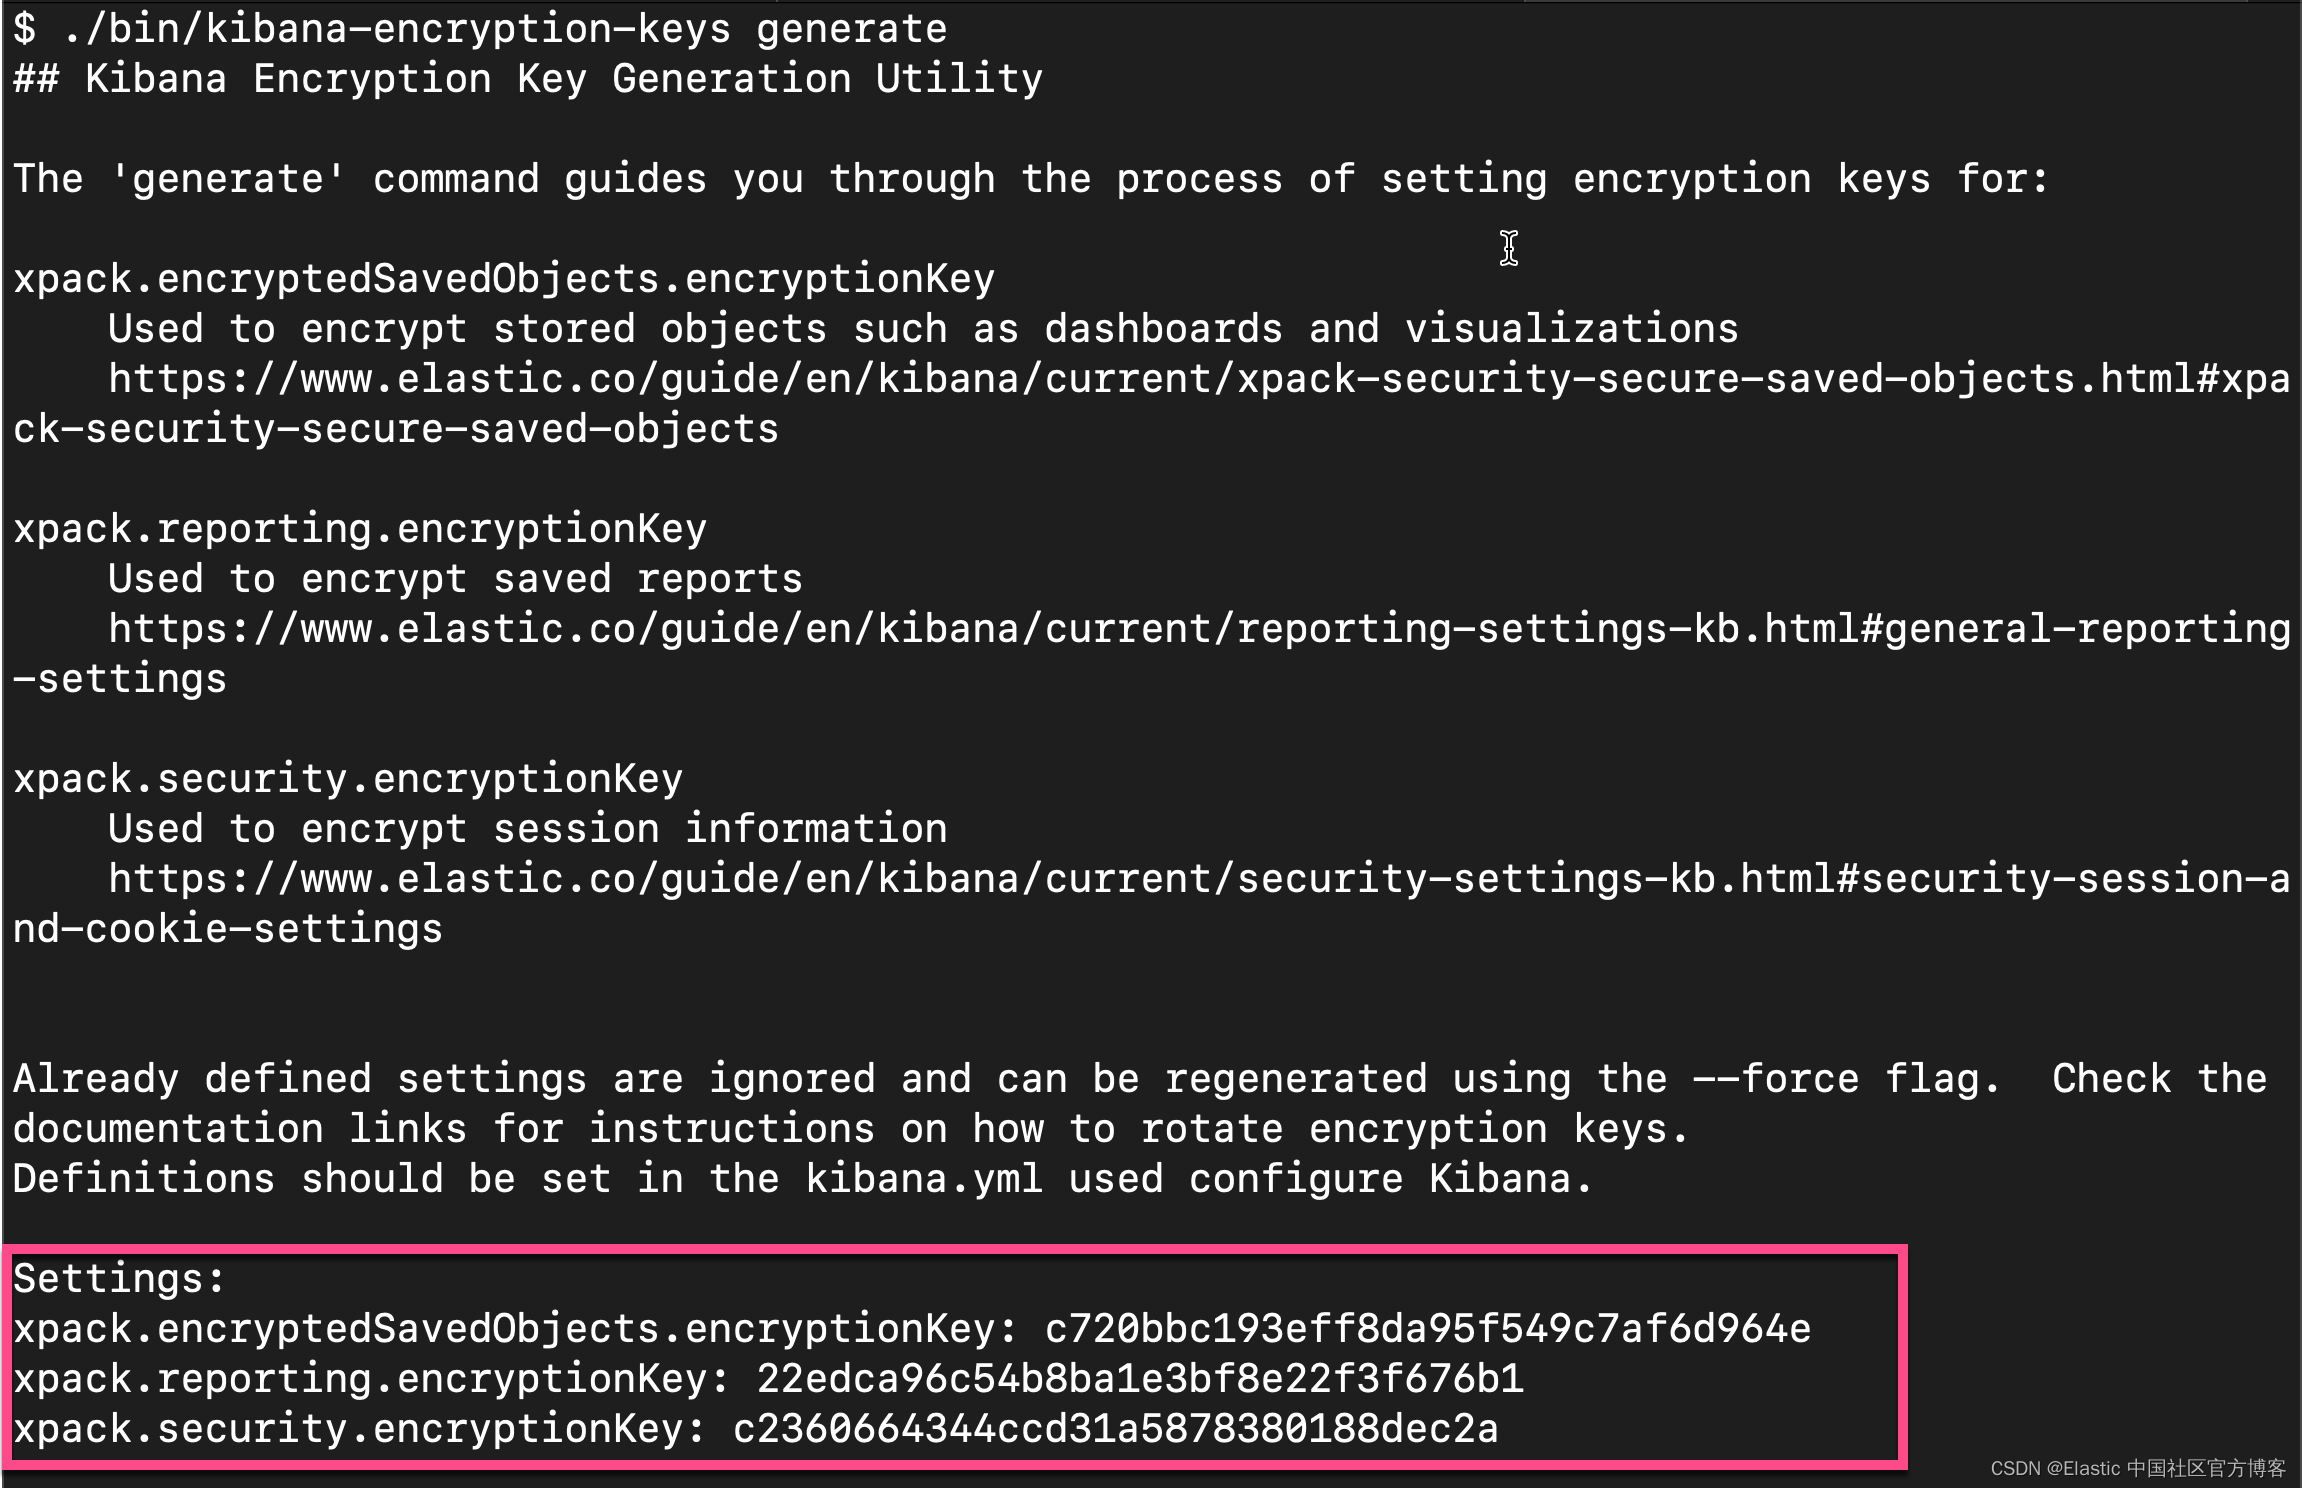
从上面的输出中,我们可以看出来,有三个输出的 key。我们可以把这三个同时拷贝,并添加到 config/kibana.yml 文件的后面。当然,我们也可以只拷贝其中的一个也可。我们再重新启动 Kibana。
这样我们对 Elasticsearch 及 Kibana 的配置就完成。 针对 Elastic Stack 8.0 以前的版本安装,请阅读我之前的文章 “Observability:如何在最新的 Elastic Stack 中使用 Fleet 摄入 system 日志及指标”。
除此之外,Kibana 需要 Internet 连接才能从 Elastic Package Registry 下载集成包。 确保 Kibana 服务器可以连接到https://epr.elastic.co 的端口 443 上 。如果你的环境有网络流量限制,有一些方法可以解决此要求。 有关详细信息,请参阅气隙环境。
目前,Fleet 只能被具有 superuser role 的用户所使用。
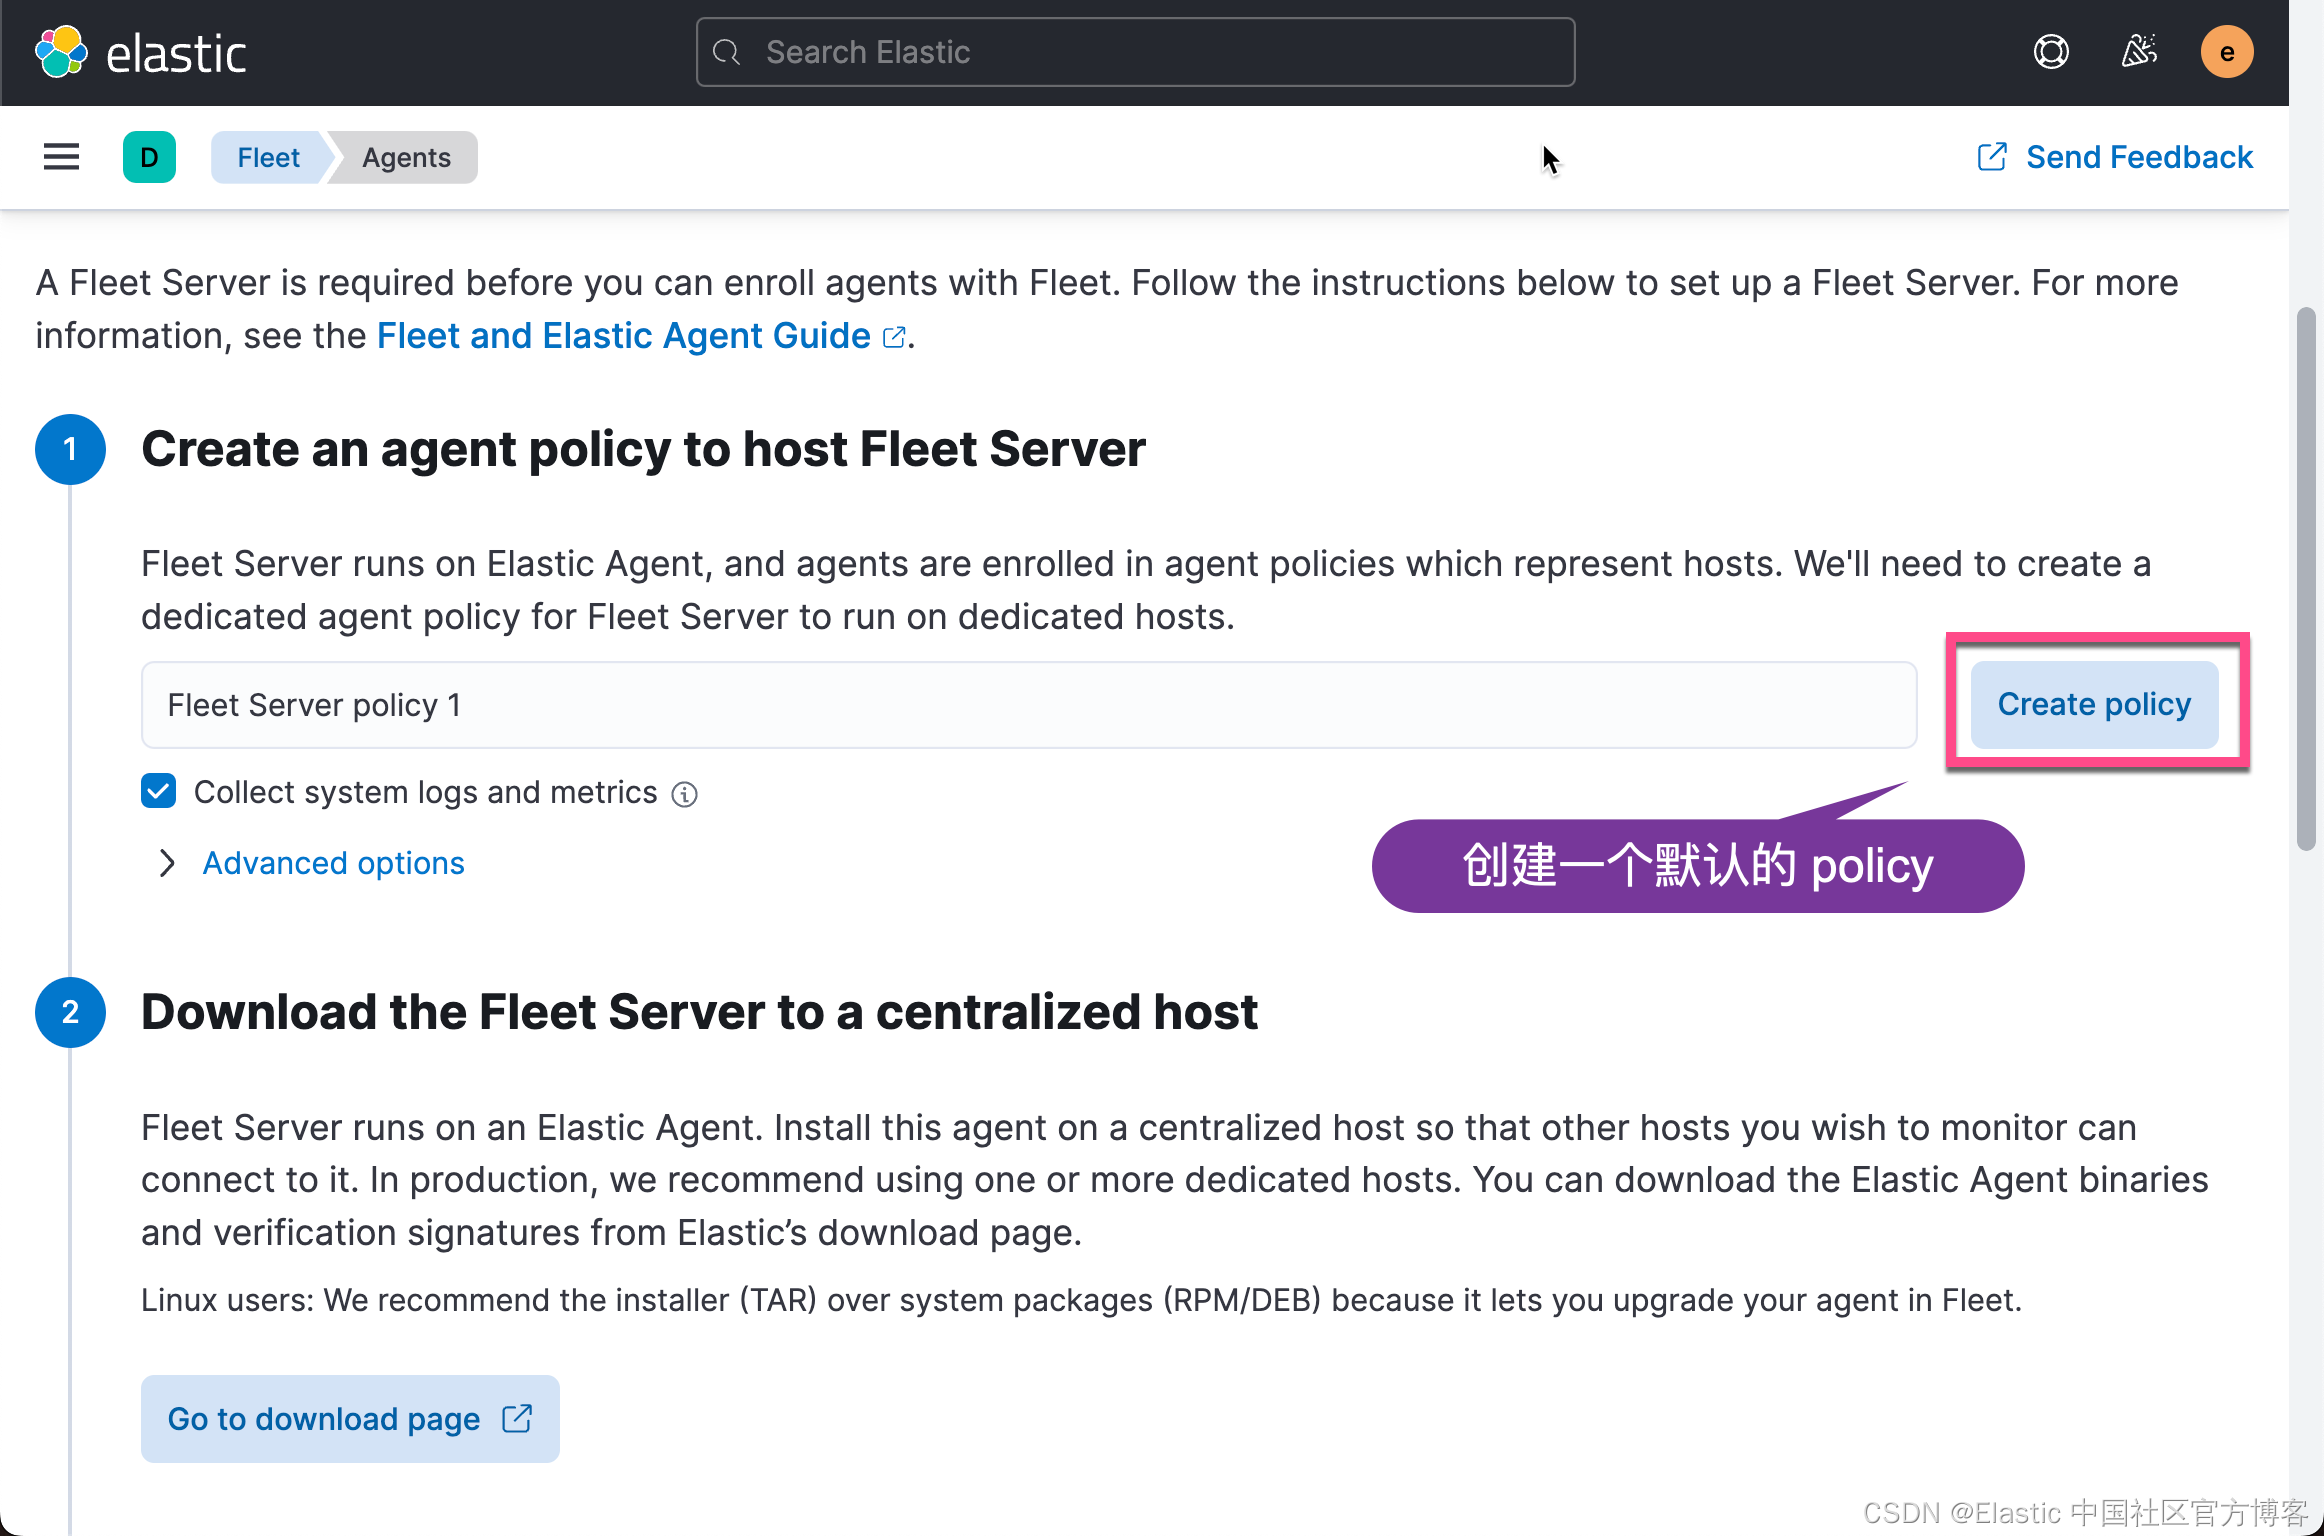
使用 Kibana 中的 Fleet 将日志、指标和安全数据导入 Elastic Stack。第一次使用 Fleet 时,你可能需要对其进行设置并添加 Fleet Server。

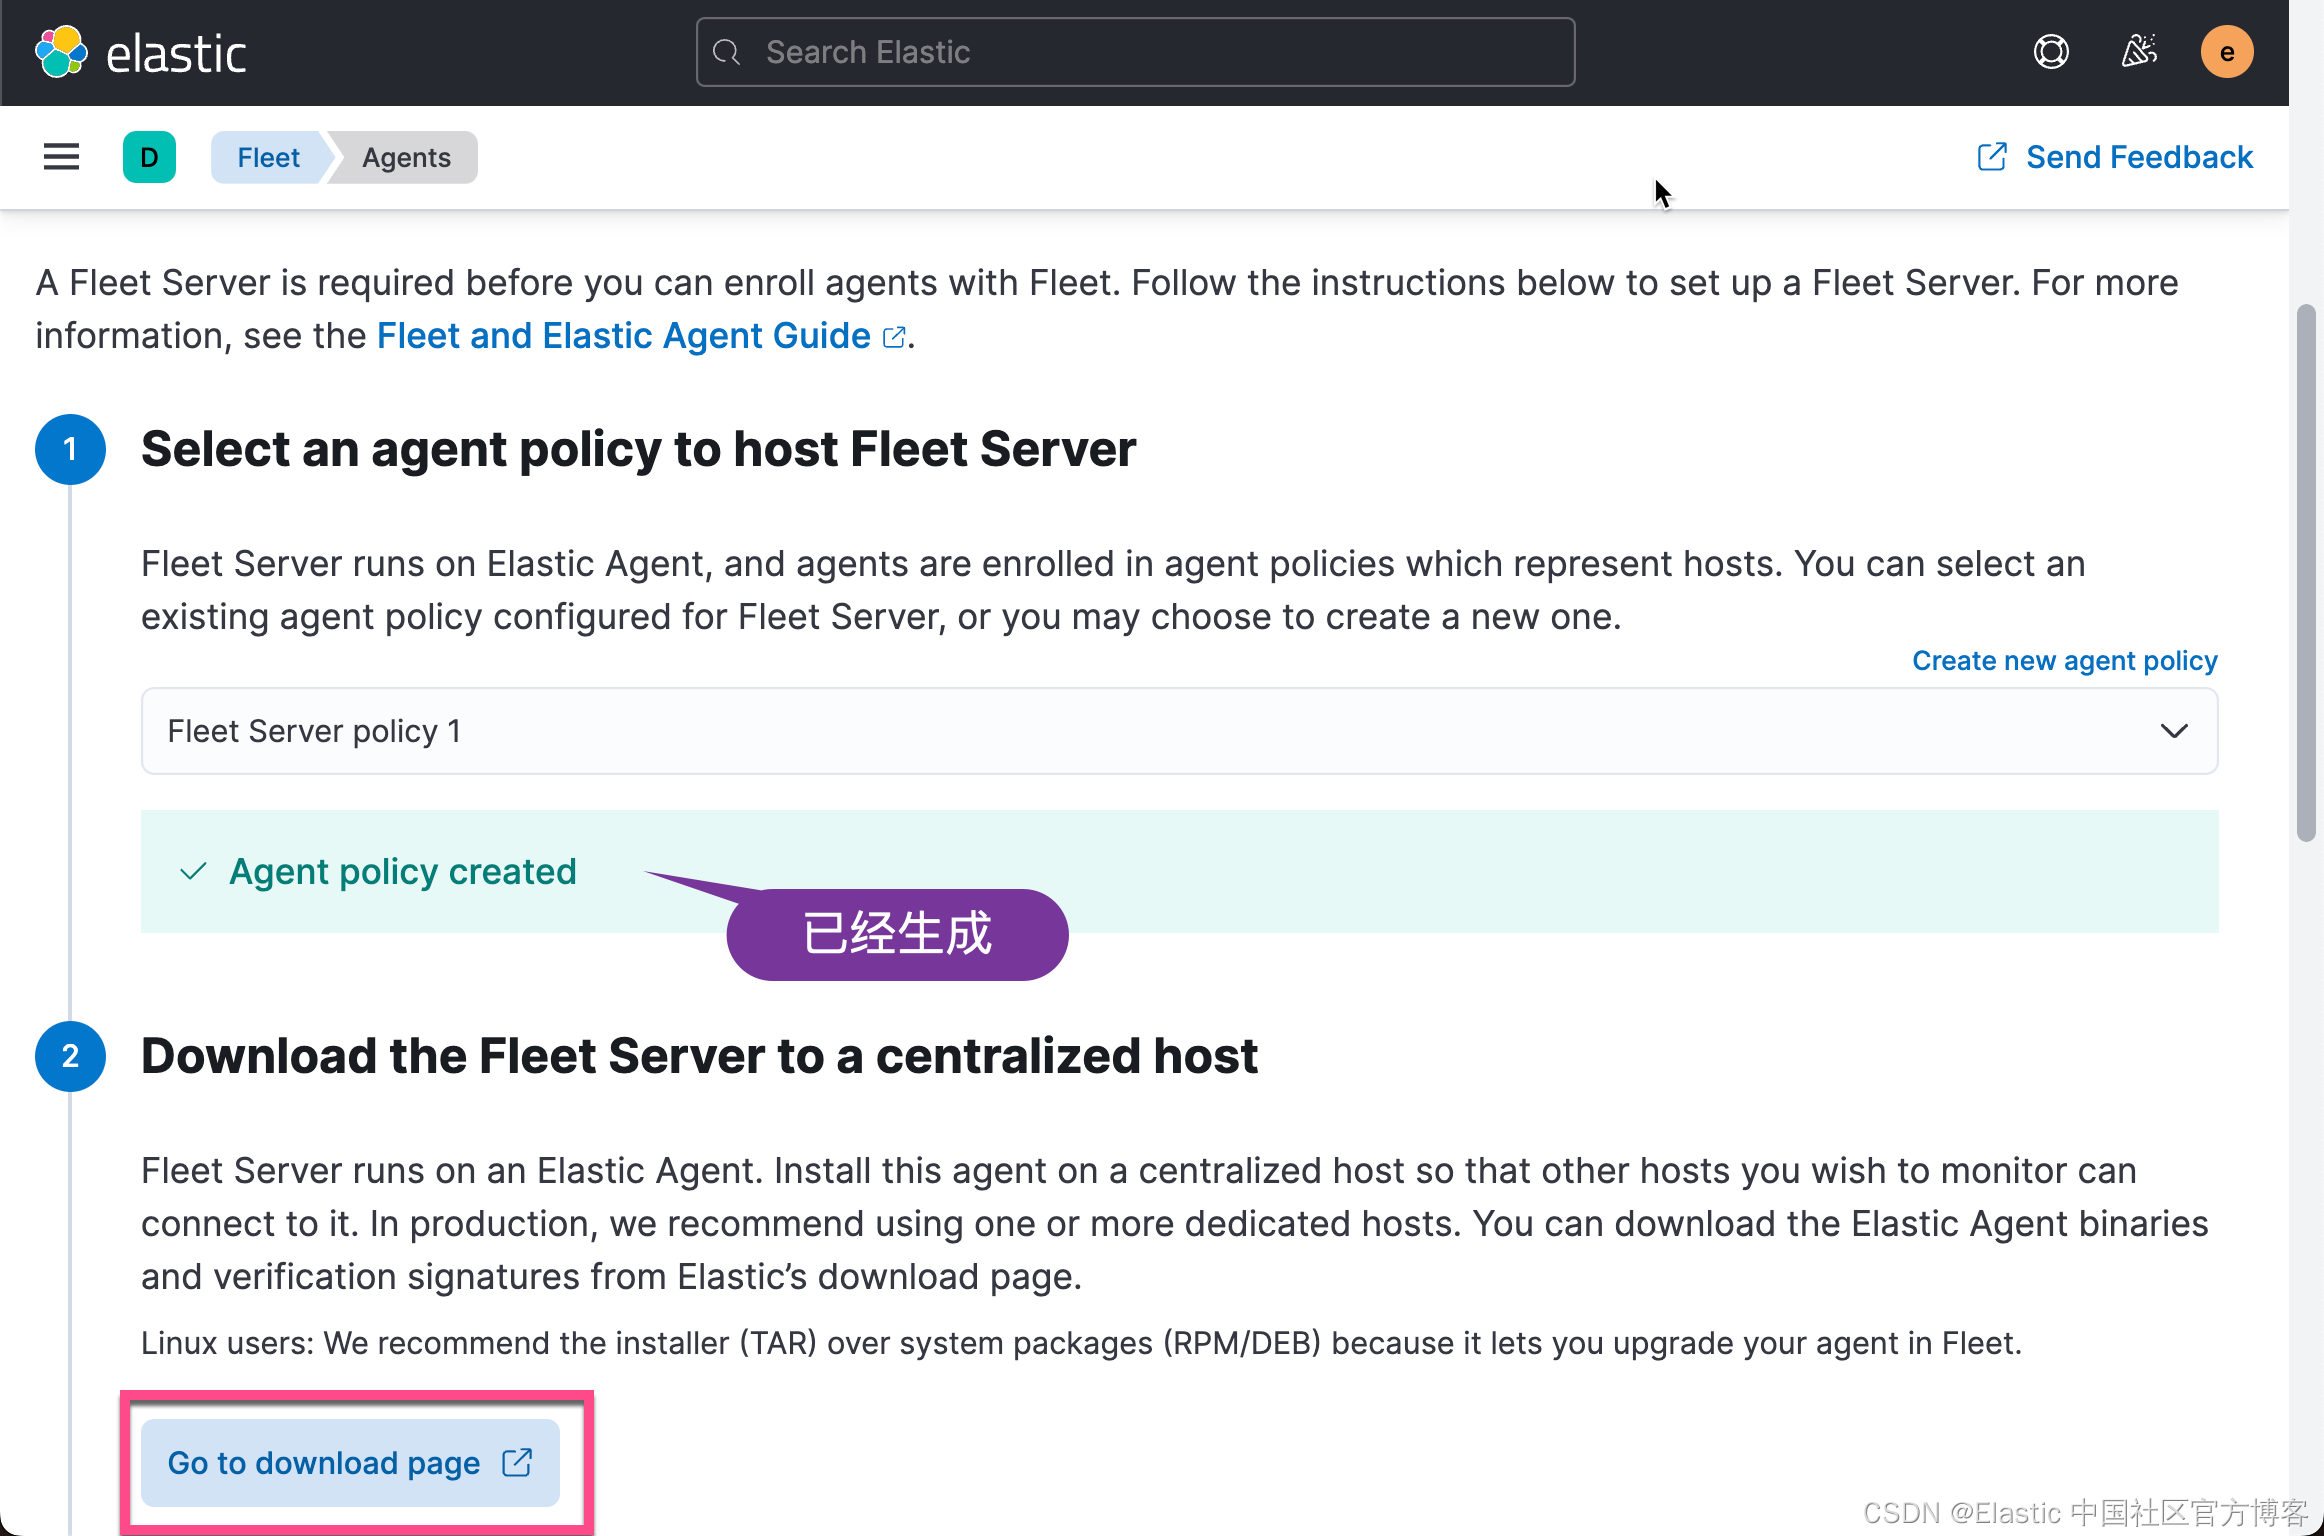
我们点击上面的链接去下载适合自己平台的 Elastic Agent:
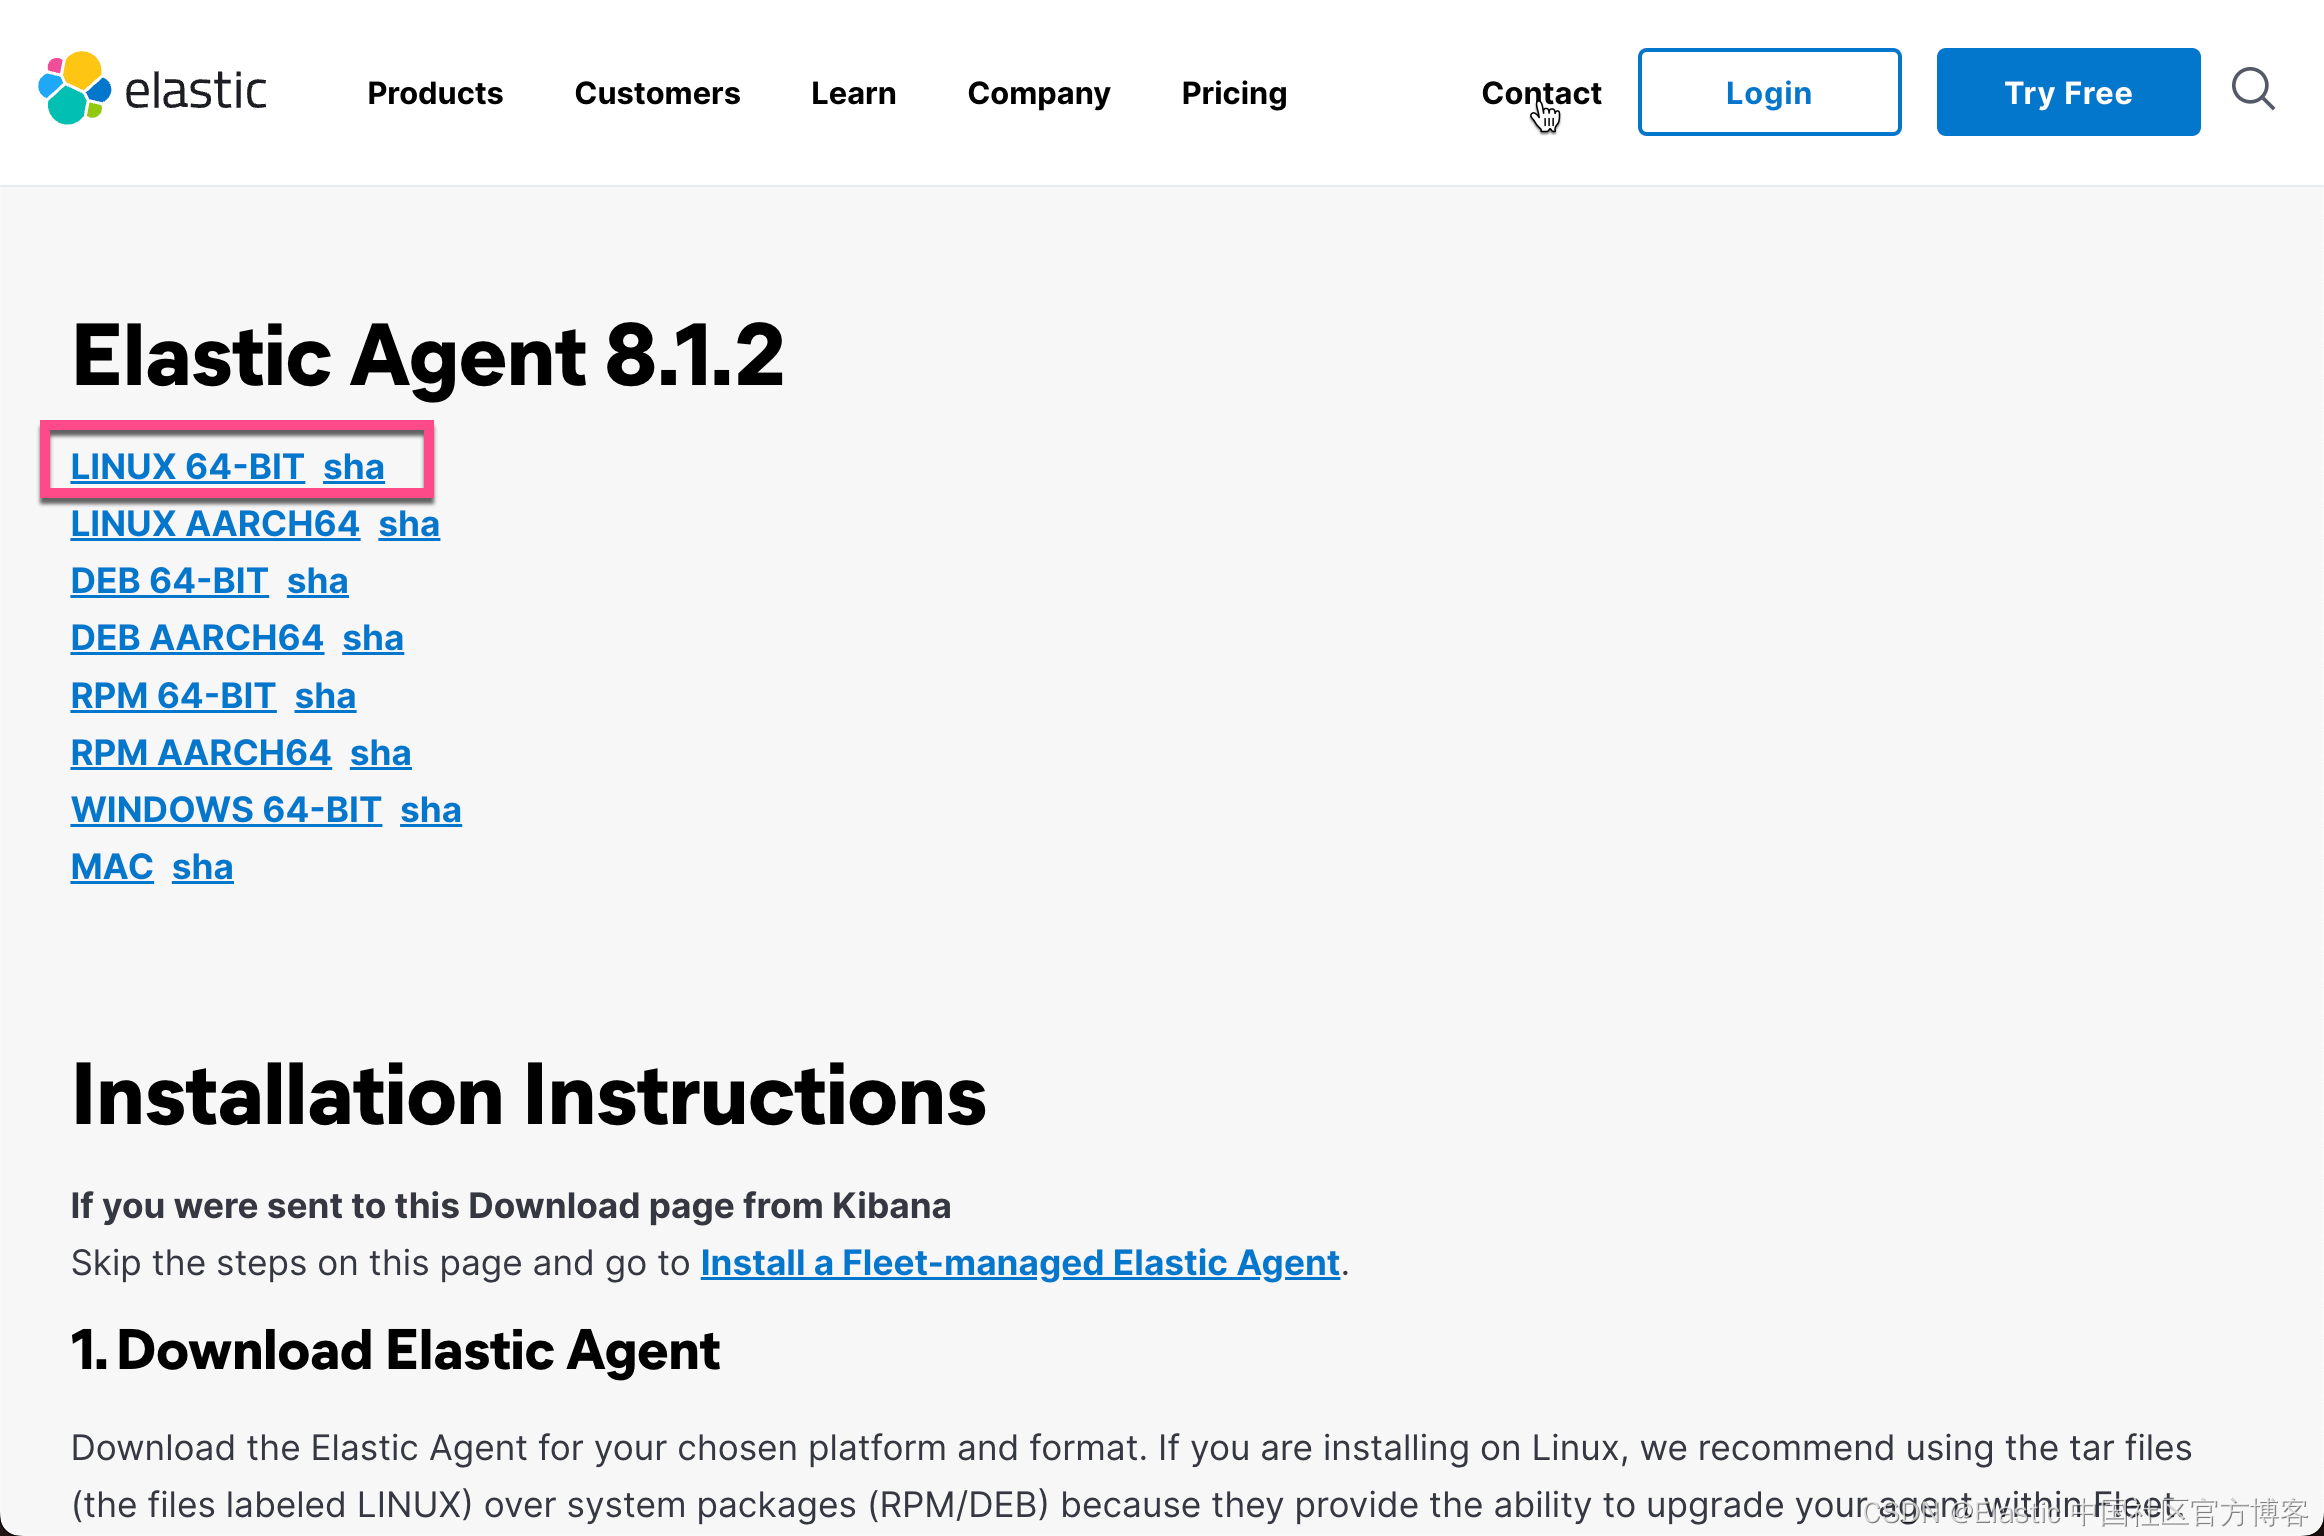
在 Ubuntu OS 机器的 terminal 中,我下载 LINUX 64-BIT:
wget https://artifacts.elastic.co/downloads/beats/elastic-agent/elastic-agent-8.1.2-linux-x86_64.tar.gz我们可以使用如下的命令连进行接压缩:
tar xzf elastic-agent-8.1.2-linux-x86_64.tar.gz然后,我们进入到安装目录:
liuxg@liuxgu:~/fleet$ pwd
/home/liuxg/fleet
liuxg@liuxgu:~/fleet$ cd elastic-agent-8.1.2-linux-x86_64/
我们再次回到 Fleet 的安装页面:
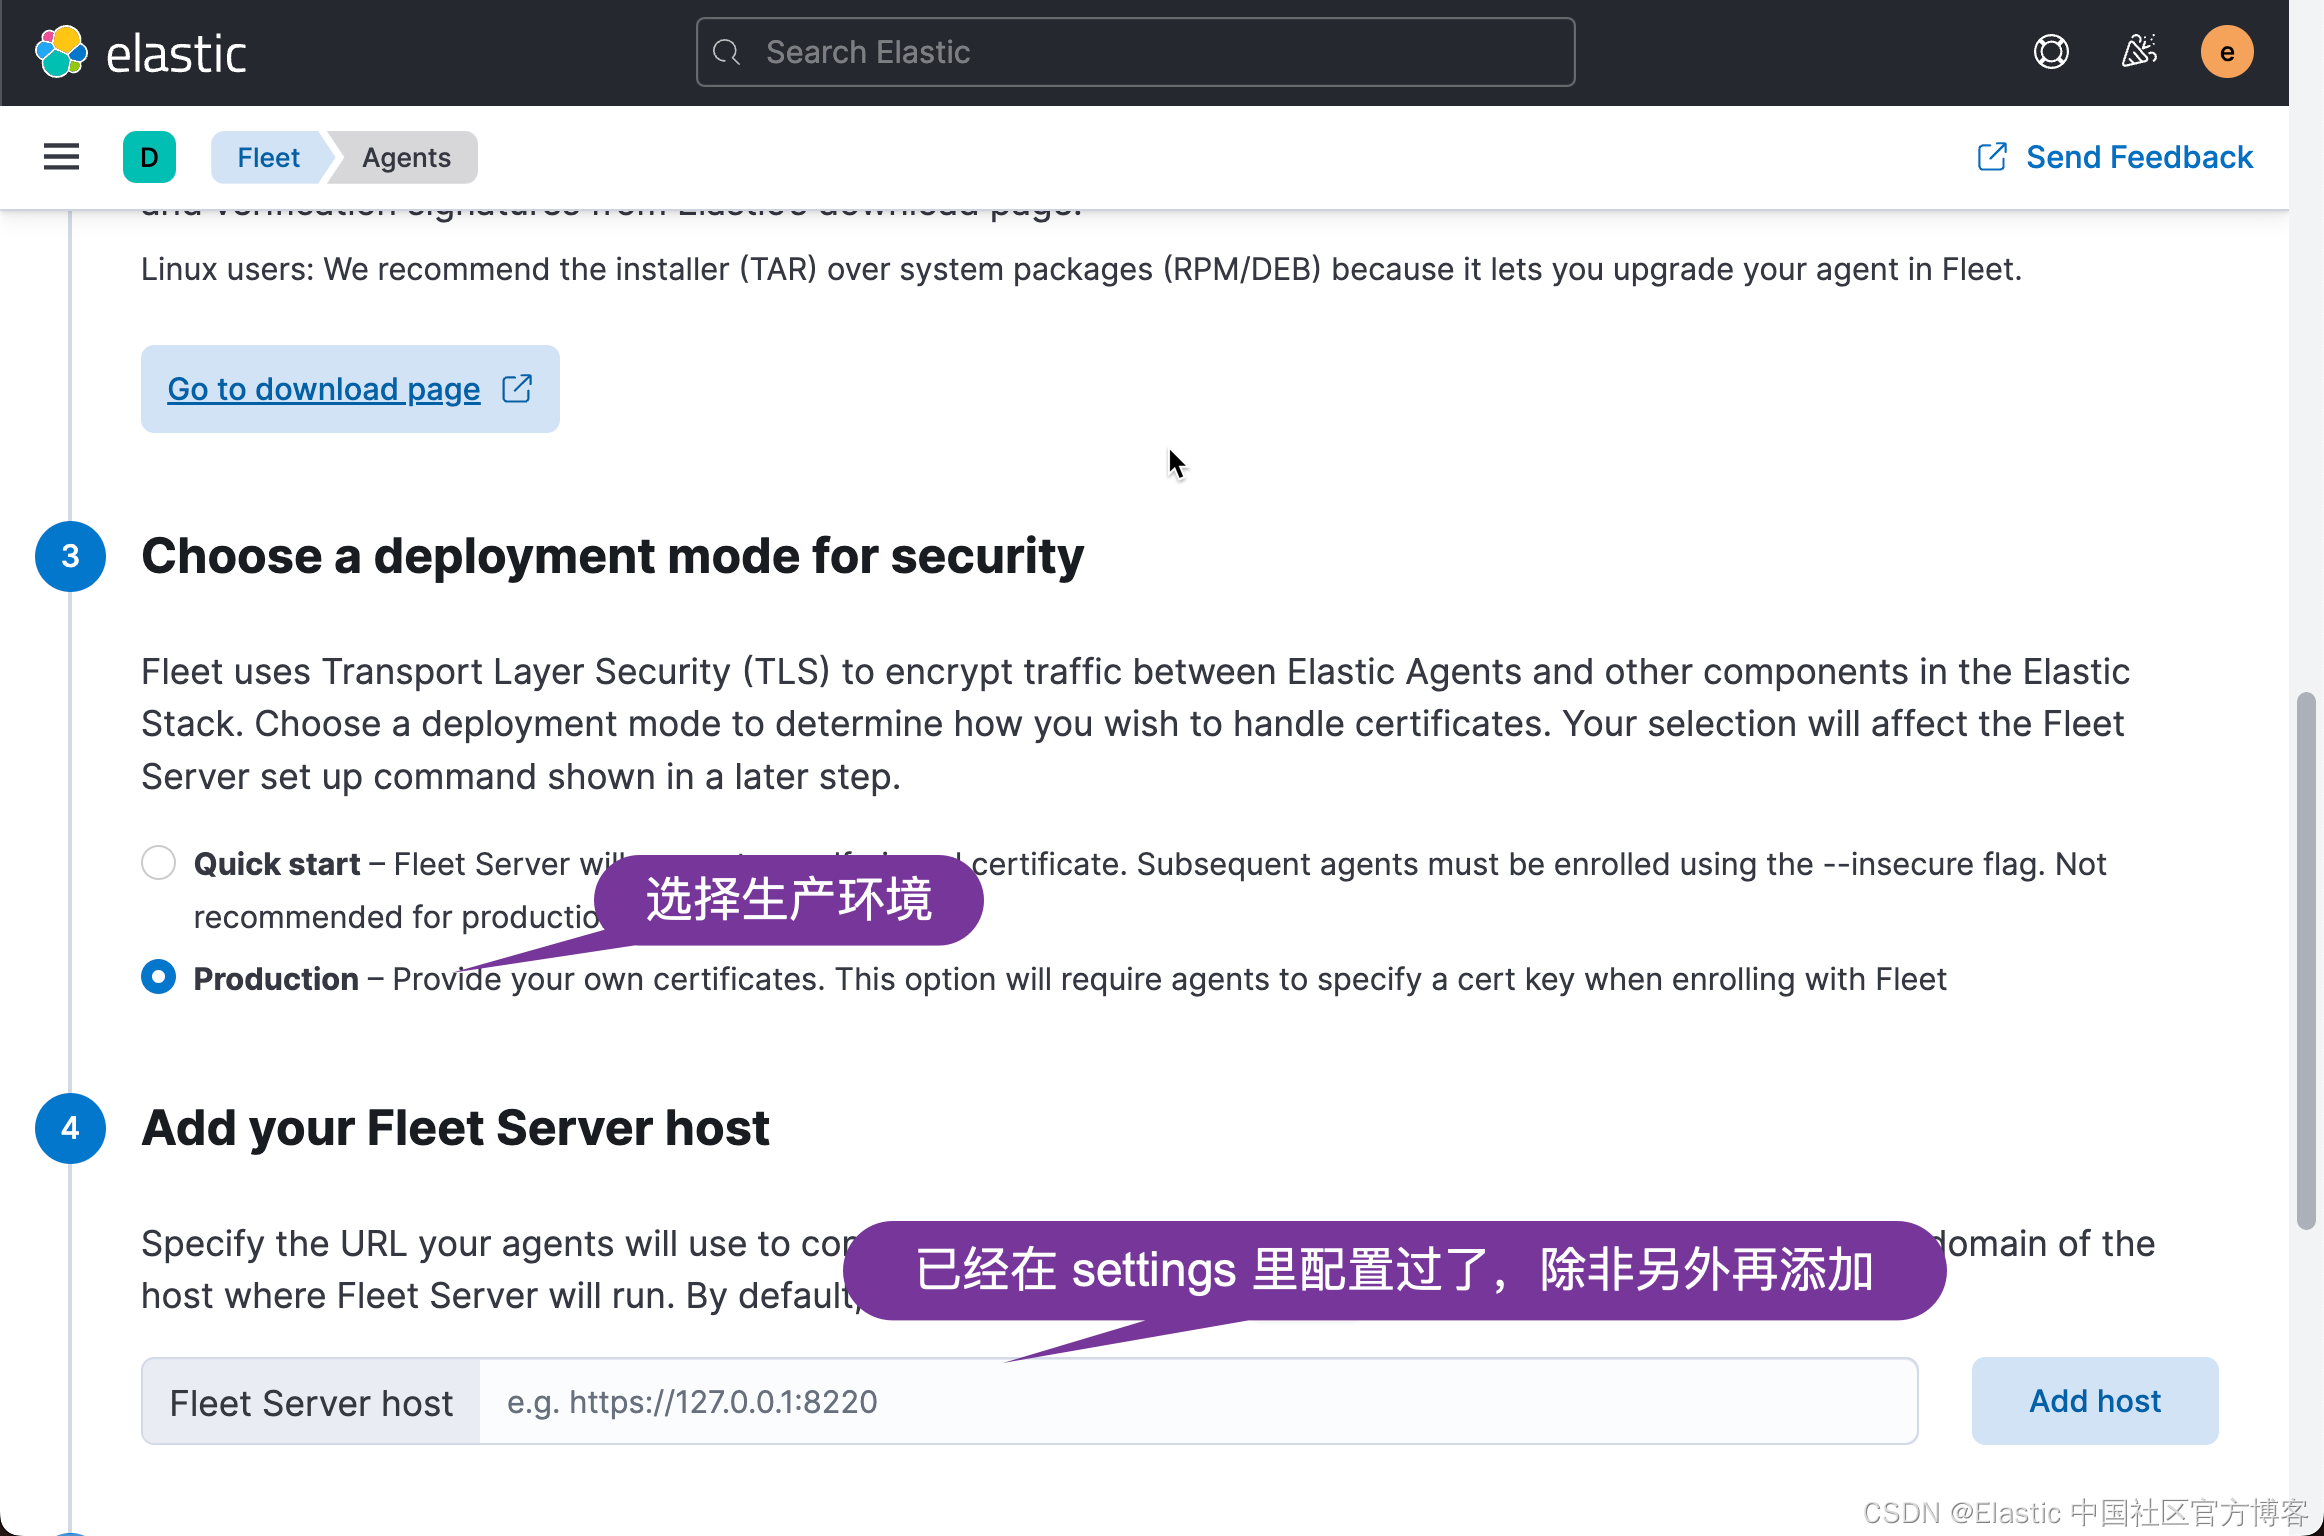

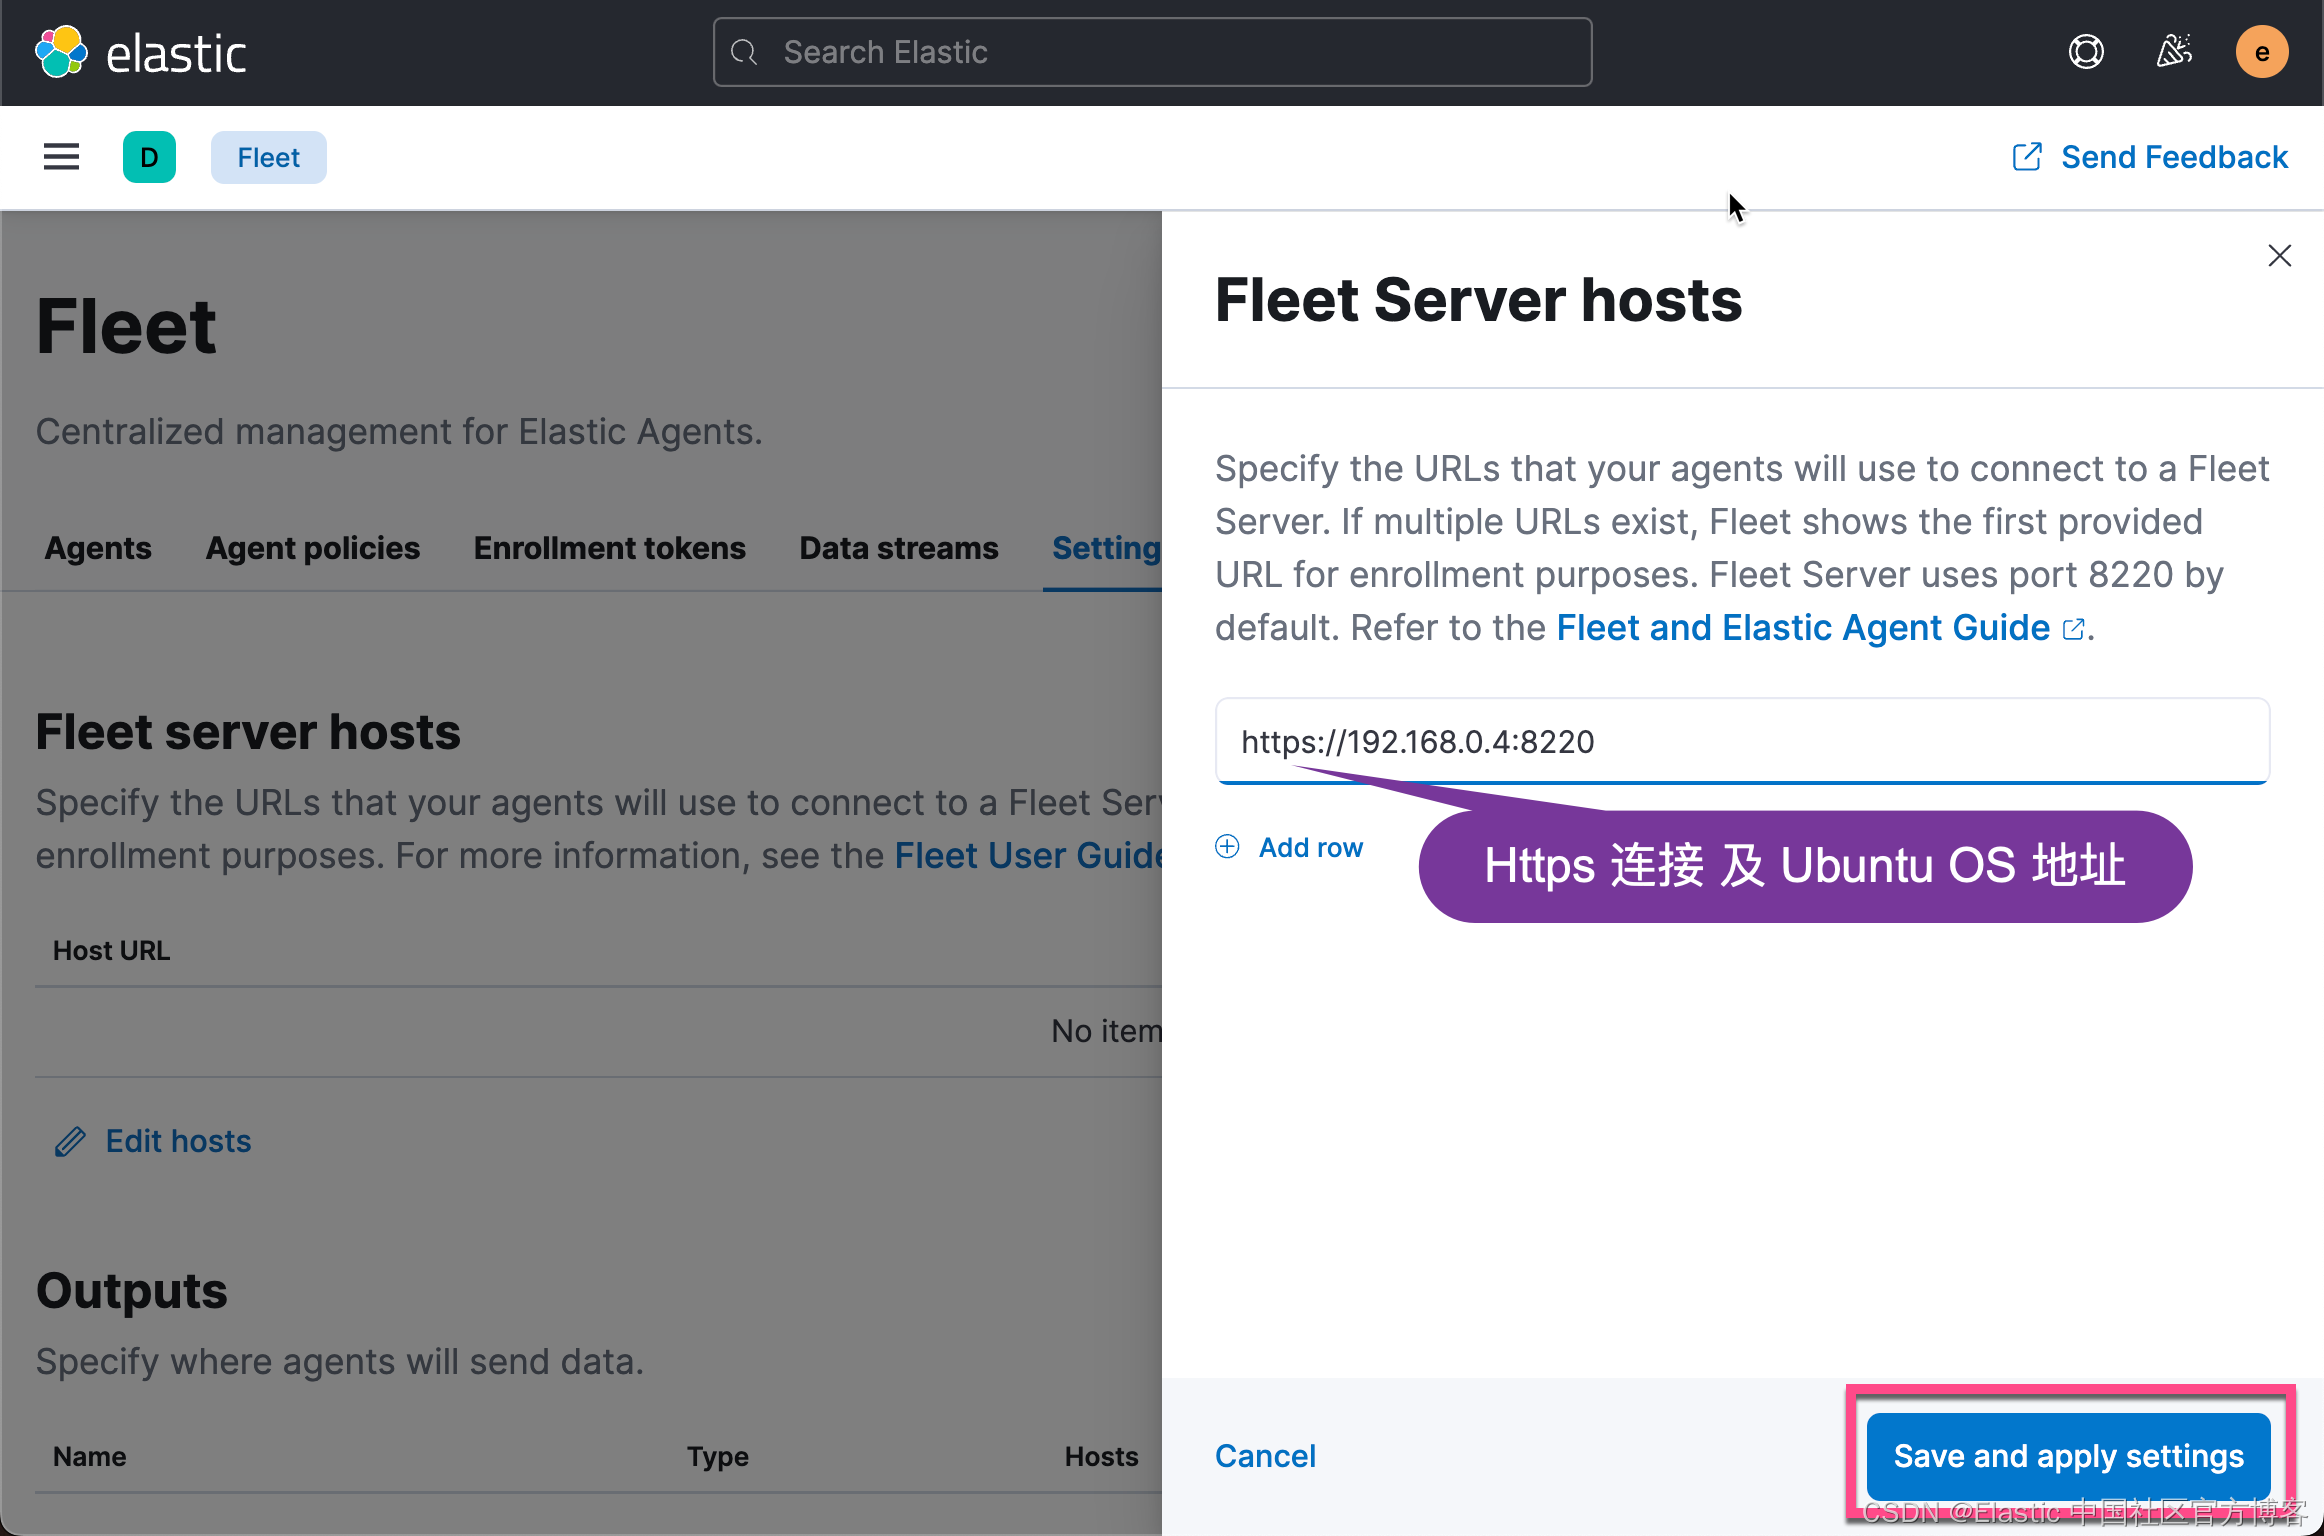
由于我们是为生产环境进行配置,为了确保 fleet server 和 elastic agent 之间的安全连接,我们必须为它生成证书。
为此,我们在 macOS 的新的 terminal 中打入如下的命令:
$ pwd
/Users/liuxg/test/elasticsearch-8.1.2
$ ./bin/elasticsearch-certutil ca --pem
This tool assists you in the generation of X.509 certificates and certificate
signing requests for use with SSL/TLS in the Elastic stack.

The 'ca' mode generates a new 'certificate authority'
This will create a new X.509 certificate and private key that can be used
to sign certificate when running in 'cert' mode.

Use the 'ca-dn' option if you wish to configure the 'distinguished name'
of the certificate authority

By default the 'ca' mode produces a single PKCS#12 output file which holds:
    * The CA certificate
    * The CA's private key

If you elect to generate PEM format certificates (the -pem option), then the output will
be a zip file containing individual files for the CA certificate and private key

Please enter the desired output file [elastic-stack-ca.zip]:
$ ls
LICENSE.txt          bin                  elastic-stack-ca.zip logs
NOTICE.txt           config               jdk.app              modules
README.asciidoc      data                 lib                  plugins
$ unzip elastic-stack-ca.zip
Archive:  elastic-stack-ca.zip
   creating: ca/
  inflating: ca/ca.crt
  inflating: ca/ca.key
如上所示,我们生成了一个叫做 elastic-stack-ca.zip 文件。我们通过 unzip 命令来解压缩。我们可以清楚地看到文件 elastic-stack-ca.zip 中含有 ca.crt 及 ca.key CA 证书信息。
接下来,我们使用 CA 来为 Fleet Server 生成证书:
./bin/elasticsearch-certutil cert \
  --name fleet-server \
  --ca-cert /path/to/ca/ca.crt \
  --ca-key /path/to/ca/ca.key \
  --dns your.host.name.here \
  --ip 192.0.2.1 \
  --pem
针对我的情况:
  ./bin/elasticsearch-certutil cert \
  --name fleet-server \
  --ca-cert ca/ca.crt \
  --ca-key ca/ca.key \
  --dns liuxgu \
  --ip 192.168.0.4 \
  --pem
$ ./bin/elasticsearch-certutil cert \
> --name fleet-server \
> --ca-cert ca/ca.crt \
> --ca-key ca/ca.key \
> --dns liuxgu \
> --ip 192.168.0.4 \
> --pem
This tool assists you in the generation of X.509 certificates and certificate
signing requests for use with SSL/TLS in the Elastic stack.
The 'cert' mode generates X.509 certificate and private keys.
* By default, this generates a single certificate and key for use
on a single instance.
* The '-multiple' option will prompt you to enter details for multiple
instances and will generate a certificate and key for each one
* The '-in' option allows for the certificate generation to be automated by describing
the details of each instance in a YAML file
* An instance is any piece of the Elastic Stack that requires an SSL certificate.
Depending on your configuration, Elasticsearch, Logstash, Kibana, and Beats
may all require a certificate and private key.
* The minimum required value for each instance is a name. This can simply be the
hostname, which will be used as the Common Name of the certificate. A full
distinguished name may also be used.
* A filename value may be required for each instance. This is necessary when the
name would result in an invalid file or directory name. The name provided here
is used as the directory name (within the zip) and the prefix for the key and
certificate files. The filename is required if you are prompted and the name
is not displayed in the prompt.
* IP addresses and DNS names are optional. Multiple values can be specified as a
comma separated string. If no IP addresses or DNS names are provided, you may
disable hostname verification in your SSL configuration.
* All certificates generated by this tool will be signed by a certificate authority (CA)
unless the --self-signed command line option is specified.
The tool can automatically generate a new CA for you, or you can provide your own with
the --ca or --ca-cert command line options.
By default the 'cert' mode produces a single PKCS#12 output file which holds:
* The instance certificate
* The private key for the instance certificate
* The CA certificate
If you specify any of the following options:
* -pem (PEM formatted output)
* -multiple (generate multiple certificates)
* -in (generate certificates from an input file)
then the output will be be a zip file containing individual certificate/key files
Please enter the desired output file [certificate-bundle.zip]:
Certificates written to /Users/liuxg/test/elasticsearch-8.1.2/certificate-bundle.zip
This file should be properly secured as it contains the private key for
your instance.
After unzipping the file, there will be a directory for each instance.
Each instance has a certificate and private key.
For each Elastic product that you wish to configure, you should copy
the certificate, key, and CA certificate to the relevant configuration directory
and then follow the SSL configuration instructions in the product guide.
For client applications, you may only need to copy the CA certificate and
configure the client to trust this certificate.上述命令将生成一个叫做 certificate-bundle.zip 的文件。
接下来,我们把 ca.crt 及 certificate-bundle.zip 拷贝到 Ubuntu OS 机器上的 elastic agent 安装目录中。
liuxg@liuxgu:~/fleet/elastic-agent-8.1.2-linux-x86_64$ pwd
/home/liuxg/fleet/elastic-agent-8.1.2-linux-x86_64
liuxg@liuxgu:~/fleet/elastic-agent-8.1.2-linux-x86_64$ ls
LICENSE.txt  ca.crt                  elastic-agent                fleet.yml       output.pem
NOTICE.txt   certificate-bundle.zip  elastic-agent.reference.yml  fleet.yml.lock
README.md    data                    elastic-agent.yml            http_ca.crt
如上所示,在 Ubuntu 机器上,我们可以看到 ca.crt 文件 及 certificate-bundle.zip。我们通过如下的命令来解压缩 certificate-bundle.zip 文件:
liuxg@liuxgu:~/fleet/elastic-agent-8.1.2-linux-x86_64$ unzip certificate-bundle.zip
Archive:  certificate-bundle.zip
   creating: fleet-server/
  inflating: fleet-server/fleet-server.crt
  inflating: fleet-server/fleet-server.key
我们可以看到有 fleet-server 目录被生成。里面含有所有的证书信息。
我们接下来拷贝下来 Kibana 中的安装信息,并做相应的修改:
sudo ./elastic-agent install --url=https://192.168.0.4:8220 \
  --fleet-server-es=https://192.168.0.3:9200 \
  --fleet-server-service-token=AAEAAWVsYXN0aWMvZmxlZXQtc2VydmVyL3Rva2VuLTE2NTEzNjk3NTIxNzQ6aXZVUHltTXhTZXlWaDNzd1hGVGlCZw \
  --fleet-server-policy=fleet-server-policy \
  --fleet-server-es-ca-trusted-fingerprint=0eee78cb2faee1556848acd6a9d3b3c828bd57d1eeb442834d047110a75c975e \
  --certificate-authorities=/home/liuxg/fleet/elastic-agent-8.1.2-linux-x86_64/ca.crt \
  --fleet-server-cert=/home/liuxg/fleet/elastic-agent-8.1.2-linux-x86_64/fleet-server/fleet-server.crt \
  --fleet-server-cert-key=/home/liuxg/fleet/elastic-agent-8.1.2-linux-x86_64/fleet-server/fleet-server.key
我们把相应的路径添加上,并在安装目录下运行:
liuxg@liuxgu:~/fleet/elastic-agent-8.1.2-linux-x86_64$ sudo ./elastic-agent install --url=https://192.168.0.4:8220 \
>   --fleet-server-es=https://192.168.0.3:9200 \
>   --fleet-server-service-token=AAEAAWVsYXN0aWMvZmxlZXQtc2VydmVyL3Rva2VuLTE2NTEzNjk3NTIxNzQ6aXZVUHltTXhTZXlWaDNzd1hGVGlCZw \
>   --fleet-server-policy=fleet-server-policy \
>   --fleet-server-es-ca-trusted-fingerprint=0eee78cb2faee1556848acd6a9d3b3c828bd57d1eeb442834d047110a75c975e \
>   --certificate-authorities=/home/liuxg/fleet/elastic-agent-8.1.2-linux-x86_64/ca.crt \
>   --fleet-server-cert=/home/liuxg/fleet/elastic-agent-8.1.2-linux-x86_64/fleet-server/fleet-server.crt \
>   --fleet-server-cert-key=/home/liuxg/fleet/elastic-agent-8.1.2-linux-x86_64/fleet-server/fleet-server.key
Elastic Agent will be installed at /opt/Elastic/Agent and will run as a service. Do you want to continue? [Y/n]:
{"log.level":"info","@timestamp":"2022-05-01T10:06:57.258+0800","log.origin":{"file.name":"cmd/enroll_cmd.go","file.line":777},"message":"Fleet Server - Starting","ecs.version":"1.6.0"}
{"log.level":"info","@timestamp":"2022-05-01T10:06:59.261+0800","log.origin":{"file.name":"cmd/enroll_cmd.go","file.line":758},"message":"Fleet Server - Running on policy with Fleet Server integration: fleet-server-policy; missing config fleet.agent.id (expected during bootstrap process)","ecs.version":"1.6.0"}
{"log.level":"info","@timestamp":"2022-05-01T10:06:59.971+0800","log.origin":{"file.name":"cmd/enroll_cmd.go","file.line":455},"message":"Starting enrollment to URL: https://192.168.0.4:8220/","ecs.version":"1.6.0"}
{"log.level":"info","@timestamp":"2022-05-01T10:07:03.018+0800","log.origin":{"file.name":"cmd/enroll_cmd.go","file.line":255},"message":"Successfully triggered restart on running Elastic Agent.","ecs.version":"1.6.0"}
Successfully enrolled the Elastic Agent.
Elastic Agent has been successfully installed.
从上面,我们可以看出来,安装是成功的。我们再次回到 Kibana 的界面:
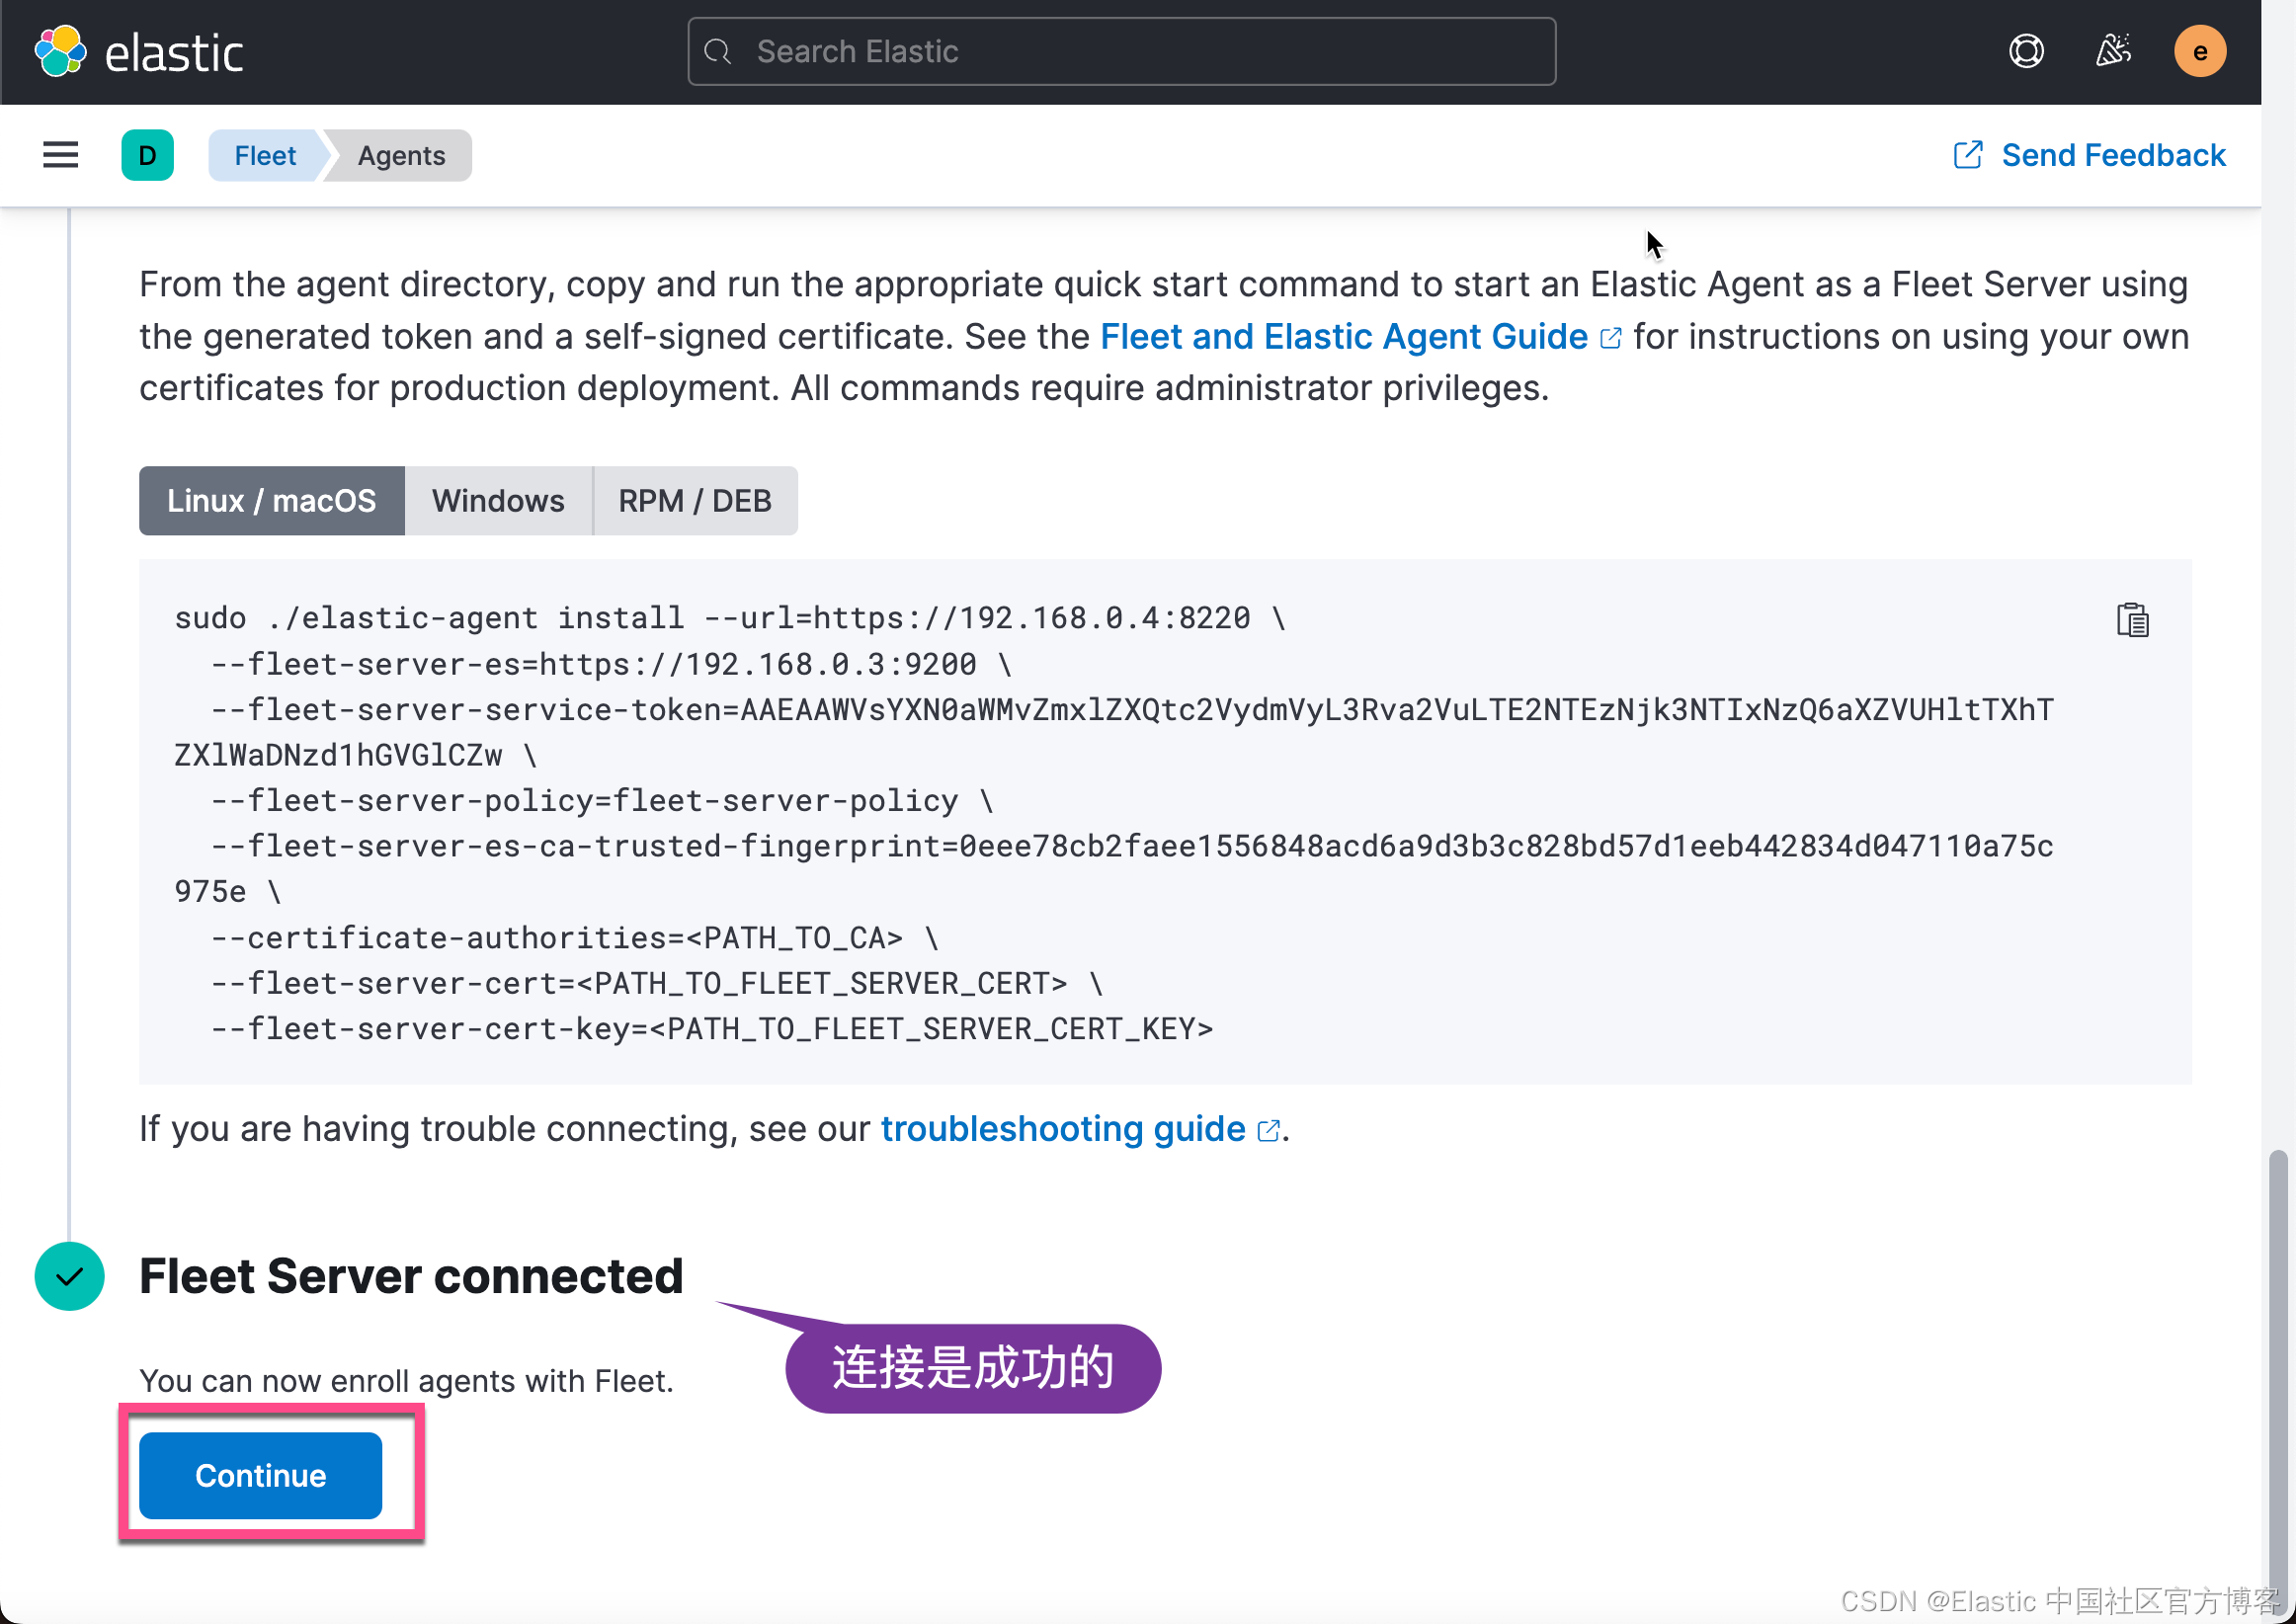
点击上面的 Continue 按钮:
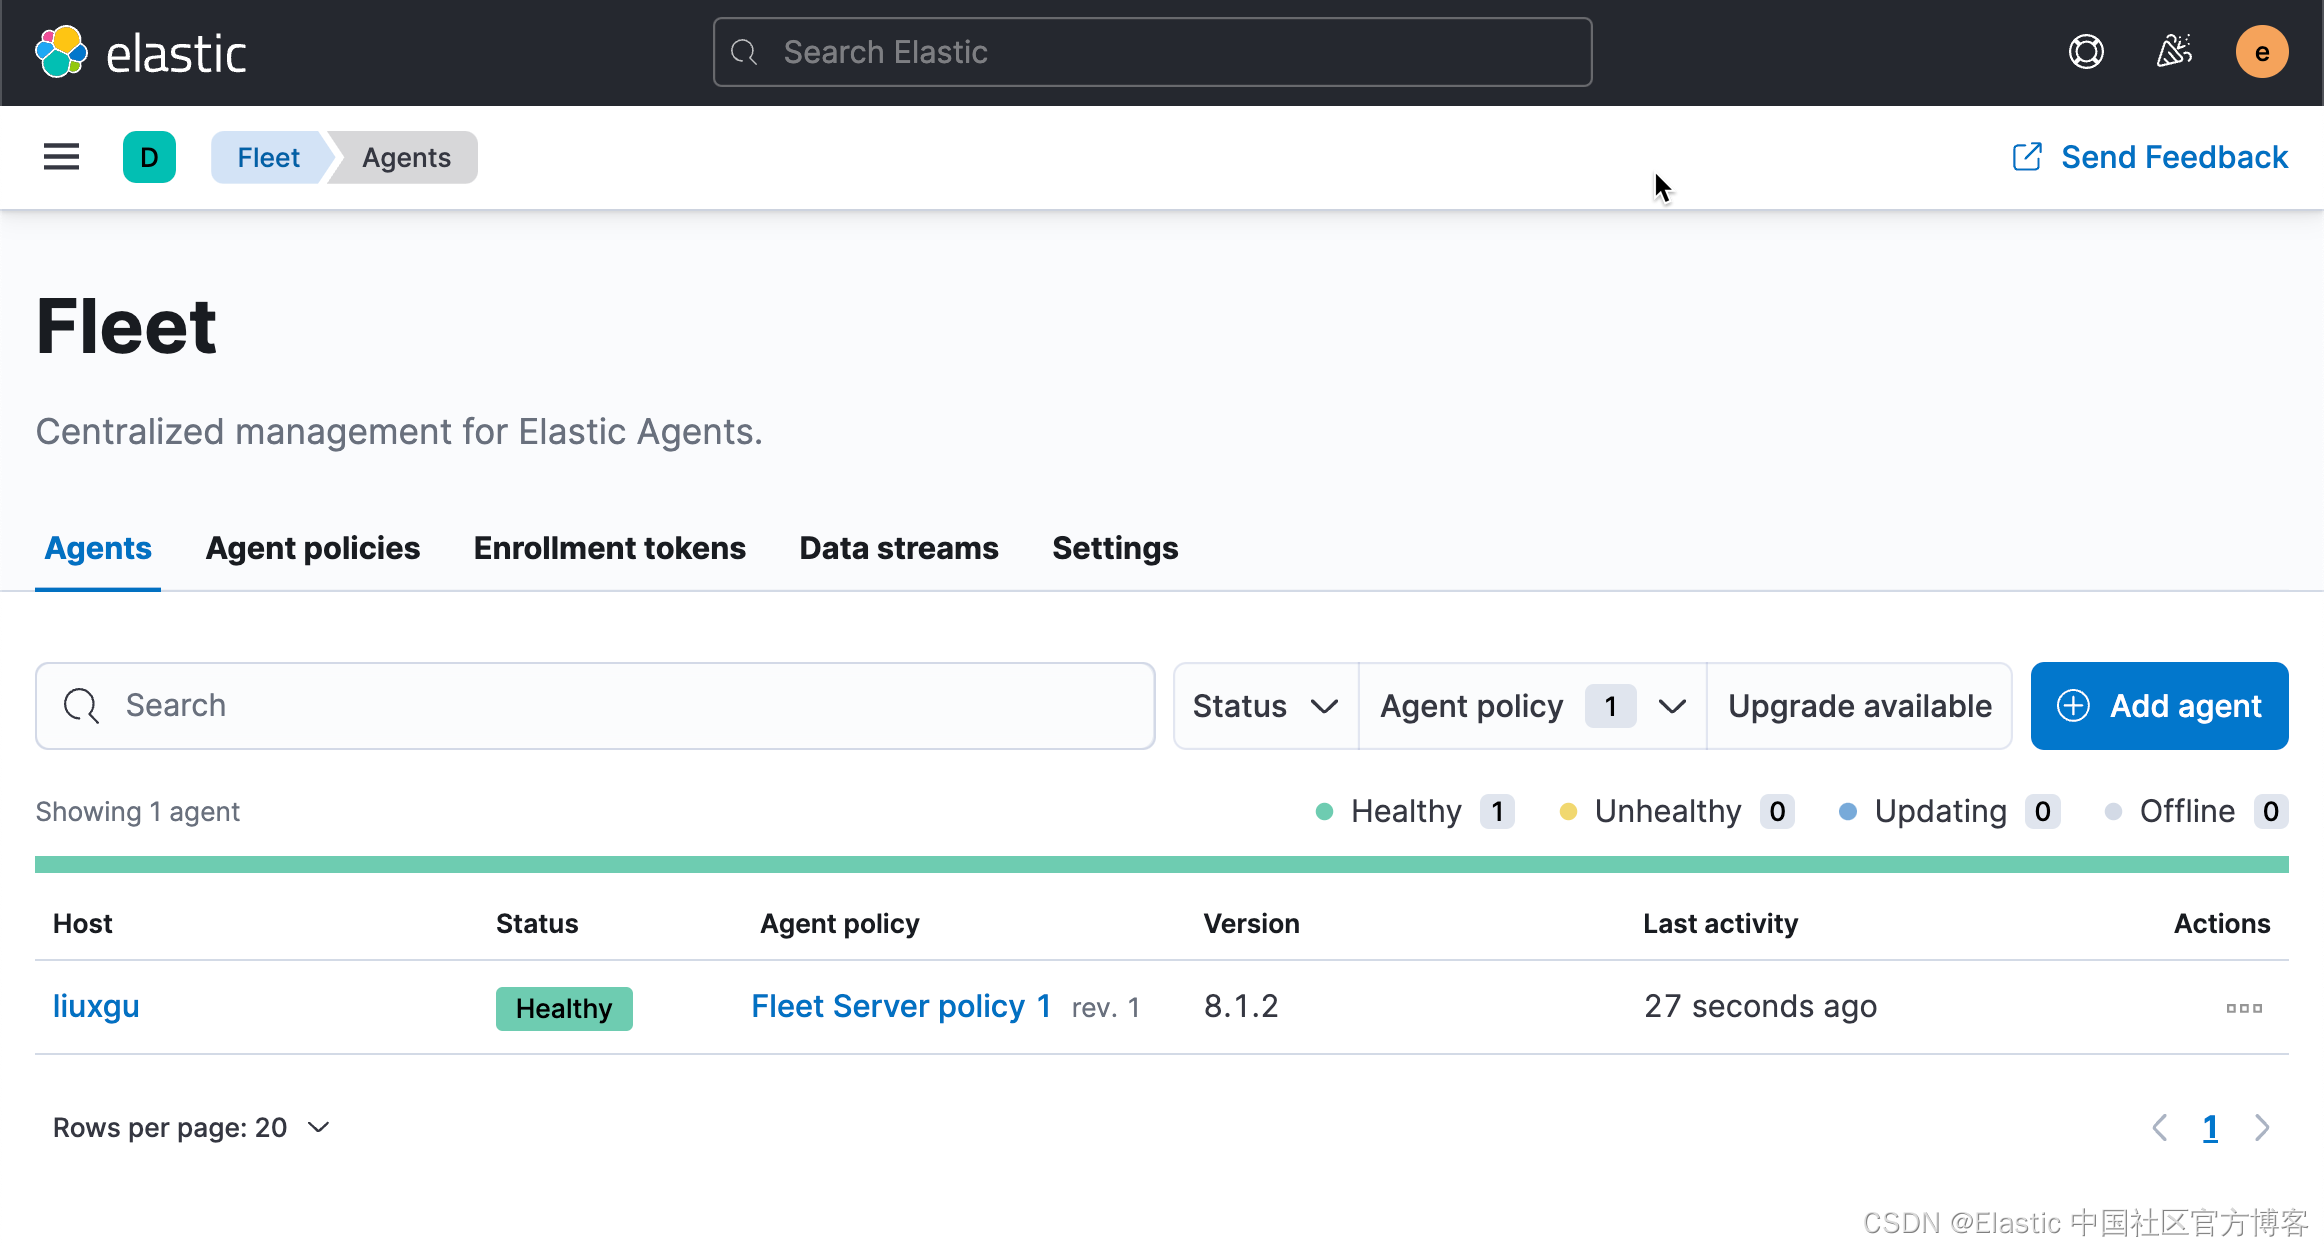
从上面,我们可以看出来我们的 Fleet 安装是成功的。 Fleet Server 已经被成功地安装。
参考:
我构建了两个需要相互通信和发送文件的Rails应用程序。例如,一个Rails应用程序会发送请求以查看其他应用程序数据库中的表。然后另一个应用程序将呈现该表的json并将其发回。我还希望一个应用程序将存储在其公共(public)目录中的文本文件发送到另一个应用程序的公共(public)目录。我从来没有做过这样的事情,所以我什至不知道从哪里开始。任何帮助,将不胜感激。谢谢! 最佳答案 无论Rails是什么,几乎所有Web应用程序都有您的要求,大多数现代Web应用程序都需要相互通信。但是有一个小小的理解需要你坚持下去,网站不应直接访问彼此
我正在编写一个小脚本来定位aws存储桶中的特定文件,并创建一个临时验证的url以发送给同事。(理想情况下,这将创建类似于在控制台上右键单击存储桶中的文件并复制链接地址的结果)。我研究过回形针,它似乎不符合这个标准,但我可能只是不知道它的全部功能。我尝试了以下方法:defauthenticated_url(file_name,bucket)AWS::S3::S3Object.url_for(file_name,bucket,:secure=>true,:expires=>20*60)end产生这种类型的结果:...-1.amazonaws.com/file_path/file.zip.A
我有一个在Linux服务器上运行的ruby脚本。它不使用rails或任何东西。它基本上是一个命令行ruby脚本,可以像这样传递参数:./ruby_script.rbarg1arg2如何将参数抽象到配置文件(例如yaml文件或其他文件)中?您能否举例说明如何做到这一点?提前谢谢你。 最佳答案 首先,您可以运行一个写入YAML配置文件的独立脚本:require"yaml"File.write("path_to_yaml_file",[arg1,arg2].to_yaml)然后,在您的应用中阅读它:require"yaml"arg
在Rails4.0.2中,我使用s3_direct_upload和aws-sdkgems直接为s3存储桶上传文件。在开发环境中它工作正常,但在生产环境中它会抛出如下错误,ActionView::Template::Error(noimplicitconversionofnilintoString)在View中,create_cv_url,:id=>"s3_uploader",:key=>"cv_uploads/{unique_id}/${filename}",:key_starts_with=>"cv_uploads/",:callback_param=>"cv[direct_uplo
我已经在Sinatra上创建了应用程序,它代表了一个简单的API。我想在生产和开发上进行部署。我想在部署时选择,是开发还是生产,一些方法的逻辑应该改变,这取决于部署类型。是否有任何想法,如何完成以及解决此问题的一些示例。例子:我有代码get'/api/test'doreturn"Itisdev"end但是在部署到生产环境之后我想在运行/api/test之后看到ItisPROD如何实现? 最佳答案 根据SinatraDocumentation:EnvironmentscanbesetthroughtheRACK_ENVenvironm
在Cooper的书BeginningRuby中,第166页有一个我无法重现的示例。classSongincludeComparableattr_accessor:lengthdef(other)@lengthother.lengthenddefinitialize(song_name,length)@song_name=song_name@length=lengthendenda=Song.new('Rockaroundtheclock',143)b=Song.new('BohemianRhapsody',544)c=Song.new('MinuteWaltz',60)a.betwee
我正在检查一个Rails项目。在ERubyHTML模板页面上,我看到了这样几行:我不明白为什么不这样写:在这种情况下,||=和ifnil?有什么区别? 最佳答案 在这种特殊情况下没有区别,但可能是出于习惯。每当我看到nil?被使用时,它几乎总是使用不当。在Ruby中,很少有东西在逻辑上是假的,只有文字false和nil是。这意味着像if(!x.nil?)这样的代码几乎总是更好地表示为if(x)除非期望x可能是文字false。我会将其切换为||=false,因为它具有相同的结果,但这在很大程度上取决于偏好。唯一的缺点是赋值会在每次运行
我正在玩HTML5视频并且在ERB中有以下片段:mp4视频从在我的开发环境中运行的服务器很好地流式传输到chrome。然而firefox显示带有海报图像的视频播放器,但带有一个大X。问题似乎是mongrel不确定ogv扩展的mime类型,并且只返回text/plain,如curl所示:$curl-Ihttp://0.0.0.0:3000/pr6.ogvHTTP/1.1200OKConnection:closeDate:Mon,19Apr201012:33:50GMTLast-Modified:Sun,18Apr201012:46:07GMTContent-Type:text/plain
在Ruby中是否有Gem或安全删除文件的方法?我想避免系统上可能不存在的外部程序。“安全删除”指的是覆盖文件内容。 最佳答案 如果您使用的是*nix,一个很好的方法是使用exec/open3/open4调用shred:`shred-fxuz#{filename}`http://www.gnu.org/s/coreutils/manual/html_node/shred-invocation.html检查这个类似的帖子:Writingafileshredderinpythonorruby?
之前在培训新生的时候,windows环境下配置opencv环境一直教的都是网上主流的vsstudio配置属性表,但是这个似乎对新生来说难度略高(虽然个人觉得完全是他们自己的问题),加之暑假之后对cmake实在是爱不释手,且这样配置确实十分简单(其实都不需要配置),故斗胆妄言vscode下配置CV之法。其实极为简单,图比较多所以很长。如果你看此文还配不好,你应该思考一下是不是自己的问题。闲话少说,直接开始。0.CMkae简介有的人到大二了都不知道cmake是什么,我不说是谁。CMake是一个开源免费并且跨平台的构建工具,可以用简单的语句来描述所有平台的编译过程。它能够根据当前所在平台输出对应的m