写在前面:在PyTorch中有两种上采样/下采样的方法,一种是Upsample,另一种是interpolate
这两个函数的使用方法略有差异,这里仅介绍Upsample
torch.nn.Upsample(size=None, scale_factor=None, mode='nearest', align_corners=None)
此函数可以上采样或者下采样(但是在PyTorch中下采样推荐interpolate,不过我发现没有区别?)
在上采样/下采样的过程中,只需要给定size或者scale_factor一个值即可,不需要给定所有的值,不然会冲突
最近邻插值的公式为
s r c X = d e s X ( s r c W / d e s W ) s r c Y = d e s Y ( s r c H / d e s H ) srcX = desX(srcW/desW) \\ srcY = desY(srcH/desH) srcX=desX(srcW/desW)srcY=desY(srcH/desH)
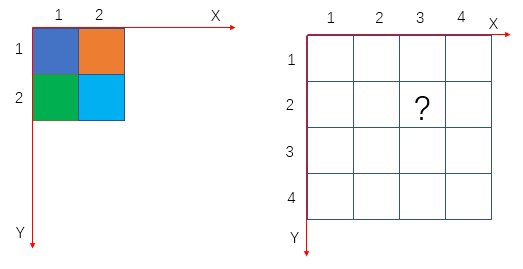
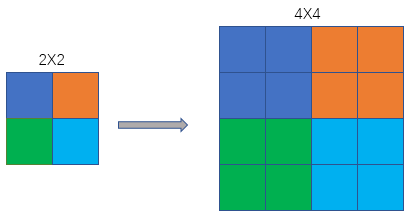
上采样
举个例子,假设放大倍数为2,那么 s r c = d e s × 0.5 src=des\times 0.5 src=des×0.5,对于下图,坐标(3,2)处的颜色应为原来坐标系 ( 3 × 0.5 , 2 × 0.5 ) = ( 1.5 , 1 ) (3\times 0.5, 2\times 0.5)=(1.5, 1) (3×0.5,2×0.5)=(1.5,1)也就是(2, 1)对应橙色
下采样
下采样和上采样的处理过程完全相同
代码示例
input = torch.arange(1, 5, dtype=torch.float32).view(1, 1, 2, 2)
sample = nn.Upsample(scale_factor=2, mode='nearest')
print(input)
print(sample(input))
'''
tensor([[[[1., 2.],
          [3., 4.]]]])
tensor([[[[1., 1., 2., 2.],
          [1., 1., 2., 2.],
          [3., 3., 4., 4.],
          [3., 3., 4., 4.]]]])
'''
双线性插值
代码示例
input = torch.arange(1, 5, dtype=torch.float32).view(1, 1, 2, 2)
sample = nn.Upsample(scale_factor=2, mode='bilinear', align_corners=False)
sample2 = nn.Upsample(scale_factor=2, mode='bilinear', align_corners=True)
print(input)
print(sample(input))
print(sample2(input))
'''
tensor([[[[1., 2.],
          [3., 4.]]]])
tensor([[[[1.0000, 1.2500, 1.7500, 2.0000],
          [1.5000, 1.7500, 2.2500, 2.5000],
          [2.5000, 2.7500, 3.2500, 3.5000],
          [3.0000, 3.2500, 3.7500, 4.0000]]]])
tensor([[[[1.0000, 1.3333, 1.6667, 2.0000],
          [1.6667, 2.0000, 2.3333, 2.6667],
          [2.3333, 2.6667, 3.0000, 3.3333],
          [3.0000, 3.3333, 3.6667, 4.0000]]]])
'''
关于align_corners参数的用法:给出PyTorch论坛的讨论链接。下面是相应的图解

Here is a simple illustration I made showing how a 4x4 image is upsampled to 8x8.
在最近的使用中,程序报了如下错误
UserWarning: The default behavior for interpolate/upsample with float scale_factor changed in 1.6.0 to align with other frameworks/libraries, and now uses scale_factor directly, instead of relying on the computed output size. If you wish to restore the old behavior, please set recompute_scale_factor=True. See the documentation of nn.Upsample for details.
这个错误来源于,当我的Upsample中scale_factor为整数时不会报错,为分数时就会报错,这个解决方案是不对scale_factor进行赋值,只对size进行赋值,错误就消失了
代码示例
input = torch.arange(1, 13, dtype=torch.float32).view(1, 3, 2, 2)
# sample = nn.Upsample(size=(5), mode='nearest')  # 使用这行,错误消失
sample = nn.Upsample(scale_factor=2.5, mode='nearest')  # 报错:如下
print(input)
print(sample(input))
'''
tensor([[[[ 1.,  2.],
          [ 3.,  4.]],

         [[ 5.,  6.],
          [ 7.,  8.]],

         [[ 9., 10.],
          [11., 12.]]]])
/home/wangyh/anaconda3/envs/torch/lib/python3.6/site-packages/torch/nn/functional.py:3103: UserWarning: The default behavior for interpolate/upsample with float scale_factor changed in 1.6.0 to align with other frameworks/libraries, and now uses scale_factor directly, instead of relying on the computed output size. If you wish to restore the old behavior, please set recompute_scale_factor=True. See the documentation of nn.Upsample for details.
  warnings.warn("The default behavior for interpolate/upsample with float scale_factor changed "
tensor([[[[ 1.,  1.,  1.,  2.,  2.],
          [ 1.,  1.,  1.,  2.,  2.],
          [ 1.,  1.,  1.,  2.,  2.],
          [ 3.,  3.,  3.,  4.,  4.],
          [ 3.,  3.,  3.,  4.,  4.]],

         [[ 5.,  5.,  5.,  6.,  6.],
          [ 5.,  5.,  5.,  6.,  6.],
          [ 5.,  5.,  5.,  6.,  6.],
          [ 7.,  7.,  7.,  8.,  8.],
          [ 7.,  7.,  7.,  8.,  8.]],

         [[ 9.,  9.,  9., 10., 10.],
          [ 9.,  9.,  9., 10., 10.],
          [ 9.,  9.,  9., 10., 10.],
          [11., 11., 11., 12., 12.],
          [11., 11., 11., 12., 12.]]]])
'''
还有另一种方法,根据报错内容,我们找到Upsample的文档介绍,其中有一句为,If you want downsampling/general resizing, you should use interpolate().,也就是说当我们采用下采样的时候,scale factor为0.5这时候要用interpolate函数,由此我们进入到interpolate函数的文档中,我们再次找到一个提示信息When scale_factor is specified, if recompute_scale_factor=True, scale_factor is used to compute the output_size which will then be used to infer new scales for the interpolation. The default behavior for recompute_scale_factor changed to False in 1.6.0, and scale_factor is used in the interpolation calculation.,此时如果我们下采样的话需要将scale factor设为0.5,同时加上recompute_scale_factor=True即可
目录简介torch.nn.init.xavier_uniform_()语法作用举例参考结语简介Hello!非常感谢您阅读海轰的文章,倘若文中有错误的地方,欢迎您指出~ ଘ(੭ˊᵕˋ)੭昵称:海轰标签:程序猿|C++选手|学生简介:因C语言结识编程,随后转入计算机专业,获得过国家奖学金,有幸在竞赛中拿过一些国奖、省奖…已保研学习经验:扎实基础+多做笔记+多敲代码+多思考+学好英语! 唯有努力💪 本文仅记录自己感兴趣的内容torch.nn.init.xavier_uniform_()语法torch.nn.init.xavier_uniform_(tensor,gain=1.0)作用根据了解训练深度
我正在尝试使用nn制作一个神经元网络项目而且我认为我正在正确使用它。当我尝试使用cargo进行编译时,我的问题就开始了。我不知道这是Windows的问题还是什么,但我的friend可以使用相同的操作系统完美编译。这是我在两台计算机上遇到的错误:C:\Users\juanr_000\Desktop\red_neuronal>cargorunCompilingtimev0.1.24failedtoruncustombuildcommandfor`timev0.1.24`Processdidn'texitsuccessfully:C:\Users\juanr_000\Desktop\red_
我有一个管道长度列表,我需要将这些长度安装在最大允许长度内以获得最佳产量例如,最大允许长度是90,我需要制作的部分是:25、60、13、48、23、29、27、22为了在90以内得到最佳拟合,我有一组这样的数字:60、29(共89)27、25、13、23(共88个)48、22(共70)我找到了this回答类似的问题,但我不知道如何将其转换为在excel或javascript或php中使用如有任何帮助,我们将不胜感激。谢谢。 最佳答案 这是一种可能的解决方案。但它是一种蛮力算法,所以它不是越快越好。functionbestComb(n
我正在研究多维vector的快速神经网络搜索。(比如在提取和计算特征向量后搜索相似图像)我目前正在使用ORB,它用一些位串来描述它的关键点。要比较2个描述符,ORB需要汉明距离。我读过LSH基于Eucliand距离(L2)或Manathann距离(L1)计算其哈希表。这是否意味着LSH不是需要汉明距离的vector比较的选项?编辑LSH可以使用汉明距离,因为它根据初始位串上的子串创建哈希表,这就是它起作用的原因 最佳答案 汉明距离等同于限制为boolvector的L1(曼哈顿)距离。 关
我正在尝试在启用Kerberos身份验证的安全模式下设置单节点Hadoop集群,使用hadoop-2.4.0和jdk1.7.0_25.为此,我按照文档中的描述创建了key表文件。在调试具有属性HADOOP_OPTS的东西时设置为-Dsun.security.krb5.debug=true我看到以下错误消息:Foundunsupportedkeytype(8)fornn/hadoop-kerberos@HADOOP-KERBEROSAddedkey:23version:4Addedkey:16version:4Addedkey:17version:4Addedkey:18version:
通常可以使用pytorch中的torch.nn.functional.interpolate()实现插值和上采样。上采样,在深度学习框架中,可以简单理解为任何可以让你的图像变成更高分辨率的技术。input(Tensor):输入张量size(int orTuple[int]orTuple[int,int]orTuple[int,int,int]):输出大小scale_factor(floatorTuple[float]): 指定输出为输入的多少倍数。如果输入为tuple,其也要制定为tuple类型mode(str): 可使用的上采样算法,有’nearest’,‘linear’,‘bili
【pytorch官方文档】:https://pytorch.org/docs/stable/generated/torch.nn.AvgPool2d.html?highlight=avgpool2d#torch.nn.AvgPool2dtorch.nn.AvgPool2d()作用在由多通道组成的输入特征中进行2D平均池化计算函数torch.nn.AvgPool2d(kernel_size,stride=None,padding=0,ceil_mode=False,count_include_pad=True,divisor_override=None)参数Args: kernel_size:
由于二者有一定共通之处,因此放在一篇文章内介绍。1.关于torch.nn.functional.grid_sample函数的说明(F.grid_sample) 该函数的作用是在图像/体素空间中采样特征。1.1输入和输出:变量名数据类型默认值含义备注inputTensor-原始图像/体素空间的特征形状需为(B,C,H,W)(B,C,H,W)(B,C,H,W)或(B,C,D,H,W)(B,C,D,H,W)(B,C,D,H,W),分别表示在图像中采样特征和在3D体素空间中采样特征gridTensor-采样图像/体素空间的归一化坐标形状需为(B,h,w,2)(B,h,w,2)(B,h,w,2)(对应
PyTorch中的torch.nn.Parameter()详解今天来聊一下PyTorch中的torch.nn.Parameter()这个函数,笔者第一次见的时候也是大概能理解函数的用途,但是具体实现原理细节也是云里雾里,在参考了几篇博文,做过几个实验之后算是清晰了,本文在记录的同时希望给后来人一个参考,欢迎留言讨论。分析先看其名,parameter,中文意为参数。我们知道,使用PyTorch训练神经网络时,本质上就是训练一个函数,这个函数输入一个数据(如CV中输入一张图像),输出一个预测(如输出这张图像中的物体是属于什么类别)。而在我们给定这个函数的结构(如卷积、全连接等)之后,能学习的就是这
我很好奇tf.nn.conv2d(...)的Tensorflow实现。要调用它,只需运行tf.nn.conv2d(...)。但是,我正在尝试查看它的执行位置。代码如下(其中箭头表示最终调用的函数):tf.nn.conv2d(...)->tf.nn_ops.conv2d(...)->tf.gen_nn_ops.conv2d(...)->_op_def_lib.apply_op("Conv2D",...)->?我熟悉Tensorflow的LSTM实现以及根据需要轻松操作它们的能力。执行conv2d()计算的函数是用Python编写的吗?如果是,它在哪里?我可以看到在何处以及如何执行步幅吗?