resource "null_resource" "ins_centos7_run_remote_command" {
  # 定义了SSH连接方式,可以通过密码或者密钥方式
  connection {
    timeout  = "5m"
    type     = "ssh"
    user     = "root"
    password = "${random_password.password.result}"
    host     = "${openstack_compute_instance_v2.ins_centos7.network[0].fixed_ip_v4}"
  }
  # 将本地文件上传至远程资源的某个目录中
  provisioner "file" {
    source      = "../downloads/linux_agent.sh"
    destination = "/tmp/script.sh"
  }
  # 通过remote-exec远程执行脚本
  provisioner "remote-exec" {
    inline = [
      "chmod +x /tmp/script.sh",
      "sudo bash /tmp/script.sh",
    ]
  }
  depends_on = [openstack_compute_instance_v2.ins_centos7]
}resource "null_resource" "run_windows_remote_command" {
# 注意此处的类型为winrm
connection {
timeout = "5m"
type = "winrm"
user = "Administrator"
password = "${random_password.password.result}"
host = "${openstack_compute_instance_v2.ins_windows.network[0].fixed_ip_v4}"
https = true
insecure = true
}
# 如果给定的是一个目录,则会上传整个目录,但是要注意Windows目录的斜线方向,盘符需要转移C:\\
provisioner "file" {
source = "../downloads/Windows_server_64bit_beta"
destination = "C:\\Windows_server_64bit_beta"
}
# 远程执行方式与Linux相同
provisioner "remote-exec" {
inline = [
"C:\\Windows_server_64bit_beta\\install-cli.bat",
"net start DiskSyncAgent",
]
}
depends_on = [openstack_compute_instance_v2.ins_windows]
}.
├── main.tf
├── playbooks
│ └── apache-install.ymlresource "null_resource" "run_ansible" {
connection {
timeout = "5m"
type = "ssh"
user = "root"
password = "${random_password.password.result}"
host = "${huaweicloud_vpc_eip.myeip.address}"
}
# 这里调用了local-exec本地执行Ansible命令
provisioner "local-exec" {
command = "ANSIBLE_HOST_KEY_CHECKING=False ansible-playbook -u root -i '${huaweicloud_vpc_eip.myeip.address},' --extra-vars 'ansible_ssh_pass=${random_password.password.result}' --ssh-common-args '-o StrictHostKeyChecking=no -o UserKnownHostsFile=/dev/null' playbooks/apache-install.yml"
}
depends_on = [huaweicloud_compute_eip_associate.associated]
}resource "local_file" "inventory" {
filename = "./sources.conf"
content = <<-EOF
[${openstack_compute_instance_v2.ins_centos7.network[0].fixed_ip_v4}]
username = centos
password = ${nonsensitive(random_password.password.result)}
ipv4 = ${openstack_compute_instance_v2.ins_centos7.network[0].fixed_ip_v4}
mac = ${openstack_compute_instance_v2.ins_centos7.network[0].mac}
private_key = "${abspath(path.module)}/../keys/openstack_linux.pem"
os = CentOS7
EOF
}.
├── install.sh
├── plugins-cache
│ └── registry.terraform.io
│ ├── hashicorp
│ │ ├── local
│ │ ├── null
│ │ ├── random
│ │ ├── template
│ │ └── tls
│ ├── huaweicloud
│ │ └── huaweicloud
│ └── terraform-provider-openstack
│ └── openstack
├── README.md
├── terraform_1.3.7_linux_amd64.zip
└── update_plugins_cache.shplugin_cache_dir = "$HOME/.terraform.d/plugins-cache"terraform init -ignore-remote-versionterrform providers mirror /path/to/your/plugins-cache#!/bin/bash
#
# This script is used to install Terraform from local
#
set -e
CURRENT_PATH=$(cd `dirname $0`; pwd)
TERRAFORM_CLI="$HOME/bin/terraform"
PLUGINS_CACHE_PATH="${CURRENT_PATH}/plugins-cache"
SRC_ROOT_PATH="${CURRENT_PATH}/.."
# NOTE(Ray): Find all terraform directories and cache providers
for dir in $(find $SRC_ROOT_PATH -type d); do
for file in "$dir"/*tf; do
if [ -f "$file" ]; then
echo "Run terraform cache in $dir..."
$TERRAFORM_CLI providers mirror $PLUGINS_CACHE_PATH
break
fi
done
donetasks =
cloud_config_oss = autotest.tasks.cloud_config:CloudConfigOss
cloud_config_block = autotest.tasks.cloud_config:CloudConfigBlock
cloud_config_clean = autotest.tasks.cloud_config:CloudConfigClean
data_sync_oss = autotest.tasks.data_sync:DataSyncOss
data_sync_block = autotest.tasks.data_sync:DataSyncBlock
host_boot = autotest.tasks.host_boot:HostBoot
host_clean = autotest.tasks.host_clean:HostClean
report = autotest.tasks.report:Reportdef run_tasks(args, hosts_conf, hyperbdr_conf):
"""Load each tasks as a driver"""
# We use a csv as a data table
data_table = DataTable(hosts_conf, args.work_path)
data_table.init()
status_file = StatusFile(args.work_path)
status_file.init()
driver_name = args.which.replace("-", "_")
logging.info("Loading task driver for %s..." % driver_name)
# 根据不同的命令行名称,加载相关的驱动
driver_manager = driver.DriverManager(
namespace="tasks",
name=driver_name,
invoke_on_load=False)
task_driver = driver_manager.driver(hyperbdr_conf, data_table, status_file)
task_driver.run()import taskflow.engines
from taskflow.patterns import linear_flow as lf
class BaseTask(object):
# 此处有代码省略
def run(self, tasks=[], *args, **kwargs):
# 子类只需要在继承类中定义好自己的tasks即可
if not tasks:
raise NotImplementedError("run() method "
"is not implemented")
# .......
flow_name = self.__class__.__name__
flow_api = lf.Flow(flow_name)
for task in tasks:
flow_api.add(task)
try:
taskflow.engines.run(flow_api,
engine_conf={"engine": "serial"},
store={
# 参数传递
})
except Exception as e:
raise e
finally:
# 任务失败后的处理,比如记录数据from taskflow import task
from autotest.tasks.base import BaseTask
class CloudConfigOss(BaseTask):
def run(self, *args, **kwargs):
steps = [
AddCloudAccount(),
WaitCloudAccount(),
AddOss(),
]
super().run(steps)
class AddCloudAccount(task.Task):
# TODO
class WaitCloudAccount(task.Task):
# TODO
class AddOss(task.Task):
# TODO.
├── Jenkinsfile
├── openstack_oss_qa_tiny_smoke
│ ├── hyperbdr.conf
│ └── terraform_templatespipeline {
// 省略部分代码
parameters {
string(
name: 'TEST_CASE',
defaultValue: 'openstack_oss_qa_tiny_smoke',
description: '测试任务执行的目录,对应autotest-cases的目录'
)
string(
name: 'HYPERBDR_URL',
defaultValue: 'https://xxxx',
description: 'HyperBDR地址,需要配合鉴权信息使用'
)
// 省略部分代码
}
stages {
stage('Clone Repository') {
// 省略部分代码
} // end stage
stage('更新HyperBDR环境') {
// 省略部分代码
} // end stage
stage('下载Agent代理') {
// 省略部分代码
} // end stage
// 鉴权信息固定写在Terraform tfvars文件时,使用时通过Jenkins中的Credentials进行替换
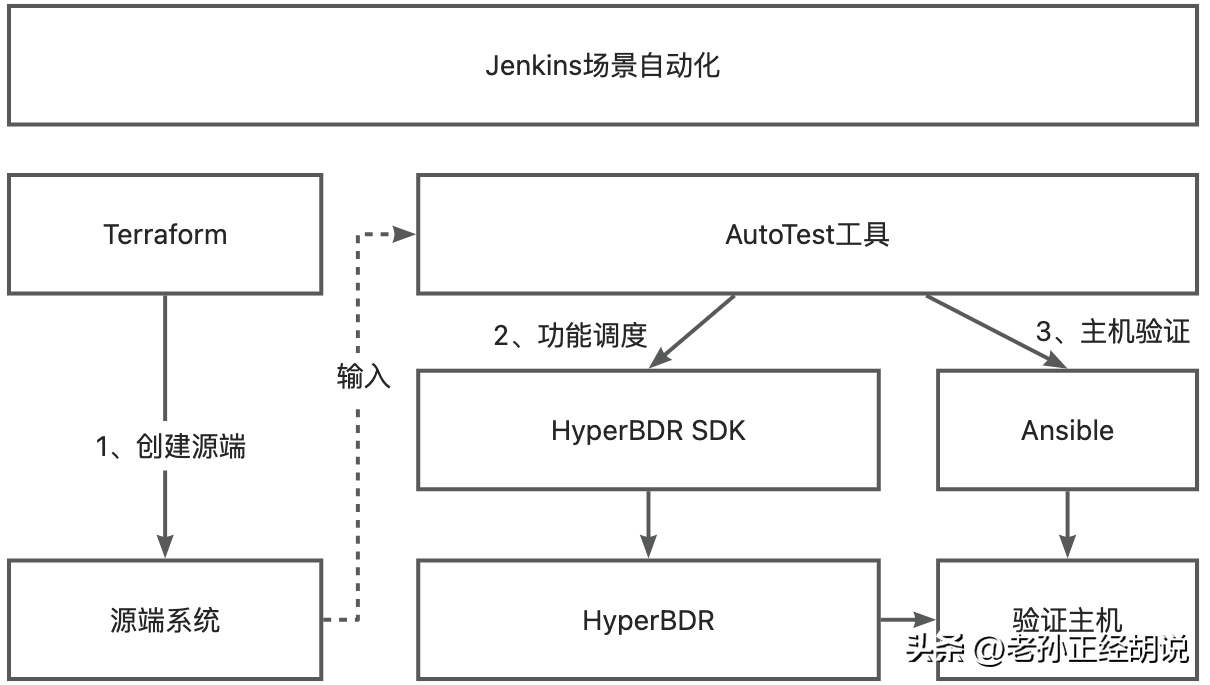
stage('创建源端') {
steps {
// 对每个目录下auth文件进行替换后,source声明环境变量
withCredentials([usernamePassword(credentialsId: "${CLOUD_CREDENTIALS_ID}", usernameVariable: 'USERNAME', passwordVariable: 'PASSWORD')]) {
sh """
sed -i "s/JENKINS_CLOUD_USERNAME/${USERNAME}/g" "${terraformVars}"
sed -i "s/JENKINS_CLOUD_PASSWORD/${PASSWORD}/g" "${terraformVars}"
"""
}
dir("${terraformTemplatePath}") {
sh """
${terraformPath} init -ignore-remote-version -plugin-dir ~/.terraform.d/plugins-cache
${terraformPath} apply -auto-approve -var-file="${terraformVars}"
"""
}
} // end steps
} // end stage
stage('目标平台配置') {
// 省略部分代码
} // end stage
stage('数据同步') {
// 省略部分代码
} // end stage
stage('启动主机') {
// 省略部分代码
} // end stage
stage('清理资源') {
// 省略部分代码
} // end stage
stage('清理环境') {
steps {
dir("${terraformTemplatePath}") {
sh """
${terraformPath} destroy -auto-approve -var-file="${terraformVars}"
"""
}
} // end steps
} // end stage
stage('发送报告') {
// 将Markdown格式报告发送至钉钉,包含执行结果和执行时间
} // end stage
} // end stages
} // end pipelinepost {
failure {
// TODO(Ray): 目前暂未加入清理目标端资源的逻辑
// 全局异常处理,保证源端和目标端不残留资源
dir("${terraformTemplatePath}") {
sh """
${terraformPath} destroy -auto-approve -var-file="${terraformVars}"
"""
}
} // end failure
} // end post很好奇,就使用rubyonrails自动化单元测试而言,你们正在做什么?您是否创建了一个脚本来在cron中运行rake作业并将结果邮寄给您?git中的预提交Hook?只是手动调用?我完全理解测试,但想知道在错误发生之前捕获错误的最佳实践是什么。让我们理所当然地认为测试本身是完美无缺的,并且可以正常工作。下一步是什么以确保他们在正确的时间将可能有害的结果传达给您? 最佳答案 不确定您到底想听什么,但是有几个级别的自动代码库控制:在处理某项功能时,您可以使用类似autotest的内容获得关于哪些有效,哪些无效的即时反馈。要确保您的提
我正在编写一个包含C扩展的gem。通常当我写一个gem时,我会遵循TDD的过程,我会写一个失败的规范,然后处理代码直到它通过,等等......在“ext/mygem/mygem.c”中我的C扩展和在gemspec的“扩展”中配置的有效extconf.rb,如何运行我的规范并仍然加载我的C扩展?当我更改C代码时,我需要采取哪些步骤来重新编译代码?这可能是个愚蠢的问题,但是从我的gem的开发源代码树中输入“bundleinstall”不会构建任何native扩展。当我手动运行rubyext/mygem/extconf.rb时,我确实得到了一个Makefile(在整个项目的根目录中),然后当
我有一个围绕一些对象的包装类,我想将这些对象用作散列中的键。包装对象和解包装对象应映射到相同的键。一个简单的例子是这样的:classAattr_reader:xdefinitialize(inner)@inner=innerenddefx;@inner.x;enddef==(other)@inner.x==other.xendenda=A.new(o)#oisjustanyobjectthatallowso.xb=A.new(o)h={a=>5}ph[a]#5ph[b]#nil,shouldbe5ph[o]#nil,shouldbe5我试过==、===、eq?并散列所有无济于事。
我有一些Ruby代码,如下所示:Something.createdo|x|x.foo=barend我想编写一个测试,它使用double代替block参数x,这样我就可以调用:x_double.should_receive(:foo).with("whatever").这可能吗? 最佳答案 specify'something'dox=doublex.should_receive(:foo=).with("whatever")Something.should_receive(:create).and_yield(x)#callthere
Sinatra新手;我正在运行一些rspec测试,但在日志中收到了一堆不需要的噪音。如何消除日志中过多的噪音?我仔细检查了环境是否设置为:test,这意味着记录器级别应设置为WARN而不是DEBUG。spec_helper:require"./app"require"sinatra"require"rspec"require"rack/test"require"database_cleaner"require"factory_girl"set:environment,:testFactoryGirl.definition_file_paths=%w{./factories./test/
我遵循MichaelHartl的“RubyonRails教程:学习Web开发”,并创建了检查用户名和电子邮件长度有效性的测试(名称最多50个字符,电子邮件最多255个字符)。test/helpers/application_helper_test.rb的内容是:require'test_helper'classApplicationHelperTest在运行bundleexecraketest时,所有测试都通过了,但我看到以下消息在最后被标记为错误:ERROR["test_full_title_helper",ApplicationHelperTest,1.820016791]test
我收到这个错误:RuntimeError(自动加载常量Apps时检测到循环依赖当我使用多线程时。下面是我的代码。为什么会这样?我尝试多线程的原因是因为我正在编写一个HTML抓取应用程序。对Nokogiri::HTML(open())的调用是一个同步阻塞调用,需要1秒才能返回,我有100,000多个页面要访问,所以我试图运行多个线程来解决这个问题。有更好的方法吗?classToolsController0)app.website=array.join(',')putsapp.websiteelseapp.website="NONE"endapp.saveapps=Apps.order("
我已经构建了一些serverspec代码来在多个主机上运行一组测试。问题是当任何测试失败时,测试会在当前主机停止。即使测试失败,我也希望它继续在所有主机上运行。Rakefile:namespace:specdotask:all=>hosts.map{|h|'spec:'+h.split('.')[0]}hosts.eachdo|host|begindesc"Runserverspecto#{host}"RSpec::Core::RakeTask.new(host)do|t|ENV['TARGET_HOST']=hostt.pattern="spec/cfengine3/*_spec.r
我在app/helpers/sessions_helper.rb中有一个帮助程序文件,其中包含一个方法my_preference,它返回当前登录用户的首选项。我想在集成测试中访问该方法。例如,这样我就可以在测试中使用getuser_path(my_preference)。在其他帖子中,我读到这可以通过在测试文件中包含requiresessions_helper来实现,但我仍然收到错误NameError:undefinedlocalvariableormethod'my_preference'.我做错了什么?require'test_helper'require'sessions_hel
只是想确保我理解了事情。据我目前收集到的信息,Cucumber只是一个“包装器”,或者是一种通过将事物分类为功能和步骤来组织测试的好方法,其中实际的单元测试处于步骤阶段。它允许您根据事物的工作方式组织您的测试。对吗? 最佳答案 有点。它是一种组织测试的方式,但不仅如此。它的行为就像最初的Rails集成测试一样,但更易于使用。这里最大的好处是您的session在整个Scenario中保持透明。关于Cucumber的另一件事是您(应该)从使用您的代码的浏览器或客户端的角度进行测试。如果您愿意,您可以使用步骤来构建对象和设置状态,但通常您