文章目录
最近由于疫情居家办公,有点空闲时间把开发环境搭建一下。其实之前也有预感,所以在闲鱼上买了台解锁的Pixel4(Flame),配合云电脑(Ubuntu 18.04.1),在云电脑上搭建Android系统开发环境。
本文主要记录Android源码(Android 12)的下载、编译和刷机全过程。
本地编译的好处:
硬件要求:
由于在国内使用 Google 的官方下载站点,会有下不动的情况,有时候 .repo 都下载不下来,所以本教程是以国内的镜像站点为例子,如果你有方法可以爬墙,那么可以简单参考 官方的教程 https://source.android.google.cn/source/downloading
科大 AOSP 镜像站点地址:https://mirrors.ustc.edu.cn/help/aosp.html
下载只需要跟着下面几个步骤走即可,建议大家还是使用 Ubuntu 这样的 Linux 系统来进行代码的下载、编译、开发工作。
mkdir ~/bin
PATH=~/bin:$PATH
curl -sSL  'https://gerrit-googlesource.proxy.ustclug.org/git-repo/+/master/repo?format=TEXT' |base64 -d > ~/bin/repo
chmod a+x ~/bin/repo
sudo apt install git
git config --global user.name "xxxx"
git config --global user.email "xxxx@example.com"
配置好git后可以通过git config --list查看是否成功,比如我的:
user.name=quexl1
user.email=quexl1@xxxx.cn
在本地建立一个工作目录(名字任意,我买的机器是Pixel4,代号是flame,这里以 aosp_12.0_flame 为例子)
mkdir aosp_12.0_flame
cd aosp_12.0_flame
repo init -u git://mirrors.ustc.edu.cn/aosp/platform/manifest -b android-12.1.0_r11
## 如果提示无法连接到 gerrit.googlesource.com,可以编辑 ~/bin/repo,把 REPO_URL 一行替换成下面的:
## REPO_URL = 'https://gerrit-googlesource.proxy.ustclug.org/git-repo'
如不后面不带"-b",默认会下载所有的代码,默认分支是 master。
我这里同步最新的12.0版本,因此使用的分支是:android-12.1.0_r11
这里需要注意,默认的 repo 使用的地址是 REPO_URL = ‘https://gerrit.googlesource.com/git-repo’ ,这里我们需要修改 REPO_URL,否则会出现无法下载的情况
下载好 .repo 之后会有下面的信息
➜  Android12 repo init -u git://mirrors.ustc.edu.cn/aosp/platform/manifest
Downloading Repo source from https://gerrit-googlesource.proxy.ustclug.org/git-repo

... A new version of repo (2.17) is available.
... You should upgrade soon:
    cp /home/gracker/Code/Android12/.repo/repo/repo /home/gracker/bin/repo

Downloading manifest from git://mirrors.ustc.edu.cn/aosp/platform/manifest
remote: Enumerating objects: 91965, done.
remote: Total 91965 (delta 0), reused 0 (delta 0)

Your identity is: quexl1 <quexl1@xxxx>
If you want to change this, please re-run 'repo init' with --config-name

repo has been initialized in /home/aosp_12.0_flame
上面的步骤初始化 .repo 文件后,代码同步要执行 repo sync 来进行下载。由于镜像站的限制和下载过程中可能会遇到的问题,建议大家用 -j4 来下载
repo sync -j4
代码下载完成之后,我们先不着急编译,如果要想在真机上跑,需要下载一些厂商闭源的驱动文件,这样后续编译的代码才可以跑到真机上,此处对应的 官方文档
由于我同步的代码是android-12.1.0_r11 分支,驱动程序需要在这里下载 https://developers.google.cn/android/drivers
以我的 pixel 4 为例,下载的代码是android-12.1.0_r11,TAG对应的驱动BUILD ID我们可以在这里查:https://source.android.google.cn/docs/setup/about/build-numbers,因此我需要下载的驱动是
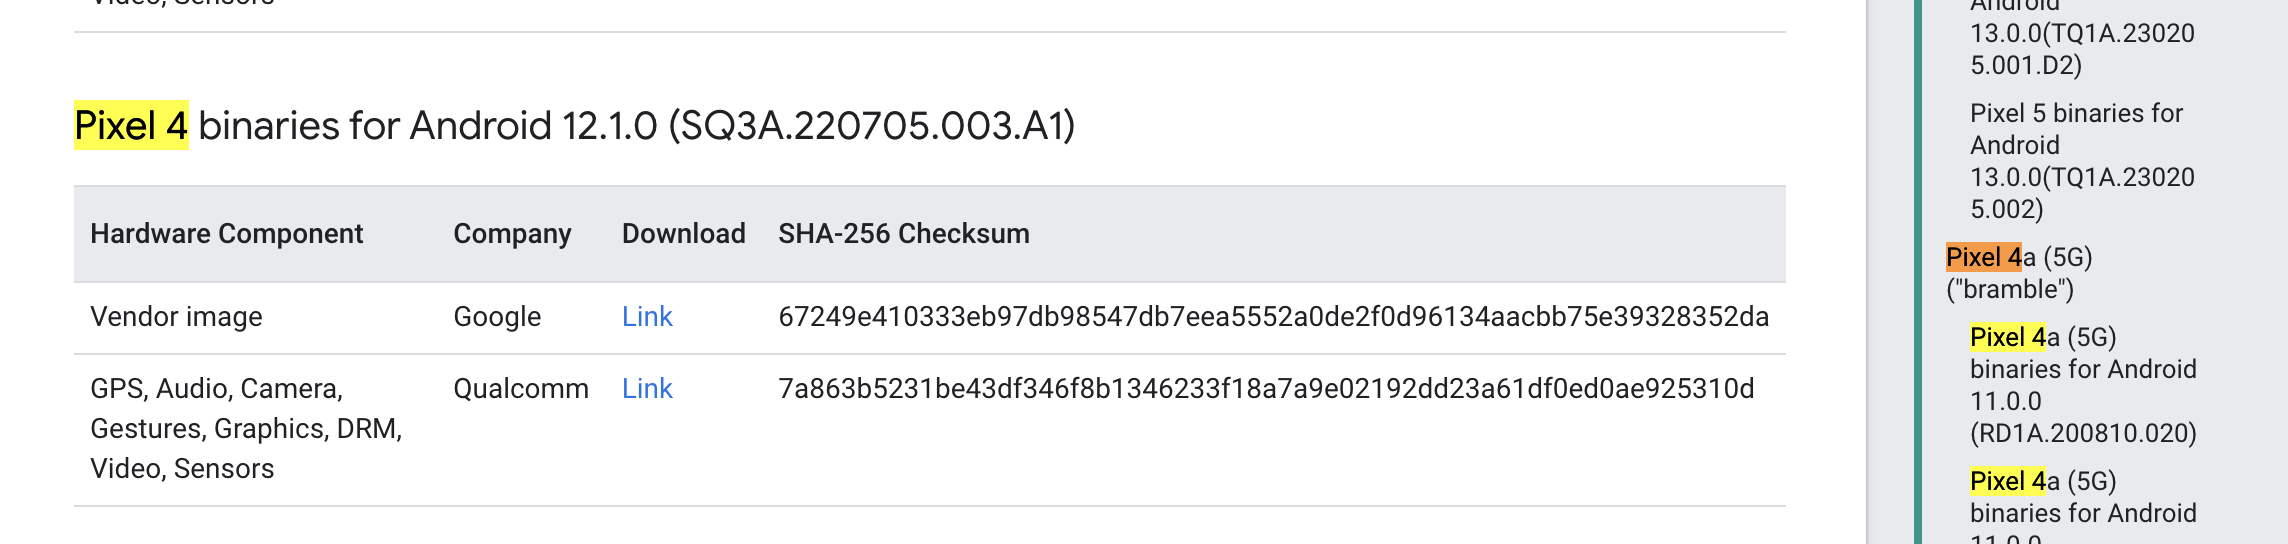
点击 Link 下载两个文件,然后进行解压到代码根目录,然后执行 sh 脚本释放驱动到合适的位置,二进制文件及其对应的 makefile 将会安装在源代码树的 vendor/ 层次结构中。
下载的内容解压后,是两个 sh 文件,以我的 Pixel 4 为例,在代码根目录执行,使用 D 来向下翻页,直到最后手动输入 I ACCEPT
# 解压缩 extract-google_devices-crosshatch.sh
./extract-google_devices-flame.sh
# 解压缩  ./extract-qcom-crosshatch.sh
 ./extract-qcom-flame.sh
代码和驱动都下载好之后,就可以开始代码的编译工作了,由于新版本不再支持 Mac 编译,所以建议大家还是使用 Linux 来进行编译,推荐使用Ubuntu。
参考:https://source.android.google.cn/setup/build/initializing
Ubuntu 18.04 以上直接运行:
sudo apt-get install git-core gnupg flex bison build-essential zip curl zlib1g-dev gcc-multilib g++-multilib libc6-dev-i386 libncurses5 lib32ncurses5-dev x11proto-core-dev libx11-dev lib32z1-dev libgl1-mesa-dev libxml2-utils xsltproc unzip fontconfig
注意如果apt-get找不到源,可以通过修改apt-get的源来解决,自行百度。
也可以使用我这份源替换/etc/apt下的sources.list
# 默认注释了源码镜像以提高 apt update 速度,如有需要可自行取消注释
deb https://mirrors.tuna.tsinghua.edu.cn/ubuntu/ bionic main restricted universe multiverse
# deb-src https://mirrors.tuna.tsinghua.edu.cn/ubuntu/ bionic main restricted universe multiverse
deb https://mirrors.tuna.tsinghua.edu.cn/ubuntu/ bionic-updates main restricted universe multiverse
# deb-src https://mirrors.tuna.tsinghua.edu.cn/ubuntu/ bionic-updates main restricted universe multiverse
deb https://mirrors.tuna.tsinghua.edu.cn/ubuntu/ bionic-backports main restricted universe multiverse
# deb-src https://mirrors.tuna.tsinghua.edu.cn/ubuntu/ bionic-backports main restricted universe multiverse
deb https://mirrors.tuna.tsinghua.edu.cn/ubuntu/ bionic-security main restricted universe multiverse
# deb-src https://mirrors.tuna.tsinghua.edu.cn/ubuntu/ bionic-security main restricted universe multiverse

# 预发布软件源,不建议启用
# deb https://mirrors.tuna.tsinghua.edu.cn/ubuntu/ bionic-proposed main restricted universe multiverse
# deb-src https://mirrors.tuna.tsinghua.edu.cn/ubuntu/ bionic-proposed main restricted universe multiverse
sudo apt-get update 更新;
在工程源码根目录执行
source build/envsetup.sh
lunch
会输出编译目标列表提供选择。
You're building on Linux

Lunch menu .. Here are the common combinations:
     1. aosp_arm-eng
     2. aosp_arm64-eng
     3. aosp_barbet-userdebug
     4. aosp_bluejay-userdebug
     5. aosp_bramble-userdebug
     6. aosp_bramble_car-userdebug
     7. aosp_car_arm-userdebug
     8. aosp_car_arm64-userdebug
     9. aosp_car_x86-userdebug
     10. aosp_car_x86_64-userdebug
     11. aosp_cf_arm64_auto-userdebug
     12. aosp_cf_arm64_phone-userdebug
     13. aosp_cf_x86_64_auto-userdebug
     14. aosp_cf_x86_64_foldable-userdebug
     15. aosp_cf_x86_64_pc-userdebug
     16. aosp_cf_x86_64_phone-userdebug
     17. aosp_cf_x86_64_tv-userdebug
     18. aosp_cf_x86_phone-userdebug
     19. aosp_cf_x86_tv-userdebug
     20. aosp_cheetah-userdebug
     21. aosp_cloudripper-userdebug
     22. aosp_coral-userdebug
     23. aosp_coral_car-userdebug
     24. aosp_flame-userdebug
     25. aosp_flame_car-userdebug
     26. aosp_oriole-userdebug
选择自己机器的代号名称即可,我的Pixel 4的机器代号是flame,因此选择24。
在这里可以查看所有机型对应的代号:https://source.android.google.cn/setup/build/running#selecting-device-build
执行make编译,可以选择12或者32线程编译。
make -j12
编译成功之后,会有下面的输出
注: 有关详细信息, 请使用 -Xlint:deprecation 重新编译。
[100% 777/777] Target vbmeta image: out/target/product/flame/vbmeta.img

#### build completed successfully (03:57 (mm:ss)) ####
编译好之后下面开始刷机,以我的测试机器 Pixel 4 为例,依次执行下面的命令
adb reboot fastboot

# 等待手机进入 fastboot 界面之后
fastboot flashall -w

# 刷机完成之后,执行 fastboot reboot 长期系统即可
fastboot reboot
注意:fastboot flashall -w命令如果在工程外面执行,要配置$ANDROID_PRODUCT_OUT目录环境
刷机截图如下:
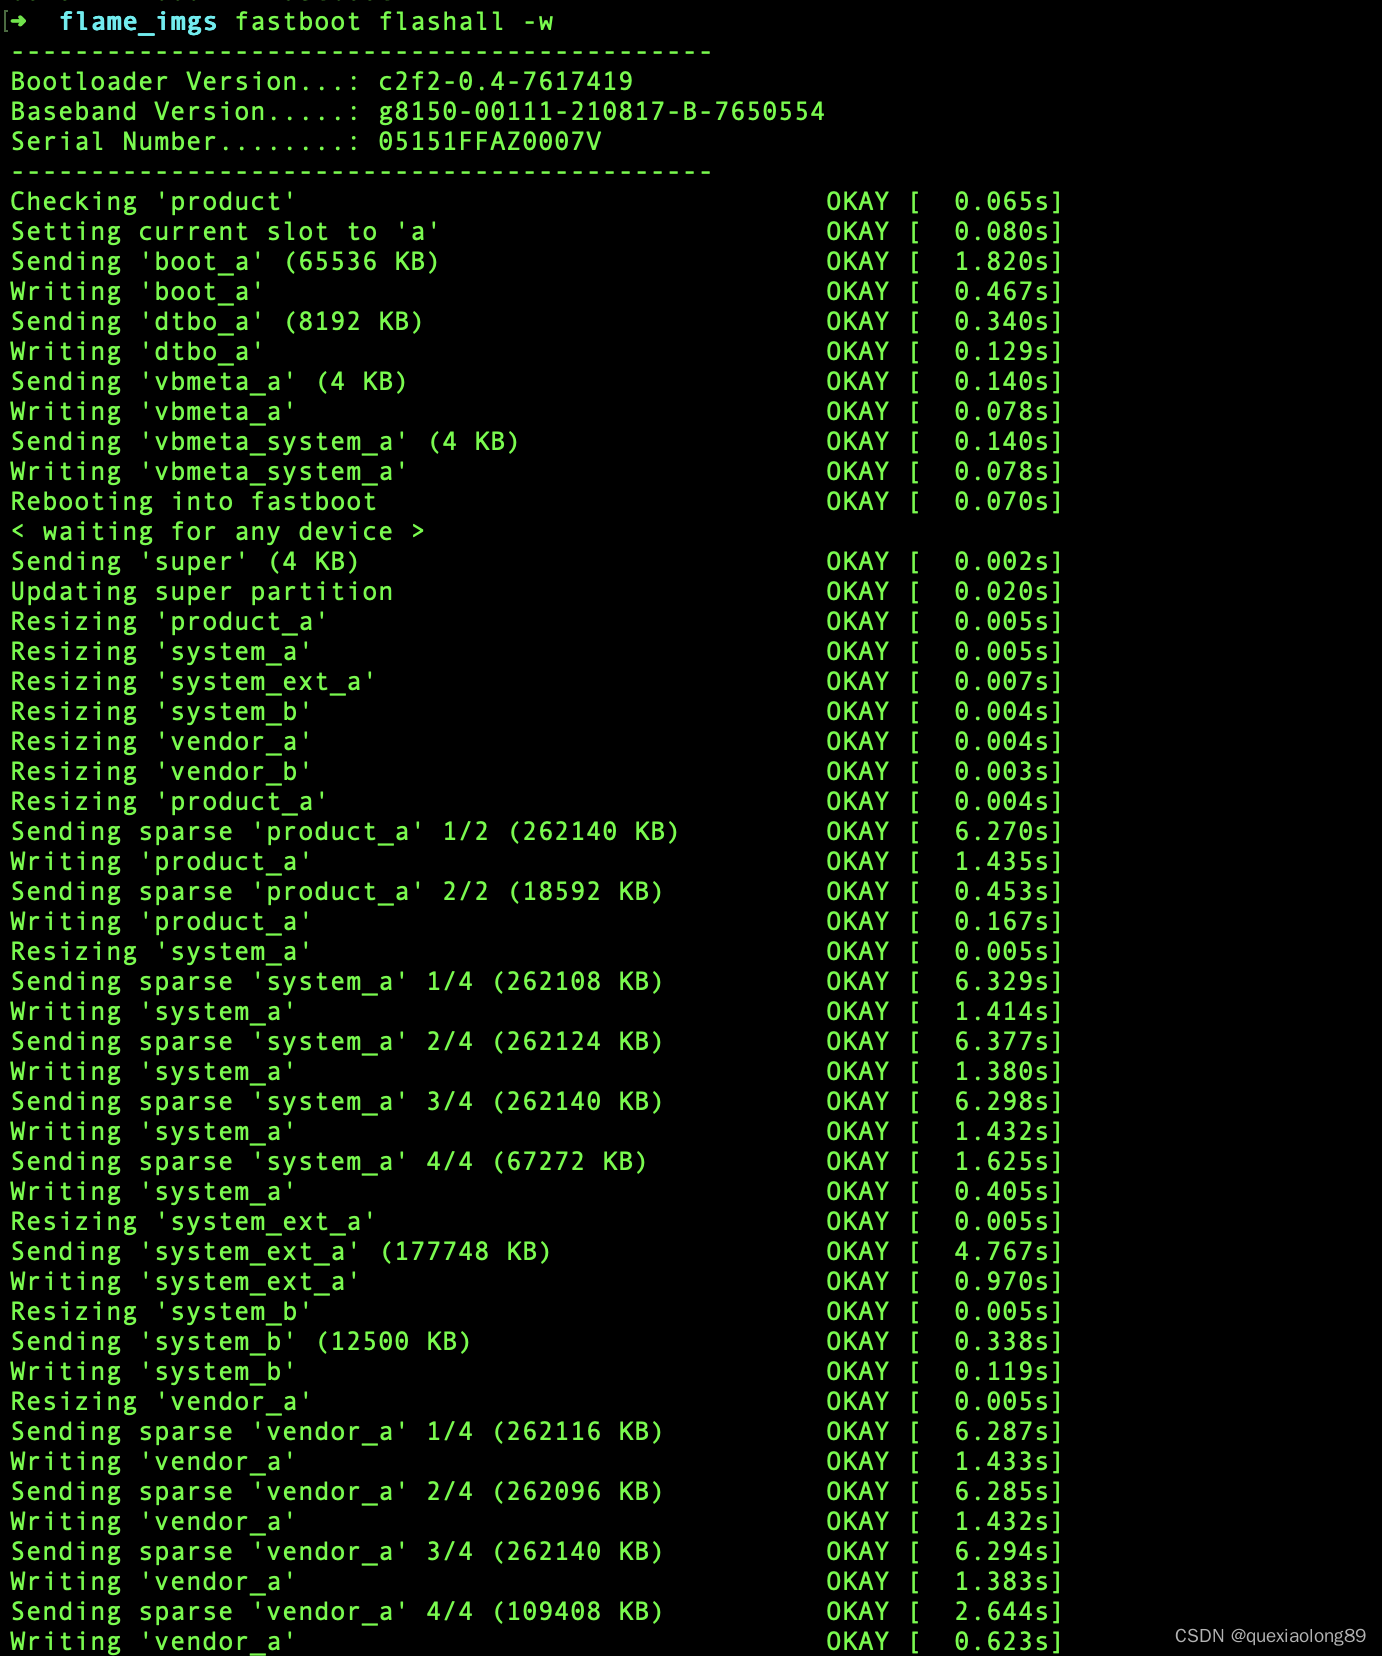
之后手机会自动重启,然后进入主界面,至此,我们的代码下载-编译-刷机的这部分就结束了。
如果在刷机的过程中遇到问题,可刷官方的刷机包拯救 :https://developers.google.cn/android/images
DM-verity 是Android 系统安全的重要部分,它能保证Android 的 vendor 和 system 镜像文件中的内容是真实可靠的。所以如果打开了DM-verity功能那么如果我们通过fastboot修改android系统的system分区或者vendor分区,那么DM-verity校验时就会出错,因此在fastboot之前需要先将DM-verity解锁。
adb root
adb reboot bootloader
fastboot devices
fastboot flashing unlock
fastboot reboot(稍等系统重启完毕)
此时发现oem选项已经变灰色了。
adb root
adb disable-verity
adb reboot
adb root
adb remount可以成功remount /system为读写模式
注意:fastboot 需要安装对应的驱动才可以使用。
好了,以上就是Android 12 源码下载、编译和刷机的全过程。
framework.jar单编和替换:
首先修改完framework/base/core部分的代码后,通过以下命令编译framework.jar
make framework-minus-apex
编译出framework.jar后,先用第五步的方法执行remount。
然后把framework.jar push到system/framework/下面,同时还要删除这个目录下面的oat,arm,arm64三个目录(不删除会一直卡在开机动画),最后再运行下面的命令重启zygote,这样新替换的framework.jar就生效了。
adb shell stop;adb shell start;
services.jar单编和替换就比较简单:
首先修改完framework/base/services部分的代码后,通过以下命令编译services.jar
mmm framework/base/services -j12
编译出services.jar后,先用第五步的方法执行remount,然后push services.jar到system/framework下面,重启即可。
参考:
https://source.android.google.cn/source/downloading?hl=zh-cn
https://source.android.google.cn/docs/setup/about/build-numbers
https://developers.google.cn/android/drivers
https://android.googlesource.com/platform/manifest
https://blog.csdn.net/superlee1125/article/details/115491698
我正在编写一个小脚本来定位aws存储桶中的特定文件,并创建一个临时验证的url以发送给同事。(理想情况下,这将创建类似于在控制台上右键单击存储桶中的文件并复制链接地址的结果)。我研究过回形针,它似乎不符合这个标准,但我可能只是不知道它的全部功能。我尝试了以下方法:defauthenticated_url(file_name,bucket)AWS::S3::S3Object.url_for(file_name,bucket,:secure=>true,:expires=>20*60)end产生这种类型的结果:...-1.amazonaws.com/file_path/file.zip.A
当我尝试安装Ruby时遇到此错误。我试过查看this和this但无济于事➜~brewinstallrubyWarning:YouareusingOSX10.12.Wedonotprovidesupportforthispre-releaseversion.Youmayencounterbuildfailuresorotherbreakages.Pleasecreatepull-requestsinsteadoffilingissues.==>Installingdependenciesforruby:readline,libyaml,makedepend==>Installingrub
GivenIamadumbprogrammerandIamusingrspecandIamusingsporkandIwanttodebug...mmm...let'ssaaay,aspecforPhone.那么,我应该把“require'ruby-debug'”行放在哪里,以便在phone_spec.rb的特定点停止处理?(我所要求的只是一个大而粗的箭头,即使是一个有挑战性的程序员也能看到:-3)我已经尝试了很多位置,除非我没有正确测试它们,否则会发生一些奇怪的事情:在spec_helper.rb中的以下位置:require'rubygems'require'spork'
使用Ruby1.9.2运行IDE提示说需要gemruby-debug-base19x并提供安装它。但是,在尝试安装它时会显示消息Failedtoinstallgems.Followinggemswerenotinstalled:C:/ProgramFiles(x86)/JetBrains/RubyMine3.2.4/rb/gems/ruby-debug-base19x-0.11.30.pre2.gem:Errorinstallingruby-debug-base19x-0.11.30.pre2.gem:The'linecache19'nativegemrequiresinstall
我不知道为什么,但是当我设置这个设置时它无法编译设置:static_cache_control,[:public,:max_age=>300]这是我得到的syntaxerror,unexpectedtASSOC,expecting']'(SyntaxError)set:static_cache_control,[:public,:max_age=>300]^我只想将“过期”header设置为css、javaascript和图像文件。谢谢。 最佳答案 我猜您使用的是Ruby1.8.7。Sinatra文档中显示的语法似乎是在Ruby1.
我有:When/^(?:|I)follow"([^"]*)"(?:within"([^"]*)")?$/do|link,selector|with_scope(selector)doclick_link(link)endend我打电话的地方:Background:GivenIamanexistingadminuserWhenIfollow"CLIENTS"我的HTML是这样的:CLIENTS我一直收到这个错误:.F-.F--U-----U(::)failedsteps(::)nolinkwithtitle,idortext'CLIENTS'found(Capybara::Element
一、引擎主循环UE版本:4.27一、引擎主循环的位置:Launch.cpp:GuardedMain函数二、、GuardedMain函数执行逻辑:1、EnginePreInit:加载大多数模块int32ErrorLevel=EnginePreInit(CmdLine);PreInit模块加载顺序:模块加载过程:(1)注册模块中定义的UObject,同时为每个类构造一个类默认对象(CDO,记录类的默认状态,作为模板用于子类实例创建)(2)调用模块的StartUpModule方法2、FEngineLoop::Init()1、检查Engine的配置文件找出使用了哪一个GameEngine类(UGame
?博客主页:https://xiaoy.blog.csdn.net?本文由呆呆敲代码的小Y原创,首发于CSDN??学习专栏推荐:Unity系统学习专栏?游戏制作专栏推荐:游戏制作?Unity实战100例专栏推荐:Unity实战100例教程?欢迎点赞?收藏⭐留言?如有错误敬请指正!?未来很长,值得我们全力奔赴更美好的生活✨------------------❤️分割线❤️-------------------------
最近因为项目需要,需要将Android手机系统自带的某个系统软件反编译并更改里面某个资源,并重新打包,签名生成新的自定义的apk,下面我来介绍一下我的实现过程。APK修改,分为以下几步:反编译解包,修改,重打包,修改签名等步骤。安卓apk修改准备工作1.系统配置好JavaJDK环境变量2.需要root权限的手机(针对系统自带apk,其他软件免root)3.Auto-Sign签名工具4.apktool工具安卓apk修改开始反编译本文拿Android系统里面的Settings.apk做demo,具体如何将apk获取出来在此就不过多介绍了,直接进入主题:按键win+R输入cmd,打开命令窗口,并将路
Ruby是否有逐步调试器,类似于Perl的“perl-d”? 最佳答案 ruby-debug(对于ruby1.8),debugger(对于ruby1.9),byebug(对于ruby2.0)以及trepanning系列都有一个-x或--trace选项。在调试器内部,命令setlinetrace将打开或关闭线路跟踪。这是themanualforruby-debug原来的答案已经修改,因为数据噪声文章的链接,唉,不再有效了。还添加了ruby-debug的后继者 关于ruby-Ruby
