YOLOV5 + 双目相机实现三维测距
1. zed + yolov7 实现双目测距
2. zed+yolov4实现双目测距(直接调用,免标定)
3. zed+yolov5实现双目测距(直接调用,免标定)
4. 本文具体实现效果已在哔哩哔哩发布,点击跳转(欢迎投币点赞)
5. 如果有用zed相机的,可以参考我上边的两边文章👆👆👆直接调用内部相机参数,精度比双目测距好很多
下载链接1: https://download.csdn.net/download/qq_45077760/87233955 (CSDN)
下载链接2:https://github.com/up-up-up-up/yolov5_ceju (github)
我所做的是在10m以内的检测,没计算过具体误差,当然标定误差越小精度会好一点,其次注意光线、亮度等影响因素,当然检测范围效果跟相机的好坏也有很大关系
大致流程: 双目标定→双目校正→立体匹配→结合yolov5→深度测距
双目相机参数stereoconfig.py
双目相机标定误差越小越好,我这里误差为0.1,尽量使误差在0.2以下
import numpy as np
# 双目相机参数
class stereoCamera(object):
    def __init__(self):

        self.cam_matrix_left = np.array([[1101.89299, 0, 1119.89634],
                                         [0, 1100.75252, 636.75282],
                                         [0, 0, 1]])
        self.cam_matrix_right = np.array([[1091.11026, 0, 1117.16592],
                                          [0, 1090.53772, 633.28256],
                                          [0, 0, 1]])

        self.distortion_l = np.array([[-0.08369, 0.05367, -0.00138, -0.0009, 0]])
        self.distortion_r = np.array([[-0.09585, 0.07391, -0.00065, -0.00083, 0]])

        self.R = np.array([[1.0000, -0.000603116945856524, 0.00377055351856816],
                           [0.000608108737333211, 1.0000, -0.00132288199083992],
                           [-0.00376975166958581, 0.00132516525298933, 1.0000]])

        self.T = np.array([[-119.99423], [-0.22807], [0.18540]])
        self.baseline = 119.99423
以下我stereo.py里的对图像进行处理的代码
这些都是网上现成的,直接套用就可以
class stereo_dd:
    def __init__(self,imgl,imgr):
        self.left  = imgl
        self.right = imgr

    # 预处理
    def preprocess(self, img1, img2):
        # 彩色图->灰度图
        if(img1.ndim == 3):#判断为三维数组
            img1 = cv2.cvtColor(img1, cv2.COLOR_BGR2GRAY)  # 通过OpenCV加载的图像通道顺序是BGR
        if(img2.ndim == 3):
            img2 = cv2.cvtColor(img2, cv2.COLOR_BGR2GRAY)

        # 直方图均衡
        img1 = cv2.equalizeHist(img1)
        img2 = cv2.equalizeHist(img2)
        return img1, img2

    '''
    # 消除畸变
    def undistortion(self, image, camera_matrix, dist_coeff):
        undistortion_image = cv2.undistort(image, camera_matrix, dist_coeff)
        return undistortion_image
    '''
    # 消除畸变
    def undistortion(self, imagleft,imagright, camera_matrix_left, camera_matrix_right, dist_coeff_left,dist_coeff_right):
        undistortion_imagleft  = cv2.undistort(imagleft,  camera_matrix_left,  dist_coeff_left )
        undistortion_imagright = cv2.undistort(imagright, camera_matrix_right, dist_coeff_right)
        return undistortion_imagleft, undistortion_imagright

    # 畸变校正和立体校正
    def rectifyImage(self, image1, image2, map1x, map1y, map2x, map2y):
        rectifyed_img1 = cv2.remap(image1, map1x, map1y, cv2.INTER_AREA)
        rectifyed_img2 = cv2.remap(image2, map2x, map2y, cv2.INTER_AREA)
        return rectifyed_img1, rectifyed_img2

    # 立体校正检验----画线
    def draw_line(self, image1, image2):
        # 建立输出图像
        height = max(image1.shape[0], image2.shape[0])
        width = image1.shape[1] + image2.shape[1]

        output = np.zeros((height, width, 3), dtype=np.uint8)
        output[0:image1.shape[0], 0:image1.shape[1]] = image1
        output[0:image2.shape[0], image1.shape[1]:] = image2

        # 绘制等间距平行线
        line_interval = 50  # 直线间隔:50
        for k in range(height // line_interval):
            cv2.line(output, (0, line_interval * (k + 1)), (2 * width, line_interval * (k + 1)), (0, 255, 0), thickness=2, lineType=cv2.LINE_AA)

        return output

    # 视差计算
    def stereoMatchSGBM(self, left_image, right_image, down_scale=False):
        # SGBM匹配参数设置
        if left_image.ndim == 2:
            img_channels = 1
        else:
            img_channels = 3
        blockSize = 3
        paraml = {'minDisparity': 0,
                 'numDisparities': 128,
                 'blockSize': blockSize,
                 'P1': 8 * img_channels * blockSize ** 2,
                 'P2': 32 * img_channels * blockSize ** 2,
                 'disp12MaxDiff': -1,
                 'preFilterCap': 63,
                 'uniquenessRatio': 10,
                 'speckleWindowSize': 100,
                 'speckleRange': 1,
                 'mode': cv2.STEREO_SGBM_MODE_SGBM_3WAY
                 }

        # 构建SGBM对象
        left_matcher = cv2.StereoSGBM_create(**paraml)
        paramr = paraml
        paramr['minDisparity'] = -paraml['numDisparities']
        right_matcher = cv2.StereoSGBM_create(**paramr)

        # 计算视差图
        size = (left_image.shape[1], left_image.shape[0])
        if down_scale == False:
            disparity_left = left_matcher.compute(left_image, right_image)
            disparity_right = right_matcher.compute(right_image, left_image)

        else:
            left_image_down = cv2.pyrDown(left_image)
            right_image_down = cv2.pyrDown(right_image)
            factor = left_image.shape[1] / left_image_down.shape[1]

            disparity_left_half = left_matcher.compute(left_image_down, right_image_down)
            disparity_right_half = right_matcher.compute(right_image_down, left_image_down)
            disparity_left = cv2.resize(disparity_left_half, size, interpolation=cv2.INTER_AREA)
            disparity_right = cv2.resize(disparity_right_half, size, interpolation=cv2.INTER_AREA)
            disparity_left = factor * disparity_left
            disparity_right = factor * disparity_right

        trueDisp_left = disparity_left.astype(np.float32) / 16.
        trueDisp_right = disparity_right.astype(np.float32) / 16.
        return trueDisp_left, trueDisp_right
测距代码部分解析
这一部分我直接计算了目标检测框中心点的深度值,把中心点的深度值当作了距离
你也可以写个循环,计算平均值或者中位数,把他们当作深度值
if (accel_frame % fps_set == 0):
    t3 = time.time()
    thread.join()
    points_3d = thread.get_result()
    t4 = time.time()
    a = points_3d[int(y_0), int(x_0), 0] / 1000
    b = points_3d[int(y_0), int(x_0), 1] / 1000
    c = points_3d[int(y_0), int(x_0), 2] / 1000
    dis = ((a**2+b**2+c**2)**0.5)
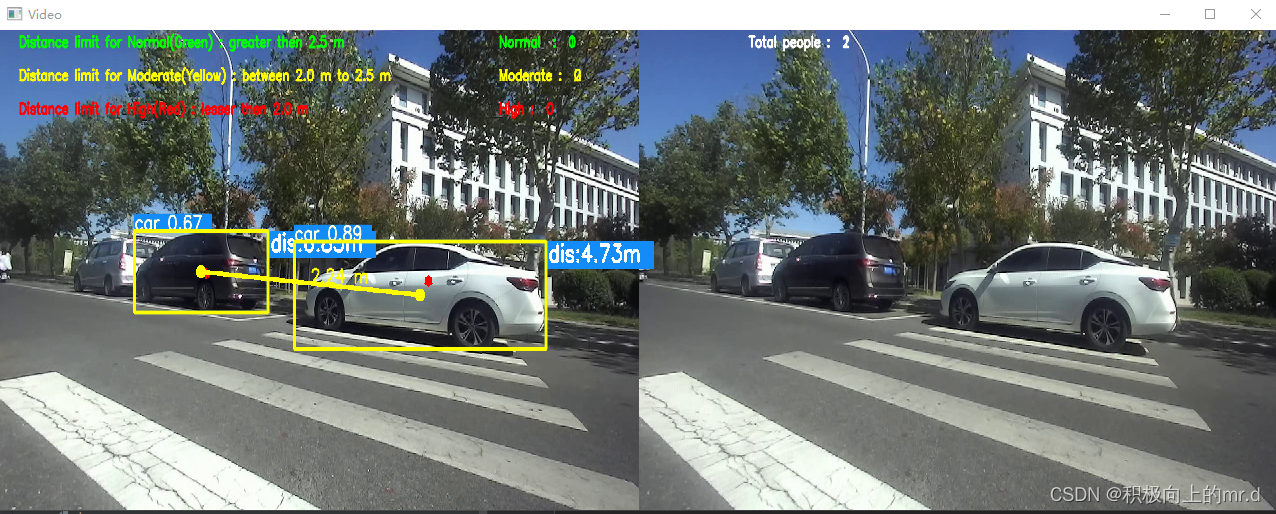
这里我加入了检测人与车之间的三维距离,分为了正常、中等、高风险三个距离等级
你也可以替换成人与人或者车与车等等
##########  plot_one_box 系列 ###########
if (distance != 0):  ## Add bbox to image
    label = f'{names[int(cls)]} {conf:.2f} '
    '''下边这几行如果不需要,可以改成
    plot_one_box(xyxy, im0, label=label, color=colors[int(cls)], line_thickness=3)
    我是做了分类,是为了计算人与汽车之间的距离写的'''
    if label is not None:
        if (label.split())[0] == 'person':
            people_coords.append(xyxy)
        if (label.split())[0] == 'car' or (label.split())[0] =='truck':
            car_coords.append(xyxy)
            #plot_dots_on_car(xyxy, im0)
        plot_one_box(xyxy, im0, label=label, color=colors[int(cls)],line_thickness=3)
##########  annotator.box_label 系列 ###########
if names[int(cls)] == "person":
     people_coords.append(xyxy)
     c = int(cls)  # integer class  整数类 1111111111
     label = None if hide_labels else (
         names[c] if hide_conf else f'{names[c]} {conf:.2f}')  # 111
     print("x:", point_cloud_value[0], "y:", point_cloud_value[1], "z:",
           point_cloud_value[2], "dis:", distance, '', label)
     # print("dis:", distance,  "W:", wide)
     txt = '{0}  dis:{1} '.format(label, distance)
     # annotator.box_label(xyxy, txt, color=(255, 0, 255))
     annotator.box_label(xyxy, txt, color=colors(c, True))
 if names[int(cls)] == "chair":
     car_coords.append(xyxy)
     c = int(cls)  # integer class  整数类 1111111111
     label = None if hide_labels else (names[c] if hide_conf else f'{names[c]} {conf:.2f}') # 111
     print("x:", point_cloud_value[0], "y:", point_cloud_value[1], "z:",
           point_cloud_value[2], "dis:", distance, '',label)
     #print("dis:", distance,  "W:", wide)
     txt = '{0}  dis:{1} '.format(label,distance)
     #annotator.box_label(xyxy, txt, color=(255, 0, 255))
     annotator.box_label(xyxy, txt, color = colors(c, True))
normal, intermediate, high = distancing(people_coords,car_coords, im0, intermediate, high,normal,dist_thres_lim=(2, 3))
主代码
加入了多线程处理,加快处理速度
import argparse
import time
from pathlib import Path
import threading
from threading import Thread
import cv2
import torch
import torch.backends.cudnn as cudnn
from numpy import random
import numpy as np
from utils.datasets import *  ##1111111111
#from utils.utils import *  # 111111111111
from PIL import Image, ImageDraw, ImageFont
from models.experimental import attempt_load
from utils.datasets import LoadStreams, LoadImages
from utils.general import check_img_size, check_requirements, check_imshow, non_max_suppression, apply_classifier, \
    scale_coords, xyxy2xywh, strip_optimizer, set_logging, increment_path
from utils.plots import plot_one_box
from utils.torch_utils import select_device, load_classifier, time_synchronized

from stereo.dianyuntu_yolo import preprocess, undistortion, getRectifyTransform, draw_line, rectifyImage, \
    stereoMatchSGBM  # , hw3ToN3, view_cloud ,DepthColor2Cloud
from stereo import stereoconfig
from stereo.stereo import stereo_dd
from stereo.stereo import get_median, stereo_threading, MyThread
intermediate = 0
high = 0
normal = 0
people_label = " "
normal_label = " "
inter_label = " "
high_label = " "
def detect(save_img=False):
    accel_frame = 0
    source, weights, view_img, save_txt, imgsz = opt.source, opt.weights, opt.view_img, opt.save_txt, opt.img_size
    webcam = source.isnumeric() or source.endswith('.txt') or source.lower().startswith(
        ('rtsp://', 'rtmp://', 'http://'))

    # Initialize
    set_logging()
    device = select_device(opt.device)
    half = device.type != 'cpu'

    # Load model
    model = attempt_load(weights, map_location=device)
    stride = int(model.stride.max())
    imgsz = check_img_size(imgsz,s=stride)
    if half:
        model.half()

    # Second-stage classifier
    classify = False
    if classify:
        modelc = load_classifier(name='resnet101', n=2)
        modelc.load_state_dict(torch.load('weights/resnet101.pt', map_location=device)['model']).to(device).eval()

    # Set Dataloader
    vid_path, vid_writer = None, None
    if webcam:
        save_stream_dir = Path(
            increment_path(Path("./runs/streams") / opt.name, exist_ok=opt.exist_ok))
        (save_stream_dir / 'labels' if save_txt else save_stream_dir).mkdir(parents=True,
                                                                            exist_ok=True)

        flag = 0
        view_img = check_imshow()
        cudnn.benchmark = True
        dataset = LoadStreams(source, img_size=imgsz, stride=stride)
        # 获取视频信息,线程抓取图片dataset类中imgs[0]是0个摄像头的图片,LoadStreams是迭代类---》dataset是一个迭代器
    else:
        # Directories
        save_dir = Path(increment_path(Path(opt.project) / opt.name, exist_ok=opt.exist_ok))
        (save_dir / 'labels' if save_txt else save_dir).mkdir(parents=True, exist_ok=True)

        save_img = True
        dataset = LoadImages(source, img_size=imgsz,
                             stride=stride)
        print("img_size:")
        print(imgsz)

    names = model.module.names if hasattr(model, 'module') else model.names
    colors = [[random.randint(0, 255) for _ in range(3)] for _ in names]

    ################################ stereo #############################
    if device.type != 'cpu':
        model(torch.zeros(1, 3, imgsz, imgsz).to(device).type_as(next(model.parameters())))  # run once
    t0 = time.time()  # 整个推理过程的开始计时


    config = stereoconfig_040_2.stereoCamera()
    # 立体校正
    map1x, map1y, map2x, map2y, Q = getRectifyTransform(720, 1280, config)
    # -----------------摄像头从此处开始反复循环-dataset为迭代器类--------------------------------
    for path, img, im0s, vid_cap in dataset:
        img = torch.from_numpy(img).to(device)
        img = img.half() if half else img.float()
        img /= 255.0
        if img.ndimension() == 3:
            img = img.unsqueeze(0)
        t1 = time_synchronized()
        pred = model(img, augment=opt.augment)[0]

        pred = non_max_suppression(pred, opt.conf_thres, opt.iou_thres, classes=opt.classes, agnostic=opt.agnostic_nms)
        t2 = time_synchronized()

        # Apply Classifier
        if classify:
            pred = apply_classifier(pred, modelc, img, im0s)

        # List to store bounding coordinates of people      1111111
        people_coords = []  # 1111111111
        car_coords = []
        # Process detections
        for i, det in enumerate(pred):
            if webcam:
                p, s, im0, frame = path[i], '%g: ' % i, im0s[
                    i].copy(), dataset.count
            else:
                p, s, im0, frame = path, '', im0s, getattr(dataset, 'frame', 0)

            fps_set = 10  # setting the frame
            if (accel_frame % fps_set == 0):
                thread = MyThread(stereo_threading,args=(config, im0, map1x, map1y, map2x, map2y, Q))
                thread.start()
                print(threading.active_count())
                print(threading.enumerate())
                print("############## Frame is %d !##################" % accel_frame)

            p = Path(p)
            if webcam:
                save_stream_path = str(save_stream_dir / "stream0.mp4")
            else:
                save_path = str(save_dir / p.name)
                txt_path = str(save_dir / 'labels' / p.stem) + (
                    '' if dataset.mode == 'image' else f'_{frame}')

            s += '%gx%g ' % img.shape[2:]
            gn = torch.tensor(im0.shape)[[1, 0, 1, 0]]

            if len(det):
                det[:, :4] = scale_coords(img.shape[2:], det[:, :4], im0.shape).round()
                for c in det[:, -1].unique():
                    n = (det[:, -1] == c).sum()
                    s += f"{n} {names[int(c)]} {'s' * (n > 1)} , "
                for *xyxy, conf, cls in reversed(det):

                    if (0 < xyxy[2] < 1280):
                        if save_txt:
                            xywh = (xyxy2xywh(torch.tensor(xyxy).view(1, 4)) / gn).view(-1).tolist()

                            print("xywh  x : %d, y : %d" % (xywh[0], xywh[1]))
                            line = (cls, *xywh, conf) if opt.save_conf else (cls, *xywh)
                            with open(txt_path + '.txt', 'a') as f:
                                f.write(('%g ' * len(line)).rstrip() % line + '\n')
                        if save_img or view_img:
                            x_center = (xyxy[0] + xyxy[2]) / 2
                            y_center = (xyxy[1] + xyxy[3]) / 2
                            x_0 = int(x_center)
                            y_0 = int(y_center)
                            if (0 < x_0 < 1280):
                                x1 = xyxy[0]
                                x2 = xyxy[2]
                                y1 = xyxy[1]
                                y2 = xyxy[3]

                                if (accel_frame % fps_set == 0):
                                    t3 = time.time()
                                    thread.join()
                                    points_3d = thread.get_result()
                                    t4 = time.time()
                                    print(f'{s}Stereo Done. ({t4 - t3:.3f}s)')
                                    a = points_3d[int(y_0), int(x_0), 0] / 1000
                                    b = points_3d[int(y_0), int(x_0), 1] / 1000
                                    c = points_3d[int(y_0), int(x_0), 2] / 1000
                                    dis = ((a**2+b**2+c**2)**0.5)
                                distance = []
                                distance.append(dis)
                                if (distance != 0):  ## Add bbox to image
                                    label = f'{names[int(cls)]} {conf:.2f} '
                                    '''下边这几行如果不需要,可以改成
                                    plot_one_box(xyxy, im0, label=label, color=colors[int(cls)], line_thickness=3)
                                    我是做了分类,是为了计算人与汽车之间的距离写的'''
                                    if label is not None:
                                        if (label.split())[0] == 'person':
                                            people_coords.append(xyxy)

                                        if (label.split())[0] == 'car' or (label.split())[0] =='truck':
                                            car_coords.append(xyxy)
                                            #plot_dots_on_car(xyxy, im0)
                                        plot_one_box(xyxy, im0, label=label, color=colors[int(cls)],line_thickness=3)

                                    text_xy_0 = "*"
                                    cv2.putText(im0, text_xy_0, (int(x_0), int(y_0)), cv2.FONT_ITALIC, 1.2,(0, 0, 255), 3)

                                    print()
                                    print('点 (%d, %d) 的 %s 距离左摄像头的相对距离为 %0.2f m' % (x_center, y_center, label, distance))
                                    text_dis_avg = "dis:%0.2fm" % distance

                                    # only put dis on frame
                                    cv2.rectangle(im0, (int(x1 + (x2 - x1)), int(y1)),(int(x1 + (x2 - x1) + 5 + 210), int(y1 + 40)), colors[int(cls)],-1)  # 画框存三维坐标
                                    cv2.putText(im0, text_dis_avg, (int(x1 + (x2 - x1) + 5), int(y1 + 30)),cv2.FONT_ITALIC, 1.2, (255, 255, 255), 3)
                                    '''同理,下边这一行如果不需要可以去除,我也是做行人与车辆之间距离用的'''
                                    normal, intermediate, high = distancing(people_coords,car_coords, im0, intermediate, high,normal,dist_thres_lim=(2, 3))

            t5 = time_synchronized()  # stereo time end
            print(f'{s}yolov5 Done. ({t2 - t1:.3f}s)')


            if (accel_frame % fps_set == 0):
                print(f'{s}yolov5+stereo Done. ({t5 - t1:.3f}s)')

            if cv2.waitKey(1) & 0xFF == ord('q'):
                if save_txt or save_img:
                    s = f"\n{len(list(save_dir.glob('labels/*.txt')))} labels saved to {save_dir / 'labels'}" if save_txt else ''

                if view_img:
                    s = save_stream_path
                print(f"Results saved to {s}")
                print(f'All Done. ({time.time() - t0:.3f}s)')
                vid_writer.release()
                exit()

            # Stream results
            if view_img:
                if (dataset.mode == 'stream') & (flag == 0):
                    if isinstance(vid_writer, cv2.VideoWriter):
                        vid_writer.release()  # release previous video writer

                    fourcc = 'mp4v'  # output video codec
                    fps = 24  # vid_cap.get(cv2.CAP_PROP_FPS)
                    w = 2560  # int(vid_cap.get(cv2.CAP_PROP_FRAME_WIDTH))
                    h = 720  # int(vid_cap.get(cv2.CAP_PROP_FRAME_HEIGHT))
                    print("save_stream_dir is %s" % save_stream_dir)
                    print("save_stream_path is %s" % save_stream_path)
                    vid_writer = cv2.VideoWriter(save_stream_path, cv2.VideoWriter_fourcc(*fourcc), fps, (w, h))
                    flag = 1

                vid_writer.write(im0)
                cv2.namedWindow("Webcam", cv2.WINDOW_NORMAL)
                cv2.resizeWindow("Webcam", 1280, 480)
                cv2.moveWindow("Webcam", 0, 100)
                cv2.imshow("Webcam", im0)
                cv2.waitKey(1)

            # Save results
            if save_img:
                if dataset.mode == 'image':
                    cv2.imwrite(save_path, im0)
                else:
                    if vid_path != save_path:
                        vid_path = save_path
                        if isinstance(vid_writer, cv2.VideoWriter):
                            vid_writer.release()

                        fourcc = 'mp4v'
                        fps = 24
                        w = int(vid_cap.get(cv2.CAP_PROP_FRAME_WIDTH))
                        h = int(vid_cap.get(cv2.CAP_PROP_FRAME_HEIGHT))
                        vid_writer = cv2.VideoWriter(save_path, cv2.VideoWriter_fourcc(*fourcc), fps, (w, h))
                    vid_writer.write(im0)
                    cv2.namedWindow("Video", cv2.WINDOW_NORMAL)
                    cv2.resizeWindow("Video", 1280, 480)
                    cv2.moveWindow("Video", 0, 0)
                    cv2.imshow("Video", im0)
                    cv2.waitKey(1)

        print("frame %d is done!" % accel_frame)
        accel_frame += 1
    if save_txt or save_img:
        s = f"\n{len(list(save_dir.glob('labels/*.txt')))} labels saved to {save_dir / 'labels'}" if save_txt else ''
        print(f"Results saved to {save_dir}{s}")
    print(f'All Done. ({time.time() - t0:.3f}s)')


if __name__ == '__main__':
    parser = argparse.ArgumentParser()
    parser.add_argument('--weights', nargs='+', type=str, default='./yolov5s.pt', help='model.pt path(s)')
    parser.add_argument('--source', type=str, default='./data/video/test.mp4',help='source')
    parser.add_argument('--img-size', type=int, default=640, help='inference size (pixels)')
    parser.add_argument('--conf-thres', type=float, default=0.25, help='object confidence threshold')
    parser.add_argument('--iou-thres', type=float, default=0.45, help='IOU threshold for NMS')
    parser.add_argument('--device', default='', help='cuda device, i.e. 0 or 0,1,2,3 or cpu')
    parser.add_argument('--view-img', action='store_true', help='display results')
    parser.add_argument('--save-txt', action='store_true', help='save results to *.txt')
    parser.add_argument('--save-conf', action='store_true', help='save confidences in --save-txt labels')
    parser.add_argument('--classes', nargs='+', type=int, help='filter by class: --class 0, or --class 0 2 3')
    parser.add_argument('--agnostic-nms', action='store_true', help='class-agnostic NMS')
    parser.add_argument('--augment', action='store_true', help='augmented inference')
    parser.add_argument('--update', action='store_true', help='update all models')
    parser.add_argument('--project', default='runs/detect', help='save results to project/name')
    parser.add_argument('--name', default='exp', help='save results to project/name')
    parser.add_argument('--exist-ok', action='store_true', help='existing project/name ok, do not increment')
    opt = parser.parse_args()
    print(opt)
    check_requirements()
    with torch.no_grad():
        if opt.update:
            for opt.weights in ['yolov5s.pt', 'yolov5m.pt', 'yolov5l.pt', 'yolov5x.pt']:
                detect()
                strip_optimizer(opt.weights)
        else:
            detect()
有点乱,后续会慢慢完善,下边是测距后的图,精度不是很高
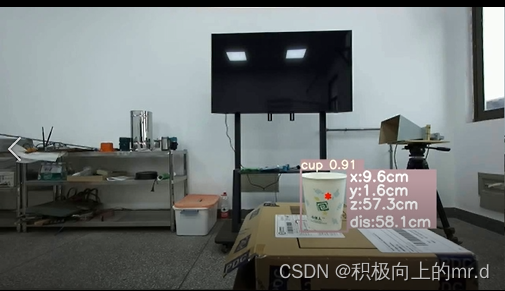
单目标测距
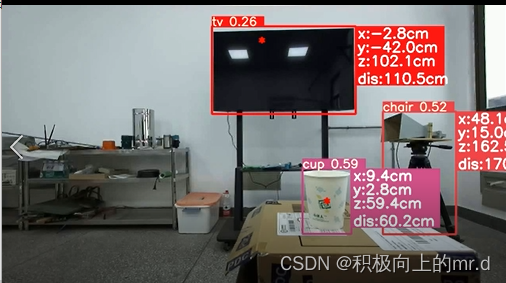
多目标测距
目标之间三维距离检测计数
检测效果(视频展示)
关闭。这个问题是opinion-based.它目前不接受答案。想要改进这个问题?更新问题,以便editingthispost可以用事实和引用来回答它.关闭4年前。Improvethisquestion我想在固定时间创建一系列低音和高音调的哔哔声。例如:在150毫秒时发出高音调的蜂鸣声在151毫秒时发出低音调的蜂鸣声200毫秒时发出低音调的蜂鸣声250毫秒的高音调蜂鸣声有没有办法在Ruby或Python中做到这一点?我真的不在乎输出编码是什么(.wav、.mp3、.ogg等等),但我确实想创建一个输出文件。
这个问题在这里已经有了答案:关闭10年前。PossibleDuplicate:Pythonconditionalassignmentoperator对于这样一个简单的问题表示歉意,但是谷歌搜索||=并不是很有帮助;)Python中是否有与Ruby和Perl中的||=语句等效的语句?例如:foo="hey"foo||="what"#assignfooifit'sundefined#fooisstill"hey"bar||="yeah"#baris"yeah"另外,类似这样的东西的通用术语是什么?条件分配是我的第一个猜测,但Wikipediapage跟我想的不太一样。
什么是ruby的rack或python的Java的wsgi?还有一个路由库。 最佳答案 来自Python标准PEP333:Bycontrast,althoughJavahasjustasmanywebapplicationframeworksavailable,Java's"servlet"APImakesitpossibleforapplicationswrittenwithanyJavawebapplicationframeworktoruninanywebserverthatsupportstheservletAPI.ht
华为OD机试题本篇题目:明明的随机数题目输入描述输出描述:示例1输入输出说明代码编写思路最近更新的博客华为od2023|什么是华为od,od薪资待遇,od机试题清单华为OD机试真题大全,用Python解华为机试题|机试宝典【华为OD机试】全流程解析+经验分享,题型分享,防作弊指南华为o
我想解析一个已经存在的.mid文件,改变它的乐器,例如从“acousticgrandpiano”到“violin”,然后将它保存回去或作为另一个.mid文件。根据我在文档中看到的内容,该乐器通过program_change或patch_change指令进行了更改,但我找不到任何在已经存在的MIDI文件中执行此操作的库.他们似乎都只支持从头开始创建的MIDI文件。 最佳答案 MIDIpackage会为您完成此操作,但具体方法取决于midi文件的原始内容。一个MIDI文件由一个或多个音轨组成,每个音轨是十六个channel中任何一个上的
本文主要介绍在使用Selenium进行自动化测试或者任务时,对于使用了iframe的页面,如何定位iframe中的元素文章目录场景描述解决方案具体代码场景描述当我们在使用Selenium进行自动化测试的时候,可能会遇到一些界面或者窗体是使用HTML的iframe标签进行承载的。对于iframe中的标签,如果直接查找是无法找到的,会抛出没有找到元素的异常。比如近在咫尺的例子就是,CSDN的登录窗体就是使用的iframe,大家可以尝试通过F12开发者模式查看到的tag_name,class_name,id或者xpath来定位中的页面元素,会抛出NoSuchElementException异常。解决
2022/8/4更新支持加入水印水印必须包含透明图像,并且水印图像大小要等于原图像的大小pythonconvert_image_to_video.py-f30-mwatermark.pngim_dirout.mkv2022/6/21更新让命令行参数更加易用新的命令行使用方法pythonconvert_image_to_video.py-f30im_dirout.mkvFFMPEG命令行转换一组JPG图像到视频时,是将这组图像视为MJPG流。我需要转换一组PNG图像到视频,FFMPEG就不认了。pyav内置了ffmpeg库,不需要系统带有ffmpeg工具因此我使用ffmpeg的python包装p
ValidPalindromeGivenastring,determineifitisapalindrome,consideringonlyalphanumericcharactersandignoringcases. [#125]Example:"Aman,aplan,acanal:Panama"isapalindrome."raceacar"isnotapalindrome.Haveyouconsiderthatthestringmightbeempty?Thisisagoodquestiontoaskduringaninterview.Forthepurposeofthisproblem
是否可以在PyYAML或Ruby的Psych引擎中禁用创建anchor和引用(并有效地显式列出冗余数据)?也许我在网上搜索时遗漏了一些东西,但在Psych中似乎没有太多可用的选项,而且我也无法确定PyYAML是否允许这样做.基本原理是我必须序列化一些数据并将其以可读的形式传递给一个不是真正的技术同事进行手动验证。有些数据是多余的,但我需要以最明确的方式列出它们以提高可读性(anchor和引用是提高效率的好概念,但不是人类可读性)。Ruby和Python是我选择的工具,但如果有其他一些相当简单的方法来“展开”YAML文档,它可能就可以了。 最佳答案
我很好奇.NET将如何影响Python和Ruby应用程序。用IronPython/IronRuby编写的应用程序是否会非常特定于.NET环境,以至于它们实际上将变得特定于平台?如果他们不使用任何.NET功能,那么IronPython/IronRuby相对于非.NET同类产品的优势是什么? 最佳答案 我不能说任何关于IronRuby的东西,但是大多数Python实现(如IronPython、Jython和PyPy)都试图尽可能忠实于CPython实现。不过,IronPython正在迅速成为这方面的佼佼者之一,并且在PlanetPyth