文章目录:
dlib官网:http://dlib.net/
dlib模型文件和源码下载:http://dlib.net/files/
1、人脸检测,dlib官方例子face_detector.py
这个人脸检测器是使用现在经典的直方图定向梯度(HOG)特征,结合线性分类器,图像金字塔和滑动窗口检测方案。这种类型的物体检测器是相当普遍的,除了人脸之外,还能够检测许多类型的半刚性物体。因此,如果您对制作自己的对象检测器感兴趣,那么请阅读train_object _detector.py示例程序。
# coding=utf-8
"""
Copyright (c) 2018-2022. All Rights Reserved.

@author: shliang
@email: shliang0603@gmail.com
"""

import dlib


def dlib_detector_face(img_path):
    print("Processing file: {}".format(img_path))
    img = dlib.load_rgb_image(img_path)
    # dlib正面人脸检测器
    detector = dlib.get_frontal_face_detector()
    win = dlib.image_window()
    # 1 表示图像向上采样一次,图像将被放大一倍,这样可以检测更多的人脸
    dets = detector(img, 1)
    print("Number of faces detected: {}".format(len(dets)))
    for i, d in enumerate(dets):
        # 人脸的左上和右下角坐标
        print("Detection {}: Left: {} Top: {} Right: {} Bottom: {}".format(i, d.left(), d.top(), d.right(), d.bottom()))

    win.clear_overlay()
    win.set_image(img)
    win.add_overlay(dets)
    dlib.hit_enter_to_continue()

    # 让检测器获取人脸得分score,约有把握的检测,得分越高。
    # 第三个参数调整检测的阈值,负值将返回更多的检测结果,而正值将返回较少的检测结果
    # 同时idx会告诉你那个面部对应的检测结果,用来广泛识别不同方向的面孔,idx的具体含义我还没有弄清楚
    # 如果第三个参数设置位-2就会输出更多的检测结果,如果你设置为1可能就没有检测结果
    dets, scores, idx = detector.run(img, 1, -1)   # 把-1以上的score的检测结果全部输出
    for i, d in enumerate(dets):
        print("Detection {}, score: {}, face_type:{}".format(d, scores[i], idx[i]))


if __name__ == '__main__':
    dlib_detector_face('./images/single_face.jpg')
    dlib_detector_face('./images/multi_face.jpg')
输出结果:
Processing file: ./images/single_face.jpg
Number of faces detected: 1
Detection 0: Left: 118 Top: 139 Right: 304 Bottom: 325
Hit enter to continue
Detection [(118, 139) (304, 325)], score: 1.6567257084382887, face_type:0
Detection [(55, 218) (98, 262)], score: -0.6576982940533731, face_type:2

Processing file: ./images/multi_face.jpg
Number of faces detected: 3
Detection 0: Left: 339 Top: 82 Right: 468 Bottom: 211
Detection 1: Left: 163 Top: 140 Right: 270 Bottom: 247
Detection 2: Left: 265 Top: 136 Right: 354 Bottom: 226
Hit enter to continue
Detection [(339, 82) (468, 211)], score: 1.9180631791420404, face_type:1
Detection [(163, 140) (270, 247)], score: 1.5263808407319899, face_type:0
Detection [(265, 136) (354, 226)], score: 1.153857532931697, face_type:0
如下是检测结果:
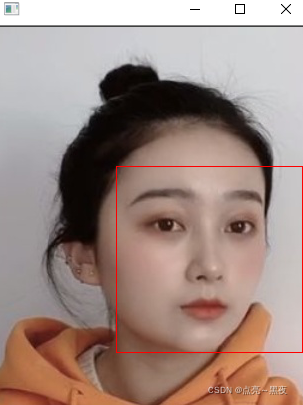
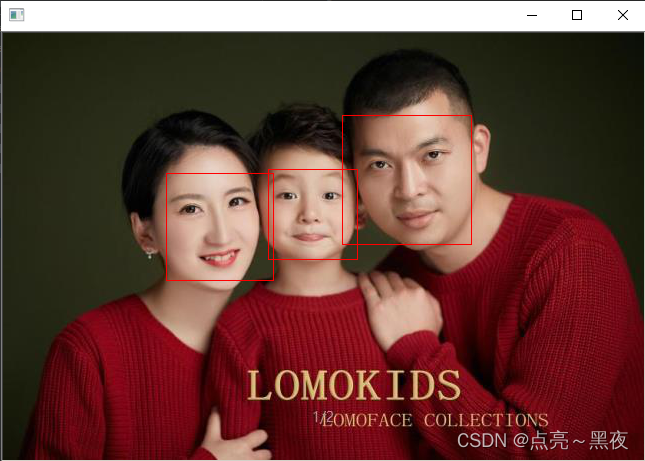
1、把上面的代码改用opencv读取与显示
# coding=utf-8
"""
Copyright (c) 2018-2022. All Rights Reserved.

@author: shliang
@email: shliang0603@gmail.com
"""

import dlib
import cv2


def dlib_detector_face(img_path):
    print("Processing file: {}".format(img_path))
    img = cv2.imread(img_path)
    # dlib正面人脸检测器
    detector = dlib.get_frontal_face_detector()
    # 1 表示图像向上采样一次,图像将被放大一倍,这样可以检测更多的人脸
    dets = detector(img, 1)
    print('dets:', dets)  # dets: rectangles[[(118, 139) (304, 325)]]
    print("Number of faces detected: {}".format(len(dets)))
    for i, d in enumerate(dets):
        # 人脸的左上和右下角坐标
        left = d.left()
        top = d.top()
        right = d.right()
        bottom = d.bottom()
        print("Detection {}: Left: {} Top: {} Right: {} Bottom: {}".format(i, left, top, right, bottom))
        cv2.rectangle(img, (left, top), (right, bottom), color=(0, 255, 255), thickness=1, lineType=cv2.LINE_AA)
    cv2.imshow('detect result', img)
    cv2.waitKey(0)


if __name__ == '__main__':
    dlib_detector_face('./images/single_face.jpg')
    dlib_detector_face('./images/multi_face.jpg')
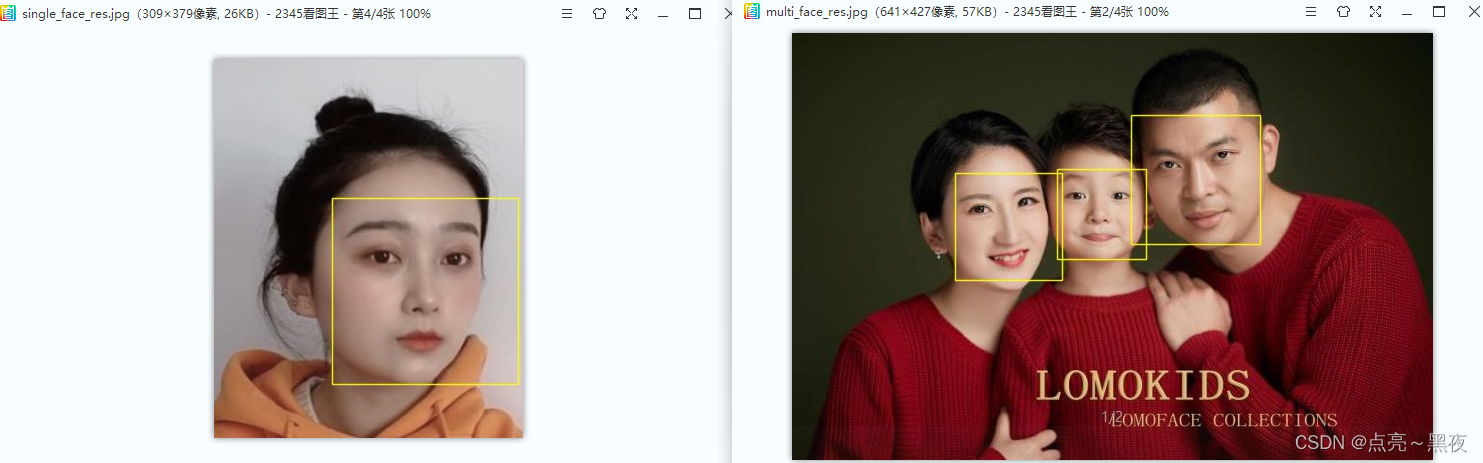
1、dlib人脸检测效果
dlib人脸检测并不是很准确,如果人脸比较小,有大角度偏转,很有可能就检测不到人脸,我以为dlib版本更新了,人脸检测的模型也会更新,其实不是,dlib是一个机器学习库,里面有很多算法的!
2、使用dlib的场景
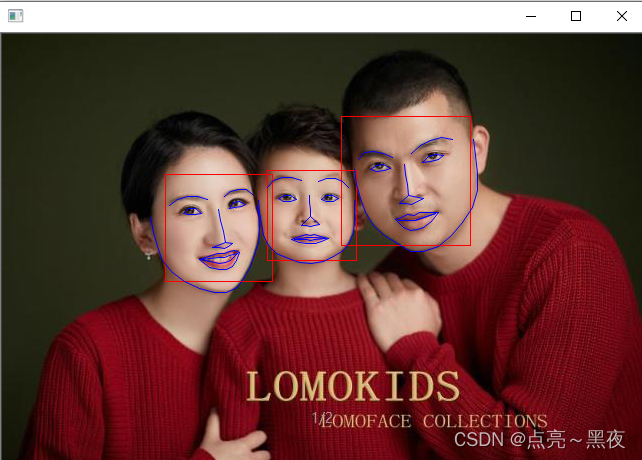
1、人脸关键点检测,dlib官方例子face_detector.py
# coding=utf-8
"""
Copyright (c) 2018-2022. All Rights Reserved.

@author: shliang
@email: shliang0603@gmail.com
"""


import dlib

# 下载人脸关键点检测模型: http://dlib.net/files/shape_predictor_68_face_landmarks.dat.bz2
predictor_path = './model/shape_predictor_68_face_landmarks.dat'


detector = dlib.get_frontal_face_detector()
predictor = dlib.shape_predictor(predictor_path)
win = dlib.image_window()

# face_image_path = './images/single_face.jpg'
face_image_path = './images/multi_face.jpg'
print("Processing file: {}".format(face_image_path))
img = dlib.load_rgb_image(face_image_path)

win.clear_overlay()
win.set_image(img)

# Ask the detector to find the bounding boxes of each face. The 1 in the
# second argument indicates that we should upsample the image 1 time. This
# will make everything bigger and allow us to detect more faces.
dets = detector(img, 1)
print("Number of faces detected: {}".format(len(dets)))
for k, d in enumerate(dets):
    print("Detection {}: Left: {} Top: {} Right: {} Bottom: {}".format(
        k, d.left(), d.top(), d.right(), d.bottom()))
    # Get the landmarks/parts for the face in box d.
    shape = predictor(img, d)
    print("Part 0: {}, Part 1: {} ...".format(shape.part(0),
                                              shape.part(1)))
    # Draw the face landmarks on the screen.
    win.add_overlay(shape)

win.add_overlay(dets)
dlib.hit_enter_to_continue()
# coding=utf-8
"""
Copyright (c) 2018-2022. All Rights Reserved.

@author: shliang
@email: shliang0603@gmail.com
"""
import os
import cv2
import dlib
import numpy as np


pred_types = {'face': ((0, 17), (0.682, 0.780, 0.909, 0.5)),
              'eyebrow1': ((17, 22), (1.0, 0.498, 0.055, 0.4)),
              'eyebrow2': ((22, 27), (1.0, 0.498, 0.055, 0.4)),
              'nose': ((27, 31), (0.345, 0.239, 0.443, 0.4)),
              'nostril': ((31, 36), (0.345, 0.239, 0.443, 0.4)),
              'eye1': ((36, 42), (0.596, 0.875, 0.541, 0.3)),
              'eye2': ((42, 48), (0.596, 0.875, 0.541, 0.3)),
              'lips': ((48, 60), (0.596, 0.875, 0.541, 0.3)),
              'teeth': ((60, 68), (0.596, 0.875, 0.541, 0.4))
              }

# 绘制直线和关键点
def draw_line(img, shape, i):
    cv2.line(img, pt1=(shape.part(i).x, shape.part(i).y), pt2=(shape.part(i+1).x, shape.part(i+1).y),
             color=(0, 255, 0), thickness=1, lineType=cv2.LINE_AA)

# 连成一圈
def draw_line_circle(img, shape, i, start, end):
    cv2.line(img, pt1=(shape.part(i).x, shape.part(i).y), pt2=(shape.part(i + 1).x, shape.part(i + 1).y),
             color=(0, 255, 0), thickness=1, lineType=cv2.LINE_AA)

    cv2.line(img, pt1=(shape.part(start).x, shape.part(start).y), pt2=(shape.part(end).x, shape.part(end).y),
             color=(0, 255, 0), thickness=1, lineType=cv2.LINE_AA)


# 使用训练好的模型shape_predictor_68_face_landmarks.dat检测出人脸上的68个关键点
def dlib_face_keypoint_detector(img_path, save_result=True):

    # 检测人脸框
    detector = dlib.get_frontal_face_detector()

    # 下载人脸关键点检测模型: http://dlib.net/files/shape_predictor_68_face_landmarks.dat.bz2
    predictor_path = './model/shape_predictor_68_face_landmarks.dat'
    # 检测人脸关键点
    predictor = dlib.shape_predictor(predictor_path)

    img = cv2.imread(img_path)
    print("Processing file: {}".format(img_path))

    # # 1 表示图像向上采样一次,图像将被放大一倍,这样可以检测更多的人脸
    dets = detector(img, 1)
    print("Number of faces detected: {}".format(len(dets)))
    for k, d in enumerate(dets):
        x1 = d.left()
        y1 = d.top()
        x2 = d.right()
        y2 = d.bottom()
        print("Detection {}: Left: {} Top: {} Right: {} Bottom: {}".format(k, x1, y1, x2, y2))
        cv2.rectangle(img, (x1, y1), (x2, y2), color=(0, 255, 255), thickness=1, lineType=cv2.LINE_AA)
        # Get the landmarks/parts for the face in box d.
        shape = predictor(img, d)
        # print(dir(shape))  # 'num_parts', 'part', 'parts', 'rect'
        print(shape.num_parts)  # 68   打印出关键点的个数
        print(shape.rect)  # 检测到每个面部的矩形框 [(118, 139) (304, 325)]
        print(shape.parts())  # points[(147, 182), (150, 197), (154, 211), (160, 225),...,(222, 227), (215, 228)]   # 68个关键点坐标
        # print(type(shape.part(0)))  # <class 'dlib.point'>
        # 打印出第一个关键点和第2个关键点的坐标
        print("Part 0: {}, Part 1: {} ...".format(shape.part(0), shape.part(1)))

        # 可以把关键点转换成shape为(68,2)的矩阵
        landmarks = np.matrix([[p.x, p.y] for p in shape.parts()])
        # 绘制所有的关键点
        for i, point in enumerate(shape.parts()):
            x = point.x
            y = point.y
            cv2.circle(img, (x, y), 1, color=(255, 0, 255), thickness=1, lineType=cv2.LINE_AA)
            cv2.putText(img, str(i+1), (x, y), fontFace=cv2.FONT_HERSHEY_SCRIPT_SIMPLEX,
                        fontScale=0.3, color=(255, 255, 0))

            # 连接关键点
            if i + 1 < 17:  # face
                draw_line(img, shape, i)
            elif 17 < i + 1 < 22:  # eyebrow1
                draw_line(img, shape, i)
            elif 22 < i + 1 < 27:  # eyebrow2
                draw_line(img, shape, i)
            elif 27 < i + 1 < 31:  # nose
                draw_line(img, shape, i)
            elif 31 < i + 1 < 36:  # nostril
                draw_line(img, shape, i)
            elif 36 < i + 1 < 42:  # eye1
                draw_line_circle(img, shape, i, 36, 42 - 1)
            elif 42 < i + 1 < 48:  # eye2
                draw_line_circle(img, shape, i, 42, 48 - 1)
            elif 48 < i + 1 < 60:  # lips
                draw_line_circle(img, shape, i, 48, 60 - 1)
            elif 60 < i + 1 < 68:  # teeth
                draw_line_circle(img, shape, i, 60, 68 - 1)

    cv2.imshow('detect keypoints', img)
    if save_result:
        dir, filename = os.path.split(img_path)
        save_filename = os.path.join(dir, filename.split('.')[0] + '_keypoint' + '.' + filename.split('.')[1])
        cv2.imwrite(save_filename, img)
    cv2.waitKey(0)


if __name__ == '__main__':
    dlib_face_keypoint_detector('./images/single_face.jpg')
    # dlib_face_keypoint_detector('./images/face.jpg')
    dlib_face_keypoint_detector('./images/multi_face.jpg')
注意:
    # 检测人脸框
    detector = dlib.get_frontal_face_detector()

    # 下载人脸关键点检测模型: http://dlib.net/files/shape_predictor_68_face_landmarks.dat.bz2
    predictor_path = './model/shape_predictor_68_face_landmarks.dat'
    # 检测人脸关键点
    predictor = dlib.shape_predictor(predictor_path)
如果循环检测多张图片,detector和predictor只需要在最开始调用,相当于是加载模型,不用每次都加载,如果每次都加载你检测一张图片的时间大概是2s,如果只在最开始加载,检测每张图片关键点的时间为50ms左右
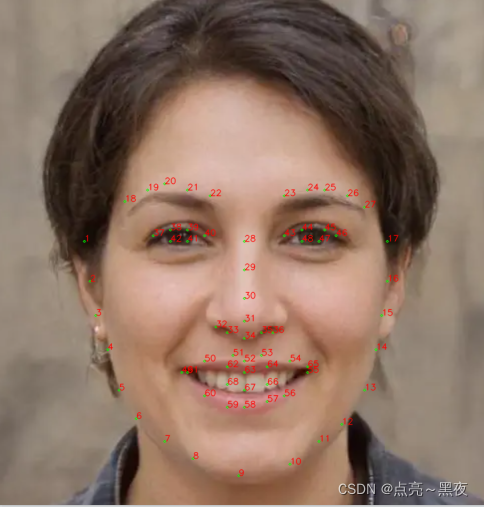
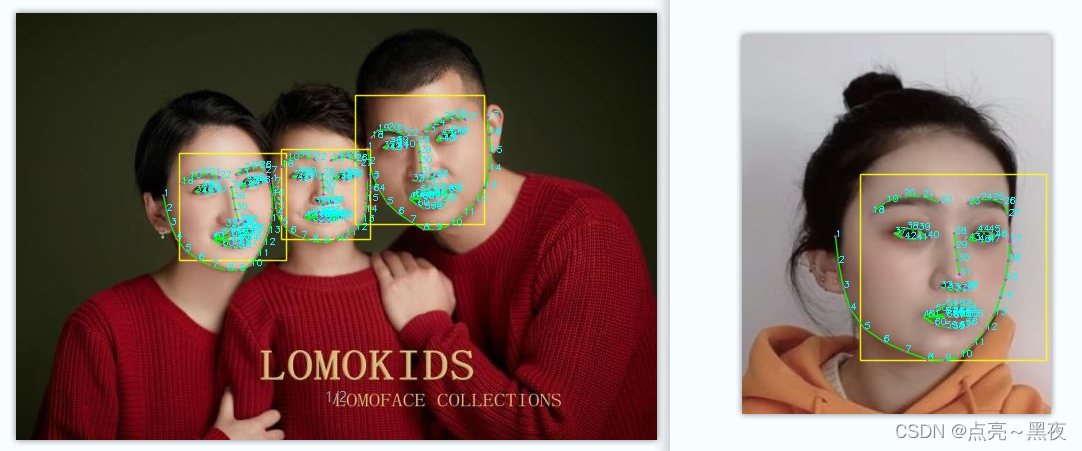
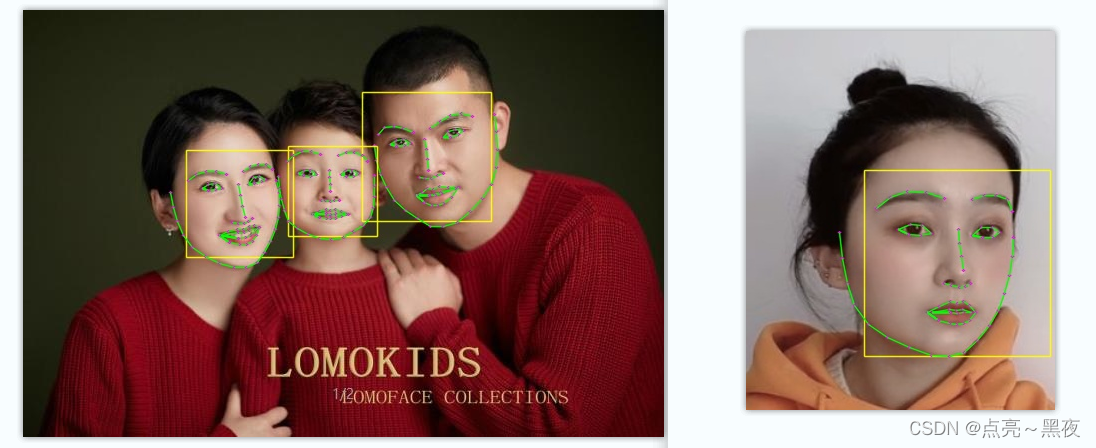
看下68个关键点的位置,然后进行连线:
1、首先需要需要构建一个人脸识别的底库(专业点就叫gallery),也就是每一个人在数据库中注册一张人脸图片,这里假设./images/recog_face/register是我们注册的人脸数据,每张人脸数据是包含人脸ID(这里我就先简单用文件名表示,如reba,表示的是迪丽热巴,实际场景中一般注册的都是提前提取好的人脸特征)
2、提取注册图片中的人脸
3、提取待识别图片中的人脸特征:./images/recog_face/test_face:目录下待识别的人脸,我们并不知道每张图片中人脸的真实身份(我的图片命名成已知身份,只是为了方便后续和识别结果做对比)
4、特征比对:将待识别图片中提取的人脸特征 和 注册数据中的每张人脸特征都做比对,然后取特征距离最近的一张注册数据,如果距离小于设定的阈值,则该注册数据的ID身份则为识别未知人脸的身份,否则在数据库中没有正确匹配识别都人脸
注意:
在提取图片中人脸特征之前,是先经过了检测人脸 和 人脸对齐操作的,可以看下面具体代码!
如下是我人脸识别图片相关路径:
images/recog_face/register:注册的人脸images/recog_face/test_face:待识别人脸图片images/recog_face/recog_result:保存识别人脸的结果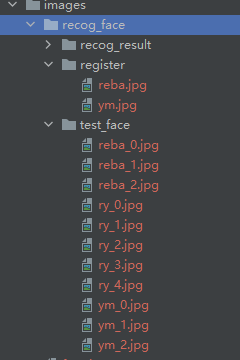
1、dlib通过检测出每个人脸框,然后对人脸框中的每张人脸进行特征提取,每张人脸特征映射为一个128维的向量,当两个向量之间的Euclidean距离小于0.6时,可以认为属于同一个人
2、这里需要用到两个模型:
shape_predictor_68_face_landmarks.datdlib_face_recognition_resnet_model_v1.dat以上判定标准在LFW(Labeled Faces in the Wild)数据集上可以获得99.38%的识别准确率
3、你也可以这样调用这个函数:face_descriptor = facerec.compute_face_descriptor(img, shape, 100, 0.25) 在LFW(Labeled Faces in the Wild)上:
所以选择你可以根据需要选择使不使用该参数。
解释一下:
第三个参数100:告诉代码抖动/重新采样图像的次数。当将其设置为100时,它将对稍微修改过的面部版本执行100次面部描述符提取,并返回平均结果。您还可以选择一个更中间的值,比如10,它的速度只有10倍,但仍然可以获得99.3%的LFW精度。
第四个参数0.25:是脸周围的填充。如果填充== 0,那么对齐时将会在面部周围被紧密裁剪。设置更大的填充值将导致更松散的裁剪。特别是0.5的填充值将使裁剪区域的宽度加倍,即值为1会是三倍,以此类推。还有另一个compute_face_descriptor重载,它可以将一个对齐的图像作为输入。注意,将对齐的图像生成为dlib是很重要的。Get_face_chip会这样做,即大小必须是150x150,居中并缩放。
# coding=utf-8
"""
Copyright (c) 2018-2022. All Rights Reserved.

@author: shliang
@email: shliang0603@gmail.com
"""
import cv2
import os
import dlib
import glob
import numpy as np


# 计算两个特征向量的欧式距离
# 定义一个计算Euclidean距离的函数
def Eucl_distance(a, b):
    '''
    d = 0
    for i in range(len(a)):
    	d += (a[i] - b[i]) * (a[i] - b[i])
    return np.sqrt(d)
    :param a:
    :param b:
    :return:
    '''
    return np.linalg.norm(a - b, ord=2)


# 提取人脸的128维特征向量
def extract_face_feature(img_array):
    predictor_path = './model/shape_predictor_68_face_landmarks.dat'
    face_rec_model_path = './model/dlib_face_recognition_resnet_model_v1.dat'

    # 导入需要的模型,人脸检测、人脸68个关键点检测模型、人脸识别模型
    detector = dlib.get_frontal_face_detector()
    predictor = dlib.shape_predictor(predictor_path)
    facerec = dlib.face_recognition_model_v1(face_rec_model_path)

    # 当前帧中所有人脸的特征

    # 1 表示图像向上采样一次,图像将被放大一倍,这样可以检测更多的人脸
    dets = detector(img_array, 1)
    print("Number of faces detected: {}".format(len(dets)))

    # 一张图片中可能有多张脸,每张都要验证,同时保存每张人脸的矩形框坐标,用于后续处理
    all_face_feature = []
    all_face_rect = []
    # Now process each face we found.
    for k, d in enumerate(dets):
        x1 = d.left()
        y1 = d.top()
        x2 = d.right()
        y2 = d.bottom()
        print("Detection {}: Left: {} Top: {} Right: {} Bottom: {}".format(k, x1, y1, x2, y2))
        all_face_rect.append([x1, y1, x2, y2])
        shape = predictor(img_array, d)
        # Draw the face landmarks on the screen so we can see what face is currently being processed.

        # 把人脸的特征表示成128维向量,然后计算两张人脸的128维向量之间的欧式距离,一般来说如果距离小于0.6认为是同一个人
        # 如果距离大于0.6则认为是不同的人!
        face_descriptor = facerec.compute_face_descriptor(img_array, shape)    # 人脸特征秒描述子

        print("Computing descriptor on aligned image ..")

        # 使用get_face_chip函数生成对齐后的图像
        face_chip = dlib.get_face_chip(img_array, shape)

        # 然后将对齐后图像chip(aligned image)传给api
        face_descriptor_from_prealigned_image = facerec.compute_face_descriptor(face_chip)
        # print(type(face_descriptor_from_prealigned_image))  # <class 'dlib.vector'>
        # print(dir(face_descriptor_from_prealigned_image))  # 'resize', 'set_size', 'shape'
        # print(face_descriptor_from_prealigned_image.shape)  # (128, 1)    表示的是特征向量的值
        # print('face_descriptor_from_prealigned_image:', face_descriptor_from_prealigned_image)
        # 可以把128维的特征向量转换为numpy数组类型
        face_descriptor_from_prealigned_image_np = np.array(face_descriptor_from_prealigned_image)
        all_face_feature.append(face_descriptor_from_prealigned_image_np)
    feature_rect = list(zip(all_face_feature, all_face_rect))
    return feature_rect


# 先提取数据库中的特征,当前你也可以把特征提前保存到一个csv文件或这数据库中
def extract_register_face_feature():
    register_face_feature = {}
    img_paths = glob.glob('./images/recog_face/register/*.jpg')
    for img_path in img_paths:
        name = os.path.split(img_path)[-1].split('.')[0]
        img = cv2.imread(img_path)
        feature_rect = extract_face_feature(img)
        register_face_feature[name] = feature_rect[0][0]
    return register_face_feature

def main(save_result=True):
    # 注册人脸特征
    all_regiter_feature_dict = extract_register_face_feature()

    # 读取待验证身份的图片
    face_img_paths = glob.glob('./images/recog_face/test_face/*.jpg')
    for img_path in face_img_paths:
        img_name = os.path.split(img_path)[-1]
        img = cv2.imread(img_path)
        h, w, c = img.shape
        all_feature_rect = extract_face_feature(img)
        for feature_rect in all_feature_rect:
            face_feat = feature_rect[0]
            x1, y1, x2, y2 = feature_rect[1]
            cv2.rectangle(img, (x1, y1), (x2, y2), color=(0, 255, 255), thickness=1, lineType=cv2.LINE_AA)
            # cv2.putText(img, str(i+1), (x, y), fontFace=cv2.FONT_HERSHEY_SCRIPT_SIMPLEX,
            #             fontScale=0.3, color=(255, 255, 0))
            cv2.putText(img, img_name, (20, h-20), fontFace=cv2.FONT_HERSHEY_SIMPLEX,
                        fontScale=0.8, color=(0, 0, 255), thickness=2, lineType=cv2.LINE_AA)
            cv2.putText(img, 'Detect Face: {}'.format(len(all_feature_rect)), (20, h - 50), fontFace=cv2.FONT_HERSHEY_SIMPLEX,
                        fontScale=0.8, color=(0, 0, 255), thickness=2, lineType=cv2.LINE_AA)

            # 当前人脸特征和数据库中每张脸比对以下,并计算距离,然后记录
            all_dist_dict = dict()
            for reg_name, reg_feat in all_regiter_feature_dict.items():
                # print(reg_feat)
                # print(face_feat)
                print(f'src image name: {img_name}, reg image name: {reg_name}')
                dist = Eucl_distance(reg_feat, face_feat)
                print('dist:', dist)
                all_dist_dict[dist] = reg_name
            print('all dist with reg: ', all_dist_dict)
            print(all_dist_dict.keys())
            # print(type(all_dist_dict.keys()[0]))

            print(list(all_dist_dict.keys()))
            print(any(list(all_dist_dict.keys())) < 0.4)
            '''
            >>> any([0.38222860571657313, 0.5497940177651175])<0.4
            False
            # 浮点型返回貌似有点问题,应该返回True才对呀
            '''
            min_dist = min(list(all_dist_dict.keys()))
            if min_dist < 0.5:
                reg_name = all_dist_dict[min_dist]
                if reg_name == "ym":
                    # name = "杨幂"
                    reg_name = "Yang Mi"
                if reg_name == "reba":
                    # name = "迪丽热巴"
                    reg_name = "Reba"
                # cv2.putText(img, 'recog result: {}'.format(reg_name), (50, h-50), fontFace=cv2.FONT_HERSHEY_SIMPLEX,
                #             fontScale=1, color=(0, 0, 255), thickness=2, lineType=cv2.LINE_AA)
                cv2.putText(img, reg_name, (x1, y1-2), fontFace=cv2.FONT_HERSHEY_SIMPLEX,
                            fontScale=0.8, color=(255, 255, 0), thickness=2, lineType=cv2.LINE_AA)

            else:
                # cv2.putText(img, 'recog result: unknown', (50, h-50), fontFace=cv2.FONT_HERSHEY_SIMPLEX,
                #             fontScale=1, color=(0, 0, 255), thickness=2, lineType=cv2.LINE_AA)
                cv2.putText(img, 'unknown', (x1, y1-2), fontFace=cv2.FONT_HERSHEY_SIMPLEX,
                            fontScale=0.8, color=(255, 255, 0), thickness=2, lineType=cv2.LINE_AA)

        if save_result:
            save_name = img_name.split('.')[0] + '_result.' + img_name.split('.')[1]
            save_filename = os.path.join('./images/recog_face/recog_result', save_name)
            cv2.imwrite(save_filename, img)
        cv2.imshow('detect face', img)
        cv2.waitKey(0)


if __name__ == '__main__':
    main()
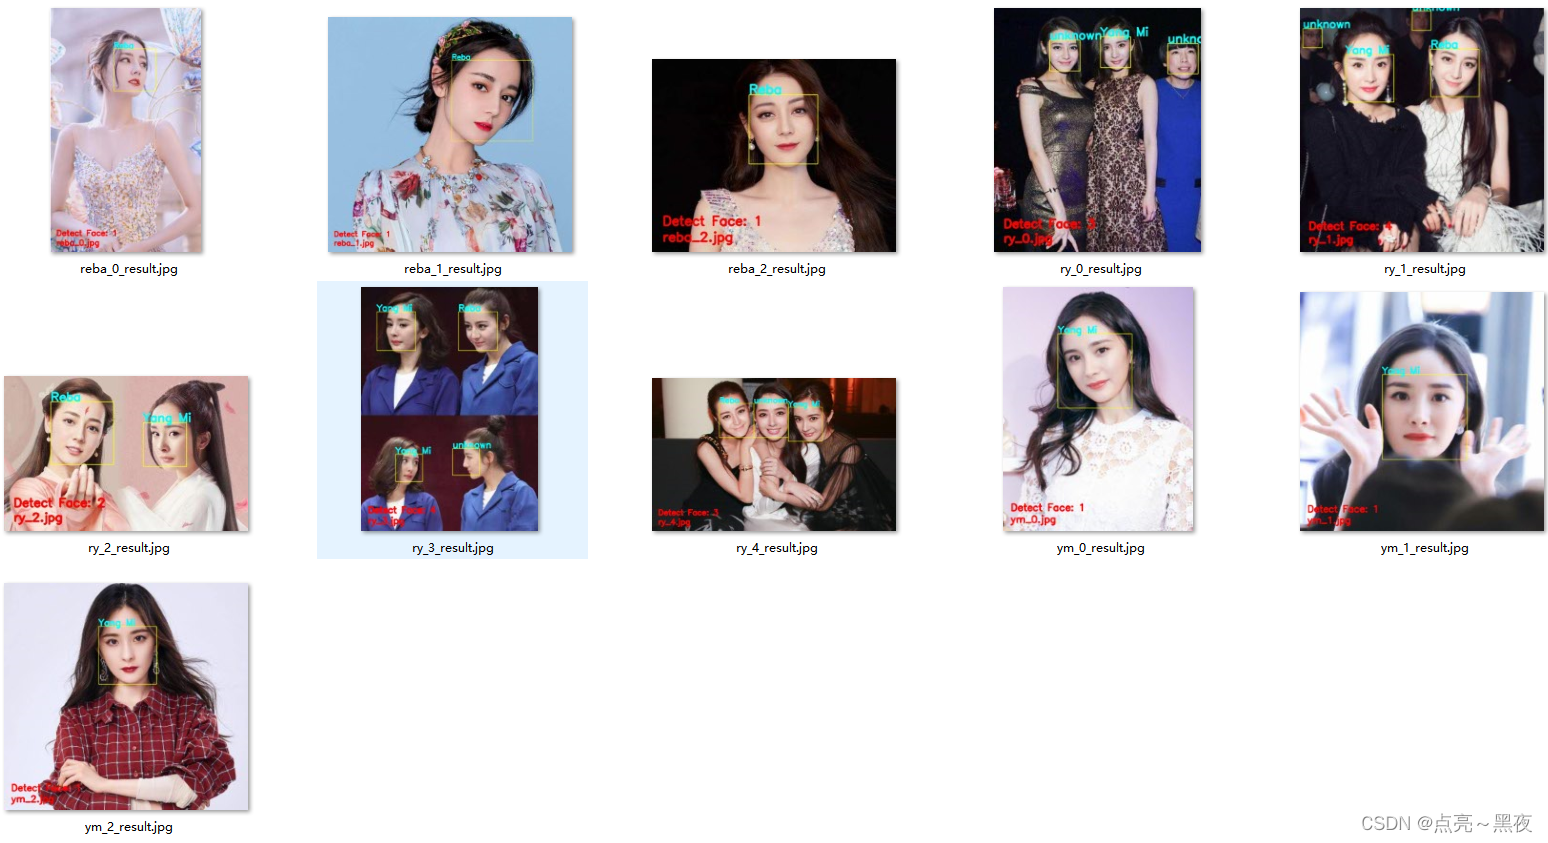
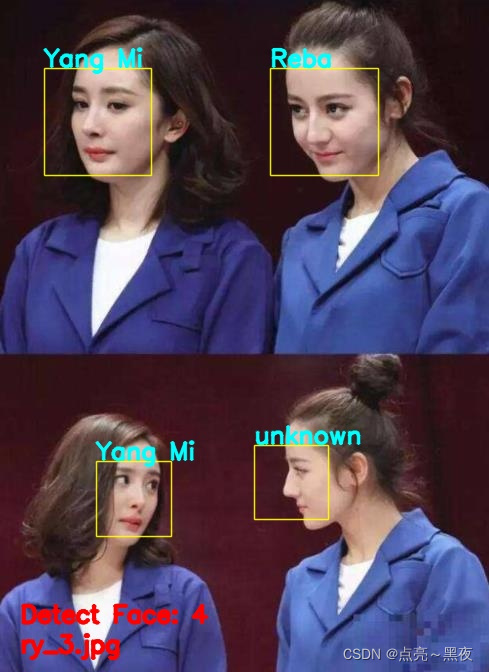
如下时人脸识别的结果:
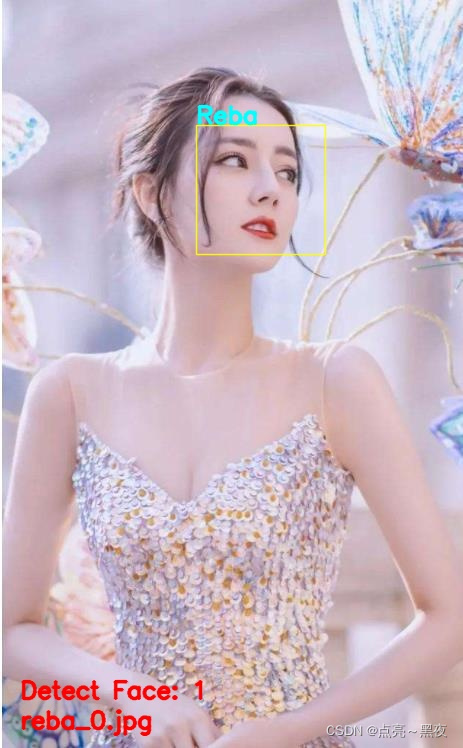
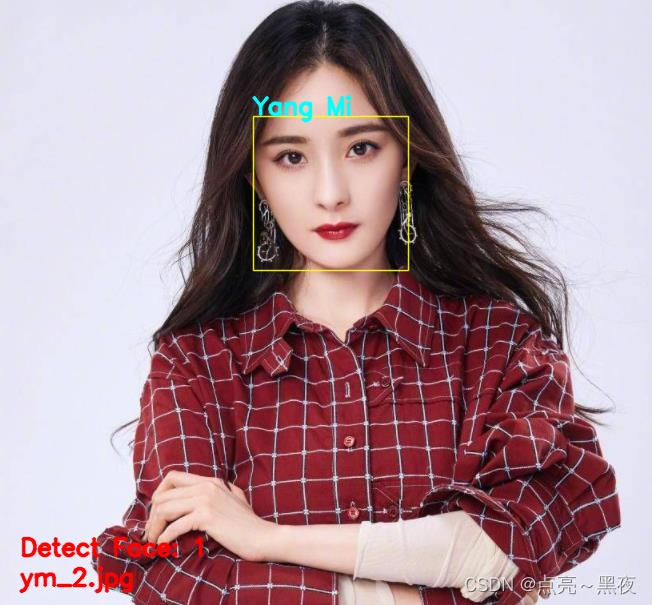
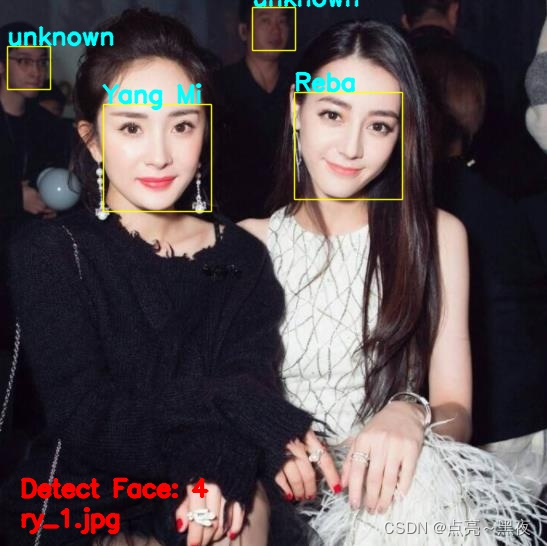
再调几张:
1、首先注册(入库)的图片的质量要好
2、需要选择一个合适的阈值,虽然dlib介绍如再LFW上准确率有有91.3%,但是再实际场景中这个准确率肯定会大打折扣的
3、dlib人脸识别的速度也不是很快,还有很多地方需要优化的,通过了解dlib人脸识别可以大概了解做人脸识别的一个基本流程:
具体做成一个人脸识别系统,还有很多细节,以及对自己的人脸识别系统的评测等!
参考:https://blog.csdn.net/weixin_33696106/article/details/87951676
# coding=utf-8
"""
Copyright (c) 2018-2022. All Rights Reserved.

@author: shliang
@email: shliang0603@gmail.com
"""

import os
import dlib
import glob
import cv2
import numpy as np
from collections import Counter

def dlib_face_cluster():
    predictor_path = './model/shape_predictor_68_face_landmarks.dat'
    face_rec_model_path = './model/dlib_face_recognition_resnet_model_v1.dat'
    # 图片来源:https://github.com/davisking/dlib/tree/master/examples/johns
    faces_path = glob.glob('./images/cluster/johns/*/*.jpg')
    output_folder_path = './images/cluster/johns_output'


    detector = dlib.get_frontal_face_detector()
    predictor = dlib.shape_predictor(predictor_path)
    facerec = dlib.face_recognition_model_v1(face_rec_model_path)


    descriptors = []
    images = []


    # 获取所有人脸的关键点检测结果 和 128D向量表示
    for img_path in faces_path:
        print("Processing file: {}".format(img_path))
        img = cv2.imread(img_path)


        dets = detector(img, 1)
        print("Number of faces detected: {}".format(len(dets)))

        # 处理检测到每张人脸
        for k, d in enumerate(dets):
            # shape 检测到人脸的关键点
            shape = predictor(img, d)
            # print(dir(shape))  # 'num_parts', 'part', 'parts', 'rect'
            print(shape.num_parts)  # 68   打印出关键点的个数
            print(shape.rect)  # 检测到每个面部的矩形框 [(118, 139) (304, 325)]
            print(
                shape.parts())  # points[(147, 182), (150, 197), (154, 211), (160, 225),...,(222, 227), (215, 228)]   # 68个关键点坐标
            # print(type(shape.part(0)))  # <class 'dlib.point'>
            # 打印出第一个关键点和第2个关键点的坐标
            print("Part 0: {}, Part 1: {} ...".format(shape.part(0), shape.part(1)))

            # 可以把关键点转换成shape为(68,2)的矩阵
            landmarks = np.matrix([[p.x, p.y] for p in shape.parts()])

            # face_descriptor 是128D的人脸特征向量
            face_descriptor = facerec.compute_face_descriptor(img, shape)

            descriptors.append(face_descriptor)
            images.append((img, shape))

    # 聚类人脸:以0.5为阈值进行聚类,并找出人脸数量最多的类
    labels = dlib.chinese_whispers_clustering(descriptors, 0.5)
    num_classes = len(set(labels))
    print("Number of clusters: {}".format(num_classes))  # Number of clusters: 5
    biggest_class = Counter(labels).most_common(1)
    print(biggest_class)  # [(0, 11)]

    # Find biggest class
    biggest_class = None
    biggest_class_length = 0
    for i in range(0, num_classes):
        class_length = len([label for label in labels if label == i])
        if class_length > biggest_class_length:
            biggest_class_length = class_length
            biggest_class = i

    print("Biggest cluster id number: {}".format(biggest_class))  # Biggest cluster id number: 0
    print("Number of faces in biggest cluster: {}".format(biggest_class_length))  # Number of faces in biggest cluster: 11

    # 找到最多类的索引
    indices = []
    for i, label in enumerate(labels):
        if label == biggest_class:
            indices.append(i)

    print("Indices of images in the biggest cluster: {}".format(str(indices)))
    # Indices of images in the biggest cluster: [0, 1, 2, 3, 4, 5, 6, 7, 8, 9, 10]


if __name__ == '__main__':
    dlib_face_cluster()
1、源码
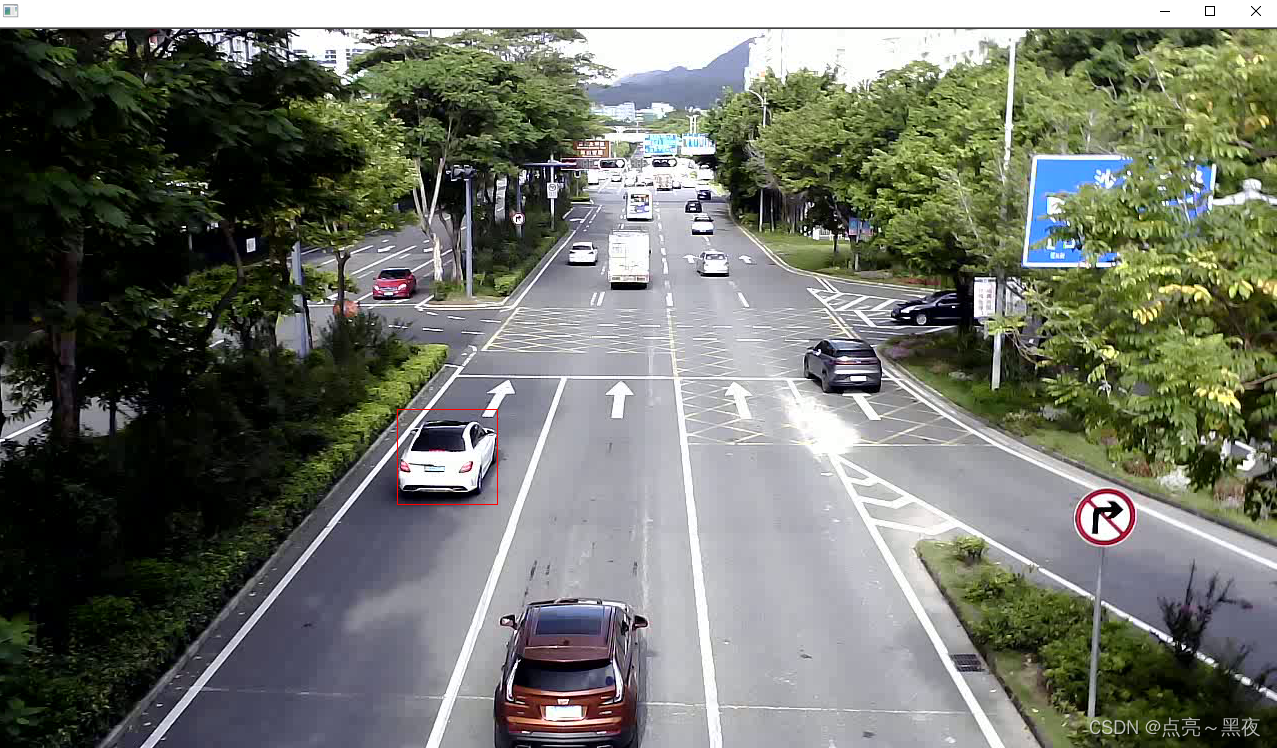
视频第一帧的位置,就是矩形框的坐标# coding=utf-8
"""
Copyright (c) 2018-2022. All Rights Reserved.
@author: shliang
@email: shliang0603@gmail.com
"""
import dlib
import cv2
# 物体追踪是指,对于视频文件,在第一帧指定一个矩形区域,对于后续帧自动追踪和更新区域的位置
def dlib_video_object_tracking():
tracker = dlib.correlation_tracker()
win = dlib.image_window()
cap = cv2.VideoCapture('./images/cars_cut.mp4')
i = 0
while True:
ret, frame = cap.read()
frame = cv2.cvtColor(frame, cv2.COLOR_BGR2RGB)
# 首先指定要追踪物体所在的矩形框位置
if i == 0:
tracker.start_track(frame, dlib.rectangle(400, 380, 500, 475))
# 后续帧,自动追踪
else:
tracker.update(frame)
i += 1
win.clear_overlay()
win.set_image(frame)
win.add_overlay(tracker.get_position())
dlib.hit_enter_to_continue()
if __name__ == '__main__':
dlib_video_object_tracking()
第一帧:
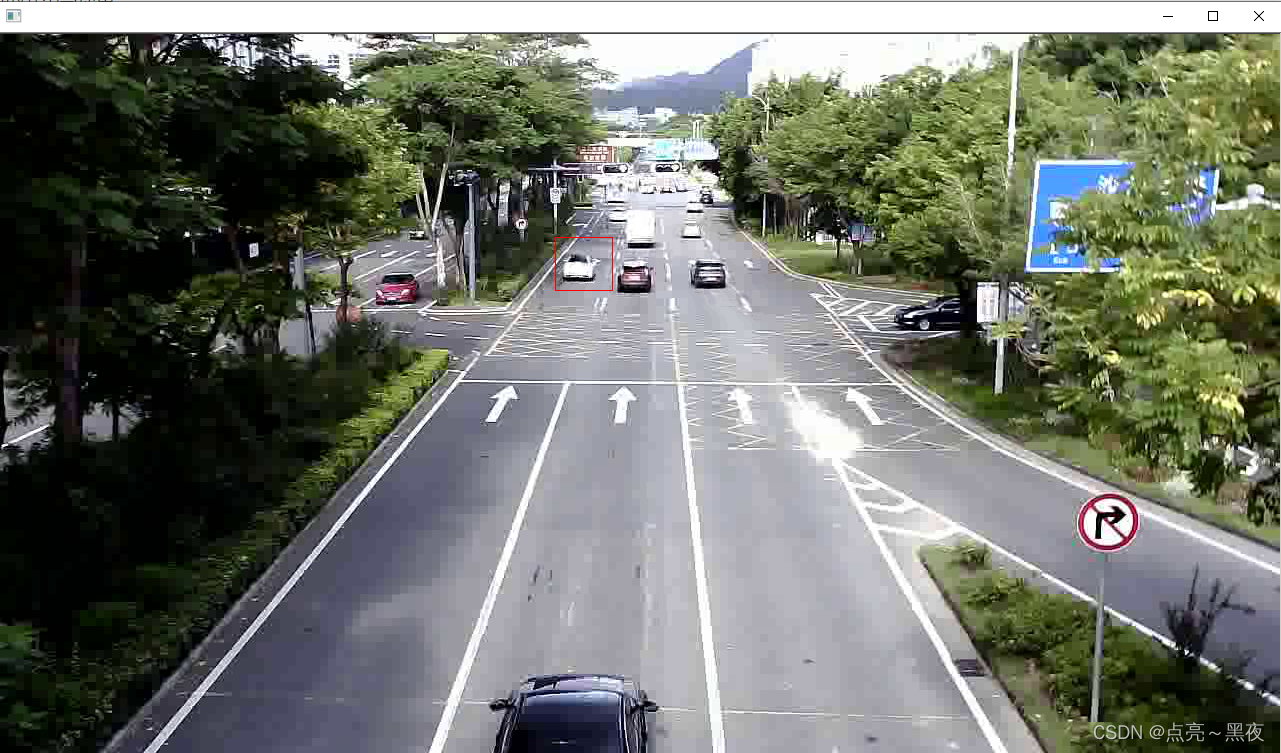
第N帧的跟踪结果:
2、改进:
通过python+opencv,用鼠标的方式获取视频中待跟踪目标框:
很好奇,就使用rubyonrails自动化单元测试而言,你们正在做什么?您是否创建了一个脚本来在cron中运行rake作业并将结果邮寄给您?git中的预提交Hook?只是手动调用?我完全理解测试,但想知道在错误发生之前捕获错误的最佳实践是什么。让我们理所当然地认为测试本身是完美无缺的,并且可以正常工作。下一步是什么以确保他们在正确的时间将可能有害的结果传达给您? 最佳答案 不确定您到底想听什么,但是有几个级别的自动代码库控制:在处理某项功能时,您可以使用类似autotest的内容获得关于哪些有效,哪些无效的即时反馈。要确保您的提
在控制台中反复尝试之后,我想到了这种方法,可以按发生日期对类似activerecord的(Mongoid)对象进行分组。我不确定这是完成此任务的最佳方法,但它确实有效。有没有人有更好的建议,或者这是一个很好的方法?#eventsisanarrayofactiverecord-likeobjectsthatincludeatimeattributeevents.map{|event|#converteventsarrayintoanarrayofhasheswiththedayofthemonthandtheevent{:number=>event.time.day,:event=>ev
我正在编写一个包含C扩展的gem。通常当我写一个gem时,我会遵循TDD的过程,我会写一个失败的规范,然后处理代码直到它通过,等等......在“ext/mygem/mygem.c”中我的C扩展和在gemspec的“扩展”中配置的有效extconf.rb,如何运行我的规范并仍然加载我的C扩展?当我更改C代码时,我需要采取哪些步骤来重新编译代码?这可能是个愚蠢的问题,但是从我的gem的开发源代码树中输入“bundleinstall”不会构建任何native扩展。当我手动运行rubyext/mygem/extconf.rb时,我确实得到了一个Makefile(在整个项目的根目录中),然后当
这是一道面试题,我没有答对,但还是很好奇怎么解。你有N个人的大家庭,分别是1,2,3,...,N岁。你想给你的大家庭拍张照片。所有的家庭成员都排成一排。“我是家里的friend,建议家庭成员安排如下:”1岁的家庭成员坐在这一排的最左边。每两个坐在一起的家庭成员的年龄相差不得超过2岁。输入:整数N,1≤N≤55。输出:摄影师可以拍摄的照片数量。示例->输入:4,输出:4符合条件的数组:[1,2,3,4][1,2,4,3][1,3,2,4][1,3,4,2]另一个例子:输入:5输出:6符合条件的数组:[1,2,3,4,5][1,2,3,5,4][1,2,4,3,5][1,2,4,5,3][
我收到这个错误:RuntimeError(自动加载常量Apps时检测到循环依赖当我使用多线程时。下面是我的代码。为什么会这样?我尝试多线程的原因是因为我正在编写一个HTML抓取应用程序。对Nokogiri::HTML(open())的调用是一个同步阻塞调用,需要1秒才能返回,我有100,000多个页面要访问,所以我试图运行多个线程来解决这个问题。有更好的方法吗?classToolsController0)app.website=array.join(',')putsapp.websiteelseapp.website="NONE"endapp.saveapps=Apps.order("
我已经构建了一些serverspec代码来在多个主机上运行一组测试。问题是当任何测试失败时,测试会在当前主机停止。即使测试失败,我也希望它继续在所有主机上运行。Rakefile:namespace:specdotask:all=>hosts.map{|h|'spec:'+h.split('.')[0]}hosts.eachdo|host|begindesc"Runserverspecto#{host}"RSpec::Core::RakeTask.new(host)do|t|ENV['TARGET_HOST']=hostt.pattern="spec/cfengine3/*_spec.r
我们的git存储库中目前有一个Gemfile。但是,有一个gem我只在我的环境中本地使用(我的团队不使用它)。为了使用它,我必须将它添加到我们的Gemfile中,但每次我checkout到我们的master/dev主分支时,由于与跟踪的gemfile冲突,我必须删除它。我想要的是类似Gemfile.local的东西,它将继承从Gemfile导入的gems,但也允许在那里导入新的gems以供使用只有我的机器。此文件将在.gitignore中被忽略。这可能吗? 最佳答案 设置BUNDLE_GEMFILE环境变量:BUNDLE_GEMFI
这似乎非常适得其反,因为太多的gem会在window上破裂。我一直在处理很多mysql和ruby-mysqlgem问题(gem本身发生段错误,一个名为UnixSocket的类显然在Windows机器上不能正常工作,等等)。我只是在浪费时间吗?我应该转向不同的脚本语言吗? 最佳答案 我在Windows上使用Ruby的经验很少,但是当我开始使用Ruby时,我是在Windows上,我的总体印象是它不是Windows原生系统。因此,在主要使用Windows多年之后,开始使用Ruby促使我切换回原来的系统Unix,这次是Linux。Rub
之前在培训新生的时候,windows环境下配置opencv环境一直教的都是网上主流的vsstudio配置属性表,但是这个似乎对新生来说难度略高(虽然个人觉得完全是他们自己的问题),加之暑假之后对cmake实在是爱不释手,且这样配置确实十分简单(其实都不需要配置),故斗胆妄言vscode下配置CV之法。其实极为简单,图比较多所以很长。如果你看此文还配不好,你应该思考一下是不是自己的问题。闲话少说,直接开始。0.CMkae简介有的人到大二了都不知道cmake是什么,我不说是谁。CMake是一个开源免费并且跨平台的构建工具,可以用简单的语句来描述所有平台的编译过程。它能够根据当前所在平台输出对应的m
动漫制作技巧是很多新人想了解的问题,今天小编就来解答与大家分享一下动漫制作流程,为了帮助有兴趣的同学理解,大多数人会选择动漫培训机构,那么今天小编就带大家来看看动漫制作要掌握哪些技巧?一、动漫作品首先完成草图设计和原型制作。设计草图要有目的、有对象、有步骤、要形象、要简单、符合实际。设计图要一致性,以保证制作的顺利进行。二、原型制作是根据设计图纸和制作材料,可以是手绘也可以是3d软件创建。在此步骤中,要注意的问题是色彩和平面布局。三、动漫制作制作完成后,加工成型。完成不同的表现形式后,就要对设计稿进行加工处理,使加工的难易度降低,并得到一些基本准确的概念,以便于后续的大样、准确的尺寸制定。四、
