
💂作者简介: THUNDER王,一名热爱财税和SAP ABAP编程以及热爱分享的博主。目前于江西师范大学会计学专业大二本科在读,同时任汉硕云(广东)科技有限公司ABAP开发顾问。在学习工作中,我通常使用偏后端的开发语言ABAP,SQL进行任务的完成,对SAP企业管理系统,SAP ABAP开发和数据库具有较深入的研究。
💅文章概要: 各位小伙伴们大家好呀!今天给大家带来的是一款可爱兔兔的纯CSS日历,希望大家喜欢!让我们一起用日历记录下今天的日子!
🤟每日一言: 永远年轻,永远热泪盈眶!
目录

各位小伙伴们大家好呀!今天给大家带来的是一款可爱兔兔的纯CSS日历,希望大家喜欢!让我们一起用日历记录下今天的日子!
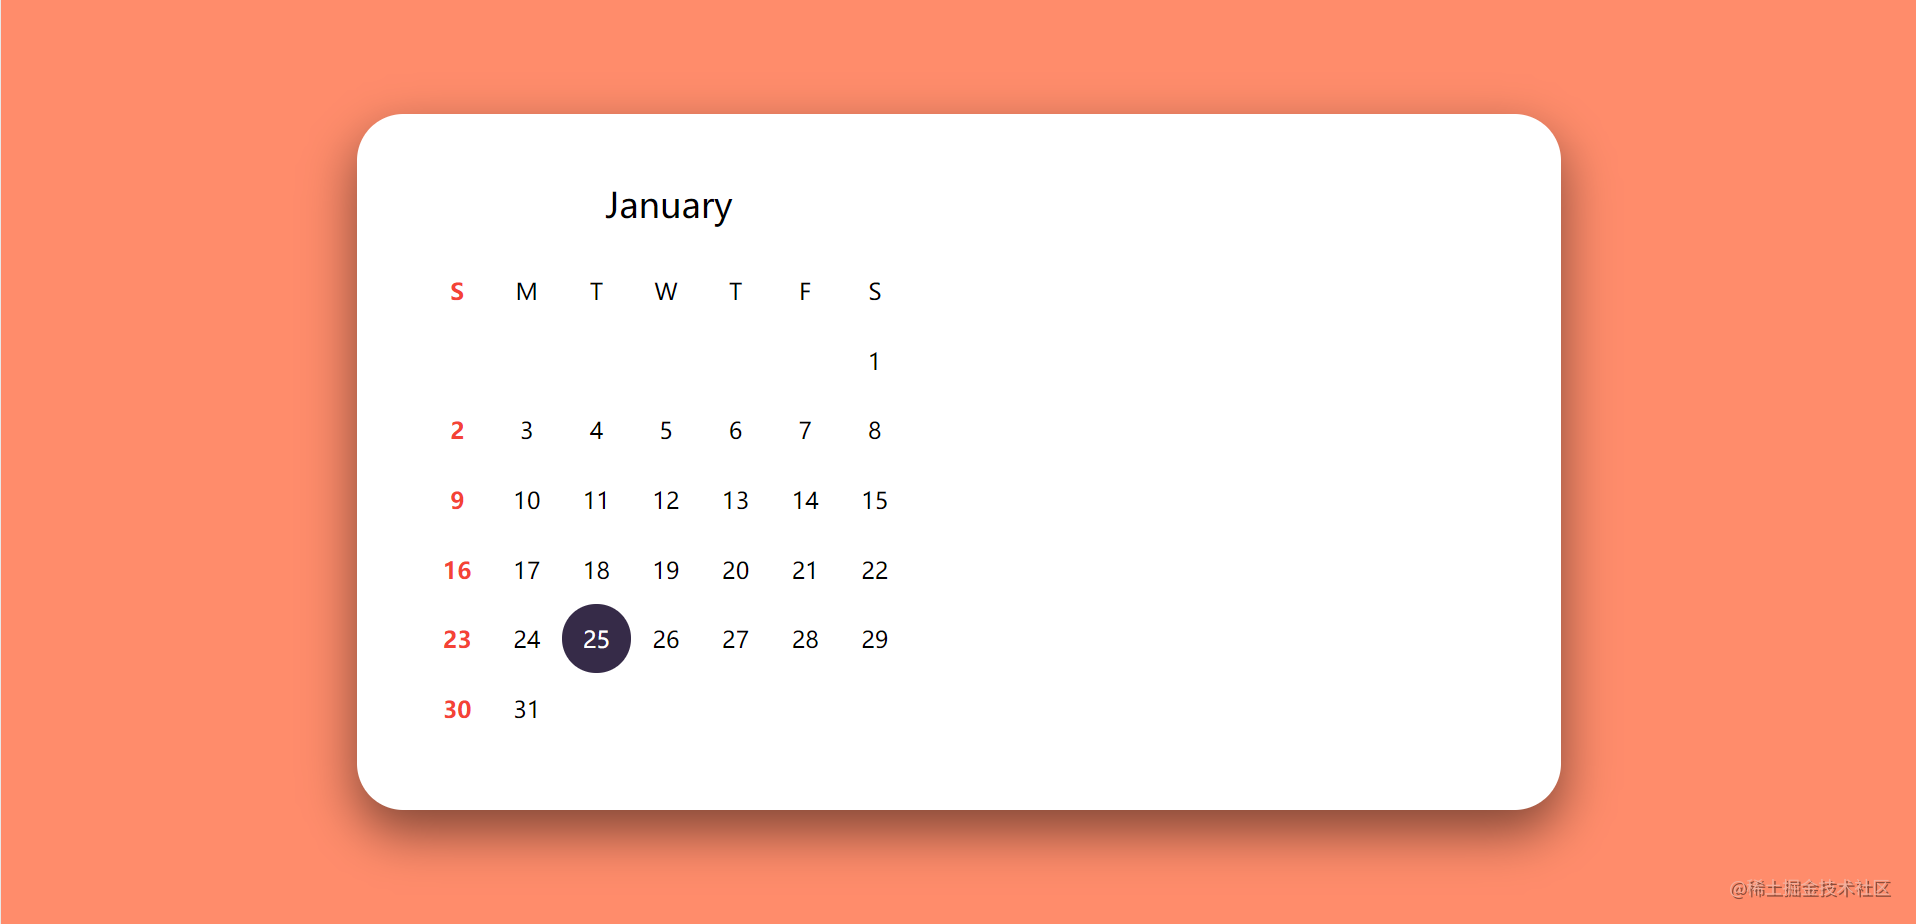
下面为大家展示的是瑞兔日历的预览图:
看完效果图后,各位小伙伴们肯定很想知道实现的思路,接下来我将分步骤逐一进行讲解,如果想要获取源码的小伙伴可以跳过该部分,直接前往最后的完整源码章节!在分步讲解中我会将HTML,CSS两个部分全部放在同一个文件中,方便各位小伙伴们获取!
我将实现思路分成了如下四个部分,列举如下:
通过使用HTML和CSS可以完成整个日历背景的设置,背景颜色采取了橘橙色的设计,具有一种高级感和亲切感!

<!DOCTYPE html>
<html lang="en">
<head>
    <meta charset="UTF-8">
    <meta name="viewport" content="width=device-width, initial-scale=1.0">
    <meta http-equiv="X-UA-Compatible" content="ie=edge">
    <title>Document</title>
    <style>
    </style>
</head>
<body>

</body>
</html>
将下面代码复制粘贴至<style></style>之间
body{
    margin: 0; /*外边距*/
    padding: 0; /*内边距*/
    display: flex; /*盒模型*/
    justify-content: center; /*主轴居中*/
    align-items: center; /*项目居中*/
    height: 100vh; /*高度*/
    background-color: #ff8c6b; /*背景颜色*/
    font-family: sans-serif; /*字体*/
}
日历框设计对四个角落采取了圆角化处理,并且设计了底部阴影模糊处理,使得整个日历框呈现一种三维立体的感觉!
圆角化处理使用CSS中的border-radius对象选择器底部阴影模糊处理使用CSS中的border-radius对象选择器
将下面代码复制粘贴至<body></body>之间
<div class="calendar">
</div>
将下面代码复制粘贴至<style></style>之间
.calendar{
    position: relative;
    background-color: #fff;
    width: 800px;
    height: 450px;
    display: flex;
    justify-content: space-between;
    align-items: center;
    border: 15px solid #fff; /*边框*/
    box-shadow: 0 15px 35px rgba(0,0,0,0.5);
    border-radius: 2rem;
}
左侧黑色高亮的日期可以自己进行修改,代表当天的日期。根据月份的不同,需要对当月的日期进行重新设计!
将下面代码复制粘贴至<div class="calendar"></div>之间
       <div class="date">
            <h3>January</h3>
            <div class="days">
                <div class="day">S</div>
                <div class="day">M</div>
                <div class="day">T</div>
                <div class="day">W</div>
                <div class="day">T</div>
                <div class="day">F</div>
                <div class="day">S</div>
                <div class="number"></div>
                <div class="number"></div>
                <div class="number"></div>
                <div class="number"></div>
                <div class="number"></div>
                <div class="number"></div>
                <div class="number">1</div>
                <div class="number">2</div>
                <div class="number">3</div>
                <div class="number">4</div>
                <div class="number">5</div>
                <div class="number">6</div>
                <div class="number">7</div>
                <div class="number">8</div>
                <div class="number">9</div>
                <div class="number">10</div>
                <div class="number">11</div>
                <div class="number">12</div>
                <div class="number">13</div>
                <div class="number">14</div>
                <div class="number">15</div>
                <div class="number">16</div>
                <div class="number">17</div>
                <div class="number">18</div>
                <div class="number">19</div>
                <div class="number">20</div>
                <div class="number">21</div>
                <div class="number">22</div>
                <div class="number">23</div>
                <div class="number">24</div>
                <div class="number active">25</div>
                <div class="number">26</div>
                <div class="number">27</div>
                <div class="number">28</div>
                <div class="number">29</div>
                <div class="number">30</div>
                <div class="number">31</div>
            </div>
        </div>
将下面代码复制粘贴至<style></style>之间
.calendar .date{
    width: 400px;
    padding: 30px;
    box-sizing: border-box; /*盒子大小规则*/
}
.calendar .date h3{
    margin: 0 0 20px;
    padding: 0;
    font-size: 24px; /*字体大小*/
    font-weight: 500; /*字体维度*/
    text-align: center; /*字体居中*/
    user-select: none; /*不可选中*/
    text-transform: capitalize; /*首字母大写*/
}
.calendar .date .days{
    display: flex;
    flex-wrap: wrap; /*可换行*/
}
.calendar .date .days .number.active{
    background-color: #362b48;
    color: #fff;
    cursor: pointer; /*鼠标样式*/
    border-radius: 50%; /*边框圆角*/
}
.calendar .date .days .day,
.calendar .date .days .number{
    width: 48px;
    height: 48px;
    display: flex;
    justify-content: center;
    align-items: center;
    user-select: none;
}
.calendar .date .days .day:first-child,
.calendar .date .days .number:nth-child(7n+1){ /*7个为一组,每组第一个*/
    color: #f44336;
    font-weight: 600;
}

将下面代码复制粘贴至最后一个</div>之上
 <div class="img">
       <img src="https://wyz-math.cn/usr/uploads/2023/01/3088778204.jpg" alt="Error" >
 </div>
将下面代码复制粘贴至<style></style>之间
.calendar .img{
    position: relative; /*定位*/
    top:0;
    right: 0;
    width: 400px;
    height: 100%;
    background-color: #000;
    user-select: none;
    border-radius: 3.3rem;
}
.calendar .img img{
    position: relative;
    top: 0;
    left: 0;
    width: 100%;
    height: 100%;
    object-fit: cover; /*元素内容如何适应屏幕*/
    border-radius: 3.3rem;
}
<!DOCTYPE html>
<html lang="en">
<head>
    <meta charset="UTF-8">
    <meta name="viewport" content="width=device-width, initial-scale=1.0">
    <meta http-equiv="X-UA-Compatible" content="ie=edge">
    <title>Document</title>
    <style>
    body{
    margin: 0; /*外边距*/
    padding: 0; /*内边距*/
    display: flex; /*盒模型*/
    justify-content: center; /*主轴居中*/
    align-items: center; /*项目居中*/
    height: 100vh; /*高度*/
    background-color: #ff8c6b; /*背景颜色*/
    font-family: sans-serif; /*字体*/
}
.calendar{
    position: relative;
    background-color: #fff;
    width: 800px;
    height: 450px;
    display: flex;
    justify-content: space-between;
    align-items: center;
    border: 15px solid #fff; /*边框*/
    box-shadow: 0 15px 35px rgba(0,0,0,0.5);
    border-radius: 2rem;
}
.calendar .date{
    width: 400px;
    padding: 30px;
    box-sizing: border-box; /*盒子大小规则*/
}
.calendar .date h3{
    margin: 0 0 20px;
    padding: 0;
    font-size: 24px; /*字体大小*/
    font-weight: 500; /*字体维度*/
    text-align: center; /*字体居中*/
    user-select: none; /*不可选中*/
    text-transform: capitalize; /*首字母大写*/
}
.calendar .date .days{
    display: flex;
    flex-wrap: wrap; /*可换行*/
}
.calendar .date .days .number.active{
    background-color: #362b48;
    color: #fff;
    cursor: pointer; /*鼠标样式*/
    border-radius: 50%; /*边框圆角*/
}
.calendar .date .days .day,
.calendar .date .days .number{
    width: 48px;
    height: 48px;
    display: flex;
    justify-content: center;
    align-items: center;
    user-select: none;
}
.calendar .date .days .day:first-child,
.calendar .date .days .number:nth-child(7n+1){ /*7个为一组,每组第一个*/
    color: #f44336;
    font-weight: 600;
}
.calendar .img{
    position: relative; /*定位*/
    top:0;
    right: 0;
    width: 400px;
    height: 100%;
    background-color: #000;
    user-select: none;
    border-radius: 3.3rem;
}
.calendar .img img{
    position: relative;
    top: 0;
    left: 0;
    width: 100%;
    height: 100%;
    object-fit: cover; /*元素内容如何适应屏幕*/
    border-radius: 3.3rem;
}

    </style>
</head>
<body>
    <div class="calendar">
        <div class="date">
            <h3>January</h3>
            <div class="days">
                <div class="day">S</div>
                <div class="day">M</div>
                <div class="day">T</div>
                <div class="day">W</div>
                <div class="day">T</div>
                <div class="day">F</div>
                <div class="day">S</div>
                <div class="number"></div>
                <div class="number"></div>
                <div class="number"></div>
                <div class="number"></div>
                <div class="number"></div>
                <div class="number"></div>
                <div class="number">1</div>
                <div class="number">2</div>
                <div class="number">3</div>
                <div class="number">4</div>
                <div class="number">5</div>
                <div class="number">6</div>
                <div class="number">7</div>
                <div class="number">8</div>
                <div class="number">9</div>
                <div class="number">10</div>
                <div class="number">11</div>
                <div class="number">12</div>
                <div class="number">13</div>
                <div class="number">14</div>
                <div class="number">15</div>
                <div class="number">16</div>
                <div class="number">17</div>
                <div class="number">18</div>
                <div class="number">19</div>
                <div class="number">20</div>
                <div class="number">21</div>
                <div class="number">22</div>
                <div class="number">23</div>
                <div class="number">24</div>
                <div class="number active">25</div>
                <div class="number">26</div>
                <div class="number">27</div>
                <div class="number">28</div>
                <div class="number">29</div>
                <div class="number">30</div>
                <div class="number">31</div>
            </div>
        </div>
        <div class="img">
            <img src="https://wyz-math.cn/usr/uploads/2023/01/3088778204.jpg" alt="Error" >
        </div>
    </div>
</body>
</html>
本文花费大量时间介绍了如何创建一个精美的瑞兔日历,希望能帮助到各位小伙伴,码文不易,还望各位大佬们多多支持哦,你们的支持是我最大的动力!

✨ 原 创 不 易 , 还 希 望 各 位 大 佬 支 持 一 下 \textcolor{blue}{原创不易,还希望各位大佬支持一下} 原创不易,还希望各位大佬支持一下
👍 点 赞 , 你 的 认 可 是 我 创 作 的 动 力 ! \textcolor{9c81c1}{点赞,你的认可是我创作的动力!} 点赞,你的认可是我创作的动力!
⭐️ 收 藏 , 你 的 青 睐 是 我 努 力 的 方 向 ! \textcolor{ed7976}{收藏,你的青睐是我努力的方向!} 收藏,你的青睐是我努力的方向!
✏️ 评 论 , 你 的 意 见 是 我 进 步 的 财 富 ! \textcolor{98c091}{评论,你的意见是我进步的财富!} 评论,你的意见是我进步的财富!
我在MiniTest::Spec和Capybara中使用以下规范:find_field('Email').must_have_css('[autofocus]')检查名为“电子邮件”的字段是否具有autofocus属性。doc说如下:has_css?(path,options={})ChecksifagivenCSSselectorisonthepageorcurrentnode.据我了解,字段“Email”是一个节点,因此调用must_have_css绝对有效!我做错了什么? 最佳答案 通过JonasNicklas得到了答案:No
我有一个用户工厂。我希望默认情况下确认用户。但是鉴于unconfirmed特征,我不希望它们被确认。虽然我有一个基于实现细节而不是抽象的工作实现,但我想知道如何正确地做到这一点。factory:userdoafter(:create)do|user,evaluator|#unwantedimplementationdetailshereunlessFactoryGirl.factories[:user].defined_traits.map(&:name).include?(:unconfirmed)user.confirm!endendtrait:unconfirmeddoenden
我有一个div,它根据表单是否正确提交而改变。我想知道是否可以检查类的特定元素?开始元素看起来像这样。如果输入不正确,添加错误类。 最佳答案 试试这个:browser.div(:id=>"myerrortest").class_name更多信息:http://watir.github.com/watir-webdriver/doc/Watir/HTMLElement.html#class_name-instance_method另一种选择是只查看具有您期望的类的div是否存在browser.div((:id=>"myerrortes
华为OD机试题本篇题目:明明的随机数题目输入描述输出描述:示例1输入输出说明代码编写思路最近更新的博客华为od2023|什么是华为od,od薪资待遇,od机试题清单华为OD机试真题大全,用Python解华为机试题|机试宝典【华为OD机试】全流程解析+经验分享,题型分享,防作弊指南华为o
一、引擎主循环UE版本:4.27一、引擎主循环的位置:Launch.cpp:GuardedMain函数二、、GuardedMain函数执行逻辑:1、EnginePreInit:加载大多数模块int32ErrorLevel=EnginePreInit(CmdLine);PreInit模块加载顺序:模块加载过程:(1)注册模块中定义的UObject,同时为每个类构造一个类默认对象(CDO,记录类的默认状态,作为模板用于子类实例创建)(2)调用模块的StartUpModule方法2、FEngineLoop::Init()1、检查Engine的配置文件找出使用了哪一个GameEngine类(UGame
C#实现简易绘图工具一.引言实验目的:通过制作窗体应用程序(C#画图软件),熟悉基本的窗体设计过程以及控件设计,事件处理等,熟悉使用C#的winform窗体进行绘图的基本步骤,对于面向对象编程有更加深刻的体会.Tutorial任务设计一个具有基本功能的画图软件**·包括简单的新建文件,保存,重新绘图等功能**·实现一些基本图形的绘制,包括铅笔和基本形状等,学习橡皮工具的创建**·设计一个合理舒适的UI界面**注明:你可能需要先了解一些关于winform窗体应用程序绘图的基本知识,以及关于GDI+类和结构的知识二.实验环境Windows系统下的visualstudio2017C#窗体应用程序三.
MIMO技术的优缺点优点通过下面三个增益来总体概括:阵列增益。阵列增益是指由于接收机通过对接收信号的相干合并而活得的平均SNR的提高。在发射机不知道信道信息的情况下,MIMO系统可以获得的阵列增益与接收天线数成正比复用增益。在采用空间复用方案的MIMO系统中,可以获得复用增益,即信道容量成倍增加。信道容量的增加与min(Nt,Nr)成正比分集增益。在采用空间分集方案的MIMO系统中,可以获得分集增益,即可靠性性能的改善。分集增益用独立衰落支路数来描述,即分集指数。在使用了空时编码的MIMO系统中,由于接收天线或发射天线之间的间距较远,可认为它们各自的大尺度衰落是相互独立的,因此分布式MIMO
遍历文件夹我们通常是使用递归进行操作,这种方式比较简单,也比较容易理解。本文为大家介绍另一种不使用递归的方式,由于没有使用递归,只用到了循环和集合,所以效率更高一些!一、使用递归遍历文件夹整体思路1、使用File封装初始目录,2、打印这个目录3、获取这个目录下所有的子文件和子目录的数组。4、遍历这个数组,取出每个File对象4-1、如果File是否是一个文件,打印4-2、否则就是一个目录,递归调用代码实现publicclassSearchFile{publicstaticvoidmain(String[]args){//初始目录Filedir=newFile("d:/Dev");Datebeg
通常,数组被实现为内存块,集合被实现为HashMap,有序集合被实现为跳跃列表。在Ruby中也是如此吗?我正在尝试从性能和内存占用方面评估Ruby中不同容器的使用情况 最佳答案 数组是Ruby核心库的一部分。每个Ruby实现都有自己的数组实现。Ruby语言规范只规定了Ruby数组的行为,并没有规定任何特定的实现策略。它甚至没有指定任何会强制或至少建议特定实现策略的性能约束。然而,大多数Rubyist对数组的性能特征有一些期望,这会迫使不符合它们的实现变得默默无闻,因为实际上没有人会使用它:插入、前置或追加以及删除元素的最坏情况步骤复
在ruby中,你可以这样做:classThingpublicdeff1puts"f1"endprivatedeff2puts"f2"endpublicdeff3puts"f3"endprivatedeff4puts"f4"endend现在f1和f3是公共(public)的,f2和f4是私有(private)的。内部发生了什么,允许您调用一个类方法,然后更改方法定义?我怎样才能实现相同的功能(表面上是创建我自己的java之类的注释)例如...classThingfundeff1puts"hey"endnotfundeff2puts"hey"endendfun和notfun将更改以下函数定