

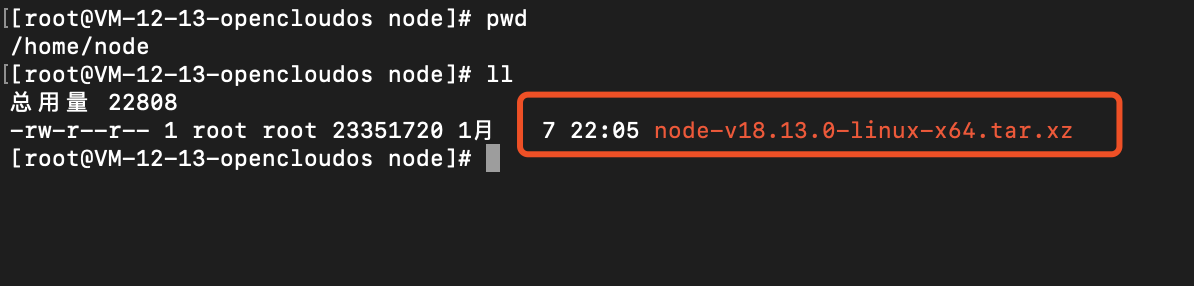
    xz -d node-v8.11.1-linux-x64.tar.xz
    tar xf node-v8.11.1-linux-x64.tar

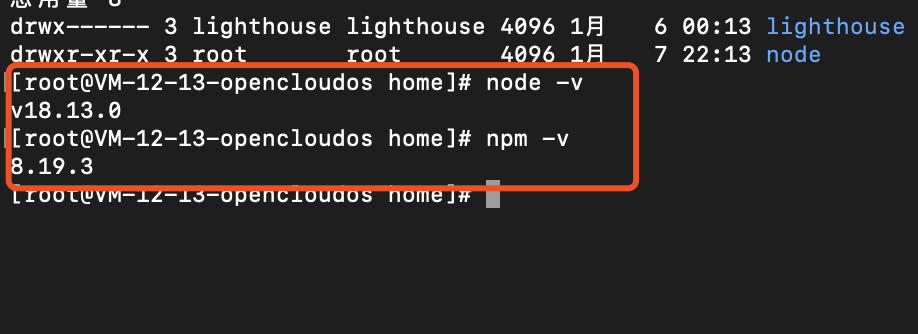
  ln -s /home/node/node-v18.13.0-linux-x64/bin/node /usr/local/bin/node
  ln -s /home/node/node-v18.13.0-linux-x64/bin/npm /usr/local/bin/npm
  ln -s /home/node/node-v18.13.0-linux-x64/bin/npx /usr/local/bin/npx

进入/home目录执行命令node -v、npm -v能正确显示版本号说明软链接成功
yum install nginx
./nginx浏览器直接访问自己服务器的公网ip地址,如果能正常访问nginx的欢迎页面说明nignx已正常启动


查看详情进入证书页面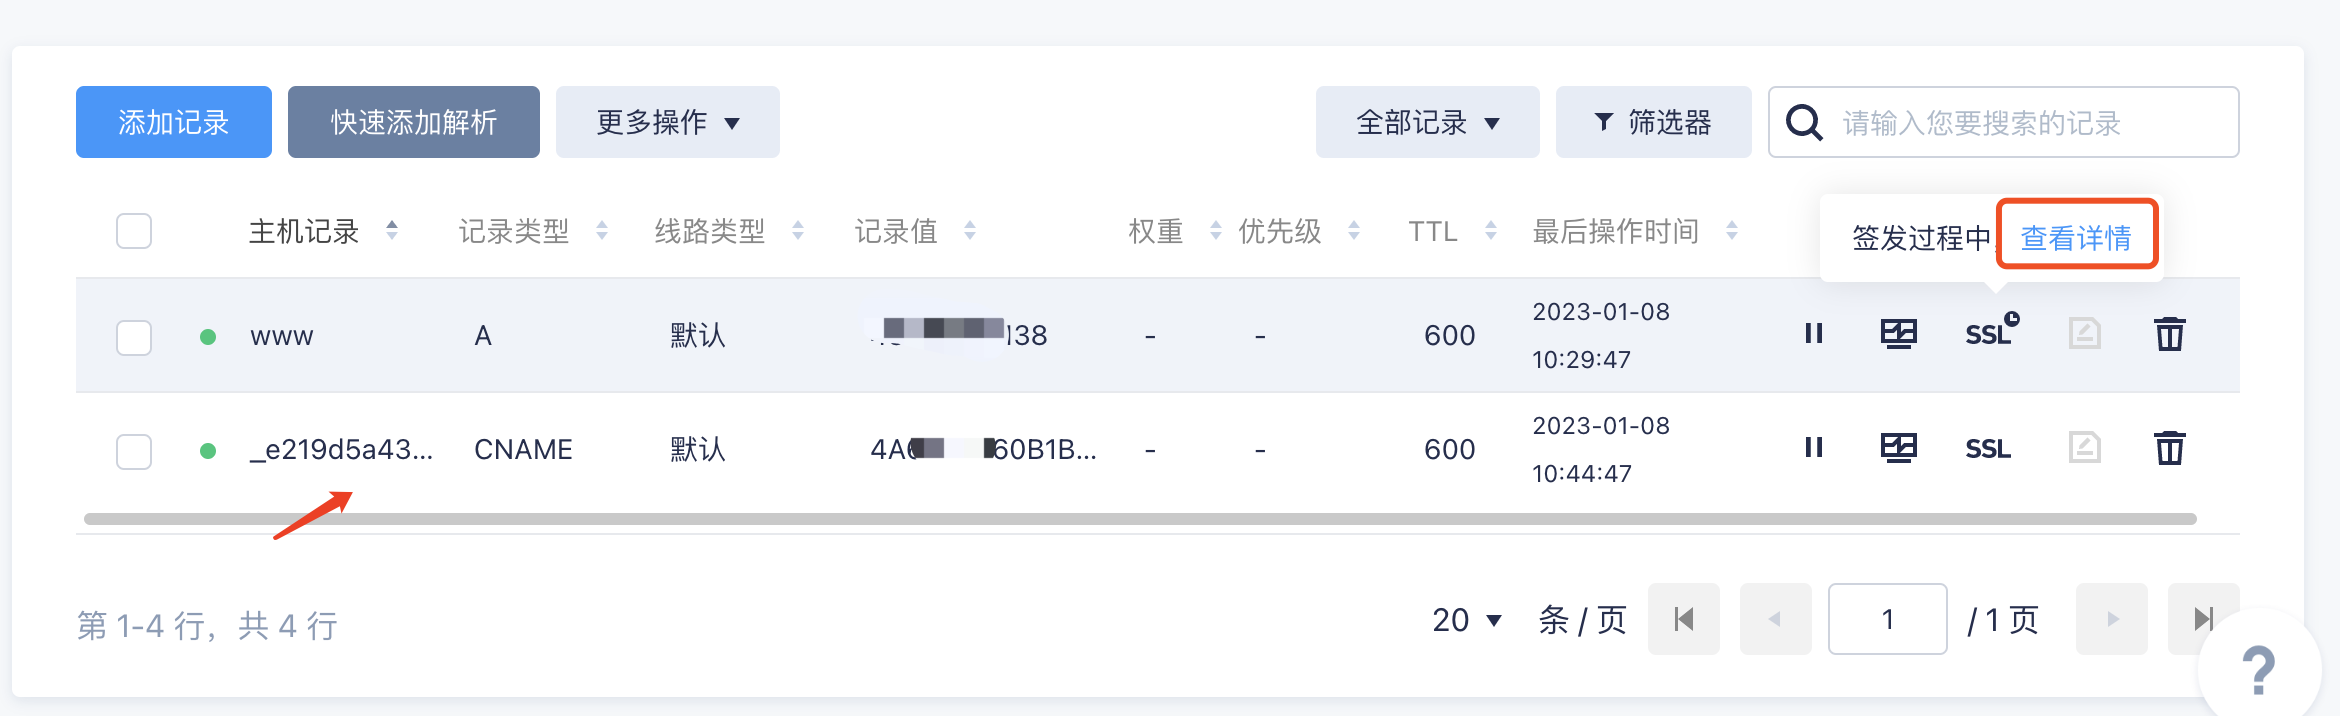
我的证书,可以看到已经申请完成和签发的证书,点击对应证书的下载按钮

.key、.pem文件上传到服务器的/home/https目录下

# For more information on configuration, see:
#   * Official English Documentation: http://nginx.org/en/docs/
#   * Official Russian Documentation: http://nginx.org/ru/docs/

user nginx;
worker_processes auto;
error_log /var/log/nginx/error.log;
pid /run/nginx.pid;

# Load dynamic modules. See /usr/share/doc/nginx/README.dynamic.
include /usr/share/nginx/modules/*.conf;

events {
    worker_connections 1024;
}

http {
    log_format  main  '$remote_addr - $remote_user [$time_local] "$request" '
                      '$status $body_bytes_sent "$http_referer" '
                      '"$http_user_agent" "$http_x_forwarded_for"';

    access_log  /var/log/nginx/access.log  main;

    sendfile            on;
    tcp_nopush          on;
    tcp_nodelay         on;
    keepalive_timeout   65;
    types_hash_max_size 2048;

    include             /etc/nginx/mime.types;
    default_type        application/octet-stream;

    include /etc/nginx/conf.d/*.conf;

    # 强制浏览器输入域名时跳转到https的协议访问
    server {
        listen 80;
        server_name _;
        rewrite ^/(.*)$ https://$host$1 permanent;
    }


    server {
        listen       443 ssl http2 default_server;
        listen       [::]:443 ssl http2 default_server;
        server_name  _;
        root         /usr/share/nginx/html/bobokeji;

        ssl_certificate "/home/https/bobokeji.pem";
        ssl_certificate_key "/home/https/bobokeji.key";
        ssl_session_cache shared:SSL:1m;
        ssl_session_timeout  10m;
        ssl_ciphers PROFILE=SYSTEM;
        ssl_prefer_server_ciphers on;

        # Load configuration files for the default server block.
        include /etc/nginx/default.d/*.conf;

        location / {
                proxy_pass http://127.0.0.1:8080/;
        }

        error_page 404 /404.html;
            location = /40x.html {
            }

        error_page 500 502 503 504 /50x.html;
            location = /50x.html {
        }
    }

}
进入目录/home/pm2,执行命令npm install pm2安装pm2
执行软链接命令ln -s /home/pm2/node_modules/pm2/bin/pm2 /usr/local/bin
执行完软连接命令后可以在/usr/local/bin目录下查看是否生成一条新的软链接

pm2 -v如果能正常返回版本好则说明pm2服务能正常运行了
执行启动命令:pm2 start index.js --name="index.js",显示如下进程列表则代表启动成功

rpm -Uvh http://dev.mysql.com/get/mysql57-community-release-el7-9.noarch.rpm

执行完上面命令后如果出现Peer reports incompatible or unsupported protocol version.这个错误请执行 yum update -y nss curl libcurl

yum -y install mysql-community-server --nogpgcheck

sudo yum module disable mysql
yum -y install mysql-community-server --nogpgcheck

rpm -qa | grep mariadb // 查看系统自带的Mariadb
rpm -e --nodeps mariadb-connector-c-config-3.1.11-2.el8_3.noarch // 卸载系统包
rpm -e --nodeps mariadb-connector-c-3.1.11-2.el8_3.x86_64 // 卸载系统包

yum -y install mysql-community-server --nogpgcheck
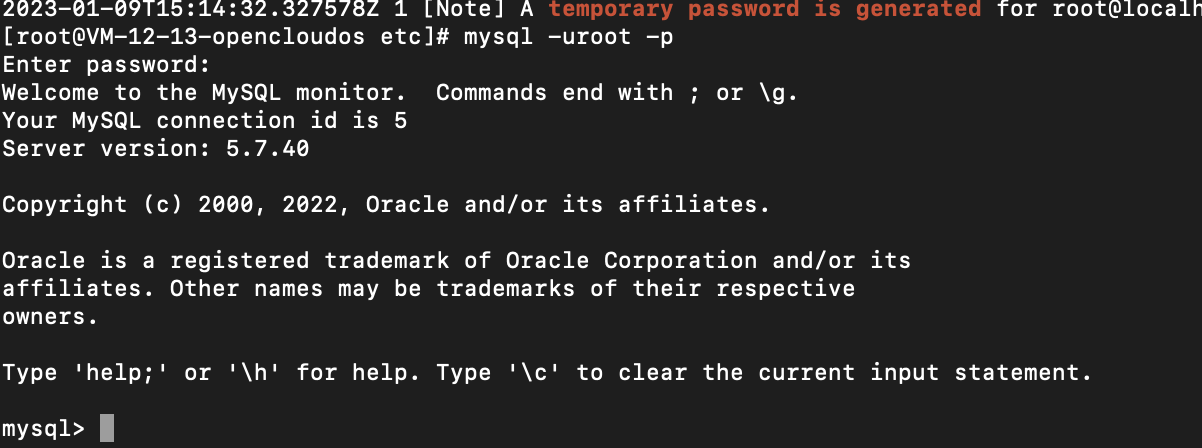
cat /var/log/mysqld.log | grep 'temporary password is generated'

mysql -uroot -p
set password='****';

mysql -u root -p //登录mysql
mysql>exit  // 退出mysql
show databases; // 查看mysql数据库
set password='testroot'; // 设置mysql数据库密码

//  服务端启动mysql
1.启动mysql服务.  systemctl start mysqld
2.添加MySQL服务到开机启动   systemctl enable mysqld
3.重启MySQL服务 service mysqld restart
启动mysql服务:
systemctl start mysqld.service

    停止mysql服务:
systemctl stop mysqld.service

    重启mysql服务:
systemctl restart mysqld.service

    查看mysql服务当前状态:
systemctl status mysqld.service

    设置mysql服务开机自启动:
systemctl enable mysqld.service

    停止mysql服务开机自启动:
systemctl disable mysqld.service

参考文章:https://blog.csdn.net/weixin_44436964/article/details/123845958
https://www.cnblogs.com/falling-trees/p/16144928.html
use mysql;      #切换访问mysql库
update user set host = '%' where user = 'root';  #使root账号能在不同机器登陆,否则只能本地localhost访问
alter user 'root'@'%' identified with mysql_native_password by 'your password';
FLUSH PRIVILEGES;       #刷新(不用重启数据库使上面的修改生效)
quit #退出数据库
添加MySQL服务到开机启动 systemctl enable mysqld


我的瘦服务器配置了nginx,我的ROR应用程序正在它们上运行。在我发布代码更新时运行thinrestart会给我的应用程序带来一些停机时间。我试图弄清楚如何优雅地重启正在运行的Thin实例,但找不到好的解决方案。有没有人能做到这一点? 最佳答案 #Restartjustthethinserverdescribedbythatconfigsudothin-C/etc/thin/mysite.ymlrestartNginx将继续运行并代理请求。如果您将Nginx设置为使用多个上游服务器,例如server{listen80;server
文章目录一、概述简介原理模块二、配置Mysql使用版本环境要求1.操作系统2.mysql要求三、配置canal-server离线下载在线下载上传解压修改配置单机配置集群配置分库分表配置1.修改全局配置2.实例配置垂直分库水平分库3.修改group-instance.xml4.启动监听四、配置canal-adapter1修改启动配置2配置映射文件3启动ES数据同步查询所有订阅同步数据同步开关启动4.验证五、配置canal-admin一、概述简介canal是Alibaba旗下的一款开源项目,Java开发。基于数据库增量日志解析,提供增量数据订阅&消费。Git地址:https://github.co
1.错误信息:Errorresponsefromdaemon:Gethttps://registry-1.docker.io/v2/:net/http:requestcanceledwhilewaitingforconnection(Client.Timeoutexceededwhileawaitingheaders)或者:Errorresponsefromdaemon:Gethttps://registry-1.docker.io/v2/:net/http:TLShandshaketimeout2.报错原因:docker使用的镜像网址默认为国外,下载容易超时,需要修改成国内镜像地址(首先阿里
我正在尝试在Rails上安装ruby,到目前为止一切都已安装,但是当我尝试使用rakedb:create创建数据库时,我收到一个奇怪的错误:dyld:lazysymbolbindingfailed:Symbolnotfound:_mysql_get_client_infoReferencedfrom:/Library/Ruby/Gems/1.8/gems/mysql2-0.3.11/lib/mysql2/mysql2.bundleExpectedin:flatnamespacedyld:Symbolnotfound:_mysql_get_client_infoReferencedf
因此,当我遵循MichaelHartl的RubyonRails教程时,我注意到在用户表中,我们为:email属性添加了一个唯一索引,以提高find的效率方法,因此它不会逐行搜索。到目前为止,我们一直在根据情况使用find_by_email和find_by_id进行搜索。然而,我们从未为:id属性设置索引。:id是否自动索引,因为它在默认情况下是唯一的并且本质上是顺序的?或者情况并非如此,我应该为:id搜索添加索引吗? 最佳答案 大多数数据库(包括sqlite,这是RoR中的默认数据库)会自动索引主键,对于RailsMigration
我已经找到了几个使用datamapper的示例,并且能够让它们正常工作。不过,所有这些示例都是针对sqlite数据库的。我正在尝试将数据映射器与postgresql一起使用。我将datamapper中的调用从sqlite3更改为postgres,并且我已经安装了dm-postgres-adapter。但它仍然不起作用。我还需要做什么? 最佳答案 与SQLite不同,PostgreSQL不将数据库存储在单个文件中。在你拥有createdyourdatabase之后,尝试这样的事情:DataMapper.setup:default,{:
A/ctohttp://wiki.nginx.org/CoreModule#usermaster进程曾经以root用户运行,是否可以以不同的用户运行nginxmaster进程? 最佳答案 只需以非root身份运行init脚本(即/etc/init.d/nginxstart),就可以用不同的用户运行nginxmaster进程。如果这真的是你想要做的,你将需要确保日志和pid目录(通常是/var/log/nginx&/var/run/nginx.pid)对该用户是可写的,并且您所有的listen调用都是针对大于1024的端口(因为绑定(
我看到其他人也遇到过类似的问题,但没有一个解决方案对我有用。0.3.14gem与其他gem文件一起存在。我已经完全按照此处指示完成了所有操作:https://github.com/brianmario/mysql2.我仍然得到以下信息。我不知道为什么安装程序指示它找不到include目录,因为我已经检查过它存在。thread.h文件存在,但不在ruby目录中。相反,它在这里:C:\RailsInstaller\DevKit\lib\perl5\5.8\msys\CORE\我正在运行Windows7并尝试在Aptana3中构建我的Rails项目。我的Ruby是1.9.3。$gemin
我使用的是遗留数据库,所以我无法控制数据模型。他们使用了很多多态链接/连接表,就像这样createtableperson(per_ident,name,...)createtableperson_links(per_ident,obj_name,obj_r_ident)createtablereport(rep_ident,name,...)其中obj_name是表名,obj_r_ident是标识符。因此链接的报告将按如下方式插入:insertintoperson(1,...)insertintoreport(1,...)insertintoreport(2,...)insertint
我正在创建一个新的Rails3.1应用程序。我希望这个新应用程序重用现有数据库(由以前的Rails2应用程序创建)。我创建了新的应用程序定义模型,它重用了数据库中的一些现有数据。在开发和测试阶段,一切正常,因为它在干净的表数据库上运行,但是当尝试部署到生产环境时,我收到如下消息:PGError:ERROR:column"email"ofrelation"users"alreadyexists***[err::localhost]:ALTERTABLE"users"ADDCOLUMN"email"charactervarying(255)DEFAULT''NOTNULL但是我在迁移中有这