Cuda 和 GPU版torch安装最全攻略,以及在GPU 上运行 torch代码
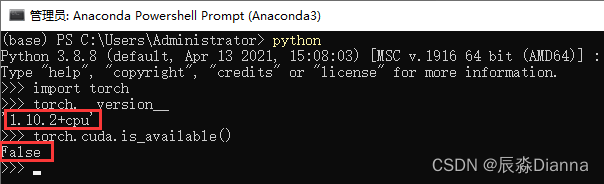
在 conda prompt 中 检查是否有可用的GPU版本 torch.cuda,发现False
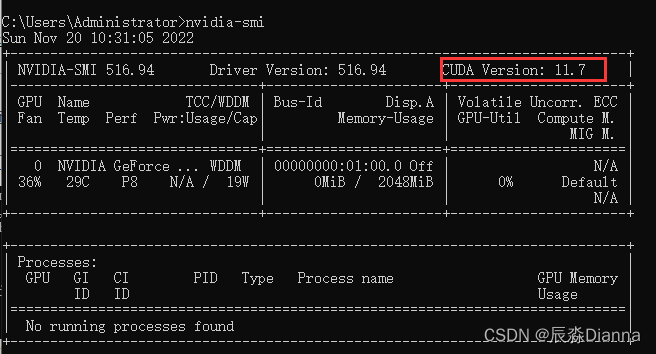
命令行输入nvidia-smi,查看 cuda 信息:
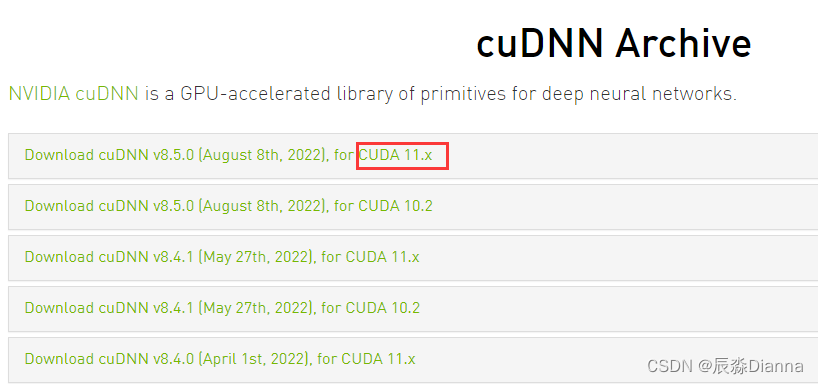
从官网下载对应版本的安装程序 CUDA Toolkit Archive | NVIDIA Developer
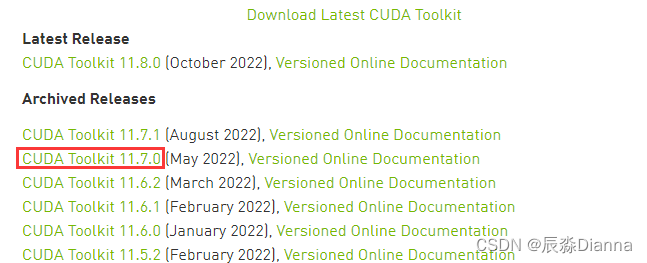
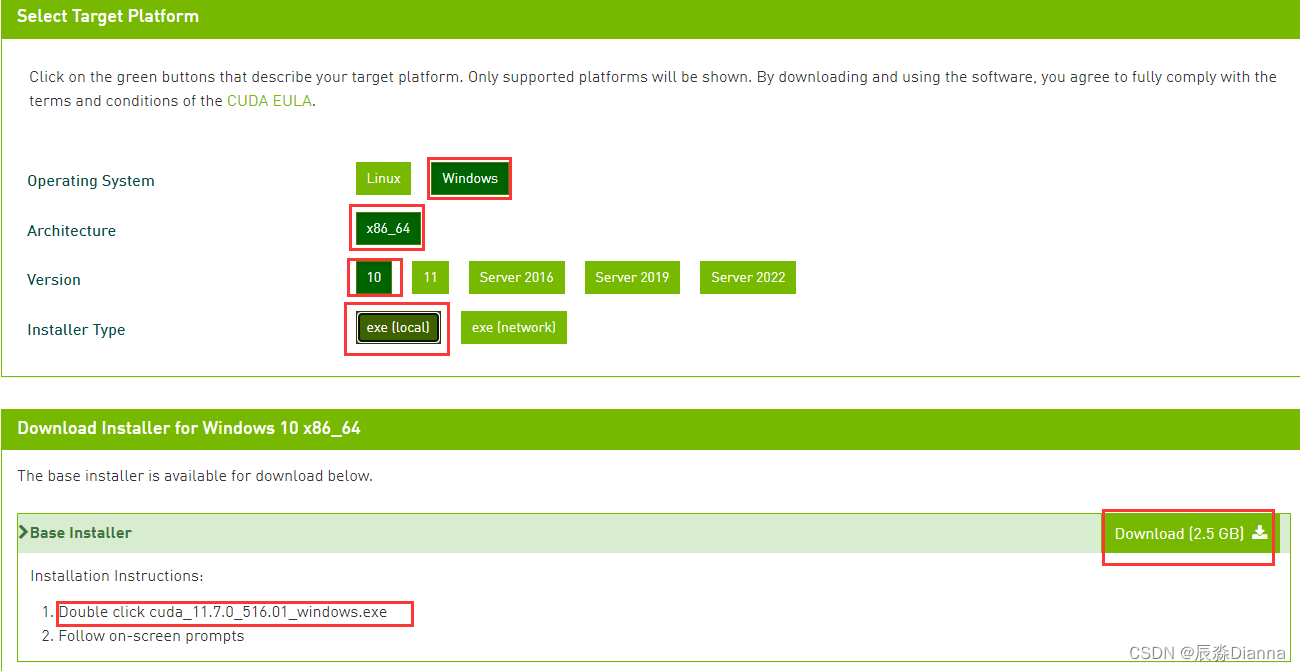
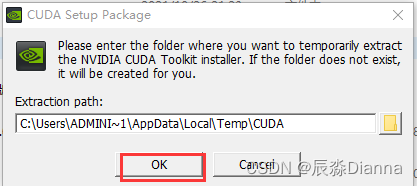

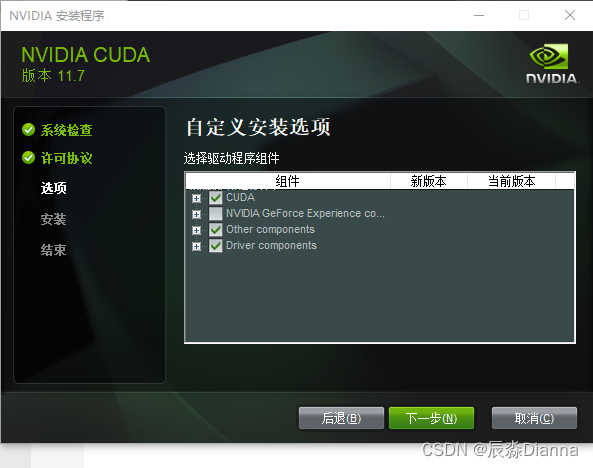
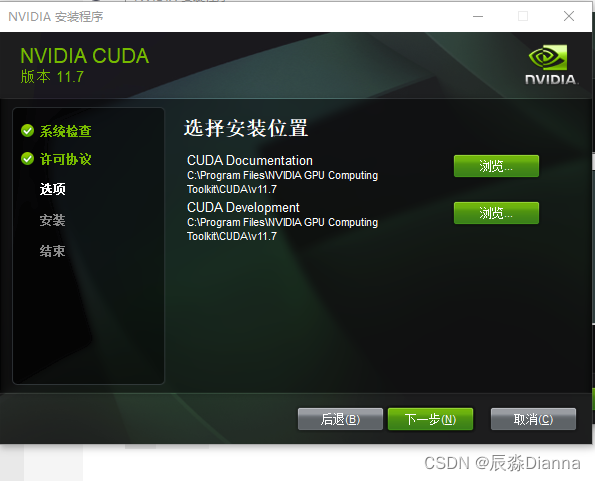

版本匹配,下载最新
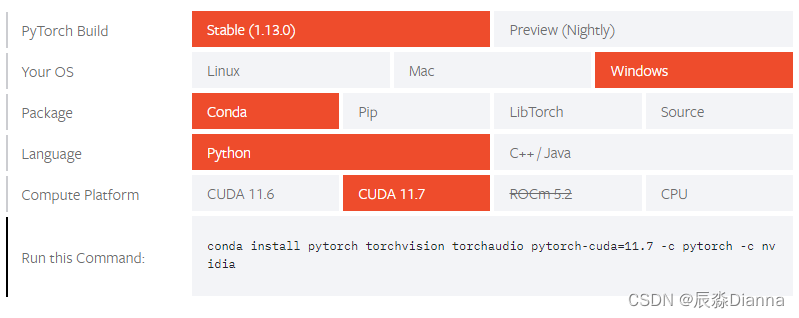
conda install pytorch torchvision torchaudio pytorch-cuda=11.7 -c pytorch -c nvidia

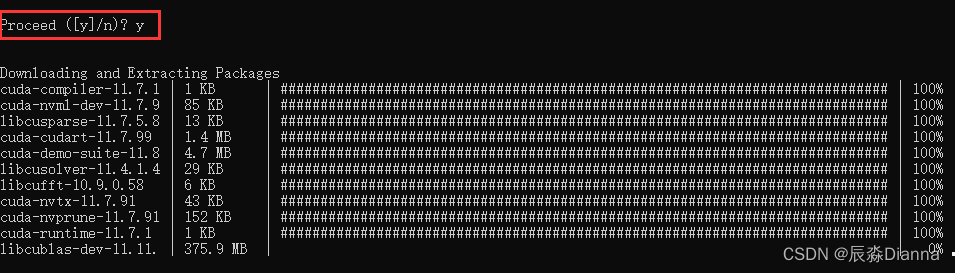
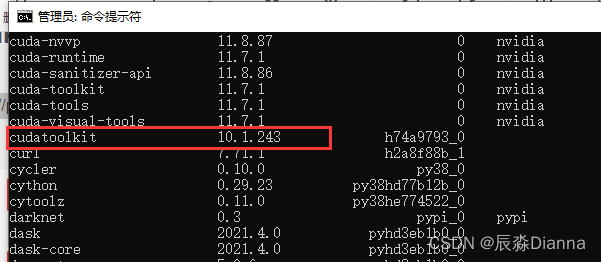
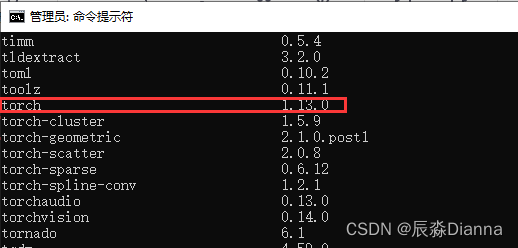
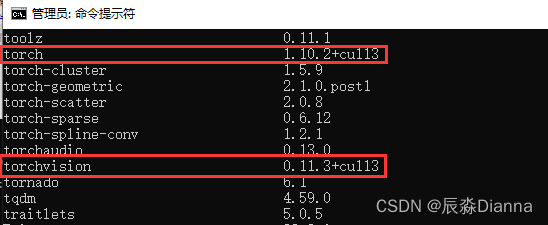
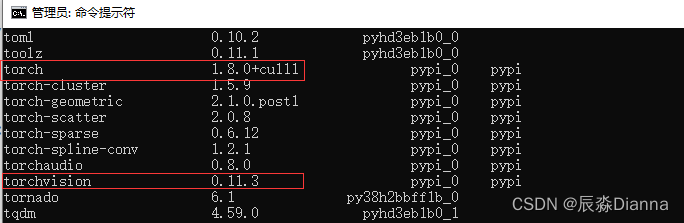
检查:下载完了在cmd里面查看conda的库,conda list,
pip list:
GPU版本pytorch和pytorchvision下载地址
torch:

torchvision:

在下载地址所在的文件夹中cmd,进行安装,但是报错
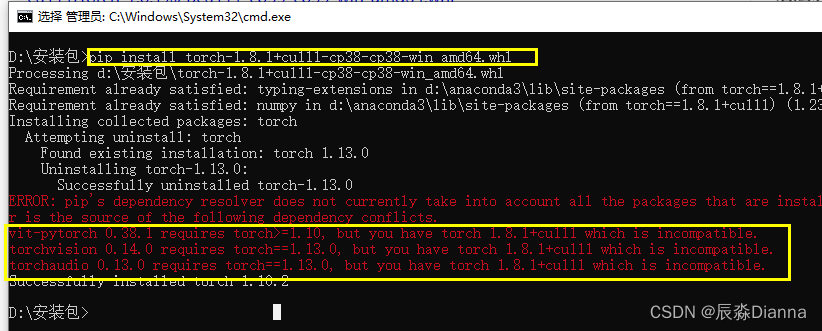
说明需要更高版本:torch1.10以上,再下载:

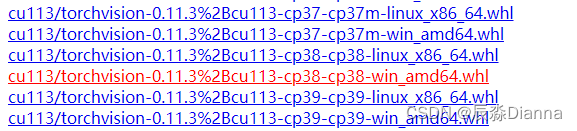
对应torchvision 版本:

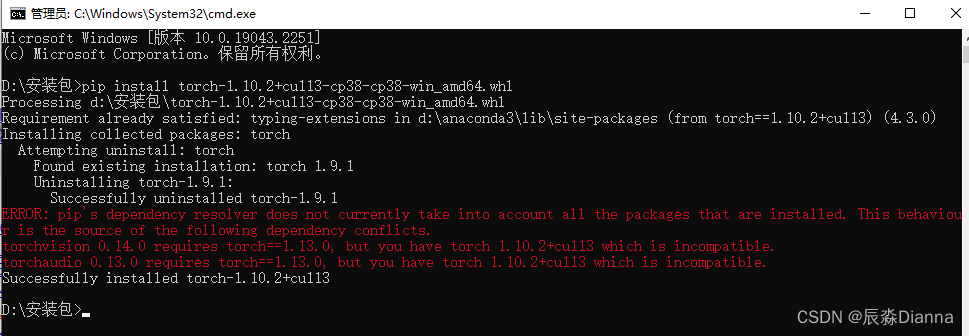
cmd中 pip list 检查:
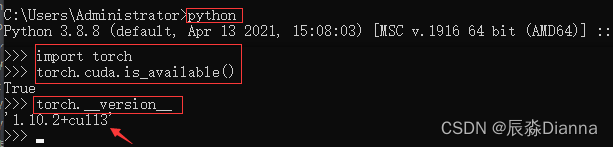
python
import torch
torch.cuda.is_available()
torch.__version__
CMD中:
Anaconda Prompt 中:
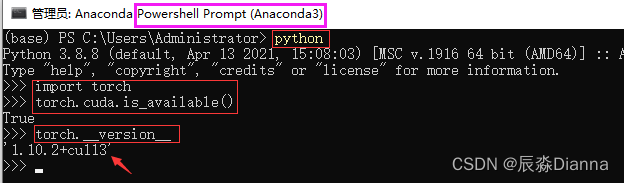
二者是一致的。
此时:用pip install 方法安装了gpu版本的torch和torchvision,所以pip list 显示二者,但conda list 可能与之不一致,因为用的不是 conda install 命令。
但在pycharm虚拟环境中,base环境下显示的和 conda list 的版本是一样的
pip list:
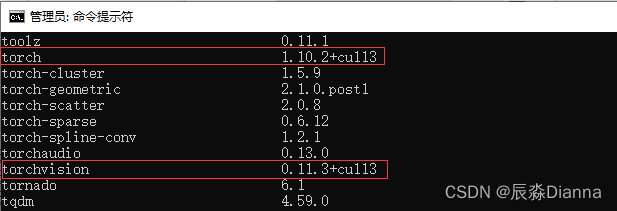
conda List 和 pycharm 环境中显示的一样
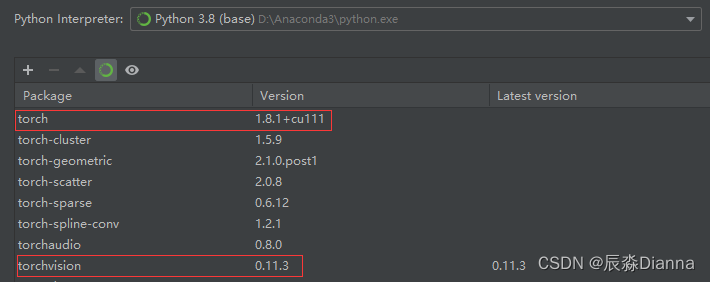
但是,在pycharm中运行以下命令时,输出的是True 和 Torch: 1.10.2+cu113 而不是 1.8.1+cu111
import torch
print(torch.cuda.is_available())
print(f"Torch: {torch.__version__}")
安装好GPU版本的 torch 后,只要 torch.cuda.is_available() 是Ture ,就可以在GPU运行代码了”:
device='cuda' model.to(device) label.to(device), data.to(device)# 设置 device='cuda'
device = 'cuda'
# 将 model 放到 gpu 上
model = ViT(
dim=128,
image_size=224,
patch_size=32,
num_classes=2,
transformer=efficient_transformer,
channels=3,
).to(device)
# 将label和data 放到 gpu 上
for epoch in range(epochs):
for data, label in tqdm(train_loader):
data = data.to(device)
label = label.to(device)
import torch
# 指定 CPU
cpu1 =torch.device("cpu:0")
print("CPU Device:【{}:{}】".format(cpu1.type,cpu1.index))

# 指定 GPU
gpu =torch.device("cuda:0")
print("GPU Device:【{}:{}】".format(gpu.type,gpu.index))
print("Total GPU Count:{}".format(torch.cuda.device_count()))   #查看所有可用GPU个数
print("Total CPU Count:{}".format(torch.cuda.os.cpu_count()))   #获取系统CPU数量
print(torch.cuda.get_device_name(torch.device("cuda:0")))       #获取GPU设备名称   NVIDIA GeForce GT 1030
print("GPU Is Available:{}".format(torch.cuda.is_available()))  #GPU设备是否可用  True
# 建立 Tensor
device = torch.device('cuda:0')

# 使用 tensor 在 cpu 建立再转移到 gpu
gpu_tensor1= torch.Tensor([[1,4,7],[3,6,9],[2,5,8]]).to(device)  # 使用to()方法将cup_tensor转到GPU上

# 直接在 gpu 上建立
gpu_tensor2 = torch.tensor([[1,4,7],[3,6,9],[2,5,8]],device=device)
gpu_tensor3 = torch.rand((3,4),device=device)                           # 方法一 直接申明 device
gpu_tensor4  = torch.randn(3,4).float().to(device)                      # 方法二 使用 to device 转移

print(gpu_tensor1)
print(gpu_tensor2)
print(gpu_tensor3)
print(gpu_tensor4)
torch.cuda.empty_cache()                      # 释放没有使用的缓存数据
print(torch.cuda.memory_cached())             # 获取缓存数据大小
print(torch.cuda.max_memory_cached())         # 最大缓存大小
print(torch.cuda.max_memory_allocated())       # 最大分配内存大小
print(torch.cuda.memory_summary())            # 查看显存信息
#创建默认的CPU设备
device = torch.device("cpu")
#如果GPU设备可用,将默认设备改为GPU
if(torch.cuda.is_available()):
    device = torch.device("cuda")
AssertionError Torch not compiled with CUDA enabled 还是要去 Cmd 或者 Anaconda Prompt 中看一下是否有可用的 GPU 版本 torch 如果是 False , 就要重新 Pip install 安装解决AssertionError Torch not compiled with CUDA enabled问题
pytorch gpu版本的最全安装教程,含环境配置、CUDA(百度云下载)安装程序失败解决方案
Pytorch(GPU版)安装
GPU版本pyTorch安装教程(实测,特别详细)
总的来说,我对ruby还比较陌生,我正在为我正在创建的对象编写一些rspec测试用例。许多测试用例都非常基础,我只是想确保正确填充和返回值。我想知道是否有办法使用循环结构来执行此操作。不必为我要测试的每个方法都设置一个assertEquals。例如:describeitem,"TestingtheItem"doit"willhaveanullvaluetostart"doitem=Item.new#HereIcoulddotheitem.name.shouldbe_nil#thenIcoulddoitem.category.shouldbe_nilendend但我想要一些方法来使用
我想为Heroku构建一个Rails3应用程序。他们使用Postgres作为他们的数据库,所以我通过MacPorts安装了postgres9.0。现在我需要一个postgresgem并且共识是出于性能原因你想要pggem。但是我对我得到的错误感到非常困惑当我尝试在rvm下通过geminstall安装pg时。我已经非常明确地指定了所有postgres目录的位置可以找到但仍然无法完成安装:$envARCHFLAGS='-archx86_64'geminstallpg--\--with-pg-config=/opt/local/var/db/postgresql90/defaultdb/po
如何在buildr项目中使用Ruby?我在很多不同的项目中使用过Ruby、JRuby、Java和Clojure。我目前正在使用我的标准Ruby开发一个模拟应用程序,我想尝试使用Clojure后端(我确实喜欢功能代码)以及JRubygui和测试套件。我还可以看到在未来的不同项目中使用Scala作为后端。我想我要为我的项目尝试一下buildr(http://buildr.apache.org/),但我注意到buildr似乎没有设置为在项目中使用JRuby代码本身!这看起来有点傻,因为该工具旨在统一通用的JVM语言并且是在ruby中构建的。除了将输出的jar包含在一个独特的、仅限ruby
我正在使用的第三方API的文档状态:"[O]urAPIonlyacceptspaddedBase64encodedstrings."什么是“填充的Base64编码字符串”以及如何在Ruby中生成它们。下面的代码是我第一次尝试创建转换为Base64的JSON格式数据。xa=Base64.encode64(a.to_json) 最佳答案 他们说的padding其实就是Base64本身的一部分。它是末尾的“=”和“==”。Base64将3个字节的数据包编码为4个编码字符。所以如果你的输入数据有长度n和n%3=1=>"=="末尾用于填充n%
在rails源中:https://github.com/rails/rails/blob/master/activesupport/lib/active_support/lazy_load_hooks.rb可以看到以下内容@load_hooks=Hash.new{|h,k|h[k]=[]}在IRB中,它只是初始化一个空哈希。和做有什么区别@load_hooks=Hash.new 最佳答案 查看rubydocumentationforHashnew→new_hashclicktotogglesourcenew(obj)→new_has
在选择我想要运行操作的频率时,唯一的选项是“每天”、“每小时”和“每10分钟”。谢谢!我想为我的Rails3.1应用程序运行调度程序。 最佳答案 这不是一个优雅的解决方案,但您可以安排它每天运行,并在实际开始工作之前检查日期是否为当月的第一天。 关于ruby-如何每月在Heroku运行一次Scheduler插件?,我们在StackOverflow上找到一个类似的问题: https://stackoverflow.com/questions/8692687/
我打算为ruby脚本创建一个安装程序,但我希望能够确保机器安装了RVM。有没有一种方法可以完全离线安装RVM并且不引人注目(通过不引人注目,就像创建一个可以做所有事情的脚本而不是要求用户向他们的bash_profile或bashrc添加一些东西)我不是要脚本本身,只是一个关于如何走这条路的快速指针(如果可能的话)。我们还研究了这个很有帮助的问题:RVM-isthereawayforsimpleofflineinstall?但有点误导,因为答案只向我们展示了如何离线在RVM中安装ruby。我们需要能够离线安装RVM本身,并查看脚本https://raw.github.com/wayn
exe应该在我打开页面时运行。异步进程需要运行。有什么方法可以在ruby中使用两个参数异步运行exe吗?我已经尝试过ruby命令-system()、exec()但它正在等待过程完成。我需要用参数启动exe,无需等待进程完成是否有任何rubygems会支持我的问题? 最佳答案 您可以使用Process.spawn和Process.wait2:pid=Process.spawn'your.exe','--option'#Later...pid,status=Process.wait2pid您的程序将作为解释器的子进程执行。除
我尝试运行2.x应用程序。我使用rvm并为此应用程序设置其他版本的ruby:$rvmuseree-1.8.7-head我尝试运行服务器,然后出现很多错误:$script/serverNOTE:Gem.source_indexisdeprecated,useSpecification.Itwillberemovedonorafter2011-11-01.Gem.source_indexcalledfrom/Users/serg/rails_projects_terminal/work_proj/spohelp/config/../vendor/rails/railties/lib/r
我有一个奇怪的问题:我在rvm上安装了rubyonrails。一切正常,我可以创建项目。但是在我输入“railsnew”时重新启动后,我有“程序'rails'当前未安装。”。SystemUbuntu12.04ruby-v"1.9.3p194"gemlistactionmailer(3.2.5)actionpack(3.2.5)activemodel(3.2.5)activerecord(3.2.5)activeresource(3.2.5)activesupport(3.2.5)arel(3.0.2)builder(3.0.0)bundler(1.1.4)coffee-rails(