
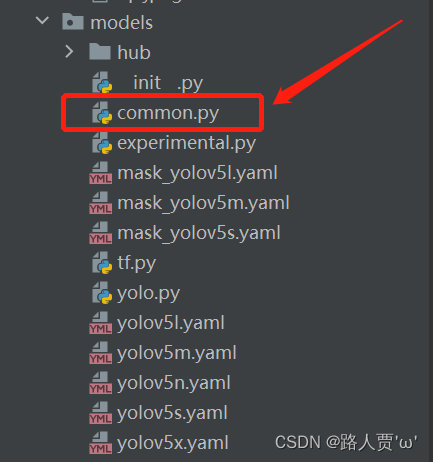
上一篇我们一起学习了YOLOv5的网络模型之一yolo.py,它这是YOLO的特定模块,而今天要学习另一个和网络搭建有关的文件——common.py,这个文件存放着YOLOv5网络搭建常见的通用模块。如果我们需要修改某一模块,那么就需要修改这个文件中对应模块的定义。
学这篇的同时,搭配【YOLO系列】YOLOv5超详细解读(网络详解)这篇算法详解效果更好噢~
common.py文件位置在./models/common.py
文章代码逐行手打注释,每个模块都有对应讲解,一文帮你梳理整个代码逻辑!
友情提示:全文5万多字,可以先点 再慢慢看哦~
源码下载地址:mirrors / ultralytics / yolov5 · GitCode

 🍀本人YOLOv5源码详解系列:
YOLOv5源码逐行超详细注释与解读(1)——项目目录结构解析
YOLOv5源码逐行超详细注释与解读(2)——推理部分detect.py
YOLOv5源码逐行超详细注释与解读(3)——训练部分train.py
YOLOv5源码逐行超详细注释与解读(4)——验证部分val(test).py
YOLOv5源码逐行超详细注释与解读(5)——配置文件yolov5s.yaml
YOLOv5源码逐行超详细注释与解读(6)——网络结构(1)yolo.py

'''======================1.导入安装好的python库====================='''
import json  # 用于json和Python数据之间的相互转换
import math  # 数学函数模块
import platform  # 获取操作系统的信息
import warnings  # 警告程序员关于语言或库功能的变化的方法
from copy import copy  # 数据拷贝模块 分浅拷贝和深拷贝
from pathlib import Path  # Path将str转换为Path对象 使字符串路径易于操作的模块

import cv2  # 调用OpenCV的cv库
import numpy as np  # numpy数组操作模块
import pandas as pd  # panda数组操作模块
import requests  # Python的HTTP客户端库
import torch  # pytorch深度学习框架
import torch.nn as nn  # 专门为神经网络设计的模块化接口
from PIL import Image  # 图像基础操作模块
from torch.cuda import amp # 混合精度训练模块首先,导入一下常用的python库:
然后再导入一些 pytorch库:
'''===================2.加载自定义模块============================'''
from utils.datasets import exif_transpose, letterbox  # 加载数据集的函数
from utils.general import (LOGGER, check_requirements, check_suffix, colorstr, increment_path, make_divisible,
                           non_max_suppression, scale_coords, xywh2xyxy, xyxy2xywh)  # 定义了一些常用的工具函数
from utils.plots import Annotator, colors, plot_one_box  # 定义了Annotator类,可以在图像上绘制矩形框和标注信息
from utils.torch_utils import time_sync # 定义了一些与PyTorch有关的工具函数这些都是用户自定义的库,由于上一步已经把路径加载上了,所以现在可以导入,这个顺序不可以调换。具体来说,代码从如下几个文件中导入了部分函数和类:
'''===========1.autopad:根据输入的卷积核计算该卷积模块所需的pad值================'''
# 为same卷积或者same池化自动扩充
# 通过卷积核的大小来计算需要的padding为多少才能把tensor补成原来的形状
def autopad(k, p=None):  # kernel, padding
    # 如果p是none 则进行下一步
    if p is None:
        # 如果k是int 则进行k//2 若不是则进行x//2
        p = k // 2 if isinstance(k, int) else [x // 2 for x in k]  # auto-pad
return pautopad主要作用是根据输入的卷积核计算需要的padding为多少才能把tensor补成原来的形状
参数:
这里首先是判断是否有p值:
'''===========2.Conv:标准卷积 由Conv + BN + activate组成================'''
class Conv(nn.Module):
    # Standard convolution
    # init初始化构造函数
    def __init__(self, c1, c2, k=1, s=1, p=None, g=1, act=True):  # ch_in, ch_out, kernel, stride, padding, groups

        super().__init__()
        # 卷积层
        self.conv = nn.Conv2d(c1, c2, k, s, autopad(k, p), groups=g, bias=False)
        # 归一化层
        self.bn = nn.BatchNorm2d(c2)
        # 激活函数
        self.act = nn.SiLU() if act is True else (act if isinstance(act, nn.Module) else nn.Identity())

    # 正向计算,网络执行的顺序是根据forward函数来决定的
    def forward(self, x):
        # conv卷积 -> bn -> act激活
        return self.act(self.bn(self.conv(x)))

    # 正向融合计算
    def forward_fuse(self, x):
        # 这里只有卷积和激活
        return self.act(self.conv(x))
Conv是标准卷积层函数,是整个网络中最核心的模块,由卷积层 + BN层 + 激活函数 组成。
主要作用是实现了将输入特征经过卷积层,激活函数,归一化层,得到输出层。同时可以指定是否使用归一化层。
具体结构如下图:

参数:
注意,这个类中还有一个特殊函数 fuseforward ,这是一个前向加速推理模块,在前向传播过程中,通过融合conv + bn层,达到加速推理的作用,一般用于测试或验证阶段。
nn.Conv2d函数基本参数:
nn.Conv2d(self, in_channels, out_channels, kernel_size, stride=1, padding=0, dilation=1, groups=1, bias=True, padding_mode='zeros')
- in_channel: 输入数据的通道数,例RGB图片通道数为3。
- out_channel: 输出数据的通道数,这个根据模型调整。
- kennel_size: 卷积核大小,可以是int,或tuple;kennel_size=2,意味着卷积大小(2,2),kennel_size=(2,3),意味着卷积大小(2,3)即非正方形卷积。
- stride: 步长,默认为1,与kennel_size类似,stride=2,意味着步长上下左右扫描皆为2,stride=(2,3),左右扫描步长为2,上下为3。
- padding: 零填充。
- groups: 从输入通道到输出通道的阻塞连接数。
- bias: 如果为“True“,则向输出添加可学习的偏置。
'''===========3.DWConv:深度可分离卷积================'''
class DWConv(Conv):
    # Depth-wise convolution class
    def __init__(self, c1, c2, k=1, s=1, act=True):  # ch_in, ch_out, kernel, stride, padding, groups
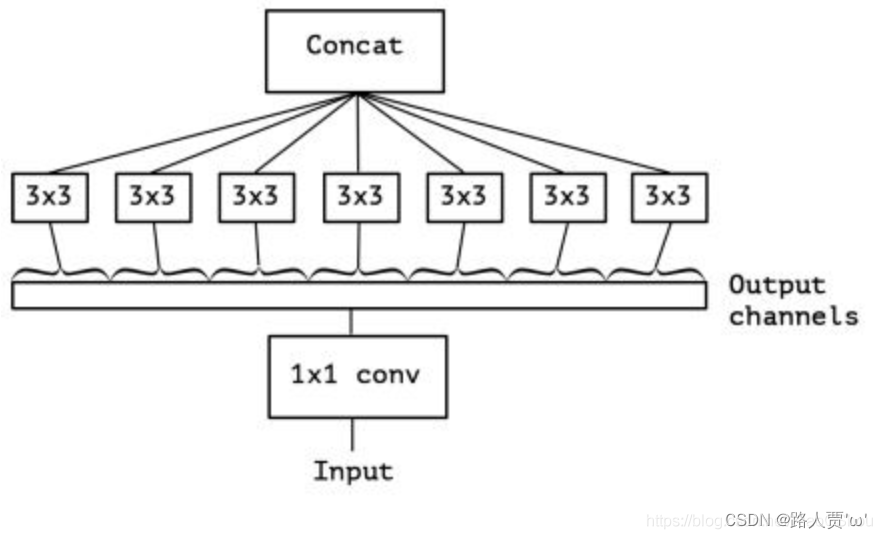
super().__init__(c1, c2, k, s, g=math.gcd(c1, c2), act=act)DWConv是GCONV的极端情况,深度分离(DepthWise)卷积层
分组数量等于输入通道数量,即每个通道作为一个小组分别进行卷积,结果联结作为输出,Cin = Cout = g,没有bias项。
主要作用是将通道按输入输出的最大公约数进行切分,在不同的通道图层上进行特征学习深度分离卷积层,不用深入研究,因为在yolov5中没有真正的使用~
具体结构如下图:
参数
'''===========4.Bottleneck:标准的瓶颈层 由1x1conv+3x3conv+残差块组成================'''
class Bottleneck(nn.Module):
    # Standard bottleneck
    def __init__(self, c1, c2, shortcut=True, g=1, e=0.5):  # ch_in, ch_out, shortcut, groups, expansion

        super().__init__()
        c_ = int(c2 * e)  # hidden channels
        # 1*1卷积层
        self.cv1 = Conv(c1, c_, 1, 1)
        # 3*3卷积层
        self.cv2 = Conv(c_, c2, 3, 1, g=g)
        # 如果shortcut为True就会将输入和输出相加之后再输出
        self.add = shortcut and c1 == c2

    def forward(self, x):
return x + self.cv2(self.cv1(x)) if self.add else self.cv2(self.cv1(x))Bottleneck是一个标准的瓶颈层,由一些 1x1conv、3x3conv、残差块组成。
具体结构如下图:
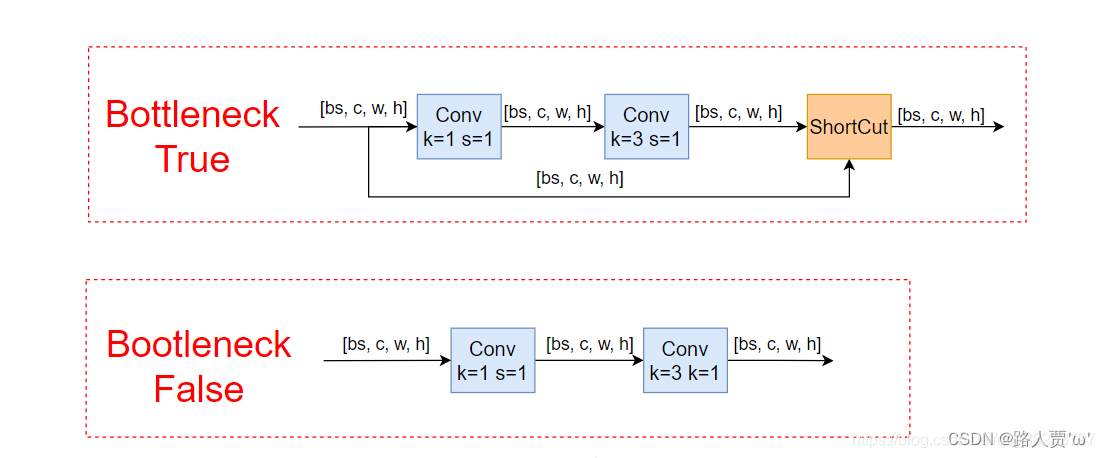
我们可以通过上图看出,网络架构中的Bottleneck模块分为True和False。主要作用是可以更加有效的提取特征,既减少了参数量,又优化了计算,保持了原有的精度。
首先Bottleneck先进行1x1卷积降维,再进行常规3×3卷积核的卷积。最后通过残差结构连接在一起。
参数:
模型结构:

通过上面瓶颈层的模型结构,我们可以看到瓶颈主要体现在通道数channel上面。
图中的红色虚线是shortcut,这里使用的shortcut成为identity分支,可以理解为恒等映射,另一个分支被称为残差分支(Residual分支)。
我们常使用的残差分支实际上是1x1+3x3+1x1的结构
'''===========5.BottleneckCSP:瓶颈层 由几个Bottleneck模块的堆叠+CSP结构组成================'''
class BottleneckCSP(nn.Module):
    # CSP Bottleneck https://github.com/WongKinYiu/CrossStagePartialNetworks
    def __init__(self, c1, c2, n=1, shortcut=True, g=1, e=0.5):  # ch_in, ch_out, number, shortcut, groups, expansion
        super().__init__()
        c_ = int(c2 * e)  # hidden channels
        # 4个1*1卷积层的堆叠
        self.cv1 = Conv(c1, c_, 1, 1)
        self.cv2 = nn.Conv2d(c1, c_, 1, 1, bias=False)
        self.cv3 = nn.Conv2d(c_, c_, 1, 1, bias=False)
        self.cv4 = Conv(2 * c_, c2, 1, 1)
        # bn层
        self.bn = nn.BatchNorm2d(2 * c_)  # applied to cat(cv2, cv3)
        # 激活函数
        self.act = nn.SiLU()
        # m:叠加n次Bottleneck的操作
        # 操作符*可以把一个list拆开成一个个独立的元素
        self.m = nn.Sequential(*(Bottleneck(c_, c_, shortcut, g, e=1.0) for _ in range(n)))

    def forward(self, x):
        # y1相当于先做一次cv1操作然后进行m操作最后进行cv3操作,也就是BCSPn模块中的上面的分支操作
        # 输入x ->Conv模块 ->n个bottleneck模块 ->Conv模块 ->y1
        y1 = self.cv3(self.m(self.cv1(x)))
        # y2就是进行cv2操作,也就是BCSPn模块中的下面的分支操作(直接逆行conv操作的分支, Conv--nXBottleneck--conv)
        # 输入x -> Conv模块 -> 输出y2
        y2 = self.cv2(x)
        # 最后y1和y2做拼接, 接着进入bn层做归一化, 然后做act激活, 最后输出cv4
        # 输入y1,y2->按照通道数融合 ->归一化 -> 激活函数 -> Conv输出 -> 输出
        # torch.cat(y1, y2), dim=1: 这里是指定在第一个维度上进行合并,即在channel维度上合并
        return self.cv4(self.act(self.bn(torch.cat((y1, y2), dim=1))))
BottleneckCSP也是瓶颈层,由Bottleneck模块和CSP结构组成
具体结构如下图:
 由上图可以看出BottleneckCSP中cv2和cv3调用的是系统的卷积层,使用concat连接之后,加上BN层和激活函数。
CSP结构主要思想是在输入block(如Bottleneck)之前,将输入分为两个部分,其中一部分通过block进行计算,另一部分直接通过一个带卷积shortcut进行concat。
主要作用是加强CNN的学习能力、减少内存消耗,减少计算瓶颈,现在的网络大多计算代价昂贵,不利于工业的落地。
参数:
模型结构:
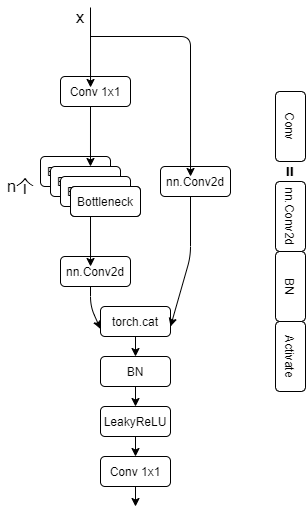
CSP瓶颈层结构在Bottleneck部分存在一个可修改的参数n,标识使用的Bottleneck结构个数。这一条也是我们的主分支,是对残差进行学习的主要结构(这里没有实现DenseNet,可选的有卷积块,transformer块、Ghost块),右侧分支nn.Conv2d实际上是shortcut分支实现不同stage的连接(CSP的思想实现)。
'''===========6.C3:和BottleneckCSP模块类似,但是少了一个Conv模块================'''
# ===6.1 C3=== #
class C3(nn.Module):
    # CSP Bottleneck with 3 convolutions
    def __init__(self, c1, c2, n=1, shortcut=True, g=1, e=0.5):  # ch_in, ch_out, number, shortcut, groups, expansion

        super().__init__()
        c_ = int(c2 * e)  # hidden channels
        # 3个1*1卷积层的堆叠,比BottleneckCSP少一个
        self.cv1 = Conv(c1, c_, 1, 1)
        self.cv2 = Conv(c1, c_, 1, 1)
        self.cv3 = Conv(2 * c_, c2, 1)  # act=FReLU(c2)
        self.m = nn.Sequential(*(Bottleneck(c_, c_, shortcut, g, e=1.0) for _ in range(n)))
        # self.m = nn.Sequential(*[CrossConv(c_, c_, 3, 1, g, 1.0, shortcut) for _ in range(n)])

    def forward(self, x):
        # 将第一个卷积层与第二个卷积层的结果拼接在一起
return self.cv3(torch.cat((self.m(self.cv1(x)), self.cv2(x)), dim=1))C3是一种简化版的BottleneckCSP,模块和BottleneckCSP模块类似,但是少了一个Conv模块,只有3个卷积,可以减少参数,所以取名C3。其实结构是一样的,写法略微有差异。
BottleneckCSP中cv2和cv3调用的是系统的卷积层,使用concat连接之后加上BN层和激活函数;C3则直接使用了作者自己定义的卷积层(conv+batchnorm+SiLU),这里激活函数也有修改。
具体结构如下图:

参数:
# ===6.2 C3SPP(C3):继承自 C3,n 个 Bottleneck 更换为 1 个 SPP=== #
class C3SPP(C3):
    # C3 module with SPP()
    def __init__(self, c1, c2, k=(5, 9, 13), n=1, shortcut=True, g=1, e=0.5):
        super().__init__(c1, c2, n, shortcut, g, e)
        c_ = int(c2 * e)
self.m = SPP(c_, c_, k)C3SPP(C3):继承自 C3,将n 个 Bottleneck 更换为 1 个 SPP
参数和上面一样,不再细讲~
# ===6.3 C3Ghost(C3):继承自 C3,Bottleneck 更换为 GhostBottleneck=== #
class C3Ghost(C3):
    # C3 module with GhostBottleneck()
    def __init__(self, c1, c2, n=1, shortcut=True, g=1, e=0.5):
        super().__init__(c1, c2, n, shortcut, g, e)
        c_ = int(c2 * e)  # hidden channels
        self.m = nn.Sequential(*(GhostBottleneck(c_, c_) for _ in range(n)))
C3Ghost(C3):继承自 C3,将Bottleneck 更换为 GhostBottleneck
参数和上面一样,不再细讲~
'''===========7.SPP:空间金字塔池化模块================'''

# ===7.1 SPP:空间金字塔池化=== #
class SPP(nn.Module):
    # Spatial Pyramid Pooling (SPP) layer https://arxiv.org/abs/1406.4729
    def __init__(self, c1, c2, k=(5, 9, 13)):

        super().__init__()
        c_ = c1 // 2  # hidden channels
        # 1*1卷积
        self.cv1 = Conv(c1, c_, 1, 1)
        #  这里+1是因为有len(k)+1个输入
        self.cv2 = Conv(c_ * (len(k) + 1), c2, 1, 1)
        # m先进行最大池化操作, 然后通过nn.ModuleList进行构造一个模块 在构造时对每一个k都要进行最大池化
        self.m = nn.ModuleList([nn.MaxPool2d(kernel_size=x, stride=1, padding=x // 2) for x in k])

    def forward(self, x):
        # 先进行cv1的操作
        x = self.cv1(x)
        # 忽略了警告错误的输出
        with warnings.catch_warnings():
            warnings.simplefilter('ignore')  # suppress torch 1.9.0 max_pool2d() warning
            # 对每一个m进行最大池化 和没有做池化的每一个输入进行叠加  然后做拼接 最后做cv2操作
            return self.cv2(torch.cat([x] + [m(x) for m in self.m], 1))
SPP 是空间金字塔池化的缩写。用在骨干网络收尾阶段,用于融合多尺度特征。
SPP模块是何恺明等大佬提出来的,非常经典从yolov3中开始使用到现在,yolo系列基本上都用到了。这个模块的主要作用是为了将更多不同分辨率的特征进行融合,得到更多的信息。
具体结构如下图:
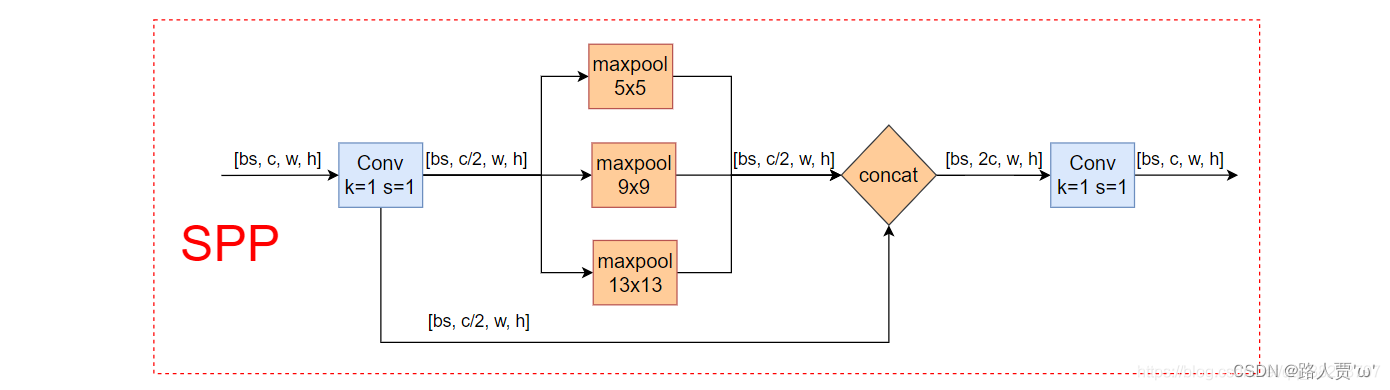
参数:
# ===7.2 SPPF:快速版的空间金字塔池化=== #
class SPPF(nn.Module):
    # Spatial Pyramid Pooling - Fast (SPPF) layer for YOLOv5 by Glenn Jocher
    def __init__(self, c1, c2, k=5):  # equivalent to SPP(k=(5, 9, 13))
        super().__init__()
        c_ = c1 // 2  # hidden channels
        self.cv1 = Conv(c1, c_, 1, 1)
        self.cv2 = Conv(c_ * 4, c2, 1, 1)
        self.m = nn.MaxPool2d(kernel_size=k, stride=1, padding=k // 2)

    def forward(self, x):
        x = self.cv1(x)
        with warnings.catch_warnings():
            warnings.simplefilter('ignore')  # suppress torch 1.9.0 max_pool2d() warning
            y1 = self.m(x)
            y2 = self.m(y1)
return self.cv2(torch.cat([x, y1, y2, self.m(y2)], 1))SPPF是快速版的空间金字塔池化
池化尺寸等价于:5、9、13,和原来一样,但是运算量从原来的 减少到了
(YOLOv5中SPP和SPPF可以看这篇:YOLOv5中的SPP/SPPF结构详解_tt丫的博客-CSDN博客)
'''===========8.Focus:把宽度w和高度h的信息整合到c空间================'''
class Focus(nn.Module):
    # Focus wh information into c-space
    def __init__(self, c1, c2, k=1, s=1, p=None, g=1, act=True):  # ch_in, ch_out, kernel, stride, padding, groups

        super().__init__()
        # concat后的卷积(最后的卷积)
        self.conv = Conv(c1 * 4, c2, k, s, p, g, act)
        # self.contract = Contract(gain=2)

    def forward(self, x):  # x(b,c,w,h) -> y(b,4c,w/2,h/2)
        # 先进行切分, 然后进行拼接, 最后再做conv操作
        return self.conv(torch.cat([x[..., ::2, ::2], x[..., 1::2, ::2], x[..., ::2, 1::2], x[..., 1::2, 1::2]], 1))
        # return self.conv(self.contract(x))

# 以下模块Contract,Expand,Concat是用来处理输入特征的shape的Focus是YOLOv5作者自己设计的一个模块,用在了模型的一开始,作用是把宽度w和高度h的信息整合到c空间。
具体结构如下图:
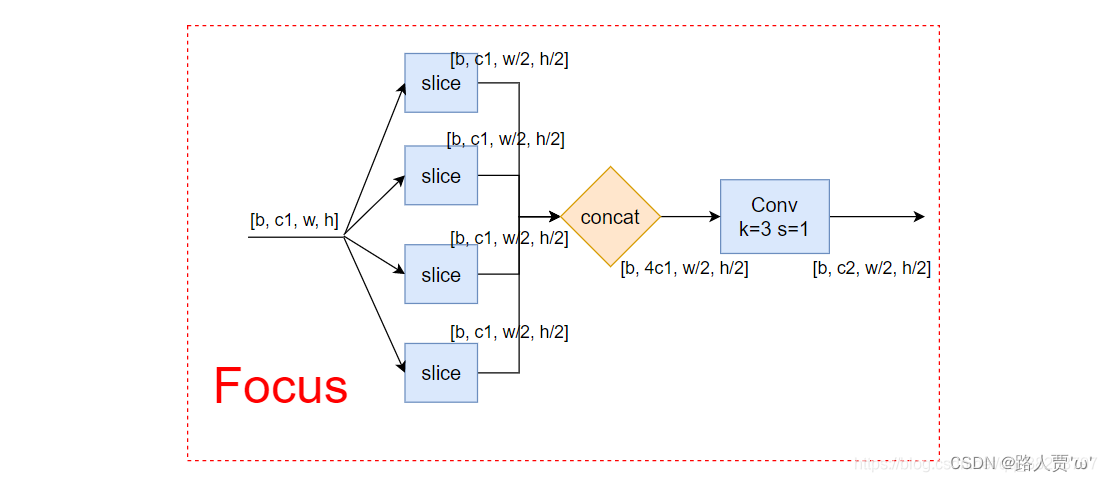
参数:
主要思想:
Focus模块在YOLOv5中是图片进入Backbone前,对图片进行切片操作,具体操作是在一张图片中每隔一个像素拿到一个值,类似于邻近下采样,这样就拿到了四张图片,四张图片互补,长得差不多,但是没有信息丢失,这样一来,将W、H信息就集中到了通道空间,输入通道扩充了4倍,即拼接起来的图片相对于原先的RGB三通道模式变成了12个通道,最后将得到的新图片再经过卷积操作,最终得到了没有信息丢失情况下的二倍下采样特征图。

步骤:
首先把输入x分别从(0,0)、(1,0)、(0,1)、(1,1)开始,按步长为2取值,然后进行一次卷积。
然后将输入(b,c,w,h)的shape变成了输出(b, 4c, w/2, h/2)。也就是说将特征层的长和宽都缩减为原来的一半,然后通道数变成原来的4倍,也可以理解成将一个图片等分切成4个,接着将这四个小的上下堆叠起来。
最后再经过一个conv输出。
'''===========9.Contract:收缩模块:调整张量的大小,将宽高收缩到通道中。================'''
class Contract(nn.Module):
    # Contract width-height into channels, i.e. x(1,64,80,80) to x(1,256,40,40)


    def __init__(self, gain=2):
        super().__init__()
        self.gain = gain

    def forward(self, x):
        b, c, h, w = x.size()  # assert (h / s == 0) and (W / s == 0), 'Indivisible gain'
        s = self.gain
        # permute: 改变tensor的维度顺序
        x = x.view(b, c, h // s, s, w // s, s)  # x(1,64,40,2,40,2)
        # .view: 改变tensor的维度
        x = x.permute(0, 3, 5, 1, 2, 4).contiguous()  # x(1,2,2,64,40,40)
        return x.view(b, c * s * s, h // s, w // s)  # x(1,256,40,40)
Contract是收缩模块,调整张量的大小,将宽高收缩到通道中。
将feature map的w和h维度(缩小)的数据收缩到channel维度上(放大)
如:当 gain = 2 的时候,(64, 80, 80) 的图像 -> (256, 40, 40) 的图像。其操作类似 Focus,但更灵活,相比之下少了一个卷积。
'''===========10.Expand:扩张模块,将特征图像素变大================'''
class Expand(nn.Module):
    # Expand channels into width-height, i.e. x(1,64,80,80) to x(1,16,160,160)
    def __init__(self, gain=2):
        super().__init__()
        self.gain = gain

    def forward(self, x):
        b, c, h, w = x.size()  # assert C / s ** 2 == 0, 'Indivisible gain'
        s = self.gain
        x = x.view(b, s, s, c // s ** 2, h, w)  # x(1,2,2,16,80,80)
        x = x.permute(0, 3, 4, 1, 5, 2).contiguous()  # x(1,16,80,2,80,2)
return x.view(b, c // s ** 2, h * s, w * s) # x(1,16,160,160)Expand是Contract的逆操作,扩张模块,将特征图像素变大。
改变输入特征的shape,是将channel维度(变小)的数据扩展到 W 和 H 维度(变大)。
如:当 gain = 2 的时候,(1,64,80,80) 的图像 -> (1,16,160,160) 的图像。
'''===========11.Concat:自定义concat模块,dimension就是维度值,说明沿着哪一个维度进行拼接================'''
# 作拼接的一个类
# 拼接函数,将两个tensor进行拼接
class Concat(nn.Module):
    # Concatenate a list of tensors along dimension
    def __init__(self, dimension=1):
        super().__init__()
        self.d = dimension

    def forward(self, x):
return torch.cat(x, self.d)Concat是拼接函数,将两个tensor进行拼接起来。
这个是自定义concat模块,dimension就是维度值,说明沿着哪一个维度进行拼接。当 dimension = 1 时,将多张相同尺寸的图像在通道维度上拼接 (通道数可能不同)
这个函数是讲自身按照某个维度进行concat,常用来合并前后两个feature map,也就是yolov5s结构图中的Concat。
关于transformer这个我还没有学习,所以这一块内容暂不做详解,等我后期学过再来填这个坑吧~
这里先放代码,小伙伴们自己看看吧!
'''===========1.TransformerLayer:================'''
class TransformerLayer(nn.Module):
    # Transformer layer https://arxiv.org/abs/2010.11929 (LayerNorm layers removed for better performance)
    """
        Transformer layer https://arxiv.org/abs/2010.11929 (LayerNorm layers removed for better performance)

        这部分相当于原论文中的单个Encoder部分(只移除了两个Norm部分, 其他结构和原文中的Encoding一模一样)
       """
    def __init__(self, c, num_heads):
        super().__init__()
        self.q = nn.Linear(c, c, bias=False)
        self.k = nn.Linear(c, c, bias=False)
        self.v = nn.Linear(c, c, bias=False)
        # 输入: query、key、value
        # 输出: 0 attn_output 即通过self-attention之后,从每一个词语位置输出来的attention 和输入的query它们形状一样的
        #      1 attn_output_weights 即attention weights 每一个单词和任意另一个单词之间都会产生一个weight
        self.ma = nn.MultiheadAttention(embed_dim=c, num_heads=num_heads)
        self.fc1 = nn.Linear(c, c, bias=False)
        self.fc2 = nn.Linear(c, c, bias=False)

    def forward(self, x):
        # 多头注意力机制 + 残差(这里移除了LayerNorm for better performance)
        x = self.ma(self.q(x), self.k(x), self.v(x))[0] + x
        # feed forward 前馈神经网络 + 残差(这里移除了LayerNorm for better performance)
        x = self.fc2(self.fc1(x)) + x
return x'''===========2.TransformerBlock:================'''
class TransformerBlock(nn.Module):
# Vision Transformer https://arxiv.org/abs/2010.11929
def __init__(self, c1, c2, num_heads, num_layers):
super().__init__()
self.conv = None
if c1 != c2:
self.conv = Conv(c1, c2)
self.linear = nn.Linear(c2, c2) # learnable position embedding
self.tr = nn.Sequential(*(TransformerLayer(c2, num_heads) for _ in range(num_layers)))
self.c2 = c2
def forward(self, x):
if self.conv is not None:
x = self.conv(x)
b, _, w, h = x.shape
p = x.flatten(2).permute(2, 0, 1)
return self.tr(p + self.linear(p)).permute(1, 2, 0).reshape(b, self.c2, w, h)
'''===========1.GhostConv:幻象卷积 轻量化网络卷积模块================'''
class GhostConv(nn.Module):
# Ghost Convolution https://github.com/huawei-noah/ghostnet
def __init__(self, c1, c2, k=1, s=1, g=1, act=True): # ch_in, ch_out, kernel, stride, groups
super().__init__()
c_ = c2 // 2 # hidden channels
# 第一步卷积: 少量卷积, 一般是一半的计算量
self.cv1 = Conv(c1, c_, k, s, None, g, act)
# 第二步卷积: cheap operations 使用3x3或5x5的卷积, 并且是逐个特征图的进行卷积(Depth-wise convolutional
self.cv2 = Conv(c_, c_, 5, 1, None, c_, act)
def forward(self, x):
y = self.cv1(x)
return torch.cat([y, self.cv2(y)], 1)GhostConv是幻象卷积,属于轻量化网络卷积模块
具体结构如下图:
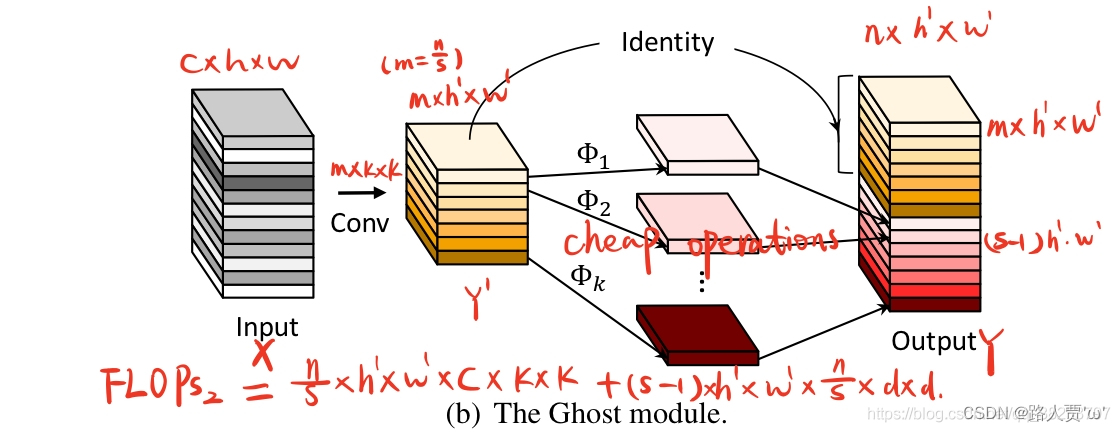
参数:
GhostConv主要作用是可以代替一般的Conv,GhostBottleneck代替C3,至于在哪些位置代替,可以自己决定。幻象模块虽然不能增加mAP,但是可以大大减少模型计算量。
'''===========2.GhostBottleneck:幻象瓶颈层 ================'''
class GhostBottleneck(nn.Module):
# Ghost Bottleneck https://github.com/huawei-noah/ghostnet
def __init__(self, c1, c2, k=3, s=1): # ch_in, ch_out, kernel, stride
super().__init__()
c_ = c2 // 2
self.conv = nn.Sequential(GhostConv(c1, c_, 1, 1), # pw
DWConv(c_, c_, k, s, act=False) if s == 2 else nn.Identity(), # dw
GhostConv(c_, c2, 1, 1, act=False)) # pw-linear
# 注意, 源码中并不是直接Identity连接, 而是先经过一个DWConv + Conv, 再进行shortcut连接的。
self.shortcut = nn.Sequential(DWConv(c1, c1, k, s, act=False),
Conv(c1, c2, 1, 1, act=False)) if s == 2 else nn.Identity()
def forward(self, x):
return self.conv(x) + self.shortcut(x)GhostBottleneck顾名思义就是幻象模块的瓶颈层。
参数:
具体结构如下图:
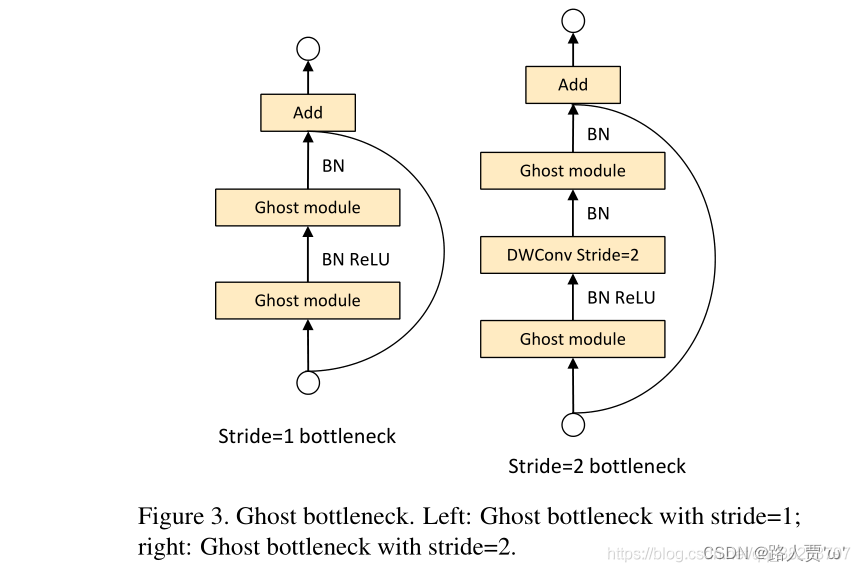
这是一个可复用模块,我们可以放到现有的网络中替换掉Bottleneck模块,从而减少计算了,降低模型体积。类似于ResNet中的基本残差块,由两个堆叠的Ghost模块组成:
Ghost Bottleneck中对于stride = 2的情况,两个Ghost module之间通过一个stride = 2的深度卷积进行连接。
(这个内容以后也会等学习后再详细说,这里参考:[目标检测]-cv常用模块ghostbottleneck原理讲解与pytorch实现_orangezs的博客-CSDN博客)
'''===========1.C3TR(C3):继承自 C3,n 个 Bottleneck 更换为 1 个 TransformerBlock ================'''
class C3TR(C3):
# C3 module with TransformerBlock()
def __init__(self, c1, c2, n=1, shortcut=True, g=1, e=0.5):
super().__init__(c1, c2, n, shortcut, g, e)
c_ = int(c2 * e)
self.m = TransformerBlock(c_, c_, 4, n)C3TR(C3)是继承自 C3,将n 个 Bottleneck 更换为 1 个 TransformerBlock
这部分是根据上面的C3结构改编而来的,将原先的Bottleneck替换为调用TransformerBlock模块
参数:
'''===========2.AutoShape:自动调整shape,该类基本未用================'''
class AutoShape(nn.Module):
# YOLOv5 input-robust model wrapper for passing cv2/np/PIL/torch inputs. Includes preprocessing, inference and NMS
conf = 0.25 # NMS confidence threshold
iou = 0.45 # NMS IoU threshold
classes = None # (optional list) filter by class, i.e. = [0, 15, 16] for COCO persons, cats and dogs
multi_label = False # NMS multiple labels per box
max_det = 1000 # maximum number of detections per image
def __init__(self, model):
super().__init__()
self.model = model.eval()
def autoshape(self):
LOGGER.info('AutoShape already enabled, skipping... ') # model already converted to model.autoshape()
return self
def _apply(self, fn):
# Apply to(), cpu(), cuda(), half() to model tensors that are not parameters or registered buffers
self = super()._apply(fn)
m = self.model.model[-1] # Detect()
m.stride = fn(m.stride)
m.grid = list(map(fn, m.grid))
if isinstance(m.anchor_grid, list):
m.anchor_grid = list(map(fn, m.anchor_grid))
return self
@torch.no_grad()
def forward(self, imgs, size=640, augment=False, profile=False):
# Inference from various sources. For height=640, width=1280, RGB images example inputs are:
# file: imgs = 'data/images/zidane.jpg' # str or PosixPath
# URI: = 'https://ultralytics.com/images/zidane.jpg'
# OpenCV: = cv2.imread('image.jpg')[:,:,::-1] # HWC BGR to RGB x(640,1280,3)
# PIL: = Image.open('image.jpg') or ImageGrab.grab() # HWC x(640,1280,3)
# numpy: = np.zeros((640,1280,3)) # HWC
# torch: = torch.zeros(16,3,320,640) # BCHW (scaled to size=640, 0-1 values)
# multiple: = [Image.open('image1.jpg'), Image.open('image2.jpg'), ...] # list of images
t = [time_sync()]
p = next(self.model.parameters()) # for device and type
if isinstance(imgs, torch.Tensor): # torch
with amp.autocast(enabled=p.device.type != 'cpu'):
return self.model(imgs.to(p.device).type_as(p), augment, profile) # inference
# Pre-process
n, imgs = (len(imgs), imgs) if isinstance(imgs, list) else (1, [imgs]) # number of images, list of images
shape0, shape1, files = [], [], [] # image and inference shapes, filenames
for i, im in enumerate(imgs):
f = f'image{i}' # filename
if isinstance(im, (str, Path)): # filename or uri
im, f = Image.open(requests.get(im, stream=True).raw if str(im).startswith('http') else im), im
im = np.asarray(exif_transpose(im))
elif isinstance(im, Image.Image): # PIL Image
im, f = np.asarray(exif_transpose(im)), getattr(im, 'filename', f) or f
files.append(Path(f).with_suffix('.jpg').name)
if im.shape[0] < 5: # image in CHW
im = im.transpose((1, 2, 0)) # reverse dataloader .transpose(2, 0, 1)
im = im[..., :3] if im.ndim == 3 else np.tile(im[..., None], 3) # enforce 3ch input
s = im.shape[:2] # HWC
shape0.append(s) # image shape
g = (size / max(s)) # gain
shape1.append([y * g for y in s])
imgs[i] = im if im.data.contiguous else np.ascontiguousarray(im) # update
shape1 = [make_divisible(x, int(self.stride.max())) for x in np.stack(shape1, 0).max(0)] # inference shape
x = [letterbox(im, new_shape=shape1, auto=False)[0] for im in imgs] # pad
x = np.stack(x, 0) if n > 1 else x[0][None] # stack
x = np.ascontiguousarray(x.transpose((0, 3, 1, 2))) # BHWC to BCHW
x = torch.from_numpy(x).to(p.device).type_as(p) / 255 # uint8 to fp16/32
t.append(time_sync())
with amp.autocast(enabled=p.device.type != 'cpu'):
# Inference
y = self.model(x, augment, profile)[0] # forward
t.append(time_sync())
# Post-process
y = non_max_suppression(y, self.conf, iou_thres=self.iou, classes=self.classes,
multi_label=self.multi_label, max_det=self.max_det) # NMS
for i in range(n):
scale_coords(shape1, y[i][:, :4], shape0[i])
t.append(time_sync())
return Detections(imgs, y, files, t, self.names, x.shape)AutoShape是一个模型扩展模块,给模型封装成包含前处理、推理、后处理的模块(预处理 + 推理 + nms)。
注意Autoshape模块在train中不会被调用,当模型训练结束后,会通过这个模块对图片进行重塑,来方便模型的预测。
因为这个模块基本没啥用,所以不做细讲。
'''===========3.Detections:对推理结果进行处理================'''
class Detections:
# YOLOv5 detections class for inference results
"""用在AutoShape函数结尾
detections class for YOLOv5 inference results
"""
def __init__(self, imgs, pred, files, times=None, names=None, shape=None):
super().__init__()
d = pred[0].device # device
gn = [torch.tensor([*(im.shape[i] for i in [1, 0, 1, 0]), 1, 1], device=d) for im in imgs] # normalizations
# imgs:原图
self.imgs = imgs # list of images as numpy arrays
# pred:预测值(xyxy, conf, cls)
self.pred = pred # list of tensors pred[0] = (xyxy, conf, cls)
# names: 类名
self.names = names # class names
# files: 图像文件名
self.files = files # image filenames
# xyxy:左上角+右下角格式
self.xyxy = pred # xyxy pixels
# xywh:中心点+宽长格式
self.xywh = [xyxy2xywh(x) for x in pred] # xywh pixels
# xyxyn:xyxy标准化
self.xyxyn = [x / g for x, g in zip(self.xyxy, gn)] # xyxy normalized
# xywhn:xywhn标准化
self.xywhn = [x / g for x, g in zip(self.xywh, gn)] # xywh normalized
self.n = len(self.pred) # number of images (batch size)
self.t = tuple((times[i + 1] - times[i]) * 1000 / self.n for i in range(3)) # timestamps (ms)
self.s = shape # inference BCHW shape
def display(self, pprint=False, show=False, save=False, crop=False, render=False, save_dir=Path('')):
crops = []
for i, (im, pred) in enumerate(zip(self.imgs, self.pred)):
s = f'image {i + 1}/{len(self.pred)}: {im.shape[0]}x{im.shape[1]} ' # string
if pred.shape[0]:
for c in pred[:, -1].unique():
n = (pred[:, -1] == c).sum() # detections per class
s += f"{n} {self.names[int(c)]}{'s' * (n > 1)}, " # add to string
if show or save or render or crop:
annotator = Annotator(im, example=str(self.names))
for *box, conf, cls in reversed(pred): # xyxy, confidence, class
label = f'{self.names[int(cls)]} {conf:.2f}'
if crop:
file = save_dir / 'crops' / self.names[int(cls)] / self.files[i] if save else None
crops.append({'box': box, 'conf': conf, 'cls': cls, 'label': label,
'im': save_one_box(box, im, file=file, save=save)})
else: # all others
annotator.box_label(box, label, color=colors(cls))
im = annotator.im
else:
s += '(no detections)'
im = Image.fromarray(im.astype(np.uint8)) if isinstance(im, np.ndarray) else im # from np
if pprint:
LOGGER.info(s.rstrip(', '))
if show:
im.show(self.files[i]) # show
if save:
f = self.files[i]
im.save(save_dir / f) # save
if i == self.n - 1:
LOGGER.info(f"Saved {self.n} image{'s' * (self.n > 1)} to {colorstr('bold', save_dir)}")
if render:
self.imgs[i] = np.asarray(im)
if crop:
if save:
LOGGER.info(f'Saved results to {save_dir}\n')
return crops
def print(self):
self.display(pprint=True) # print results
LOGGER.info(f'Speed: %.1fms pre-process, %.1fms inference, %.1fms NMS per image at shape {tuple(self.s)}' %
self.t)
def show(self):
self.display(show=True) # show results
def save(self, save_dir='runs/detect/exp'):
save_dir = increment_path(save_dir, exist_ok=save_dir != 'runs/detect/exp', mkdir=True) # increment save_dir
self.display(save=True, save_dir=save_dir) # save results
def crop(self, save=True, save_dir='runs/detect/exp'):
save_dir = increment_path(save_dir, exist_ok=save_dir != 'runs/detect/exp', mkdir=True) if save else None
return self.display(crop=True, save=save, save_dir=save_dir) # crop results
def render(self):
self.display(render=True) # render results
return self.imgs
def pandas(self):
# return detections as pandas DataFrames, i.e. print(results.pandas().xyxy[0])
new = copy(self) # return copy
ca = 'xmin', 'ymin', 'xmax', 'ymax', 'confidence', 'class', 'name' # xyxy columns
cb = 'xcenter', 'ycenter', 'width', 'height', 'confidence', 'class', 'name' # xywh columns
for k, c in zip(['xyxy', 'xyxyn', 'xywh', 'xywhn'], [ca, ca, cb, cb]):
a = [[x[:5] + [int(x[5]), self.names[int(x[5])]] for x in x.tolist()] for x in getattr(self, k)] # update
setattr(new, k, [pd.DataFrame(x, columns=c) for x in a])
return new
def tolist(self):
# return a list of Detections objects, i.e. 'for result in results.tolist():'
x = [Detections([self.imgs[i]], [self.pred[i]], self.names, self.s) for i in range(self.n)]
for d in x:
for k in ['imgs', 'pred', 'xyxy', 'xyxyn', 'xywh', 'xywhn']:
setattr(d, k, getattr(d, k)[0]) # pop out of list
return x
def __len__(self):
return self.n
Detections是专门针对目标检测的封装类,对推理结果进行处理。
这个模块吧,代码so长。是对推理结果进行一些处理,用的不是很多,整个YOLOv5只在上面的AutoShape函数结尾调用了一下。不用仔细研究的,把yolo.py的Detect模块了解清楚既可~
'''===========4.Classify:二级分类模块================'''
class Classify(nn.Module):
# Classification head, i.e. x(b,c1,20,20) to x(b,c2)
def __init__(self, c1, c2, k=1, s=1, p=None, g=1): # ch_in, ch_out, kernel, stride, padding, groups
super().__init__()
self.aap = nn.AdaptiveAvgPool2d(1) # to x(b,c1,1,1)
# 自适应平均池化操作
self.conv = nn.Conv2d(c1, c2, k, s, autopad(k, p), groups=g) # to x(b,c2,1,1)
# 展平
self.flat = nn.Flatten()
def forward(self, x):
# 先自适应平均池化操作, 然后拼接
z = torch.cat([self.aap(y) for y in (x if isinstance(x, list) else [x])], 1) # cat if list
# 对z进行展平操作
return self.flat(self.conv(z)) # flatten to x(b,c2)Classify是一个二级分类模块
什么是二级分类模块?
比如做车牌的识别,先识别出车牌,如果想对车牌上的字进行识别,就需要二级分类进一步检测。
再比如要做识别人脸面部表情,先要识别出人脸,如果想识别出人的面部表情,就需要二级分类进一步检测。
# YOLOv5 🚀 by Ultralytics, GPL-3.0 license
"""
Common modules
"""
'''===============================================一、导入包==================================================='''
'''======================1.导入安装好的python库====================='''
import json # 用于json和Python数据之间的相互转换
import math # 数学函数模块
import platform # 获取操作系统的信息
import warnings # 警告程序员关于语言或库功能的变化的方法
from copy import copy # 数据拷贝模块 分浅拷贝和深拷贝
from pathlib import Path # Path将str转换为Path对象 使字符串路径易于操作的模块
import cv2 # 调用OpenCV的cv库
import numpy as np # numpy数组操作模块
import pandas as pd # panda数组操作模块
import requests # Python的HTTP客户端库
import torch # pytorch深度学习框架
import torch.nn as nn # 专门为神经网络设计的模块化接口
from PIL import Image # 图像基础操作模块
from torch.cuda import amp # 混合精度训练模块
'''===================2.加载自定义模块============================'''
from utils.datasets import exif_transpose, letterbox # 加载数据集的函数
from utils.general import (LOGGER, check_requirements, check_suffix, colorstr, increment_path, make_divisible,
non_max_suppression, scale_coords, xywh2xyxy, xyxy2xywh) # 定义了一些常用的工具函数
from utils.plots import Annotator, colors, plot_one_box # 定义了Annotator类,可以在图像上绘制矩形框和标注信息
from utils.torch_utils import time_sync # 定义了一些与PyTorch有关的工具函数
'''===============================================二、基础组件==================================================='''
'''===========1.autopad:根据输入的卷积核计算该卷积模块所需的pad值================'''
# 为same卷积或者same池化自动扩充
# 通过卷积核的大小来计算需要的padding为多少才能把tensor补成原来的形状
def autopad(k, p=None): # kernel, padding
# Pad to 'same'
# 如果p是none 则进行下一步
if p is None:
# 如果k是int 则进行k//2 若不是则进行x//2
p = k // 2 if isinstance(k, int) else [x // 2 for x in k] # auto-pad
return p
'''===========2.Conv:标准卷积 由Conv + BN + activate组成================'''
class Conv(nn.Module):
# Standard convolution
# init初始化构造函数
def __init__(self, c1, c2, k=1, s=1, p=None, g=1, act=True): # ch_in, ch_out, kernel, stride, padding, groups
"""在Focus、Bottleneck、BottleneckCSP、C3、SPP、DWConv、TransformerBloc等模块中调用
Standard convolution conv+BN+act
:params c1: 输入的channel值
:params c2: 输出的channel值
:params k: 卷积的kernel_size
:params s: 卷积的stride
:params p: 卷积的padding 一般是None 可以通过autopad自行计算需要pad的padding数
:params g: 卷积的groups数 =1就是普通的卷积 >1就是深度可分离卷积
:params act: 激活函数类型 True就是SiLU()/Swish False就是不使用激活函数
类型是nn.Module就使用传进来的激活函数类型
"""
super().__init__()
# 卷积层
self.conv = nn.Conv2d(c1, c2, k, s, autopad(k, p), groups=g, bias=False)
# 归一化层
self.bn = nn.BatchNorm2d(c2)
# 激活函数
self.act = nn.SiLU() if act is True else (act if isinstance(act, nn.Module) else nn.Identity())
# 正向计算,网络执行的顺序是根据forward函数来决定的
def forward(self, x):
# conv卷积 -> bn -> act激活
return self.act(self.bn(self.conv(x)))
# 正向融合计算
def forward_fuse(self, x):
# 这里只有卷积和激活
return self.act(self.conv(x))
'''===========3.DWConv:深度可分离卷积================'''
class DWConv(Conv):
# Depth-wise convolution class
def __init__(self, c1, c2, k=1, s=1, act=True): # ch_in, ch_out, kernel, stride, padding, groups
super().__init__(c1, c2, k, s, g=math.gcd(c1, c2), act=act)
'''===========4.Bottleneck:标准的瓶颈层 由1x1conv+3x3conv+残差块组成================'''
class Bottleneck(nn.Module):
# Standard bottleneck
def __init__(self, c1, c2, shortcut=True, g=1, e=0.5): # ch_in, ch_out, shortcut, groups, expansion
"""在BottleneckCSP和yolo.py的parse_model中调用
Standard bottleneck Conv+Conv+shortcut
:params c1: 第一个卷积的输入channel
:params c2: 第二个卷积的输出channel
:params shortcut: bool 是否有shortcut连接 默认是True
:params g: 卷积分组的个数 =1就是普通卷积 >1就是深度可分离卷积
:params e: expansion ratio e*c2就是第一个卷积的输出channel=第二个卷积的输入channel
"""
super().__init__()
c_ = int(c2 * e) # hidden channels
# 1*1卷积层
self.cv1 = Conv(c1, c_, 1, 1)
# 3*3卷积层
self.cv2 = Conv(c_, c2, 3, 1, g=g)
# 如果shortcut为True就会将输入和输出相加之后再输出
self.add = shortcut and c1 == c2
def forward(self, x):
return x + self.cv2(self.cv1(x)) if self.add else self.cv2(self.cv1(x))
'''===========5.BottleneckCSP:瓶颈层 由几个Bottleneck模块的堆叠+CSP结构组成================'''
class BottleneckCSP(nn.Module):
# CSP Bottleneck https://github.com/WongKinYiu/CrossStagePartialNetworks
def __init__(self, c1, c2, n=1, shortcut=True, g=1, e=0.5): # ch_in, ch_out, number, shortcut, groups, expansion
"""在C3模块和yolo.py的parse_model模块调用
CSP Bottleneck https://github.com/WongKinYiu/CrossStagePartialNetworks
:params c1: 整个BottleneckCSP的输入channel
:params c2: 整个BottleneckCSP的输出channel
:params n: 有n个Bottleneck
:params shortcut: bool Bottleneck中是否有shortcut,默认True
:params g: Bottleneck中的3x3卷积类型 =1普通卷积 >1深度可分离卷积
:params e: expansion ratio c2xe=中间其他所有层的卷积核个数/中间所有层的输入输出channel数
c_: bottleneckCSP 结构的中间层的通道数,由膨胀率e决定
"""
super().__init__()
c_ = int(c2 * e) # hidden channels
# 4个1*1卷积层的堆叠
self.cv1 = Conv(c1, c_, 1, 1)
self.cv2 = nn.Conv2d(c1, c_, 1, 1, bias=False)
self.cv3 = nn.Conv2d(c_, c_, 1, 1, bias=False)
self.cv4 = Conv(2 * c_, c2, 1, 1)
# bn层
self.bn = nn.BatchNorm2d(2 * c_) # applied to cat(cv2, cv3)
# 激活函数
self.act = nn.SiLU()
# m:叠加n次Bottleneck的操作
# 操作符*可以把一个list拆开成一个个独立的元素
self.m = nn.Sequential(*(Bottleneck(c_, c_, shortcut, g, e=1.0) for _ in range(n)))
def forward(self, x):
# y1相当于先做一次cv1操作然后进行m操作最后进行cv3操作,也就是BCSPn模块中的上面的分支操作
# 输入x ->Conv模块 ->n个bottleneck模块 ->Conv模块 ->y1
y1 = self.cv3(self.m(self.cv1(x)))
# y2就是进行cv2操作,也就是BCSPn模块中的下面的分支操作(直接逆行conv操作的分支, Conv--nXBottleneck--conv)
# 输入x -> Conv模块 -> 输出y2
y2 = self.cv2(x)
# 最后y1和y2做拼接, 接着进入bn层做归一化, 然后做act激活, 最后输出cv4
# 输入y1,y2->按照通道数融合 ->归一化 -> 激活函数 -> Conv输出 -> 输出
# torch.cat(y1, y2), dim=1: 这里是指定在第一个维度上进行合并,即在channel维度上合并
return self.cv4(self.act(self.bn(torch.cat((y1, y2), dim=1))))
'''===========6.C3:和BottleneckCSP模块类似,但是少了一个Conv模块================'''
# ===6.1 C3=== #
class C3(nn.Module):
# CSP Bottleneck with 3 convolutions
def __init__(self, c1, c2, n=1, shortcut=True, g=1, e=0.5): # ch_in, ch_out, number, shortcut, groups, expansion
"""在C3TR模块和yolo.py的parse_model模块调用
CSP Bottleneck with 3 convolutions
:params c1: 整个BottleneckCSP的输入channel
:params c2: 整个BottleneckCSP的输出channel
:params n: 有n个Bottleneck
:params shortcut: bool Bottleneck中是否有shortcut,默认True
:params g: Bottleneck中的3x3卷积类型 =1普通卷积 >1深度可分离卷积
:params e: expansion ratio c2xe=中间其他所有层的卷积核个数/中间所有层的输入输出channel数
"""
super().__init__()
c_ = int(c2 * e) # hidden channels
# 3个1*1卷积层的堆叠,比BottleneckCSP少一个
self.cv1 = Conv(c1, c_, 1, 1)
self.cv2 = Conv(c1, c_, 1, 1)
self.cv3 = Conv(2 * c_, c2, 1) # act=FReLU(c2)
self.m = nn.Sequential(*(Bottleneck(c_, c_, shortcut, g, e=1.0) for _ in range(n)))
# self.m = nn.Sequential(*[CrossConv(c_, c_, 3, 1, g, 1.0, shortcut) for _ in range(n)])
def forward(self, x):
# 将第一个卷积层与第二个卷积层的结果拼接在一起
return self.cv3(torch.cat((self.m(self.cv1(x)), self.cv2(x)), dim=1))
# ===6.2 C3SPP(C3):继承自 C3,n 个 Bottleneck 更换为 1 个 SPP=== #
class C3SPP(C3):
# C3 module with SPP()
def __init__(self, c1, c2, k=(5, 9, 13), n=1, shortcut=True, g=1, e=0.5):
super().__init__(c1, c2, n, shortcut, g, e)
c_ = int(c2 * e)
self.m = SPP(c_, c_, k)
# ===6.3 C3Ghost(C3):继承自 C3,Bottleneck 更换为 GhostBottleneck=== #
class C3Ghost(C3):
# C3 module with GhostBottleneck()
def __init__(self, c1, c2, n=1, shortcut=True, g=1, e=0.5):
super().__init__(c1, c2, n, shortcut, g, e)
c_ = int(c2 * e) # hidden channels
self.m = nn.Sequential(*(GhostBottleneck(c_, c_) for _ in range(n)))
'''===========7.SPP:空间金字塔池化模块================'''
# 用在骨干网络收尾阶段,用于融合多尺度特征。
# ===7.1 SPP:空间金字塔池化=== #
class SPP(nn.Module):
# Spatial Pyramid Pooling (SPP) layer https://arxiv.org/abs/1406.4729
def __init__(self, c1, c2, k=(5, 9, 13)):
"""在yolo.py的parse_model模块调用
空间金字塔池化 Spatial pyramid pooling layer used in YOLOv3-SPP
:params c1: SPP模块的输入channel
:params c2: SPP模块的输出channel
:params k: 保存着三个maxpool的卷积核大小 默认是(5, 9, 13)
"""
super().__init__()
c_ = c1 // 2 # hidden channels
# 1*1卷积
self.cv1 = Conv(c1, c_, 1, 1)
# 这里+1是因为有len(k)+1个输入
self.cv2 = Conv(c_ * (len(k) + 1), c2, 1, 1)
# m先进行最大池化操作, 然后通过nn.ModuleList进行构造一个模块 在构造时对每一个k都要进行最大池化
self.m = nn.ModuleList([nn.MaxPool2d(kernel_size=x, stride=1, padding=x // 2) for x in k])
def forward(self, x):
# 先进行cv1的操作
x = self.cv1(x)
# 忽略了警告错误的输出
with warnings.catch_warnings():
warnings.simplefilter('ignore') # suppress torch 1.9.0 max_pool2d() warning
# 对每一个m进行最大池化 和没有做池化的每一个输入进行叠加 然后做拼接 最后做cv2操作
return self.cv2(torch.cat([x] + [m(x) for m in self.m], 1))
# ===7.2 SPPF:快速版的空间金字塔池化=== #
class SPPF(nn.Module):
# Spatial Pyramid Pooling - Fast (SPPF) layer for YOLOv5 by Glenn Jocher
def __init__(self, c1, c2, k=5): # equivalent to SPP(k=(5, 9, 13))
super().__init__()
c_ = c1 // 2 # hidden channels
self.cv1 = Conv(c1, c_, 1, 1)
self.cv2 = Conv(c_ * 4, c2, 1, 1)
self.m = nn.MaxPool2d(kernel_size=k, stride=1, padding=k // 2)
def forward(self, x):
x = self.cv1(x)
with warnings.catch_warnings():
warnings.simplefilter('ignore') # suppress torch 1.9.0 max_pool2d() warning
y1 = self.m(x)
y2 = self.m(y1)
return self.cv2(torch.cat([x, y1, y2, self.m(y2)], 1))
'''===========8.Focus:把宽度w和高度h的信息整合到c空间================'''
class Focus(nn.Module):
# Focus wh information into c-space
def __init__(self, c1, c2, k=1, s=1, p=None, g=1, act=True): # ch_in, ch_out, kernel, stride, padding, groups
"""在yolo.py的parse_model函数中被调用
理论:从高分辨率图像中,周期性的抽出像素点重构到低分辨率图像中,即将图像相邻的四个位置进行堆叠,
聚焦wh维度信息到c通道空,提高每个点感受野,并减少原始信息的丢失,该模块的设计主要是减少计算量加快速度。
Focus wh information into c-space 把宽度w和高度h的信息整合到c空间中
先做4个slice 再concat 最后再做Conv
slice后 (b,c1,w,h) -> 分成4个slice 每个slice(b,c1,w/2,h/2)
concat(dim=1)后 4个slice(b,c1,w/2,h/2)) -> (b,4c1,w/2,h/2)
conv后 (b,4c1,w/2,h/2) -> (b,c2,w/2,h/2)
:params c1: slice后的channel
:params c2: Focus最终输出的channel
:params k: 最后卷积的kernel
:params s: 最后卷积的stride
:params p: 最后卷积的padding
:params g: 最后卷积的分组情况 =1普通卷积 >1深度可分离卷积
:params act: bool激活函数类型 默认True:SiLU()/Swish False:不用激活函数
"""
super().__init__()
# concat后的卷积(最后的卷积)
self.conv = Conv(c1 * 4, c2, k, s, p, g, act)
# self.contract = Contract(gain=2)
def forward(self, x): # x(b,c,w,h) -> y(b,4c,w/2,h/2)
# 先进行切分, 然后进行拼接, 最后再做conv操作
return self.conv(torch.cat([x[..., ::2, ::2], x[..., 1::2, ::2], x[..., ::2, 1::2], x[..., 1::2, 1::2]], 1))
# return self.conv(self.contract(x))
# 以下模块Contract,Expand,Concat是用来处理输入特征的shape的
'''===========9.Contract:收缩模块:调整张量的大小,将宽高收缩到通道中。================'''
class Contract(nn.Module):
# Contract width-height into channels, i.e. x(1,64,80,80) to x(1,256,40,40)
"""用在yolo.py的parse_model模块 用的不多
改变输入特征的shape 将w和h维度(缩小)的数据收缩到channel维度上(放大)
Contract width-height into channels, i.e. x(1,64,80,80) to x(1,256,40,40)
"""
def __init__(self, gain=2):
super().__init__()
self.gain = gain
def forward(self, x):
b, c, h, w = x.size() # assert (h / s == 0) and (W / s == 0), 'Indivisible gain'
s = self.gain
# permute: 改变tensor的维度顺序
x = x.view(b, c, h // s, s, w // s, s) # x(1,64,40,2,40,2)
# .view: 改变tensor的维度
x = x.permute(0, 3, 5, 1, 2, 4).contiguous() # x(1,2,2,64,40,40)
return x.view(b, c * s * s, h // s, w // s) # x(1,256,40,40)
'''===========10.Expand:扩张模块,将特征图像素变大================'''
class Expand(nn.Module):
# Expand channels into width-height, i.e. x(1,64,80,80) to x(1,16,160,160)
def __init__(self, gain=2):
super().__init__()
self.gain = gain
def forward(self, x):
b, c, h, w = x.size() # assert C / s ** 2 == 0, 'Indivisible gain'
s = self.gain
x = x.view(b, s, s, c // s ** 2, h, w) # x(1,2,2,16,80,80)
x = x.permute(0, 3, 4, 1, 5, 2).contiguous() # x(1,16,80,2,80,2)
return x.view(b, c // s ** 2, h * s, w * s) # x(1,16,160,160)
'''===========11.Concat:自定义concat模块,dimension就是维度值,说明沿着哪一个维度进行拼接================'''
# 作拼接的一个类
# 拼接函数,将两个tensor进行拼接
class Concat(nn.Module):
# Concatenate a list of tensors along dimension
def __init__(self, dimension=1):
super().__init__()
self.d = dimension
def forward(self, x):
return torch.cat(x, self.d)
'''===============================================三、注意力模块==================================================='''
'''===========1.TransformerLayer:================'''
class TransformerLayer(nn.Module):
# Transformer layer https://arxiv.org/abs/2010.11929 (LayerNorm layers removed for better performance)
"""
Transformer layer https://arxiv.org/abs/2010.11929 (LayerNorm layers removed for better performance)
这部分相当于原论文中的单个Encoder部分(只移除了两个Norm部分, 其他结构和原文中的Encoding一模一样)
"""
def __init__(self, c, num_heads):
super().__init__()
self.q = nn.Linear(c, c, bias=False)
self.k = nn.Linear(c, c, bias=False)
self.v = nn.Linear(c, c, bias=False)
# 输入: query、key、value
# 输出: 0 attn_output 即通过self-attention之后,从每一个词语位置输出来的attention 和输入的query它们形状一样的
# 1 attn_output_weights 即attention weights 每一个单词和任意另一个单词之间都会产生一个weight
self.ma = nn.MultiheadAttention(embed_dim=c, num_heads=num_heads)
self.fc1 = nn.Linear(c, c, bias=False)
self.fc2 = nn.Linear(c, c, bias=False)
def forward(self, x):
# 多头注意力机制 + 残差(这里移除了LayerNorm for better performance)
x = self.ma(self.q(x), self.k(x), self.v(x))[0] + x
# feed forward 前馈神经网络 + 残差(这里移除了LayerNorm for better performance)
x = self.fc2(self.fc1(x)) + x
return x
'''===========2.TransformerBlock:================'''
class TransformerBlock(nn.Module):
    # Vision Transformer https://arxiv.org/abs/2010.11929
    def __init__(self, c1, c2, num_heads, num_layers):
        super().__init__()
        self.conv = None
        if c1 != c2:
            self.conv = Conv(c1, c2)
        self.linear = nn.Linear(c2, c2)  # learnable position embedding
        self.tr = nn.Sequential(*(TransformerLayer(c2, num_heads) for _ in range(num_layers)))
        self.c2 = c2

    def forward(self, x):
        if self.conv is not None:
            x = self.conv(x)
        b, _, w, h = x.shape
        p = x.flatten(2).permute(2, 0, 1)
        return self.tr(p + self.linear(p)).permute(1, 2, 0).reshape(b, self.c2, w, h)
'''===============================================四、幻象模块==================================================='''
'''===========1.GhostConv:幻象卷积  轻量化网络卷积模块================'''
class GhostConv(nn.Module):
    # Ghost Convolution https://github.com/huawei-noah/ghostnet

    def __init__(self, c1, c2, k=1, s=1, g=1, act=True):  # ch_in, ch_out, kernel, stride, groups
        super().__init__()
        c_ = c2 // 2  # hidden channels
        # 第一步卷积: 少量卷积, 一般是一半的计算量
        self.cv1 = Conv(c1, c_, k, s, None, g, act)
        # 第二步卷积: cheap operations 使用3x3或5x5的卷积, 并且是逐个特征图的进行卷积(Depth-wise convolutional
        self.cv2 = Conv(c_, c_, 5, 1, None, c_, act)

    def forward(self, x):
        y = self.cv1(x)
        return torch.cat([y, self.cv2(y)], 1)
'''===========2.GhostBottleneck:幻象瓶颈层 ================'''
class GhostBottleneck(nn.Module):
    # Ghost Bottleneck https://github.com/huawei-noah/ghostnet
    def __init__(self, c1, c2, k=3, s=1):  # ch_in, ch_out, kernel, stride
        super().__init__()
        c_ = c2 // 2
        self.conv = nn.Sequential(GhostConv(c1, c_, 1, 1),  # pw
                                  DWConv(c_, c_, k, s, act=False) if s == 2 else nn.Identity(),  # dw
                                  GhostConv(c_, c2, 1, 1, act=False))  # pw-linear
        # 注意, 源码中并不是直接Identity连接, 而是先经过一个DWConv + Conv, 再进行shortcut连接的。
        self.shortcut = nn.Sequential(DWConv(c1, c1, k, s, act=False),
                                      Conv(c1, c2, 1, 1, act=False)) if s == 2 else nn.Identity()

    def forward(self, x):
        return self.conv(x) + self.shortcut(x)
'''===============================================五、模型扩展模块==================================================='''
'''===========1.C3TR(C3):继承自 C3,n 个 Bottleneck 更换为 1 个 TransformerBlock ================'''
class C3TR(C3):
"""
这部分是根据上面的C3结构改编而来的, 将原先的Bottleneck替换为调用TransformerBlock模块
"""
# C3 module with TransformerBlock()
def __init__(self, c1, c2, n=1, shortcut=True, g=1, e=0.5):
''' 在C3RT模块和yolo.py的parse_model函数中被调用
:params c1: 整个C3的输入channel
:params c2: 整个C3的输出channel
:params n: 有n个子模块[Bottleneck/CrossConv]
:params shortcut: bool值,子模块[Bottlenec/CrossConv]中是否有shortcut,默认True
:params g: 子模块[Bottlenec/CrossConv]中的3x3卷积类型,=1普通卷积,>1深度可分离卷积
:params e: expansion ratio,e*c2=中间其它所有层的卷积核个数=中间所有层的的输入输出channel
'''
super().__init__(c1, c2, n, shortcut, g, e)
c_ = int(c2 * e)
self.m = TransformerBlock(c_, c_, 4, n)
'''===========2.DetectMultiBackend: ================'''
class DetectMultiBackend(nn.Module):
# YOLOv5 MultiBackend class for python inference on various backends
def __init__(self, weights='yolov5s.pt', device=None, dnn=True):
# Usage:
# PyTorch: weights = *.pt
# TorchScript: *.torchscript.pt
# CoreML: *.mlmodel
# TensorFlow: *_saved_model
# TensorFlow: *.pb
# TensorFlow Lite: *.tflite
# ONNX Runtime: *.onnx
# OpenCV DNN: *.onnx with dnn=True
super().__init__()
# 判断weights是否为list,若是取出第一个值作为传入路径
w = str(weights[0] if isinstance(weights, list) else weights)
suffix, suffixes = Path(w).suffix.lower(), ['.pt', '.onnx', '.tflite', '.pb', '', '.mlmodel']
check_suffix(w, suffixes) # check weights have acceptable suffix
pt, onnx, tflite, pb, saved_model, coreml = (suffix == x for x in suffixes) # backend booleans
jit = pt and 'torchscript' in w.lower()
stride, names = 64, [f'class{i}' for i in range(1000)] # assign defaults
if jit: # TorchScript
LOGGER.info(f'Loading {w} for TorchScript inference...')
extra_files = {'config.txt': ''} # model metadata
model = torch.jit.load(w, _extra_files=extra_files)
if extra_files['config.txt']:
d = json.loads(extra_files['config.txt']) # extra_files dict
stride, names = int(d['stride']), d['names']
elif pt: # PyTorch
from models.experimental import attempt_load # scoped to avoid circular import
model = torch.jit.load(w) if 'torchscript' in w else attempt_load(weights, map_location=device)
stride = int(model.stride.max()) # model stride
names = model.module.names if hasattr(model, 'module') else model.names # get class names
elif coreml: # CoreML *.mlmodel
import coremltools as ct
model = ct.models.MLModel(w)
elif dnn: # ONNX OpenCV DNN
LOGGER.info(f'Loading {w} for ONNX OpenCV DNN inference...')
check_requirements(('opencv-python>=4.5.4',))
net = cv2.dnn.readNetFromONNX(w)
elif onnx: # ONNX Runtime
LOGGER.info(f'Loading {w} for ONNX Runtime inference...')
check_requirements(('onnx', 'onnxruntime-gpu' if torch.has_cuda else 'onnxruntime'))
import onnxruntime
session = onnxruntime.InferenceSession(w, None)
else: # TensorFlow model (TFLite, pb, saved_model)
import tensorflow as tf
if pb: # https://www.tensorflow.org/guide/migrate#a_graphpb_or_graphpbtxt
def wrap_frozen_graph(gd, inputs, outputs):
x = tf.compat.v1.wrap_function(lambda: tf.compat.v1.import_graph_def(gd, name=""), []) # wrapped
return x.prune(tf.nest.map_structure(x.graph.as_graph_element, inputs),
tf.nest.map_structure(x.graph.as_graph_element, outputs))
LOGGER.info(f'Loading {w} for TensorFlow *.pb inference...')
graph_def = tf.Graph().as_graph_def()
graph_def.ParseFromString(open(w, 'rb').read())
frozen_func = wrap_frozen_graph(gd=graph_def, inputs="x:0", outputs="Identity:0")
elif saved_model:
LOGGER.info(f'Loading {w} for TensorFlow saved_model inference...')
model = tf.keras.models.load_model(w)
elif tflite: # https://www.tensorflow.org/lite/guide/python#install_tensorflow_lite_for_python
if 'edgetpu' in w.lower():
LOGGER.info(f'Loading {w} for TensorFlow Edge TPU inference...')
import tflite_runtime.interpreter as tfli
delegate = {'Linux': 'libedgetpu.so.1', # install https://coral.ai/software/#edgetpu-runtime
'Darwin': 'libedgetpu.1.dylib',
'Windows': 'edgetpu.dll'}[platform.system()]
interpreter = tfli.Interpreter(model_path=w, experimental_delegates=[tfli.load_delegate(delegate)])
else:
LOGGER.info(f'Loading {w} for TensorFlow Lite inference...')
interpreter = tf.lite.Interpreter(model_path=w) # load TFLite model
interpreter.allocate_tensors() # allocate
input_details = interpreter.get_input_details() # inputs
output_details = interpreter.get_output_details() # outputs
self.__dict__.update(locals()) # assign all variables to self
def forward(self, im, augment=False, visualize=False, val=False):
# YOLOv5 MultiBackend inference
b, ch, h, w = im.shape # batch, channel, height, width
if self.pt: # PyTorch
y = self.model(im) if self.jit else self.model(im, augment=augment, visualize=visualize)
return y if val else y[0]
elif self.coreml: # CoreML *.mlmodel
im = im.permute(0, 2, 3, 1).cpu().numpy() # torch BCHW to numpy BHWC shape(1,320,192,3)
im = Image.fromarray((im[0] * 255).astype('uint8'))
# im = im.resize((192, 320), Image.ANTIALIAS)
y = self.model.predict({'image': im}) # coordinates are xywh normalized
box = xywh2xyxy(y['coordinates'] * [[w, h, w, h]]) # xyxy pixels
conf, cls = y['confidence'].max(1), y['confidence'].argmax(1).astype(np.float)
y = np.concatenate((box, conf.reshape(-1, 1), cls.reshape(-1, 1)), 1)
elif self.onnx: # ONNX
im = im.cpu().numpy() # torch to numpy
if self.dnn: # ONNX OpenCV DNN
self.net.setInput(im)
y = self.net.forward()
else: # ONNX Runtime
y = self.session.run([self.session.get_outputs()[0].name], {self.session.get_inputs()[0].name: im})[0]
else: # TensorFlow model (TFLite, pb, saved_model)
im = im.permute(0, 2, 3, 1).cpu().numpy() # torch BCHW to numpy BHWC shape(1,320,192,3)
if self.pb:
y = self.frozen_func(x=self.tf.constant(im)).numpy()
elif self.saved_model:
y = self.model(im, training=False).numpy()
elif self.tflite:
input, output = self.input_details[0], self.output_details[0]
int8 = input['dtype'] == np.uint8 # is TFLite quantized uint8 model
if int8:
scale, zero_point = input['quantization']
im = (im / scale + zero_point).astype(np.uint8) # de-scale
self.interpreter.set_tensor(input['index'], im)
self.interpreter.invoke()
y = self.interpreter.get_tensor(output['index'])
if int8:
scale, zero_point = output['quantization']
y = (y.astype(np.float32) - zero_point) * scale # re-scale
y[..., 0] *= w # x
y[..., 1] *= h # y
y[..., 2] *= w # w
y[..., 3] *= h # h
y = torch.tensor(y)
return (y, []) if val else y
'''===========3.AutoShape:自动调整shape,该类基本未用================'''
class AutoShape(nn.Module):
# YOLOv5 input-robust model wrapper for passing cv2/np/PIL/torch inputs. Includes preprocessing, inference and NMS
conf = 0.25 # NMS confidence threshold
iou = 0.45 # NMS IoU threshold
classes = None # (optional list) filter by class, i.e. = [0, 15, 16] for COCO persons, cats and dogs
multi_label = False # NMS multiple labels per box
max_det = 1000 # maximum number of detections per image
def __init__(self, model):
super().__init__()
self.model = model.eval()
def autoshape(self):
LOGGER.info('AutoShape already enabled, skipping... ') # model already converted to model.autoshape()
return self
def _apply(self, fn):
# Apply to(), cpu(), cuda(), half() to model tensors that are not parameters or registered buffers
self = super()._apply(fn)
m = self.model.model[-1] # Detect()
m.stride = fn(m.stride)
m.grid = list(map(fn, m.grid))
if isinstance(m.anchor_grid, list):
m.anchor_grid = list(map(fn, m.anchor_grid))
return self
@torch.no_grad()
def forward(self, imgs, size=640, augment=False, profile=False):
# Inference from various sources. For height=640, width=1280, RGB images example inputs are:
# file: imgs = 'data/images/zidane.jpg' # str or PosixPath
# URI: = 'https://ultralytics.com/images/zidane.jpg'
# OpenCV: = cv2.imread('image.jpg')[:,:,::-1] # HWC BGR to RGB x(640,1280,3)
# PIL: = Image.open('image.jpg') or ImageGrab.grab() # HWC x(640,1280,3)
# numpy: = np.zeros((640,1280,3)) # HWC
# torch: = torch.zeros(16,3,320,640) # BCHW (scaled to size=640, 0-1 values)
# multiple: = [Image.open('image1.jpg'), Image.open('image2.jpg'), ...] # list of images
t = [time_sync()]
p = next(self.model.parameters()) # for device and type
if isinstance(imgs, torch.Tensor): # torch
with amp.autocast(enabled=p.device.type != 'cpu'):
return self.model(imgs.to(p.device).type_as(p), augment, profile) # inference
# Pre-process
n, imgs = (len(imgs), imgs) if isinstance(imgs, list) else (1, [imgs]) # number of images, list of images
shape0, shape1, files = [], [], [] # image and inference shapes, filenames
for i, im in enumerate(imgs):
f = f'image{i}' # filename
if isinstance(im, (str, Path)): # filename or uri
im, f = Image.open(requests.get(im, stream=True).raw if str(im).startswith('http') else im), im
im = np.asarray(exif_transpose(im))
elif isinstance(im, Image.Image): # PIL Image
im, f = np.asarray(exif_transpose(im)), getattr(im, 'filename', f) or f
files.append(Path(f).with_suffix('.jpg').name)
if im.shape[0] < 5: # image in CHW
im = im.transpose((1, 2, 0)) # reverse dataloader .transpose(2, 0, 1)
im = im[..., :3] if im.ndim == 3 else np.tile(im[..., None], 3) # enforce 3ch input
s = im.shape[:2] # HWC
shape0.append(s) # image shape
g = (size / max(s)) # gain
shape1.append([y * g for y in s])
imgs[i] = im if im.data.contiguous else np.ascontiguousarray(im) # update
shape1 = [make_divisible(x, int(self.stride.max())) for x in np.stack(shape1, 0).max(0)] # inference shape
x = [letterbox(im, new_shape=shape1, auto=False)[0] for im in imgs] # pad
x = np.stack(x, 0) if n > 1 else x[0][None] # stack
x = np.ascontiguousarray(x.transpose((0, 3, 1, 2))) # BHWC to BCHW
x = torch.from_numpy(x).to(p.device).type_as(p) / 255 # uint8 to fp16/32
t.append(time_sync())
with amp.autocast(enabled=p.device.type != 'cpu'):
# Inference
y = self.model(x, augment, profile)[0] # forward
t.append(time_sync())
# Post-process
y = non_max_suppression(y, self.conf, iou_thres=self.iou, classes=self.classes,
multi_label=self.multi_label, max_det=self.max_det) # NMS
for i in range(n):
scale_coords(shape1, y[i][:, :4], shape0[i])
t.append(time_sync())
return Detections(imgs, y, files, t, self.names, x.shape)
'''===========3.Detections:对推理结果进行处理================'''
class Detections:
    # YOLOv5 detections class for inference results
    """用在AutoShape函数结尾
    detections class for YOLOv5 inference results
    """
    def __init__(self, imgs, pred, files, times=None, names=None, shape=None):
        super().__init__()
        d = pred[0].device  # device
        gn = [torch.tensor([*(im.shape[i] for i in [1, 0, 1, 0]), 1, 1], device=d) for im in imgs]  # normalizations
        # imgs:原图
        self.imgs = imgs  # list of images as numpy arrays
        # pred:预测值(xyxy, conf, cls)
        self.pred = pred  # list of tensors pred[0] = (xyxy, conf, cls)
        # names: 类名
        self.names = names  # class names
        # files: 图像文件名
        self.files = files  # image filenames
        # xyxy:左上角+右下角格式
        self.xyxy = pred  # xyxy pixels
        # xywh:中心点+宽长格式
        self.xywh = [xyxy2xywh(x) for x in pred]  # xywh pixels
        # xyxyn:xyxy标准化
        self.xyxyn = [x / g for x, g in zip(self.xyxy, gn)]  # xyxy normalized
        # xywhn:xywhn标准化
        self.xywhn = [x / g for x, g in zip(self.xywh, gn)]  # xywh normalized
        self.n = len(self.pred)  # number of images (batch size)
        self.t = tuple((times[i + 1] - times[i]) * 1000 / self.n for i in range(3))  # timestamps (ms)
        self.s = shape  # inference BCHW shape

    def display(self, pprint=False, show=False, save=False, crop=False, render=False, save_dir=Path('')):
        crops = []
        for i, (im, pred) in enumerate(zip(self.imgs, self.pred)):
            s = f'image {i + 1}/{len(self.pred)}: {im.shape[0]}x{im.shape[1]} '  # string
            if pred.shape[0]:
                for c in pred[:, -1].unique():
                    n = (pred[:, -1] == c).sum()  # detections per class
                    s += f"{n} {self.names[int(c)]}{'s' * (n > 1)}, "  # add to string
                if show or save or render or crop:
                    annotator = Annotator(im, example=str(self.names))
                    for *box, conf, cls in reversed(pred):  # xyxy, confidence, class
                        label = f'{self.names[int(cls)]} {conf:.2f}'
                        if crop:
                            file = save_dir / 'crops' / self.names[int(cls)] / self.files[i] if save else None
                            crops.append({'box': box, 'conf': conf, 'cls': cls, 'label': label,
                                          'im': save_one_box(box, im, file=file, save=save)})
                        else:  # all others
                            annotator.box_label(box, label, color=colors(cls))
                    im = annotator.im
            else:
                s += '(no detections)'

            im = Image.fromarray(im.astype(np.uint8)) if isinstance(im, np.ndarray) else im  # from np
            if pprint:
                LOGGER.info(s.rstrip(', '))
            if show:
                im.show(self.files[i])  # show
            if save:
                f = self.files[i]
                im.save(save_dir / f)  # save
                if i == self.n - 1:
                    LOGGER.info(f"Saved {self.n} image{'s' * (self.n > 1)} to {colorstr('bold', save_dir)}")
            if render:
                self.imgs[i] = np.asarray(im)
        if crop:
            if save:
                LOGGER.info(f'Saved results to {save_dir}\n')
            return crops

    def print(self):
        self.display(pprint=True)  # print results
        LOGGER.info(f'Speed: %.1fms pre-process, %.1fms inference, %.1fms NMS per image at shape {tuple(self.s)}' %
                    self.t)

    def show(self):
        self.display(show=True)  # show results

    def save(self, save_dir='runs/detect/exp'):
        save_dir = increment_path(save_dir, exist_ok=save_dir != 'runs/detect/exp', mkdir=True)  # increment save_dir
        self.display(save=True, save_dir=save_dir)  # save results

    def crop(self, save=True, save_dir='runs/detect/exp'):
        save_dir = increment_path(save_dir, exist_ok=save_dir != 'runs/detect/exp', mkdir=True) if save else None
        return self.display(crop=True, save=save, save_dir=save_dir)  # crop results

    def render(self):
        self.display(render=True)  # render results
        return self.imgs

    def pandas(self):
        # return detections as pandas DataFrames, i.e. print(results.pandas().xyxy[0])
        new = copy(self)  # return copy
        ca = 'xmin', 'ymin', 'xmax', 'ymax', 'confidence', 'class', 'name'  # xyxy columns
        cb = 'xcenter', 'ycenter', 'width', 'height', 'confidence', 'class', 'name'  # xywh columns
        for k, c in zip(['xyxy', 'xyxyn', 'xywh', 'xywhn'], [ca, ca, cb, cb]):
            a = [[x[:5] + [int(x[5]), self.names[int(x[5])]] for x in x.tolist()] for x in getattr(self, k)]  # update
            setattr(new, k, [pd.DataFrame(x, columns=c) for x in a])
        return new

    def tolist(self):
        # return a list of Detections objects, i.e. 'for result in results.tolist():'
        x = [Detections([self.imgs[i]], [self.pred[i]], self.names, self.s) for i in range(self.n)]
        for d in x:
            for k in ['imgs', 'pred', 'xyxy', 'xyxyn', 'xywh', 'xywhn']:
                setattr(d, k, getattr(d, k)[0])  # pop out of list
        return x

    def __len__(self):
        return self.n
'''===========5.Classify:二级分类模块================'''
class Classify(nn.Module):
# Classification head, i.e. x(b,c1,20,20) to x(b,c2)
def __init__(self, c1, c2, k=1, s=1, p=None, g=1): # ch_in, ch_out, kernel, stride, padding, groups
"""
这是一个二级分类模块, 什么是二级分类模块? 比如做车牌的识别, 先识别出车牌, 如果想对车牌上的字进行识别, 就需要二级分类进一步检测.
如果对模型输出的分类再进行分类, 就可以用这个模块. 不过这里这个类写的比较简单, 若进行复杂的二级分类, 可以根据自己的实际任务可以改写, 这里代码不唯一.
Classification head, i.e. x(b,c1,20,20) to x(b,c2)
用于第二级分类 可以根据自己的任务自己改写,比较简单
比如车牌识别 检测到车牌之后还需要检测车牌在哪里,如果检测到侧拍后还想对车牌上的字再做识别的话就要进行二级分类
"""
super().__init__()
self.aap = nn.AdaptiveAvgPool2d(1) # to x(b,c1,1,1)
# 自适应平均池化操作
self.conv = nn.Conv2d(c1, c2, k, s, autopad(k, p), groups=g) # to x(b,c2,1,1)
# 展平
self.flat = nn.Flatten()
def forward(self, x):
# 先自适应平均池化操作, 然后拼接
z = torch.cat([self.aap(y) for y in (x if isinstance(x, list) else [x])], 1) # cat if list
# 对z进行展平操作
return self.flat(self.conv(z)) # flatten to x(b,c2)
本文参考:

一、引擎主循环UE版本:4.27一、引擎主循环的位置:Launch.cpp:GuardedMain函数二、、GuardedMain函数执行逻辑:1、EnginePreInit:加载大多数模块int32ErrorLevel=EnginePreInit(CmdLine);PreInit模块加载顺序:模块加载过程:(1)注册模块中定义的UObject,同时为每个类构造一个类默认对象(CDO,记录类的默认状态,作为模板用于子类实例创建)(2)调用模块的StartUpModule方法2、FEngineLoop::Init()1、检查Engine的配置文件找出使用了哪一个GameEngine类(UGame
在VMware16.2.4安装Ubuntu一、安装VMware1.打开VMwareWorkstationPro官网,点击即可进入。2.进入后向下滑动找到Workstation16ProforWindows,点击立即下载。3.下载完成,文件大小615MB,如下图:4.鼠标右击,以管理员身份运行。5.点击下一步6.勾选条款,点击下一步7.先勾选,再点击下一步8.去掉勾选,点击下一步9.点击下一步10.点击安装11.点击许可证12.在百度上搜索VM16许可证,复制填入,然后点击输入即可,亲测有效。13.点击完成14.重启系统,点击是15.双击VMwareWorkstationPro图标,进入虚拟机主
关闭。这个问题是opinion-based.它目前不接受答案。想要改进这个问题?更新问题,以便editingthispost可以用事实和引用来回答它.关闭5年前。Improvethisquestion我审查了一些用Ruby编写的专业代码,没有发现任何评论。代码读起来相当清晰,但没有self记录。我应该期望专业编写的Ruby代码有注释吗?或者,是否有一些Ruby原则认为注释不是必需的?
1.问题描述使用Python的turtle(海龟绘图)模块提供的函数绘制直线。2.问题分析一幅复杂的图形通常都可以由点、直线、三角形、矩形、平行四边形、圆、椭圆和圆弧等基本图形组成。其中的三角形、矩形、平行四边形又可以由直线组成,而直线又是由两个点确定的。我们使用Python的turtle模块所提供的函数来绘制直线。在使用之前我们先介绍一下turtle模块的相关知识点。turtle模块提供面向对象和面向过程两种形式的海龟绘图基本组件。面向对象的接口类如下:1)TurtleScreen类:定义图形窗口作为绘图海龟的运动场。它的构造器需要一个tkinter.Canvas或ScrolledCanva
1.回顾.TransportServicepublicclassTransportServiceextendsAbstractLifecycleComponentTransportService:方法:1publicfinalTextendsTransportResponse>voidsendRequest(finalTransport.Connectionconnection,finalStringaction,finalTransportRequestrequest,finalTransportRequestOptionsoptions,TransportResponseHandlerT>
参考文章搭建文章gitte源码在线体验可以注册两个号来测试演示图:一.整体介绍 介绍SignalR一种通讯模型Hub(中心模型,或者叫集线器模型),调用这个模型写好的方法,去发送消息。 内容有: ①:Hub模型的方法介绍 ②:服务器端代码介绍 ③:前端vue3安装并调用后端方法 ④:聊天室样例整体流程:1、进入网站->调用连接SignalR的方法2、与好友发送消息->调用SignalR的自定义方法 前端通过,signalR内置方法.invoke() 去请求接口3、监听接受方法(渲染消息)通过new signalR.HubConnectionBuilder().on
目录H2数据库入门以及实际开发时的使用1.H2数据库的初识1.1H2数据库介绍1.2为什么要使用嵌入式数据库?1.3嵌入式数据库对比1.3.1性能对比1.4技术选型思考2.H2数据库实战2.1H2数据库下载搭建以及部署2.1.1H2数据库的下载2.1.2数据库启动2.1.2.1windows系统可以在bin目录下执行h2.bat2.1.2.2同理可以通过cmd直接使用命令进行启动:2.1.2.3启动后控制台页面:2.1.3spring整合H2数据库2.1.3.1引入依赖文件2.1.4数据库通过file模式实际保存数据的位置2.2H2数据库操作2.2.1Mysql兼容模式2.2.2Mysql模式
我有一些如下所示的Ruby代码:#some_string="{really?}"大括号需要是字符串的一部分。这一行是注释掉的代码,我想保留在那里。我还使用YARD来记录代码,所以当我运行yarddoc时,它(自然地)会发出无法“真正”链接的警告。有没有办法让YARD忽略注释掉的代码? 最佳答案 IsthereawayIcantellYARDtoignorecommentedoutcode?一方面,YARD记录支持Rdoc标记。并且Rdoc被记录为支持几种隐藏部件的方法。RDocstopsprocessingcommentsifitf
查看用Ruby编写的源代码,比如Rails,我经常看到小代码用tt标签包裹,比如rails/activesupport/core_ext/array/access.rb#Equaltoself[2].##%w(abcde).third#=>"c"defthirdself[2]end这背后的约定是什么,何时以及为何决定使用此表示法? 最佳答案 是的,我错了,抱歉这是特殊RDoc系统的一部分。Non-verbatimtextcanbemarkedup:italic:wordortextbold:wordortexttypewriter:
目录一、安装包链接二、安装详细步骤1.安装Wireshark和WinPcap2.安装OracleVMVirtualBox3.安装ensp三、安装后注册四、启动路由器出现40错误怎么解决一、安装包链接二、安装详细步骤链接:https://pan.baidu.com/s/1QbUUYMOMIV2oeIKHWP1SpA?pwd=xftx提取码:xftx1.安装Wireshark和WinPcap找到Wireshark安装包所在文件夹,双击它,按照以下步骤安装。2.安装OracleVMVirtualBox找到OracleVMVirtualBox安装包所在文件夹,双击它,按照以下步骤安装。注:可自定义安装
