随着互联网的发展如今已经出现了越来越多更加简洁的框架了,amis就是一种通过配置json代码来实现不同页面效果的框架。此文章是我自己的一个学习实例。
https://aisuda.bce.baidu.com/amis/zh-CN/components/index
https://aisuda.bce.baidu.com/amis/zh-CN/docs/index
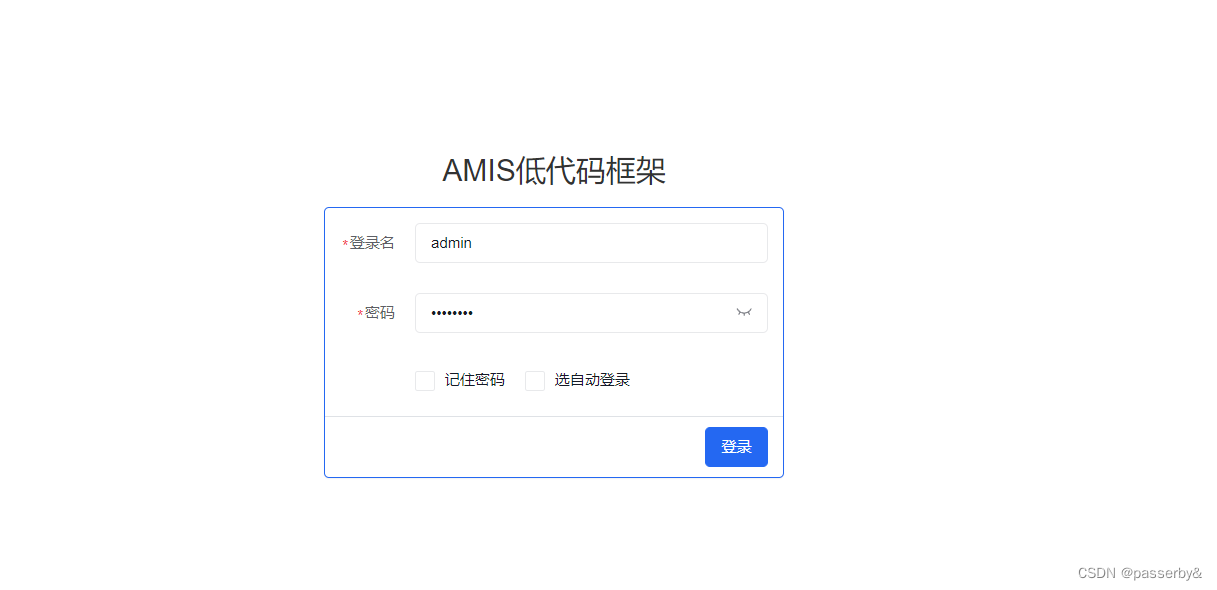
{
  "type": "form",
  "title": "",
  "body": [
    {
      "label": "登录名",
      "type": "input-text",
      "name": "login_name",
      "required": true,
      "visibleOn": "!this._logined",
      "placeholder": "请输入用户名"
    },
    {
      "type": "input-password",
      "label": "密码",
      "name": "password",
      "id": "u:6d67561d4b38",
      "required": true,
      "visibleOn": "!this._logined"
    },
    {
      "type": "checkboxes",
      "label": "",
      "name": "checkboxes",
      "options": [
        {
          "label": "记住密码",
          "value": "A"
        },
        {
          "label": "选自动登录",
          "value": "B"
        }
      ],
      "id": "u:a56f72eb2a9f"
    }
  ],
  "id": "u:cbe2b7997281",
  "submitText": "登录",
  "api": {
    "method": "post",
    "url": "/privilege/login",
    "dataType": "json",
    "adaptor": "",
    "requestAdaptor": "document.cookie = '';\r\nreturn api;"
  },
  "messages": {
    "fetchFailed": "",
    "saveSuccess": "登录成功",
    "saveFailed": "登录失败",
    "fetchSuccess": ""
  },
  "mode": "horizontal",
  "horizontal": {
    "leftFixed": "",
    "left": 2,
    "right": 10
  },
  "redirect": "",
  "checkAll": false,
  "reload": "",
  "debug": false,
  "affixFooter": false,
  "visibleOn": "",
  "panelClassName": "b-info"
}
<!DOCTYPE html>
<html>
  <head>
    <meta charset="UTF-8" />
    <title>登录</title>
    <meta http-equiv="Content-Type" content="text/html; charset=utf-8" />
    <meta
      name="viewport"
      content="width=device-width, initial-scale=1, maximum-scale=1"
    />
    <meta http-equiv="X-UA-Compatible" content="IE=Edge" />
    <link
      rel="stylesheet"
      title="default"
      href="https://unpkg.com/amis@beta/sdk/sdk.css"
    />
    <link
      rel="stylesheet"
      href="https://unpkg.com/amis@beta/sdk/helper.css"
    />
    <script src="https://unpkg.com/amis@beta/sdk/sdk.js"></script>
    <script src="https://unpkg.com/vue@2"></script>
    <script src="https://unpkg.com/history@4.10.1
/umd/history.js"></script>
    <style>
      html,
      body,
      .app-wrapper {
        position: relative;
        width: 100%;
        height: 100%;
        margin: 0;
        padding: 0;
      }
    </style>
  </head>
  <body>
    <div id="root" class="app-wrapper"></div>
    <script>
      (function () {
        let amis = amisRequire('amis/embed');
        const match = amisRequire('path-to-regexp').match;

        // 如果想用 browserHistory 请切换下这处代码, 其他不用变
        // const history = History.createBrowserHistory();
        const history = History.createHashHistory();

        const app = {
          type: 'service',
          schemaApi: 'get:/pages/index.json'
        };

        function normalizeLink(to, location = history.location) {
          to = to || '';

          if (to && to[0] === '#') {
            to = location.pathname + location.search + to;
          } else if (to && to[0] === '?') {
            to = location.pathname + to;
          }

          const idx = to.indexOf('?');
          const idx2 = to.indexOf('#');
          let pathname = ~idx
            ? to.substring(0, idx)
            : ~idx2
            ? to.substring(0, idx2)
            : to;
          let search = ~idx ? to.substring(idx, ~idx2 ? idx2 : undefined) : '';
          let hash = ~idx2 ? to.substring(idx2) : location.hash;

          if (!pathname) {
            pathname = location.pathname;
          } else if (pathname[0] != '/' && !/^https?\:\/\//.test(pathname)) {
            let relativeBase = location.pathname;
            const paths = relativeBase.split('/');
            paths.pop();
            let m;
            while ((m = /^\.\.?\//.exec(pathname))) {
              if (m[0] === '../') {
                paths.pop();
              }
              pathname = pathname.substring(m[0].length);
            }
            pathname = paths.concat(pathname).join('/');
          }

          return pathname + search + hash;
        }

        function isCurrentUrl(to, ctx) {
          if (!to) {
            return false;
          }
          const pathname = history.location.pathname;
          const link = normalizeLink(to, {
            ...location,
            pathname,
            hash: ''
          });

          if (!~link.indexOf('http') && ~link.indexOf(':')) {
            let strict = ctx && ctx.strict;
            return match(link, {
              decode: decodeURIComponent,
              strict: typeof strict !== 'undefined' ? strict : true
            })(pathname);
          }

          return decodeURI(pathname) === link;
        }

        let amisInstance = amis.embed(
          '#root',
          app,
          {
            location: history.location
          },
          {
            // watchRouteChange: fn => {
            //   return history.listen(fn);
            // },
            updateLocation: (location, replace) => {
              location = normalizeLink(location);
              if (location === 'goBack') {
                return history.goBack();
              } else if (
                (!/^https?\:\/\//.test(location) &&
                  location ===
                    history.location.pathname + history.location.search) ||
                location === history.location.href
              ) {
                // 目标地址和当前地址一样,不处理,免得重复刷新
                return;
              } else if (/^https?\:\/\//.test(location) || !history) {
                return (window.location.href = location);
              }

              history[replace ? 'replace' : 'push'](location);
            },
            jumpTo: (to, action) => {
              if (to === 'goBack') {
                return history.goBack();
              }

              to = normalizeLink(to);

              if (isCurrentUrl(to)) {
                return;
              }

              if (action && action.actionType === 'url') {
                action.blank === false
                  ? (window.location.href = to)
                  : window.open(to, '_blank');
                return;
              } else if (action && action.blank) {
                window.open(to, '_blank');
                return;
              }

              if (/^https?:\/\//.test(to)) {
                window.location.href = to;
              } else if (
                (!/^https?\:\/\//.test(to) &&
                  to === history.pathname + history.location.search) ||
                to === history.location.href
              ) {
                // do nothing
              } else {
                history.push(to);
              }
            },
            isCurrentUrl: isCurrentUrl,
            theme: 'cxd'
          }
        );

        history.listen(state => {
          amisInstance.updateProps({
            location: state.location || state
          });
        });
      })();
    </script>
  </body>
</html>
如何在buildr项目中使用Ruby?我在很多不同的项目中使用过Ruby、JRuby、Java和Clojure。我目前正在使用我的标准Ruby开发一个模拟应用程序,我想尝试使用Clojure后端(我确实喜欢功能代码)以及JRubygui和测试套件。我还可以看到在未来的不同项目中使用Scala作为后端。我想我要为我的项目尝试一下buildr(http://buildr.apache.org/),但我注意到buildr似乎没有设置为在项目中使用JRuby代码本身!这看起来有点傻,因为该工具旨在统一通用的JVM语言并且是在ruby中构建的。除了将输出的jar包含在一个独特的、仅限ruby
在rails源中:https://github.com/rails/rails/blob/master/activesupport/lib/active_support/lazy_load_hooks.rb可以看到以下内容@load_hooks=Hash.new{|h,k|h[k]=[]}在IRB中,它只是初始化一个空哈希。和做有什么区别@load_hooks=Hash.new 最佳答案 查看rubydocumentationforHashnew→new_hashclicktotogglesourcenew(obj)→new_has
我正在查看instance_variable_set的文档并看到给出的示例代码是这样做的:obj.instance_variable_set(:@instnc_var,"valuefortheinstancevariable")然后允许您在类的任何实例方法中以@instnc_var的形式访问该变量。我想知道为什么在@instnc_var之前需要一个冒号:。冒号有什么作用? 最佳答案 我的第一直觉是告诉你不要使用instance_variable_set除非你真的知道你用它做什么。它本质上是一种元编程工具或绕过实例变量可见性的黑客攻击
在我的应用程序中,我需要能够找到所有数字子字符串,然后扫描每个子字符串,找到第一个匹配范围(例如5到15之间)的子字符串,并将该实例替换为另一个字符串“X”。我的测试字符串s="1foo100bar10gee1"我的初始模式是1个或多个数字的任何字符串,例如,re=Regexp.new(/\d+/)matches=s.scan(re)给出["1","100","10","1"]如果我想用“X”替换第N个匹配项,并且只替换第N个匹配项,我该怎么做?例如,如果我想替换第三个匹配项“10”(匹配项[2]),我不能只说s[matches[2]]="X"因为它做了两次替换“1fooX0barXg
我有一个用户工厂。我希望默认情况下确认用户。但是鉴于unconfirmed特征,我不希望它们被确认。虽然我有一个基于实现细节而不是抽象的工作实现,但我想知道如何正确地做到这一点。factory:userdoafter(:create)do|user,evaluator|#unwantedimplementationdetailshereunlessFactoryGirl.factories[:user].defined_traits.map(&:name).include?(:unconfirmed)user.confirm!endendtrait:unconfirmeddoenden
我有一个正在构建的应用程序,我需要一个模型来创建另一个模型的实例。我希望每辆车都有4个轮胎。汽车模型classCar轮胎模型classTire但是,在make_tires内部有一个错误,如果我为Tire尝试它,则没有用于创建或新建的activerecord方法。当我检查轮胎时,它没有这些方法。我该如何补救?错误是这样的:未定义的方法'create'forActiveRecord::AttributeMethods::Serialization::Tire::Module我测试了两个环境:测试和开发,它们都因相同的错误而失败。 最佳答案
我的主要目标是能够完全理解我正在使用的库/gem。我尝试在Github上从头到尾阅读源代码,但这真的很难。我认为更有趣、更温和的踏脚石就是在使用时阅读每个库/gem方法的源代码。例如,我想知道RubyonRails中的redirect_to方法是如何工作的:如何查找redirect_to方法的源代码?我知道在pry中我可以执行类似show-methodmethod的操作,但我如何才能对Rails框架中的方法执行此操作?您对我如何更好地理解Gem及其API有什么建议吗?仅仅阅读源代码似乎真的很难,尤其是对于框架。谢谢! 最佳答案 Ru
我正在处理旧代码的一部分。beforedoallow_any_instance_of(SportRateManager).toreceive(:create).and_return(true)endRubocop错误如下:Avoidstubbingusing'allow_any_instance_of'我读到了RuboCop::RSpec:AnyInstance我试着像下面那样改变它。由此beforedoallow_any_instance_of(SportRateManager).toreceive(:create).and_return(true)end对此:let(:sport_
我的假设是moduleAmoduleBendend和moduleA::Bend是一样的。我能够从thisblog找到解决方案,thisSOthread和andthisSOthread.为什么以及什么时候应该更喜欢紧凑语法A::B而不是另一个,因为它显然有一个缺点?我有一种直觉,它可能与性能有关,因为在更多命名空间中查找常量需要更多计算。但是我无法通过对普通类进行基准测试来验证这一点。 最佳答案 这两种写作方法经常被混淆。首先要说的是,据我所知,没有可衡量的性能差异。(在下面的书面示例中不断查找)最明显的区别,可能也是最著名的,是你的
几个月前,我读了一篇关于rubygem的博客文章,它可以通过阅读代码本身来确定编程语言。对于我的生活,我不记得博客或gem的名称。谷歌搜索“ruby编程语言猜测”及其变体也无济于事。有人碰巧知道相关gem的名称吗? 最佳答案 是这个吗:http://github.com/chrislo/sourceclassifier/tree/master 关于ruby-寻找通过阅读代码确定编程语言的rubygem?,我们在StackOverflow上找到一个类似的问题:
