无论是什么比赛,图片和表格的格式都非常重要,这边的重要不只是指规范性,还有抓住评委眼球的能力。
那么怎样抓住评委的眼球?
最重要的一点就是善用图片和表格(当然撰写论文最重要的是逻辑,这个是需要长期的阅读和总结训练的,前期甚至还需要大量的背诵,要记住你的核心不是站在作者角度整理工作,是以读者为核心阐述工作)。
清华大学刘洋老师的一次讲座中提及信息元素的易理解度理论,我感觉说的特别有道理,这里我最前两个信息的表达方式在格式上的应用做一点小小的总结。总结主要是针对数学建模美赛的,发论文期刊和会议大多有自己的格式要求,也有 latex 模板。
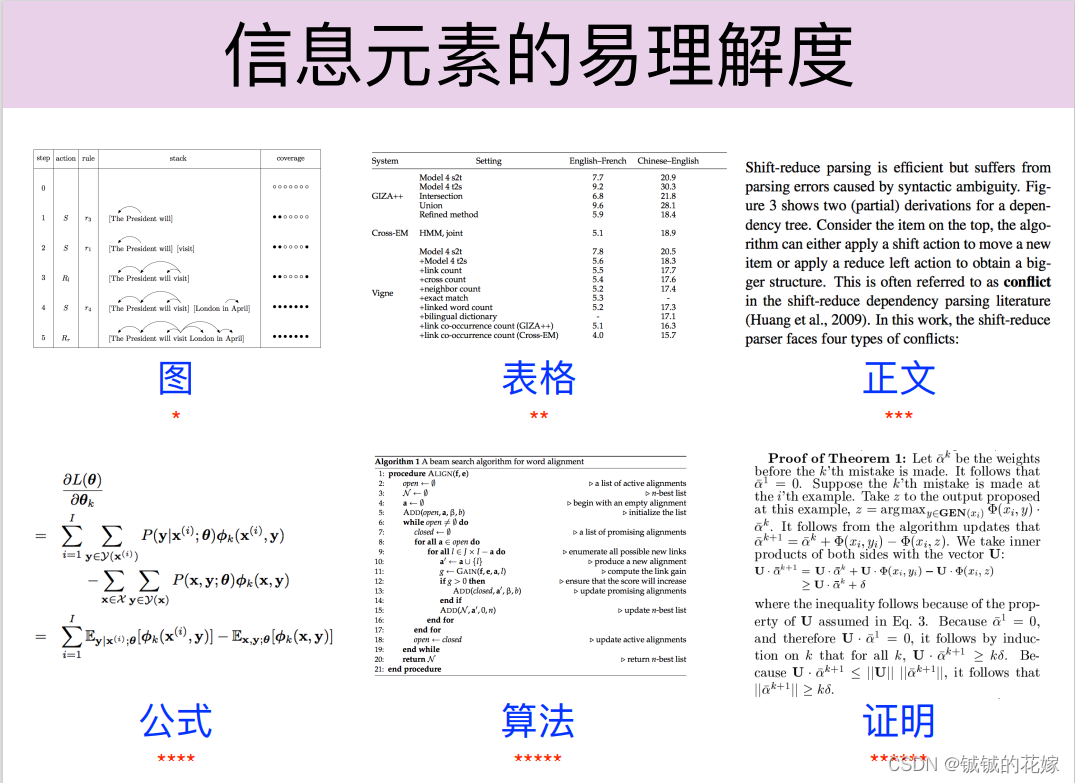
这边我按照三个部分总结了一下,算是网上信息的汇总再加一点自己的实验,实验都是在 overleaf 上做的。
目录
注意图名需要首字母大写,其他字母小写。
可以加入一些注释说明图中的信息,注意不要跟分析结果混淆。
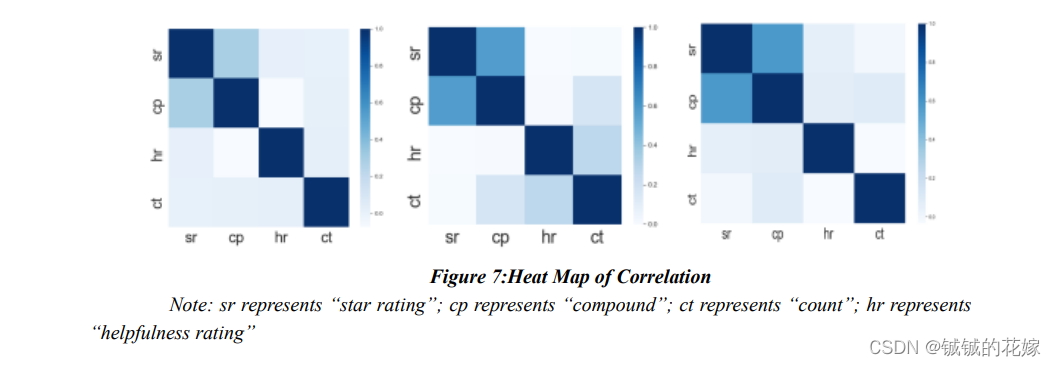
图标注一定是在图下面的,如果是word图名下面还需要空一行。
在文字中后面加入图片的引用就能完成。
在 latex 里,图片表格啥的会乱跑的,因为latex为了让空间最大化利用,会把图片插到刚好能卡住它的位置。因此我们需要引入俩包,并在写图片的时候插入一个**[H]**
\usepackage{graphicx}
\usepackage{float} %固定图片让它别跑[H]
代码如下:
% 图片 -------------------------------------------------------
\subsection{Picture}
\subsubsection{Insert picture directly.}
Here we put the first picture here and named it Figure \ref{modifyheight}. % \ref{图label}
\begin{figure}[H] % [H]别乱跑
    \centering % 居中
    \includegraphics[height=3cm]{1.jpg} % =3cm用绝对距离控制高度
    \caption{Modify picture height} % 图片名
    \label{modifyheight} % 图label,引用的时候填它
\end{figure}

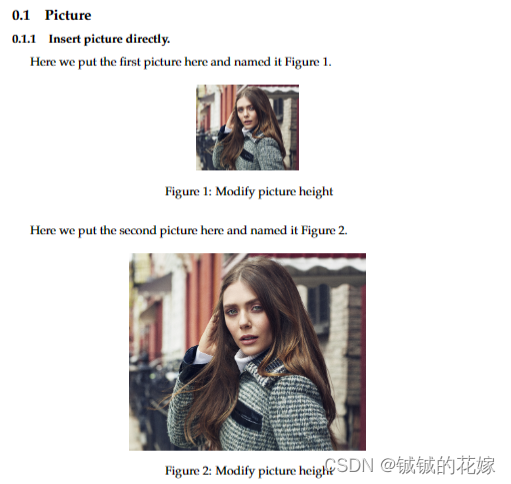
Here we put the second picture here and named it Figure \ref{modifywidth}.
\begin{figure}[H]
    \centering
    \includegraphics[width=0.5\linewidth]{1.jpg} % 宽度写linewidth很不错
    \caption{Modify picture height}
    \label{modifywidth}
\end{figure}
效果图如下:
在写子图代码之前记得加引用包
\usepackage{subfigure} % 子图
代码如下:
\subsection{Insert multiple images}
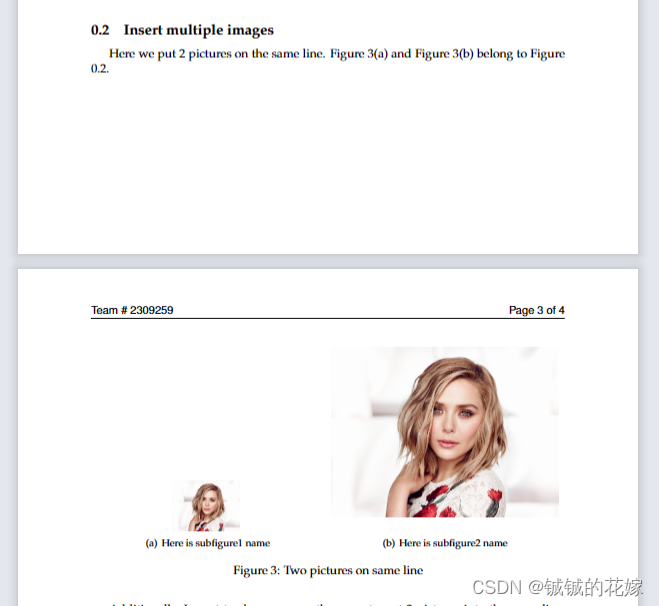
Here we put 2 pictures on the same line. Figure \ref{sona} and Figure \ref{sonb} belong to Figure \ref{2pic_in_row}.

\begin{figure}[H]
    \centering% 整体居中
    \subfigure[Here is subfigure1 name]{ %[]里面写子图名字
        \begin{minipage}[b]{0.48\linewidth} % 子图框架的大小,对比整体
        \centering % 子图在框架中居中
        \includegraphics[width=0.3\linewidth]{2.jpg} % 子图的宽度,对比子图框架
        \label{sona}
        \par\vspace{0pt} % 子图放到最底下,不然两个不一样高的图的子图名不会像现在一样显示在同一高度,小的那个会飘的很高
        \end{minipage}
    }
    \hfill  % 是行意义上的下一个不是列意义
    \subfigure[Here is subfigure2 name]{
        \begin{minipage}[b]{0.48\linewidth}
        \centering
        \includegraphics[width=\linewidth]{2.jpg}
        \label{sonb}
        \par\vspace{0pt}
        \end{minipage}
    }
    \label{2pic_in_row} % 整体图名
    \caption{Two pictures on same line}
\end{figure}
效果如下:
代码如下:
Additionally, I want to show you another way to put 2 pictures into the same line, which are showed in Figure \ref{son21} and Figure \ref{son22}.

\begin{figure}[H]
    \centering
    \begin{minipage}{0.48\linewidth}
        \centering
        \includegraphics[height=7cm,width=0.9\linewidth]{3.jpg} % 固定长宽后会强行拉伸图片
        \caption{Here is Figures on the same line without subfigure}
        \label{son21}
    \end{minipage}
    \hfill
    \begin{minipage}{0.48\linewidth}
        \centering
        \includegraphics[width=0.9\linewidth]{5.jpg}
        \caption{Here is Figures on the same line without subfigure}
        \label{son22}
        % 没了这句图片底边不等高
        % \par\vspace{0pt}
    \end{minipage}
\end{figure}
效果如下:
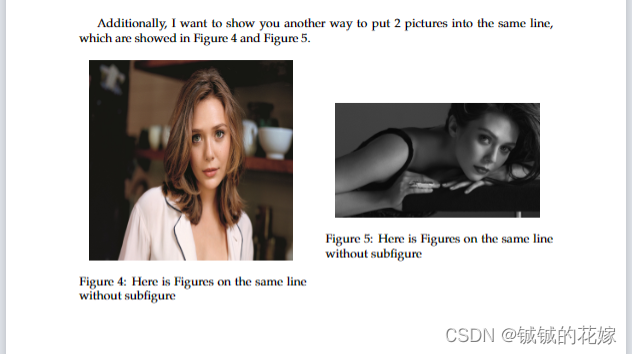
一般建议这边的多图采用长宽比比较接近的,不然的话困难需要强行拉扯图片,实在很丑,有之前的画图做铺垫,这边没啥好解释的。
代码如下:
\subsubsection{2*2}

\begin{figure}[H]
    \centering
    \begin{minipage}[b]{0.48\linewidth}
        \centering
        \includegraphics[width=0.95\linewidth]{6.jpg}
        \caption{1-1}
        \label{sse}
    \end{minipage}
    \vspace{6pt} % 增大第一列和第二行之间的间距,没它的话第一行的标题直接贴到第二行去了
    \hfill
    \begin{minipage}[b]{0.48\linewidth}
        \centering
        \includegraphics[width=0.95\linewidth]{2.jpg}
        \caption{1-2}
        \label{kmeans}
    \end{minipage}
    \qquad % 图片换行
    \begin{minipage}[b]{0.48\linewidth}
        \centering
        \includegraphics[width=0.95\linewidth]{3.jpg}
        \caption{2-1}
        \label{dbscan}
    \end{minipage}
    \hfill
    \begin{minipage}[b]{0.48\linewidth}
        \centering
        \includegraphics[width=0.95\linewidth]{4.jpg}
        \caption{2-2}
        \label{gmm}
        % \par\vspace{0pt}
    \end{minipage}
\end{figure}
效果如下:
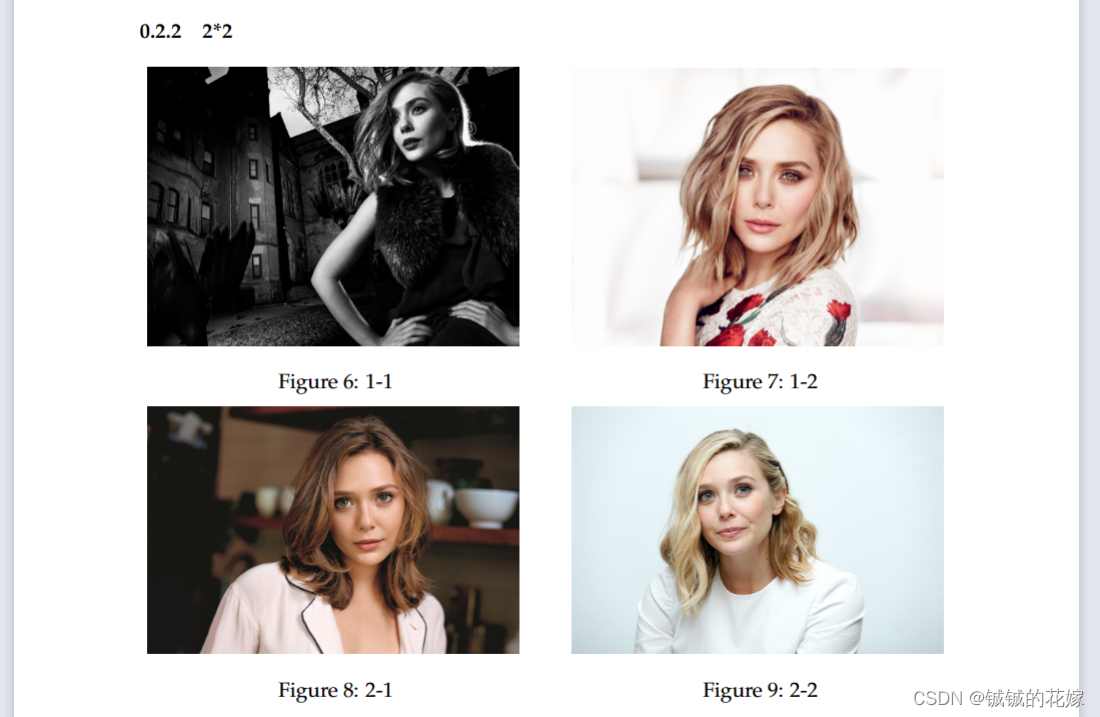
2*2的组合会了,那其他偶数组合总归是有手就行的吧。
跟楼上类似,但是需要调整图间间距,横向纵向都需要。
代码如下:
\subsubsection{2+3}

\begin{figure}[H]
    \centering
    \subfigure{
        \begin{minipage}[b]{0.32\linewidth}
            \centering
            \includegraphics[width=0.95\linewidth]{6.jpg}
            \caption{1-1}
            \label{sse}
        \end{minipage}
    }
    \hspace{2cm} % 改变间距用的,注意单位,有的单位是不能在hspace用的
    \subfigure{
        \begin{minipage}[b]{0.32\linewidth}
            \centering
            \includegraphics[width=0.95\linewidth]{2.jpg}
            \caption{1-2}
            \label{kmeans}
        \end{minipage}
    }
    \vskip -6pt % 减小列间留白

    % 空一格也能达到换行效果
    \subfigure{
        \begin{minipage}[b]{0.32\linewidth}
            \centering
            \includegraphics[width=0.95\linewidth]{3.jpg}
            \caption{2-1}
            \label{dbscan}
        \end{minipage}
    }
    \hfill
    \subfigure{
        \begin{minipage}[b]{0.32\linewidth}
            \centering
            \includegraphics[width=0.95\linewidth]{4.jpg}
            \caption{2-2}
            \label{gmm}
            % \par\vspace{0pt}
        \end{minipage}
    }
    \hfill
    \subfigure{
        \begin{minipage}[b]{0.30\linewidth} % 因为不想拉扯图片,只能微调 宽度让它们看起来还算等高
            \centering
            \includegraphics[width=0.85\linewidth]{1.jpg}
            \caption{2-3}
            \label{debacl}
            % \par\vspace{0pt}
        \end{minipage}
    }
\end{figure}
效果如下:
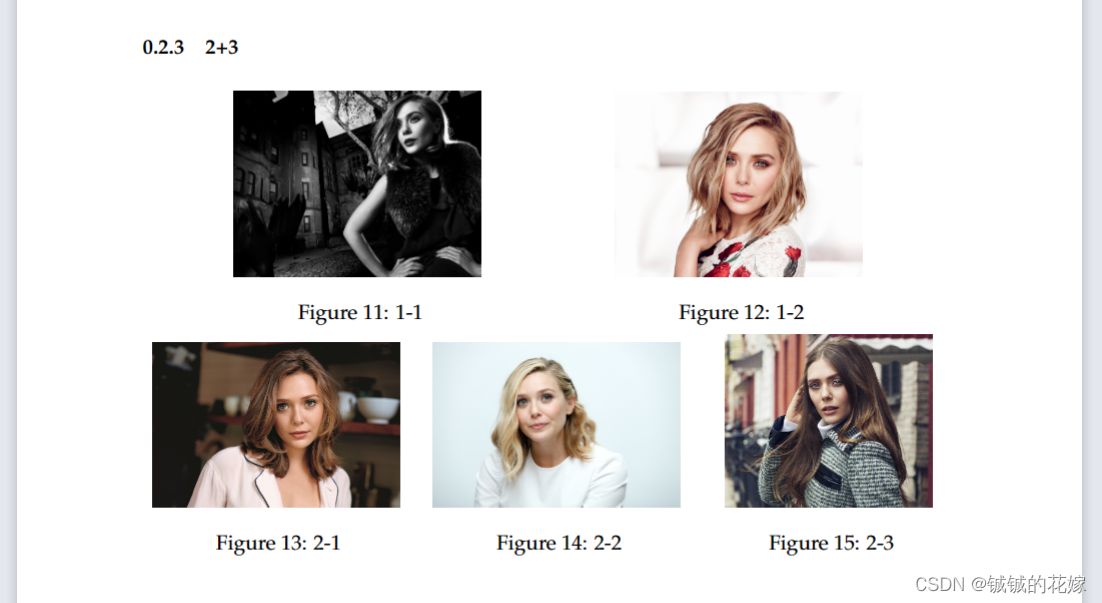
这个是在行上面图片数目不一致的情况,如果遇到列上图数目不一致那就要看这个示例了。感觉这个示例也不是特别好,主要是因为 minipage 和 subfigure 的嵌套写的有点迷,因为 subfigure 有点老,在 overleaf 里面它的一些功能没用了,被 subcaption 里的一些东西平替了。评论区路过的大佬可以帮我解答一下,感激不尽~~
代码如下:
\subsubsection{1+2}


\begin{figure}[H]
    \centering
    \begin{minipage}[b]{0.43\linewidth}
        \begin{minipage}[b]{\linewidth}
            \centering
            \includegraphics[width=\linewidth]{7.jpg}
            \vspace{-0.75cm} % 手动减小标注和图之间的距离
            \caption{1-1}
            \label{sse}
        \end{minipage}

        \begin{minipage}[b]{\linewidth}
            \centering
            \includegraphics[width=\linewidth]{5.jpg}
            \vspace{-0.75cm}
            \caption{1-2}
            \label{kmeans}
        \end{minipage}
    \end{minipage}
    \subfigure{
        \begin{minipage}[b]{0.55\linewidth}
            \centering
            \includegraphics[width=\linewidth]{1.jpg}
            \caption{2-1}
            \label{debacl}
            % \par\vspace{0pt}
        \end{minipage}
    }
\end{figure}
效果如下:
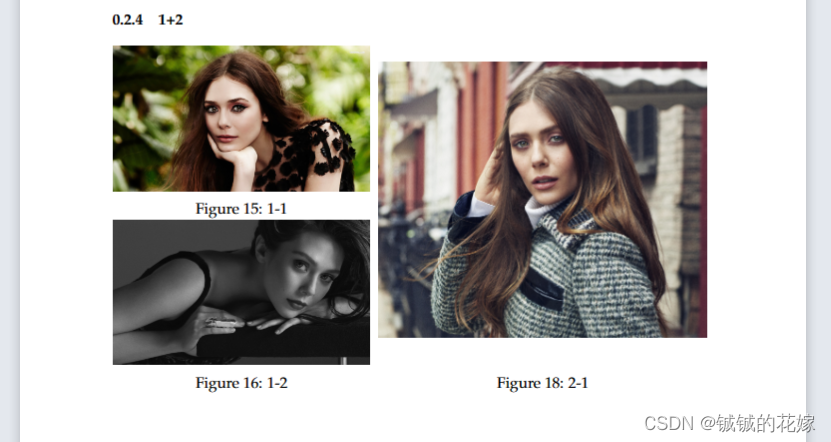
有一说一在美赛中间这样的排版感觉不常用,主要原因是需要一张很长的图片,不然会拉伸变丑;而且美赛中有篇幅限制,如果放这个图可能会占据太多的空间,这样一张图我们完全可以放到一行中解释。
简单插入一个表格示范基本功能:
\textcolor[rgb]{[0,1], [0,1], [0,1]}{文字}rowcolor, cellcolor\makecell[居中情况]{第1行内容 \\ 第2行内容 \\ 第3行内容 ...}为了能单元格换行:
\usepackage{makecell} % 单元格内换行
表格代码如下:
\section{Table}

\subsection{Insert table directly}
\begin{tabular}{|l|c|r|} % 注意表中居中,放左,放右
 \hline
\textbf{OS} & \textit{Release} & \underline{Editor}\\
 \hline % 加粗(ctrl b),斜体(ctrl i),下划线
 \rowcolor{Lavender}Windows & MikTeX & TexMakerX \\
 \hline % 整行换色
Unix/Linux & \textcolor[rgb]{0.3176,0.4375,0.7734}{teTeX} & Kile \\ % 变颜色
 \hline
\makecell[l]{1. Mac OS\\ 2. Mac os \\ 3. mac \\ os} & MacTeX & $TeXShop + x_i$ \\ % 行内换行 + 公式
 \hline
\cellcolor {Lavender}General & TeX Live & TeXworks \\ % 单元格颜色
 \hline
\end{tabular}
效果如下:
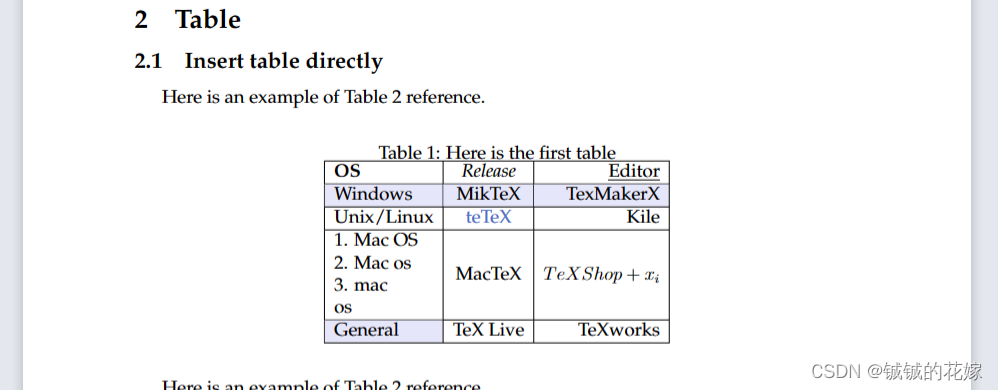
稍微改下,虽然这里有点奇怪,但是在没那么多花里胡哨的东西的时候,三线表还是顶的:
 Here is an example of Table \ref{table11} reference.
\begin{table}[H]
    \centering
    \caption{Here is the first table}
    \label{table11} % 紧跟caption,不然可能表的标号和文本中的标号不一样
    \begin{tabular}{lcr} % 注意表中居中,放左,放右
     \toprule[2pt]
    \textbf{OS} & \textit{Release} & \underline{Editor}\\
     \hline % 加粗(ctrl b),斜体(ctrl i),下划线
     \rowcolor{Lavender}Windows & MikTeX & TexMakerX \\ % 整行换色
    Unix/Linux & \textcolor[rgb]{0.3176,0.4375,0.7734}{teTeX} & Kile \\ % 变颜色
    \makecell[l]{1. Mac OS\\ 2. Mac os \\ 3. mac \\ os} & MacTeX & $TeXShop + x_i$ \\ % 行内换行 + 公式
    \cellcolor {Lavender}General & TeX Live & TeXworks \\ % 单元格颜色
     \bottomrule[2pt]
    \end{tabular}
\end{table}
效果如下:
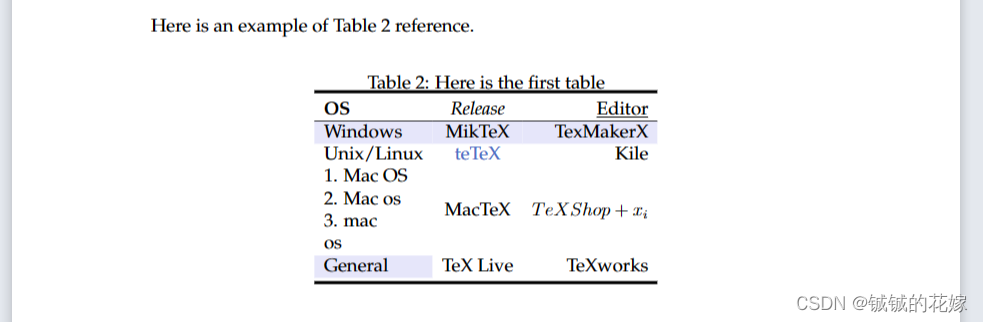
这里就需要我们万金油 minipage 了:
\subsection{Two tables in the same line}

\begin{table}[H]
    \centering
    \begin{minipage}{0.45\linewidth}
        \centering
        \caption{Here is the first table}
        \label{table11}
        \begin{tabular}{lcr}
            \toprule[2pt]
            \textbf{OS} & \textit{Release} & \underline{Editor}\\
            \hline
            \rowcolor{Lavender}Windows & MikTeX & TexMakerX \\
            Unix/Linux & \textcolor[rgb]{0.3176,0.4375,0.7734}{teTeX} & Kile \\
            \makecell[l]{1. Mac OS\\ 2. Mac os \\ 3. mac \\ os} & MacTeX & $TeXShop + x_i$ \\
            \cellcolor {Lavender}General & TeX Live & TeXworks \\
            \bottomrule[2pt]
        \end{tabular}
    \end{minipage}
    %\qquad
    \hfill
    \begin{minipage}{0.45\linewidth}
        \centering
        \caption{Here is the first table}
        \label{table11}
        \begin{tabular}{lcr}
            \toprule[2pt]
            \textbf{OS} & \textit{Release} & \underline{Editor}\\
            \hline
            \rowcolor{Lavender}Windows & MikTeX & TexMakerX \\
            Unix/Linux & \textcolor[rgb]{0.3176,0.4375,0.7734}{teTeX} & Kile \\
            \makecell[l]{1. Mac OS\\ 2. Mac os \\ 3. mac \\ os} & MacTeX & $TeXShop + x_i$ \\
            \cellcolor {Lavender}General & TeX Live & TeXworks \\
            \bottomrule[2pt]
        \end{tabular}
    \end{minipage}
\end{table}
效果如下:
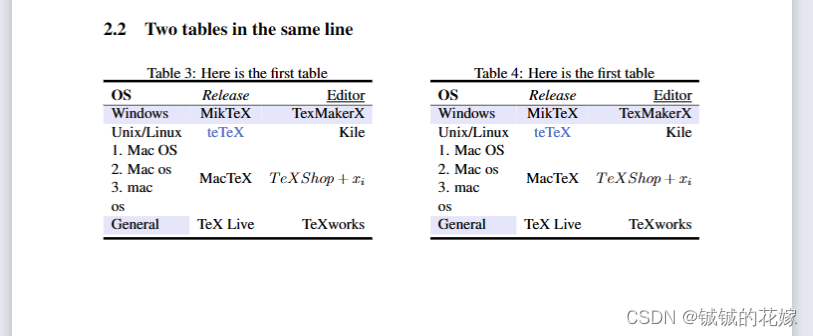
我们之前说过整行换颜色,但是真正比赛的时候这样一行一行打还是比较麻烦的,所以有:\rowcolors [<commands>]{<row>}{<odd-row color >}{<even-row color >}
这里的 row 参数是起始行数,odd-row color 表示奇数行颜色,even-row color 表示偶数行颜色如:\rowcolors{1}{blue!20}{blue!10} 表示从第一行开始,奇数行为蓝色20%,偶数行为蓝色10%。
需要注意的是这里需要加入新包:
\usepackage[table]{xcolor}
\definecolor{mygray}{gray}{0.90} % 顺便定义一个颜色
这个包应用广泛,如果直接用可能会报错,因为在其他宏包种也被调用了:
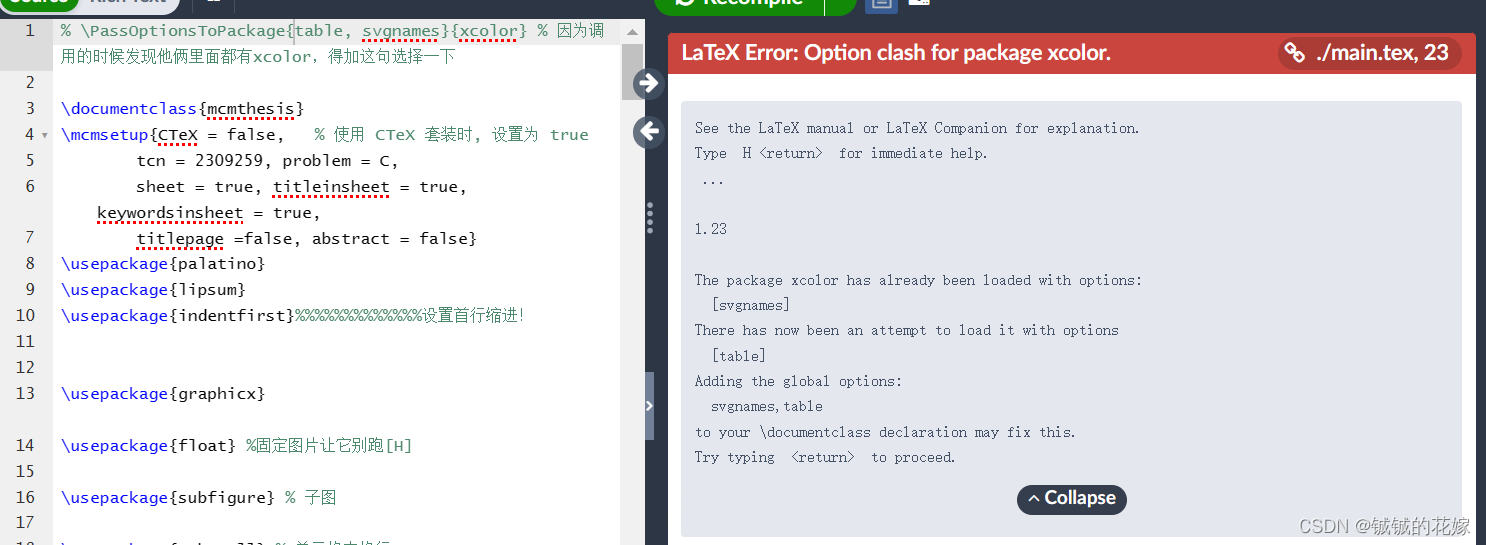
比如我这里就跟 sygnames 重复了,那就需要在最前面加一个:
\PassOptionsToPackage{table, svgnames}{xcolor} % 因为调用的时候发现他俩里面都有xcolor,得加这句选择一下
变成全局的
接下来再写:
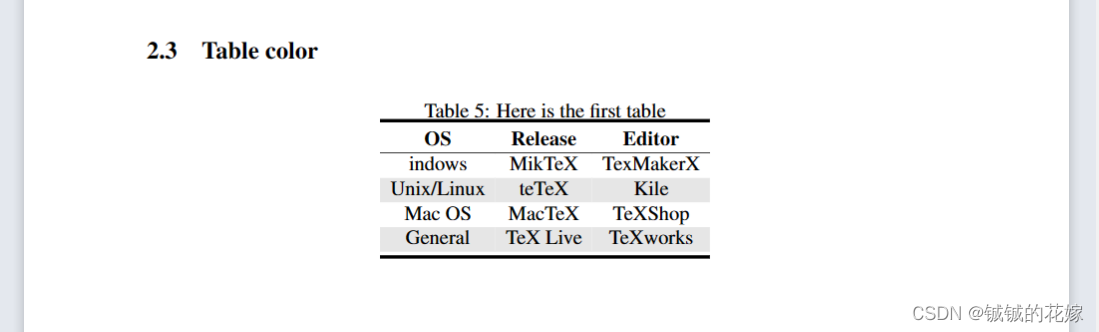
\subsection{Table color}

\begin{table}[H]
    \centering
    \caption{Here is the first table}
    \label{table11}
    \rowcolors{2}{mygray}{white}
    \begin{tabular}{ccc}
        \toprule[2pt]
        \textbf{OS} & \textbf{Release} & \textbf{Editor}\\
        \hline
        indows & MikTeX & TexMakerX \\
        Unix/Linux & teTeX & Kile \\
        Mac OS & MacTeX & TeXShop \\
        General & TeX Live & TeXworks \\
        \bottomrule[2pt]
    \end{tabular}
\end{table}
效果如下:
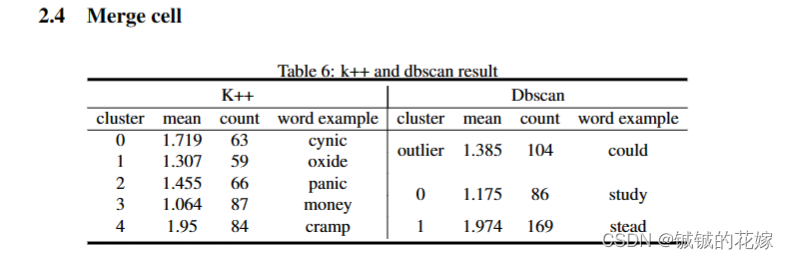
主要就是行合并和列合并,解释下几个点:
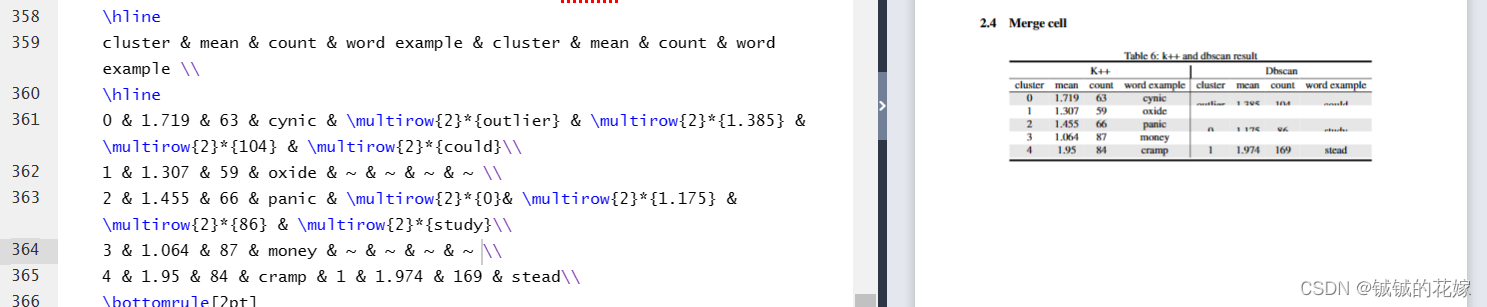

因为颜色效果不佳,这段不用颜色了(主要是右边那四列颜色不会调):
 \subsection{Merge cell}

 \begin{table}[!ht]
    \centering
    \label{clusterrrrr}
    \caption{k++ and dbscan result}
    % \rowcolors{2}{mygray}{white!0}
    \begin{tabular}{cccc|cccc}
    \toprule[2pt]
    \multicolumn{4}{c|}{K++} & \multicolumn{4}{|c}{Dbscan} \\  % 4列融合,中间加杠
    \hline
    cluster & mean & count & word example & cluster & mean & count & word example \\
    \hline
    0 & 1.719 & 63 & cynic & \multirow{2}*{outlier} & \multirow{2}*{1.385} & \multirow{2}*{104} & \multirow{2}*{could}\\
    1 & 1.307 & 59 & oxide  \\
    2 & 1.455 & 66 & panic & \multirow{2}*{0}& \multirow{2}*{1.175} & \multirow{2}*{86} & \multirow{2}*{study}\\
    3 & 1.064 & 87 & money\\
    4 & 1.95 & 84 & cramp & 1 & 1.974 & 169 & stead\\
    \bottomrule[2pt]
    \end{tabular}
\end{table}
效果如下:
实际上就是之前的知识的组合:
\section{Picture \& table}
\begin{table}[H]
    \centering
    \begin{minipage}[c]{0.48\linewidth}
        \centering
        \caption{Here is the first table}
        \label{table11}
        \rowcolors{2}{mygray}{white}
        \begin{tabular}{ccc}
            \toprule[2pt]
            \textbf{OS} & \textbf{Release} & \textbf{Editor}\\
            \hline
            indows & MikTeX & TexMakerX \\
            Unix/Linux & teTeX & Kile \\
            Mac OS & MacTeX & TeXShop \\
            General & TeX Live & TeXworks \\
            \bottomrule[2pt]
        \end{tabular}
    \end{minipage}
    \hfill
    \begin{minipage}[c]{0.48\linewidth}
        \centering
        \includegraphics[width=0.95\linewidth]{7.jpg}
        \caption{1-1}
        \label{sse}
    \end{minipage}
\end{table}
效果如下:

把几张图片填上去就能用了:
代码如下:
\PassOptionsToPackage{table, svgnames}{xcolor} % 因为调用的时候发现他俩里面都有xcolor,得加这句选择一下
\documentclass{mcmthesis}
\mcmsetup{CTeX = false,   % 使用 CTeX 套装时, 设置为 true
	tcn = 2309259, problem = C,
	sheet = true, titleinsheet = true, keywordsinsheet = true,
	titlepage =false, abstract = false}
\usepackage{palatino}
\usepackage{lipsum}
\usepackage{indentfirst}%%%%%%%%%%%%%设置首行缩进!


\usepackage{graphicx}
\usepackage{float} %固定图片让它别跑[H]

\usepackage{subfigure} % 子图

\usepackage{makecell} % 单元格内换行

\usepackage[table]{xcolor}
\definecolor{mygray}{gray}{0.90} % 顺便定义一个颜色

% \RequirePackage{fontspec}
% \setmainfont{Times New Roman}%%%以上2行用来设字体
\usepackage{times}%%字体设置跟textstudio不一样


% 控制页 %%%%%%%%%%%%%%%%%%%%%%%%%%%%%%%%%%%%%%%%%%%%%%%%%%%%%%%%%%%%%%%
% 论文标题
\title{The \LaTeX{} Template for MCM Version \MCMversion}  % 修改标题
\date{\today}

\begin{document}
\begin{abstract}
% 摘要部分
Here is the main abstract part. \\ Go to the next line.
% 关键词
\begin{keywords}
keyword1; keyword2
\end{keywords}
\end{abstract}

% 目录页 %%%%%%%%%%%%%%%%%%%%%%%%%%%%%%%%%%%%%%%%%%%%%%%%%%%%%%%%%%%%%%%%
\maketitle         % 控制序列
\tableofcontents   % 生成目录
\newpage


% 图片 -------------------------------------------------------
\section{Picture}
\subsection{Insert picture directly}
Here we put the first picture here and named it Figure \ref{modifyheight}. % \ref{图label}
\begin{figure}[H] % [H]别乱跑
    \centering % 居中
    \includegraphics[height=3cm]{1.jpg} % =3cm用绝对距离控制高度
    \caption{Modify picture height} % 图片名
    \label{modifyheight} % 图label,引用的时候填它
\end{figure}

Here we put the second picture here and named it Figure \ref{modifywidth}.
\begin{figure}[H]
    \centering
    \includegraphics[width=0.5\linewidth]{1.jpg} % 宽度写linewidth很不错
    \caption{Modify picture height}
    \label{modifywidth}
\end{figure}

\subsection{Insert multiple images}
\subsubsection{1*2}
Here we put 2 pictures on the same line. Figure \ref{sona} and Figure \ref{sonb} belong to Figure \ref{2pic_in_row}.

\begin{figure}[H]
    \centering% 整体居中
    \subfigure[Here is subfigure1 name]{ %[]里面写子图名字
        \begin{minipage}[b]{0.48\linewidth} % 子图框架的大小,对比整体
        \centering % 子图在框架中居中
        \includegraphics[width=0.3\linewidth]{2.jpg} % 子图的宽度,对比子图框架
        \label{sona}
        \par\vspace{0pt} % 子图放到最底下,不然两个不一样高的图的子图名不会像现在一样显示在同一高度,小的那个会飘的很高
        \end{minipage}
    }
    \hfill  % 是行意义上的下一个不是列意义
    \subfigure[Here is subfigure2 name]{
        \begin{minipage}[b]{0.48\linewidth}
        \centering
        \includegraphics[width=\linewidth]{2.jpg}
        \label{sonb}
        \par\vspace{0pt}
        \end{minipage}
    }
    \label{2pic_in_row} % 整体图名
    \caption{Two pictures on same line}
\end{figure}

Additionally, I want to show you another way to put 2 pictures into the same line, which are showed in Figure \ref{son21} and Figure \ref{son22}.

\begin{figure}[H]
    \centering
    \begin{minipage}{0.48\linewidth}
        \centering
        \includegraphics[height=7cm,width=0.9\linewidth]{3.jpg} % 固定长宽后会强行拉伸图片
        \caption{Here is Figures on the same line without subfigure}
        \label{son21}
    \end{minipage}
    \hfill
    \begin{minipage}{0.48\linewidth}
        \centering
        \includegraphics[width=0.9\linewidth]{5.jpg}
        \caption{Here is Figures on the same line without subfigure}
        \label{son22}
        % 没了这句图片底边不等高
        % \par\vspace{0pt}
    \end{minipage}
\end{figure}


\subsubsection{2*2}

\begin{figure}[H]
    \centering
    \begin{minipage}[b]{0.48\linewidth}
        \centering
        \includegraphics[width=0.95\linewidth]{6.jpg}
        \caption{1-1}
        \label{sse}
    \end{minipage}
    \vspace{6pt} % 增大第一列和第二行之间的间距,没它的话第一行的标题直接贴到第二行去了
    \hfill
    \begin{minipage}[b]{0.48\linewidth}
        \centering
        \includegraphics[width=0.95\linewidth]{2.jpg}
        \caption{1-2}
        \label{kmeans}
    \end{minipage}
    \qquad % 图片换行
    \begin{minipage}[b]{0.48\linewidth}
        \centering
        \includegraphics[width=0.95\linewidth]{3.jpg}
        \caption{2-1}
        \label{dbscan}
    \end{minipage}
    \hfill
    \begin{minipage}[b]{0.48\linewidth}
        \centering
        \includegraphics[width=0.95\linewidth]{4.jpg}
        \caption{2-2}
        \label{gmm}
        % \par\vspace{0pt}
    \end{minipage}
\end{figure}


\subsubsection{2+3}

\begin{figure}[H]
    \centering
    \subfigure{
        \begin{minipage}[b]{0.32\linewidth}
            \centering
            \includegraphics[width=0.95\linewidth]{6.jpg}
            \caption{1-1}
            \label{sse}
        \end{minipage}
    }
    \hspace{2cm} % 改变间距用的,注意单位,有的单位是不能在hspace用的
    \subfigure{
        \begin{minipage}[b]{0.32\linewidth}
            \centering
            \includegraphics[width=0.95\linewidth]{2.jpg}
            \caption{1-2}
            \label{kmeans}
        \end{minipage}
    }
    \vskip -6pt % 减小列间留白

    % 空一格也能达到换行效果
    \subfigure{
        \begin{minipage}[b]{0.32\linewidth}
            \centering
            \includegraphics[width=0.95\linewidth]{3.jpg}
            \caption{2-1}
            \label{dbscan}
        \end{minipage}
    }
    \hfill
    \subfigure{
        \begin{minipage}[b]{0.32\linewidth}
            \centering
            \includegraphics[width=0.95\linewidth]{4.jpg}
            \caption{2-2}
            \label{gmm}
            % \par\vspace{0pt}
        \end{minipage}
    }
    \hfill
    \subfigure{
        \begin{minipage}[b]{0.30\linewidth} % 因为不想拉扯图片,只能微调 宽度让它们看起来还算等高
            \centering
            \includegraphics[width=0.85\linewidth]{1.jpg}
            \caption{2-3}
            \label{debacl}
            % \par\vspace{0pt}
        \end{minipage}
    }
\end{figure}

\subsubsection{1+2}


\begin{figure}[H]
    \centering
    \begin{minipage}[b]{0.43\linewidth}
        \begin{minipage}[b]{\linewidth}
            \centering
            \includegraphics[width=\linewidth]{7.jpg}
            \vspace{-0.75cm} % 手动减小标注和图之间的距离
            \caption{1-1}
            \label{sse}
        \end{minipage}

        \begin{minipage}[b]{\linewidth}
            \centering
            \includegraphics[width=\linewidth]{5.jpg}
            \vspace{-0.75cm}
            \caption{1-2}
            \label{kmeans}
        \end{minipage}
    \end{minipage}
    \subfigure{
        \begin{minipage}[b]{0.55\linewidth}
            \centering
            \includegraphics[width=\linewidth]{1.jpg}
            \caption{2-1}
            \label{debacl}
            % \par\vspace{0pt}
        \end{minipage}
    }
\end{figure}


% 表格 -------------------------------------------------------
\section{Table}
\subsection{Insert table directly}

 Here is an example of Table \ref{table11} reference.
\begin{table}[!ht]
    \centering
    \caption{Here is the first table}
    \label{table11} % 紧跟caption,不然可能表的标号和文本中的标号不一样
    \begin{tabular}{|l|c|r|} % 注意表中居中,放左,放右
     \hline
    \textbf{OS} & \textit{Release} & \underline{Editor}\\
     \hline % 加粗(ctrl b),斜体(ctrl i),下划线
     \rowcolor{Lavender}Windows & MikTeX & TexMakerX \\
     \hline % 整行换色
    Unix/Linux & \textcolor[rgb]{0.3176,0.4375,0.7734}{teTeX} & Kile \\ % 变颜色
     \hline
    \makecell[l]{1. Mac OS\\ 2. Mac os \\ 3. mac \\ os} & MacTeX & $TeXShop + x_i$ \\ % 行内换行 + 公式
     \hline
    \cellcolor {Lavender}General & TeX Live & TeXworks \\ % 单元格颜色
     \hline
    \end{tabular}
\end{table}


 Here is an example of Table \ref{table11} reference.
\begin{table}[H]
    \centering
    \caption{Here is the first table}
    \label{table11} % 紧跟caption,不然可能表的标号和文本中的标号不一样
    \begin{tabular}{lcr} % 注意表中居中,放左,放右
     \toprule[2pt]
    \textbf{OS} & \textit{Release} & \underline{Editor}\\
     \hline % 加粗(ctrl b),斜体(ctrl i),下划线
     \rowcolor{Lavender}Windows & MikTeX & TexMakerX \\ % 整行换色
    Unix/Linux & \textcolor[rgb]{0.3176,0.4375,0.7734}{teTeX} & Kile \\ % 变颜色
    \makecell[l]{1. Mac OS\\ 2. Mac os \\ 3. mac \\ os} & MacTeX & $TeXShop + x_i$ \\ % 行内换行 + 公式
    \cellcolor {Lavender}General & TeX Live & TeXworks \\ % 单元格颜色
     \bottomrule[2pt]
    \end{tabular}
\end{table}

\subsection{Two tables in the same line}

\begin{table}[H]
    \centering
    \begin{minipage}{0.45\linewidth}
        \centering
        \caption{Here is the first table}
        \label{table11}
        \begin{tabular}{lcr}
            \toprule[2pt]
            \textbf{OS} & \textit{Release} & \underline{Editor}\\
            \hline
            \rowcolor{Lavender}Windows & MikTeX & TexMakerX \\
            Unix/Linux & \textcolor[rgb]{0.3176,0.4375,0.7734}{teTeX} & Kile \\
            \makecell[l]{1. Mac OS\\ 2. Mac os \\ 3. mac \\ os} & MacTeX & $TeXShop + x_i$ \\
            \cellcolor {Lavender}General & TeX Live & TeXworks \\
            \bottomrule[2pt]
        \end{tabular}
    \end{minipage}
    %\qquad
    \hfill
    \begin{minipage}{0.45\linewidth}
        \centering
        \caption{Here is the first table}
        \label{table11}
        \begin{tabular}{lcr}
            \toprule[2pt]
            \textbf{OS} & \textit{Release} & \underline{Editor}\\
            \hline
            \rowcolor{Lavender}Windows & MikTeX & TexMakerX \\
            Unix/Linux & \textcolor[rgb]{0.3176,0.4375,0.7734}{teTeX} & Kile \\
            \makecell[l]{1. Mac OS\\ 2. Mac os \\ 3. mac \\ os} & MacTeX & $TeXShop + x_i$ \\
            \cellcolor {Lavender}General & TeX Live & TeXworks \\
            \bottomrule[2pt]
        \end{tabular}
    \end{minipage}
\end{table}

\subsection{Table color}


\begin{table}[H]
    \centering
    \caption{Here is the first table}
    \label{table11}
    \rowcolors{2}{mygray}{white}
    \begin{tabular}{ccc}
        \toprule[2pt]
        \textbf{OS} & \textbf{Release} & \textbf{Editor}\\
        \hline
        indows & MikTeX & TexMakerX \\
        Unix/Linux & teTeX & Kile \\
        Mac OS & MacTeX & TeXShop \\
        General & TeX Live & TeXworks \\
        \bottomrule[2pt]
    \end{tabular}
\end{table}


 \subsection{Merge cell}

 \begin{table}[!ht]
    \centering
    \label{clusterrrrr}
    \caption{k++ and dbscan result}
    % \rowcolors{2}{mygray}{white!0}
    \begin{tabular}{cccc|cccc}
    \toprule[2pt]
    \multicolumn{4}{c|}{K++} & \multicolumn{4}{|c}{Dbscan} \\  % 4列融合,中间加杠
    \hline
    cluster & mean & count & word example & cluster & mean & count & word example \\
    \hline
    0 & 1.719 & 63 & cynic & \multirow{2}*{outlier} & \multirow{2}*{1.385} & \multirow{2}*{104} & \multirow{2}*{could}\\
    1 & 1.307 & 59 & oxide  \\
    2 & 1.455 & 66 & panic & \multirow{2}*{0} & \multirow{2}*{1.175} & \multirow{2}*{86} & \multirow{2}*{study}\\
    3 & 1.064 & 87 & money\\
    4 & 1.95 & 84 & cramp & 1 & 1.974 & 169 & stead\\
    \bottomrule[2pt]
    \end{tabular}
\end{table}

\section{Picture \& table}
\begin{table}[H]
    \centering
    \begin{minipage}[c]{0.48\linewidth}
        \centering
        \caption{Here is the first table}
        \label{table11}
        \rowcolors{2}{mygray}{white}
        \begin{tabular}{ccc}
            \toprule[2pt]
            \textbf{OS} & \textbf{Release} & \textbf{Editor}\\
            \hline
            indows & MikTeX & TexMakerX \\
            Unix/Linux & teTeX & Kile \\
            Mac OS & MacTeX & TeXShop \\
            General & TeX Live & TeXworks \\
            \bottomrule[2pt]
        \end{tabular}
    \end{minipage}
    \hfill
    \begin{minipage}[c]{0.48\linewidth}
        \centering
        \includegraphics[width=0.95\linewidth]{7.jpg}
        \caption{1-1}
        \label{sse}
    \end{minipage}
\end{table}

\end{document}
我正在使用的第三方API的文档状态:"[O]urAPIonlyacceptspaddedBase64encodedstrings."什么是“填充的Base64编码字符串”以及如何在Ruby中生成它们。下面的代码是我第一次尝试创建转换为Base64的JSON格式数据。xa=Base64.encode64(a.to_json) 最佳答案 他们说的padding其实就是Base64本身的一部分。它是末尾的“=”和“==”。Base64将3个字节的数据包编码为4个编码字符。所以如果你的输入数据有长度n和n%3=1=>"=="末尾用于填充n%
我希望将Favorite模型添加到我的User和Link模型。业务逻辑用户可以有多个链接(即可以添加多个链接)用户可以收藏多个链接(他们自己的或其他用户的)一个链接可以被多个用户收藏,但只有一个所有者我对如何为这种关联建模以及在模型就位后如何创建用户收藏夹感到困惑?classUser 最佳答案 下面的数据模型怎么样:classUser:destroyhas_many:favorite_links,:through=>:favorites,:source=>:linkendclassLink:destroyhas_many:favor
我是Rails的新手,所以请原谅简单的问题。我正在为一家公司创建一个网站。那家公司想在网站上展示它的客户。我想让客户自己管理这个。我正在为“客户”生成一个表格,我想要的三列是:公司名称、公司描述和Logo。对于名称,我使用的是name:string但不确定如何在脚本/生成脚手架终端命令中最好地创建描述列(因为我打算将其设置为文本区域)和图片。我怀疑描述(我想成为一个文本区域)应该仍然是描述:字符串,然后以实际形式进行调整。不确定如何处理图片字段。那么……说来话长:我在脚手架命令中输入什么来生成描述和图片列? 最佳答案 对于“文本”数
我正在尝试用Prawn生成PDF。在我的PDF模板中,我有带单元格的表格。在其中一个单元格中,我有一个电子邮件地址:cell_email=pdf.make_cell(:content=>booking.user_email,:border_width=>0)我想让电子邮件链接到“mailto”链接。我知道我可以这样链接:pdf.formatted_text([{:text=>booking.user_email,:link=>"mailto:#{booking.user_email}"}])但是将这两行组合起来(将格式化文本作为内容)不起作用:cell_email=pdf.make_c
在应用开发中,有时候我们需要获取系统的设备信息,用于数据上报和行为分析。那在鸿蒙系统中,我们应该怎么去获取设备的系统信息呢,比如说获取手机的系统版本号、手机的制造商、手机型号等数据。1、获取方式这里分为两种情况,一种是设备信息的获取,一种是系统信息的获取。1.1、获取设备信息获取设备信息,鸿蒙的SDK包为我们提供了DeviceInfo类,通过该类的一些静态方法,可以获取设备信息,DeviceInfo类的包路径为:ohos.system.DeviceInfo.具体的方法如下:ModifierandTypeMethodDescriptionstatic StringgetAbiList()Obt
作为新的阿里云用户,您可以50免费试用多种优惠,价值高达1,700美元(或8,500美元)。这将让您了解和体验阿里云平台上提供的一系列产品和服务。如果您以个人身份注册免费试用,您将获得价值1,700美元的优惠。但是,如果您是注册公司,您可以选择企业免费试用,提交基本信息通过企业实名注册验证,即可开始价值$8,500的免费试用!本教程介绍了如何设置您的帐户并使用您的免费试用版。关于免费试用在我们开始此试用之前,您还必须遵守以下条款和条件才能访问您的免费试用:只有在一年内创建的账户才有资格获得阿里云免费试用。通过此免费试用优惠,用户可以免费试用免费试用活动页面上列出的每种产品一次。如果您有多个帐
我正在尝试将一个简单的CSV文件读入HTML表格以在浏览器中显示,但我遇到了麻烦。这就是我正在尝试的:Controller:defshow@csv=CSV.open("file.csv",:headers=>true)end查看:输出:NameStartDateEndDateQuantityPostalCode基本上我只获取标题,而不会读取和呈现CSV正文。 最佳答案 这最终成为最终解决方案:Controller:defshow#OpenaCSVfile,andthenreaditintoaCSV::Tableobjectforda
我想用Nokogiri解析HTML页面。页面的一部分有一个表,它没有使用任何特定的ID。是否可以提取如下内容:Today,3,455,34Today,1,1300,3664Today,10,100000,3444,Yesterday,3454,5656,3Yesterday,3545,1000,10Yesterday,3411,36223,15来自这个HTML:TodayYesterdayQntySizeLengthLengthSizeQnty345534345456563113003664354510001010100000344434113622315
我有可变数量的表格和可变数量的行,我想让它们一个接一个地显示,但如果表格不适合当前页面,请将其放在下一页,然后继续。我已将表格放入事务中,以便我可以回滚然后打印它(如果高度适合当前页面),但我如何获得表格高度?我现在有这段代码pdf.transactiondopdf.table@data,:font_size=>12,:border_style=>:grid,:horizontal_padding=>10,:vertical_padding=>3,:border_width=>2,:position=>:left,:row_colors=>["FFFFFF","DDDDDD"]pdf.
我的ruby脚本从命令行参数获取某些输入。它检查是否缺少任何命令行参数,然后提示用户输入。但是我无法使用gets从用户那里获得输入。示例代码:test.rbname=""ARGV.eachdo|a|ifa.include?('-n')name=aputs"Argument:#{a}"endendifname==""puts"entername:"name=getsputsnameend运行脚本:rubytest.rbraghav-k错误结果:test.rb:6:in`gets':Nosuchfileordirectory-raghav-k(Errno::ENOENT)fromtes
