本文已经过csdn认证,请放心食用

单元测试(unit testing)是指对软件中的最小可测试单元进行检查和验证。它是软件测试中的一种基本方法,也是软件开发过程中的一个重要步骤。
单元测试的目的是在于确保软件的每个独立模块都被正确地测试,并且没有潜在的缺陷或漏洞。在单元测试中,需要对每个模块进行测试,以确保它们能够按照预期的方式工作,并且没有任何错误或漏洞。
单元测试通常包括以下几个步骤:
确定测试范围:在开始测试之前,需要确定测试的范围,即要测试的功能或模块。
编写测试用例:根据确定的测试范围,编写测试用例,这些用例应该覆盖软件中的每个模块。
执行测试用例:使用测试工具(如JUnit、TestNG、Mock等)执行测试用例,以确保每个模块都按照预期的方式工作。
分析测试结果:在测试完成后,需要分析测试结果,以确定是否存在缺陷或漏洞。
修复缺陷或漏洞:如果发现缺陷或漏洞,需要修复它们,以确保软件的质量。
提高代码质量:通过编写单元测试,可以发现代码中的错误和漏洞,从而提高代码的质量。
提高开发效率:通过编写单元测试,可以快速地发现代码中的问题,从而减少测试时间,提高开发效率。
降低维护成本:通过编写单元测试,可以及早地发现代码中的问题,从而减少维护成本,提高代码的可维护性。
提高代码可靠性:通过编写单元测试,可以检查代码中的错误和漏洞,从而提高代码的可靠性,减少故障的发生。
看完上面的就知道什么时候或者为什么要编写单元测试了。其他的我们不多说了,直接进入实战操作,这次使用的是springboot+Mockito框架,在最后会指出一些小技巧和bug。
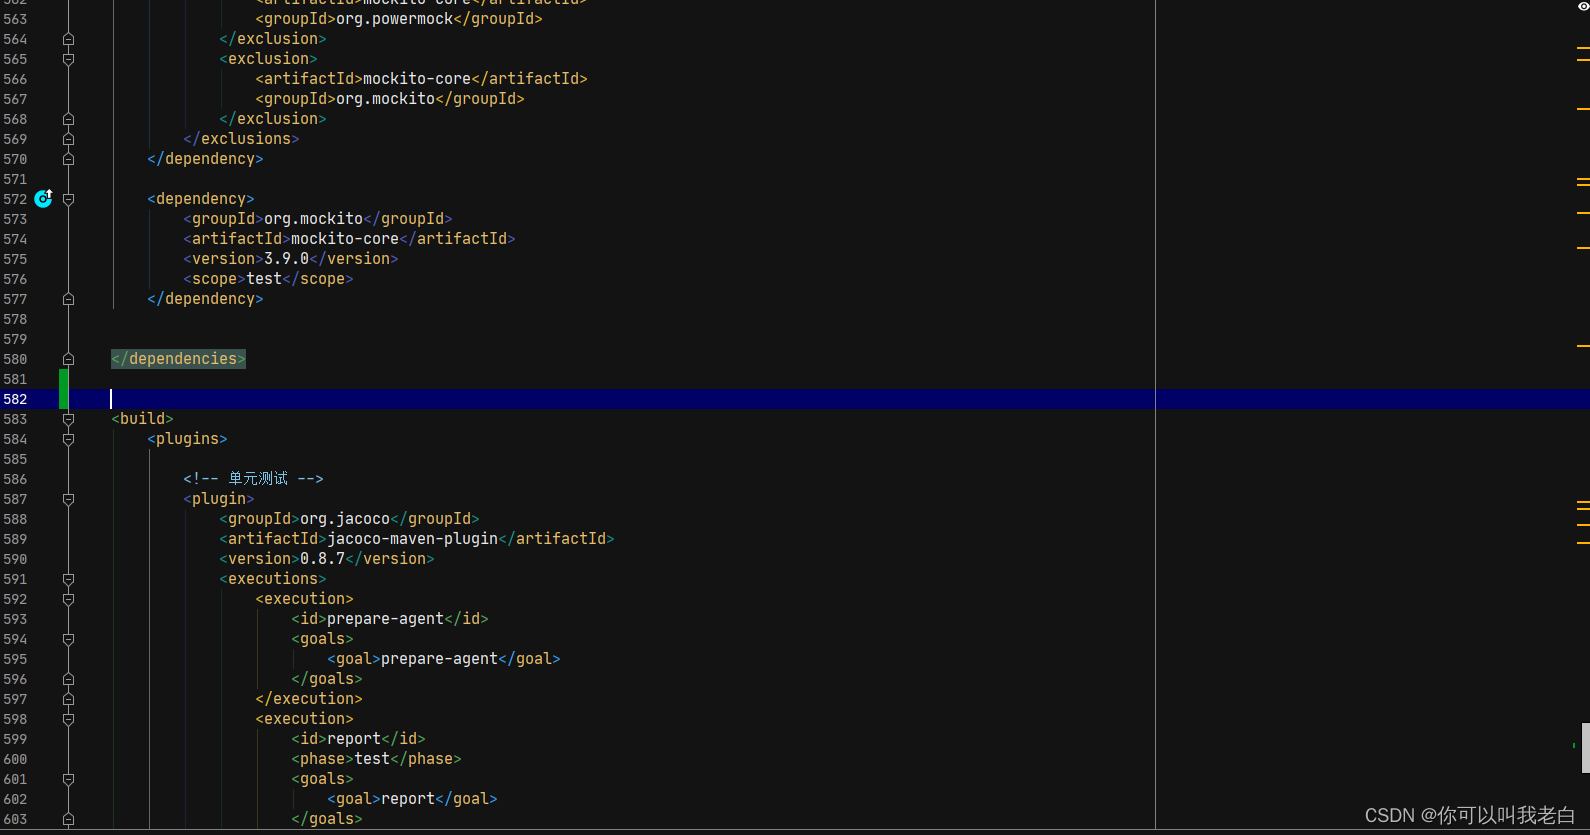
<dependencies>
  <!-- 单元测试 -->
		<dependency>
			<groupId>org.jmockit</groupId>
			<artifactId>jmockit</artifactId>
			<version>1.38</version>
			<scope>test</scope>
		</dependency>
		<dependency>
			<groupId>junit</groupId>
			<artifactId>junit</artifactId>
			<version>4.12</version>
			<scope>test</scope>
		</dependency>
		<dependency>
			<groupId>org.powermock</groupId>
			<artifactId>powermock-module-junit4</artifactId>
			<version>2.0.2</version>
			<scope>test</scope>
			<exclusions>
				<exclusion>
					<groupId>junit</groupId>
					<artifactId>junit</artifactId>
				</exclusion>
				<exclusion>
					<groupId>org.objenesis</groupId>
					<artifactId>objenesis</artifactId>
				</exclusion>
			</exclusions>
		</dependency>
		<dependency>
			<groupId>org.powermock</groupId>
			<artifactId>powermock-api-mockito2</artifactId>
			<version>2.0.2</version>
			<scope>test</scope>
			<exclusions>
				<exclusion>
					<artifactId>mockito-core</artifactId>
					<groupId>org.powermock</groupId>
				</exclusion>
				<exclusion>
					<artifactId>mockito-core</artifactId>
					<groupId>org.mockito</groupId>
				</exclusion>
			</exclusions>
		</dependency>

		<dependency>
			<groupId>org.mockito</groupId>
			<artifactId>mockito-core</artifactId>
			<version>3.9.0</version>
			<scope>test</scope>
		</dependency>
  </dependencies>
<build>
		<plugins>
  <!-- 单元测试 -->
			<plugin>
				<groupId>org.jacoco</groupId>
				<artifactId>jacoco-maven-plugin</artifactId>
				<version>0.8.7</version>
				<executions>
					<execution>
						<id>prepare-agent</id>
						<goals>
							<goal>prepare-agent</goal>
						</goals>
					</execution>
					<execution>
						<id>report</id>
						<phase>test</phase>
						<goals>
							<goal>report</goal>
						</goals>
					</execution>
				</executions>
			</plugin>
			<plugin>
				<groupId>org.apache.maven.plugins</groupId>
				<artifactId>maven-surefire-plugin</artifactId>
				<version>2.12.2</version>
				<configuration>
					<testFailureIgnore>true</testFailureIgnore>
				</configuration>
			</plugin>

</plugins>
		<!-- 修改对应名称 -->
		<finalName>iot-open-api</finalName>
	</build>
package com.shimao.iot.iotopenapi.service.impl;
import com.shimao.iot.common.bean.AttributesEntity;
import com.shimao.iot.common.bean.DeviceDataEntity;
import com.shimao.iot.common.bean.DeviceEntity;
import com.shimao.iot.common.bean.DeviceTypeEntity;
import com.shimao.iot.common.bean.device.UpdateBatchDeviceAttributeReq;
import com.shimao.iot.common.bean.member.EditShimaoFaceReq;
import com.shimao.iot.common.bean.member.ShimaoFaceReq;
import com.shimao.iot.common.elk.entity.DeviceReportEntity;
import com.shimao.iot.common.entity.ResultVO;
import com.shimao.iot.common.model.device.req.DeviceReportHeartReq;
import com.shimao.iot.common.model.device.req.DeviceReportInfoReq;
import com.shimao.iot.common.model.face.req.AlarmInfo;
import com.shimao.iot.common.model.face.req.DeviceStateReq;
import com.shimao.iot.common.model.face.req.FaceCollectInfoReq;
import com.shimao.iot.common.model.face.req.FaceCollectReq;
import com.shimao.iot.common.model.face.req.PassRecord;
import com.shimao.iot.iotopenapi.bean.dto.device.DeviceExtDataEntity;
import com.shimao.iot.iotopenapi.kafka.KafkaProducer;
import com.shimao.iot.iotopenapi.serviceFeign.DeviceFeignService;
import com.shimao.iot.iotopenapi.serviceFeign.ElkClient;
import com.shimao.iot.iotopenapi.serviceFeign.MemberClient;
import com.shimao.iot.iotopenapi.serviceFeign.OssService;
import org.junit.Assert;
import org.junit.Before;
import org.junit.Test;
import org.junit.runner.RunWith;
import org.mockito.InjectMocks;
import org.mockito.Mock;
import org.mockito.Mockito;
import org.mockito.MockitoAnnotations;
import org.powermock.modules.junit4.PowerMockRunner;
import org.springframework.beans.factory.annotation.Value;
import java.util.ArrayList;
import java.util.Arrays;
import java.util.List;
/**
*
* @author zhangtonghao
* @create 2023-01-31 14:41
*/
@RunWith(PowerMockRunner.class)
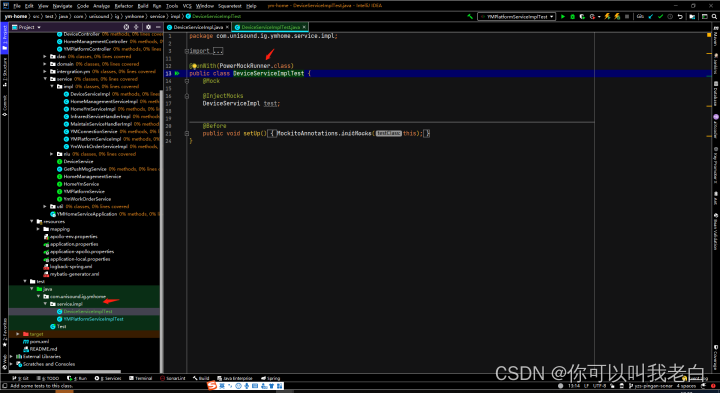
public class DeviceReportServiceImplTest {
@Mock
private DeviceFeignService deviceFeignService;
@Mock
private OssService ossService;
@InjectMocks
com.shimao.iot.iotopenapi.service.Impl.DeviceReportServiceImpl deviceReportServiceImpl;
static {
System.setProperty("env", "baseline");
}
@Before
public void setUp() {
MockitoAnnotations.openMocks(this);
}
@Test
public void testDeviceLockState() {
// Setup
DeviceStateReq req = new DeviceStateReq();
req.setEntityCode("entityCode");
req.setGwCode("gwCode");
req.setTimestamp("timestamp");
req.setReqId("reqId");
req.setTypeCode("typeCode");
req.setOpt("opt");
req.setMsgType("msgType");
//存取code
AlarmInfo alarmInfo = new AlarmInfo();
alarmInfo.setCode("10000");
alarmInfo.setMessage("message");
alarmInfo.setPictureUrl("pictureUrl");
req.setAlarmInfo(alarmInfo);
req.setAttributesEntities(Arrays.asList(new AttributesEntity(0L, 0L, "attributeCode", "value")));
PassRecord passRecord = new PassRecord();
passRecord.setId("id");
passRecord.setRecordId("recordId");
passRecord.setName("name");
passRecord.setPassPhoto("passPhoto");
passRecord.setPassMode("passMode");
passRecord.setResultType(0);
passRecord.setPassTime("passTime");
passRecord.setCode("10000");
passRecord.setPersonType(0);
req.setPassRecords(Arrays.asList(passRecord));
// Configure DeviceFeignService.queryDeviceInfoByDeviceCode(...).
DeviceExtDataEntity deviceExtDataEntity = getDeviceExtDataEntity();
Mockito.when(deviceFeignService.queryDeviceInfoByDeviceCode(Mockito.any())).thenReturn(deviceExtDataEntity);
Mockito.when(deviceFeignService.updateAttributesById(Mockito.any())).thenReturn(ResultVO.ok(null));
Mockito.when(ossService.uploadByBase64(Mockito.any())).thenReturn(ResultVO.ok(null));
// Run the test
ResultVO result = deviceReportServiceImpl.deviceLockState(req);
// Verify the results
Assert.assertNotNull(result);
}
private DeviceExtDataEntity getDeviceExtDataEntity() {
AttributesEntity attributesEntity = new AttributesEntity();
attributesEntity.setEntityId(11L);
attributesEntity.setAttributeCode("11L");
attributesEntity.setValue("11");
List<AttributesEntity> attributes = new ArrayList<>();
attributes.add(attributesEntity);
DeviceExtDataEntity deviceExtDataEntity = new DeviceExtDataEntity();
deviceExtDataEntity.setChannel(1);
deviceExtDataEntity.setSpaceId(11L);
deviceExtDataEntity.setTypeCode("1");
deviceExtDataEntity.setComdTopic("1");
deviceExtDataEntity.setDeviceCode("11");
deviceExtDataEntity.setDeviceId(11L);
deviceExtDataEntity.setDeviceName("11L");
deviceExtDataEntity.setDiff("11");
deviceExtDataEntity.setPanType("11");
deviceExtDataEntity.setSourcePlatform("11");
deviceExtDataEntity.setSpaceId(11L);
deviceExtDataEntity.setIconUrl("11");
deviceExtDataEntity.setRootSpaceId(11L);
deviceExtDataEntity.setAttributesEntities(attributes);
deviceExtDataEntity.setStatus(1);
return deviceExtDataEntity;
}
}
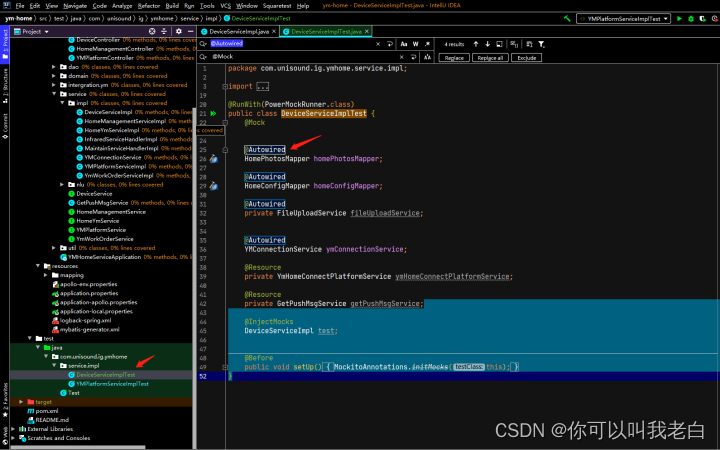
@InjectMocks:通过创建一个实例,它可以调用真实代码的方法,其余用@Mock(或@Spy)注解创建的mock将被注入到用该实例中。
@Mock:对函数的调用均执行mock(即虚假函数),不执行真正部分。
@Spy:对函数的调用均执行真正部分。(几乎不会使用)
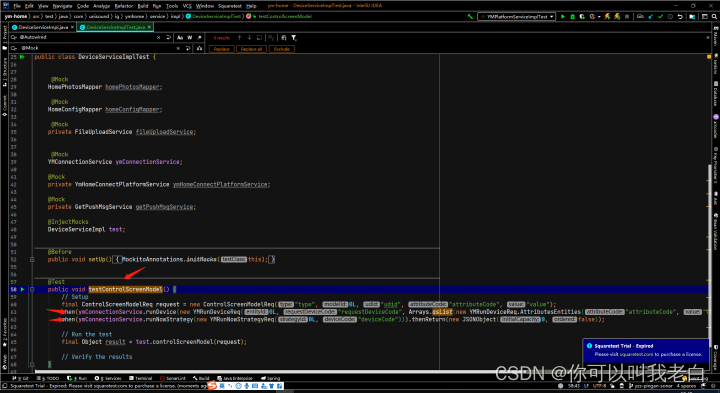
Mockito.when( 对象.方法名() ).thenReturn( 自定义结果 ):后面自定返回结果,需要和方法返回结果类型一致,
Mockito.any():用于匹配任意类型的参数
@RunWith(PowerMockRunner.class)
是JUnit的一个Runner,PowerMockRunner通过使用Java Instrumentation API和字节码操作库ByteBuddy,使得Java类和对象避免了Java单继承和final类限制,能够进行更灵活的mock测试。在JUnit中使用@RunWith(PowerMockRunner.class)来运行单元测试,可以使用PowerMock框架进行Mocking、Stubbing和Verification等操作,它可以完全模拟一个无法模拟的对象,如静态方法、final类、private类等。此外,PowerMockRunner还支持EasyMock和Mockito等常见的Mock技术。
@Mock
所谓的mock就是创建一个类的虚假的对象,在测试环境中,用来替换掉真实的对象,以达到两大目的:
验证这个对象的某些方法的调用情况,调用了多少次,参数是什么等等
指定这个对象的某些方法的行为,返回特定的值,或者是执行特定的动作
是一个Mockito框架中的注解,它可以用于创建一个模拟对象。使用@Mock注解可以使测试代码更简洁并且便于阅读,无需手动创建模拟对象。
具体来说,@Mock注解通常用于测试类中需要测试的类所依赖的对象。当我们使用@Mock注解标注一个对象时,这个对象的行为可以被模拟,以便对测试目标类进行测试。在对模拟对象进行测试时,我们可以设定模拟对象的返回值或行为,并用这些值来测试测试目标类的行为。
需要注意的是,使用@Mock注解必须先使用Mockito.mock()初始化Mock对象。通常,我们会在测试类的setUp()方法中使用@Mock注解来初始化Mock对象,这样测试类的每个测试方法都可以使用它。
同时还需要注意,@Mock注解只是用于创建一个模拟对象,在使用这个对象进行测试时,需要手动设定其返回值或行为。
@InjectMocks
是Mockito框架中的注解。它可以自动为测试类中声明的变量注入被mock的对象。使用@InjectMocks注解可以让测试代码更加简洁和易读,无需手动创建对象。
具体来说,@InjectMocks注解通常用于注入一个类的成员变量,这个成员变量通常是另外一个类的实例(被mock的对象)。在测试类实例化时,Mockito会自动查找这个被mock对象的实例,然后把它注入到@InjectMocks注解标识的变量中。
需要注意的是,@InjectMocks注解仅仅用于自动注入成员变量。如果需要mock类的方法,应该使用@Mock注解。
同时,如果一个类里面有多个同类型的成员变量,需要手动使用@Qualifier注解来指定需要注入的对象。当然你也可以通过不同名称来区分同一类型的变量。
Mockito.when()
是Mockito框架中的一个方法,它可以被用于设定模拟对象的行为。该方法通常和@Mock或@Spy注解一起使用,用于模拟对象的行为并指定返回值或者其他行为。
具体来说,Mockito.when()方法接受两个参数,一个是模拟对象的方法调用,另一个是指定的行为或返回值。当模拟对象的方法被调用时,Mockito就会按照when()方法中指定的方式进行处理。例如,可以使用Mockito.when()方法来模拟一个方法的返回值.
需要注意的是,Mockito.when()方法并不会真正地执行方法,而是返回了一个指定的返回值或设定的行为,用于在测试中进行验证。同样需要注意的是,如果模拟对象的方法参数不是一个基本类型或String,则需要手动匹配参数。
Mockito.any()
它可以用于匹配任意类型的参数。在测试代码中,当需要匹配方法的参数但不关心具体的参数值时,可以使用Mockito.any()方法来匹配参数。
具体来说,Mockito.any()方法可以用于模拟对象的方法调用或验证方法调用时的参数匹配。
需要注意的是,当使用Mockito.any()方法时,需要确保模拟方法的返回值与模拟方法的参数类型兼容。
Mockito的使用,一般有以下几种组合:
do/when:包括doThrow(…).when(…)/doReturn(…).when(…)/doAnswer(…).when(…)

given/will:包括given(…).willReturn(…)/given(…).willAnswer(…)

when/then: 包括when(…).thenReturn(…)/when(…).thenAnswer(…)/when(…).thenThrow(…)
Mockito 的多种匹配函数,部分如下:
any()所有对象类型

anyInt()基本类型 int、非 null 的 Integer 类型

anyChar()基本类型 char、非 null 的 Character 类型

anyShort()基本类型 short、非 null 的 Short 类型

anyBoolean()基本类型 boolean、非 null 的 Boolean 类型

anyDouble()基本类型 double、非 null 的 Double 类型

anyFloat()基本类型 float、非 null 的 Float 类型

anyLong()基本类型 long、非 null 的 Long 类型

anyByte()基本类型 byte、非 null 的 Byte 类型

anyString()String 类型(不能是 null)

anyList()List<T> 类型(不能是 null)

anyMap()Map<K, V>类型(不能是 null)
mock中模拟Mockito.when( 对象.方法名() ).thenReturn( 自定义结果 ),方法名()中参数有的人会使用实际的参数,这样会导致模拟是无法找到正确的结果。所以我们需要使用Mockito.any()去替代,让mock自己去模拟。以及thenReturn中返回的值要符合业务逻辑才能保证业务能够走通。参考:
Mockito.when(deviceFeignService.queryDeviceInfoByDeviceCode(Mockito.any())).thenReturn(deviceExtDataEntity);
这个是因为有时模拟时的参数类型不正确的原因,参考:Mockito 的多种匹配函数。如果还是报错,建议使用准确值,比如参数为int=1。但就会出现问题一无法返回结果。有知道的大佬可以评论。
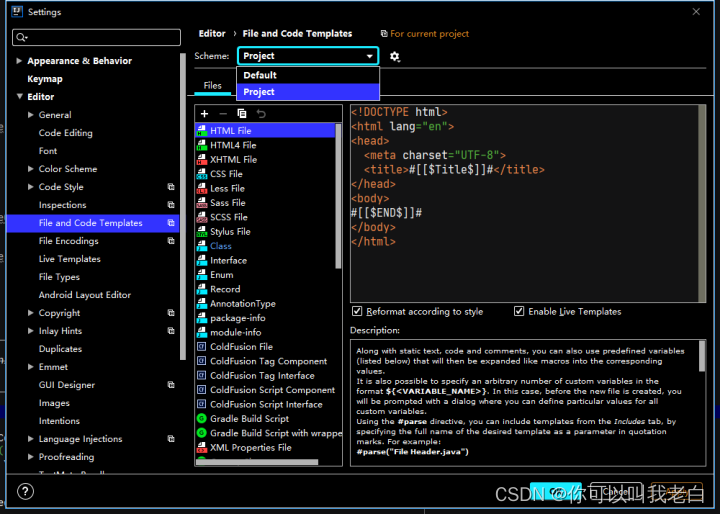
代表启动参数或者是使用的某个配置文件,注解和代码选择其中之一。参考下图
@ActiveProfiles("baseline")

或者

static {

System.setProperty("env", "baseline");

}
说实话,这个问题很恶心,麻烦了很久。后来查到可以使用映射测试模拟类,参考:
ReflectionTestUtils.setField()方法接受三个参数:要设置属性值的对象、属性名称和属性值。通过这个方法,我们可以方便地通过反射去设置一个对象的私有变量值,从而在测试代码中控制这个对象的行为。需要注意的是,如果想要通过ReflectionTestUtils.setField()方法修改的变量是静态的,那么第一个参数应为null,因为静态变量属于类级别的而不是实例级别的。
ReflectionTestUtils.setField(deviceServiceImpl, "deviceTypeCodes", "1000");
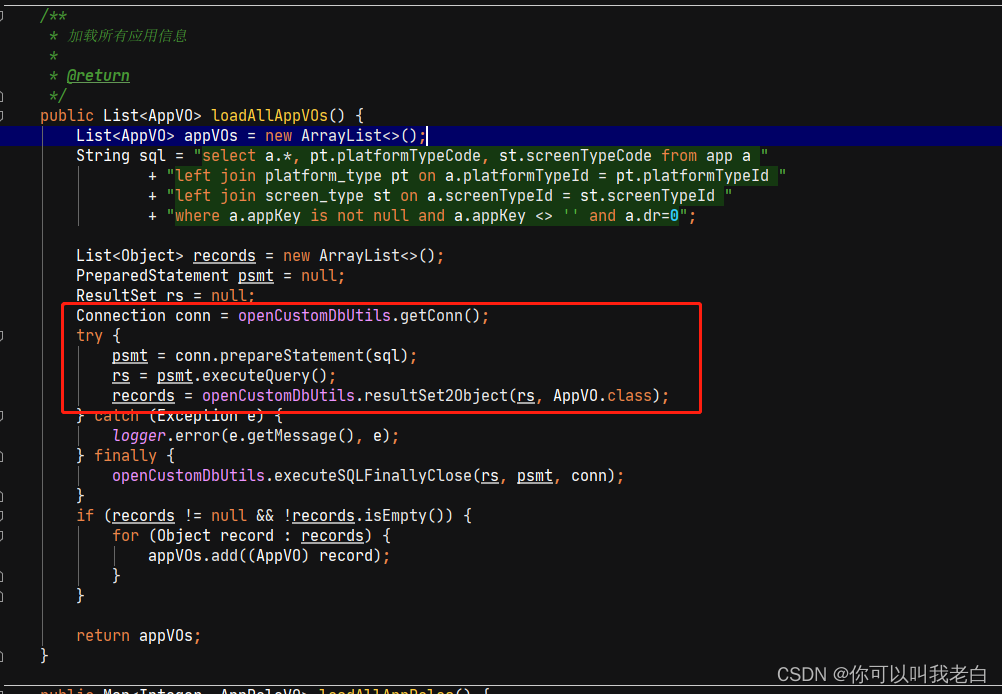
因为返回的对象无法正常new,我们可以通过Mockito.mock()方法可以创建类或接口的模拟对象。比如
// redisTemplate写法
ListOperations<String, String> listOperations = Mockito.mock(ListOperations.class);

Mockito.when(redisTemplate.opsForList()).thenReturn(listOperations);Mockito.when(listOperations.size(Mockito.any())).thenReturn(10L);
//JDBC写法
你可以直接带@Before方法中去先初始化模拟
@Mock
DbUtils openCustomDbUtils;

@Mock
DbUtils newCustomDbUtils;

@InjectMocks
NluDataDao test;


@Before
public void setUp() {
    MockitoAnnotations.openMocks(this);
    getTestByOne();
}

private void getTestByOne() {
    try {
        Connection conn = Mockito.mock(Connection.class);
        conn.setAutoCommit(true);
        PreparedStatement ps = Mockito.mock(PreparedStatement.class);
        ResultSet rs = Mockito.mock(ResultSet.class);
        ps.setString(1, "1");
        int i = ps.executeUpdate();

        PowerMockito.when(conn.prepareStatement(Mockito.any())).thenReturn(ps);
        PowerMockito.when(ps.getGeneratedKeys()).thenReturn(rs);
        PowerMockito.when(ps.executeUpdate()).thenReturn(1);
        PowerMockito.when(openCustomDbUtils.getConn()).thenReturn(conn);
    } catch (Exception e) {

    }

}

@Test
public void testLoadAllAppVOs() {
    // Setup
    getTestByOne();
    getTestByFour();
    // Run the test
   test.loadAllAppVOs();
}
test.loadAllAppVOs()方法代码:
其实这也是我为什么讨厌有的人炫技的原因之一。下列报错:

解决方法:
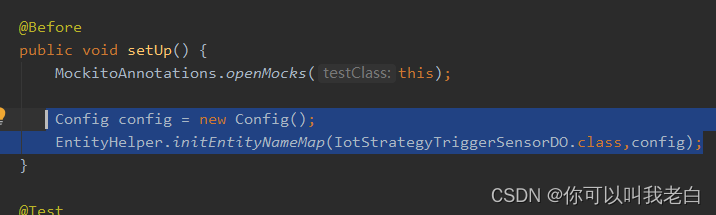
Config config = new Config();EntityHelper.initEntityNameMap(IotStrategyTriggerSensorDO.class,config);
jar包选择:
import tk.mybatis.mapper.entity.Config;import tk.mybatis.mapper.mapperhelper.EntityHelper;
有的工程师写完以后想看一下自己覆盖率的多少,以idea为例有两种方法。(方法2通用)
1.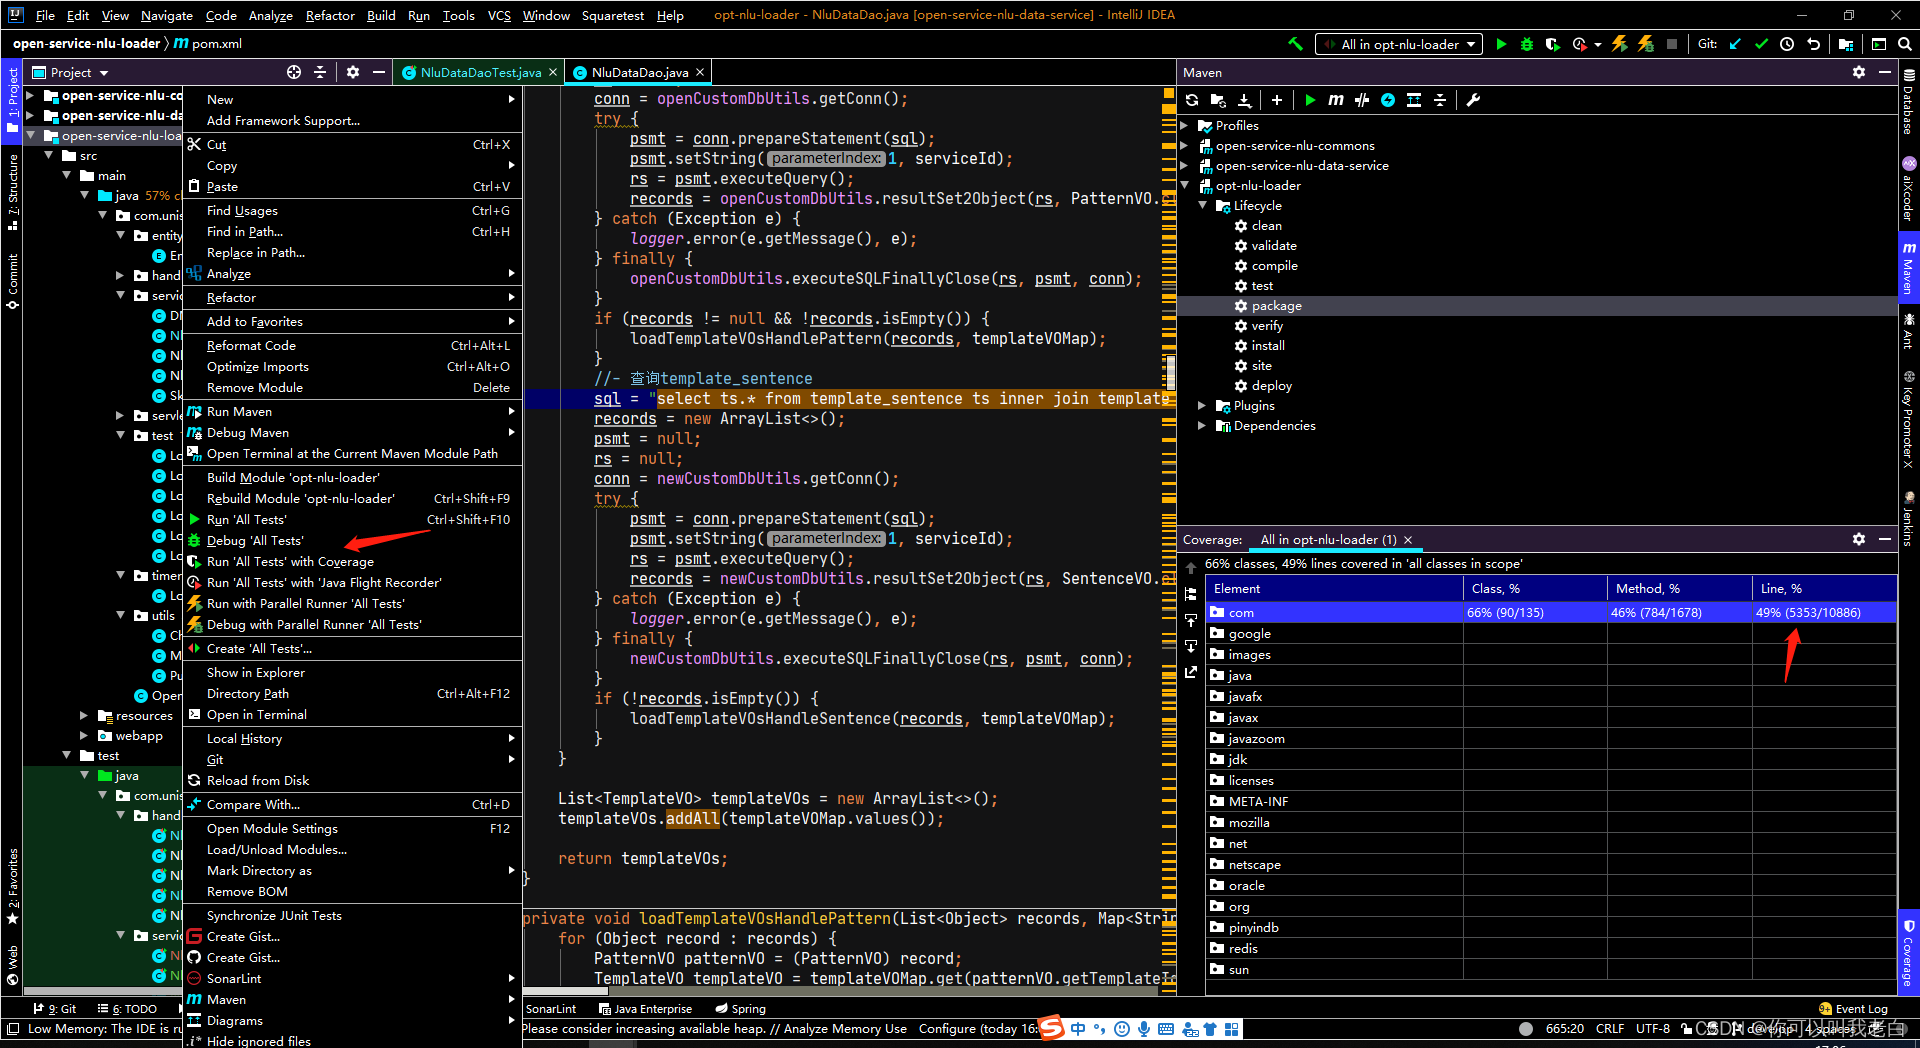
2.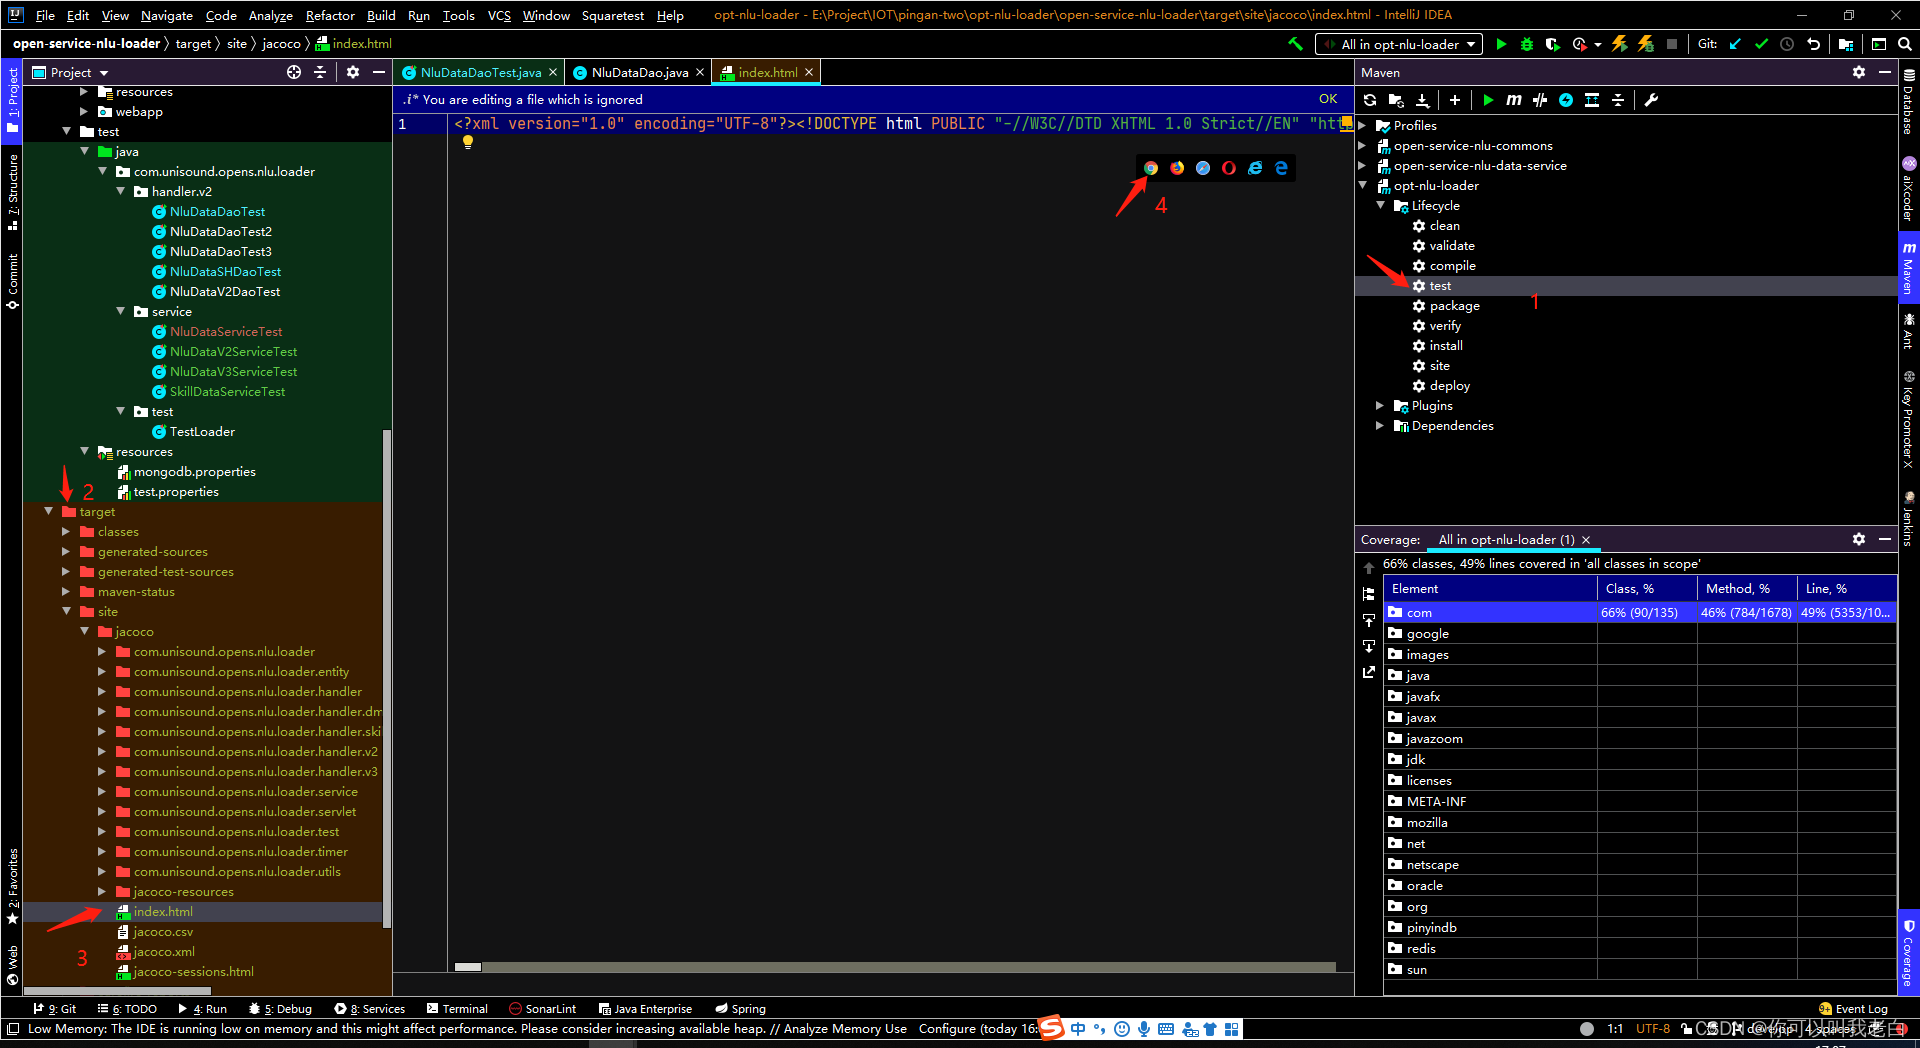
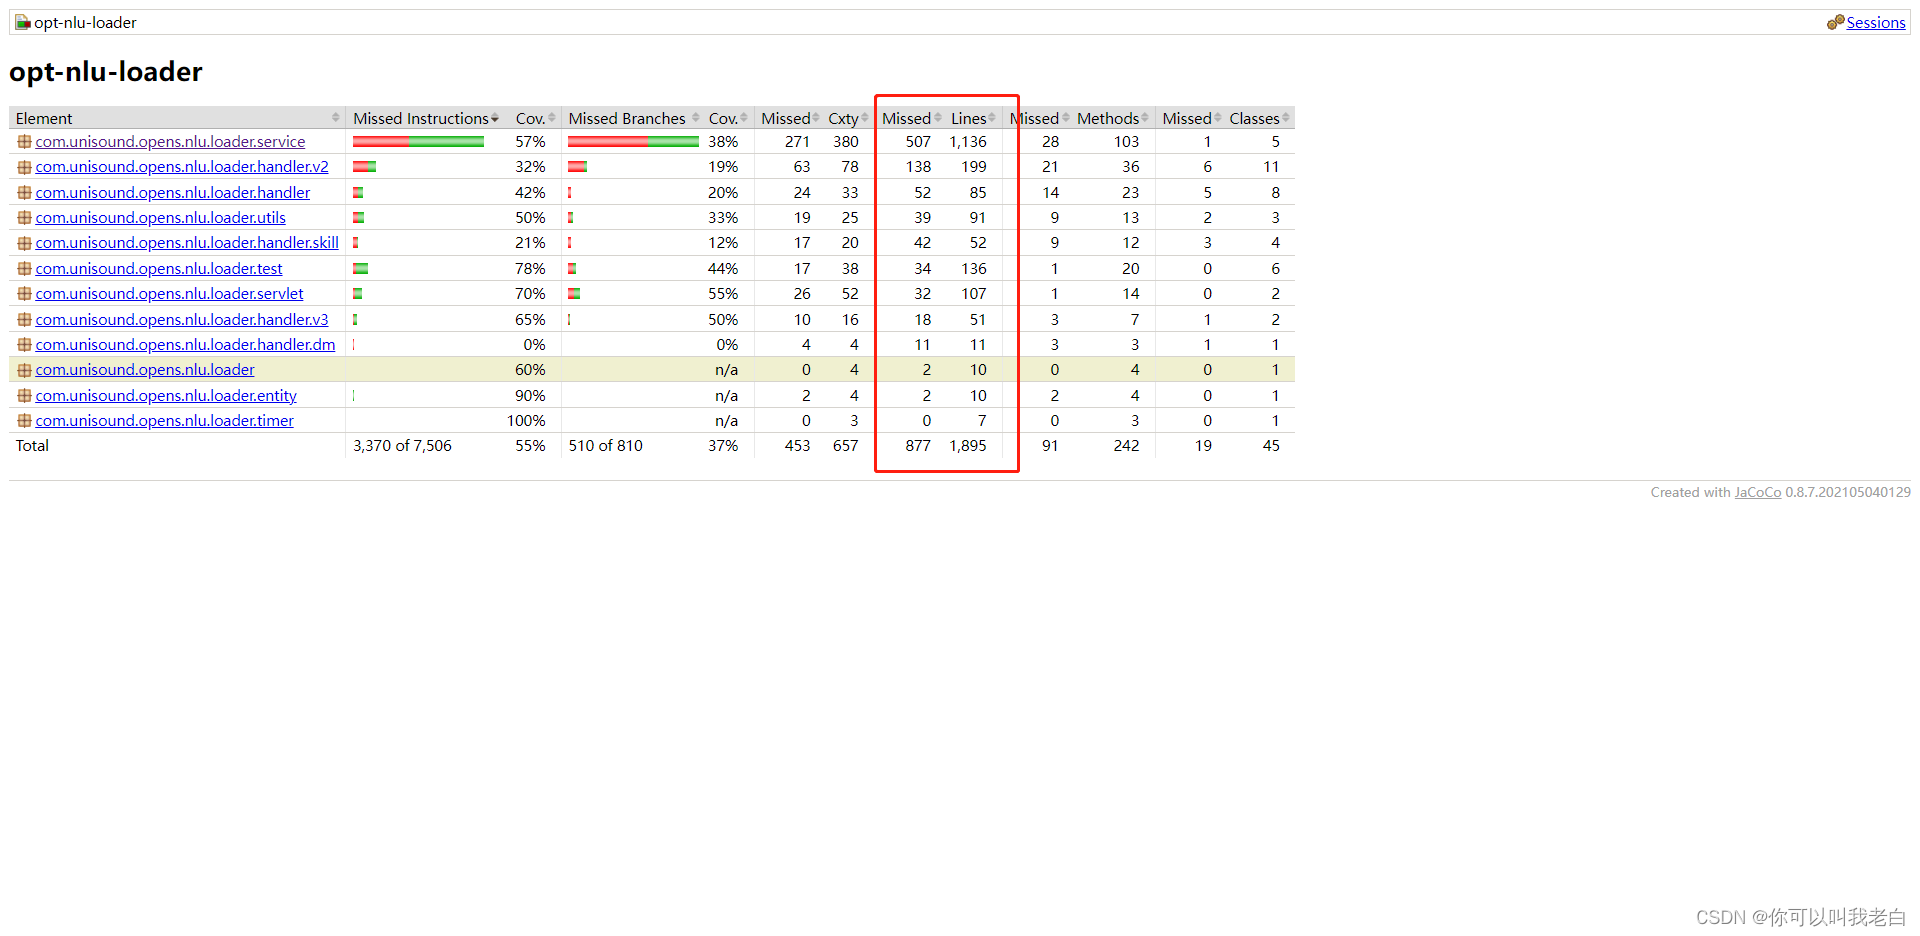
第二种相当于执行mvn test命令。有的时候测试报告和idea扫描的会有不同,需要以自己环境为准.
帮助自动生成单元测试类。选择第二种使用。注意:生成后的需要修改,别忘了上面碰到的问题。
一些网友反映说插件生成的代码很多重复的处理有些费劲,然后网上收集了一些信息后,提供了一个类模板供大家使用。下面是教程:
1.替换类生成模板直接复制粘贴即可,如果你长期写就选择Default,否则就选择Project
#if (${PACKAGE_NAME} && ${PACKAGE_NAME} != "")package ${PACKAGE_NAME};#end
#parse("File Header.java")
import org.junit.Assert;
import org.junit.Before;
import org.junit.Test;
import org.junit.runner.RunWith;
import org.mockito.InjectMocks;
import org.mockito.Mock;
import org.mockito.MockitoAnnotations;
import org.powermock.modules.junit4.PowerMockRunner;


@RunWith(PowerMockRunner.class)
public class ${NAME}Test {
  @Mock

  @InjectMocks
    ${NAME} test;


  @Before
    public void setUp() {
        MockitoAnnotations.initMocks(this);
    }
}
2.生成测试类,直接复制要生成的类名
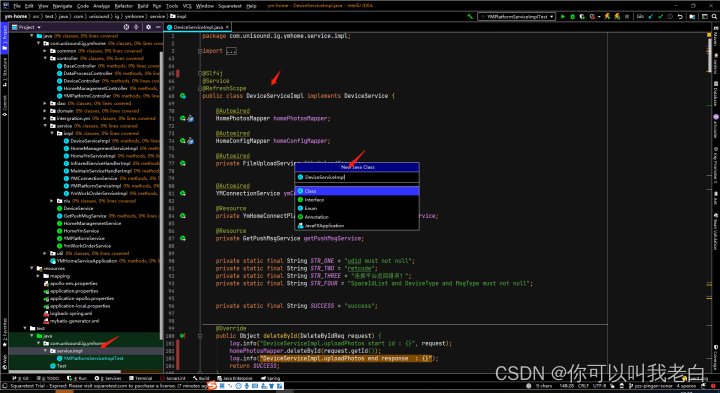
3.注意我们首先要把需要模拟的类先拿过来,否则我们后面生成代码时会发现没有生成模拟的方法。比如下面的

错误的:

正确的:
以上就是大致的演示,有其他好的方法的可以评论下。
创作不易,感觉不错的话请给点个赞吧!我是老白,我们下期再见!
我正在学习如何使用Nokogiri,根据这段代码我遇到了一些问题:require'rubygems'require'mechanize'post_agent=WWW::Mechanize.newpost_page=post_agent.get('http://www.vbulletin.org/forum/showthread.php?t=230708')puts"\nabsolutepathwithtbodygivesnil"putspost_page.parser.xpath('/html/body/div/div/div/div/div/table/tbody/tr/td/div
总的来说,我对ruby还比较陌生,我正在为我正在创建的对象编写一些rspec测试用例。许多测试用例都非常基础,我只是想确保正确填充和返回值。我想知道是否有办法使用循环结构来执行此操作。不必为我要测试的每个方法都设置一个assertEquals。例如:describeitem,"TestingtheItem"doit"willhaveanullvaluetostart"doitem=Item.new#HereIcoulddotheitem.name.shouldbe_nil#thenIcoulddoitem.category.shouldbe_nilendend但我想要一些方法来使用
关闭。这个问题是opinion-based.它目前不接受答案。想要改进这个问题?更新问题,以便editingthispost可以用事实和引用来回答它.关闭4年前。Improvethisquestion我想在固定时间创建一系列低音和高音调的哔哔声。例如:在150毫秒时发出高音调的蜂鸣声在151毫秒时发出低音调的蜂鸣声200毫秒时发出低音调的蜂鸣声250毫秒的高音调蜂鸣声有没有办法在Ruby或Python中做到这一点?我真的不在乎输出编码是什么(.wav、.mp3、.ogg等等),但我确实想创建一个输出文件。
给定这段代码defcreate@upgrades=User.update_all(["role=?","upgraded"],:id=>params[:upgrade])redirect_toadmin_upgrades_path,:notice=>"Successfullyupgradeduser."end我如何在该操作中实际验证它们是否已保存或未重定向到适当的页面和消息? 最佳答案 在Rails3中,update_all不返回任何有意义的信息,除了已更新的记录数(这可能取决于您的DBMS是否返回该信息)。http://ar.ru
我在我的项目目录中完成了compasscreate.和compassinitrails。几个问题:我已将我的.sass文件放在public/stylesheets中。这是放置它们的正确位置吗?当我运行compasswatch时,它不会自动编译这些.sass文件。我必须手动指定文件:compasswatchpublic/stylesheets/myfile.sass等。如何让它自动运行?文件ie.css、print.css和screen.css已放在stylesheets/compiled。如何在编译后不让它们重新出现的情况下删除它们?我自己编译的.sass文件编译成compiled/t
我想为Heroku构建一个Rails3应用程序。他们使用Postgres作为他们的数据库,所以我通过MacPorts安装了postgres9.0。现在我需要一个postgresgem并且共识是出于性能原因你想要pggem。但是我对我得到的错误感到非常困惑当我尝试在rvm下通过geminstall安装pg时。我已经非常明确地指定了所有postgres目录的位置可以找到但仍然无法完成安装:$envARCHFLAGS='-archx86_64'geminstallpg--\--with-pg-config=/opt/local/var/db/postgresql90/defaultdb/po
我正在寻找执行以下操作的正确语法(在Perl、Shell或Ruby中):#variabletoaccessthedatalinesappendedasafileEND_OF_SCRIPT_MARKERrawdatastartshereanditcontinues. 最佳答案 Perl用__DATA__做这个:#!/usr/bin/perlusestrict;usewarnings;while(){print;}__DATA__Texttoprintgoeshere 关于ruby-如何将脚
尝试通过RVM将RubyGems升级到版本1.8.10并出现此错误:$rvmrubygemslatestRemovingoldRubygemsfiles...Installingrubygems-1.8.10forruby-1.9.2-p180...ERROR:Errorrunning'GEM_PATH="/Users/foo/.rvm/gems/ruby-1.9.2-p180:/Users/foo/.rvm/gems/ruby-1.9.2-p180@global:/Users/foo/.rvm/gems/ruby-1.9.2-p180:/Users/foo/.rvm/gems/rub
Rackup通过Rack的默认处理程序成功运行任何Rack应用程序。例如:classRackAppdefcall(environment)['200',{'Content-Type'=>'text/html'},["Helloworld"]]endendrunRackApp.new但是当最后一行更改为使用Rack的内置CGI处理程序时,rackup给出“NoMethodErrorat/undefinedmethod`call'fornil:NilClass”:Rack::Handler::CGI.runRackApp.newRack的其他内置处理程序也提出了同样的反对意见。例如Rack
在选择我想要运行操作的频率时,唯一的选项是“每天”、“每小时”和“每10分钟”。谢谢!我想为我的Rails3.1应用程序运行调度程序。 最佳答案 这不是一个优雅的解决方案,但您可以安排它每天运行,并在实际开始工作之前检查日期是否为当月的第一天。 关于ruby-如何每月在Heroku运行一次Scheduler插件?,我们在StackOverflow上找到一个类似的问题: https://stackoverflow.com/questions/8692687/