文章目录
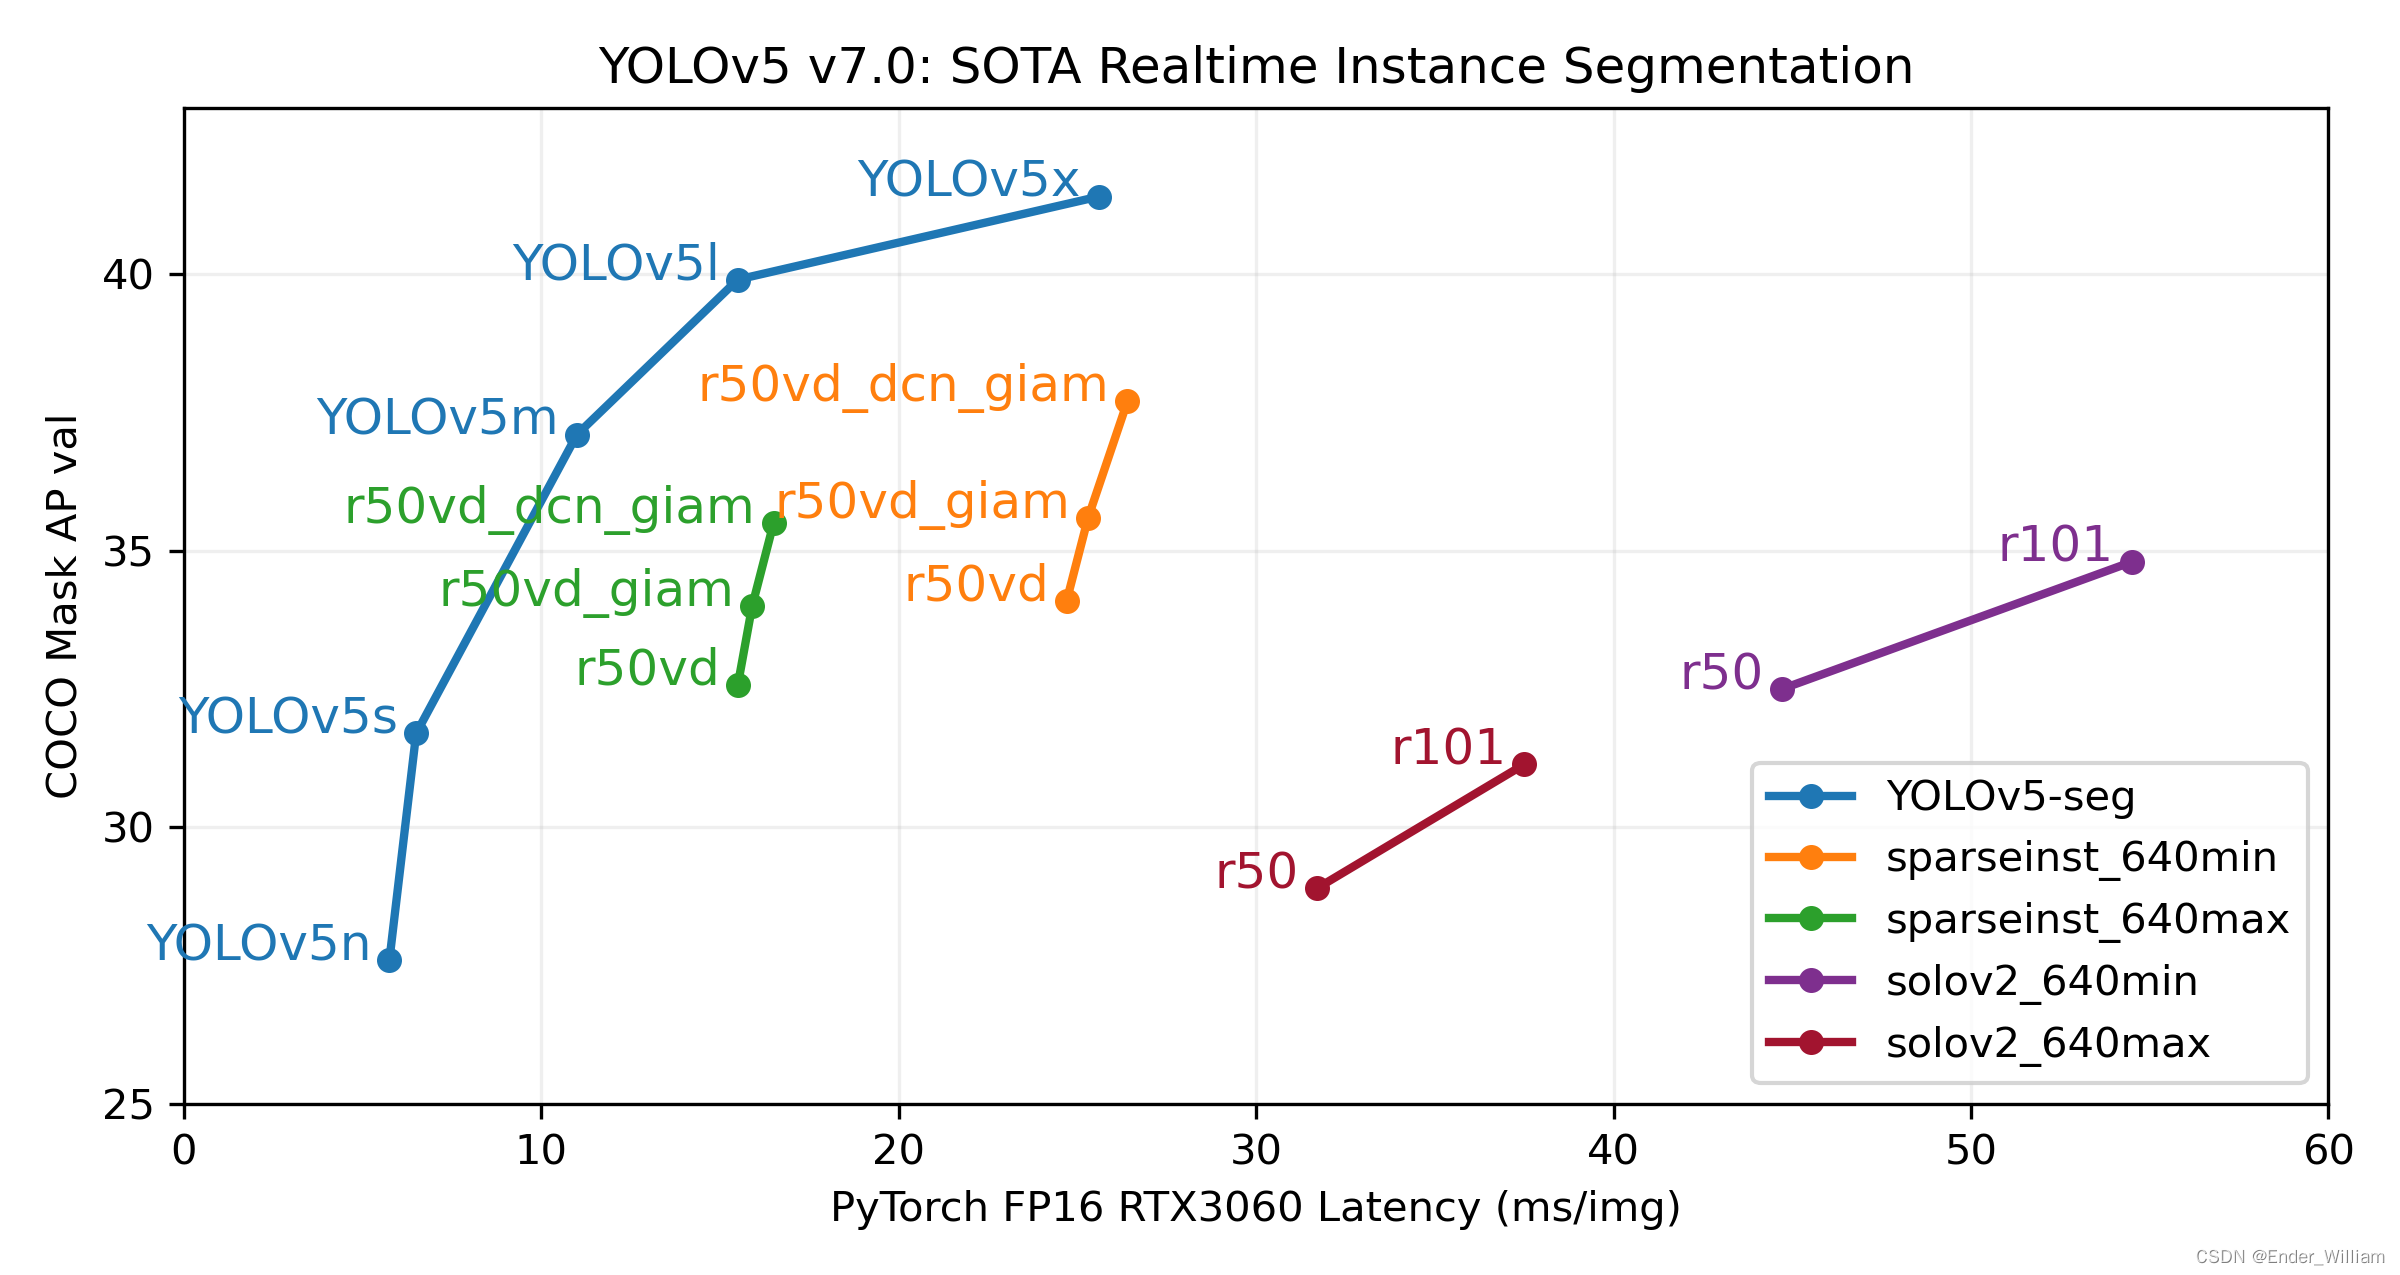
YoloV5 作为 YoloV4 之后的改进型,在算法上做出了优化,检测的性能得到了一定的提升。其特点之一就是权重文件非常的小,可以在一些配置更低的移动设备上运行,且提高速度的同时准确度更高。具体的性能见下图[^1]。本次使用的是最新推出的 YoloV5 Version7 版本。
GitHub 地址:YOLOv5 🚀 是世界上最受欢迎的视觉 AI,代表 Ultralytics 对未来视觉 AI 方法的开源研究,结合在数千小时的研究和开发中积累的经验教训和最佳实践。
本人目前的一个项目需要使用到手势识别,得益于 YoloV5 的优秀的识别速度与准确率,因此识别部分的模型均使用 YoloV5 Version7 版本进行训练。训练之后需要使用这个模型,原始的 detect.py 程序使用 argparse 对参数进行封装,这为初期验证模型提供了一定的便利,我们可以通过 Pycharm 或者 Terminal 来快速地执行程序,然后在 run/detect 路径下快速地查看到结果。但是在实际的应用中,识别程序往往是作为整个系统的一个组件来运行的,现有的 detect.py 无法满足使用需求,因此需要将其封装成一个可供多个程序调用的 API 接口。通过这个接口可以获得 种类、坐标、置信度 这三个信息。通过这些信息来控制系统软件做出对应的操作。
这部分的代码与思路参照了[^2] 爆改YOLOV7的detect.py制作成API接口供其他python程序调用(超低延时) 这篇文章的思路。由于 YoloV5 和 YoloV7 的程序有些许不一样,因此做了一些修改。
大体的思路是去除掉 argparse 部分,通过类将参数封装进去,去除掉识别这个核心功能之外的其它功能。
需要传入一些常用的参数,后面的 API 会使用到这个类里面的参数
class YoloOpt:
    def __init__(self, weights='weights/last.pt',
                 imgsz=(640, 640), conf_thres=0.25,
                 iou_thres=0.45, device='cpu', view_img=False,
                 classes=None, agnostic_nms=False,
                 augment=False, update=False, exist_ok=False,
                 project='/detect/result', name='result_exp',
                 save_csv=True):
        self.weights = weights  # 权重文件地址
        self.source = None  # 待识别的图像
        if imgsz is None:
            self.imgsz = (640, 640)
        self.imgsz = imgsz  # 输入图片的大小,默认 (640,640)
        self.conf_thres = conf_thres  # object置信度阈值 默认0.25  用在nms中
        self.iou_thres = iou_thres  # 做nms的iou阈值 默认0.45   用在nms中
        self.device = device  # 执行代码的设备,由于项目只能用 CPU,这里只封装了 CPU 的方法
        self.view_img = view_img  # 是否展示预测之后的图片或视频 默认False
        self.classes = classes  # 只保留一部分的类别,默认是全部保留
        self.agnostic_nms = agnostic_nms  # 进行NMS去除不同类别之间的框, 默认False
        self.augment = augment  # augmented inference TTA测试时增强/多尺度预测,可以提分
        self.update = update  # 如果为True,则对所有模型进行strip_optimizer操作,去除pt文件中的优化器等信息,默认为False
        self.exist_ok = exist_ok  # 如果为True,则对所有模型进行strip_optimizer操作,去除pt文件中的优化器等信息,默认为False
        self.project = project  # 保存测试日志的参数,本程序没有用到
        self.name = name  # 每次实验的名称,本程序也没有用到
        self.save_csv = save_csv  # 是否保存成 csv 文件,本程序目前也没有用到
class DetectAPI:
    def __init__(self, weights, imgsz=640):
        self.opt = YoloOpt(weights=weights, imgsz=imgsz)
        weights = self.opt.weights
        imgsz = self.opt.imgsz

        # Initialize 初始化
        # 获取设备 CPU/CUDA
        self.device = select_device(self.opt.device)
        # 不使用半精度
        self.half = self.device.type != 'cpu'  # # FP16 supported on limited backends with CUDA

        # Load model 加载模型
        self.model = DetectMultiBackend(weights, self.device, dnn=False)
        self.stride = self.model.stride
        self.names = self.model.names
        self.pt = self.model.pt
        self.imgsz = check_img_size(imgsz, s=self.stride)

        # 不使用半精度
        if self.half:
            self.model.half() # switch to FP16

        # read names and colors
        self.names = self.model.module.names if hasattr(self.model, 'module') else self.model.names
        self.colors = [[random.randint(0, 255) for _ in range(3)] for _ in self.names]

    def detect(self, source):
        # 输入 detect([img])
        if type(source) != list:
            raise TypeError('source must a list and contain picture read by cv2')

        # DataLoader 加载数据
        # 直接从 source 加载数据
        dataset = LoadImages(source)
        # 源程序通过路径加载数据,现在 source 就是加载好的数据,因此 LoadImages 就要重写
        bs = 1 # set batch size

        # 保存的路径
        vid_path, vid_writer = [None] * bs, [None] * bs

        # Run inference
        result = []
        if self.device.type != 'cpu':
            self.model(torch.zeros(1, 3, self.imgsz, self.imgsz).to(self.device).type_as(
                next(self.model.parameters())))  # run once
        dt, seen = (Profile(), Profile(), Profile()), 0

        for im, im0s in dataset:
            with dt[0]:
                im = torch.from_numpy(im).to(self.model.device)
                im = im.half() if self.model.fp16 else im.float()  # uint8 to fp16/32
                im /= 255  # 0 - 255 to 0.0 - 1.0
                if len(im.shape) == 3:
                    im = im[None]  # expand for batch dim

                # Inference
                pred = self.model(im, augment=self.opt.augment)[0]

                # NMS
                with dt[2]:
                    pred = non_max_suppression(pred, self.opt.conf_thres, self.opt.iou_thres, self.opt.classes, self.opt.agnostic_nms, max_det=2)

                # Process predictions
                # 处理每一张图片
                det = pred[0]  # API 一次只处理一张图片,因此不需要 for 循环
                im0 = im0s.copy()  # copy 一个原图片的副本图片
                result_txt = []  # 储存检测结果,每新检测出一个物品,长度就加一。
                                 # 每一个元素是列表形式,储存着 类别,坐标,置信度
                # 设置图片上绘制框的粗细,类别名称
                annotator = Annotator(im0, line_width=3, example=str(self.names))
                if len(det):
                    # Rescale boxes from img_size to im0 size
                    # 映射预测信息到原图
                    det[:, :4] = scale_boxes(im.shape[2:], det[:, :4], im0.shape).round()

                    #
                    for *xyxy, conf, cls in reversed(det):
                        line = (int(cls.item()), [int(_.item()) for _ in xyxy], conf.item())  # label format
                        result_txt.append(line)
                        label = f'{self.names[int(cls)]} {conf:.2f}'
                        annotator.box_label(xyxy, label, color=self.colors[int(cls)])
                result.append((im0, result_txt))  # 对于每张图片,返回画完框的图片,以及该图片的标签列表。
            return result, self.names
DetectAPI.pyimport argparse
import os
import platform
import random
import sys
from pathlib import Path
import torch
from torch.backends import cudnn
FILE = Path(__file__).resolve()
ROOT = FILE.parents[0] # YOLOv5 root directory
if str(ROOT) not in sys.path:
sys.path.append(str(ROOT)) # add ROOT to PATH
ROOT = Path(os.path.relpath(ROOT, Path.cwd())) # relative
from models.common import DetectMultiBackend
from utils.dataloaders import IMG_FORMATS, VID_FORMATS, LoadImages, LoadScreenshots, LoadStreams
from utils.general import (LOGGER, Profile, check_file, check_img_size, check_imshow, check_requirements, colorstr, cv2,
increment_path, non_max_suppression, print_args, scale_boxes, strip_optimizer, xyxy2xywh)
from utils.plots import Annotator, colors, save_one_box
from utils.torch_utils import select_device, smart_inference_mode, time_sync
"""
使用面向对象编程中的类来封装,需要去除掉原始 detect.py 中的结果保存方法,重写
保存方法将结果保存到一个 csv 文件中并打上视频的对应帧率
"""
class YoloOpt:
def __init__(self, weights='weights/last.pt',
imgsz=(640, 640), conf_thres=0.25,
iou_thres=0.45, device='cpu', view_img=False,
classes=None, agnostic_nms=False,
augment=False, update=False, exist_ok=False,
project='/detect/result', name='result_exp',
save_csv=True):
self.weights = weights # 权重文件地址
self.source = None # 待识别的图像
if imgsz is None:
self.imgsz = (640, 640)
self.imgsz = imgsz # 输入图片的大小,默认 (640,640)
self.conf_thres = conf_thres # object置信度阈值 默认0.25 用在nms中
self.iou_thres = iou_thres # 做nms的iou阈值 默认0.45 用在nms中
self.device = device # 执行代码的设备,由于项目只能用 CPU,这里只封装了 CPU 的方法
self.view_img = view_img # 是否展示预测之后的图片或视频 默认False
self.classes = classes # 只保留一部分的类别,默认是全部保留
self.agnostic_nms = agnostic_nms # 进行NMS去除不同类别之间的框, 默认False
self.augment = augment # augmented inference TTA测试时增强/多尺度预测,可以提分
self.update = update # 如果为True,则对所有模型进行strip_optimizer操作,去除pt文件中的优化器等信息,默认为False
self.exist_ok = exist_ok # 如果为True,则对所有模型进行strip_optimizer操作,去除pt文件中的优化器等信息,默认为False
self.project = project # 保存测试日志的参数,本程序没有用到
self.name = name # 每次实验的名称,本程序也没有用到
self.save_csv = save_csv # 是否保存成 csv 文件,本程序目前也没有用到
class DetectAPI:
def __init__(self, weights, imgsz=640):
self.opt = YoloOpt(weights=weights, imgsz=imgsz)
weights = self.opt.weights
imgsz = self.opt.imgsz
# Initialize 初始化
# 获取设备 CPU/CUDA
self.device = select_device(self.opt.device)
# 不使用半精度
self.half = self.device.type != 'cpu' # # FP16 supported on limited backends with CUDA
# Load model 加载模型
self.model = DetectMultiBackend(weights, self.device, dnn=False)
self.stride = self.model.stride
self.names = self.model.names
self.pt = self.model.pt
self.imgsz = check_img_size(imgsz, s=self.stride)
# 不使用半精度
if self.half:
self.model.half() # switch to FP16
# read names and colors
self.names = self.model.module.names if hasattr(self.model, 'module') else self.model.names
self.colors = [[random.randint(0, 255) for _ in range(3)] for _ in self.names]
def detect(self, source):
# 输入 detect([img])
if type(source) != list:
raise TypeError('source must a list and contain picture read by cv2')
# DataLoader 加载数据
# 直接从 source 加载数据
dataset = LoadImages(source)
# 源程序通过路径加载数据,现在 source 就是加载好的数据,因此 LoadImages 就要重写
bs = 1 # set batch size
# 保存的路径
vid_path, vid_writer = [None] * bs, [None] * bs
# Run inference
result = []
if self.device.type != 'cpu':
self.model(torch.zeros(1, 3, self.imgsz, self.imgsz).to(self.device).type_as(
next(self.model.parameters()))) # run once
dt, seen = (Profile(), Profile(), Profile()), 0
for im, im0s in dataset:
with dt[0]:
im = torch.from_numpy(im).to(self.model.device)
im = im.half() if self.model.fp16 else im.float() # uint8 to fp16/32
im /= 255 # 0 - 255 to 0.0 - 1.0
if len(im.shape) == 3:
im = im[None] # expand for batch dim
# Inference
pred = self.model(im, augment=self.opt.augment)[0]
# NMS
with dt[2]:
pred = non_max_suppression(pred, self.opt.conf_thres, self.opt.iou_thres, self.opt.classes, self.opt.agnostic_nms, max_det=2)
# Process predictions
# 处理每一张图片
det = pred[0] # API 一次只处理一张图片,因此不需要 for 循环
im0 = im0s.copy() # copy 一个原图片的副本图片
result_txt = [] # 储存检测结果,每新检测出一个物品,长度就加一。
# 每一个元素是列表形式,储存着 类别,坐标,置信度
# 设置图片上绘制框的粗细,类别名称
annotator = Annotator(im0, line_width=3, example=str(self.names))
if len(det):
# Rescale boxes from img_size to im0 size
# 映射预测信息到原图
det[:, :4] = scale_boxes(im.shape[2:], det[:, :4], im0.shape).round()
#
for *xyxy, conf, cls in reversed(det):
line = (int(cls.item()), [int(_.item()) for _ in xyxy], conf.item()) # label format
result_txt.append(line)
label = f'{self.names[int(cls)]} {conf:.2f}'
annotator.box_label(xyxy, label, color=self.colors[int(cls)])
result.append((im0, result_txt)) # 对于每张图片,返回画完框的图片,以及该图片的标签列表。
return result, self.names
dataloaders.py文件路径在 utils/dataloaders.py ,修改其中的 LoadImages 类,将下面的代码完整替换掉就可以了。
class LoadImages:
    # YOLOv5 image/video dataloader, i.e. `python detect.py --source image.jpg/vid.mp4`
    def __init__(self, path, img_size=640, stride=32):

       for img in path:
           if type(img) != np.ndarray or len(img.shape) != 3:
               raise TypeError('item is not a picture read by cv2')

       self.img_size = img_size
       self.stride = stride
       self.files = path
       self.nf = len(path)
       self.mode = 'image'

    def __iter__(self):
        self.count = 0
        return self

    def __next__(self):
        if self.count == self.nf:
            raise StopIteration
        path = self.files[self.count]

        # Read image
        self.count += 1

        # Padded resize
        img = letterbox(path, self.img_size, stride=self.stride)[0]

        # Convert
        img = img[:, :, ::-1].transpose(2, 0, 1)  # BGR to RGB, to 3x416x416
        img = np.ascontiguousarray(img)

        return img, path

    def _new_video(self, path):
        # Create a new video capture object
        self.frame = 0
        self.cap = cv2.VideoCapture(path)
        self.frames = int(self.cap.get(cv2.CAP_PROP_FRAME_COUNT) / self.vid_stride)
        self.orientation = int(self.cap.get(cv2.CAP_PROP_ORIENTATION_META))  # rotation degrees
        # self.cap.set(cv2.CAP_PROP_ORIENTATION_AUTO, 0)  # disable https://github.com/ultralytics/yolov5/issues/8493

    def _cv2_rotate(self, im):
        # Rotate a cv2 video manually
        if self.orientation == 0:
            return cv2.rotate(im, cv2.ROTATE_90_CLOCKWISE)
        elif self.orientation == 180:
            return cv2.rotate(im, cv2.ROTATE_90_COUNTERCLOCKWISE)
        elif self.orientation == 90:
            return cv2.rotate(im, cv2.ROTATE_180)
        return im

    def __len__(self):
        return self.nf  # number of files
if __name__ == '__main__':
cap = cv2.VideoCapture(0)
a = DetectAPI.DetectAPI(weights='weights/last.pt')
with torch.no_grad():
while True:
rec, img = cap.read()
result, names = a.detect([img])
img = result[0][0] # 每一帧图片的处理结果图片
# 每一帧图像的识别结果(可包含多个物体)
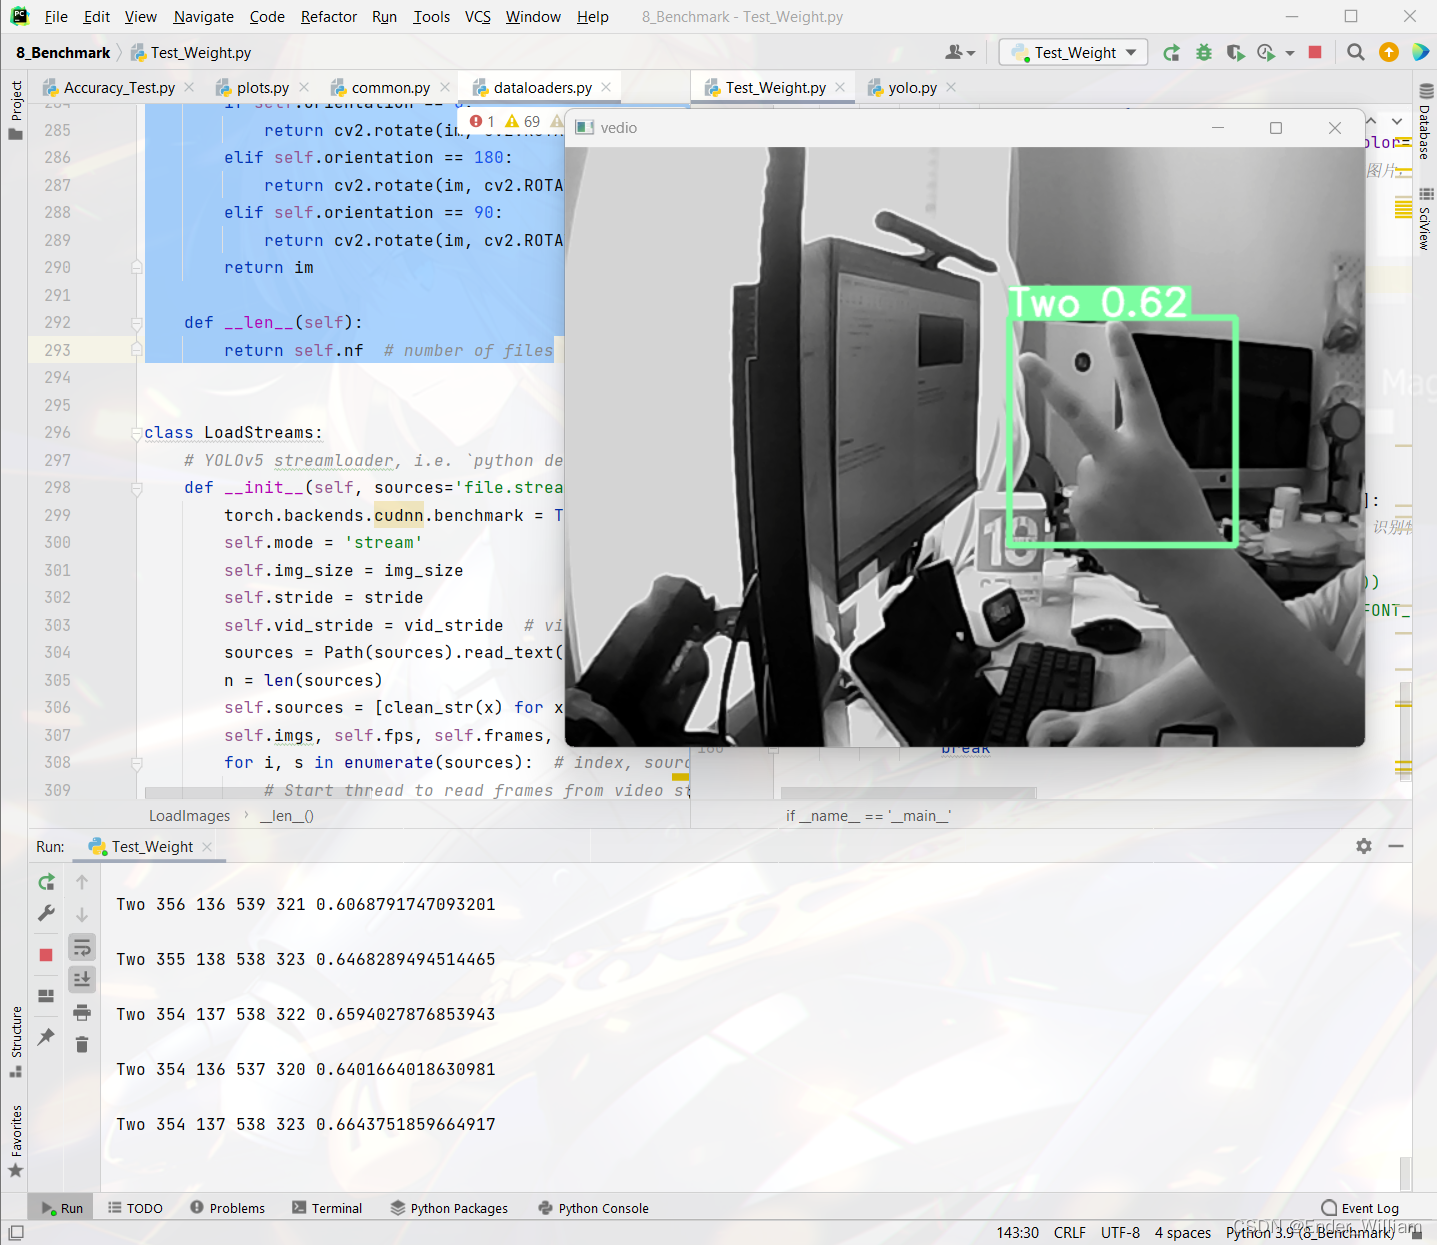
for cls, (x1, y1, x2, y2), conf in result[0][1]:
print(names[cls], x1, y1, x2, y2, conf) # 识别物体种类、左上角x坐标、左上角y轴坐标、右下角x轴坐标、右下角y轴坐标,置信度
'''
cv2.rectangle(img,(x1,y1),(x2,y2),(0,255,0))
cv2.putText(img,names[cls],(x1,y1-20),cv2.FONT_HERSHEY_DUPLEX,1.5,(255,0,0))'''
print() # 将每一帧的结果输出分开
cv2.imshow("video", img)
if cv2.waitKey(1) == ord('q'):
break
具体的下载方式与安装方式见我的这篇博客 封装 YoloV5 detect.py 成 Python 库以供 python 程序使用
我个人认为那样安装与使用起来更为地灵活,推荐大家去看看!
本程序的修改参考了以下的资料,在此为前人做出的努力与贡献表示感谢!
https://github.com/ultralytics/yolov5/releases/tag/v7.0
https://blog.csdn.net/weixin_51331359/article/details/126012620
https://blog.csdn.net/CharmsLUO/article/details/123422822
我需要在客户计算机上运行Ruby应用程序。通常需要几天才能完成(复制大备份文件)。问题是如果启用sleep,它会中断应用程序。否则,计算机将持续运行数周,直到我下次访问为止。有什么方法可以防止执行期间休眠并让Windows在执行后休眠吗?欢迎任何疯狂的想法;-) 最佳答案 Here建议使用SetThreadExecutionStateWinAPI函数,使应用程序能够通知系统它正在使用中,从而防止系统在应用程序运行时进入休眠状态或关闭显示。像这样的东西:require'Win32API'ES_AWAYMODE_REQUIRED=0x0
关闭。这个问题是opinion-based.它目前不接受答案。想要改进这个问题?更新问题,以便editingthispost可以用事实和引用来回答它.关闭4年前。Improvethisquestion我想在固定时间创建一系列低音和高音调的哔哔声。例如:在150毫秒时发出高音调的蜂鸣声在151毫秒时发出低音调的蜂鸣声200毫秒时发出低音调的蜂鸣声250毫秒的高音调蜂鸣声有没有办法在Ruby或Python中做到这一点?我真的不在乎输出编码是什么(.wav、.mp3、.ogg等等),但我确实想创建一个输出文件。
Rackup通过Rack的默认处理程序成功运行任何Rack应用程序。例如:classRackAppdefcall(environment)['200',{'Content-Type'=>'text/html'},["Helloworld"]]endendrunRackApp.new但是当最后一行更改为使用Rack的内置CGI处理程序时,rackup给出“NoMethodErrorat/undefinedmethod`call'fornil:NilClass”:Rack::Handler::CGI.runRackApp.newRack的其他内置处理程序也提出了同样的反对意见。例如Rack
我想用ruby编写一个小的命令行实用程序并将其作为gem分发。我知道安装后,Guard、Sass和Thor等某些gem可以从命令行自行运行。为了让gem像二进制文件一样可用,我需要在我的gemspec中指定什么。 最佳答案 Gem::Specification.newdo|s|...s.executable='name_of_executable'...endhttp://docs.rubygems.org/read/chapter/20 关于ruby-在Ruby中编写命令行实用程序
我构建了两个需要相互通信和发送文件的Rails应用程序。例如,一个Rails应用程序会发送请求以查看其他应用程序数据库中的表。然后另一个应用程序将呈现该表的json并将其发回。我还希望一个应用程序将存储在其公共(public)目录中的文本文件发送到另一个应用程序的公共(public)目录。我从来没有做过这样的事情,所以我什至不知道从哪里开始。任何帮助,将不胜感激。谢谢! 最佳答案 无论Rails是什么,几乎所有Web应用程序都有您的要求,大多数现代Web应用程序都需要相互通信。但是有一个小小的理解需要你坚持下去,网站不应直接访问彼此
我尝试运行2.x应用程序。我使用rvm并为此应用程序设置其他版本的ruby:$rvmuseree-1.8.7-head我尝试运行服务器,然后出现很多错误:$script/serverNOTE:Gem.source_indexisdeprecated,useSpecification.Itwillberemovedonorafter2011-11-01.Gem.source_indexcalledfrom/Users/serg/rails_projects_terminal/work_proj/spohelp/config/../vendor/rails/railties/lib/r
刚入门rails,开始慢慢理解。有人可以解释或给我一些关于在application_controller中编码的好处或时间和原因的想法吗?有哪些用例。您如何为Rails应用程序使用应用程序Controller?我不想在那里放太多代码,因为据我了解,每个请求都会调用此Controller。这是真的? 最佳答案 ApplicationController实际上是您应用程序中的每个其他Controller都将从中继承的类(尽管这不是强制性的)。我同意不要用太多代码弄乱它并保持干净整洁的态度,尽管在某些情况下ApplicationContr
我是一个Rails初学者,但我想从我的RailsView(html.haml文件)中查看Ruby变量的内容。我试图在ruby中打印出变量(认为它会在终端中出现),但没有得到任何结果。有什么建议吗?我知道Rails调试器,但更喜欢使用inspect来打印我的变量。 最佳答案 您可以在View中使用puts方法将信息输出到服务器控制台。您应该能够在View中的任何位置使用Haml执行以下操作:-puts@my_variable.inspect 关于ruby-on-rails-如何在我的R
这个问题在这里已经有了答案:关闭10年前。PossibleDuplicate:Pythonconditionalassignmentoperator对于这样一个简单的问题表示歉意,但是谷歌搜索||=并不是很有帮助;)Python中是否有与Ruby和Perl中的||=语句等效的语句?例如:foo="hey"foo||="what"#assignfooifit'sundefined#fooisstill"hey"bar||="yeah"#baris"yeah"另外,类似这样的东西的通用术语是什么?条件分配是我的第一个猜测,但Wikipediapage跟我想的不太一样。
如何检查Ruby文件是否是通过“require”或“load”导入的,而不是简单地从命令行执行的?例如:foo.rb的内容:puts"Hello"bar.rb的内容require'foo'输出:$./foo.rbHello$./bar.rbHello基本上,我想调用bar.rb以不执行puts调用。 最佳答案 将foo.rb改为:if__FILE__==$0puts"Hello"end检查__FILE__-当前ruby文件的名称-与$0-正在运行的脚本的名称。 关于ruby-检查是否