
入职的第一个需求是跟着一位前端大佬一起完成的一个活动项目。
由于是一起开发,当然不会放过阅读大佬的代码的机会。
因为我的页面中需要使用到倒计时功能,发现大佬的已经写了个现成的倒计时组件,于是直接就拿过来用了。
传个参数就实现了功能的感觉真是太棒了。项目完成后,就膜拜了一下大佬的倒计时组件的代码。真是让我学到了不少。列举如下:
1.计时器为什么要用setTimeout而不用setInterval
2.为什么不直接将剩余时间-1。
3.如何将所需要的时间返回出去(有可能我只需要分钟和秒数,那就只返回分钟和秒数,也有可能我全都要)。
4.不确定接口返回的是剩余时间还是截止日期,该怎么同时兼容这两种情况。
5.不确定接口返回的时间是秒还是毫秒单位。
好了,你可能不太理解这些问题,但是没关系,看完下面的解释,相信你会豁然开朗。
<template>
  <div class="_base-count-down">
  </div>
</template>
<script>

export default {
  data: () => ({

  }),
  props: {

  },
};
</script>
<style lang='scss' scoped>

</style>
接下来,假设接口获得的是一个剩余时间。
将剩余时间time传入这个倒计时组件,由于time可能是秒为单位的,也有可能是毫秒为单位的,所以我们需要在传入time的是有也传入一个isMilliSecond来告诉倒计时组件这个time是毫秒还是秒为单位的。如下代码中的props所示。
<template>
  <div class="_base-count-down">
  </div>
</template>
<script>

export default {
  data: () => ({
  }),
  props: {
    time: {
      type: [Number, String],
      default: 0
    },
    isMilliSecond: {
      type: Boolean,
      default: false
    }
  },
  computed: {
    duration() {
      const time = this.isMiniSecond ? Math.round(+this.time / 1000) : Math.round(+this.time);
      return time;
    }
  },
};
</script>
<style lang='scss' scoped>

</style>
computed中的duration是将time进行转化的结果,不管time是毫秒还是秒,都转化为秒 不知道你注意到了没有:+this.time。为什么要在前面加个‘+’号。这点很值得我们学习,因为接口返回的一串数字有时候是字符串的形式,有时候是数字的形式(不能过分相信后端同学,必须自己做好防范)。所以通过前面加个‘+’号 通通转化为数字。现在的duration就是转化后的time啦!
我们获得duration之后就可以开始倒计时了
<template>
  <div class="_base-count-down">
  </div>
</template>
<script>

export default {
  data: () => ({
  }),
  props: {
    time: {
      type: [Number, String],
      default: 0
    },
    isMilliSecond: {
      type: Boolean,
      default: false
    }
  },
  computed: {
    duration() {
      const time = this.isMiniSecond ? Math.round(+this.time / 1000) : Math.round(+this.time);
      return time;
    }
  },
  // 新增代码:
  mounted() {
    this.countDown();
  },
  methods: {
    countDown() {
      this.getTime(this.duration);
    },
  }
};
</script>
<style lang='scss' scoped>

</style>
在这里创建了一个countDown方法,表示开始倒计时的意思,已进入页面就开始执行countdown方法。
countDown方法调用了getTime方法,getTime需要传入duration这个参数,也就是我们获得的剩余时间。
现在来实现一下这个方法。
<template>
  <div class="_base-count-down">
    还剩{{days}}天{{hours}}:{{mins}}:{{seconds}}
  </div>
</template>
<script>

export default {
  data: () => ({
    days: '0',
    hours: '00',
    mins: '00',
    seconds: '00',
    timer: null,
  }),
  props: {
    time: {
      type: [Number, String],
      default: 0
    },
    isMilliSecond: {
      type: Boolean,
      default: false
    }
  },
  computed: {
    duration() {
      const time = this.isMiniSecond ? Math.round(+this.time / 1000) : Math.round(+this.time);
      return time;
    }
  },
  mounted() {
    this.countDown();
  },
  methods: {
    countDown() {
      this.getTime(this.duration);
    },
    // 新增代码:
    getTime(duration) {
      this.timer && clearTimeout(this.timer);
      if (duration < 0) {
        return;
      }
      const { dd, hh, mm, ss } = this.durationFormatter(duration);
      this.days = dd || 0;
      this.hours = hh || 0;
      this.mins = mm || 0;
      this.seconds = ss || 0;
      this.timer = setTimeout(() => {
        this.getTime(duration - 1);
      }, 1000);
    }
  }
};
</script>
<style lang='scss' scoped>

</style>
可以看到,getTime的目的就是获得 days,hours,mins,seconds,然后显示到html上,并且通过定时器实时来刷新days,hours,mins,seconds这个几个值。从而实现了倒计时。很简单,有木有?
durationFormatter是一个将duration转化成天数,小时,分钟,秒数的方法,很简单,可以看下它的具体实现。
durationFormatter(time) {
  if (!time) return { ss: 0 };
  let t = time;
  const ss = t % 60;
  t = (t - ss) / 60;
  if (t < 1) return { ss };
  const mm = t % 60;
  t = (t - mm) / 60;
  if (t < 1) return { mm, ss };
  const hh = t % 24;
  t = (t - hh) / 24;
  if (t < 1) return { hh, mm, ss };
  const dd = t;
  return { dd, hh, mm, ss };
},
这里用setInerval不是更方便吗?
setTimeout(function(){··· }, n); // n毫秒后执行function
setInterval(function(){··· }, n); // 每隔n毫秒执行一次function
可以看看setInterval有什么缺点:
再次强调,定时器指定的时间间隔,表示的是何时将定时器的代码添加到消息队列,而不是何时执行代码。所以真正何时执行代码的时间是不能保证的,取决于何时被主线程的事件循环取到,并执行。
setInterval(function, N)
//即:每隔N秒把function事件推到消息队列中
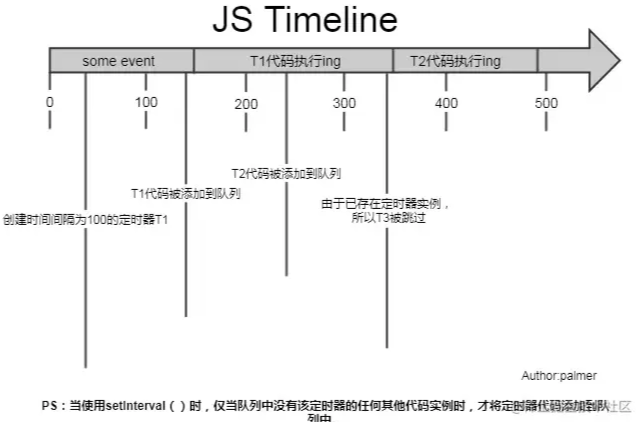
上图可见,setInterval每隔100ms往队列中添加一个事件;100ms后,添加T1定时器代码至队列中,主线程中还有任务在执行,所以等待,some event执行结束后执行T1定时器代码;又过了100ms,T2定时器被添加到队列中,主线程还在执行T1代码,所以等待;又过了100ms,理论上又要往队列里推一个定时器代码,但由于此时T2还在队列中,所以T3不会被添加,结果就是此时被跳过;这里我们可以看到,T1定时器执行结束后马上执行了T2代码,所以并没有达到定时器的效果。
综上所述,setInterval有两个缺点:
1.使用setInterval时,某些间隔会被跳过;
2.可能多个定时器会连续执行;
可以这么理解:每个setTimeout产生的任务会直接push到任务队列中;而setInterval在每次把任务push到任务队列前,都要进行一下判断(看上次的任务是否仍在队列中)。
因而我们一般用setTimeout模拟setInterval,来规避掉上面的缺点。
第二问:为什么要有this.timer && clearTimeout(this.timer);这一句?
假设一个场景:
如图所示,在倒计时的父组件中,有两个按钮,点击活动一就会传入活动一的剩余时间,点击活动二,就会传入活动二的时间。
如果此时倒计时组件正在做活动一的倒计时,然后点击活动二,就要会马上传入新的time,这个时候就需要重新计时。当然,这里并不会重新计时,因为组件的mounted只会执行一次。也就是说this.countDown();只会执行一次,也就是说this.getTime(this.duration);只会执行一次,因此duration还是活动一的时间,怎么办呢?watch派上用场了。
我们来监听duration,如果发现duration变化,说明新的时间time传入组件,这时就要重新调用this.countDown()。
代码如下:
<template>
  <div class="_base-count-down">
    还剩{{day}}天{{hours}}:{{mins}}:{{seconds}}
  </div>
</template>
<script>

export default {
  data: () => ({
    days: '0',
    hours: '00',
    mins: '00',
    seconds: '00',
    timer: null,
  }),
  props: {
    time: {
      type: [Number, String],
      default: 0
    },
    isMilliSecond: {
      type: Boolean,
      default: false
    }
  },
  computed: {
    duration() {
      const time = this.isMiniSecond ? Math.round(+this.time / 1000) : Math.round(+this.time);
      return time;
    }
  },
  mounted() {
    this.countDown();
  },
  // 新增代码:
  watch: {
    duration() {
      this.countDown();
    }
  },
  methods: {
    countDown() {
      this.getTime(this.duration);
    },
    durationFormatter(){...}
    getTime(duration) {
      this.timer && clearTimeout(this.timer);
      if (duration < 0) {
        return;
      }
      const { dd, hh, mm, ss } = this.durationFormatter(duration);
      this.days = dd || 0;
      this.hours = hh || 0;
      this.mins = mm || 0;
      this.seconds = ss || 0;
      this.timer = setTimeout(() => {
        this.getTime(duration - 1);
      }, 1000);
    }
  }
};
</script>
<style lang='scss' scoped>

</style>
好了,但是并没有解释上面提出的那个问题:为什么要有this.timer && clearTimeout(this.timer);这一句?
这样,假设现在页面显示的是活动一的时间,这时,执行到setTimeout,在一秒后就会把setTimeout里的回调函数放到任务队列中,注意是一秒后哦!这时,然而,在这一秒的开头,我们点击了活动二按钮,这时候的活动二的时间就会传入倒计时组件中,然后触发countDown(),也就调用this.getTime(this.duration);,然后执行到setTimeout,也会一秒后把回调函数放到任务队列中。
这时,任务队列中就会有两个setTimeout的回调函数了。等待一秒过去,两个回调函数相继执行,我们就会看到页面上的时间一下子背减了2,实际上是很快速地进行了两遍减1的操作。
这就是为什么要添加上this.timer && clearTimeout(this.timer);这一句的原因了。就是要把上一个setTimeout清除掉。
当你认为这是一个完美的组件的时候,你想把这个组件用到项目上,假设你也确实用了,而且还上线了,确发现出现了个大问题:当页面打开的时候,倒计时开始了,时间是 还剩1天12:25:25,然后有人给你发微信,你马上切换到微信,回复消息后切回浏览器,发现倒计时时间却还是还剩1天12:25:25。你慌了:你写的代码出现bug了!
这是怎么回事?
出于节能的考虑, 部分浏览器在进入后台时(或者失去焦点时), 会将 setTimeout 等定时任务暂停 待用户回到浏览器时, 才会重新激活定时任务
说是暂停, 其实应该说是延迟, 1s 的任务延迟到 2s, 2s 的延迟到 5s, 实际情况因浏览器而异。
原来如此,看来不能每次都只是减1这么简单了(毕竟你把浏览器切到后台之后setTimeout就冷却了,等几秒后切回,然后执行setTimeout,只是减了一秒而已)。
所以我们需要改写一下getTime方法。
<template>
  <div class="_base-count-down">
    还剩{{day}}天{{hours}}:{{mins}}:{{seconds}}
  </div>
</template>
<script>

export default {
  data: () => ({
    days: '0',
    hours: '00',
    mins: '00',
    seconds: '00',
    timer: null,
    curTime: 0,// 新增代码:
  }),
  props: {
    time: {
      type: [Number, String],
      default: 0
    },
    isMilliSecond: {
      type: Boolean,
      default: false
    }
  },
  computed: {
    duration() {
      const time = this.isMiniSecond ? Math.round(+this.time / 1000) : Math.round(+this.time);
      return time;
    }
  },
  mounted() {
    this.countDown();
  },

  watch: {
    duration() {
      this.countDown();
    }
  },
  methods: {
    countDown() {
      // 新增代码:
      this.curTime = Date.now();
      this.getTime(this.duration);
    },
    durationFormatter(){...}
    getTime(duration) {
      this.timer && clearTimeout(this.timer);
      if (duration < 0) {
        return;
      }
      const { dd, hh, mm, ss } = this.durationFormatter(duration);
      this.days = dd || 0;
      this.hours = hh || 0;
      this.mins = mm || 0;
      this.seconds = ss || 0;
      this.timer = setTimeout(() => {
        // 新增代码:
        const now = Date.now();
        const diffTime = Math.floor((now - this.curTime) / 1000);
        this.curTime = now;
        this.getTime(duration - diffTime);
      }, 1000);
    }
  }
};
</script>
<style lang='scss' scoped>

</style>
可以看到,我们在三个位置添加了新的代码。
首先在data了添加了curTime这个变量,然后在执行countDown的时候给curTime赋值Date.now(),也就是当前的时刻,也就是显示在页面上的那个时刻。
然后看修改的第三处代码。可以看到是将-1改成了-diffTime。
now 是 setTimeout的回调函数执行的时候的那个时刻。
因而 diffTime 则 表示 当前这个setTimeout的回调函数执行的时刻距离上 页面上的剩余时间上一次变化的时间段。其实也就是 当前这个setTimeout的回调函数执行的时刻距离上 一个setTimeout的回调函数执行的时刻时间段。
可能你还是不太能理解diffTime。举个例子:
你打开了这个倒计时页面,于是执行了countDown,也就是说要执行getTime这个方法了。也就是会马上执行下列的代码。
this.days = dd || 0;
this.hours = hh || 0;
this.mins = mm || 0;
this.seconds = ss || 0;
执行完这些代码页面上就会出现剩余时间。
而this.curTime = Date.now(); 就记录下了此刻的时间点。
然后一秒后执行setTimeout里的回调函数:
const now = Date.now(); 记录当前这个setTimeout的回调函数执行的时间点。
const diffTime = Math.floor((now - this.curTime) / 1000); 记录当前这个setTimeout的回调函数执行的时间点距离页面上开始 渲染 剩余时间的 这一段时间。其实此时的diffTime就是=1。
然后this.curTime = now; 将curTime的值变成当前这个setTimeout的回调函数执行的时间点。
this.getTime(duration - diffTime); 其实就是this.getTime(duration - 1);
然后又执行getTime,就会重新执行下面的代码,有渲染了新的剩余时间。
this.days = dd || 0;
this.hours = hh || 0;
this.mins = mm || 0;
this.seconds = ss || 0;
然后一秒后又要执行setTmieout的回调函数,在这一秒还没结束的时候,我们将浏览器切到后台,此时setTimeout冷却了。等5秒后再切回。于是setTmieout的回调函数才得以执行。
这时const now = Date.now(); 记录当前这个setTimeout的回调函数执行的时间点。
而curTime是上一个setTimeout的回调函数执行的时间。
所以const diffTime = Math.floor((now - this.curTime) / 1000);实际上,diffTime的值就是5秒。
因而this.getTime(duration - diffTime); 其实就是this.getTime(duration - 5);
这样就完美解决了因为浏览器切到后台,导致剩余时间不变的问题。
之前是只能传入剩余时间的,现在希望也支持传入到期时间。
只需要改动一下duration就好了。
  computed: {
    duration() {
      if (this.end) {
        let end = String(this.end).length >= 13 ? +this.end : +this.end * 1000;
        end -= Date.now();
        return end;
      }
      const time = this.isMiniSecond ? Math.round(+this.time / 1000) : Math.round(+this.time);
      return time;
    }
  },
判断传入的end的长度是否大于13来判断是秒还是毫秒。轻松!
只需要改动一下html:
<template>
  <div class="_base-count-down no-rtl">
    <div class="content">
      <slot v-bind="{
        d: days, h: hours, m: mins, s: seconds,
        hh: `00${hours}`.slice(-2),
        mm: `00${mins}`.slice(-2),
        ss: `00${seconds}`.slice(-2),
      }"></slot>
    </div>
  </div>
</template>
很巧妙有没有,只需要用插槽,就把倒计时组件,也就是把子组件的值传递给父组件了。
看看父组件是怎么使用这个组件的。
<base-counter v-slot="timeObj" :time="countDown">
  <div class="count-down">
    <div class="icon"></div>
    {{timeObj.d}}天{{timeObj.hh}}小时{{timeObj.mm}}分钟{{timeObj.ss}}秒
  </div>
</base-counter>
看,如此巧妙又简单。
发现00${hours}.slice(-2) 这种写法也很值得学习。以前在获得到分钟的时候,要手动判断获得的分钟是两位数还是一位数,如果是一位数的话就要在前面手动补上0。就像下面的代码:
var StartMinute = startDate.getMinutes().toString().length >= 2 ? startDate.getMinutes() : '0' + startDate.getHours();
而00${hours}.slice(-2) 则不用判断,先补上0再说,然后再从后面往前截取两位。
到此。
一个完美的倒计时组件就完成了。
1.明白了setInterval的缺点以及用setTimeout代替setInterval。
2.学到了“+”,操作,不管三七二十一,将接口得到的长串数字转化为数字保平安。
3.利用clearTimeout来清除掉之前的计时器,以防止造成影响。
4.学会使用v-slot来子传父传值
5.学会一个倒计时组件,为了以后方便cv操作。把组件完整代码贴上:
<template>
  <div class="time-box">
    还剩{{days}}天{{`00${hours}`.slice(-2)}}:{{`00${mins}`.slice(-2)}}:{{`00${seconds}`.slice(-2)}}
  </div>
</template>
<script>

export default {
  name: 'compTime',
  data: () => ({
    days: '0',
    hours: '00',
    mins: '00',
    seconds: '00',
    timer: null,
    curTime: 0,
  }),
  props: {
    time:{
      type:[Number,String],
      default:0
    },
    refreshCounter:{
      type:[Number,String],
      default:0
    },
    end:{
      type:[Number,String],
      default:0
    },
    isMilliSecond:{
      type:Boolean,
      default: false
    }
  },
  //传入数据处理
  computed:{
    duration(){
      if(this.end){

        let end = String(this.end).length >= 13 ? +this.end : +this.end * 1000
        end -= Date.now()
        return (end / 1000).toFixed(0)
      }
      const time = this.isMilliSecond ? Math.round(+this.time/1000):Math.round(+this.time)
      return time
    }
  },
  mounted() {
    this.countDown()
  },
  watch:{
    duration(){
      this.countDown()
    },
    refreshCounter(){
      this.countDown()
    }
  },
  methods:{
    //总启动
    countDown(){
      this.curTime = Date.now()
      this.getTime(this.duration)
    },
    //定时器方法,定时获取时间
    getTime(duration){
      this.timer && clearTimeout(this.timer)
      if(duration < 0){
        return
      }
      const { dd,hh,mm,ss } = this.durationForMatter(duration)
      this.days = dd || 0
      this.hours = hh || 0
      this.mins = mm || 0
      this.seconds = ss || 0
      this.timer = setTimeout(()=>{
        const now = Date.now()
        const diffTime = Math.floor((now - this.curTime) / 1000)
        const step = diffTime > 1?diffTime:1
        this.curTime = now
        this.getTime(duration - step)
      },1000)
    },
    durationForMatter(time){
      if(!time) return { ss:0 }
      let t = time
      const ss = t % 60
      t = (t - ss) / 60
      if(t < 1) return { ss }
      const mm = t % 60
      t = (t - mm) / 60
      if(t < 1)return { mm,ss }
      const hh = t % 24
      t = (t - hh) / 24
      if(t< 1)return { hh,mm,ss }
      const dd = t
      return { dd,hh,mm,ss }
    }
  }
};
</script>
<style lang='stylus' scoped>
 .time-box
   width 100%
   line-height 100px
   font-weight bold
   font-size 30px
   text-align center
   background white
</style>

我有一个字符串input="maybe(thisis|thatwas)some((nice|ugly)(day|night)|(strange(weather|time)))"Ruby中解析该字符串的最佳方法是什么?我的意思是脚本应该能够像这样构建句子:maybethisissomeuglynightmaybethatwassomenicenightmaybethiswassomestrangetime等等,你明白了......我应该一个字符一个字符地读取字符串并构建一个带有堆栈的状态机来存储括号值以供以后计算,还是有更好的方法?也许为此目的准备了一个开箱即用的库?
我主要使用Ruby来执行此操作,但到目前为止我的攻击计划如下:使用gemsrdf、rdf-rdfa和rdf-microdata或mida来解析给定任何URI的数据。我认为最好映射到像schema.org这样的统一模式,例如使用这个yaml文件,它试图描述数据词汇表和opengraph到schema.org之间的转换:#SchemaXtoschema.orgconversion#data-vocabularyDV:name:namestreet-address:streetAddressregion:addressRegionlocality:addressLocalityphoto:i
使用带有Rails插件的vim,您可以创建一个迁移文件,然后一次性打开该文件吗?textmate也可以这样吗? 最佳答案 你可以使用rails.vim然后做类似的事情::Rgeneratemigratonadd_foo_to_bar插件将打开迁移生成的文件,这正是您想要的。我不能代表textmate。 关于ruby-使用VimRails,您可以创建一个新的迁移文件并一次性打开它吗?,我们在StackOverflow上找到一个类似的问题: https://sta
我需要从一个View访问多个模型。以前,我的links_controller仅用于提供以不同方式排序的链接资源。现在我想包括一个部分(我假设)显示按分数排序的顶级用户(@users=User.all.sort_by(&:score))我知道我可以将此代码插入每个链接操作并从View访问它,但这似乎不是“ruby方式”,我将需要在不久的将来访问更多模型。这可能会变得很脏,是否有针对这种情况的任何技术?注意事项:我认为我的应用程序正朝着单一格式和动态页面内容的方向发展,本质上是一个典型的网络应用程序。我知道before_filter但考虑到我希望应用程序进入的方向,这似乎很麻烦。最终从任何
我想要做的是有2个不同的Controller,client和test_client。客户端Controller已经构建,我想创建一个test_clientController,我可以使用它来玩弄客户端的UI并根据需要进行调整。我主要是想绕过我在客户端中内置的验证及其对加载数据的管理Controller的依赖。所以我希望test_clientController加载示例数据集,然后呈现客户端Controller的索引View,以便我可以调整客户端UI。就是这样。我在test_clients索引方法中试过这个:classTestClientdefindexrender:template=>
我正在使用ruby1.9解析以下带有MacRoman字符的csv文件#encoding:ISO-8859-1#csv_parse.csvName,main-dialogue"Marceu","Giveittohimóhe,hiswife."我做了以下解析。require'csv'input_string=File.read("../csv_parse.rb").force_encoding("ISO-8859-1").encode("UTF-8")#=>"Name,main-dialogue\r\n\"Marceu\",\"Giveittohim\x97he,hiswife.\"\
如果您尝试在Ruby中的nil对象上调用方法,则会出现NoMethodError异常并显示消息:"undefinedmethod‘...’fornil:NilClass"然而,有一个tryRails中的方法,如果它被发送到一个nil对象,它只返回nil:require'rubygems'require'active_support/all'nil.try(:nonexisting_method)#noNoMethodErrorexceptionanymore那么try如何在内部工作以防止该异常? 最佳答案 像Ruby中的所有其他对象
Sinatra新手;我正在运行一些rspec测试,但在日志中收到了一堆不需要的噪音。如何消除日志中过多的噪音?我仔细检查了环境是否设置为:test,这意味着记录器级别应设置为WARN而不是DEBUG。spec_helper:require"./app"require"sinatra"require"rspec"require"rack/test"require"database_cleaner"require"factory_girl"set:environment,:testFactoryGirl.definition_file_paths=%w{./factories./test/
关闭。这个问题需要detailsorclarity.它目前不接受答案。想改进这个问题吗?通过editingthispost添加细节并澄清问题.关闭8年前。Improvethisquestion为什么SecureRandom.uuid创建一个唯一的字符串?SecureRandom.uuid#=>"35cb4e30-54e1-49f9-b5ce-4134799eb2c0"SecureRandom.uuid方法创建的字符串从不重复?
我有一个正在构建的应用程序,我需要一个模型来创建另一个模型的实例。我希望每辆车都有4个轮胎。汽车模型classCar轮胎模型classTire但是,在make_tires内部有一个错误,如果我为Tire尝试它,则没有用于创建或新建的activerecord方法。当我检查轮胎时,它没有这些方法。我该如何补救?错误是这样的:未定义的方法'create'forActiveRecord::AttributeMethods::Serialization::Tire::Module我测试了两个环境:测试和开发,它们都因相同的错误而失败。 最佳答案