目录
Spring Boot 3已经发布一段时间,网上关于Spring Boot 3的资料不是很多,本着对新技术的热情,学习和研究了大量Spring Boot 3新功能和新特性,感兴趣的同学可以参考Spring官方资料全面详细的新功能/新改进介绍
新特性有很多,本文主要针对OAuth 2.0的集成,如果快速开发自己的认证授权服务、OAuth客户端以及资源服务
| 开发依赖 | 版本 |
|---|---|
| Spring Boot | 3.0.2 |
新建三个服务,分别对应认证授权服务、OAuth客户端以及资源服务
| 服务 | 端口 |
|---|---|
| 认证授权服务 | 8080 |
| OAuth客户端服务 | 8081 |
| 资源服务 | 8082 |
Spring发布了spring-security-oauth2-authorization-server项目,目前最新版是1.0版,pom.xml依赖如下
<dependencies>
    <dependency>
        <groupId>org.springframework.boot</groupId>
        <artifactId>spring-boot-starter-web</artifactId>
    </dependency>
    <dependency>
        <groupId>org.springframework.boot</groupId>
        <artifactId>spring-boot-starter-security</artifactId>
    </dependency>
    <dependency>
        <groupId>org.springframework.security</groupId>
        <artifactId>spring-security-oauth2-authorization-server</artifactId>
        <version>${spring-security-oauth2-authorization-server.version}</version>
    </dependency>
</dependencies>
package com.wen3.oauth.ss.authserver.authconfigure;

import com.nimbusds.jose.jwk.JWKSet;
import com.nimbusds.jose.jwk.RSAKey;
import com.nimbusds.jose.jwk.source.ImmutableJWKSet;
import com.nimbusds.jose.jwk.source.JWKSource;
import com.nimbusds.jose.proc.SecurityContext;
import org.springframework.context.annotation.Bean;
import org.springframework.context.annotation.Configuration;
import org.springframework.core.annotation.Order;
import org.springframework.security.config.Customizer;
import org.springframework.security.config.annotation.web.builders.HttpSecurity;
import org.springframework.security.config.annotation.web.configurers.oauth2.server.resource.OAuth2ResourceServerConfigurer;
import org.springframework.security.core.userdetails.User;
import org.springframework.security.core.userdetails.UserDetails;
import org.springframework.security.core.userdetails.UserDetailsService;
import org.springframework.security.oauth2.core.AuthorizationGrantType;
import org.springframework.security.oauth2.core.ClientAuthenticationMethod;
import org.springframework.security.oauth2.core.oidc.OidcScopes;
import org.springframework.security.oauth2.jwt.JwtDecoder;
import org.springframework.security.oauth2.server.authorization.client.InMemoryRegisteredClientRepository;
import org.springframework.security.oauth2.server.authorization.client.RegisteredClient;
import org.springframework.security.oauth2.server.authorization.client.RegisteredClientRepository;
import org.springframework.security.oauth2.server.authorization.config.annotation.web.configuration.OAuth2AuthorizationServerConfiguration;
import org.springframework.security.oauth2.server.authorization.config.annotation.web.configurers.OAuth2AuthorizationServerConfigurer;
import org.springframework.security.oauth2.server.authorization.settings.AuthorizationServerSettings;
import org.springframework.security.oauth2.server.authorization.settings.ClientSettings;
import org.springframework.security.provisioning.InMemoryUserDetailsManager;
import org.springframework.security.web.SecurityFilterChain;
import org.springframework.security.web.authentication.LoginUrlAuthenticationEntryPoint;
import org.springframework.security.web.util.matcher.AntPathRequestMatcher;

import java.security.KeyPair;
import java.security.KeyPairGenerator;
import java.security.interfaces.RSAPrivateKey;
import java.security.interfaces.RSAPublicKey;
import java.util.UUID;

@Configuration
public class Oauth2ServerAutoConfiguration {

    @Bean
    @Order(1)
    public SecurityFilterChain authorizationServerSecurityFilterChain(HttpSecurity http) throws Exception {
        OAuth2AuthorizationServerConfiguration.applyDefaultSecurity(http);
        http.getConfigurer(OAuth2AuthorizationServerConfigurer.class)
                .oidc(Customizer.withDefaults());	// Enable OpenID Connect 1.0
        http
                // Redirect to the login page when not authenticated from the
                // authorization endpoint
                .exceptionHandling((exceptions) -> exceptions
                        .authenticationEntryPoint(
                                new LoginUrlAuthenticationEntryPoint("/login"))
                )
                // Accept access tokens for User Info and/or Client Registration
                .oauth2ResourceServer(OAuth2ResourceServerConfigurer::jwt);

        return http.build();
    }

    @Bean
    @Order(2)
    public SecurityFilterChain defaultSecurityFilterChain(HttpSecurity http) throws Exception {
        http
                .authorizeHttpRequests((authorize) -> authorize
                        .requestMatchers(new AntPathRequestMatcher("/actuator/**"),
                                new AntPathRequestMatcher("/oauth2/**"),
                                new AntPathRequestMatcher("/**/*.json"),
                                new AntPathRequestMatcher("/**/*.html")).permitAll()
                        .anyRequest().authenticated()
                )
                // Form login handles the redirect to the login page from the
                // authorization server filter chain
                .formLogin(Customizer.withDefaults());

        return http.build();
    }

    @Bean
    public UserDetailsService userDetailsService() {
        UserDetails userDetails = User.withDefaultPasswordEncoder()
                .username("test")
                .password("test")
                .roles("USER")
                .build();

        return new InMemoryUserDetailsManager(userDetails);
    }

    @Bean
    public RegisteredClientRepository registeredClientRepository() {
        RegisteredClient registeredClient = RegisteredClient.withId(UUID.randomUUID().toString())
                .clientId("demo-client-id")
                .clientSecret("{noop}demo-client-secret")
                .clientAuthenticationMethod(ClientAuthenticationMethod.CLIENT_SECRET_BASIC)
                .authorizationGrantType(AuthorizationGrantType.AUTHORIZATION_CODE)
                .authorizationGrantType(AuthorizationGrantType.REFRESH_TOKEN)
                .authorizationGrantType(AuthorizationGrantType.CLIENT_CREDENTIALS)
//                .tokenSettings(TokenSettings.builder().accessTokenFormat(OAuth2TokenFormat.REFERENCE).build())
                .redirectUri("http://127.0.0.1:8081/login/oauth2/code/client-id-1")
                .redirectUri("http://127.0.0.1:8081/login/oauth2/code/client-id-2")
                .scope(OidcScopes.OPENID)
                .scope(OidcScopes.PROFILE)
                .scope("message.read")
                .scope("message.write")
                .scope("user_info")
                .scope("pull_requests")
                // 登录成功后对scope进行确认授权
                .clientSettings(ClientSettings.builder().requireAuthorizationConsent(true).build())
                .build();

        return new InMemoryRegisteredClientRepository(registeredClient);
    }

    @Bean
    public JWKSource<SecurityContext> jwkSource() {
        KeyPair keyPair = generateRsaKey();
        RSAPublicKey publicKey = (RSAPublicKey) keyPair.getPublic();
        RSAPrivateKey privateKey = (RSAPrivateKey) keyPair.getPrivate();
        RSAKey rsaKey = new RSAKey.Builder(publicKey)
                .privateKey(privateKey)
                .keyID(UUID.randomUUID().toString())
                .build();
        JWKSet jwkSet = new JWKSet(rsaKey);
        return new ImmutableJWKSet<>(jwkSet);
    }

    private static KeyPair generateRsaKey() {
        KeyPair keyPair;
        try {
            KeyPairGenerator keyPairGenerator = KeyPairGenerator.getInstance("RSA");
            keyPairGenerator.initialize(2048);
            keyPair = keyPairGenerator.generateKeyPair();
        }
        catch (Exception ex) {
            throw new IllegalStateException(ex);
        }
        return keyPair;
    }

    @Bean
    public JwtDecoder jwtDecoder(JWKSource<SecurityContext> jwkSource) {
        return OAuth2AuthorizationServerConfiguration.jwtDecoder(jwkSource);
    }

    @Bean
    public AuthorizationServerSettings authorizationServerSettings() {
        return AuthorizationServerSettings.builder().build();
    }
}
@SpringBootApplication
public class OauthServerApplication {

    public static void main(String[] args) {
        SpringApplication.run(OauthServerApplication.class, args);
    }
}
server:
  port: 8080
<dependencies>
    <dependency>
        <groupId>org.springframework.boot</groupId>
        <artifactId>spring-boot-starter-web</artifactId>
    </dependency>
    <dependency>
        <groupId>org.springframework.boot</groupId>
        <artifactId>spring-boot-starter-security</artifactId>
    </dependency>
    <dependency>
        <groupId>org.springframework.boot</groupId>
        <artifactId>spring-boot-starter-oauth2-client</artifactId>
    </dependency>
</dependencies>
package com.wen3.oauth.ss.authclient.autoconfigure;

import org.springframework.context.annotation.Bean;
import org.springframework.context.annotation.Configuration;
import org.springframework.security.config.annotation.web.builders.HttpSecurity;
import org.springframework.security.config.http.SessionCreationPolicy;
import org.springframework.security.web.SecurityFilterChain;

@Configuration
public class Oauth2ClientAutoConfiguration {

    @Bean
    public SecurityFilterChain authorizationClientSecurityFilterChain(HttpSecurity http) throws Exception {
        http
                .authorizeHttpRequests()
                .anyRequest().authenticated()
                .and().logout()
                .and().sessionManagement().sessionCreationPolicy(SessionCreationPolicy.ALWAYS)
                .and().oauth2Client()
                .and().oauth2Login();

        return http.build();
    }
}
package com.wen3.oauth.ss.authclient.controller;

import lombok.extern.slf4j.Slf4j;
import org.springframework.security.core.Authentication;
import org.springframework.security.core.context.SecurityContextHolder;
import org.springframework.web.bind.annotation.RequestMapping;
import org.springframework.web.bind.annotation.RestController;

@Slf4j
@RestController
public class OauthClientDemoController {

    @RequestMapping(path = "/hello")
    public String demo() {
        Authentication authentication = SecurityContextHolder.getContext().getAuthentication();
        log.info("authentication: {}", authentication);

        return "hello";
    }
}
@SpringBootApplication
public class OauthServerApplication {

    public static void main(String[] args) {
        SpringApplication.run(OauthServerApplication.class, args);
    }
}
server:
  port: 8081
  servlet:
    session:
      cookie:
        # 需要更换存放sessionId的cookie名字,否则认证服务和客户端的sessionId会相互覆盖
        name: JSESSIONID-2

spring:
  security:
    oauth2:
      client:
        registration:
          client-id-1:
            provider: demo-client-id
            client-id: demo-client-id
            client-secret: demo-client-secret
            authorization-grant-type: authorization_code
            redirect-uri: '{baseUrl}/{action}/oauth2/code/{registrationId}'
            #            client-authentication-method: POST
            scope: user_info, pull_requests
            client-name: demo-client-id
          client-id-2:
            provider: demo-client-id2
            client-id: demo-client-id
            client-secret: demo-client-secret
            authorization-grant-type: authorization_code
            redirect-uri: '{baseUrl}/{action}/oauth2/code/{registrationId}'
            #            client-authentication-method: POST
            scope: user_info, pull_requests
            client-name: demo-client-id2
        provider:
          demo-client-id:
            authorization-uri: http://127.0.0.1:8080/oauth2/authorize
            token-uri: http://127.0.0.1:8080/oauth2/token
            user-info-uri: http://127.0.0.1:8082/user/info
            user-name-attribute: name
            jwk-set-uri: http://127.0.0.1:8080/oauth2/jwks
          demo-client-id2:
            authorization-uri: http://127.0.0.1:8080/oauth2/authorize
            token-uri: http://127.0.0.1:8080/oauth2/token
            user-info-uri: http://127.0.0.1:8082/user/info
            user-name-attribute: name
            jwk-set-uri: http://127.0.0.1:8080/oauth2/jwks
<dependencies>
    <dependency>
        <groupId>org.springframework.boot</groupId>
        <artifactId>spring-boot-starter-web</artifactId>
    </dependency>
    <dependency>
        <groupId>org.springframework.boot</groupId>
        <artifactId>spring-boot-starter-security</artifactId>
    </dependency>
    <dependency>
        <groupId>org.springframework.boot</groupId>
        <artifactId>spring-boot-starter-oauth2-resource-server</artifactId>
    </dependency>
</dependencies>
package com.wen3.oauth.ss.resourceserver.autoconfigure;

import org.springframework.context.annotation.Bean;
import org.springframework.context.annotation.Configuration;
import org.springframework.security.config.annotation.web.builders.HttpSecurity;
import org.springframework.security.web.SecurityFilterChain;

@Configuration
public class ResourceServerAutoConfiguration {

    @Bean
    public SecurityFilterChain resourceServerSecurityFilterChain(HttpSecurity http) throws Exception {
        http.authorizeHttpRequests().anyRequest().authenticated().and()
                .oauth2ResourceServer().jwt();

        return http.build();
    }
}
package com.wen3.oauth.ss.resourceserver.controller;

import jakarta.servlet.http.HttpServletRequest;
import jakarta.servlet.http.HttpServletResponse;
import org.springframework.http.MediaType;
import org.springframework.web.bind.annotation.RequestMapping;
import org.springframework.web.bind.annotation.RequestMethod;
import org.springframework.web.bind.annotation.ResponseBody;
import org.springframework.web.bind.annotation.RestController;

import java.util.HashMap;
import java.util.Map;

@RestController
public class UserController {

    @RequestMapping(path = "/user/info", method = {RequestMethod.GET,RequestMethod.POST}, produces = MediaType.APPLICATION_JSON_VALUE)
    @ResponseBody
    public Map<String, Object> getUser(HttpServletRequest request, HttpServletResponse response) {
        Map<String, Object> map = new HashMap<>();
        map.put("name", "xxx");
        return map;
    }
}
package com.wen3.oauth.ss.resourceserver;

import org.springframework.boot.SpringApplication;
import org.springframework.boot.autoconfigure.SpringBootApplication;

@SpringBootApplication
public class ResourceServerApplication {

    public static void main(String[] args) {
        SpringApplication.run(ResourceServerApplication.class, args);
    }
}
server:
  port: 8082

spring:
  security:
    oauth2:
      resourceserver:
        jwt:
          jwk-set-uri: http://127.0.0.1:8080/oauth2/jwks
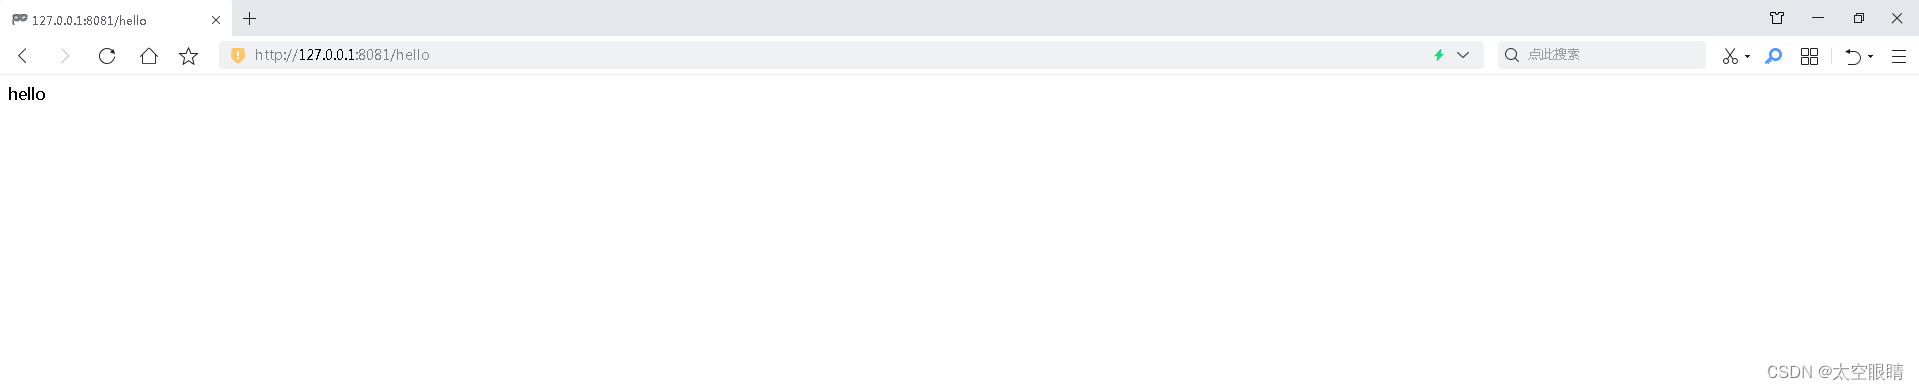
http://127.0.0.1:8081/hello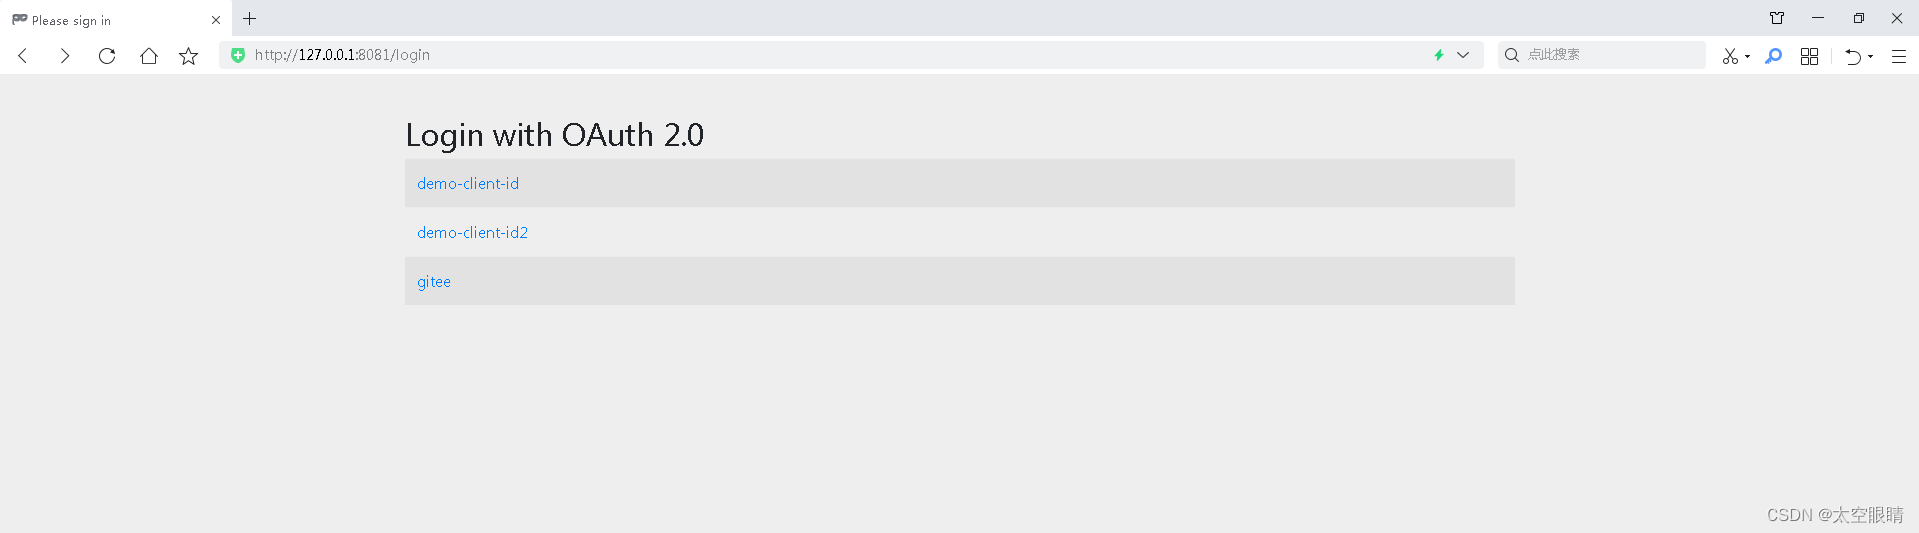
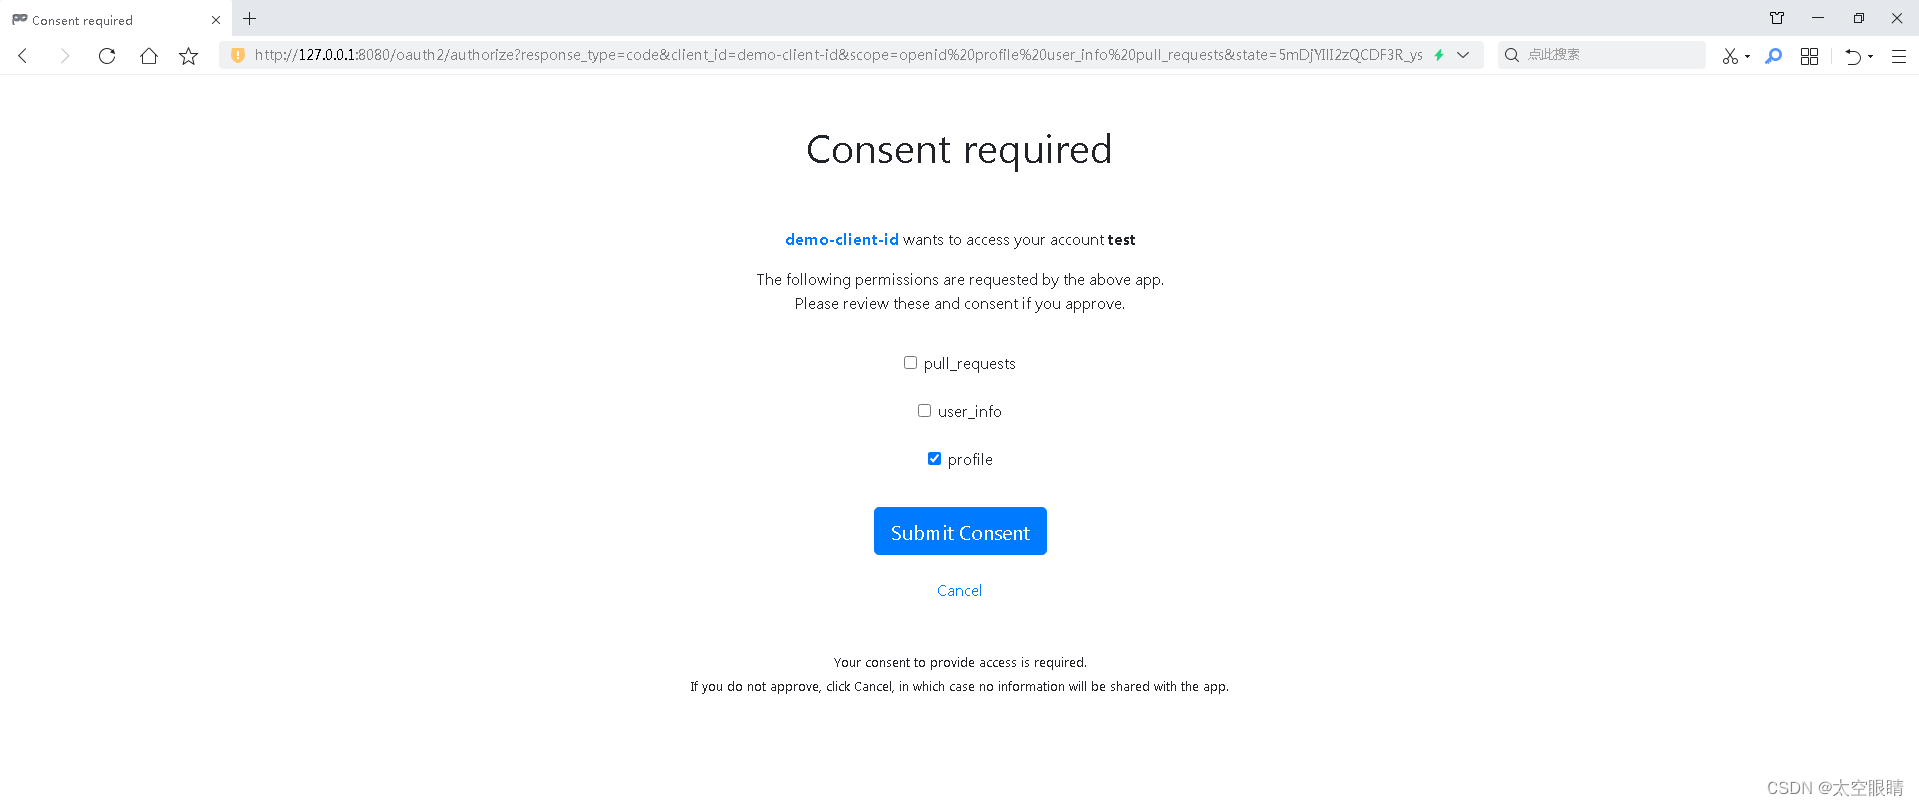
因为配置了多个client,会让用户选择用哪个client进行OAuth登录
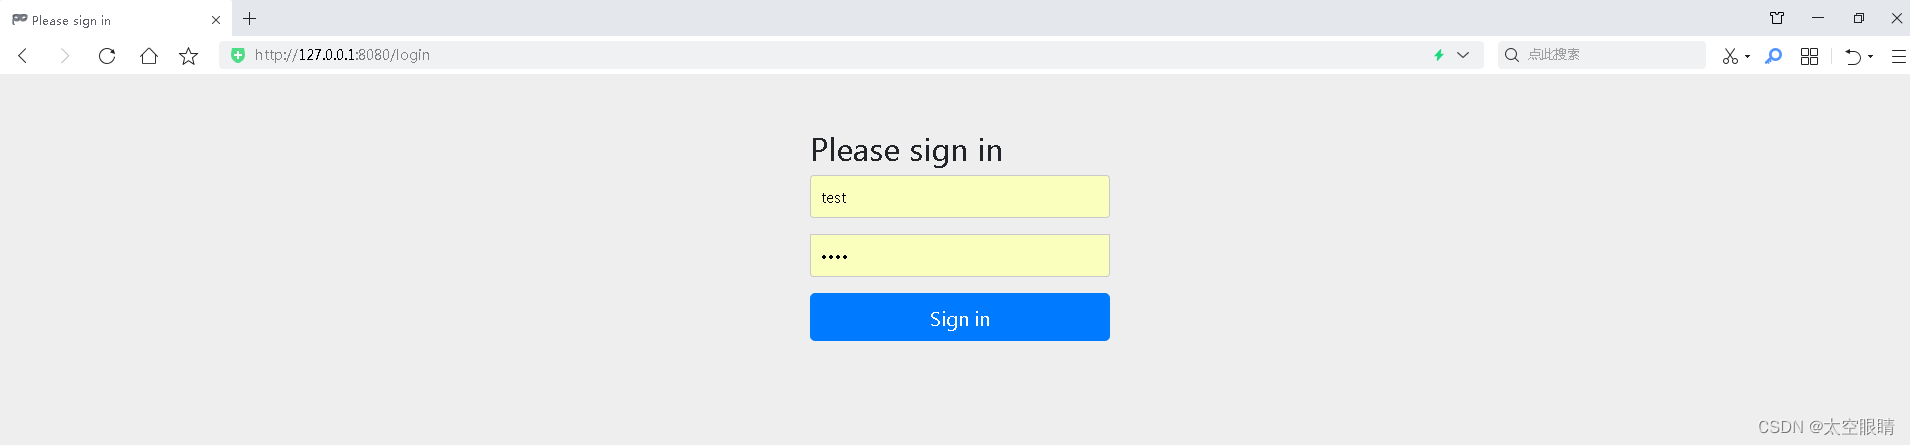
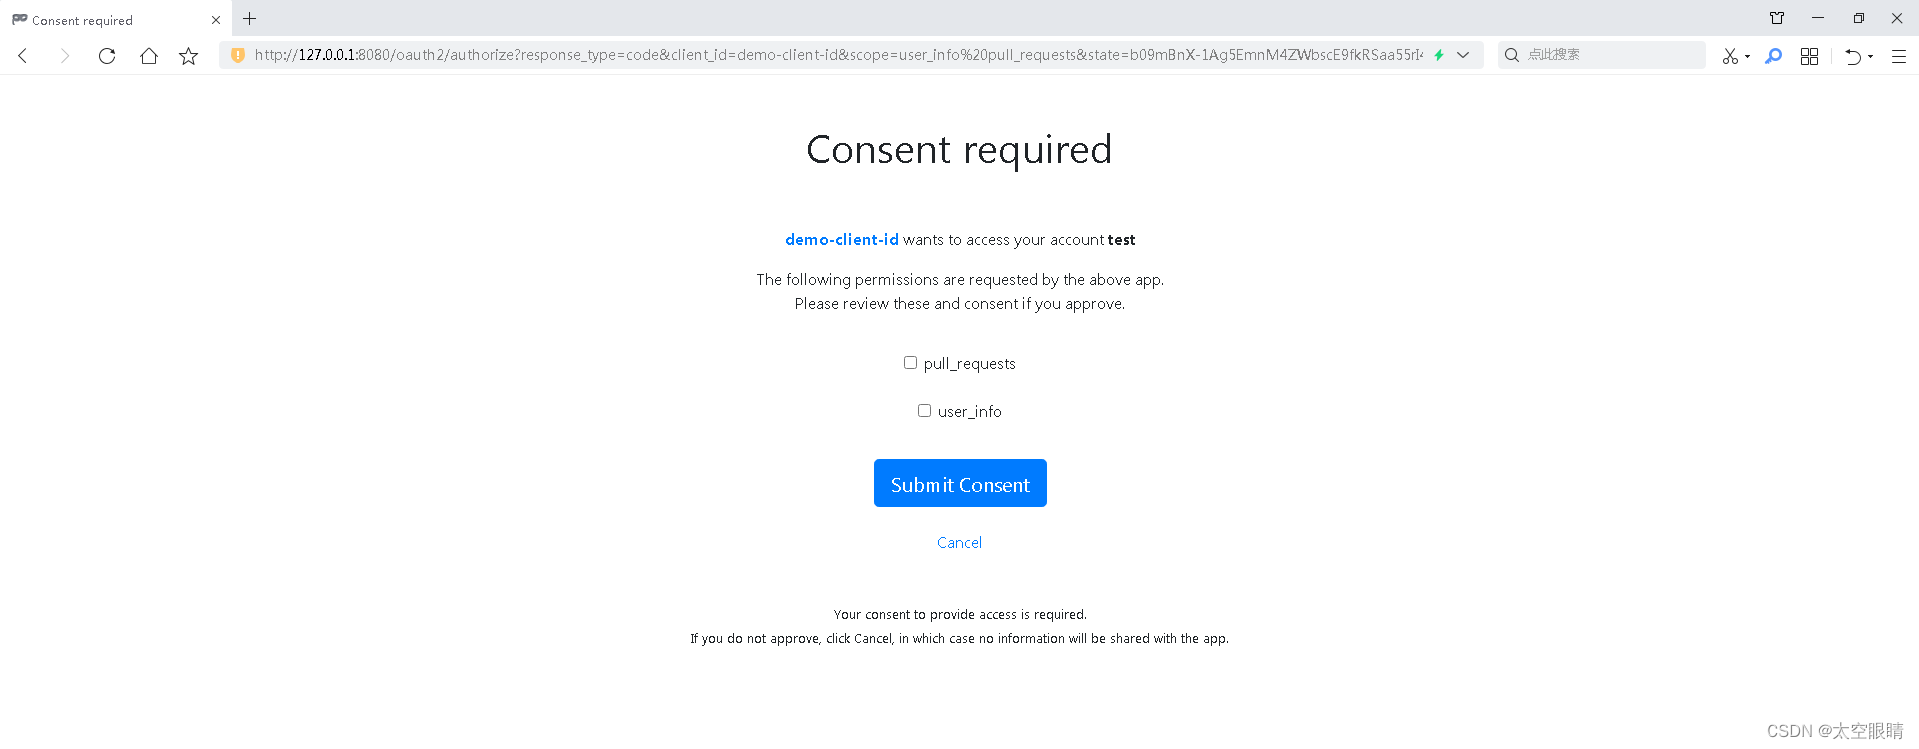
以上所有页面都是Spring默认的,真实业务开发会自定义这些页面
http://127.0.0.1:8080/.well-known/openid-configuration{"issuer":"http://127.0.0.1:8080","authorization_endpoint":"http://127.0.0.1:8080/oauth2/authorize","token_endpoint":"http://127.0.0.1:8080/oauth2/token","token_endpoint_auth_methods_supported":["client_secret_basic","client_secret_post","client_secret_jwt","private_key_jwt"],"jwks_uri":"http://127.0.0.1:8080/oauth2/jwks","userinfo_endpoint":"http://127.0.0.1:8080/userinfo","response_types_supported":["code"],"grant_types_supported":["authorization_code","client_credentials","refresh_token"],"revocation_endpoint":"http://127.0.0.1:8080/oauth2/revoke","revocation_endpoint_auth_methods_supported":["client_secret_basic","client_secret_post","client_secret_jwt","private_key_jwt"],"introspection_endpoint":"http://127.0.0.1:8080/oauth2/introspect","introspection_endpoint_auth_methods_supported":["client_secret_basic","client_secret_post","client_secret_jwt","private_key_jwt"],"subject_types_supported":["public"],"id_token_signing_alg_values_supported":["RS256"],"scopes_supported":["openid"]}
issuer-uri,启动的时候会调用${issuer-uri}/.well-known/openid-configuration获取provider配置信息,如果issuer-uri配置了path也会替换成/.well-known/openid-configuration/.well-known/openid-configuration这个接口获取到的user-info-uri地址是http://127.0.0.1:8080/userinfo 所以会从授权服务获取用户信息/userinfo接口正常返回,则需要在配置registration时,在scope增加openid,同时scope还需要在profile、email、address、phone中增加至少一个,修改后的yml配置如下server:
port: 8081
servlet:
session:
cookie:
# 需要更换存放sessionId的cookie名字,否则认证服务和客户端的sessionId会相互覆盖
name: JSESSIONID-2
spring:
security:
oauth2:
client:
registration:
client-id-1:
provider: demo-client-id
client-id: demo-client-id
client-secret: demo-client-secret
authorization-grant-type: authorization_code
redirect-uri: '{baseUrl}/{action}/oauth2/code/{registrationId}'
# client-authentication-method: POST
scope: openid, profile, user_info, pull_requests
client-name: demo-client-id
client-id-2:
provider: demo-client-id2
client-id: demo-client-id
client-secret: demo-client-secret
authorization-grant-type: authorization_code
redirect-uri: '{baseUrl}/{action}/oauth2/code/{registrationId}'
# client-authentication-method: POST
scope: openid, profile, user_info, pull_requests
client-name: demo-client-id2
provider:
demo-client-id:
issuer-uri: http://127.0.0.1:8080
demo-client-id2:
issuer-uri: http://127.0.0.1:8080
本人经过研读SpringBoot3相关源码,基本上把所有功能都体验了一遍,这篇文章主要是针对最新版的SpringBoot集成OAuth功能进行演示,背后的原理,大家有疑问的可以留言交流。
我正在尝试使用ruby和Savon来使用网络服务。测试服务为http://www.webservicex.net/WS/WSDetails.aspx?WSID=9&CATID=2require'rubygems'require'savon'client=Savon::Client.new"http://www.webservicex.net/stockquote.asmx?WSDL"client.get_quotedo|soap|soap.body={:symbol=>"AAPL"}end返回SOAP异常。检查soap信封,在我看来soap请求没有正确的命名空间。任何人都可以建议我
我想安装一个带有一些身份验证的私有(private)Rubygem服务器。我希望能够使用公共(public)Ubuntu服务器托管内部gem。我读到了http://docs.rubygems.org/read/chapter/18.但是那个没有身份验证-如我所见。然后我读到了https://github.com/cwninja/geminabox.但是当我使用基本身份验证(他们在他们的Wiki中有)时,它会提示从我的服务器获取源。所以。如何制作带有身份验证的私有(private)Rubygem服务器?这是不可能的吗?谢谢。编辑:Geminabox问题。我尝试“捆绑”以安装新的gem..
最近,当我启动我的Rails服务器时,我收到了一长串警告。虽然它不影响我的应用程序,但我想知道如何解决这些警告。我的估计是imagemagick以某种方式被调用了两次?当我在警告前后检查我的git日志时。我想知道如何解决这个问题。-bcrypt-ruby(3.1.2)-better_errors(1.0.1)+bcrypt(3.1.7)+bcrypt-ruby(3.1.5)-bcrypt(>=3.1.3)+better_errors(1.1.0)bcrypt和imagemagick有关系吗?/Users/rbchris/.rbenv/versions/2.0.0-p247/lib/ru
在Rails4.0.2中,我使用s3_direct_upload和aws-sdkgems直接为s3存储桶上传文件。在开发环境中它工作正常,但在生产环境中它会抛出如下错误,ActionView::Template::Error(noimplicitconversionofnilintoString)在View中,create_cv_url,:id=>"s3_uploader",:key=>"cv_uploads/{unique_id}/${filename}",:key_starts_with=>"cv_uploads/",:callback_param=>"cv[direct_uplo
当我尝试安装Ruby时遇到此错误。我试过查看this和this但无济于事➜~brewinstallrubyWarning:YouareusingOSX10.12.Wedonotprovidesupportforthispre-releaseversion.Youmayencounterbuildfailuresorotherbreakages.Pleasecreatepull-requestsinsteadoffilingissues.==>Installingdependenciesforruby:readline,libyaml,makedepend==>Installingrub
我想在Ruby中创建一个用于开发目的的极其简单的Web服务器(不,不想使用现成的解决方案)。代码如下:#!/usr/bin/rubyrequire'socket'server=TCPServer.new('127.0.0.1',8080)whileconnection=server.acceptheaders=[]length=0whileline=connection.getsheaders想法是从命令行运行这个脚本,提供另一个脚本,它将在其标准输入上获取请求,并在其标准输出上返回完整的响应。到目前为止一切顺利,但事实证明这真的很脆弱,因为它在第二个请求上中断并出现错误:/usr/b
您如何在Rails中的实时服务器上进行有效调试,无论是在测试版/生产服务器上?我试过直接在服务器上修改文件,然后重启应用,但是修改好像没有生效,或者需要很长时间(缓存?)我也试过在本地做“脚本/服务器生产”,但是那很慢另一种选择是编码和部署,但效率很低。有人对他们如何有效地做到这一点有任何见解吗? 最佳答案 我会回答你的问题,即使我不同意这种热修补服务器代码的方式:)首先,你真的确定你已经重启了服务器吗?您可以通过跟踪日志文件来检查它。您更改的代码显示的View可能会被缓存。缓存页面位于tmp/cache文件夹下。您可以尝试手动删除
我真的为这个而疯狂。我一直在搜索答案并尝试我找到的所有内容,包括相关问题和stackoverflow上的答案,但仍然无法正常工作。我正在使用嵌套资源,但无法使表单正常工作。我总是遇到错误,例如没有路线匹配[PUT]"/galleries/1/photos"表格在这里:/galleries/1/photos/1/edit路线.rbresources:galleriesdoresources:photosendresources:galleriesresources:photos照片Controller.rbdefnew@gallery=Gallery.find(params[:galle
require"socket"server="irc.rizon.net"port="6667"nick="RubyIRCBot"channel="#0x40"s=TCPSocket.open(server,port)s.print("USERTesting",0)s.print("NICK#{nick}",0)s.print("JOIN#{channel}",0)这个IRC机器人没有连接到IRC服务器,我做错了什么? 最佳答案 失败并显示此消息::irc.shakeababy.net461*USER:Notenoughparame
我有一个使用PDFKit呈现网页的pdf版本的Rails应用程序。我使用Thin作为开发服务器。问题是当我处于开发模式时。当我使用“bundleexecrailss”启动我的服务器并尝试呈现任何PDF时,整个过程会陷入僵局,因为当您呈现PDF时,会向服务器请求一些额外的资源,如图像和css,看起来只有一个线程.如何配置Rails开发服务器以运行多个工作线程?非常感谢。 最佳答案 我找到的最简单的解决方案是unicorn.geminstallunicorn创建一个unicorn.conf:worker_processes3然后使用它: