先说一下背景:
今天领导突然说需要做一个电子发票中发票税号的识别,于是乎就开始去调研看有哪些方案,最先想到的就是OCR文字识别,自己去画框训练模型去识别税号等相关信息
话不多说开整思路:
思路一:百度AI平台去直接调用
思路二:自己基于模型训练
思路三:基于本地化代码识别票据中信息
这几种思路接下来我都会详细展开说,且每种方式的优缺点博主也会说清楚,仅供大家参考
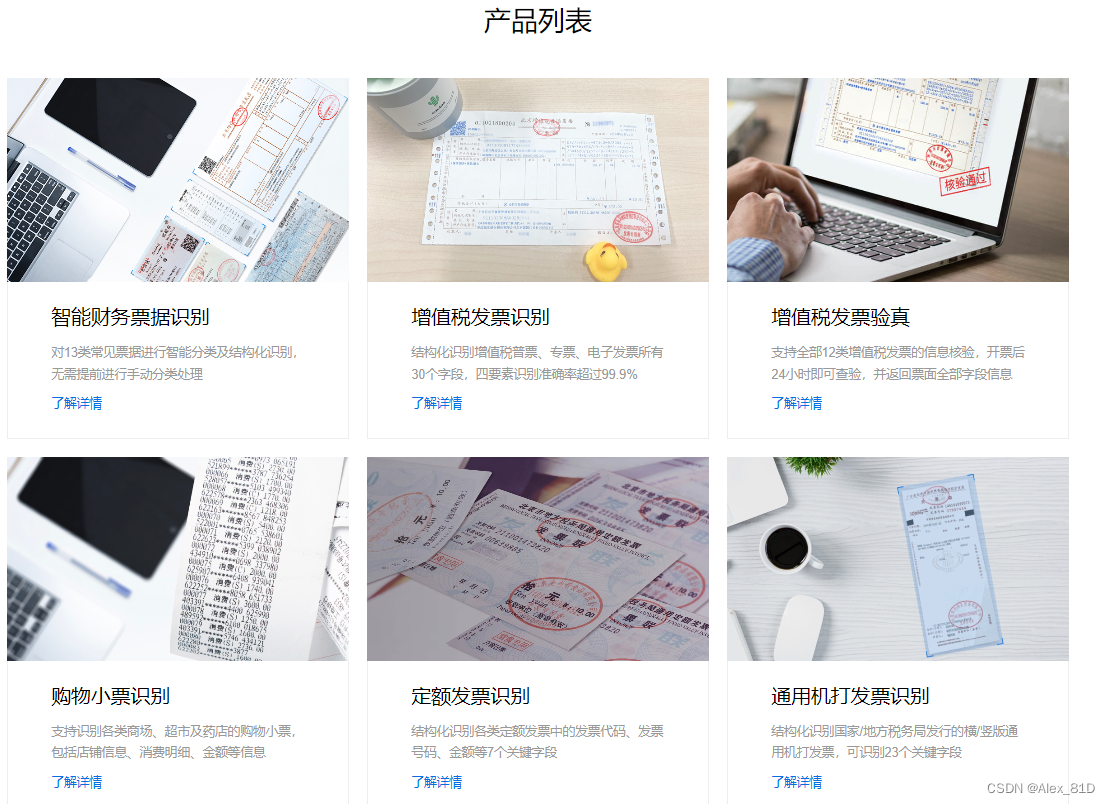
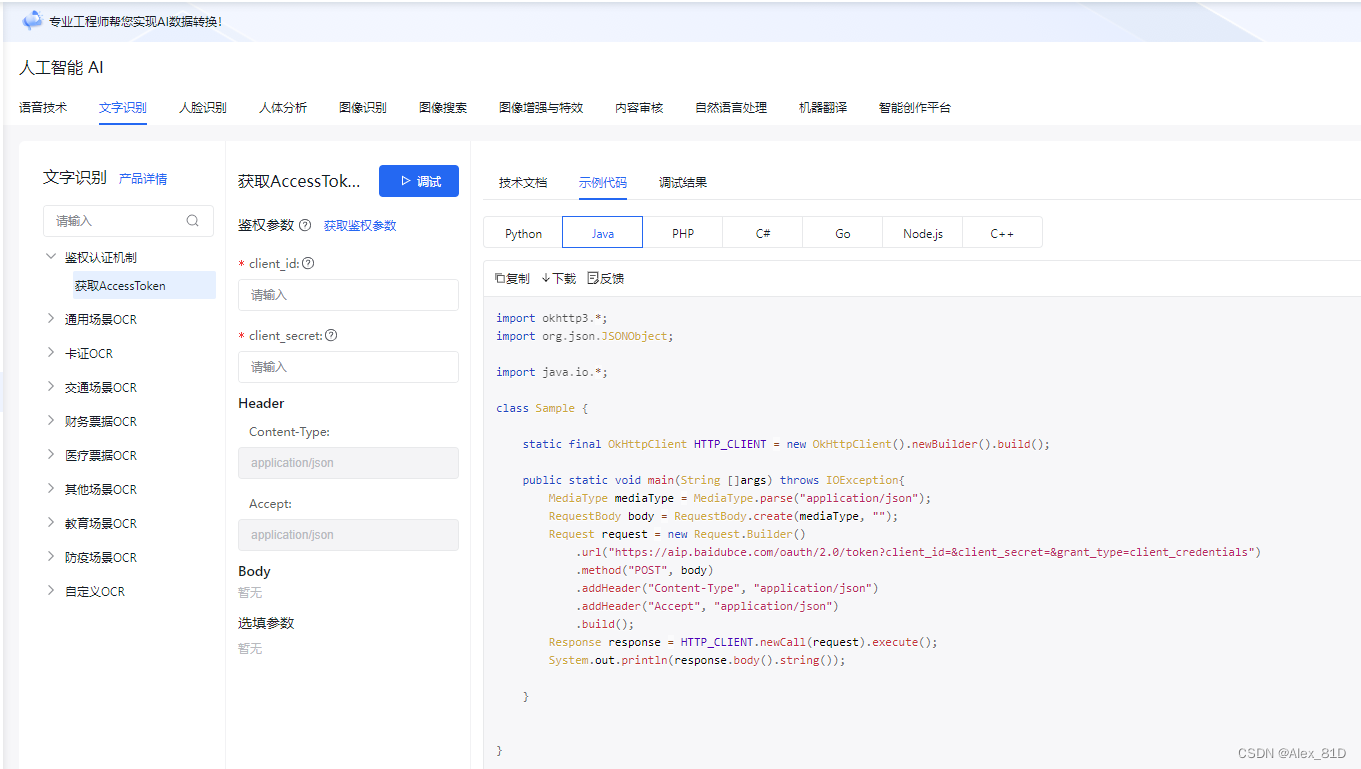
官网地址:https://ai.baidu.com/tech/ocr
你还别说,百度这几个模块想当成熟,模型训练的很好
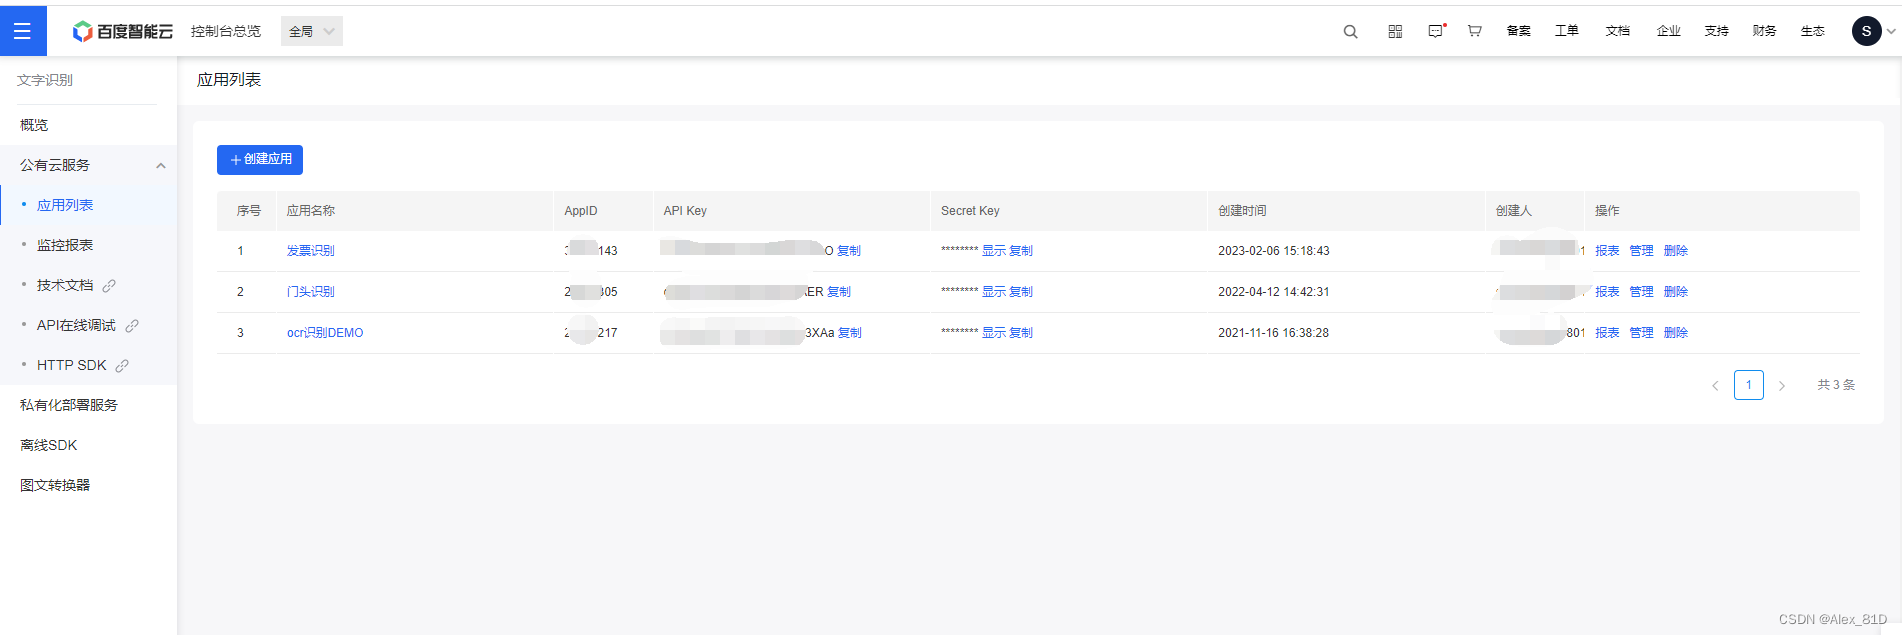
使用百度账号登录,创建应用,比较重要的是API KEY 和 SECRET KEY
<!--百度OCR-->
<dependency>
    <groupId>com.baidu.aip</groupId>
    <artifactId>java-sdk</artifactId>
    <version>4.16.5</version>
</dependency>

<dependency>
    <groupId>com.baidubce</groupId>
    <artifactId>api-explorer-sdk</artifactId>
    <version>1.0.3.1</version>
</dependency>
<dependency>
    <groupId>com.squareup.okhttp3</groupId>
    <artifactId>okhttp</artifactId>
    <version>3.10.0</version>
</dependency>FileUtil,Base64Util,HttpUtil,GsonUtils 工具类从下面链接下载
https://ai.baidu.com/file/658A35ABAB2D404FBF903F64D47C1F72
https://ai.baidu.com/file/C8D81F3301E24D2892968F09AE1AD6E2
https://ai.baidu.com/file/544D677F5D4E4F17B4122FBD60DB82B3
https://ai.baidu.com/file/470B3ACCA3FE43788B5A963BF0B625F3import org.json.JSONObject;
import java.io.BufferedReader;
import java.io.InputStreamReader;
import java.net.HttpURLConnection;
import java.net.URL;
import java.util.List;
import java.util.Map;
/**
* 获取token类
*/
public class AuthService {
/**
* 获取权限token
* @return 返回示例:
* {
* "access_token": "24.46ad247221975.2592000.1491995545.282335-1234567",
* "expires_in": 2592000
* }
*/
public static String getAuth() {
// 官网获取的 API Key 更新为你注册的
String clientId = "74AHm9bwIfrVU16EDF9uxXbO";
// 官网获取的 Secret Key 更新为你注册的
String clientSecret = "c1fzjB8jy8GmLfe8rzMzvDZYheklTZNh";
return getAuth(clientId, clientSecret);
}
public static void main(String[] args) {
System.out.println(getAuth());
}
/**
* 获取API访问token
* 该token有一定的有效期,需要自行管理,当失效时需重新获取.
* @param ak - 百度云官网获取的 API Key
* @param sk - 百度云官网获取的 Secret Key
* @return assess_token 示例:
* "24.460da4889caad24cccdb1fea17221975.2592000.1491995545.282335-1234567"
*/
public static String getAuth(String ak, String sk) {
// 获取token地址
String authHost = "https://aip.baidubce.com/oauth/2.0/token?";
String getAccessTokenUrl = authHost
// 1. grant_type为固定参数
+ "grant_type=client_credentials"
// 2. 官网获取的 API Key
+ "&client_id=" + ak
// 3. 官网获取的 Secret Key
+ "&client_secret=" + sk;
try {
URL realUrl = new URL(getAccessTokenUrl);
// 打开和URL之间的连接
HttpURLConnection connection = (HttpURLConnection) realUrl.openConnection();
connection.setRequestMethod("GET");
connection.connect();
// 获取所有响应头字段
Map<String, List<String>> map = connection.getHeaderFields();
// 遍历所有的响应头字段
/*for (String key : map.keySet()) {
System.err.println(key + "--->" + map.get(key));
}*/
// 定义 BufferedReader输入流来读取URL的响应
BufferedReader in = new BufferedReader(new InputStreamReader(connection.getInputStream()));
String result = "";
String line;
while ((line = in.readLine()) != null) {
result += line;
}
/**
* 返回结果示例
*/
//System.err.println("result:" + result);
JSONObject jsonObject = new JSONObject(result);
String access_token = jsonObject.getString("access_token");
return access_token;
} catch (Exception e) {
System.err.printf("获取token失败!");
e.printStackTrace(System.err);
}
return null;
}
}import okhttp3.*;
import java.io.*;
import java.nio.file.Files;
import java.nio.file.Paths;
import java.util.Base64;
class Sample {
static final OkHttpClient HTTP_CLIENT = new OkHttpClient().newBuilder().build();
public static void main(String[] args) throws IOException {
MediaType mediaType = MediaType.parse("application/x-www-form-urlencoded");
// image 可以通过 getFileContentAsBase64("C:\fakepath\下载.png") 方法获取
String path = "C:\\Users\\Desktop\\1.png";
String image = getFileContentAsBase64(path);
image = image.replaceAll("\\+","%2B");
image = image.replaceAll("\\/","%2F");
// 官网获取的 API Key 更新为你注册的
String clientId = "74AHm9bwIfrVO";
// 官网获取的 Secret Key 更新为你注册的
String clientSecret = "c1fzjB8jy8GZNh";
String access_token = AuthService.getAuth(clientId, clientSecret);
//String access_token = "24.acd9426de6760aa.2592000.1678264-30210143";
RequestBody body = RequestBody.create(mediaType, "image="+image);
Request request = new Request.Builder()
.url("https://aip.baidubce.com/rest/2.0/ocr/v1/vat_invoice?access_token="+access_token)
.method("POST", body)
.addHeader("Content-Type", "application/x-www-form-urlencoded")
.addHeader("Accept", "application/json")
.build();
Response response = HTTP_CLIENT.newCall(request).execute();
System.out.println(response.body().string());
}
/**
* 获取文件base64编码
*
* @param path 文件路径
* @return base64编码信息,不带文件头
* @throws IOException IO异常
*/
static String getFileContentAsBase64(String path) throws IOException {
byte[] b = Files.readAllBytes(Paths.get(path));
return Base64.getEncoder().encodeToString(b);
}
}输出结果


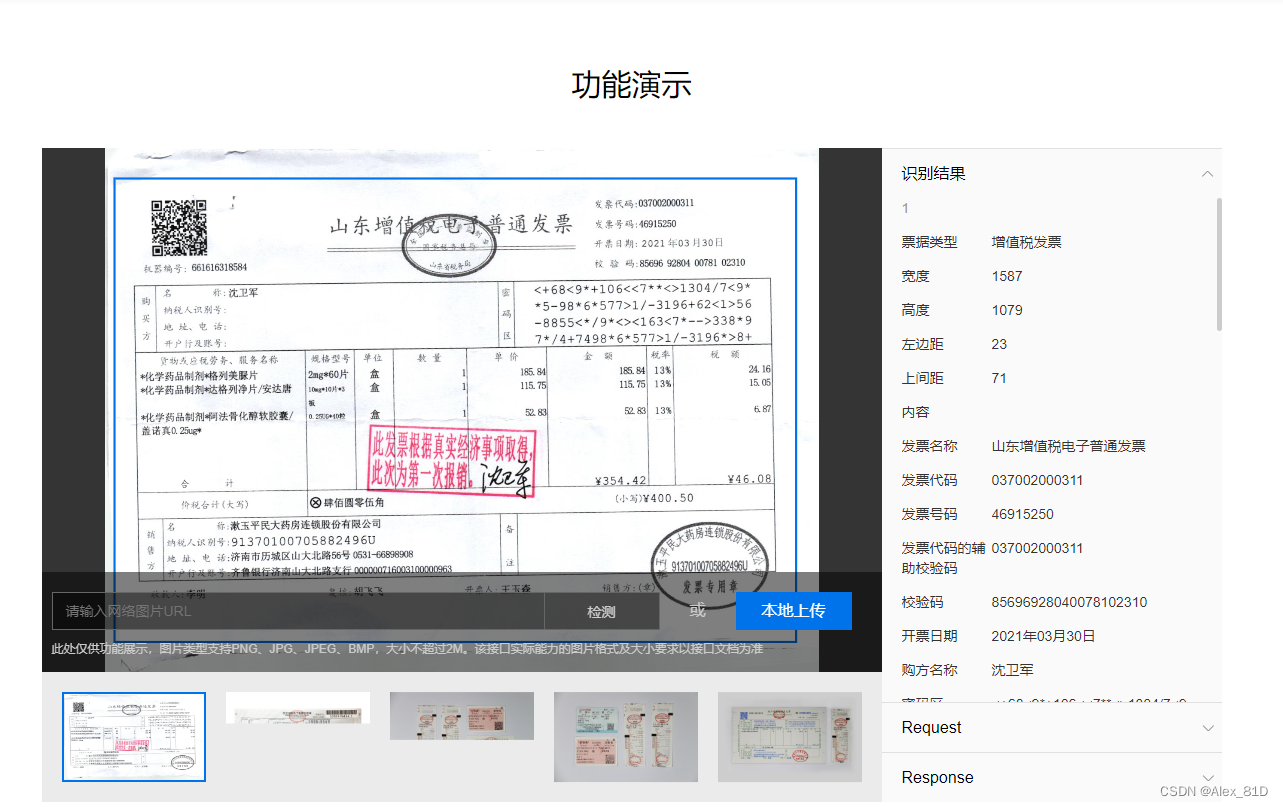
这种目前是每月免费调用1000次,但是这个需要把信息上传到百度云上,有信息安全方面考虑的同学需要思考一下,私有部署需要付费,大概是299买一个sdk
https://liuyanzhao.com/1499587043796324354.html
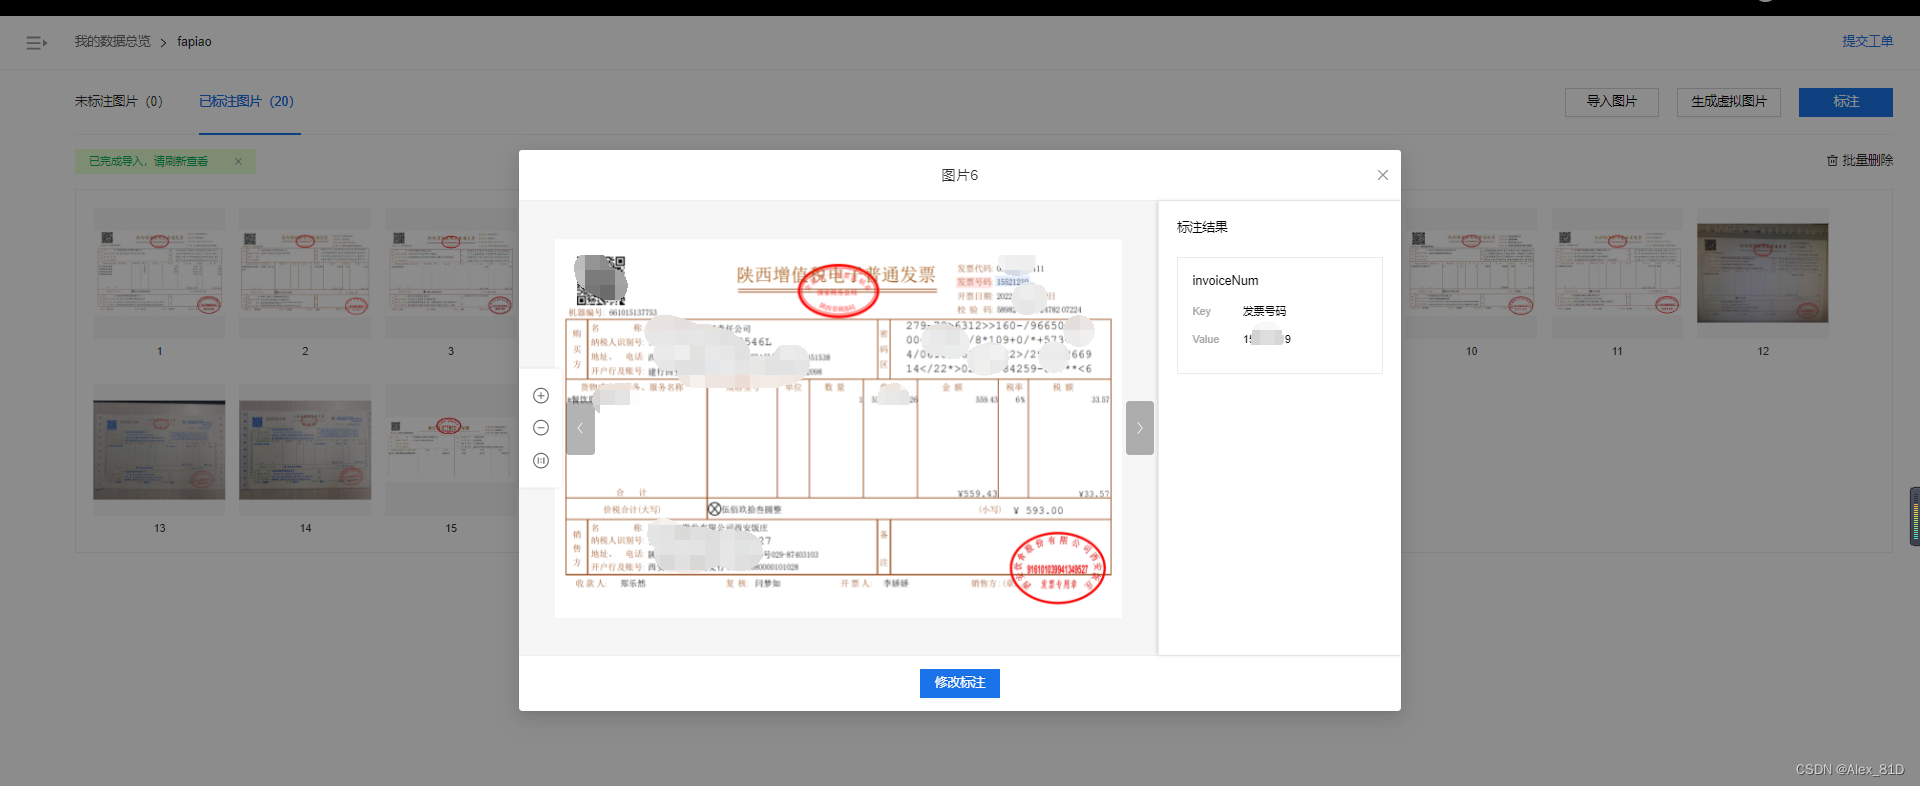
这种提供思路,需要自己训练模型,基于百度OCR自训练平台训练模型,使用方式如下,这块做个简单介绍,仅供参考
https://ai.baidu.com/easydlocr/mlist
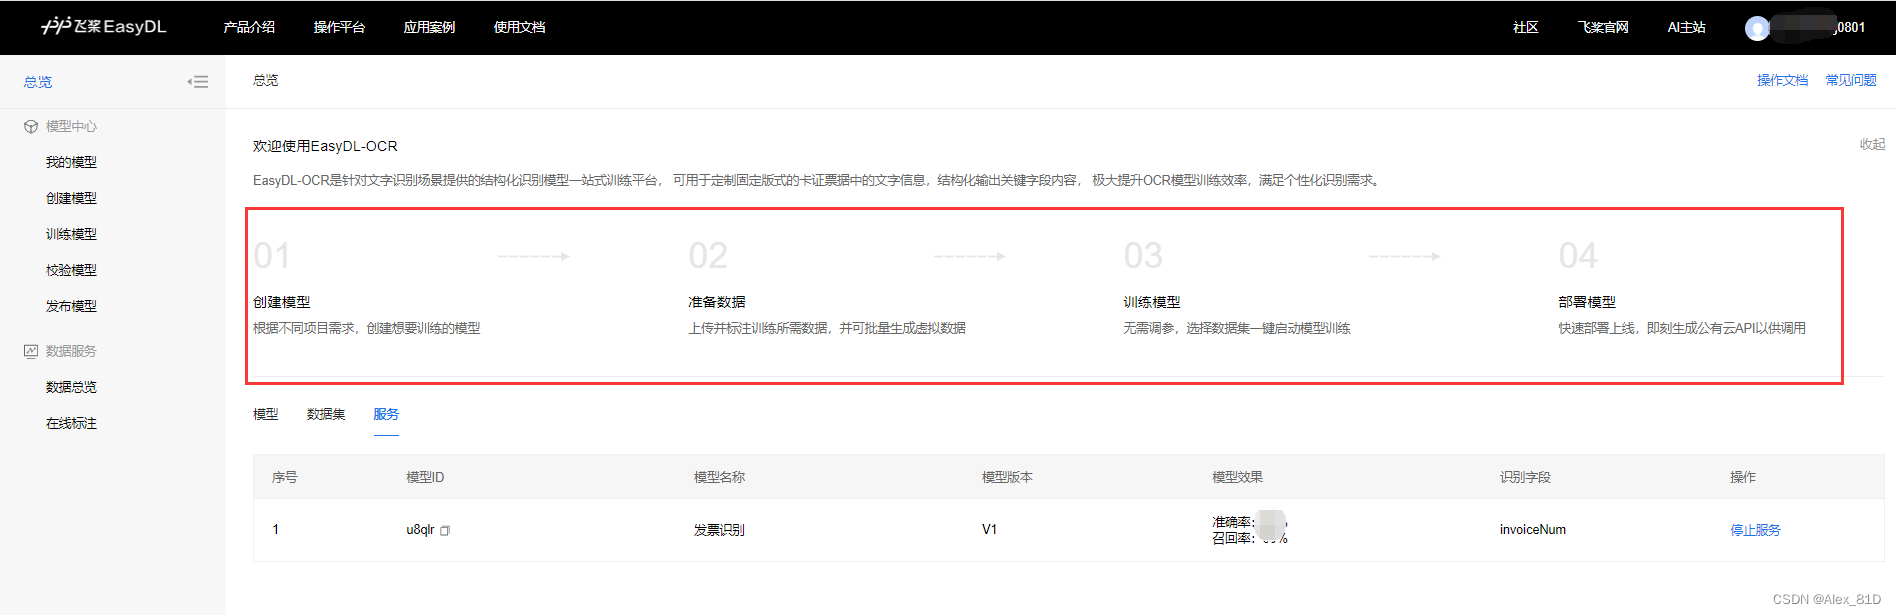
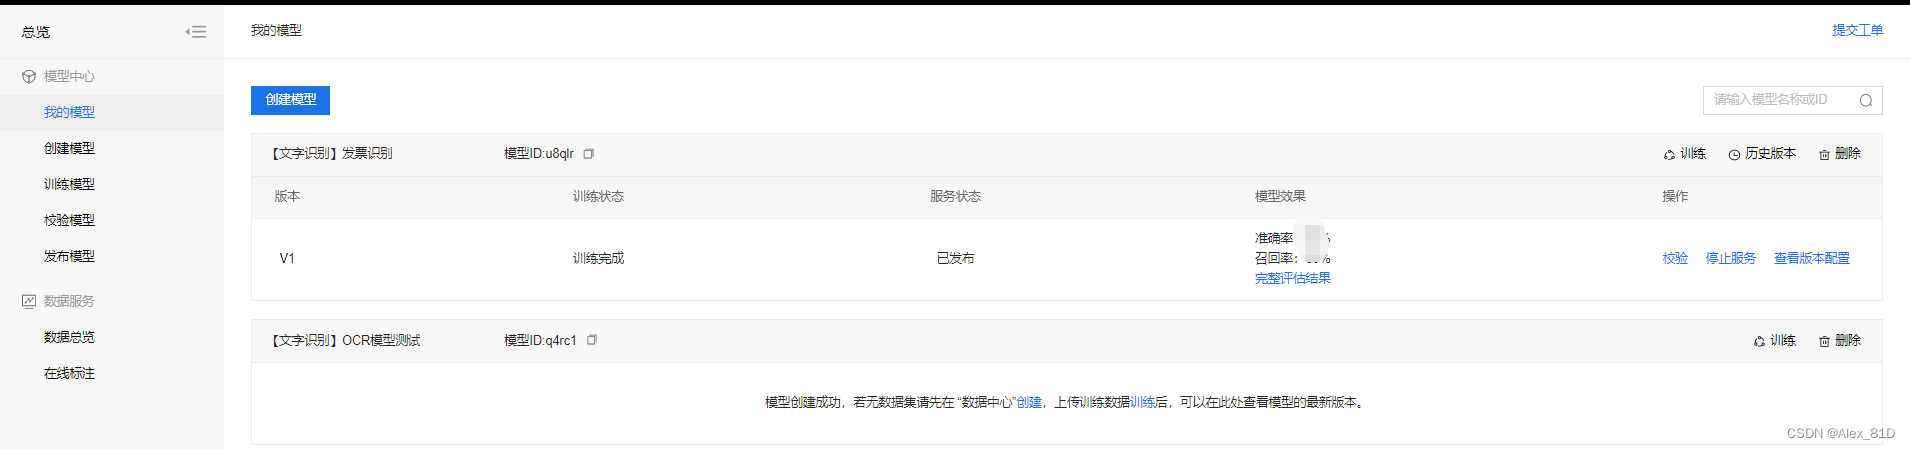
根据步骤操作几个,提供数据标注训练
这种方式好处是比较自定义化,这种本地部署比较麻烦,需要额外付费用,需多多斟酌
这个思路是跟财务同事再三确认后,目前只识别电子发票信息,且发票中都一定会有二维码信息,这就好办了,我们可以识别二维码中的信息,这不就问题解决了,且这种方式只要有二维码,准确率达到100%
重点说说第三种
干搂代码开始:
加入maven依赖包:
<dependency>
    <groupId>org.apache.pdfbox</groupId>
    <artifactId>pdfbox</artifactId>
    <version>2.0.20</version>
</dependency><dependency>
    <groupId>com.google.zxing</groupId>
    <artifactId>core</artifactId>
    <version>3.1.0</version>
</dependency><dependency>
    <groupId>com.google.zxing</groupId>
    <artifactId>javase</artifactId>
    <version>3.1.0</version>
</dependency>
上代码:
import ch.qos.logback.classic.Level;
import ch.qos.logback.classic.LoggerContext;
import com.google.zxing.BinaryBitmap;
import com.google.zxing.EncodeHintType;
import com.google.zxing.MultiFormatReader;
import com.google.zxing.Result;
import com.google.zxing.client.j2se.BufferedImageLuminanceSource;
import com.google.zxing.common.HybridBinarizer;
import com.huatek.base.utils.LoggerUtil;
import org.apache.commons.lang3.StringUtils;
import org.apache.pdfbox.cos.COSName;
import org.apache.pdfbox.pdmodel.PDDocument;
import org.apache.pdfbox.pdmodel.PDPage;
import org.apache.pdfbox.pdmodel.PDResources;
import org.apache.pdfbox.pdmodel.graphics.image.PDImageXObject;
import org.slf4j.Logger;
import org.slf4j.LoggerFactory;

import java.awt.image.BufferedImage;
import java.io.File;
import java.util.ArrayList;
import java.util.HashMap;
import java.util.List;
import java.util.Map;

public class InvoiceTest {

    //这块是为了避免log4j打印一些没必要的信息
    static {
        LoggerContext loggerContext = (LoggerContext) LoggerFactory.getILoggerFactory();
        List<ch.qos.logback.classic.Logger> loggerList = loggerContext.getLoggerList();
        loggerList.forEach(logger -> {
            logger.setLevel(Level.INFO);
        });
    }

    private Logger logger = LoggerUtil.getLogger();

    public static void main(String[] args) {
        InvoiceTest fapiao1 = new InvoiceTest();
        //填写你自己的路径即可
        fapiao1.getInvoiceInfo("C:\\Users\\Desktop\\temp\\1.pdf");
    }

    /**
     * 获取电子发票pdf文件中的发票信息
     *
     * @param filePath 电子发票路径
     * @return 发票信息
     */
    public Object getInvoiceInfo(String filePath) {
        try {
            List<BufferedImage> imageList = extractImage(new File(filePath));
            if (imageList.isEmpty()) {
                logger.info("pdf中未解析出图片,返回空");
                return null;
            }

            MultiFormatReader formatReader = new MultiFormatReader();
            //正常解析出来有3张图片,第一张是二维码,其他两张图片是发票上盖的章
            BinaryBitmap binaryBitmap = new BinaryBitmap(new HybridBinarizer(new BufferedImageLuminanceSource(imageList.get(0))));
            Map hints = new HashMap<>();
            hints.put(EncodeHintType.CHARACTER_SET, "utf-8");
            Result result = formatReader.decode(binaryBitmap);
            if (result == null || StringUtils.isEmpty(result.getText())) {
                logger.info("pdf中的第一张图片没有解析了字符串信息,直接返回空");
                return null;
            }

            logger.info("从电子发票中识别出的信息为:{}", result.getText());

            // 读取到的信息为 : 01,发票类型,发票代码,发票号码,发票金额,开票日期,校验码,随机产生的摘要信息
            String[] infos = result.getText().split(",");
            if (infos.length != 8) {
                logger.info("pdf中的第一张图片解析出的字符串数组长度不为8,返回空。");
                return null;
            }

            //这里自己去定义对象,属性自己看着定义,仅供参考
            /*Invoice invoice = new Invoice();
            invoice.setInvoiceType(infos[1]); //发票类型
            invoice.setInvoiceCode(infos[2]); //发票代码
            invoice.setInvoiceNo(infos[3]); // 发票号码
            invoice.setAmount(new BigDecimal(infos[4])); // 发票金额
            invoice.setInvoiceDate(DateUtils.parseDate(infos[5], "yyyyMMdd")); //开票日期
            invoice.setCheckCode(infos[6]); // 校验码*/

            //return invoice;
            return null;
        } catch (Exception e) {
            logger.info("解析pdf中的二维码出现异常", e);
            return null;
        }
    }


    /**
     * 提取电子发票里面的图片
     *
     * @param pdfFile 电子发票文件对象
     * @return pdf中解析出的图片列表
     * @throws Exception
     */
    private List<BufferedImage> extractImage(File pdfFile) throws Exception {
        List<BufferedImage> imageList = new ArrayList<BufferedImage>();

        PDDocument document = PDDocument.load(pdfFile);
        PDPage page = document.getPage(0); //电子发票只有一页
        PDResources resources = page.getResources();

        for (COSName name : resources.getXObjectNames()) {
            if (resources.isImageXObject(name)) {
                PDImageXObject obj = (PDImageXObject) resources.getXObject(name);
                imageList.add(obj.getImage());
            }
        }
        document.close();
        return imageList;
    }
}
至此代码完成,有的同学可能会说那如果传的是图片怎么办,别慌那就继续实现就完事儿了
依赖还是那些依赖,根据你自己的需求封装工具类和上面代码相互配合判断调用
import com.google.zxing.*;
import com.google.zxing.client.j2se.BufferedImageLuminanceSource;
import com.google.zxing.common.HybridBinarizer;

import javax.imageio.ImageIO;
import java.awt.image.BufferedImage;
import java.io.File;
import java.io.IOException;
import java.util.HashMap;
import java.util.Map;
/**
 * 作用:二维码识别(图片)
 * 类名:QRCodeUtils
 **/
public class QRCodeUtils {
    /**
     * 解析二维码,此方法解析一个路径的二维码图片
     * path:图片路径
     */
    public static String deEncodeByPath(String path) {
        String content = null;
        BufferedImage image;
        try {
            image = ImageIO.read(new File(path));
            LuminanceSource source = new BufferedImageLuminanceSource(image);
            Binarizer binarizer = new HybridBinarizer(source);
            BinaryBitmap binaryBitmap = new BinaryBitmap(binarizer);
            Map<DecodeHintType, Object> hints = new HashMap<DecodeHintType, Object>();
            hints.put(DecodeHintType.CHARACTER_SET, "UTF-8");
            Result result = new MultiFormatReader().decode(binaryBitmap, hints);//解码
            System.out.println("图片中内容:  ");
            System.out.println("content: " + result.getText());
            content = result.getText();
        } catch (IOException e) {
            e.printStackTrace();
        } catch (NotFoundException e) {
            //这里判断如果识别不了带LOGO的图片,重新添加上一个属性
            try {
                image = ImageIO.read(new File(path));
                LuminanceSource source = new BufferedImageLuminanceSource(image);
                Binarizer binarizer = new HybridBinarizer(source);
                BinaryBitmap binaryBitmap = new BinaryBitmap(binarizer);
                Map<DecodeHintType, Object> hints = new HashMap<DecodeHintType, Object>();
                //设置编码格式
                hints.put(DecodeHintType.CHARACTER_SET, "UTF-8");
                //设置优化精度
                hints.put(DecodeHintType.TRY_HARDER, Boolean.TRUE);
                //设置复杂模式开启(我使用这种方式就可以识别微信的二维码了)
                hints.put(DecodeHintType.PURE_BARCODE,Boolean.TYPE);
                Result result = new MultiFormatReader().decode(binaryBitmap, hints);//解码
                System.out.println("图片中内容:  ");
                System.out.println("content: " + result.getText());
                content = result.getText();
            } catch (IOException e1) {
                e1.printStackTrace();
            } catch (NotFoundException e2) {
                e2.printStackTrace();
            }
        }
        return content;
    }

    public static void main(String [] args){
        System.out.println(deEncodeByPath("C:\\Users\\Desktop\\3-1.jpg"));//二维码图片路径
    }
}
如果上述不能识别的话,那么就需要对图片处理一次,然后再进行识别,这里是个调优图片的工具类。
package com.face.ele.common.utils;

import javax.imageio.ImageIO;
import java.awt.*;
import java.awt.image.BufferedImage;
import java.io.File;
import java.io.IOException;

/*
 * @description: 图片清晰处理
 */
public class ImageOptimizationUtil {

    // 阈值0-255
    public static int YZ = 150;

    /**
     * 图像二值化处理
     *
     * @param filePath 要处理的图片路径
     * @param fileOutputPath 处理后的图片输出路径
     */
    public static void binarization(String filePath, String fileOutputPath) throws IOException {
        File file = new File(filePath);
        BufferedImage bi = ImageIO.read(file);
        // 获取当前图片的高,宽,ARGB
        int h = bi.getHeight();
        int w = bi.getWidth();
        int arr[][] = new int[w][h];

        // 获取图片每一像素点的灰度值
        for (int i = 0; i < w; i++) {
            for (int j = 0; j < h; j++) {
                // getRGB()返回默认的RGB颜色模型(十进制)
                arr[i][j] = getImageGray(bi.getRGB(i, j));// 该点的灰度值
            }
        }

        // 构造一个类型为预定义图像类型,BufferedImage
        BufferedImage bufferedImage = new BufferedImage(w, h, BufferedImage.TYPE_BYTE_BINARY);

        // 和预先设置的阈值大小进行比较,大的就显示为255即白色,小的就显示为0即黑色
        for (int i = 0; i < w; i++) {
            for (int j = 0; j < h; j++) {
                if (getGray(arr, i, j, w, h) > YZ) {
                    int white = new Color(255, 255, 255).getRGB();
                    bufferedImage.setRGB(i, j, white);
                } else {
                    int black = new Color(0, 0, 0).getRGB();
                    bufferedImage.setRGB(i, j, black);
                }
            }

        }
        ImageIO.write(bufferedImage, "jpg", new File(fileOutputPath));
    }

    /**
     * 图像的灰度处理
     * 利用浮点算法:Gray = R*0.3 + G*0.59 + B*0.11;
     *
     * @param rgb 该点的RGB值
     * @return 返回处理后的灰度值
     */
    private static int getImageGray(int rgb) {
        String argb = Integer.toHexString(rgb);// 将十进制的颜色值转为十六进制
        // argb分别代表透明,红,绿,蓝 分别占16进制2位
        int r = Integer.parseInt(argb.substring(2, 4), 16);// 后面参数为使用进制
        int g = Integer.parseInt(argb.substring(4, 6), 16);
        int b = Integer.parseInt(argb.substring(6, 8), 16);
        int gray = (int) (r*0.28 + g*0.95 + b*0.11);
        return gray;
    }

    /**
     * 自己加周围8个灰度值再除以9,算出其相对灰度值
     *
     * @param gray
     * @param x 要计算灰度的点的横坐标
     * @param y 要计算灰度的点的纵坐标
     * @param w 图像的宽度
     * @param h 图像的高度
     * @return
     */
    public static int getGray(int gray[][], int x, int y, int w, int h) {
        int rs = gray[x][y] + (x == 0 ? 255 : gray[x - 1][y]) + (x == 0 || y == 0 ? 255 : gray[x - 1][y - 1])
                + (x == 0 || y == h - 1 ? 255 : gray[x - 1][y + 1]) + (y == 0 ? 255 : gray[x][y - 1])
                + (y == h - 1 ? 255 : gray[x][y + 1]) + (x == w - 1 ? 255 : gray[x + 1][y])
                + (x == w - 1 || y == 0 ? 255 : gray[x + 1][y - 1])
                + (x == w - 1 || y == h - 1 ? 255 : gray[x + 1][y + 1]);
        return rs / 9;
    }

    /**
     * 二值化后的图像的开运算:先腐蚀再膨胀(用于去除图像的小黑点)
     *
     * @param filePath 要处理的图片路径
     * @param fileOutputPath 处理后的图片输出路径
     * @throws IOException
     */
    public static void opening(String filePath, String fileOutputPath) throws IOException {
        File file = new File(filePath);
        BufferedImage bi = ImageIO.read(file);
        // 获取当前图片的高,宽,ARGB
        int h = bi.getHeight();
        int w = bi.getWidth();
        int arr[][] = new int[w][h];
        // 获取图片每一像素点的灰度值
        for (int i = 0; i < w; i++) {
            for (int j = 0; j < h; j++) {
                // getRGB()返回默认的RGB颜色模型(十进制)
                arr[i][j] = getImageGray(bi.getRGB(i, j));// 该点的灰度值
            }
        }

        int black = new Color(0, 0, 0).getRGB();
        int white = new Color(255, 255, 255).getRGB();
        BufferedImage bufferedImage = new BufferedImage(w, h, BufferedImage.TYPE_BYTE_BINARY);
        // 临时存储腐蚀后的各个点的亮度
        int temp[][] = new int[w][h];
        // 1.先进行腐蚀操作
        for (int i = 0; i < w; i++) {
            for (int j = 0; j < h; j++) {
                /*
                 * 为0表示改点和周围8个点都是黑,则该点腐蚀操作后为黑
                 * 由于公司图片态模糊,完全达到9个点全为黑的点太少,最后效果很差,故改为了小于30
                 * (写30的原因是,当只有一个点为白,即总共255,调用getGray方法后得到255/9 = 28)
                 */
                if (getGray(arr, i, j, w, h) < 30) {
                    temp[i][j] = 0;
                } else{
                    temp[i][j] = 255;
                }
            }
        }

        // 2.再进行膨胀操作
        for (int i = 0; i < w; i++) {
            for (int j = 0; j < h; j++) {
                bufferedImage.setRGB(i, j, white);
            }
        }
        for (int i = 0; i < w; i++) {
            for (int j = 0; j < h; j++) {
                // 为0表示改点和周围8个点都是黑,则该点腐蚀操作后为黑
                if (temp[i][j] == 0) {
                    bufferedImage.setRGB(i, j, black);
                    if(i > 0) {
                        bufferedImage.setRGB(i-1, j, black);
                    }
                    if (j > 0) {
                        bufferedImage.setRGB(i, j-1, black);
                    }
                    if (i > 0 && j > 0) {
                        bufferedImage.setRGB(i-1, j-1, black);
                    }
                    if (j < h-1) {
                        bufferedImage.setRGB(i, j+1, black);
                    }
                    if (i < w-1) {
                        bufferedImage.setRGB(i+1, j, black);
                    }
                    if (i < w-1 && j > 0) {
                        bufferedImage.setRGB(i+1, j-1, black);
                    }
                    if (i < w-1 && j < h-1) {
                        bufferedImage.setRGB(i+1, j+1, black);
                    }
                    if (i > 0 && j < h-1) {
                        bufferedImage.setRGB(i-1, j+1, black);
                    }
                }
            }
        }

        ImageIO.write(bufferedImage, "jpg", new File(fileOutputPath));
    }

    public static void main(String[] args) {
        String fullPath="E:\\test\\img\\1.jpg";
        String newPath="E:\\test\\img\\1new.jpg";
        try {
            ImageOptimizationUtil.binarization(fullPath,newPath);
        } catch (IOException e) {
            e.printStackTrace();
        }
    }
}
可以手动测试,然后对改代码的部分进行调正对应的参数-- gray变量里的计算进行灰度调整
private static int getImageGray(int rgb) {
    String argb = Integer.toHexString(rgb);// 将十进制的颜色值转为十六进制
    // argb分别代表透明,红,绿,蓝 分别占16进制2位
    int r = Integer.parseInt(argb.substring(2, 4), 16);// 后面参数为使用进制
    int g = Integer.parseInt(argb.substring(4, 6), 16);
    int b = Integer.parseInt(argb.substring(6, 8), 16);
    int gray = (int) (r*0.28 + g*0.95 + b*0.11);
    return gray;
}
对图片进行调整之后,再对图片进行识别即可。
可以直接识别二维码读取部分票面信息,然后用这部分信息作为参数,通过调用税务的接口获取全票面信息。只要是正常的电子发票,识别率差不多是100%,效率极高,准确率也极高
只能获取部分信息,如果需要更多的信息,那就不能获取了,但是大部分场景还是可以覆盖的
https://www.jianshu.com/p/943875949239
https://www.jb51.net/article/245455.htm
至此三种思路都已经说完了,用哪个各位同学自己定夺,我目前采用的思路三,暂时没什么问题,基本满足业务需求,后续有问题就得去模型库中自己训练了
总的来说,我对ruby还比较陌生,我正在为我正在创建的对象编写一些rspec测试用例。许多测试用例都非常基础,我只是想确保正确填充和返回值。我想知道是否有办法使用循环结构来执行此操作。不必为我要测试的每个方法都设置一个assertEquals。例如:describeitem,"TestingtheItem"doit"willhaveanullvaluetostart"doitem=Item.new#HereIcoulddotheitem.name.shouldbe_nil#thenIcoulddoitem.category.shouldbe_nilendend但我想要一些方法来使用
我试图在一个项目中使用rake,如果我把所有东西都放到Rakefile中,它会很大并且很难读取/找到东西,所以我试着将每个命名空间放在lib/rake中它自己的文件中,我添加了这个到我的rake文件的顶部:Dir['#{File.dirname(__FILE__)}/lib/rake/*.rake'].map{|f|requiref}它加载文件没问题,但没有任务。我现在只有一个.rake文件作为测试,名为“servers.rake”,它看起来像这样:namespace:serverdotask:testdoputs"test"endend所以当我运行rakeserver:testid时
作为我的Rails应用程序的一部分,我编写了一个小导入程序,它从我们的LDAP系统中吸取数据并将其塞入一个用户表中。不幸的是,与LDAP相关的代码在遍历我们的32K用户时泄漏了大量内存,我一直无法弄清楚如何解决这个问题。这个问题似乎在某种程度上与LDAP库有关,因为当我删除对LDAP内容的调用时,内存使用情况会很好地稳定下来。此外,不断增加的对象是Net::BER::BerIdentifiedString和Net::BER::BerIdentifiedArray,它们都是LDAP库的一部分。当我运行导入时,内存使用量最终达到超过1GB的峰值。如果问题存在,我需要找到一些方法来更正我的代
Rails2.3可以选择随时使用RouteSet#add_configuration_file添加更多路由。是否可以在Rails3项目中做同样的事情? 最佳答案 在config/application.rb中:config.paths.config.routes在Rails3.2(也可能是Rails3.1)中,使用:config.paths["config/routes"] 关于ruby-on-rails-Rails3中的多个路由文件,我们在StackOverflow上找到一个类似的问题
大约一年前,我决定确保每个包含非唯一文本的Flash通知都将从模块中的方法中获取文本。我这样做的最初原因是为了避免一遍又一遍地输入相同的字符串。如果我想更改措辞,我可以在一个地方轻松完成,而且一遍又一遍地重复同一件事而出现拼写错误的可能性也会降低。我最终得到的是这样的:moduleMessagesdefformat_error_messages(errors)errors.map{|attribute,message|"Error:#{attribute.to_s.titleize}#{message}."}enddeferror_message_could_not_find(obje
我主要使用Ruby来执行此操作,但到目前为止我的攻击计划如下:使用gemsrdf、rdf-rdfa和rdf-microdata或mida来解析给定任何URI的数据。我认为最好映射到像schema.org这样的统一模式,例如使用这个yaml文件,它试图描述数据词汇表和opengraph到schema.org之间的转换:#SchemaXtoschema.orgconversion#data-vocabularyDV:name:namestreet-address:streetAddressregion:addressRegionlocality:addressLocalityphoto:i
我需要从一个View访问多个模型。以前,我的links_controller仅用于提供以不同方式排序的链接资源。现在我想包括一个部分(我假设)显示按分数排序的顶级用户(@users=User.all.sort_by(&:score))我知道我可以将此代码插入每个链接操作并从View访问它,但这似乎不是“ruby方式”,我将需要在不久的将来访问更多模型。这可能会变得很脏,是否有针对这种情况的任何技术?注意事项:我认为我的应用程序正朝着单一格式和动态页面内容的方向发展,本质上是一个典型的网络应用程序。我知道before_filter但考虑到我希望应用程序进入的方向,这似乎很麻烦。最终从任何
我在我的项目中添加了一个系统来重置用户密码并通过电子邮件将密码发送给他,以防他忘记密码。昨天它运行良好(当我实现它时)。当我今天尝试启动服务器时,出现以下错误。=>BootingWEBrick=>Rails3.2.1applicationstartingindevelopmentonhttp://0.0.0.0:3000=>Callwith-dtodetach=>Ctrl-CtoshutdownserverExiting/Users/vinayshenoy/.rvm/gems/ruby-1.9.3-p0/gems/actionmailer-3.2.1/lib/action_mailer
刚入门rails,开始慢慢理解。有人可以解释或给我一些关于在application_controller中编码的好处或时间和原因的想法吗?有哪些用例。您如何为Rails应用程序使用应用程序Controller?我不想在那里放太多代码,因为据我了解,每个请求都会调用此Controller。这是真的? 最佳答案 ApplicationController实际上是您应用程序中的每个其他Controller都将从中继承的类(尽管这不是强制性的)。我同意不要用太多代码弄乱它并保持干净整洁的态度,尽管在某些情况下ApplicationContr
我想向我的Controller传递一个参数,它是一个简单的复选框,但我不知道如何在模型的form_for中引入它,这是我的观点:{:id=>'go_finance'}do|f|%>Transferirde:para:Entrada:"input",:placeholder=>"Quantofoiganho?"%>Saída:"output",:placeholder=>"Quantofoigasto?"%>Nota:我想做一个额外的复选框,但我该怎么做,模型中没有一个对象,而是一个要检查的对象,以便在Controller中创建一个ifelse,如果没有检查,请帮助我,非常感谢,谢谢