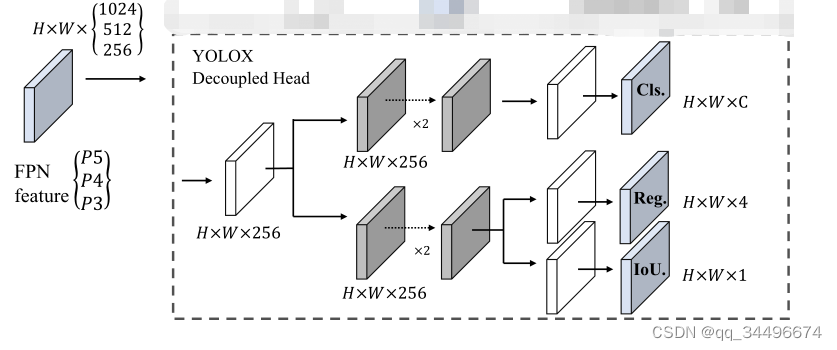
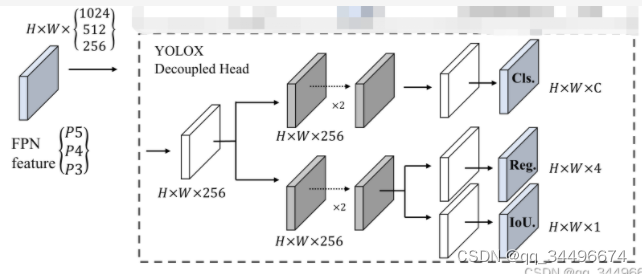
yolox的decoupled head结构
本来想将yolov5的head修改为decoupled head,与yolox的decouple head对齐,但是没注意,该成了如下结构:
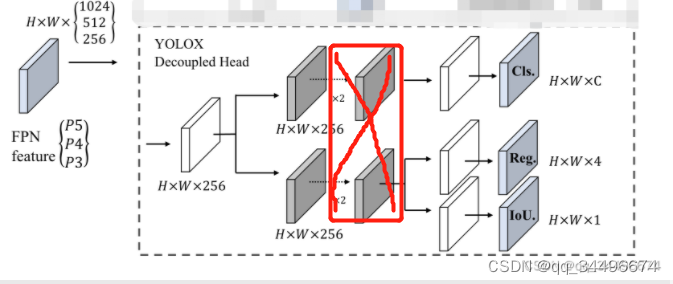
感谢少年肩上杨柳依依的指出,如还有问题欢迎指出
1.修改models下的yolo.py文件中的Detect
class Detect(nn.Module):
    stride = None  # strides computed during build
    onnx_dynamic = False  # ONNX export parameter

    def __init__(self, nc=80, anchors=(), ch=(), inplace=True):  # detection layer
        super().__init__()
        self.nc = nc  # number of classes
        self.no = nc + 5  # number of outputs per anchor
        self.nl = len(anchors)  # number of detection layers
        self.na = len(anchors[0]) // 2  # number of anchors
        self.grid = [torch.zeros(1)] * self.nl  # init grid
        self.anchor_grid = [torch.zeros(1)] * self.nl  # init anchor grid
        self.register_buffer('anchors', torch.tensor(anchors).float().view(self.nl, -1, 2))  # shape(nl,na,2)
        # self.m = nn.ModuleList(nn.Conv2d(x, self.no * self.na, 1) for x in ch)  # output conv
        self.m_box = nn.ModuleList(nn.Conv2d(256, 4 * self.na, 1) for x in ch)  # output conv
        self.m_conf = nn.ModuleList(nn.Conv2d(256, 1 * self.na, 1) for x in ch)  # output conv
        self.m_labels = nn.ModuleList(nn.Conv2d(256, self.nc * self.na, 1) for x in ch)  # output conv
        self.base_conv = nn.ModuleList(BaseConv(in_channels = x, out_channels = 256, ksize = 1, stride = 1) for x in ch)
        self.cls_convs = nn.ModuleList(BaseConv(in_channels = 256, out_channels = 256, ksize = 3, stride = 1) for x in ch)
        self.reg_convs = nn.ModuleList(BaseConv(in_channels = 256, out_channels = 256, ksize = 3, stride = 1) for x in ch)

        # self.m = nn.ModuleList(nn.Conv2d(x, 4 * self.na, 1) for x in ch, nn.Conv2d(x, 1 * self.na, 1) for x in ch,nn.Conv2d(x, self.nc * self.na, 1) for x in ch)
        self.inplace = inplace  # use in-place ops (e.g. slice assignment)self.ch = ch

    def forward(self, x):
        z = []  # inference output
        for i in range(self.nl):
            # # x[i] = self.m[i](x[i])  # convs
            # print("&&&&&&&&&&&&&&&&&&&&&&&&&&&&&&&&&&&&&&&&&&&&&&&", i)
            # print(x[i].shape)
            # print(self.base_conv[i])
            # print("%%%%%%%%%%%%%%%%%%%%%%%%%%%%%%%%%%%%%%%%%%%%%%%%%%%%%%%")


            x_feature = self.base_conv[i](x[i])
            # x_feature = x[i]

            cls_feature = self.cls_convs[i](x_feature)
            reg_feature = self.reg_convs[i](x_feature)
            # reg_feature = x_feature

            m_box = self.m_box[i](reg_feature)
            m_conf = self.m_conf[i](reg_feature)
            m_labels = self.m_labels[i](cls_feature)
            x[i] = torch.cat((m_box,m_conf, m_labels),1)
            bs, _, ny, nx = x[i].shape  # x(bs,255,20,20) to x(bs,3,20,20,85)
            x[i] = x[i].view(bs, self.na, self.no, ny, nx).permute(0, 1, 3, 4, 2).contiguous()

            if not self.training:  # inference
                if self.onnx_dynamic or self.grid[i].shape[2:4] != x[i].shape[2:4]:
                    self.grid[i], self.anchor_grid[i] = self._make_grid(nx, ny, i)

                y = x[i].sigmoid()
                if self.inplace:
                    y[..., 0:2] = (y[..., 0:2] * 2 - 0.5 + self.grid[i]) * self.stride[i]  # xy
                    y[..., 2:4] = (y[..., 2:4] * 2) ** 2 * self.anchor_grid[i]  # wh
                else:  # for YOLOv5 on AWS Inferentia https://github.com/ultralytics/yolov5/pull/2953
                    xy = (y[..., 0:2] * 2 - 0.5 + self.grid[i]) * self.stride[i]  # xy
                    wh = (y[..., 2:4] * 2) ** 2 * self.anchor_grid[i]  # wh
                    y = torch.cat((xy, wh, y[..., 4:]), -1)
                z.append(y.view(bs, -1, self.no))

        return x if self.training else (torch.cat(z, 1), x)
2.在yolo.py中添加
def get_activation(name="silu", inplace=True):
    if name == "silu":
        module = nn.SiLU(inplace=inplace)
    elif name == "relu":
        module = nn.ReLU(inplace=inplace)
    elif name == "lrelu":
        module = nn.LeakyReLU(0.1, inplace=inplace)
    else:
        raise AttributeError("Unsupported act type: {}".format(name))
    return module


class BaseConv(nn.Module):
    """A Conv2d -> Batchnorm -> silu/leaky relu block"""

    def __init__(
        self, in_channels, out_channels, ksize, stride, groups=1, bias=False, act="silu"
    ):
        super().__init__()
        # same padding
        pad = (ksize - 1) // 2
        self.conv = nn.Conv2d(
            in_channels,
            out_channels,
            kernel_size=ksize,
            stride=stride,
            padding=pad,
            groups=groups,
            bias=bias,
        )
        self.bn = nn.BatchNorm2d(out_channels)
        self.act = get_activation(act, inplace=True)

    def forward(self, x):
        # print(self.bn(self.conv(x)).shape)
        return self.act(self.bn(self.conv(x)))
        # return self.bn(self.conv(x))

    def fuseforward(self, x):
        return self.act(self.conv(x))
decouple head的特点:
由于训练模型时,应该是channels = 256的地方改成了channels = x(失误),所以在decoupled head的部分参数量比yolox要大一些,以下的结果是在channels= x的情况下得出
比yolov5s参数多,计算量大,在我自己的2.5万的数据量下map提升了3%多
1.模型给出的目标cls较高,需要将conf的阈值设置较大(0.5),不然准确率较低
parser.add_argument('--conf-thres', type=float, default=0.5, help='confidence threshold')
2.对于少样本的检测效果较好,召回率的提升比准确率多
3.在conf设置为0.25时,召回率比yolov5s高,但是准确率低;在conf设置为0.5时,召回率与准确率比yolov5s高
4.比yolov5s参数多,计算量大,在2.5万的数据量下map提升了3%多
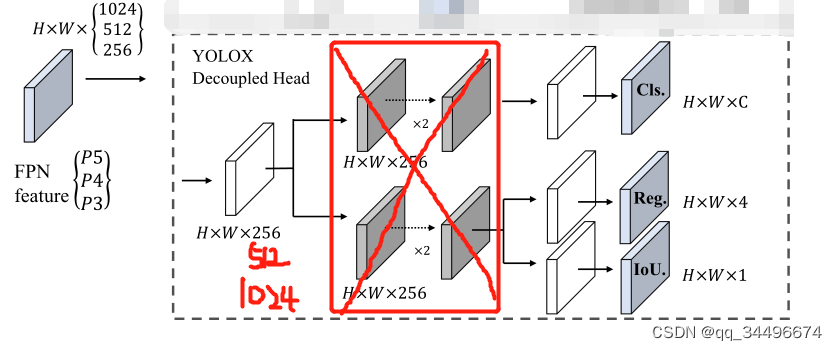
改进:
1.将红色框中的conv去掉,缩小参数量和计算量;
2.channels =256 ,512 ,1024是考虑不增加参数,不进行featuremap的信息压缩
class Detect(nn.Module):
    stride = None  # strides computed during build
    onnx_dynamic = False  # ONNX export parameter

    def __init__(self, nc=80, anchors=(), ch=(), inplace=True):  # detection layer
        super().__init__()
        self.nc = nc  # number of classes
        self.no = nc + 5  # number of outputs per anchor
        self.nl = len(anchors)  # number of detection layers
        self.na = len(anchors[0]) // 2  # number of anchors
        self.grid = [torch.zeros(1)] * self.nl  # init grid
        self.anchor_grid = [torch.zeros(1)] * self.nl  # init anchor grid
        self.register_buffer('anchors', torch.tensor(anchors).float().view(self.nl, -1, 2))  # shape(nl,na,2)
        self.m = nn.ModuleList(nn.Conv2d(x, self.no * self.na, 1) for x in ch)  # output conv
        self.inplace = inplace  # use in-place ops (e.g. slice assignment)

    def forward(self, x):
        z = []  # inference output
        for i in range(self.nl):
            x[i] = self.m[i](x[i])  # conv
            bs, _, ny, nx = x[i].shape  # x(bs,255,20,20) to x(bs,3,20,20,85)
            x[i] = x[i].view(bs, self.na, self.no, ny, nx).permute(0, 1, 3, 4, 2).contiguous()

            if not self.training:  # inference
                if self.onnx_dynamic or self.grid[i].shape[2:4] != x[i].shape[2:4]:
                    self.grid[i], self.anchor_grid[i] = self._make_grid(nx, ny, i)

                y = x[i].sigmoid()
                if self.inplace:
                    y[..., 0:2] = (y[..., 0:2] * 2 - 0.5 + self.grid[i]) * self.stride[i]  # xy
                    y[..., 2:4] = (y[..., 2:4] * 2) ** 2 * self.anchor_grid[i]  # wh
                else:  # for YOLOv5 on AWS Inferentia https://github.com/ultralytics/yolov5/pull/2953
                    xy = (y[..., 0:2] * 2 - 0.5 + self.grid[i]) * self.stride[i]  # xy
                    wh = (y[..., 2:4] * 2) ** 2 * self.anchor_grid[i]  # wh
                    y = torch.cat((xy, wh, y[..., 4:]), -1)
                z.append(y.view(bs, -1, self.no))

        return x if self.training else (torch.cat(z, 1), x)
特点
1.模型给出的目标cls较高,需要将conf的阈值设置较大(0.4),不然准确率较低
2.对于少样本的检测效果较好,准确率的提升比召回率多
3. 准确率的提升比召回率多,
该改进不如上面的模型提升多,但是参数量小,计算量小少9Gflop,占用显存少
decoupled head指标提升的原因:由于yolov5s原本的head不能完全的提取featuremap中的信息,decoupled head能够较为充分的提取featuremap的信息;
为什么decoupled head目标的cls会比较高,没想明白
为什么去掉base_conv,召回率要比准确率提升少
关于yolov5训练时参数workers和batch-size的理解yolov5训练命令workers和batch-size参数的理解两个参数的调优总结yolov5训练命令python.\train.py--datamy.yaml--workers8--batch-size32--epochs100yolov5的训练很简单,下载好仓库,装好依赖后,只需自定义一下data目录中的yaml文件就可以了。这里我使用自定义的my.yaml文件,里面就是定义数据集位置和训练种类数和名字。workers和batch-size参数的理解一般训练主要需要调整的参数是这两个:workers指数据装载时cpu所使
$gem--version[/home/rohit/.rvm/gems/ruby-1.9.3-p125@qnrDashboard/specifications/net-ssh-2.5.2.gemspec]isn'taGem::Specification(NilClassinstead).[/home/rohit/.rvm/gems/ruby-1.9.3-p125@qnrDashboard/specifications/net-sftp-2.0.5.gemspec]isn'taGem::Specification(NilClassinstead).[/home/rohit/.rvm/ge
我一直在尝试使用RVM安装Ruby1.9.2-head,但一直收到此错误消息:echoexecutablehostrubyisrequired为了通过RVM安装Ruby,是否必须具有系统Ruby?我拥有rvmnotes中给出的所有依赖项,但我没有安装任何系统Ruby。错误日志显示:[2011-05-0207:42:19]makegcc-O3-ggdb-Wextra-Wno-unused-parameter-Wno-parentheses-Wpointer-arith-Wwrite-strings-Wno-missing-field-initializers-Wno-long-long-
我使用Net::HTTP和Ruby来抓取URL。我不想抓取流式音频,例如:http://listen2.openstream.co/334其实我只想抓取Html内容,所以没有pdfs、video、txt..现在,我将open_timeout和read_timeout都设置为10,所以即使我抓取这些流式音频页面,它们也会超时。url='http://listen2.openstream.co/334'path=uri.pathreq=Net::HTTP::Get.new(path,{'Accept'=>'*/*','Content-Type'=>'text/plain;charset=u
我在OSX10.9.1中启动终端时反复出现问题。每次启动终端时,我都会重复以下至少30次Unknownoption:1Usage:head[-options]...-musemethodfortherequest(defaultis'HEAD')-fmakerequestevenifheadbelievesmethodisillegal-bUsethespecifiedURLasbase-tSettimeoutvalue-iSettheIf-Modified-Sinceheaderontherequest-cusethiscontent-typeforPOST,PUT,CHECKIN-
当引用此block时,此弃用消息对我来说意味着什么?defjson_response(object,status=:ok)renderjson:object,status:statusend编辑讯息:Rails6.1willreturnContent-Typeheaderwithoutmodification…use#media_typeinstead 最佳答案 当我将我的应用程序从Rails5.2.3升级到Rails6.0.0-rc1时,我收到了同样的错误消息config/application.rb#thiswastheline
我有一个简单的Ruby脚本,看起来像这样require'csv'whileline=STDIN.getsarray=CSV.parse_line(line)putsarray[2]end但是当我尝试在这样的Unix管道中使用此脚本时,我得到10行输出,然后是一个错误:rubylib/myscript.rb(Errno::EPIPE)有没有一种方法可以以防止引发破损管道异常的方式编写Ruby脚本? 最佳答案 head在读取所有需要的数据后关闭标准输出流。您应该处理异常并停止写入标准输出。一旦标准输出关闭,以下代码将中止循环:while
我正在使用RubyonRails3,我想知道:location=>...和head:ok语句在以下代码中的含义,如何它们的工作原理以及我如何\应该使用它们。respond_todo|format|format.xml{render:xml=>@user,:status=>:created,:location=>@user}endrespond_todo|format|format.xml{head:ok}end 最佳答案 render...:location=>@user将设置HTTPlocationheader通知客户端新创建资源
趁着寒假期间稍微尝试跑了一下yolov5和yolov7的代码,由于自己用的笔记本没有独显,台式机虽有独显但用起来并不顺利,所以选择了租云服务器的方式,选择的平台是矩池云(价格合理,操作便捷)需要特别指出的是,如果需要用pycharm链接云服务器训练,必须要使用pycharm的专业版而不是社区版,专业版可以使用SSH服务连接云服务器。关于专业版的获取,据我所知一是可以买,二是如果你是在校大学生,可以用学生证向JetBrain申请专业版使用权,我就是通过这种方式激活专业版账户的,我记得当时两三天官方就发激活邮件了,还是很人性化的,使用期一年。下面开始正题本教程只涉及将yolov5及yolov7跑通
Magento附带了六个以上的JavaScript库,这些库对已经很繁琐的加载时间没有帮助。有没有人能够成功地将head.js或labjs之类的脚本加载器与Magento一起使用,以便他们可以异步加载?我一直在努力,但无法让它发挥作用。似乎页面上的内联脚本在加载库之前就已触发。我知道head.js有一个类似于head.ready的函数来告诉脚本执行,但是内联脚本太多了,将它添加到整个站点的每个事件中是不切实际的。 最佳答案 关于内联脚本,有一个程序化的解决方案。您可以编写一个绑定(bind)到core_block_abstract_