目录
Intellij IDEA快速实现Docker镜像部署的方法步骤
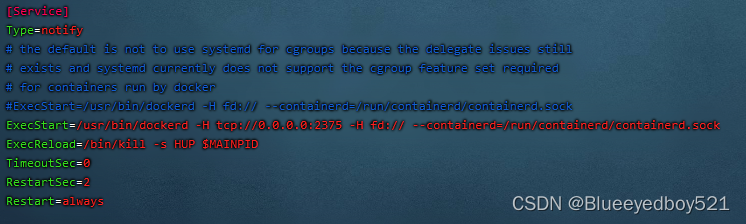
编辑vim /lib/systemd/system/docker.service添加-H tcp://0.0.0.0:2375
[root@docker]# vim /lib/systemd/system/docker.service
#修改execstart这行
execstart=/usr/bin/dockerd  -H tcp://0.0.0.0:2375  -H unix:///var/run/docker.sock
# 重新加载配置文件
[root@idocker]# systemctl daemon-reload
# 重启服务
[root@docker]# systemctl restart docker.service
# 查看端口是否开启
[root@docker]# netstat -nlpt
# 直接curl看是否生效
[root@docker]# curl http://127.0.0.1:2375/info
打开idea,从file->settings->plugins->install jetbrains plugin进入插件安装界面,在搜索框中输入docker,可以看到docker ,点击右边的install按钮进行安装。安装后重启idea。

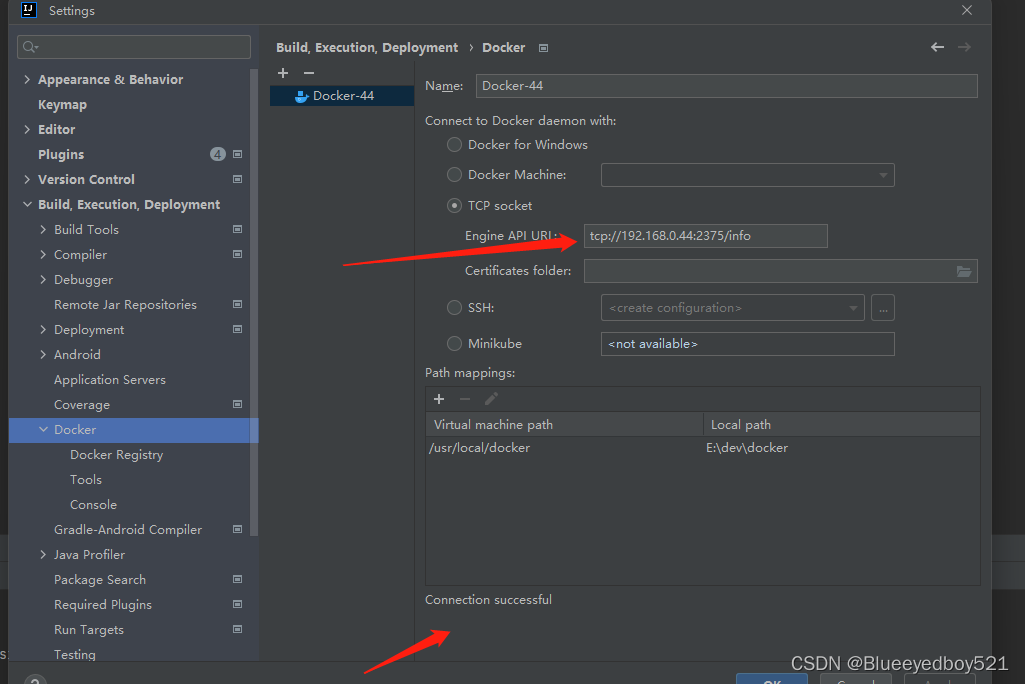
重启后配置docker,连接到远程docker服务。从file->settings->build,execution,deployment->docker打开配置界面。
<properties>
	<maven.compiler.source>8</maven.compiler.source>
	<maven.compiler.target>8</maven.compiler.target>
	<docker.image.prefix>demo</docker.image.prefix>
	<mainClass>com.demo.inspection.InspectionApplication</mainClass>
</properties>
...
...
<build>
        <resources>
            <!--引入静态文件-->
            <resource>
                <directory>src/main/resources</directory>
                <filtering>true</filtering>
            </resource>
            <!--引入mapper对应的xml文件-->
            <resource>
                <directory>src/main/java</directory>
                <includes>
                    <include>**/*.xml</include>
                </includes>
            </resource>
        </resources>
        <plugins>
            <plugin>
                <groupId>org.springframework.boot</groupId>
                <artifactId>spring-boot-maven-plugin</artifactId>
                <!--                <version>1.5.3.RELEASE</version>-->
                <configuration>
                    <mainClass>${mainClass}</mainClass>
                </configuration>
                <executions>
                    <execution>
                        <goals>
                            <goal>repackage</goal>
                        </goals>
                    </execution>
                </executions>
            </plugin>
            <plugin>
                <groupId>org.apache.maven.plugins</groupId>
                <artifactId>maven-compiler-plugin</artifactId>
                <!--                <version>${maven-compiler-plugin.version}</version>-->
                <configuration>
                    <source>${maven.compiler.source}</source>
                    <target>${maven.compiler.target}</target>
                    <encoding>${project.build.sourceEncoding}</encoding>
                    <!--<excludes>
                        <exclude>param.data</exclude>
                    </excludes>-->
                </configuration>
            </plugin>
            <plugin>
                <groupId>org.apache.maven.plugins</groupId>
                <artifactId>maven-resources-plugin</artifactId>
                <!--                <version>3.1.0</version>-->
                <configuration>
                    <encoding>UTF-8</encoding>
                    <useDefaultDelimiters>false</useDefaultDelimiters>
                    <delimiters>
                        <delimiter>$[*]</delimiter>
                    </delimiters>

                    <!-- 过滤后缀不需要转码的文件后缀名.crt/.p8 -->
                    <nonFilteredFileExtensions>
                        <nonFilteredFileExtension>dat</nonFilteredFileExtension>
                    </nonFilteredFileExtensions>

                </configuration>
            </plugin>
            <plugin>
                <groupId>org.apache.maven.plugins</groupId>
                <artifactId>maven-source-plugin</artifactId>
                <version>3.1.0</version>
                <!--                <version>2.4</version>-->

                <executions>
                    <execution>
                        <id>attach-sources</id>
                        <goals>
                            <goal>jar-no-fork</goal>
                        </goals>
                    </execution>
                </executions>
            </plugin>

            <plugin>
                <groupId>org.apache.maven.plugins</groupId>
                <artifactId>maven-deploy-plugin</artifactId>
                <version>2.8.2</version>
            </plugin>

            <plugin>
                <groupId>org.apache.maven.plugins</groupId>
                <artifactId>maven-surefire-plugin</artifactId>
                <!--                <version>2.19.1</version>-->
                <configuration>
                    <skipTests>true</skipTests>    <!--默认关掉单元测试 -->
                </configuration>
            </plugin>

        </plugins>
        <defaultGoal>package</defaultGoal>
    </build>
此处如果打包的jar包没有包含依赖,需要增加如下
<executions>
    <execution>
        <goals>
            <goal>repackage</goal>
        </goals>
    </execution>
</executions>
内容如下:
from java:8
copy target/demo-1.0.0.jar app.jar
run bash -c "touch /app.jar"
expose 8080
ENTRYPOINT java -Dfile.encoding=utf-8 -jar app.jar --spring.profiles.active=test
# entrypoint ["java","-jar","demo.jar"]
注意:Dockerfile中ENTRYPOINT前面不要有注释#
如果是ARM-aarch64架构可以使用如下jdk镜像
from king019/jdk:8_aarch64
1)、首先在idea工程目录下新建config/application.yml

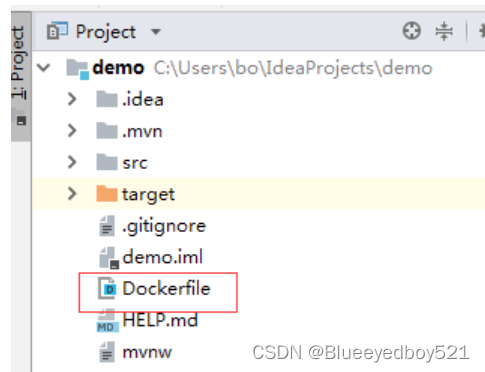
2)、修改Dockerfile如下:重点是ADD config/ /config/
from king019/jdk:8_aarch64
ENV TZ=Asia/Shanghai
run bash -c "mkdir /app"
copy target/demo-inspection-1.0.0.jar /app/app.jar
expose 8208
ADD config/ /config/
ENTRYPOINT java -Dfile.encoding=utf-8 -jar /app/app.jar
3)、在宿主机下新建配置文件
例如/usr/local/demo/config/application.yml,我们假设修改端口
server:
  port: 8209
4)、在docker创建容器时增加映射
docker run -d -p 8006:8006 -v /usr/local/demo/config/:/config --name myapp myapp:1.0
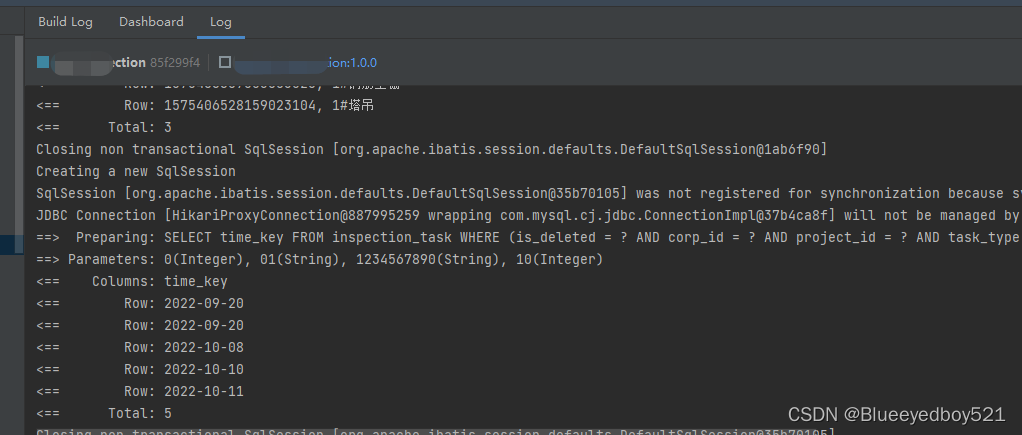
5)、效果
2022-10-11 20:12:12.498  INFO 1 --- [           main] [      127.0.0.1] daemon [未知] o.a.coyote.http11.Http11NioProtocol      : Starting ProtocolHandler ["http-nio-8209"]
2022-10-11T12:12:12.521509307Z 2022-10-11 20:12:12.521  INFO 1 --- [           main] [      127.0.0.1] daemon [未知] o.s.b.w.embedded.tomcat.TomcatWebServer  : Tomcat started on port(s): 8209 (http) with context path ''
6)、注意
如果该项目在nacos中存在application.yml,则nacos的优先级最高
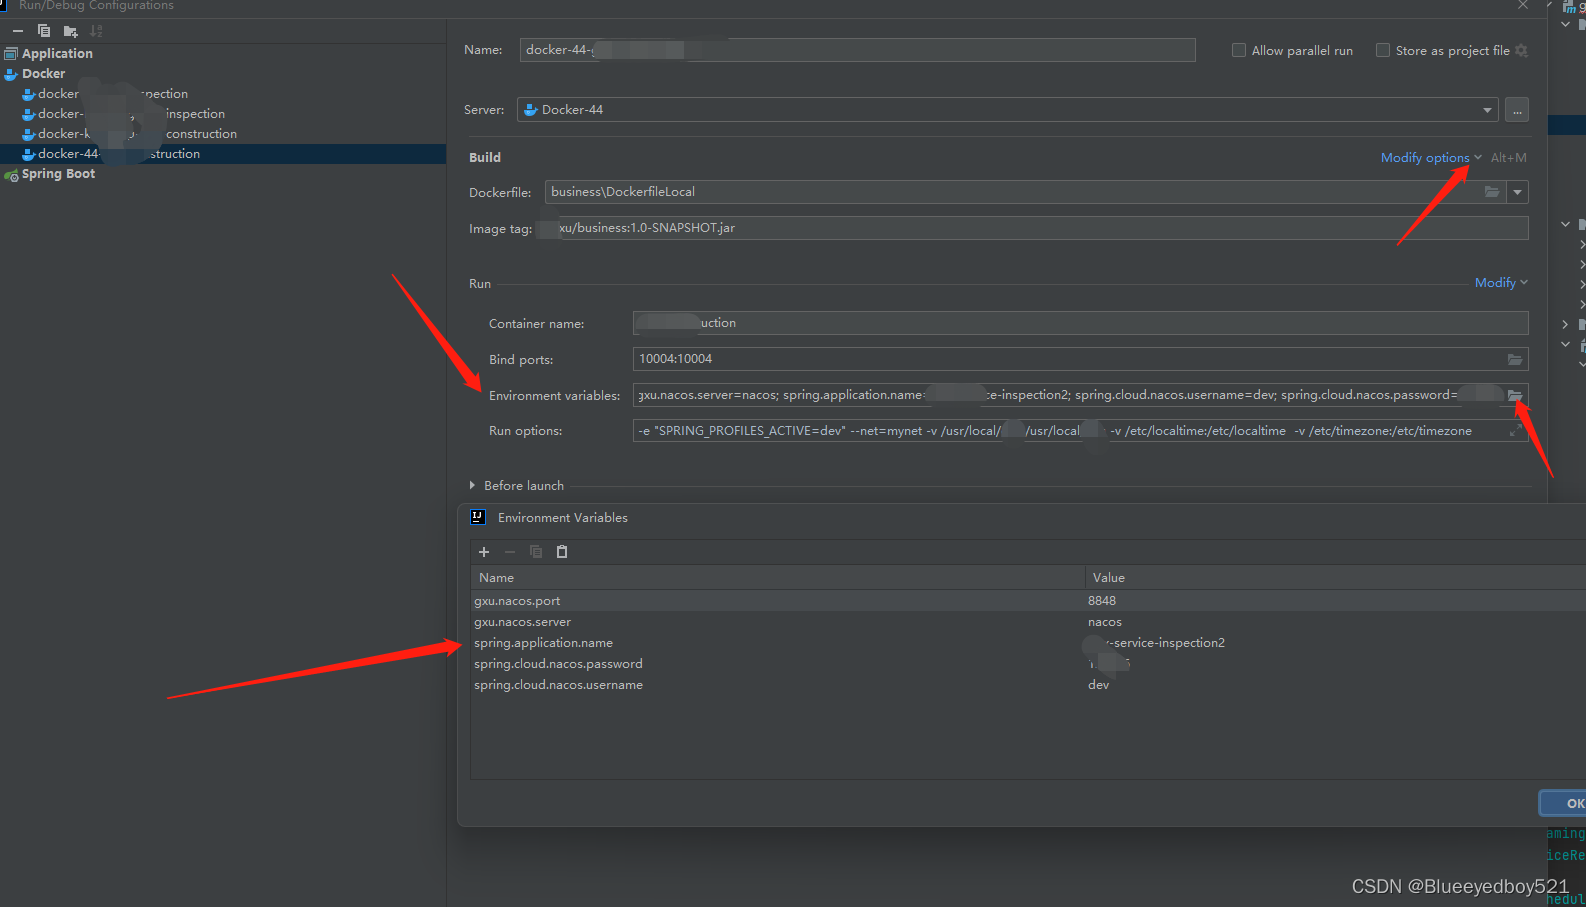
将工程打包,在idea terminal中执行mvn clean package命令进行编译打包,打包后会在target目录下生成jar包。生成jar包后,可以在本地启动服务,进行测试。测试后,配置docker镜像制件命令。从run->edit configrations进入配置界面。
点击docker,再点击+号,添加一个docker命令,输入name,选择server,选择dockerfile文件,输入镜像tag,完成配置。
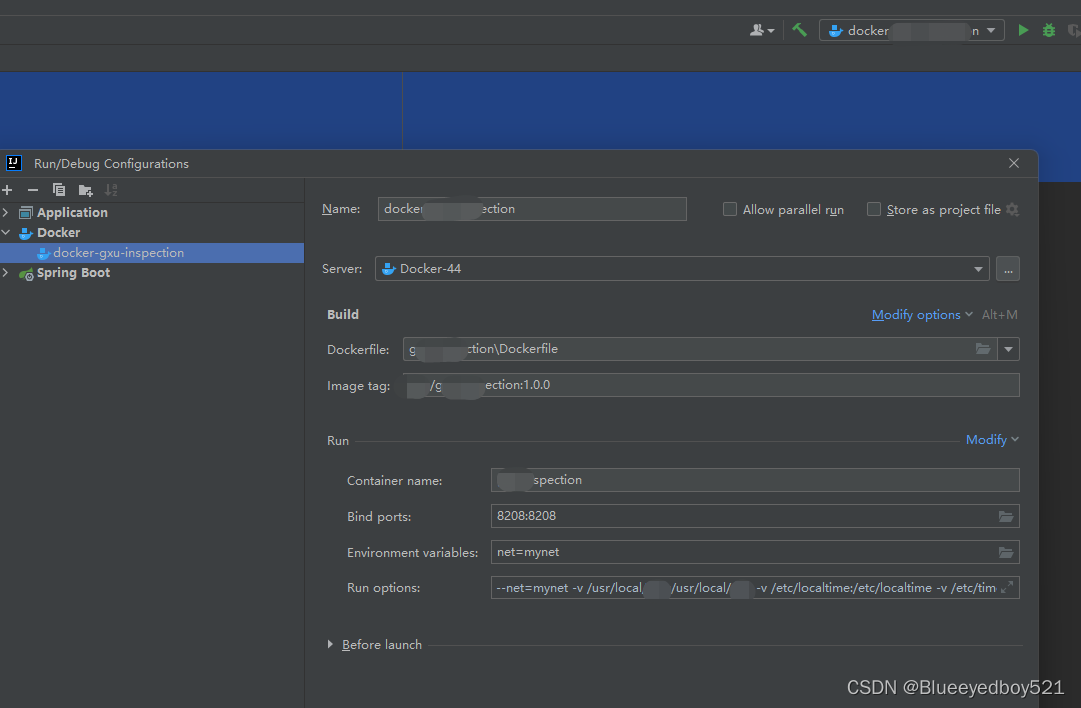
注意上面配置run options增加如下:
--net=mynet -v /usr/local/demo:/usr/local/demo -v /etc/localtime:/etc/localtime -v /etc/timezone:/etc/timezone
# 指定配置文件profile
--net=mynet -e "SPRING_PROFILES_ACTIVE=dev" -v /usr/local/demo:/usr/local/demo -v /etc/localtime:/etc/localtime -v /etc/timezone:/etc/timezone
完成后,执行这个命令:

可以看到build日志,推送到docker并且创建了容器;
此时可能遇到问题:Deploying ‘xxxx Dockerfile: Dockerfile‘... Failed to deploy ‘xxxx Dockerfile:Not connected to docker
idea自动发布到docker里面的时候发生上面的错误。参考:https://blog.csdn.net/qq_29503199/article/details/107556058
问题重现
1.idea上面可以正确远程连接服务器上面的docker,(可以删除、替换镜像等操作)
2.但是在部署程序到服务器docker上面的时候就会说连接失败
分析原因(针对于自己当时的情况)
1.是否tcp连接失败(答:不是,经测试服务器上面的docker远程连接成功)
2.是否Dockerfiel出现问题(答:不是,在服务器上面利用jar和Dockerfiel可以正确生成镜像并创建容器)
3.服务器上面内存是否充足(答:经检查服务器资源充足)
4.检查idea是否文件操作权限不足导致读取Dockerfile失败(答:将idea以管理员启动后可以正确部署了)
结论:
idea在进行某些调用三方插件的过程中,需要管理员权限的支撑

比如设置spring.application.name,修改nacos地址等信息
点击modify options,增加Environment variables 在弹框中添加如下变量
我正在学习如何使用Nokogiri,根据这段代码我遇到了一些问题:require'rubygems'require'mechanize'post_agent=WWW::Mechanize.newpost_page=post_agent.get('http://www.vbulletin.org/forum/showthread.php?t=230708')puts"\nabsolutepathwithtbodygivesnil"putspost_page.parser.xpath('/html/body/div/div/div/div/div/table/tbody/tr/td/div
总的来说,我对ruby还比较陌生,我正在为我正在创建的对象编写一些rspec测试用例。许多测试用例都非常基础,我只是想确保正确填充和返回值。我想知道是否有办法使用循环结构来执行此操作。不必为我要测试的每个方法都设置一个assertEquals。例如:describeitem,"TestingtheItem"doit"willhaveanullvaluetostart"doitem=Item.new#HereIcoulddotheitem.name.shouldbe_nil#thenIcoulddoitem.category.shouldbe_nilendend但我想要一些方法来使用
我有一个Ruby程序,它使用rubyzip压缩XML文件的目录树。gem。我的问题是文件开始变得很重,我想提高压缩级别,因为压缩时间不是问题。我在rubyzipdocumentation中找不到一种为创建的ZIP文件指定压缩级别的方法。有人知道如何更改此设置吗?是否有另一个允许指定压缩级别的Ruby库? 最佳答案 这是我通过查看rubyzip内部创建的代码。level=Zlib::BEST_COMPRESSIONZip::ZipOutputStream.open(zip_file)do|zip|Dir.glob("**/*")d
类classAprivatedeffooputs:fooendpublicdefbarputs:barendprivatedefzimputs:zimendprotecteddefdibputs:dibendendA的实例a=A.new测试a.foorescueputs:faila.barrescueputs:faila.zimrescueputs:faila.dibrescueputs:faila.gazrescueputs:fail测试输出failbarfailfailfail.发送测试[:foo,:bar,:zim,:dib,:gaz].each{|m|a.send(m)resc
很好奇,就使用rubyonrails自动化单元测试而言,你们正在做什么?您是否创建了一个脚本来在cron中运行rake作业并将结果邮寄给您?git中的预提交Hook?只是手动调用?我完全理解测试,但想知道在错误发生之前捕获错误的最佳实践是什么。让我们理所当然地认为测试本身是完美无缺的,并且可以正常工作。下一步是什么以确保他们在正确的时间将可能有害的结果传达给您? 最佳答案 不确定您到底想听什么,但是有几个级别的自动代码库控制:在处理某项功能时,您可以使用类似autotest的内容获得关于哪些有效,哪些无效的即时反馈。要确保您的提
假设我做了一个模块如下:m=Module.newdoclassCendend三个问题:除了对m的引用之外,还有什么方法可以访问C和m中的其他内容?我可以在创建匿名模块后为其命名吗(就像我输入“module...”一样)?如何在使用完匿名模块后将其删除,使其定义的常量不再存在? 最佳答案 三个答案:是的,使用ObjectSpace.此代码使c引用你的类(class)C不引用m:c=nilObjectSpace.each_object{|obj|c=objif(Class===objandobj.name=~/::C$/)}当然这取决于
出于纯粹的兴趣,我很好奇如何按顺序创建PI,而不是在过程结果之后生成数字,而是让数字在过程本身生成时显示。如果是这种情况,那么数字可以自行产生,我可以对以前看到的数字实现垃圾收集,从而创建一个无限系列。结果只是在Pi系列之后每秒生成一个数字。这是我通过互联网筛选的结果:这是流行的计算机友好算法,类机器算法:defarccot(x,unity)xpow=unity/xn=1sign=1sum=0loopdoterm=xpow/nbreakifterm==0sum+=sign*(xpow/n)xpow/=x*xn+=2sign=-signendsumenddefcalc_pi(digits
我正在尝试使用ruby和Savon来使用网络服务。测试服务为http://www.webservicex.net/WS/WSDetails.aspx?WSID=9&CATID=2require'rubygems'require'savon'client=Savon::Client.new"http://www.webservicex.net/stockquote.asmx?WSDL"client.get_quotedo|soap|soap.body={:symbol=>"AAPL"}end返回SOAP异常。检查soap信封,在我看来soap请求没有正确的命名空间。任何人都可以建议我
关闭。这个问题是opinion-based.它目前不接受答案。想要改进这个问题?更新问题,以便editingthispost可以用事实和引用来回答它.关闭4年前。Improvethisquestion我想在固定时间创建一系列低音和高音调的哔哔声。例如:在150毫秒时发出高音调的蜂鸣声在151毫秒时发出低音调的蜂鸣声200毫秒时发出低音调的蜂鸣声250毫秒的高音调蜂鸣声有没有办法在Ruby或Python中做到这一点?我真的不在乎输出编码是什么(.wav、.mp3、.ogg等等),但我确实想创建一个输出文件。
我在我的项目目录中完成了compasscreate.和compassinitrails。几个问题:我已将我的.sass文件放在public/stylesheets中。这是放置它们的正确位置吗?当我运行compasswatch时,它不会自动编译这些.sass文件。我必须手动指定文件:compasswatchpublic/stylesheets/myfile.sass等。如何让它自动运行?文件ie.css、print.css和screen.css已放在stylesheets/compiled。如何在编译后不让它们重新出现的情况下删除它们?我自己编译的.sass文件编译成compiled/t