Vue中预览HIKVSION海康威视的NVR(网络硬盘录像机)中多个通道(摄像机)的视频:
Vue中预览HIKVSION海康威视的NVR(网络硬盘录像机)中多个通道(摄像机)的视频_霸道流氓气质的博客-CSDN博客_海康nvr网页预览
在上面进行NVR视频预览时采用的是WEB控件开发包,需要电脑安装插件,并且需要浏览器在
兼容模式下预览。
除此之外,还有另一种无插件开发包的方式
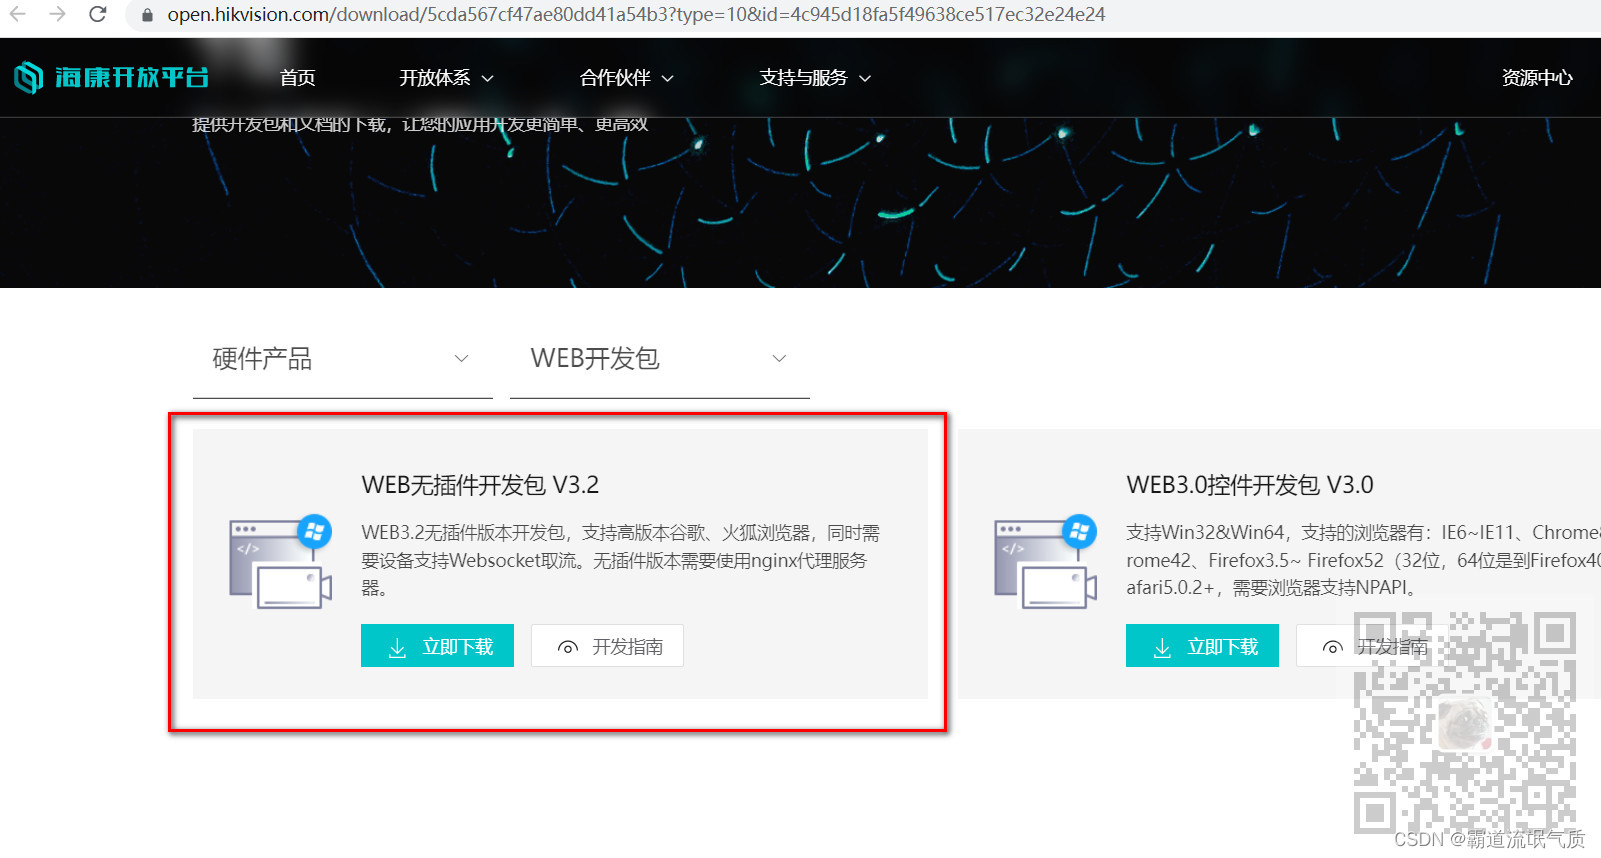
截止目前是WEB无插件开发包V3.2
WEB3.2无插件版本开发包,支持高版本谷歌、火狐浏览器,同时需要设备支持Websocket取流。无插件版本需要使用nginx代理服务器。
按照说明可知,需要NVR支持websocket取流。
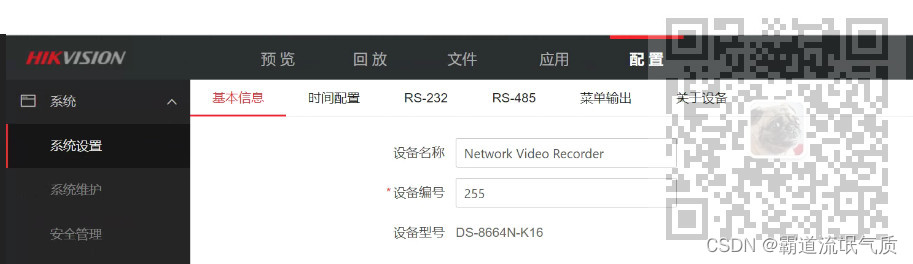
这里的NVR型号为:DS-8664n-k16
登录到NVR的web页面-配置-系统设置-网络-高级配置-启用websocket
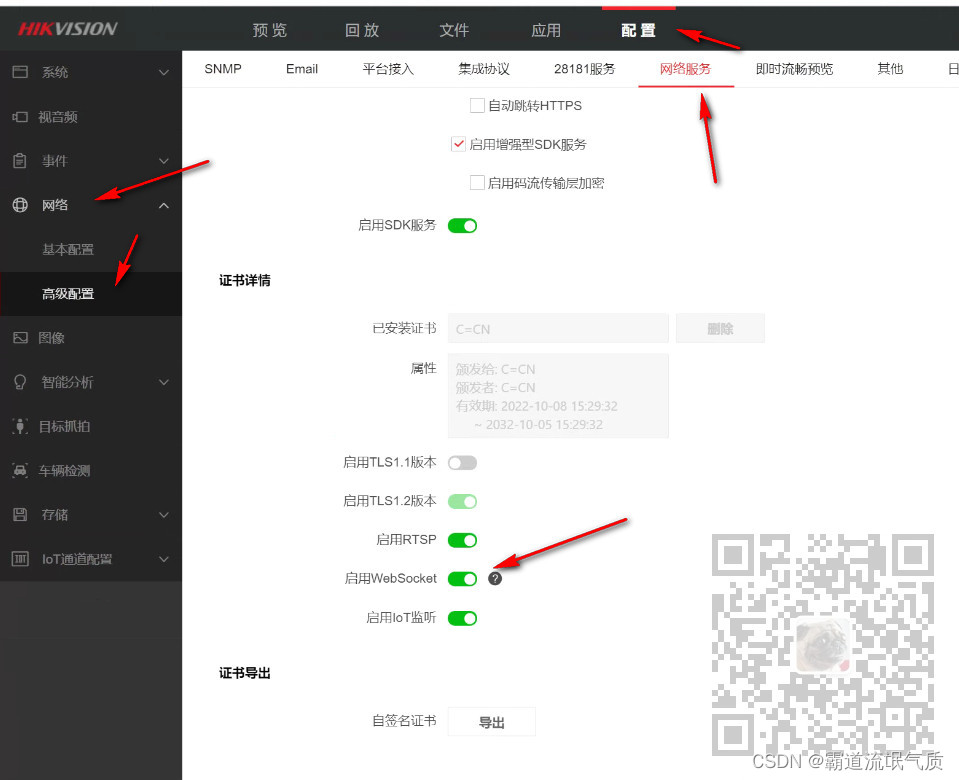
如果有启用WebSokcet选项,则代表可以,为了进一步验证,下载上面的官方demo。
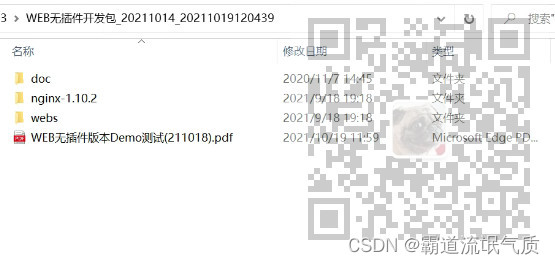
按照官方提供的说明,运行nginx的代理
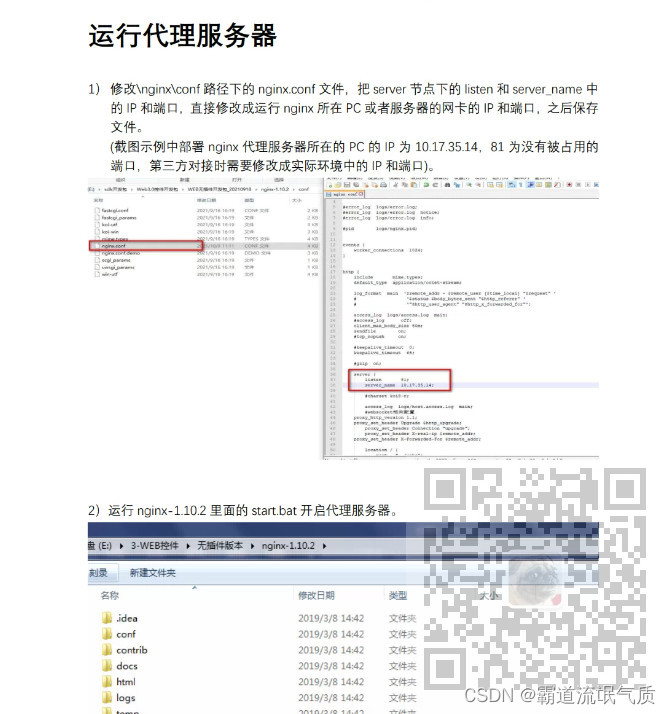
修改nginx目录下的配置文件
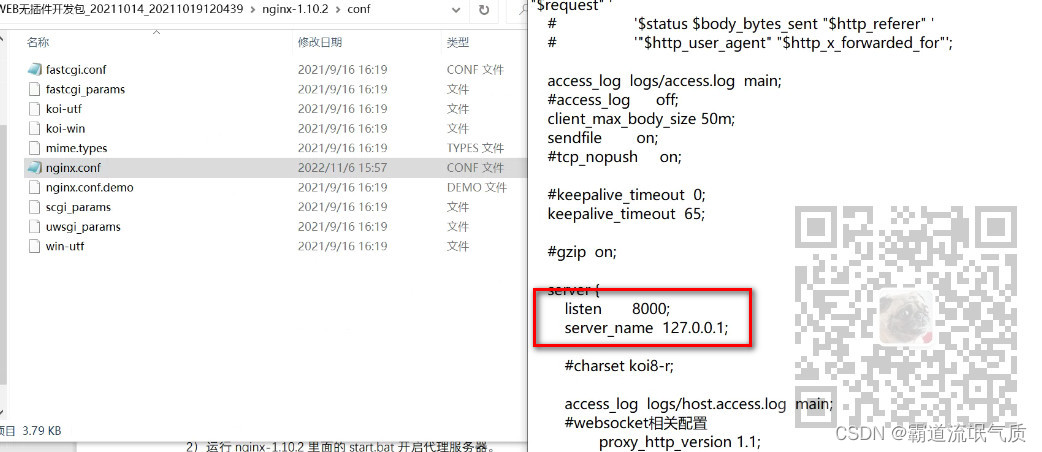
这里只是简单修改了端口号为8000
然后点击start.bat启动nginx,访问
http://127.0.0.1:8000/cn/demo.html
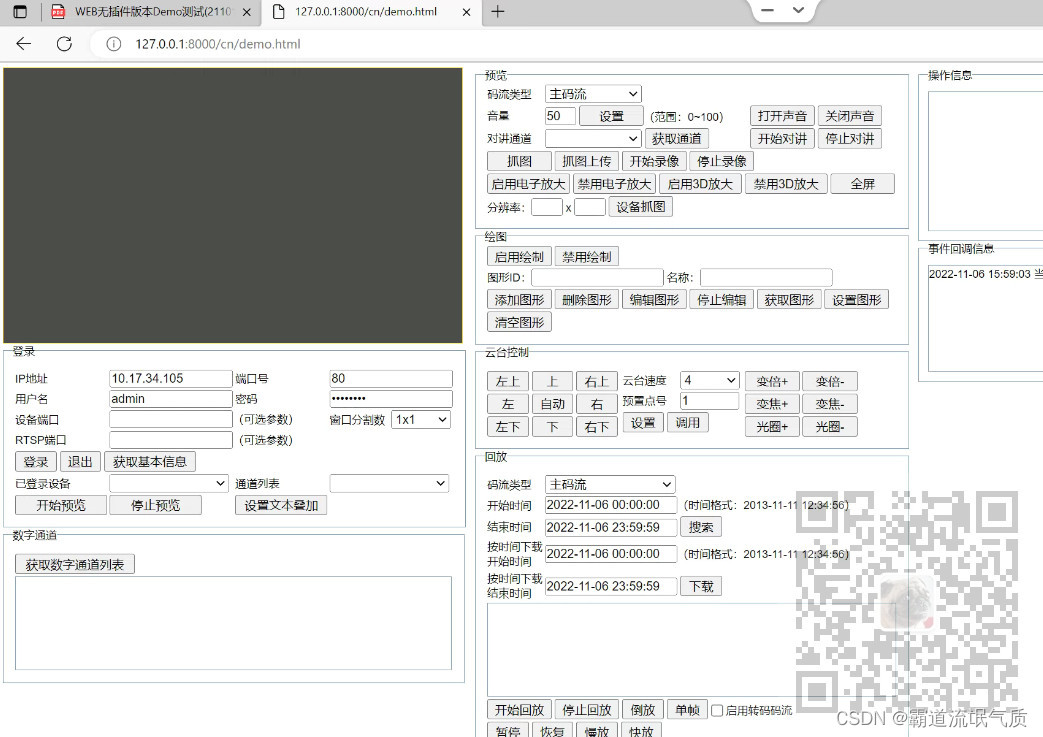
输入NVR对应的地址、用户名、密码等信息,然后点击登录和开始预览
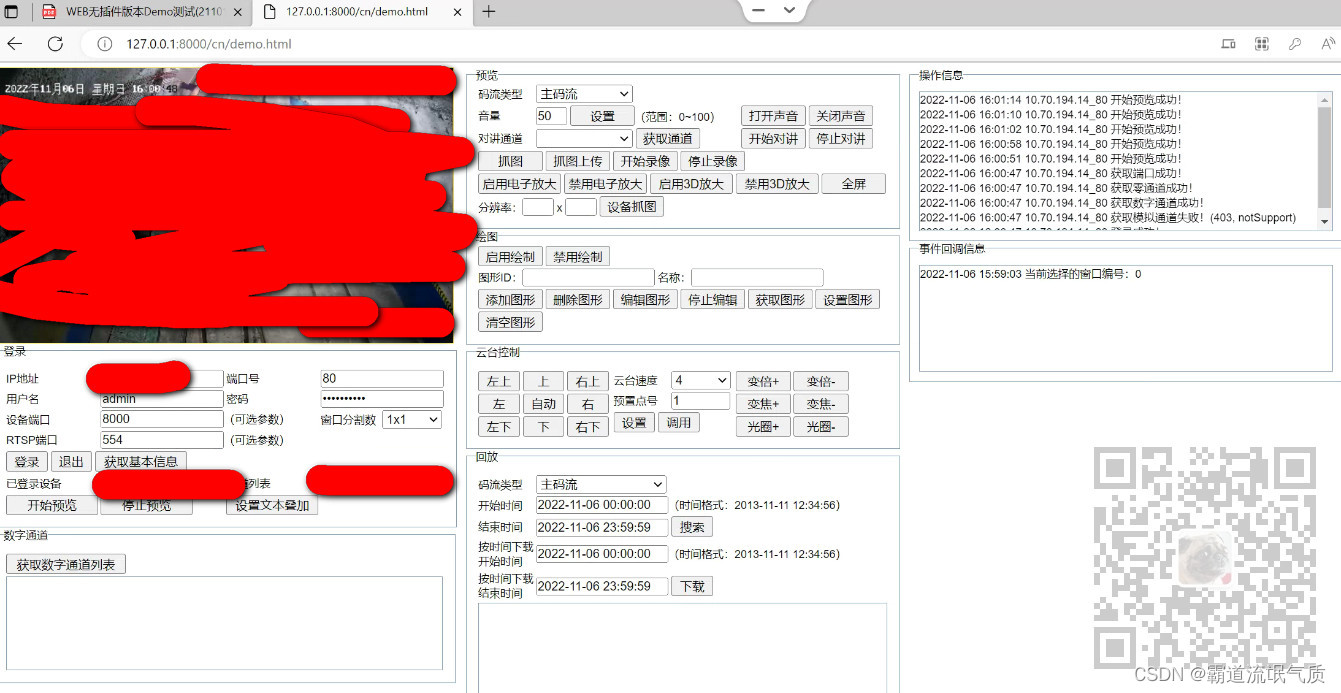
如果官方demo能预览成功,那么就可以使用无插件开发包了。
注:
博客:
霸道流氓气质的博客_CSDN博客-C#,架构之路,SpringBoot领域博主
关注公众号
霸道的程序猿
获取编程相关电子书、教程推送与免费下载。
1、在demo.html中能实现预览的基础上,只需要根据自己的需要改造即可,
对应的demo以及接口文档说的很清楚。
那么怎么将demo的示例与现有项目进行结合,比如前后端分离的SpringBoot+Vue的项目。
若依前后端分离版本地搭建开发环境并运行项目的教程:
若依前后端分离版手把手教你本地搭建环境并运行项目_霸道流氓气质的博客-CSDN博客_前后端分离项目本地运行
在基于Vue的项目上进行代码改造
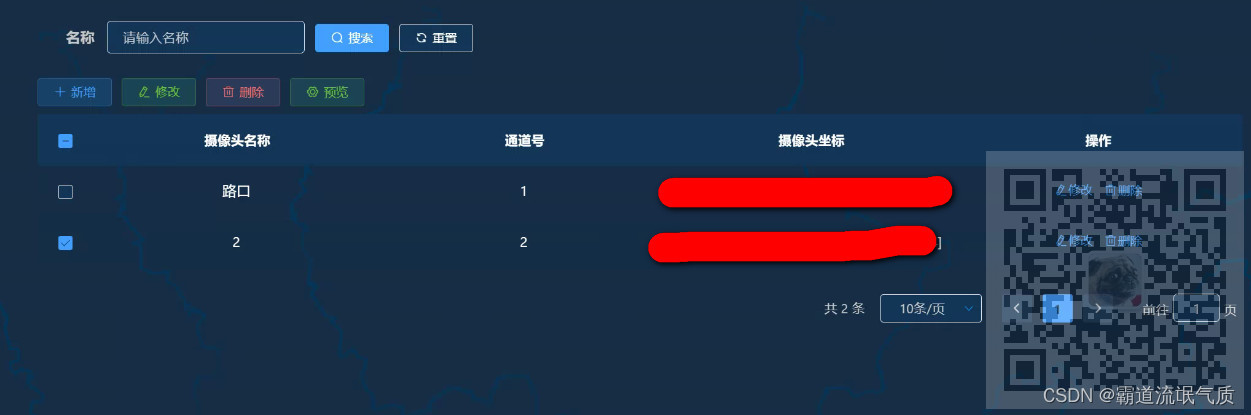
后台存储摄像头的相关信息,最需要的就是通道号,拿其来进行预览时传参用
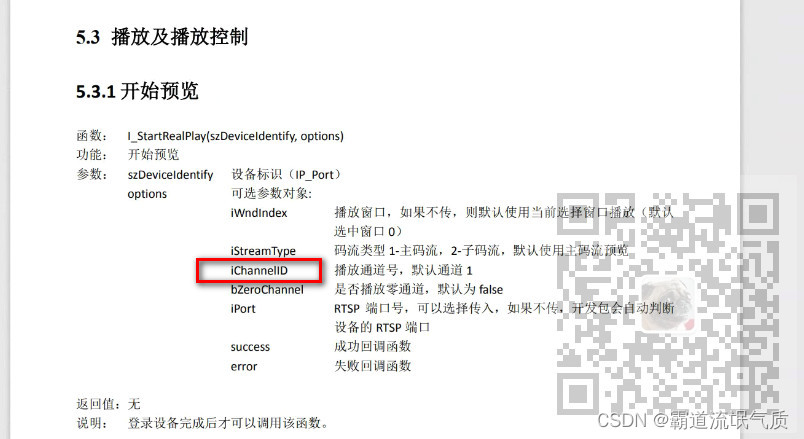
选中摄像头时点击预览按钮,传递通道号参数至预览页面。
前面流程可参考
SpringBoot+Vue+HIKVSION实现摄像头多选并多窗口预览(插件版):
SpringBoot+Vue+HIKVSION实现摄像头多选并多窗口预览(插件版)_霸道流氓气质的博客-CSDN博客_websocket取流
然后根据官方demo引入需要的js等文件
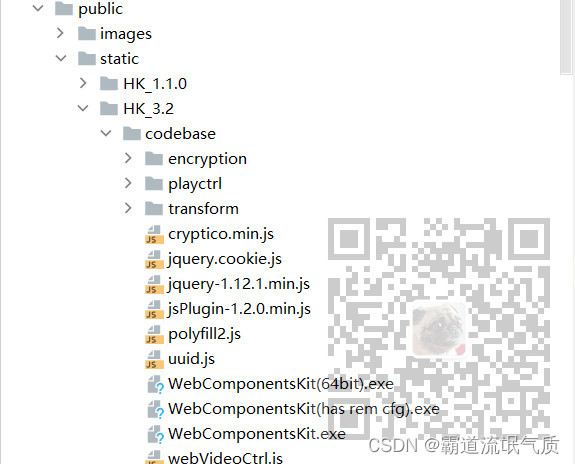
下面主要是预览页面的代码
<template>
  <el-dialog
    title="视频监控"
    :visible.sync="videoOpen"
    width="800px"
    :append-to-body=false
    @close="videoClose"
    class="video_box"
    :modal=false
  >
    <!-- 摄像头 -->
    <!--视频窗口展示-->
    <div id="playWnd" class="playWnd" ref="playWnd"></div>
  </el-dialog>
</template>

<script>
const g_iWndIndex = 0; //可以不用设置这个变量,有窗口参数的接口中,不用传值,开发包会默认使用当前选择窗口
export default {
  name: "HkVideo1",
  components: {},
  props: {
    channelId: "",
  },
  watch: {},
  data() {
    return {
      isLogin: false,
      videoOpen: false,
      szDeviceIdentify: "", // 设备标识(IP_Port)
      ip: "NVR的ip",
      port: "80",
      username: "NVR的用户名",
      password: "NVR的密码",
    };
  },
  created() {},
  mounted() {},
  destroyed() {},
  methods: {
    // 创建播放实例
    async initPlugin() {

      let iRet = window.WebVideoCtrl.I_CheckPluginInstall();

      if (-1 == iRet) {
        alert("您还未安装过插件,请安装WebComponentsKit.exe!");
        this.$confirm("是否下载WebComponentsKit.exe插件?", "提示", {
          confirmButtonText: "确定",
          cancelButtonText: "取消",
          type: "warning",
        }).then(() => {
          window.location.href = "/static/HK_3.2/WebComponentsKit.exe";
        });

        return;
      }
      // 初始化插件参数及插入插件
      window.WebVideoCtrl.I_InitPlugin(800, 600, {
        bWndFull: true, //是否支持单窗口双击全屏,默认支持 true:支持 false:不支持
        iPackageType: 2,
        //szColorProperty:"plugin-background:0000ff; sub-background:0000ff; sub-border:00ffff; sub-border-select:0000ff",   //2:PS 11:MP4
        iWndowType: 1,
        bNoPlugin: true,
        // 窗口选中事件回调
        cbSelWnd: (xmlDoc) => {
          var szInfo = "当前选择的窗口编号:" + g_iWndIndex;
          console.log(szInfo);
        },
        // 窗口双击事件回调
        cbDoubleClickWnd: (iWndIndex, bFullScreen) => {
          var szInfo = "当前放大的窗口编号:" + iWndIndex;
          if (!bFullScreen) {
            szInfo = "当前还原的窗口编号:" + iWndIndex;
          }
          console.log(szInfo);
        },
        // 插件事件回调
        cbEvent: (iEventType, iParam1, iParam2) => {
          if (2 == iEventType) {
            // 回放正常结束
            console.log("窗口" + iParam1 + "回放结束!");
          } else if (-1 == iEventType) {
            console.log("设备" + iParam1 + "网络错误!");
          } else if (3001 == iEventType) {
            this.clickStopRecord(g_szRecordType, iParam1);
          }
        },
        cbRemoteConfig: () => {
          console.log("关闭远程配置库!");
        },
        // 插件初始化完成回调
        cbInitPluginComplete: () => {
          this.$nextTick(() => {
            console.log('窗口', this.$refs.playWnd)
            let isInit = window.WebVideoCtrl.I_InsertOBJECTPlugin('playWnd');
            console.log('isInit', isInit)

            // 检查插件是否最新
            if (-1 == window.WebVideoCtrl.I_CheckPluginVersion()) {
              alert("检测到新的插件版本,请对WebComponentsKit.exe进行升级!");
              return;
            } else this.clickLogin();
          })
        },
      });
    },

    // 登录
    clickLogin() {
      let { ip, port, username, password } = this;

      if ("" == ip || "" == port) {
        return;
      }

      this.szDeviceIdentify = ip + "_" + port;

      let iRet = window.WebVideoCtrl.I_Login(ip, 1, port, username, password, {
        success: (xmlDoc) => {
          setTimeout(() => {
            this.getChannelInfo();
            this.getDevicePort();
          }, 10);
        },
        error: (status, xmlDoc) => {
          console.log(" 登录失败!", status, xmlDoc);
        },
      });

      if (-1 == iRet) {
        this.clickStartRealPlay();
      }
    },
    // 获取通道
    getChannelInfo() {
      if (null == this.szDeviceIdentify) {
        return;
      }

      // 模拟通道
      window.WebVideoCtrl.I_GetAnalogChannelInfo(this.szDeviceIdentify, {
        async: false,
        success: (xmlDoc) => {
        },
        error: (status, xmlDoc) => {
          console.log(" 获取模拟通道失败!");
        },
      });
      // 数字通道
      window.WebVideoCtrl.I_GetDigitalChannelInfo(this.szDeviceIdentify, {
        async: false,
        success: (xmlDoc) => {
        },
        error: (status, xmlDoc) => {
          console.log(" 获取数字通道失败!");
        },
      });
      // 零通道
      window.WebVideoCtrl.I_GetZeroChannelInfo(this.szDeviceIdentify, {
        async: false,
        success: (xmlDoc) => {
        },
        error: (status, xmlDoc) => {
          console.log(" 获取零通道失败!");
        },
      });
    },
    // 获取端口
    getDevicePort() {
      if (null == this.szDeviceIdentify) {
        return;
      }

      this.port = window.WebVideoCtrl.I_GetDevicePort(this.szDeviceIdentify);
      if (this.port != null) {
        this.clickStartRealPlay();
        return true
      } else {
        console.log(" 获取端口失败!");
        return false
      }
    },
    // 开始预览
    clickStartRealPlay(iStreamType) {
      let wndInfo = window.WebVideoCtrl.I_GetWindowStatus(g_iWndIndex);

      let iChannelID = this.channelId; // 通道列表
      let bZeroChannel = false; // 是否播放零通道(下拉框)
      let szInfo = "";

      if ("undefined" === typeof iStreamType) {
        iStreamType = 2; // 1主码流 2子码流 3第三码流 4转码码流
      }

      if (null == this.szDeviceIdentify) {
        return;
      }
      let startRealPlay = () => {
        window.WebVideoCtrl.I_StartRealPlay(this.szDeviceIdentify, {
          iRtspPort: 554,
          iStreamType: iStreamType,
          iChannelID: iChannelID,
          bZeroChannel: bZeroChannel,
          success: () => {
            szInfo = "开始预览成功!";
            console.log(szInfo);
          },
          error: (status, xmlDoc) => {
            if (403 === status) {
              szInfo = "设备不支持Websocket取流!";
            } else {
              szInfo = "开始预览失败!";
            }
            this.$message.error(szInfo);
          },
        });
      };

      if (wndInfo != null) {
        // 已经在播放了,先停止
        window.WebVideoCtrl.I_Stop({
          success: () => {
            startRealPlay();
          },
        });
      } else {
        startRealPlay();
      }
    },
    // 停止预览
    clickStopRealPlay() {
      let oWndInfo = window.WebVideoCtrl.I_GetWindowStatus(g_iWndIndex),
        szInfo = "";

      if (oWndInfo != null) {
        window.WebVideoCtrl.I_Stop({
          success: () => {
            szInfo = "停止预览成功!";
            console.log(szInfo);
          },
          error: () => {
            szInfo = "停止预览失败!";
            console.log(szInfo);
          },
        });
      }
    },
    // 全屏
    clickFullScreen() {
      window.WebVideoCtrl.I_FullScreen(true);
    },
    // 停止录像
    clickStopRecord(szType, iWndIndex) {
      if ("undefined" === typeof iWndIndex) {
        iWndIndex = g_iWndIndex;
      }
      var oWndInfo = window.WebVideoCtrl.I_GetWindowStatus(iWndIndex),
        szInfo = "";

      if (oWndInfo != null) {
        window.WebVideoCtrl.I_StopRecord({
          success: () => {
            if ("realplay" === szType) {
              szInfo = "停止录像成功!";
            } else if ("playback" === szType) {
              szInfo = "停止剪辑成功!";
            }
            showOPInfo(oWndInfo.szDeviceIdentify + " " + szInfo);
          },
          error: () => {
            if ("realplay" === szType) {
              szInfo = "停止录像失败!";
            } else if ("playback" === szType) {
              szInfo = "停止剪辑失败!";
            }
            showOPInfo(oWndInfo.szDeviceIdentify + " " + szInfo);
          },
        });
      }
    },
    // 查看摄像
    videoChange() {
      this.videoOpen = true;
      this.$nextTick(() => {
        if(!this.isLogin) {
          this.isLogin = true
          this.initPlugin()
        } else {
          this.clickStartRealPlay();
        }
      });
    },
    // 关闭摄像头弹窗
    videoClose() {
      this.videoOpen = false;
      console.log(this.isLogin)
      this.clickStopRealPlay();
    },
  },
};
</script>
  <style scoped lang="scss">
.video_box {
  width: 100%;
  height: 100%;
}

.plugin {
  width: 100%;
  height: 100%;
}

.playWnd {
  width: 800px;
  height: 600px;
  margin: 0;
}

.video_box {
  ::v-deep .el-dialog__body {
    padding: 0 !important;
  }
}
</style>
2、关于nginx代理
查看官方示例nginx配置文件中
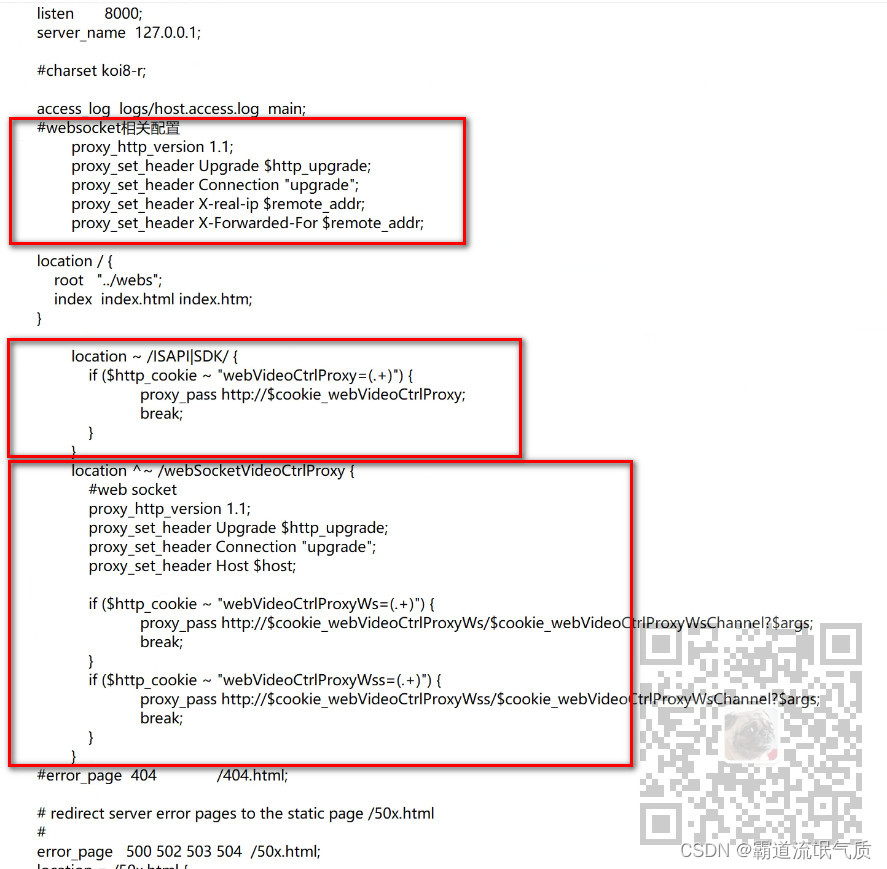
需要做两部分的代理。最前面的
        location / {
            root   "../webs";
            index  index.html index.htm;
        }
是其示例demo的静态页面的代理,对应自己的Vue的dist包的代理
对应的线上要改成
    location / {
      root C:\dist;
      try_files $uri $uri/ /index.html;
      index index.html index.htm;
    }
剩下两个代理一个是接口代理,比如调用登录接口时进行反向代理
location ~ /ISAPI|SDK/ {
if ($http_cookie ~ "webVideoCtrlProxy=(.+)") {
proxy_pass http://$cookie_webVideoCtrlProxy;
break;
}
}
这个意思大概是如果是ISAPI或者SDK开头的请求,波浪线代表不忽略大小写,就被被代理到下面的地址。
但是这里会疑问为什么代理配置文件中没有配置任何关于nvr的ip地址的配置,那我代理时是怎么请求接口的。
这里是在中间加一个nginx进行转发,nginx通过请求中的Cookie找到NVR的Ip地址进行转发,包括预览时获取视频流
也是通过这种方式进行websocket代理并获取视频流。
类似如下这张流程图。
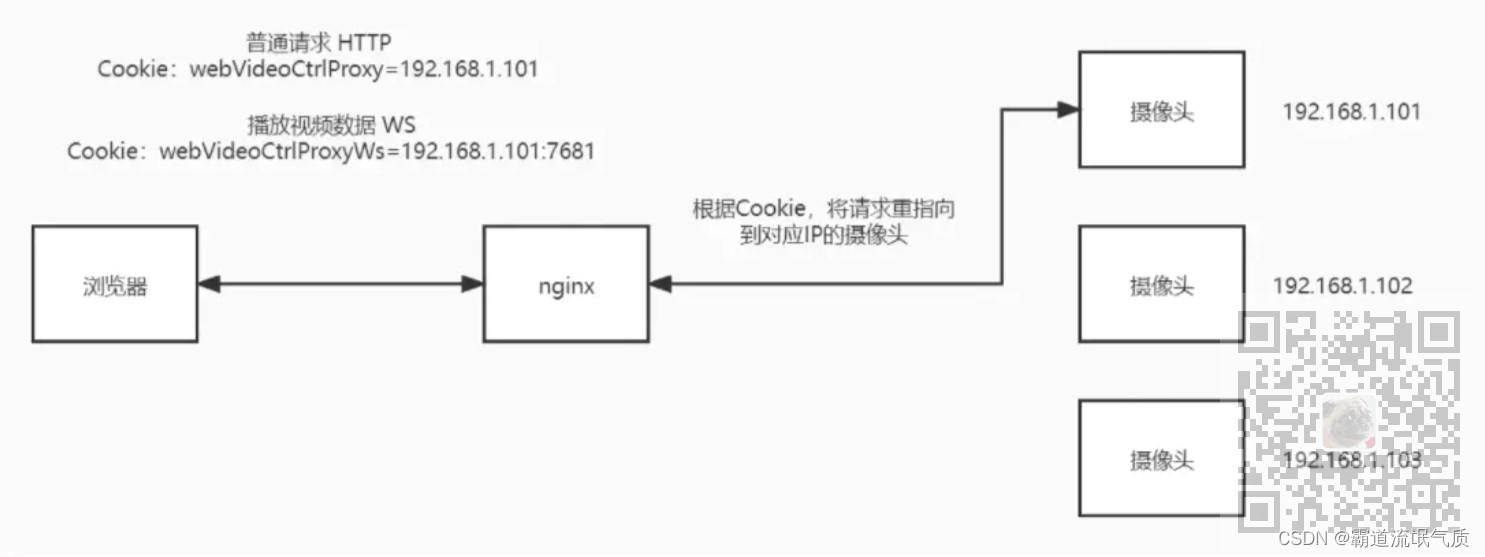
所以只要按照官方的nginx的配置文件将自己项目的nginx配置文件进行修改即可
下面提供一个改造之后项目的nginx的配置文件示例
worker_processes 1;
events {
worker_connections 1024;
}
http {
include mime.types;
default_type application/octet-stream;
sendfile on;
keepalive_timeout 65;
map $http_upgrade $connection_upgrade {
default upgrade;
'' close;
}
server {
listen 90;
server_name localhost;
client_max_body_size 300M;
#websocket相关配置
proxy_http_version 1.1;
proxy_set_header Upgrade $http_upgrade;
proxy_set_header Connection "upgrade";
proxy_set_header X-real-ip $remote_addr;
proxy_set_header X-Forwarded-For $remote_addr;
location / {
root D:\font\dist;
try_files $uri $uri/ /index.html;
index index.html index.htm;
}
location /prod-api/ {
proxy_set_header Host $http_host;
proxy_set_header X-Real-IP $remote_addr;
proxy_set_header REMOTE-HOST $remote_addr;
proxy_set_header X-Forwarded-For $proxy_add_x_forwarded_for;
proxy_pass http://服务器ip:8888/;
}
location ~ /ISAPI|SDK/ {
if ($http_cookie ~ "webVideoCtrlProxy=(.+)") {
proxy_pass http://$cookie_webVideoCtrlProxy;
break;
}
}
location ^~ /webSocketVideoCtrlProxy {
#web socket
proxy_http_version 1.1;
proxy_set_header Upgrade $http_upgrade;
proxy_set_header Connection "upgrade";
proxy_set_header Host $host;
if ($http_cookie ~ "webVideoCtrlProxyWs=(.+)") {
proxy_pass http://$cookie_webVideoCtrlProxyWs/$cookie_webVideoCtrlProxyWsChannel?$args;
break;
}
if ($http_cookie ~ "webVideoCtrlProxyWss=(.+)") {
proxy_pass http://$cookie_webVideoCtrlProxyWss/$cookie_webVideoCtrlProxyWsChannel?$args;
break;
}
}
error_page 500 502 503 504 /50x.html;
location = /50x.html {
root html;
}
}
}
前后端项目使用Nginx代理可以参考
若依前后端分离版本,Windows下使用Nginx代理的方式进行部署(全流程,图文教程):
若依前后端分离版本,Windows下使用Nginx代理的方式进行部署(全流程,图文教程)_霸道流氓气质的博客-CSDN博客
预览效果

我想将html转换为纯文本。不过,我不想只删除标签,我想智能地保留尽可能多的格式。为插入换行符标签,检测段落并格式化它们等。输入非常简单,通常是格式良好的html(不是整个文档,只是一堆内容,通常没有anchor或图像)。我可以将几个正则表达式放在一起,让我达到80%,但我认为可能有一些现有的解决方案更智能。 最佳答案 首先,不要尝试为此使用正则表达式。很有可能你会想出一个脆弱/脆弱的解决方案,它会随着HTML的变化而崩溃,或者很难管理和维护。您可以使用Nokogiri快速解析HTML并提取文本:require'nokogiri'h
我的瘦服务器配置了nginx,我的ROR应用程序正在它们上运行。在我发布代码更新时运行thinrestart会给我的应用程序带来一些停机时间。我试图弄清楚如何优雅地重启正在运行的Thin实例,但找不到好的解决方案。有没有人能做到这一点? 最佳答案 #Restartjustthethinserverdescribedbythatconfigsudothin-C/etc/thin/mysite.ymlrestartNginx将继续运行并代理请求。如果您将Nginx设置为使用多个上游服务器,例如server{listen80;server
在我的Controller中,我通过以下方式在我的index方法中支持HTML和JSON:respond_todo|format|format.htmlformat.json{renderjson:@user}end在浏览器中拉起它时,它会自然地以HTML呈现。但是,当我对/user资源进行内容类型为application/json的curl调用时(因为它是索引方法),我仍然将HTML作为响应。如何获取JSON作为响应?我还需要说明什么? 最佳答案 您应该将.json附加到请求的url,提供的格式在routes.rb的路径中定义。这
所以我在关注Railscast,我注意到在html.erb文件中,ruby代码有一个微弱的背景高亮效果,以区别于其他代码HTML文档。我知道Ryan使用TextMate。我正在使用SublimeText3。我怎样才能达到同样的效果?谢谢! 最佳答案 为SublimeText安装ERB包。假设您安装了SublimeText包管理器*,只需点击cmd+shift+P即可获得命令菜单,然后键入installpackage并选择PackageControl:InstallPackage获取包管理器菜单。在该菜单中,键入ERB并在看到包时选择
我有一个用户工厂。我希望默认情况下确认用户。但是鉴于unconfirmed特征,我不希望它们被确认。虽然我有一个基于实现细节而不是抽象的工作实现,但我想知道如何正确地做到这一点。factory:userdoafter(:create)do|user,evaluator|#unwantedimplementationdetailshereunlessFactoryGirl.factories[:user].defined_traits.map(&:name).include?(:unconfirmed)user.confirm!endendtrait:unconfirmeddoenden
我正在使用Rails构建一个简单的聊天应用程序。当用户输入url时,我希望将其输出为html链接(即“url”)。我想知道在Ruby中是否有任何库或众所周知的方法可以做到这一点。如果没有,我有一些不错的正则表达式示例代码可以使用... 最佳答案 查看auto_linkRails提供的辅助方法。这会将所有URL和电子邮件地址变成可点击的链接(htmlanchor标记)。这是文档中的代码示例。auto_link("Gotohttp://www.rubyonrails.organdsayhellotodavid@loudthinking.
我正在学习http://ruby.railstutorial.org/chapters/static-pages上的RubyonRails教程并遇到以下错误StaticPagesHomepageshouldhavethecontent'SampleApp'Failure/Error:page.shouldhave_content('SampleApp')Capybara::ElementNotFound:Unabletofindxpath"/html"#(eval):2:in`text'#./spec/requests/static_pages_spec.rb:7:in`(root)'
华为OD机试题本篇题目:明明的随机数题目输入描述输出描述:示例1输入输出说明代码编写思路最近更新的博客华为od2023|什么是华为od,od薪资待遇,od机试题清单华为OD机试真题大全,用Python解华为机试题|机试宝典【华为OD机试】全流程解析+经验分享,题型分享,防作弊指南华为o
C#实现简易绘图工具一.引言实验目的:通过制作窗体应用程序(C#画图软件),熟悉基本的窗体设计过程以及控件设计,事件处理等,熟悉使用C#的winform窗体进行绘图的基本步骤,对于面向对象编程有更加深刻的体会.Tutorial任务设计一个具有基本功能的画图软件**·包括简单的新建文件,保存,重新绘图等功能**·实现一些基本图形的绘制,包括铅笔和基本形状等,学习橡皮工具的创建**·设计一个合理舒适的UI界面**注明:你可能需要先了解一些关于winform窗体应用程序绘图的基本知识,以及关于GDI+类和结构的知识二.实验环境Windows系统下的visualstudio2017C#窗体应用程序三.
MIMO技术的优缺点优点通过下面三个增益来总体概括:阵列增益。阵列增益是指由于接收机通过对接收信号的相干合并而活得的平均SNR的提高。在发射机不知道信道信息的情况下,MIMO系统可以获得的阵列增益与接收天线数成正比复用增益。在采用空间复用方案的MIMO系统中,可以获得复用增益,即信道容量成倍增加。信道容量的增加与min(Nt,Nr)成正比分集增益。在采用空间分集方案的MIMO系统中,可以获得分集增益,即可靠性性能的改善。分集增益用独立衰落支路数来描述,即分集指数。在使用了空时编码的MIMO系统中,由于接收天线或发射天线之间的间距较远,可认为它们各自的大尺度衰落是相互独立的,因此分布式MIMO
