
设计一款带有可视化界面的简单计算器,供用户输入数据并查看结果。用户通过点击相应按钮(加减乘除运算符、等号、数字)输入正确的表达式,计算器进行相应的加减乘除运算,且可以进行小数和整数的运算;长按清除按钮3秒,可以清除已录入的内容。
<?xml version="1.0" encoding="utf-8"?>
<LinearLayout xmlns:android="http://schemas.android.com/apk/res/android"
    xmlns:app="http://schemas.android.com/apk/res-auto"
    xmlns:tools="http://schemas.android.com/tools"
    android:layout_width="match_parent"
    android:layout_height="match_parent"
    tools:context=".MainActivity"
    android:orientation="vertical"
    android:padding="10dp">

    <EditText
        android:id="@+id/result"
        android:layout_width="match_parent"
        android:layout_height="60dp"
        android:layout_marginLeft="4dp"
        android:paddingLeft="10dp"
        android:textSize="30dp"
        android:textColor="@color/colorPrimary"
        android:enabled="false"
        />
    <GridLayout
        android:layout_width="match_parent"
        android:layout_height="wrap_content"
        android:rowCount="5"
        android:columnCount="4"

        >
        <Button
            android:id="@+id/cls"
            android:layout_width="match_parent"
            android:layout_height="60dp"
            android:text="清除"
            android:textSize="20dp"
            android:textColor="@color/black"
            android:layout_columnSpan="4"
            android:background="@drawable/btn"
            />
        <Button
            android:id="@+id/one"
            android:layout_width="wrap_content"
            android:layout_height="60dp"
            android:text="1"
            android:textSize="20dp"
            android:layout_columnWeight="1"
            android:background="@drawable/btn"
            />
        <Button
            android:id="@+id/two"
            android:layout_width="wrap_content"
            android:layout_height="60dp"
            android:text="2"
            android:textSize="20dp"
            android:layout_columnWeight="1"
            android:background="@drawable/btn"
            />
        <Button
            android:id="@+id/three"
            android:layout_width="wrap_content"
            android:layout_height="60dp"
            android:text="3"
            android:textSize="20dp"
            android:layout_columnWeight="1"
            android:background="@drawable/btn"
            />
        <Button
            android:id="@+id/plus"
            android:layout_width="wrap_content"
            android:layout_height="60dp"
            android:text="+"
            android:textSize="20dp"
            android:layout_columnWeight="1"
            android:background="@drawable/btn"
            />
        <Button
            android:id="@+id/four"
            android:layout_width="wrap_content"
            android:layout_height="60dp"
            android:text="4"
            android:textSize="20dp"
            android:layout_columnWeight="1"
            android:background="@drawable/btn"
            />
        <Button
            android:id="@+id/five"
            android:layout_width="wrap_content"
            android:layout_height="60dp"
            android:text="5"
            android:textSize="20dp"
            android:layout_columnWeight="1"
            android:background="@drawable/btn"
            />
        <Button
            android:id="@+id/six"
            android:layout_width="wrap_content"
            android:layout_height="60dp"
            android:text="6"
            android:textSize="20dp"
            android:layout_columnWeight="1"
            android:background="@drawable/btn"
            />
        <Button
            android:id="@+id/min"
            android:layout_width="wrap_content"
            android:layout_height="60dp"
            android:text="-"
            android:textSize="20dp"
            android:layout_columnWeight="1"
            android:background="@drawable/btn"
            />
        <Button
            android:id="@+id/seven"
            android:layout_width="wrap_content"
            android:layout_height="60dp"
            android:text="7"
            android:textSize="20dp"
            android:layout_columnWeight="1"
            android:background="@drawable/btn"
            />
        <Button
            android:id="@+id/eight"
            android:layout_width="wrap_content"
            android:layout_height="60dp"
            android:text="8"
            android:textSize="20dp"
            android:layout_columnWeight="1"
            android:background="@drawable/btn"
            />
        <Button
            android:id="@+id/nine"
            android:layout_width="wrap_content"
            android:layout_height="60dp"
            android:text="9"
            android:textSize="20dp"
            android:layout_columnWeight="1"
            android:background="@drawable/btn"
            />
        <Button
            android:id="@+id/mul"
            android:layout_width="wrap_content"
            android:layout_height="60dp"
            android:text="×"
            android:textSize="20dp"
            android:layout_columnWeight="1"
            android:background="@drawable/btn"
            />
        <Button
            android:id="@+id/spot"
            android:layout_width="wrap_content"
            android:layout_height="60dp"
            android:text="."
            android:textSize="20dp"
            android:layout_columnWeight="1"
            android:background="@drawable/btn"
            />
        <Button
            android:id="@+id/zero"
            android:layout_width="wrap_content"
            android:layout_height="60dp"
            android:text="0"
            android:textSize="20dp"
            android:layout_columnWeight="1"
            android:background="@drawable/btn"
            />
        <Button
            android:id="@+id/equal"
            android:layout_width="wrap_content"
            android:layout_height="60dp"
            android:text="="
            android:textSize="20dp"
            android:layout_columnWeight="1"
            android:background="@drawable/btn"
            />
        <Button
            android:id="@+id/div"
            android:layout_width="wrap_content"
            android:layout_height="60dp"
            android:text="÷"
            android:textSize="20dp"
            android:layout_columnWeight="1"
            android:background="@drawable/btn"
            />
    </GridLayout>

</LinearLayout><?xml version="1.0" encoding="utf-8"?>
<selector xmlns:android="http://schemas.android.com/apk/res/android">
<item android:state_pressed="true" android:drawable="@drawable/btn_pink_bg"/>
<item android:drawable="@drawable/btn_pink"/>
</selector><?xml version="1.0" encoding="utf-8"?>
<shape xmlns:android="http://schemas.android.com/apk/res/android"
android:shape="rectangle">
<stroke
android:width="2dp"
android:color="#ff9999" />
<corners
android:radius="5dp"/>
</shape><?xml version="1.0" encoding="utf-8"?>
<shape xmlns:android="http://schemas.android.com/apk/res/android"
android:shape="rectangle">
<solid android:color="#ff9999"/>
<stroke
android:width="2dp"
android:color="#ff9999" />
<corners
android:radius="5dp"/>
</shape>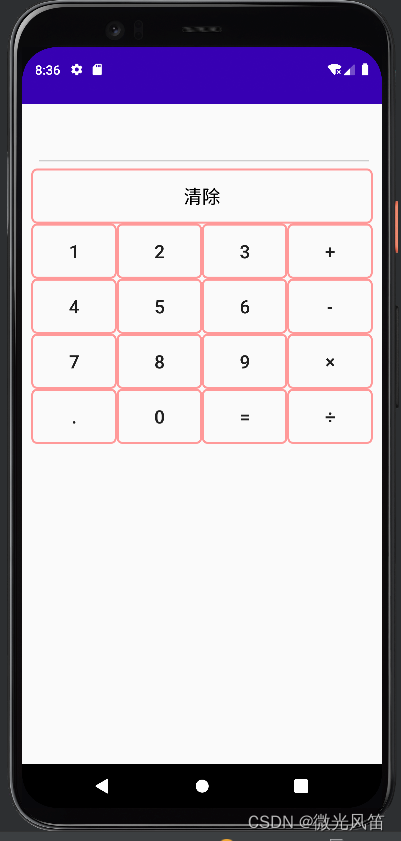
package com.example.a1108;

import androidx.appcompat.app.AppCompatActivity;

import android.os.Bundle;
import android.view.MotionEvent;
import android.view.View;
import android.widget.Button;
import android.widget.EditText;

import java.util.Date;

public class MainActivity extends AppCompatActivity implements View.OnClickListener{
    EditText result;
//    定义数字按钮
    Button zero,one,two,three,four,five,six,seven,eight,nine,spot;
//    定义加减乘除按钮
    Button plus,min,mul,div;
//    定义等号按钮
    Button equals;
//    标识符,标识运算完成
    Boolean clr_flag=false;
//    清除按钮
    Button cls;
    @Override
    protected void onCreate(Bundle savedInstanceState) {
        super.onCreate(savedInstanceState);
        setContentView(R.layout.activity_main);
        result=(EditText) findViewById(R.id.result);

        zero=findViewById(R.id.zero);
        one=findViewById(R.id.one);
        two=findViewById(R.id.two);
        three=findViewById(R.id.three);
        four=findViewById(R.id.four);
        five=findViewById(R.id.five);
        six=findViewById(R.id.six);
        seven=findViewById(R.id.seven);
        eight=findViewById(R.id.eight);
        nine=findViewById(R.id.nine);
        spot=findViewById(R.id.spot);

        zero.setOnClickListener(this);
        one.setOnClickListener(this);
        two.setOnClickListener(this);
        three.setOnClickListener(this);
        four.setOnClickListener(this);
        five.setOnClickListener(this);
        six.setOnClickListener(this);
        seven.setOnClickListener(this);
        eight.setOnClickListener(this);
        nine.setOnClickListener(this);
        spot.setOnClickListener(this);

        plus=findViewById(R.id.plus);
        min=findViewById(R.id.min);
        mul=findViewById(R.id.mul);
        div=findViewById(R.id.div);

        plus.setOnClickListener(this);
        min.setOnClickListener(this);
        mul.setOnClickListener(this);
        div.setOnClickListener(this);

        equals=findViewById(R.id.equal);

        equals.setOnClickListener(this);

        cls=findViewById(R.id.cls);
//        为清除设置事件
        cls.setOnTouchListener(new View.OnTouchListener() {
            Date curDate=new Date(System.currentTimeMillis());
            Date endDate=new Date(System.currentTimeMillis());
            @Override
            public boolean onTouch(View view, MotionEvent motionEvent) {
                switch (motionEvent.getAction()){
//                    按下
                    case MotionEvent.ACTION_DOWN:
                        curDate=new Date((System.currentTimeMillis()));
                        break;
//                    抬起
                    case MotionEvent.ACTION_UP:
                        endDate=new Date(System.currentTimeMillis());
                        long durationMS=endDate.getTime()-curDate.getTime();
                        if(durationMS>3000)
                            result.setText("");
                        break;
                }
                return true;
            }
        });
    }


    @Override
    public void onClick(View view) {
//        getText()获取的内容是一个对象,所以要转换一下
        String str=result.getText().toString();
//        根据当前按钮按下的id进行判断
        switch (view.getId())
        {
            case R.id.zero:
            case R.id.one:
            case R.id.two:
            case R.id.three:
            case R.id.four:
            case R.id.five:
            case R.id.six:
            case R.id.seven:
            case R.id.eight:
            case R.id.nine:
            case R.id.spot:
//                如果标识符为真,让值为空
                if(clr_flag)
                    str="";
//                把现在的内容追加上,现在的内容来自于按钮的文本
//                按钮这个view对象先转换为Button
                result.setText(str+((Button)view).getText());
                clr_flag=false;
                break;
            case R.id.plus:
            case R.id.min:
            case R.id.mul:
            case R.id.div:
//                如果标识符为真,让值为空
                if(clr_flag)
                    str="";
                if(str.contains("+")||str.contains("-")||str.contains("×")||str.contains("÷"))
//                    从起始位置开始,我们只要运算符之前的内容
                    str=str.substring(0,str.indexOf(" "));
//                所以在运算符的前面和后面都追加一个“ ”
                result.setText(str+" "+((Button)view).getText()+" ");
                clr_flag=false;
                break;
            case R.id.equal:
                getResult();
                break;
        }
    }
//    点了等号后
    private void getResult(){
        clr_flag=true;
//        获取到字符串
        String exp=result.getText().toString();
//        按照空格分隔字符串,形成字符串数组,第一个元素是左侧操作数,第二个元素是运算符,第三个元素是右侧操作数
        String [] exp_arr=exp.split(" ");
//        定义结果
        double cnt=0;
//        定义操作数
        double d1=Double.parseDouble(exp_arr[0]);
        double d2=Double.parseDouble(exp_arr[2]);
//        判断运算符
        if(exp_arr[1].equals("+"))
            cnt=d1+d2;
        else if(exp_arr[1].equals("-"))
            cnt=d1-d2;
        else if(exp_arr[1].equals("×"))
            cnt=d1*d2;
        else if(exp_arr[1].equals("÷"))
            cnt=d1/d2;
//        设置结果
        result.setText(String.valueOf(cnt));
    }
}
注释都写在里面了
这里是Ruby新手。完成一些练习后碰壁了。练习:计算一系列成绩的字母等级创建一个方法get_grade来接受测试分数数组。数组中的每个分数应介于0和100之间,其中100是最大分数。计算平均分并将字母等级作为字符串返回,即“A”、“B”、“C”、“D”、“E”或“F”。我一直返回错误:avg.rb:1:syntaxerror,unexpectedtLBRACK,expecting')'defget_grade([100,90,80])^avg.rb:1:syntaxerror,unexpected')',expecting$end这是我目前所拥有的。我想坚持使用下面的方法或.join,
有没有办法在这个简单的get方法中添加超时选项?我正在使用法拉第3.3。Faraday.get(url)四处寻找,我只能先发起连接后应用超时选项,然后应用超时选项。或者有什么简单的方法?这就是我现在正在做的:conn=Faraday.newresponse=conn.getdo|req|req.urlurlreq.options.timeout=2#2secondsend 最佳答案 试试这个:conn=Faraday.newdo|conn|conn.options.timeout=20endresponse=conn.get(url
我想在Ruby中创建一个用于开发目的的极其简单的Web服务器(不,不想使用现成的解决方案)。代码如下:#!/usr/bin/rubyrequire'socket'server=TCPServer.new('127.0.0.1',8080)whileconnection=server.acceptheaders=[]length=0whileline=connection.getsheaders想法是从命令行运行这个脚本,提供另一个脚本,它将在其标准输入上获取请求,并在其标准输出上返回完整的响应。到目前为止一切顺利,但事实证明这真的很脆弱,因为它在第二个请求上中断并出现错误:/usr/b
我意识到这可能是一个非常基本的问题,但我现在已经花了几天时间回过头来解决这个问题,但出于某种原因,Google就是没有帮助我。(我认为部分问题在于我是一个初学者,我不知道该问什么......)我也看过O'Reilly的RubyCookbook和RailsAPI,但我仍然停留在这个问题上.我找到了一些关于多态关系的信息,但它似乎不是我需要的(尽管如果我错了请告诉我)。我正在尝试调整MichaelHartl'stutorial创建一个包含用户、文章和评论的博客应用程序(不使用脚手架)。我希望评论既属于用户又属于文章。我的主要问题是:我不知道如何将当前文章的ID放入评论Controller。
我的工作要求我为某些测试自动生成电子邮件。我一直在四处寻找,但未能找到可以快速实现的合理解决方案。它需要在outlook而不是其他邮件服务器中,因为我们有一些奇怪的身份验证规则,我们需要保存草稿而不是仅仅发送邮件的选项。显然win32ole可以做到这一点,但我找不到任何相当简单的例子。 最佳答案 假设存储了Outlook凭据并且您设置为自动登录到Outlook,WIN32OLE可以很好地完成此操作:require'win32ole'outlook=WIN32OLE.new('Outlook.Application')message=
本文主要介绍在使用Selenium进行自动化测试或者任务时,对于使用了iframe的页面,如何定位iframe中的元素文章目录场景描述解决方案具体代码场景描述当我们在使用Selenium进行自动化测试的时候,可能会遇到一些界面或者窗体是使用HTML的iframe标签进行承载的。对于iframe中的标签,如果直接查找是无法找到的,会抛出没有找到元素的异常。比如近在咫尺的例子就是,CSDN的登录窗体就是使用的iframe,大家可以尝试通过F12开发者模式查看到的tag_name,class_name,id或者xpath来定位中的页面元素,会抛出NoSuchElementException异常。解决
//1.验证返回状态码是否是200pm.test("Statuscodeis200",function(){pm.response.to.have.status(200);});//2.验证返回body内是否含有某个值pm.test("Bodymatchesstring",function(){pm.expect(pm.response.text()).to.include("string_you_want_to_search");});//3.验证某个返回值是否是100pm.test("Yourtestname",function(){varjsonData=pm.response.json
在前面两节的例子中,主界面窗口的尺寸和标签控件显示的矩形区域等,都是用C++代码编写的。窗口和控件的尺寸都是预估的,控件如果多起来,那就不好估计每个控件合适的位置和大小了。用C++代码编写图形界面的问题就是不直观,因此Qt项目开发了专门的可视化图形界面编辑器——QtDesigner(Qt设计师)。通过QtDesigner就可以很方便地创建图形界面文件*.ui,然后将ui文件应用到源代码里面,做到“所见即所得”,大大方便了图形界面的设计。本节就演示一下QtDesigner的简单使用,学习拖拽控件和设置控件属性,并将ui文件应用到Qt程序代码里。使用QtDesigner设计界面在开始菜单中找到「Q
项目介绍随着我国经济迅速发展,人们对手机的需求越来越大,各种手机软件也都在被广泛应用,但是对于手机进行数据信息管理,对于手机的各种软件也是备受用户的喜爱小学生兴趣延时班预约小程序的设计与开发被用户普遍使用,为方便用户能够可以随时进行小学生兴趣延时班预约小程序的设计与开发的数据信息管理,特开发了小程序的设计与开发的管理系统。小学生兴趣延时班预约小程序的设计与开发的开发利用现有的成熟技术参考,以源代码为模板,分析功能调整与小学生兴趣延时班预约小程序的设计与开发的实际需求相结合,讨论了小学生兴趣延时班预约小程序的设计与开发的使用。开发环境开发说明:前端使用微信微信小程序开发工具:后端使用ssm:VU
我对如何计算通过{%assignvar=0%}赋值的变量加一完全感到困惑。这应该是最简单的任务。到目前为止,这是我尝试过的:{%assignamount=0%}{%forvariantinproduct.variants%}{%assignamount=amount+1%}{%endfor%}Amount:{{amount}}结果总是0。也许我忽略了一些明显的东西。也许有更好的方法。我想要存档的只是获取运行的迭代次数。 最佳答案 因为{{incrementamount}}将输出您的变量值并且不会影响{%assign%}定义的变量,我