目录
CAS(Central Authentication Server)是Yelu大学研发单点登录解决方案。
它包含Server端和Client端,Server一般是每个公司部署一个,Client端则由各个系统自行引入。本文是Java项目,所以本文讨论的都是CAS的Java客户端。
CAS客户端主要做两件事,身份认证(默认通过AuthenticationFilter实现)和票据校验(默认通过Cas20ProxyReceivingTicketValidationFilter实现),基于javax.servlet.Filter。
本文建立在您已了解CAS流程的基础上,如果有不太了解的博友,可以先参考一下这篇博客,讲得很清楚:CAS单点登录原理(包含详细流程,讲得很透彻,耐心看下去一定能看明白!)
现在新开发一个前后端分离系统,后端是SpringBoot(地址:localhost:8082),前端是Vue项目(地址:localhost:8081)。现要求该系统接入CAS Java客户端,实现单点登录
CAS客户端基于Filter实现,默认支持的是前后端一体的系统,对于前后端分离的系统,需要对CAS做一些扩展才能正常使用。根本原因在于,前后端分离系统一般是通过ajax通信,而CAS依赖Servlet的重定向,但对于ajax的请求,浏览器是不会响应重定向的(原因会在附录分析)
但对于前后端一体的系统来说就不同了,用户访问系统时,浏览器是先向后端请求网页(html、jsp、thymelaef等),再由网页中的javascript向后端请求数据(jsp、thymelaef可能不需要)。对于浏览器发起的请求,是可以响应重定向的。所以在浏览器向后端请求网页时,Filter发现CAS未登录,就可以按默认逻辑重定向到CAS登录页面了
引入依赖
<dependency>
    <groupId>org.jasig.cas.client</groupId>
    <artifactId>cas-client-support-springboot</artifactId>
    <version>3.6.2</version>
</dependency>
application.yml中配置属性
cas:
  server-login-url: http://10.121.xx.79/opcnet-sso/login?appid=test #CAS统一登录地址
  validation-type: cas
  server-url-prefix: http://10.121.xx.79/opcnet-sso #CAS服务端地址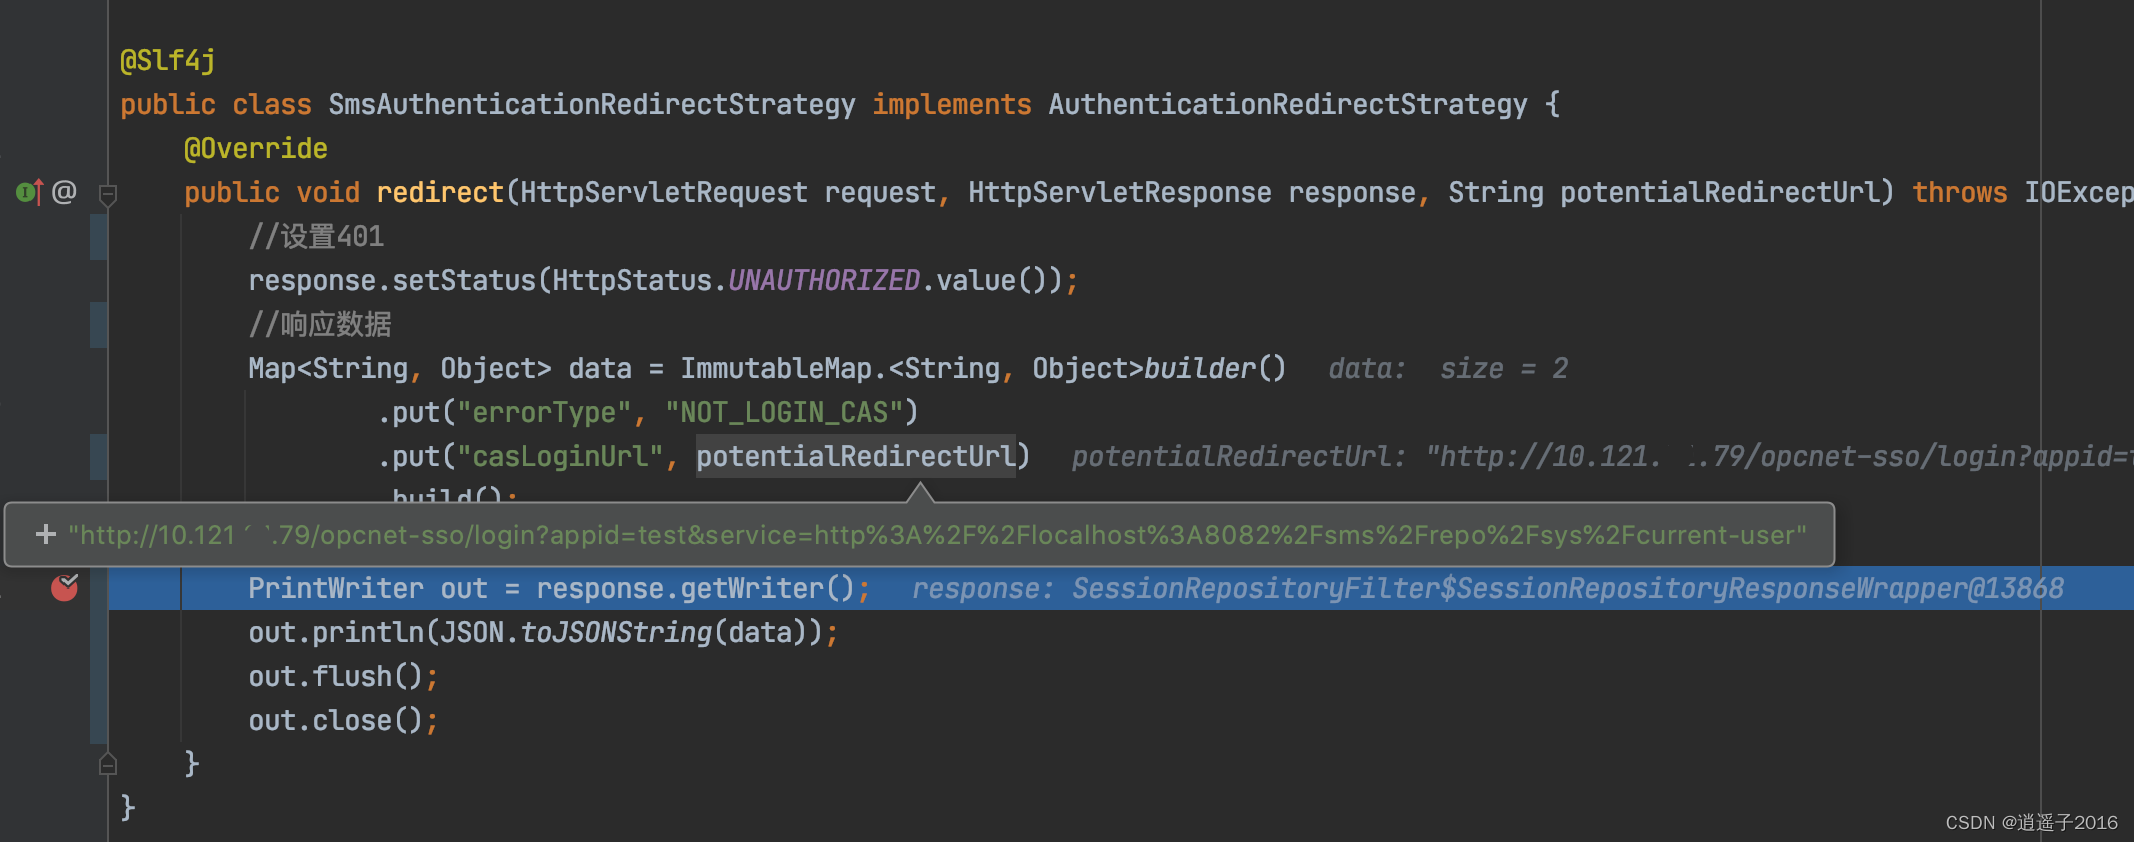
client-host-url: http://localhost:${server.port} #本项目地址创建一个类SmsAuthenticationRedirectStrategy,实现AuthenticationRedirectStrategy接口,重写redirect方法。默认实现是response.redirect()重定向到单点登录页面,这里修改默认实现,不再执行重定向,而是返回401状态码和错误信息
实现原理详见附录:原理分析1.CAS身份认证
@Slf4j
public class SmsAuthenticationRedirectStrategy implements AuthenticationRedirectStrategy {
    @Override
    public void redirect(HttpServletRequest request, HttpServletResponse response, String potentialRedirectUrl) throws IOException {
        //设置401
        response.setStatus(HttpStatus.UNAUTHORIZED.value());
        //响应数据
        Map<String, Object> data = ImmutableMap.<String, Object>builder()
                .put("errorType", "NOT_LOGIN_CAS")
                .put("casLoginUrl", potentialRedirectUrl)
                .build();
        //输出
        PrintWriter out = response.getWriter();
        out.println(JSON.toJSONString(data));
        out.flush();
        out.close();
    }
}新建一个类SmsCasClientConfigurer,实现CasClientConfigurer,重写configureAuthenticationFilter方法
实现原理详见附录:原理分析1.CAS身份认证
@Configuration
public class SmsCasClientConfigurer implements CasClientConfigurer {

    @Override
    public void configureAuthenticationFilter(FilterRegistrationBean authenticationFilter) {
      authenticationFilter.addInitParameter("authenticationRedirectStrategyClass", "com.hnair.sms.repo.component.cas.SmsAuthenticationRedirectStrategy");
    }
}前端发请求工具使用的是axios,响应拦截器配置如下
/**
 * 1.200:
 * success为true:请求成功
 * success为false:请求失败,返回可读信息
 *
 * 2.401:
 * errorType为NOT_LOGIN_CAS:CAS校验不通过,跳转到CAS登录界面
 *
 * 3.其他:(例如400,404,500,502,504等)
 * 均显示为未知错误
 */
request.interceptors.response.use(
  response => {
    if (response.data.success) {
      return Promise.resolve(response.data);
    } else {
      showMessage("请求失败,异常信息:" + response.data.message, "error")
      return Promise.reject()
    }
  },
  error => {
    let status = error.response.status;
    let data = error.response.data;

    if (status === 401) {
      if (data.errorType && data.errorType === "NOT_LOGIN_CAS") {
        //发现CAS未登录,跳转到CAS统一登录页面
        location.href = data.casLoginUrl
      } else {
        return Promise.reject(error)
      }
    } else {
      showMessage("未知错误,请联系管理员", "error")
      return Promise.reject(error)
    }
  }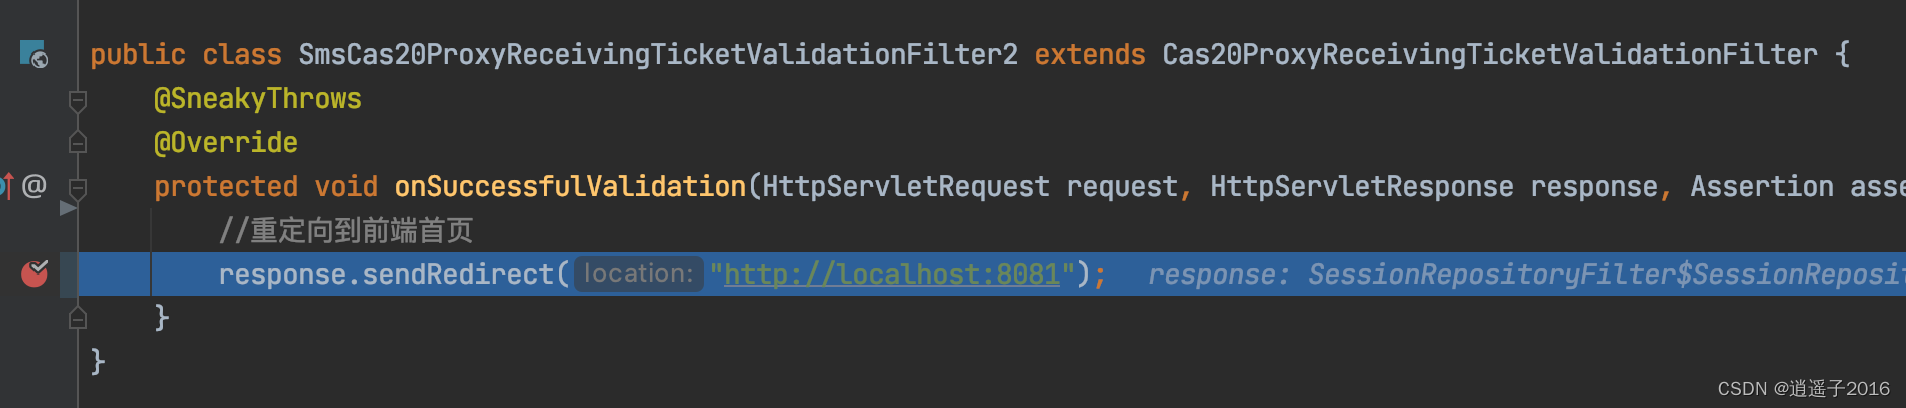
)新建一个类SmsCas20ProxyReceivingTicketValidationFilter,继承自Cas20ProxyReceivingTicketValidationFilter,重写onSuccessfulValidation方法。因为默认的票据校验过滤器在验证成功后,会重定向到源请求地址,这里修改为重定向到前端首页
实现原理详见附录:原理分析2.CAS票据检验
public class SmsCas20ProxyReceivingTicketValidationFilter extends Cas20ProxyReceivingTicketValidationFilter {
    @SneakyThrows
    @Override
    protected void onSuccessfulValidation(HttpServletRequest request, HttpServletResponse response, Assertion assertion) {
        //重定向到前端首页。此处为方便阅读使用了硬编码,实际应用时,应写入配置文件
        response.sendRedirect("localhost:8081");
    }
}回到第1步创建的类SmsCasClientConfigurer,新添加一个重写的configureValidationFilter方法,重新设置过滤器
实现细节详见附录:原理分析2.CAS票据检验
@Configuration
public class SmsCasClientConfigurer implements CasClientConfigurer {

    @Override
    public void configureAuthenticationFilter(FilterRegistrationBean authenticationFilter) {
      authenticationFilter.addInitParameter("authenticationRedirectStrategyClass", "com.hnair.sms.repo.component.cas.SmsAuthenticationRedirectStrategy");
    }

    @Override
    public void configureValidationFilter(FilterRegistrationBean validationFilter) {
        validationFilter.setFilter(new SmsCas20ProxyReceivingTicketValidationFilter());
    }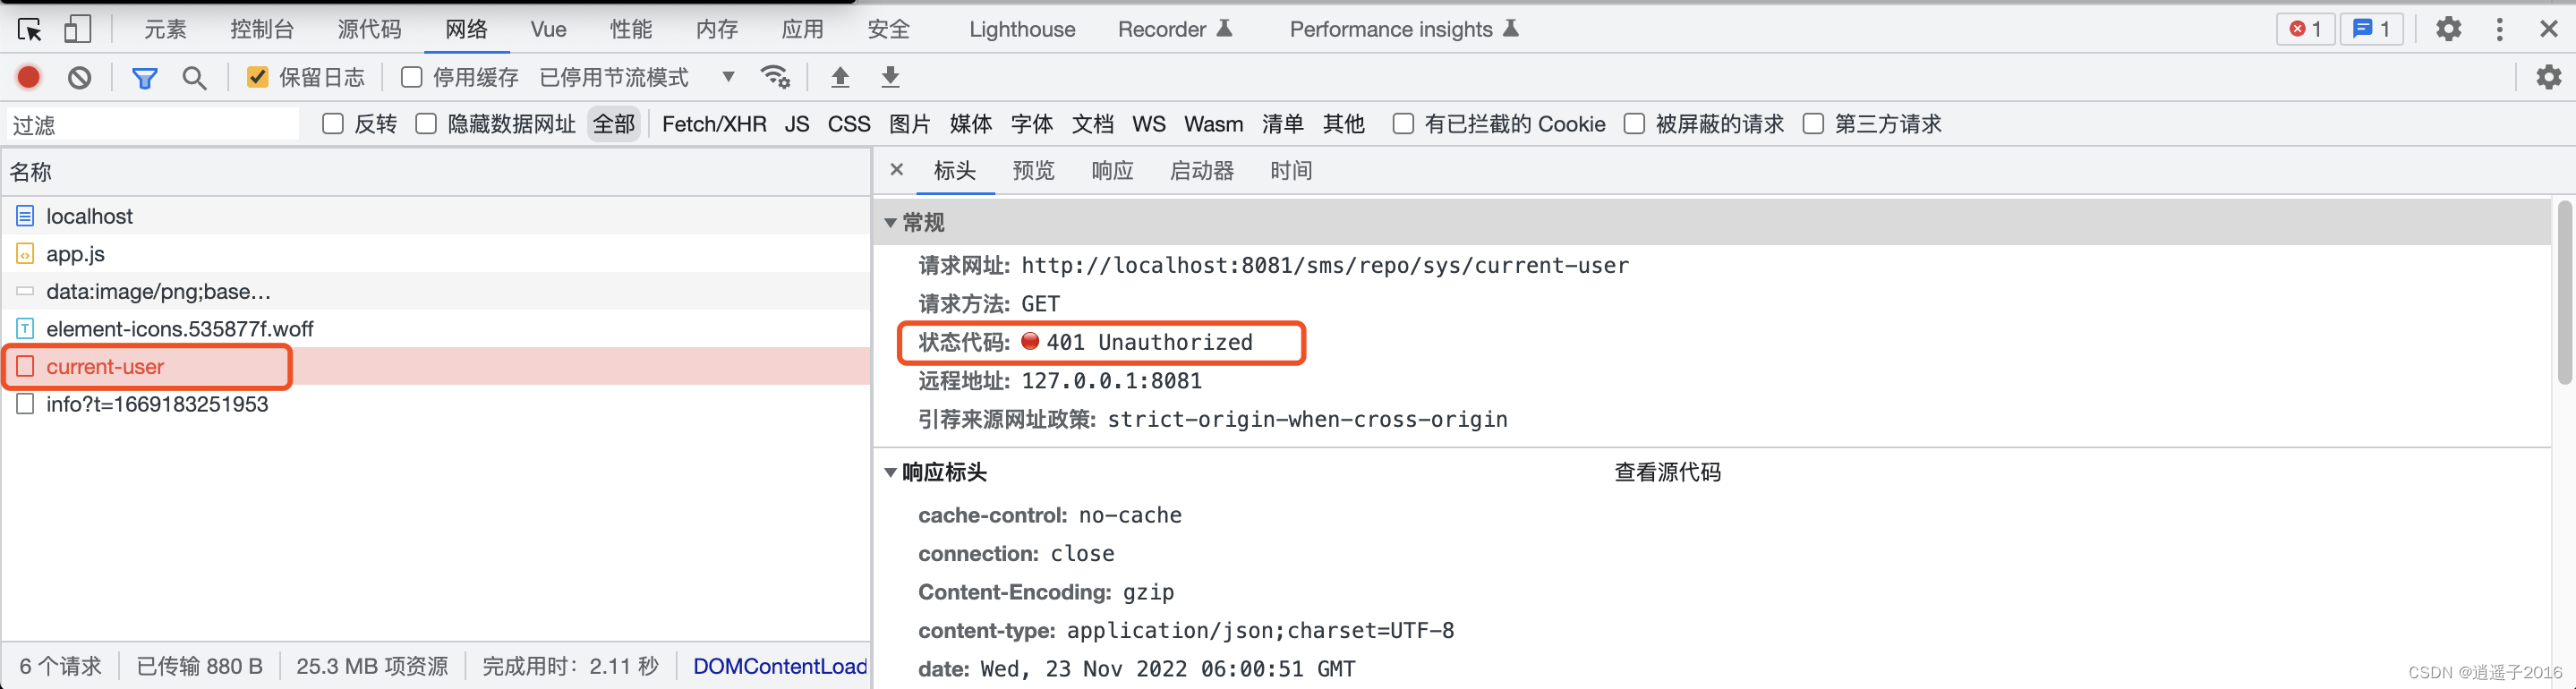
}分别启动前后端项目,访问前端首页,发起了一个ajax请求
注:由于前端使用了代理,所以network显示请求的域是localhost:8081,实际请求的域是localhost:8082

该请求被AuthenticationFilter拦截,并发现CAS未登录,准备跳转至登录页面,进入了SmsAuthenticationRedirectStrategy
前端收到401响应
进入ajax失败回调
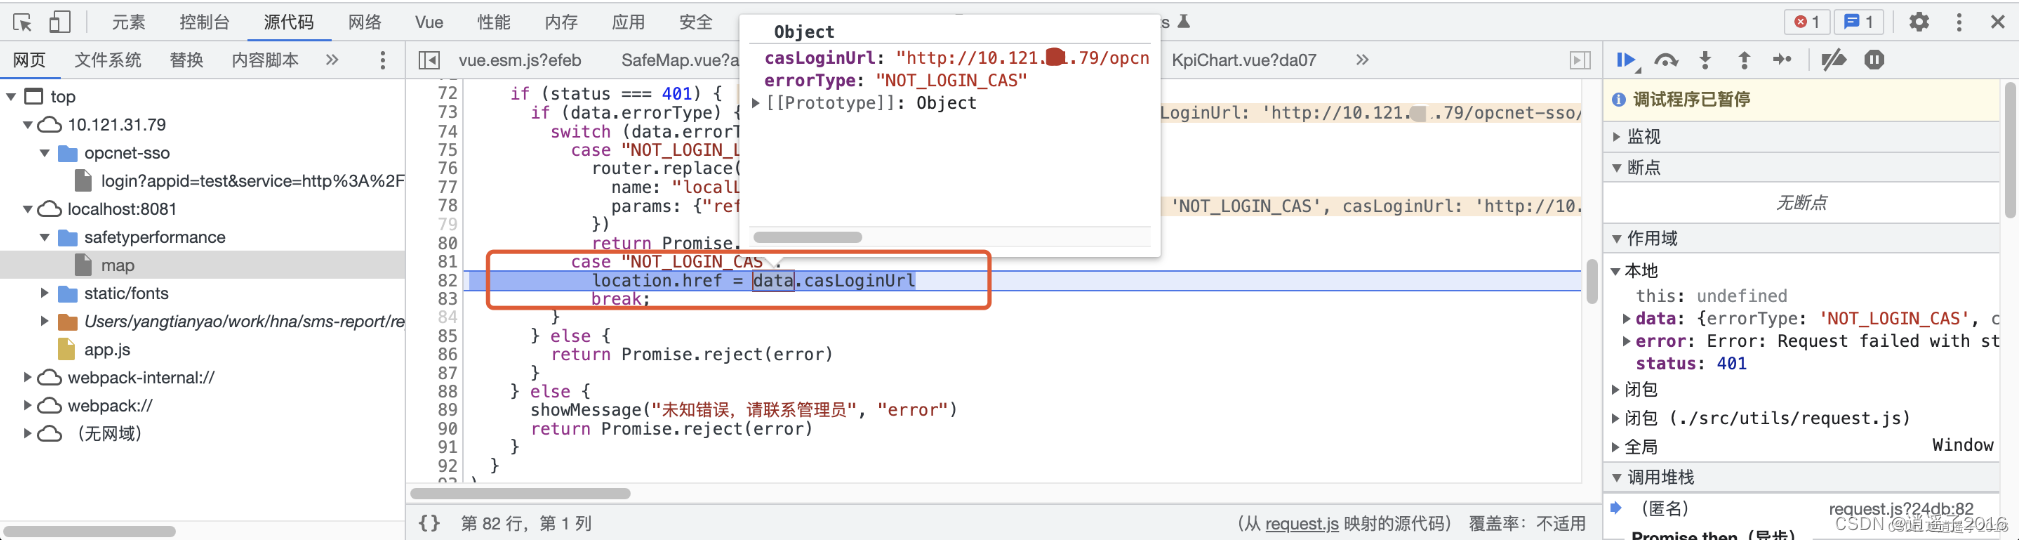
location.href跳转至CAS登录页面。从地址栏可以注意到,源请求url作为查询参数赋值给了service,登录完成后,浏览器会回调service中的url
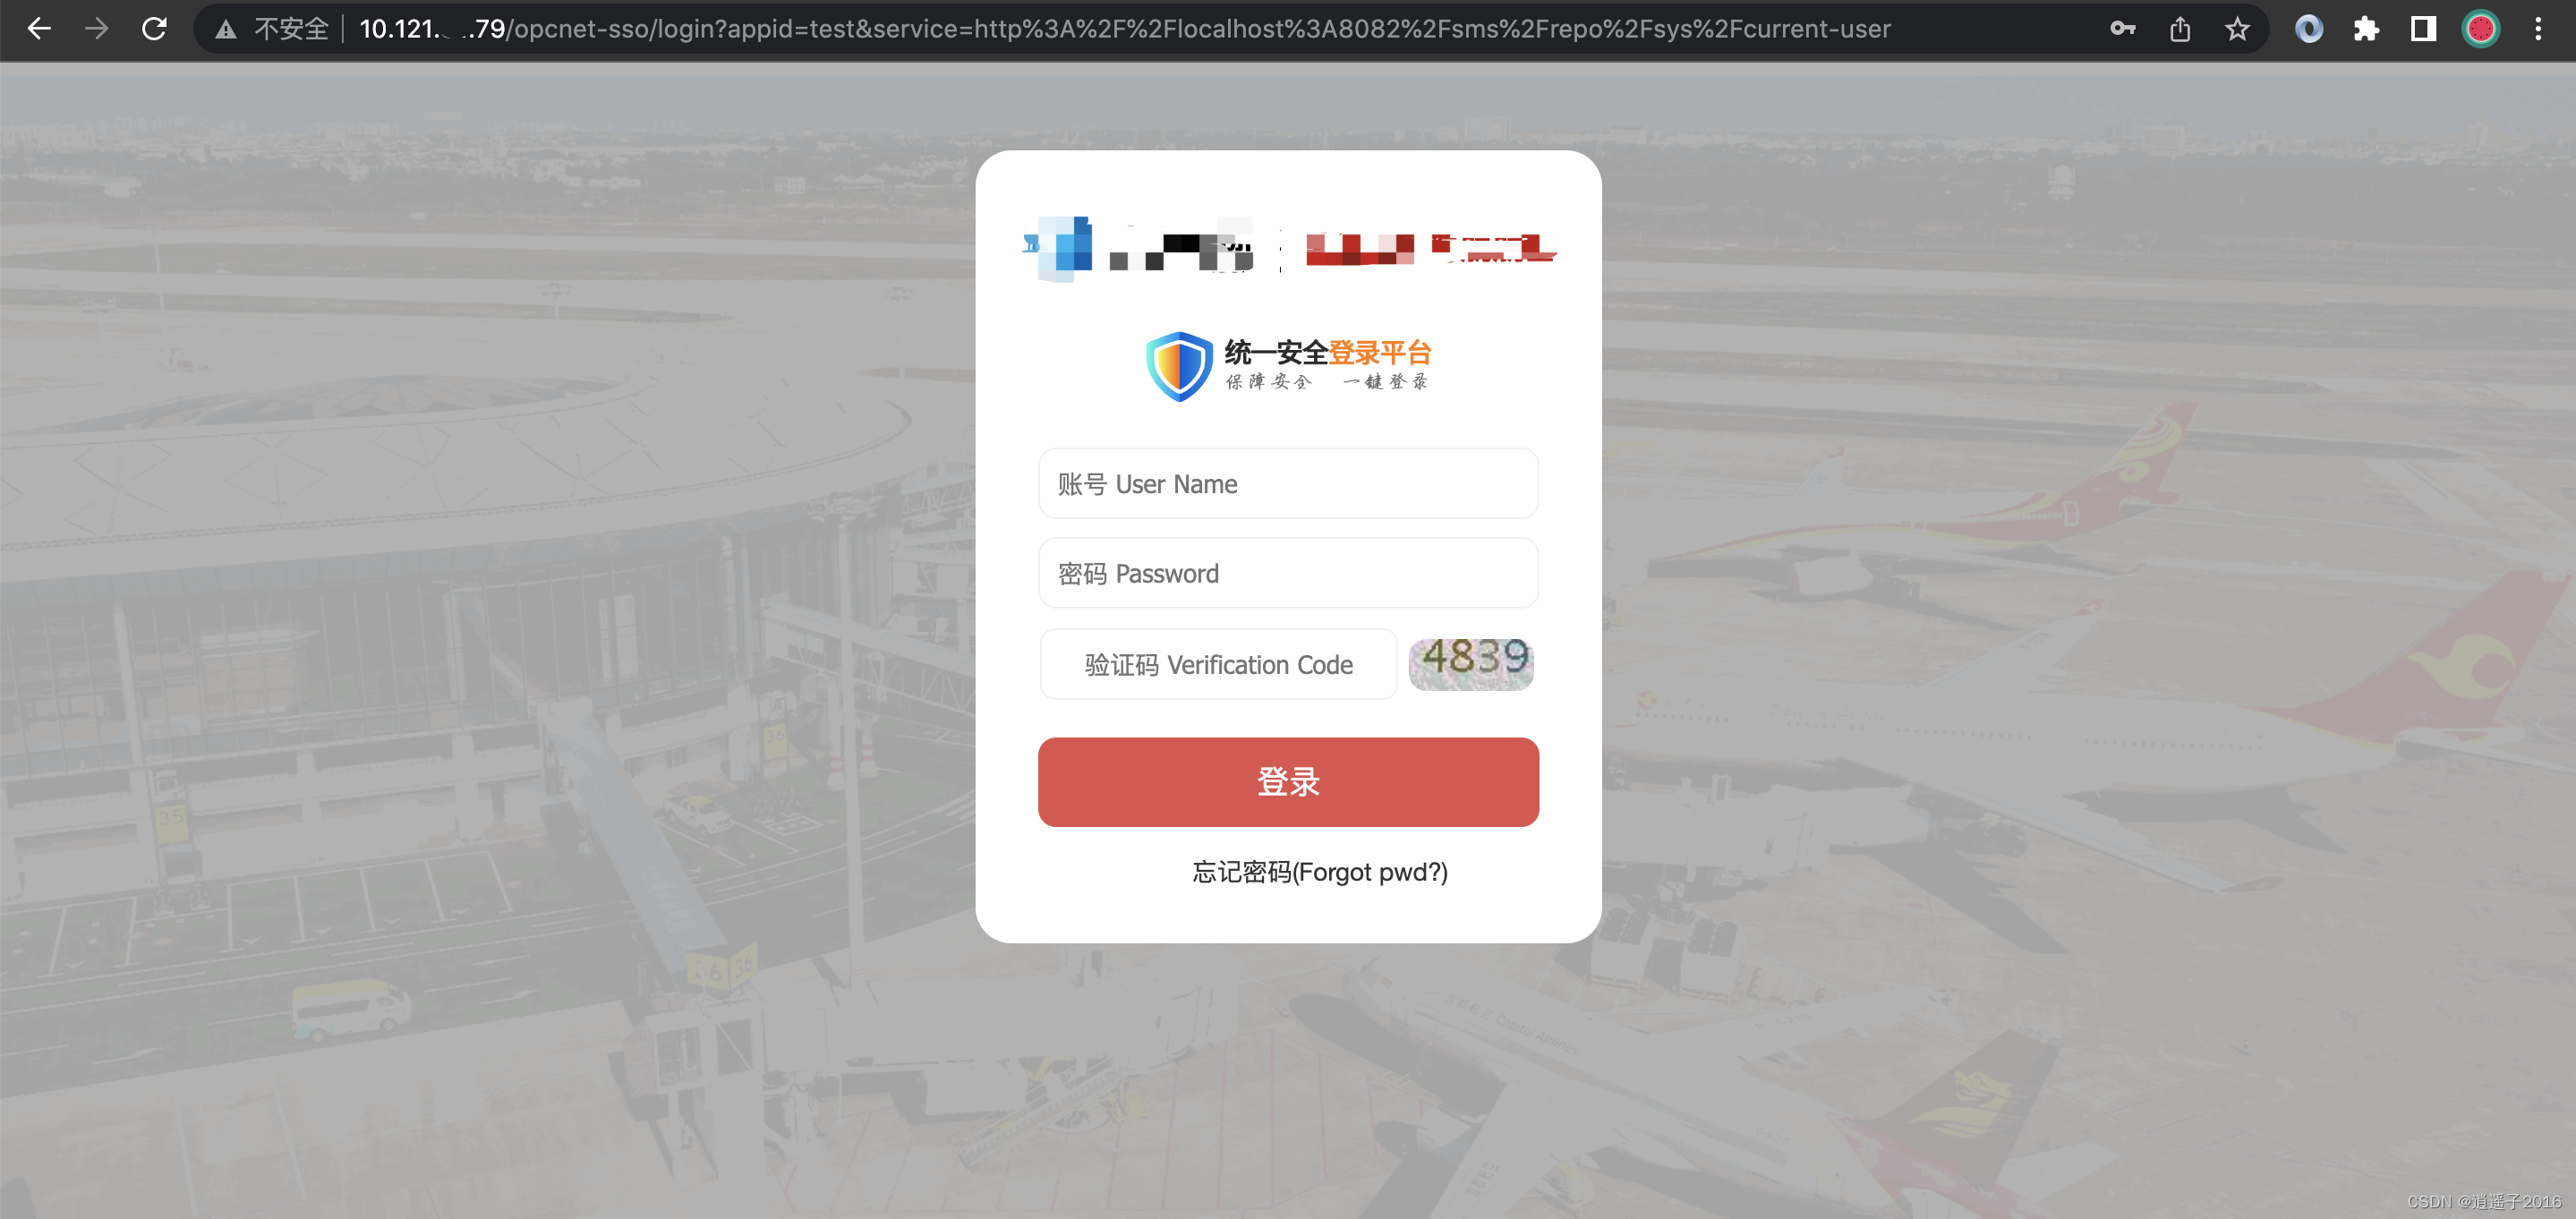
输入账号密码后,执行票据校验,校验成功后,进入SmsCas20ProxyReceivingTicketValidationFilter。接着,浏览器从CAS登录页面跳转到前端首页,CAS登录完成
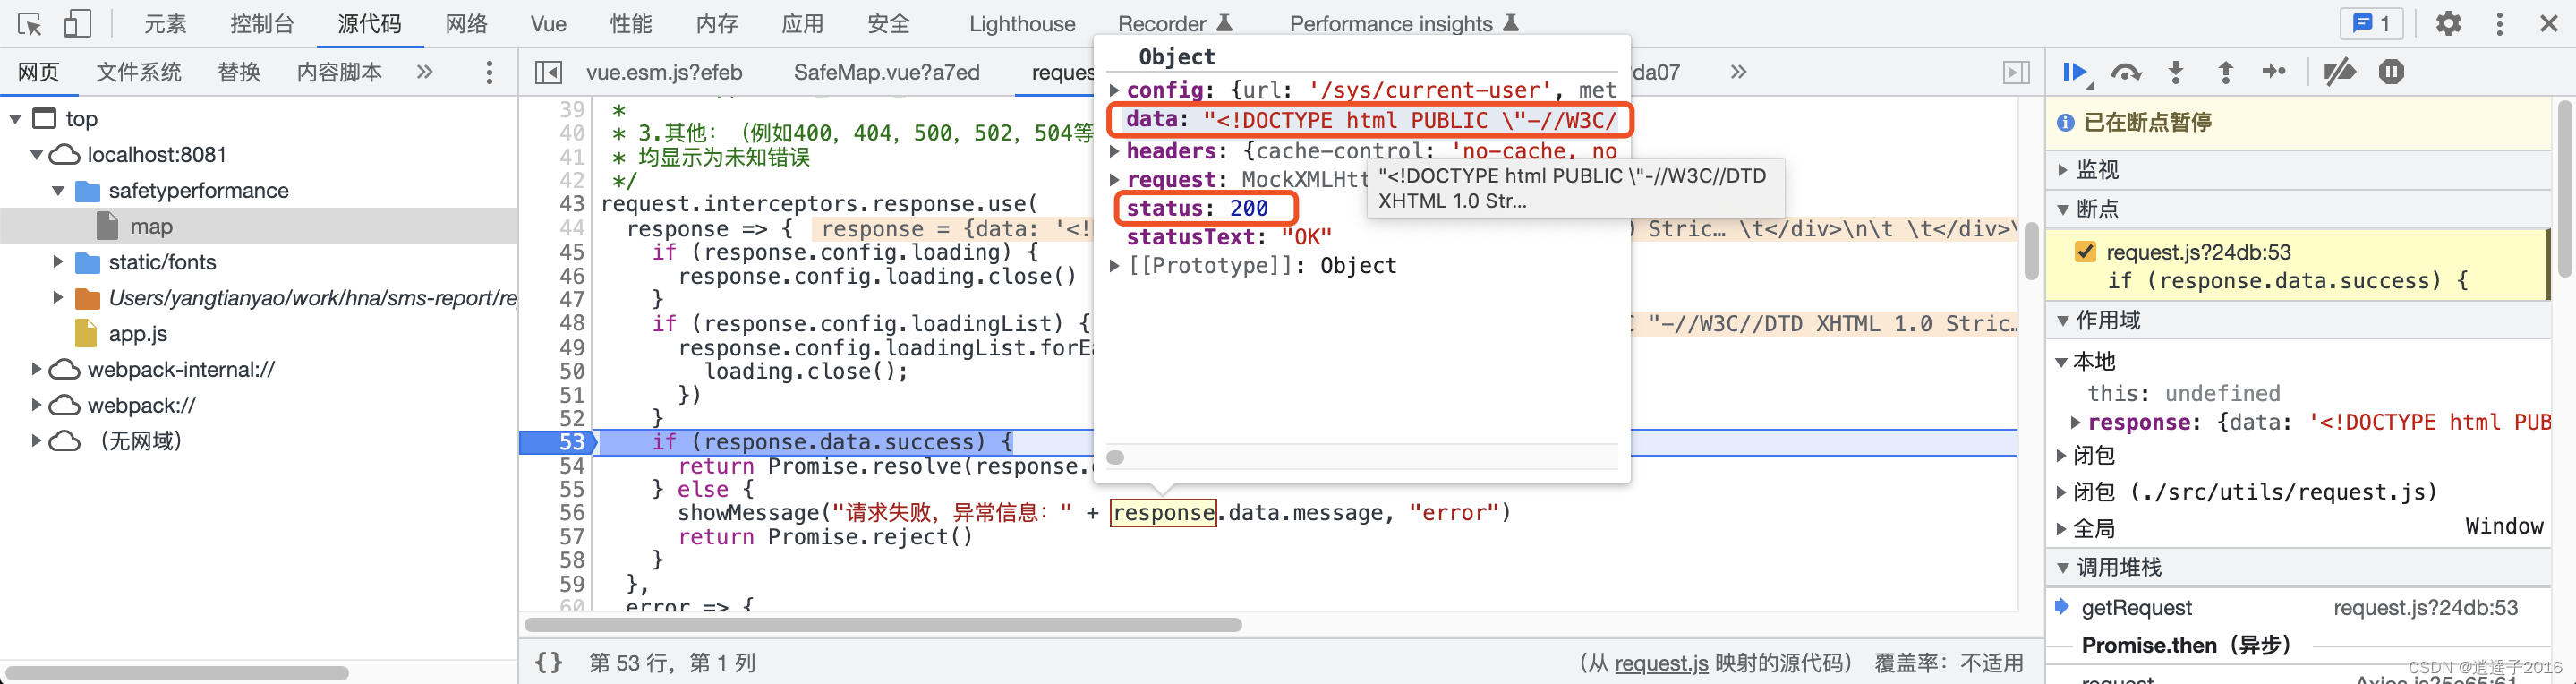
前面已经提到,由于前后端交互使用的是ajax,对于ajax请求,浏览器不会响应重定向。下方示例为ajax处理重定向的场景。
可以看到响应状态码是302,后面紧跟了CAS登录请求的URL。正常来说此时浏览器应该要跳转了,但实际却不会,而且该ajax请求也并没有结束,它仍在请求重定向后的url,请求成功后,进入ajax成功回调,这时ajax才完成。
从下方第二个截图可以看出,源请求接收到是重定向后url的响应,状态码为200,响应数据为CAS登录页面的html文本。
对于ajax这样处理的原因,感兴趣的博友可以参考一下这篇文章:ajax 遇到重定向,ajax 重定向跨域问题

后端重定向行不通,可以返回别的响应码,比如401、500或者200,然后让前端来控制浏览器跳转。本例中选择了401响应
下面是AuthenticationFilter类的doFilter方法,主要逻辑是当发现CAS未登录时,就调用this.authenticationRedirectStrategy.redirect重定向到CAS登录页面(为方便阅读,只保留了与本文相关的代码)
public class AuthenticationFilter extends AbstractCasFilter {

    /**
    * 默认的重定向策略,详见下方DefaultAuthenticationRedirectStrategy源码
    */
    private AuthenticationRedirectStrategy authenticationRedirectStrategy = new DefaultAuthenticationRedirectStrategy();

    @Override
    public final void doFilter(final ServletRequest servletRequest, final ServletResponse servletResponse,
                               final FilterChain filterChain) throws IOException, ServletException {

        final HttpServletRequest request = (HttpServletRequest) servletRequest;
        final HttpServletResponse response = (HttpServletResponse) servletResponse;

        final HttpSession session = request.getSession(false);
        final Assertion assertion = session != null ? (Assertion) session.getAttribute(CONST_CAS_ASSERTION) : null;

        //CAS已登录的判断条件是:session存在且包含用户信息
        if (assertion != null) {
            filterChain.doFilter(request, response);
            return;
        }

        //生成重定向的URL
        final String urlToRedirectTo = CommonUtils.constructRedirectUrl(this.casServerLoginUrl,
            getProtocol().getServiceParameterName(), constructServiceUrl(request, response);, this.renew, this.gateway, this.method);
        //重定向到CAS登录页面
        this.authenticationRedirectStrategy.redirect(request, response, urlToRedirectTo);
    }

    //其余代码省略...
}
this.authenticationRedirectStrategy采用了策略模式,默认策略为DefaultAuthenticationRedirectStrategy,源码如下
public final class DefaultAuthenticationRedirectStrategy implements AuthenticationRedirectStrategy {

    @Override
    public void redirect(final HttpServletRequest request, final HttpServletResponse response,
                         final String potentialRedirectUrl) throws IOException {
        response.sendRedirect(potentialRedirectUrl);
    }
}
如何修改这个默认策略呢?
查看AuthenticationFilter的初始化方法,这里设置了this.authenticationRedirectStrategy(为方便阅读,只保留了与本文相关的代码)
public class AuthenticationFilter extends AbstractCasFilter {
    @Override
    protected void initInternal(final FilterConfig filterConfig) throws ServletException {
        if (!isIgnoreInitConfiguration()) {
            super.initInternal(filterConfig);

            //从用户给定的authenticationRedirectStrategyClass参数中获取类的全限定名并获取其Class对象,然后通过反射创建实例
            final Class<? extends AuthenticationRedirectStrategy> authenticationRedirectStrategyClass = getClass(ConfigurationKeys.AUTHENTICATION_REDIRECT_STRATEGY_CLASS);

            if (authenticationRedirectStrategyClass != null) {
                this.authenticationRedirectStrategy = ReflectUtils.newInstance(authenticationRedirectStrategyClass);
            }
        }
    }
}
所以说,我们需要给AuthenticationFilter设置authenticationRedirectStrategyClass参数,参数值就是【实现步骤 - 1.身份认证 - 实现自定义的重定向策略】中创建的类SmsAuthenticationRedirectStrategy的全限定名
如何设置这个值呢?
一般来说,SpringMVC项目引入CAS客户端,通常是在web.xml中配置相关过滤器。而SpringBoot项目由于其自动配置的特性,整合到SpringBoot的三方库一般会提供自动配置类。
cas-client-support-springboot也提供了一个自动配置类:org.jasig.cas.client.boot.configuration.CasClientConfiguration,该类配置了CAS流程所需要的所有过滤器,下面是注册AuthenticationFilter的代码。它使用FilterRegistrationBean注册过滤器(相当于在web.xml中配置<filter>)
注意最后面几行代码,它支持用this.casClientConfigurer进行自定义修改
@Configuration
@EnableConfigurationProperties(CasClientConfigurationProperties.class)
public class CasClientConfiguration {

    @Bean
    public FilterRegistrationBean casAuthenticationFilter() {
        //通过FilterRegistrationBean注册一个过滤器
        final FilterRegistrationBean authnFilter = new FilterRegistrationBean();
        //application.yml中validation-type: cas,所以执行的是new AuthenticationFilter()
        final Filter targetCasAuthnFilter =
            this.configProps.getValidationType() == EnableCasClient.ValidationType.CAS
                || configProps.getValidationType() == EnableCasClient.ValidationType.CAS3
                ? new AuthenticationFilter()
                : new Saml11AuthenticationFilter();

        initFilter(authnFilter,
            targetCasAuthnFilter,
            2,
            constructInitParams("casServerLoginUrl", this.configProps.getServerLoginUrl(), this.configProps.getClientHostUrl()),
            this.configProps.getAuthenticationUrlPatterns());

        //支持自定义配置AuthenticationFilter过滤器
        if (this.casClientConfigurer != null) {
            this.casClientConfigurer.configureAuthenticationFilter(authnFilter);
        }
        return authnFilter;
    }

    //其余代码省略...
}
casClientConfigurer是一个接口,源码如下:
public interface CasClientConfigurer {
    default void configureAuthenticationFilter(FilterRegistrationBean authenticationFilter) {
    }

    default void configureValidationFilter(FilterRegistrationBean validationFilter) {
    }

    default void configureHttpServletRequestWrapperFilter(FilterRegistrationBean httpServletRequestWrapperFilter) {
    }

    default void configureAssertionThreadLocalFilter(FilterRegistrationBean assertionThreadLocalFilter) {
    }
}
下面是casClientConfigurer初始化的代码,可以看出,它通过@autowired注入依赖。所以就有了【实现步骤 - 1.身份认证 - 应用自定义的重定向策略】,重写configureAuthenticationFilter方法后,就可以给AuthenticationFilter设置authenticationRedirectStrategyClass参数了
@Configuration
@EnableConfigurationProperties(CasClientConfigurationProperties.class)
public class CasClientConfiguration {

    private CasClientConfigurer casClientConfigurer;

    @Autowired(required = false)
    void setConfigurers(final Collection<CasClientConfigurer> configurers) {
        if (CollectionUtils.isEmpty(configurers)) {
            return;
        }
        if (configurers.size() > 1) {
            throw new IllegalStateException(configurers.size() + " implementations of " +
                "CasClientConfigurer were found when only 1 was expected. " +
                "Refactor the configuration such that CasClientConfigurer is " +
                "implemented only once or not at all.");
        }
        this.casClientConfigurer = configurers.iterator().next();
    }
}重定向到CAS登录页面后,用户需要输入账号密码登录,前面说到,登录成功后,浏览器会跳转到service参数指定的url,且会在该url后面追加一个参数ticket,即CAS-Server签发的票据。另外从前面的中截图可以看到service的参数值(解码后为:http://localhost:8082/sms/repo/sys/current-user,也就是第1步身份认证时被AuthenticationFilter拦截的url)

刚才说到,登录成功后,浏览器会跳转到http://localhost:8082/sms/repo/sys/current-user。那登录成功后,页面将会是这样的
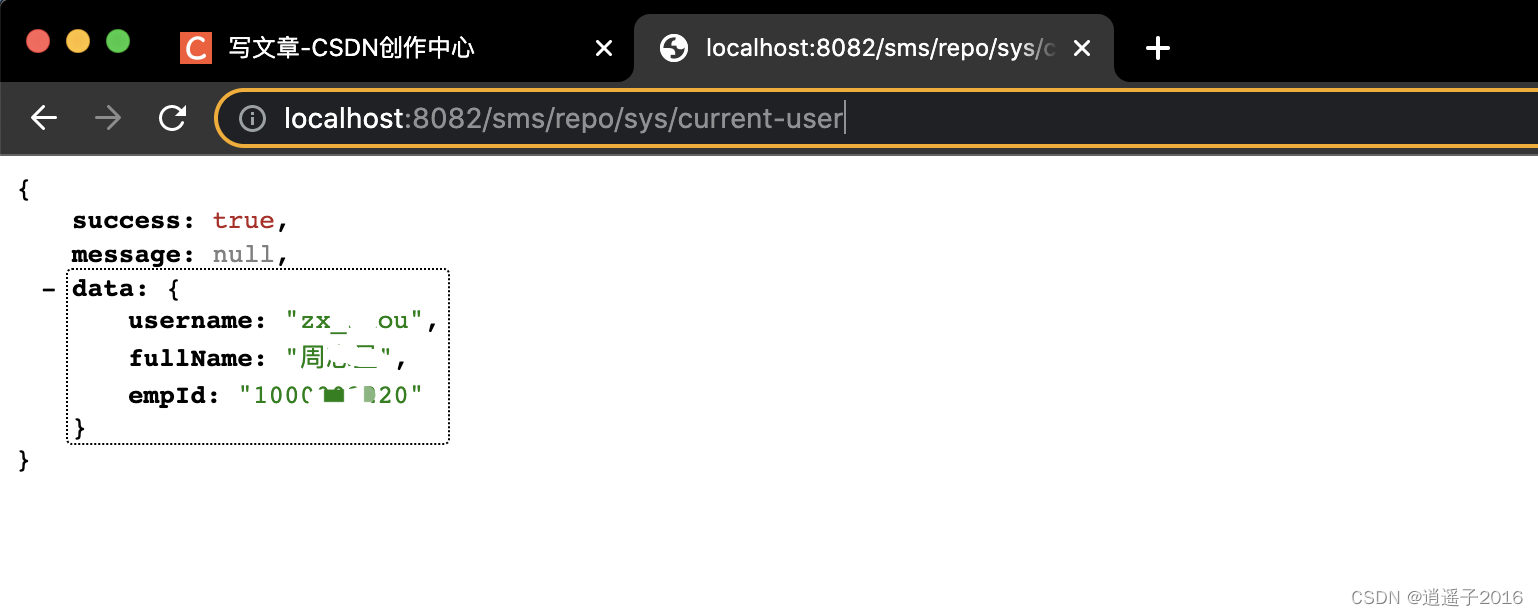
很明显这不是预期的效果,我们希望登录成功后浏览器跳转到前端的首页,如何实现呢?
下面是注册票据校验过滤器的代码,可以看到使用的是Cas20ProxyReceivingTicketValidationFilter,它的执行顺序为1(AuthenticationFilter的执行顺序为2),意味的请求会先进入Cas20ProxyReceivingTicketValidationFilter的doFilter方法
@Configuration
@EnableConfigurationProperties(CasClientConfigurationProperties.class)
public class CasClientConfiguration {

    @Bean
    @ConditionalOnProperty(prefix = "cas", name = "skipTicketValidation", havingValue = "false", matchIfMissing = true)
    public FilterRegistrationBean casValidationFilter() {
        final FilterRegistrationBean validationFilter = new FilterRegistrationBean();
        final Filter targetCasValidationFilter;
        switch (this.configProps.getValidationType()) {
            //根据由application.yml中的配置,进入case CAS分支
            case CAS:
                targetCasValidationFilter = new Cas20ProxyReceivingTicketValidationFilter();
                break;
            case SAML:
                targetCasValidationFilter = new Saml11TicketValidationFilter();
                break;
            case CAS3:
            default:
                targetCasValidationFilter = new Cas30ProxyReceivingTicketValidationFilter();
                break;
        }

        initFilter(validationFilter,
            targetCasValidationFilter,
            1,
            constructInitParams("casServerUrlPrefix", this.configProps.getServerUrlPrefix(), this.configProps.getClientHostUrl()),
            this.configProps.getValidationUrlPatterns());


        if (this.casClientConfigurer != null) {
            this.casClientConfigurer.configureValidationFilter(validationFilter);
        }
        return validationFilter;
    }

    //其余代码省略...
}
查看Cas20ProxyReceivingTicketValidationFilter源码可知,它自身并没有实现doFilter方法,doFilter方法在它的父类中实现
public class Cas20ProxyReceivingTicketValidationFilter extends AbstractTicketValidationFilter {
}
AbstractTicketValidationFilter的doFilter方法(为方便阅读,只保留了与本文相关的代码)
public abstract class AbstractTicketValidationFilter extends AbstractCasFilter {

    @Override
    public final void doFilter(final ServletRequest servletRequest, final ServletResponse servletResponse,
                               final FilterChain filterChain) throws IOException, ServletException {

        final HttpServletRequest request = (HttpServletRequest) servletRequest;
        final HttpServletResponse response = (HttpServletResponse) servletResponse;
        //从请求参数中获取ticket
        final String ticket = retrieveTicketFromRequest(request);

        //ticket存在,才执行票据校验逻辑,否则跳过该过滤器
        if (CommonUtils.isNotBlank(ticket)) {

            try {
                //票据校验,返回包含当前登录用户的信息
                final Assertion assertion = this.ticketValidator.validate(ticket,
                        constructServiceUrl(request, response));

                //this.useSession默认值为true,用户信息将被存入session
                if (this.useSession) {
                    request.getSession().setAttribute(CONST_CAS_ASSERTION, assertion);
                }
                //校验成功回调,预留给子类实现
                onSuccessfulValidation(request, response, assertion);

                //this.redirectAfterValidation默认为true,校验完成后,会重定向到request.getRequestUrl(),在本例中,就是:http://localhost:8082/sms/repo/sys/current-user
                if (this.redirectAfterValidation) {
                    response.sendRedirect(constructServiceUrl(request, response));
                    return;
                }
            }
        }

        filterChain.doFilter(request, response);

    }

    protected void onSuccessfulValidation(final HttpServletRequest request, final HttpServletResponse response,
            final Assertion assertion) {
        // nothing to do here.
    }
}
看到这里,浏览器没有出现预期效果的原因也就清晰了,doFilter方法在校验成功后,默认重定向到request.getRequestUrl(),我们要修改这个重定向url
所以就有了前面【实现步骤 - 3.票据检验】,新建了一个类SmsCas20ProxyReceivingTicketValidationFilter继承自Cas20ProxyReceivingTicketValidationFilter,重写onSuccessfulValidation方法,重定向到前端首页就可以了。
Sinatra新手;我正在运行一些rspec测试,但在日志中收到了一堆不需要的噪音。如何消除日志中过多的噪音?我仔细检查了环境是否设置为:test,这意味着记录器级别应设置为WARN而不是DEBUG。spec_helper:require"./app"require"sinatra"require"rspec"require"rack/test"require"database_cleaner"require"factory_girl"set:environment,:testFactoryGirl.definition_file_paths=%w{./factories./test/
我有两个Rails模型,即Invoice和Invoice_details。一个Invoice_details属于Invoice,一个Invoice有多个Invoice_details。我无法使用accepts_nested_attributes_forinInvoice通过Invoice模型保存Invoice_details。我收到以下错误:(0.2ms)BEGIN(0.2ms)ROLLBACKCompleted422UnprocessableEntityin25ms(ActiveRecord:4.0ms)ActiveRecord::RecordInvalid(Validationfa
一、引擎主循环UE版本:4.27一、引擎主循环的位置:Launch.cpp:GuardedMain函数二、、GuardedMain函数执行逻辑:1、EnginePreInit:加载大多数模块int32ErrorLevel=EnginePreInit(CmdLine);PreInit模块加载顺序:模块加载过程:(1)注册模块中定义的UObject,同时为每个类构造一个类默认对象(CDO,记录类的默认状态,作为模板用于子类实例创建)(2)调用模块的StartUpModule方法2、FEngineLoop::Init()1、检查Engine的配置文件找出使用了哪一个GameEngine类(UGame
在VMware16.2.4安装Ubuntu一、安装VMware1.打开VMwareWorkstationPro官网,点击即可进入。2.进入后向下滑动找到Workstation16ProforWindows,点击立即下载。3.下载完成,文件大小615MB,如下图:4.鼠标右击,以管理员身份运行。5.点击下一步6.勾选条款,点击下一步7.先勾选,再点击下一步8.去掉勾选,点击下一步9.点击下一步10.点击安装11.点击许可证12.在百度上搜索VM16许可证,复制填入,然后点击输入即可,亲测有效。13.点击完成14.重启系统,点击是15.双击VMwareWorkstationPro图标,进入虚拟机主
项目介绍随着我国经济迅速发展,人们对手机的需求越来越大,各种手机软件也都在被广泛应用,但是对于手机进行数据信息管理,对于手机的各种软件也是备受用户的喜爱小学生兴趣延时班预约小程序的设计与开发被用户普遍使用,为方便用户能够可以随时进行小学生兴趣延时班预约小程序的设计与开发的数据信息管理,特开发了小程序的设计与开发的管理系统。小学生兴趣延时班预约小程序的设计与开发的开发利用现有的成熟技术参考,以源代码为模板,分析功能调整与小学生兴趣延时班预约小程序的设计与开发的实际需求相结合,讨论了小学生兴趣延时班预约小程序的设计与开发的使用。开发环境开发说明:前端使用微信微信小程序开发工具:后端使用ssm:VU
我正在尝试将以下SQL查询转换为ActiveRecord,它正在融化我的大脑。deletefromtablewhereid有什么想法吗?我想做的是限制表中的行数。所以,我想删除少于最近10个条目的所有内容。编辑:通过结合以下几个答案找到了解决方案。Temperature.where('id这给我留下了最新的10个条目。 最佳答案 从您的SQL来看,您似乎想要从表中删除前10条记录。我相信到目前为止的大多数答案都会如此。这里有两个额外的选择:基于MurifoX的版本:Table.where(:id=>Table.order(:id).
我目前正在用Ruby编写一个项目,它使用ActiveRecordgem进行数据库交互,我正在尝试使用ActiveRecord::Base.logger记录所有数据库事件具有以下代码的属性ActiveRecord::Base.logger=Logger.new(File.open('logs/database.log','a'))这适用于迁移等(出于某种原因似乎需要启用日志记录,因为它在禁用时会出现NilClass错误)但是当我尝试运行包含调用ActiveRecord对象的线程守护程序的项目时脚本失败并出现以下错误/System/Library/Frameworks/Ruby.frame
我有一个应用需要发送用户事件邀请。当用户邀请friend(用户)参加事件时,如果尚不存在将用户连接到该事件的新记录,则会创建该记录。我的模型由用户、事件和events_user组成。classEventdefinvite(user_id,*args)user_id.eachdo|u|e=EventsUser.find_or_create_by_event_id_and_user_id(self.id,u)e.save!endendend用法Event.first.invite([1,2,3])我不认为以上是完成我的任务的最有效方法。我设想了一种方法,例如Model.find_or_cr
在许多ruby类之间共享记录器实例的最佳(正确)方法是什么?现在我只是将记录器创建为全局$logger=Logger.new变量,但我觉得有更好的方法可以在不使用全局变量的情况下执行此操作。如果我有以下内容:moduleFooclassAclassBclassC...classZend在所有类之间共享记录器实例的最佳方式是什么?我是以某种方式在Foo模块中声明/创建记录器还是只是使用全局$logger没问题? 最佳答案 在模块中添加常量:moduleFooLogger=Logger.newclassAclassBclassC..
如何在出现异常时指定全局救援,如果您将Sinatra用于API或应用程序,您将如何处理日志记录? 最佳答案 404可以在not_found方法的帮助下处理,例如:not_founddo'Sitedoesnotexist.'end500s可以通过调用带有block的错误方法来处理,例如:errordo"Applicationerror.Plstrylater."end错误的详细信息可以通过request.env中的sinatra.error访问,如下所示:errordo'Anerroroccured:'+request.env['si