FastChat开放,媲美ChatGPT的90%能力——从下载到安装、部署
$ conda create -n fastchat python=3.9
>= 3.8,注意不要安装错版本了conda config --add channels https://mirrors.tuna.tsinghua.edu.cn/anaconda/pkgs/main
conda config --add channels https://mirrors.tuna.tsinghua.edu.cn/anaconda/pkgs/free
conda config --add channels https://mirrors.tuna.tsinghua.edu.cn/anaconda/pkgs/r
conda config --add channels https://mirrors.tuna.tsinghua.edu.cn/anaconda/pkgs/pro
conda config --add channels https://mirrors.tuna.tsinghua.edu.cn/anaconda/pkgs/msys2
conda config --add channels https://mirrors.tuna.tsinghua.edu.cn/anaconda/cloud/conda-forge/
conda config --add channels https://mirrors.tuna.tsinghua.edu.cn/anaconda/cloud/bioconda/
conda config --set show_channel_urls yes
fastchat虚拟环境,执行 $ conda activate fastchat$ conda install pytorch torchvision torchaudio cudatoolkit=11.6 -c pytorch -c conda-forge$ conda install pytorch==1.13.1 torchvision==0.14.1 torchaudio==0.13.1 pytorch-cuda=11.6 -c pytorch -c nvidia$ pip3 install torch torchvision torchaudio --index-url https://download.pytorch.org/whl/cu117$ pip3 install torch torchvision torchaudio --index-url https://download.pytorch.org/whl/cu116(base) PS C:\Users\alion> conda activate fastchat
(fastchat) PS C:\Users\alion> python
Python 3.9.16 (main, Mar 8 2023, 10:39:24) [MSC v.1916 64 bit (AMD64)] on win32
Type "help", "copyright", "credits" or "license" for more information.
>>> import torch
>>> print(torch.__version__)
1.13.1+cu116
>>> print(torch.version.cuda)
11.6
>>>
>>> exit()
(fastchat) PS C:\Users\alion>
pyproject.toml文件中移除掉你认为不需要的依赖,或是源码中有错误需要修改git clone --filter=blob:none --quiet https://github.com/huggingface/transformers.git ... exit code: 128pyproject.toml文件,移除掉dependencies中的transformers,等下手动安装pip3 install git+https://github.com/huggingface/transformers-i https://pypi.tuna.tsinghua.edu.cn/simple# 安装FastChat
pip3 install fschat
# 安装 huggingface/transformers
pip3 install git+https://github.com/huggingface/transformers
(fastchat) PS C:\Users\alion> pip3 install fschat
Requirement already satisfied: fschat in c:\programdata\anaconda3\envs\fastchat\lib\site-packages (0.1.8)
Requirement already satisfied: tokenizers>=0.12.1 in c:\programdata\anaconda3\envs\fastchat\lib\site-packages (from fschat) (0.13.3)
Requirement already satisfied: requests in c:\programdata\anaconda3\envs\fastchat\lib\site-packages (from fschat) (2.28.1)
Requirement already satisfied: torch in c:\programdata\anaconda3\envs\fastchat\lib\site-packages (from fschat) (1.13.1+cu116)
Requirement already satisfied: wandb in c:\programdata\anaconda3\envs\fastchat\lib\site-packages (from fschat) (0.14.2)
Requirement already satisfied: uvicorn in c:\programdata\anaconda3\envs\fastchat\lib\site-packages (from fschat) (0.21.1)
Requirement already satisfied: sentencepiece in c:\programdata\anaconda3\envs\fastchat\lib\site-packages (from fschat) (0.1.97)
Requirement already satisfied: accelerate in c:\programdata\anaconda3\envs\fastchat\lib\site-packages (from fschat) (0.18.0)
Requirement already satisfied: numpy in c:\programdata\anaconda3\envs\fastchat\lib\site-packages (from fschat) (1.24.1)
Requirement already satisfied: fastapi in c:\programdata\anaconda3\envs\fastchat\lib\site-packages (from fschat) (0.95.0)
Requirement already satisfied: gradio==3.23 in c:\programdata\anaconda3\envs\fastchat\lib\site-packages (from fschat) (3.23.0)
Requirement already satisfied: markdown2[all] in c:\programdata\anaconda3\envs\fastchat\lib\site-packages (from fschat) (2.4.8)
# 太多了,中间的我就省略了
Requirement already satisfied: fonttools>=4.22.0 in c:\programdata\anaconda3\envs\fastchat\lib\site-packages (from matplotlib->gradio==3.23->fschat) (4.39.3)
Requirement already satisfied: kiwisolver>=1.0.1 in c:\programdata\anaconda3\envs\fastchat\lib\site-packages (from matplotlib->gradio==3.23->fschat) (1.4.4)
Requirement already satisfied: svgwrite in c:\programdata\anaconda3\envs\fastchat\lib\site-packages (from wavedrom->markdown2[all]->fschat) (1.4.3)
Requirement already satisfied: smmap<6,>=3.0.1 in c:\programdata\anaconda3\envs\fastchat\lib\site-packages (from gitdb<5,>=4.0.1->GitPython!=3.1.29,>=1.0.0->wandb->fschat) (5.0.0)
Requirement already satisfied: zipp>=3.1.0 in c:\programdata\anaconda3\envs\fastchat\lib\site-packages (from importlib-resources>=3.2.0->matplotlib->gradio==3.23->fschat) (3.15.0)
Requirement already satisfied: pyrsistent!=0.17.0,!=0.17.1,!=0.17.2,>=0.14.0 in c:\programdata\anaconda3\envs\fastchat\lib\site-packages (from jsonschema>=3.0->altair>=4.2.0->gradio==3.23->fschat) (0.19.3)
Requirement already satisfied: uc-micro-py in c:\programdata\anaconda3\envs\fastchat\lib\site-packages (from linkify-it-py<3,>=1->markdown-it-py[linkify]>=2.0.0->gradio==3.23->fschat) (1.0.1)
(fastchat) PS C:\Users\alion>
magnet:?xt=urn:btih:cdee3052d85c697b84f4c1192f43a2276c0daea0&dn=LLaMA$ git clone https://github.com/huggingface/transformers.git$ cd transformers huggingface/transformers中的代码,完成对于LLaMA的转换,示例$ python src/transformers/models/llama/convert_llama_weights_to_hf.py --input_dir D:/code/model/LLaMA --model_size 7B --output_dir D:/code/model/transformer_model_7b
--input_dir指定的是刚才你下载好的LLaMA文件地址,这个路径下有个tokenizer.model文件,请仔细核对一下--model_size指定用哪个参数数量级的模型,7B代表的是70亿个参数的那个模型(如果你用的种子链接下载的话,还有13B/30B/65B的模型)--output_dir 是转换后输出的路径,等下要用python -m fastchat.model.apply_delta --base-model-path D:/code/model/transformer_model_7b --target-model-path D:/code/model/vicuna-7b --delta-path lmsys/vicuna-7b-delta-v0
--base-model-path指定的是上一步,我们转换好的LLaMA 文件路径--target-model-path是接下来生成的Vicuna文件要存放的位置,稍后启动FastChat要用--delta-path不用改python -m fastchat.model.apply_delta --base-model-path D:/code/model/transformer_model_7b --target-model-path D:/code/model/vicuna-7b --delta-path lmsys/vicuna-7b-delta-v1.1(fastchat) PS D:\code\transformers> python -m fastchat.model.apply_delta --base-model-path D:/code/model/transformer_model_7b --target-model-path D:/code/model/vicuna-7b --delta-path lmsys/vicuna-7b-delta-v0
Loading base model
Loading checkpoint shards: 100%|█████████████████████████████████████████████████████████| 2/2 [00:03<00:00, 1.63s/it]
Loading delta
Downloading (…)lve/main/config.json: 100%|█████████████████████████████████████████████| 619/619 [00:00<00:00, 103kB/s]
Downloading (…)model.bin.index.json: 100%|████████████████████████████████████████| 26.8k/26.8k [00:00<00:00, 1.30MB/s]
Downloading (…)l-00001-of-00002.bin: 100%|████████████████████████████████████████| 9.98G/9.98G [06:47<00:00, 24.5MB/s]
Downloading (…)l-00002-of-00002.bin: 100%|████████████████████████████████████████| 3.50G/3.50G [02:29<00:00, 23.4MB/s]
Downloading shards: 100%|███████████████████████████████████████████████████████████████| 2/2 [09:19<00:00, 279.81s/it]
Loading checkpoint shards: 100%|█████████████████████████████████████████████████████████| 2/2 [00:03<00:00, 1.68s/it]
Downloading (…)neration_config.json: 100%|████████████████████████████████████████████| 137/137 [00:00<00:00, 27.3kB/s]
Downloading (…)okenizer_config.json: 100%|█████████████████████████████████████████████| 727/727 [00:00<00:00, 121kB/s]
Downloading tokenizer.model: 100%|███████████████████████████████████████████████████| 500k/500k [00:01<00:00, 411kB/s]
Downloading (…)cial_tokens_map.json: 100%|█████████████████████████████████████████████| 411/411 [00:00<00:00, 103kB/s]
Applying delta
Applying delta: 100%|████████████████████████████████████████████████████████████████| 323/323 [00:22<00:00, 14.57it/s]
Saving target model
(fastchat) PS D:\code\transformers-main>
$ pyhon -m fastchat.serve.cli --model-name D:\code\model\vicuna-7b
$ python -m fastchat.serve.cli --model-name D:\code\model\vicuna-7b --device cpu--num-gpus 2来指定多张显卡$ pyhon -m fastchat.serve.cli --model-path D:\code\model\vicuna-7b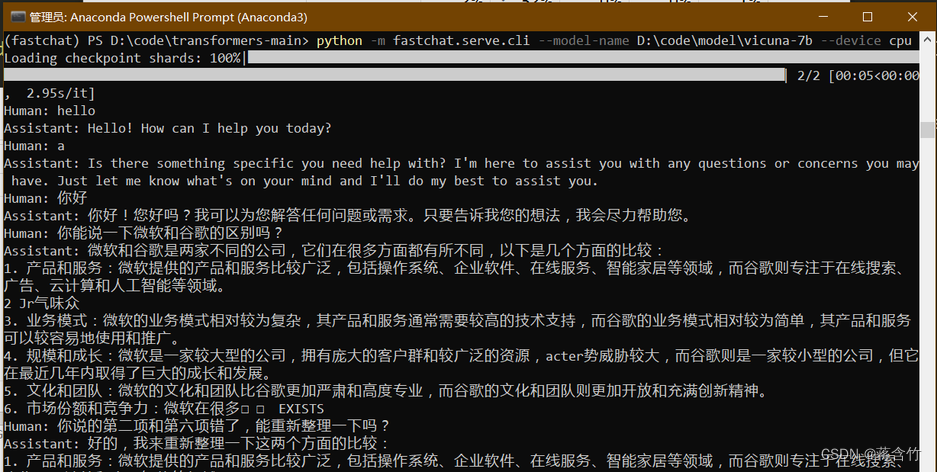
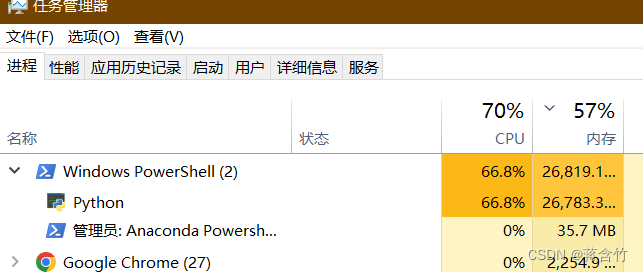
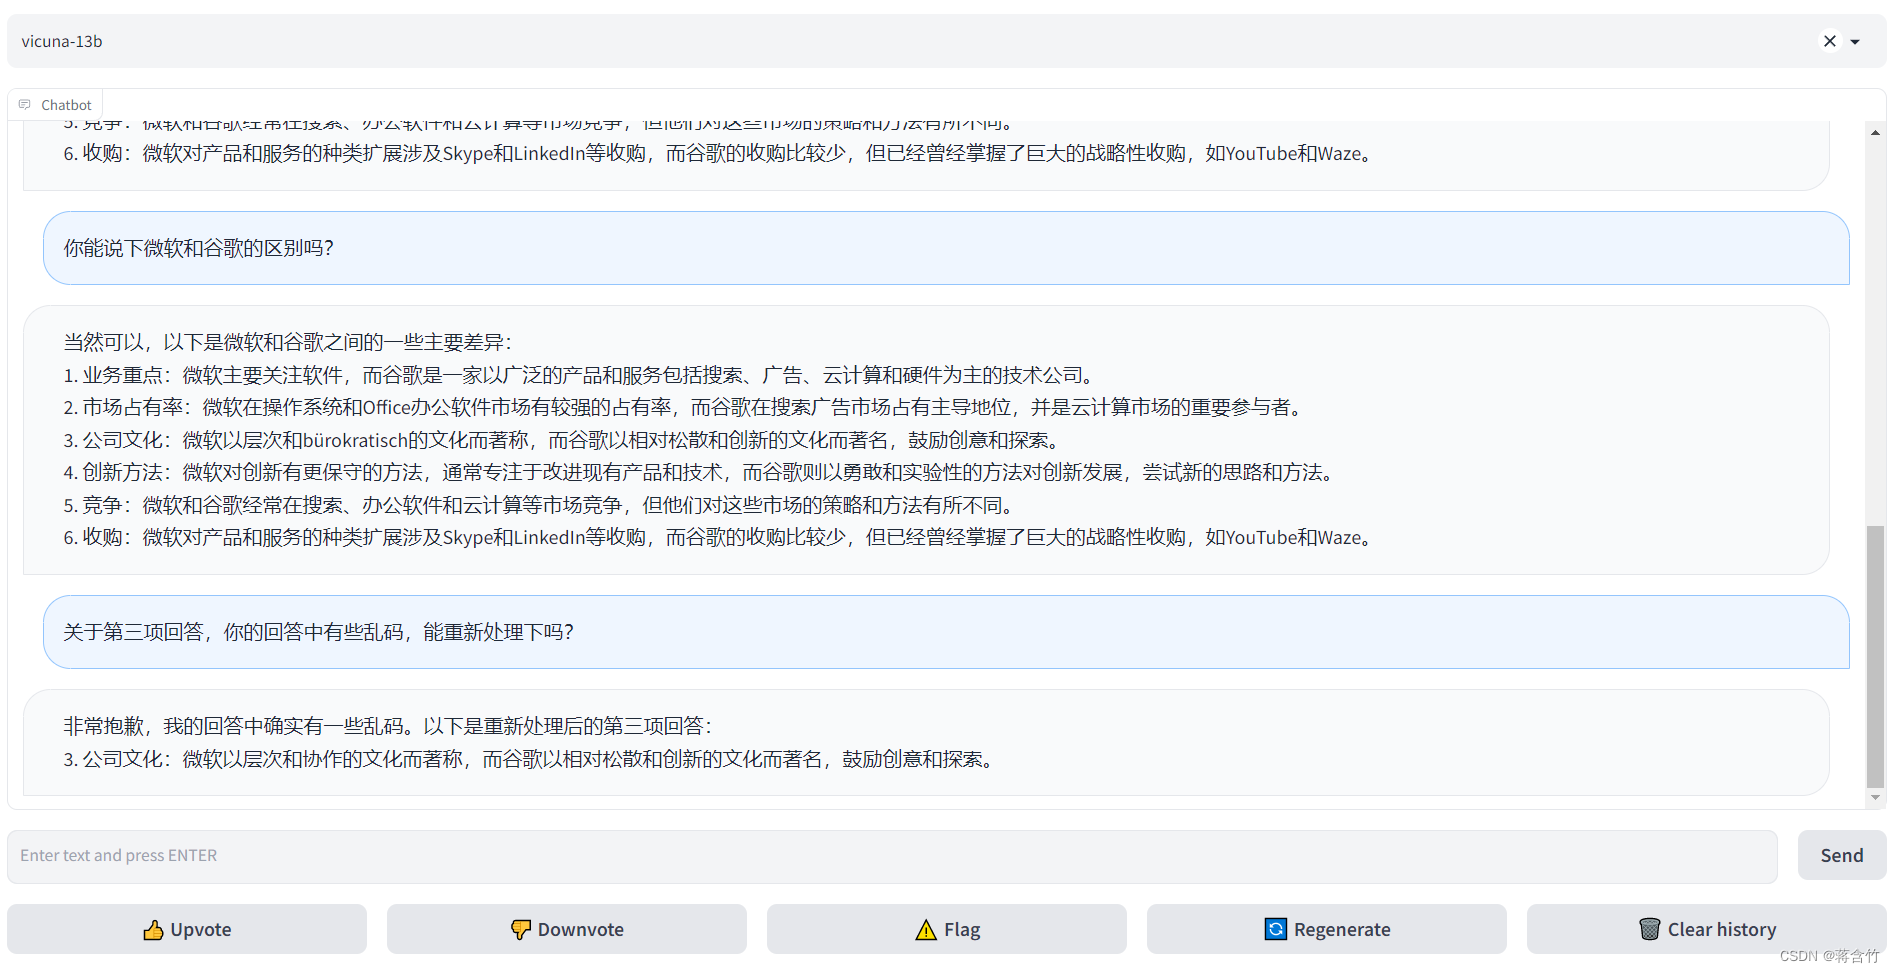
$ conda activate fastchat$ python -m fastchat.serve.controller$ conda activate fastchat$ python -m fastchat.serve.model_worker --model-path D:\code\model\vicuna-7b--device cpu$ conda activate fastchat$ python -m fastchat.serve.test_message --model-name vicuna-7bpython -m fastchat.serve.gradio_web_server
我想为Heroku构建一个Rails3应用程序。他们使用Postgres作为他们的数据库,所以我通过MacPorts安装了postgres9.0。现在我需要一个postgresgem并且共识是出于性能原因你想要pggem。但是我对我得到的错误感到非常困惑当我尝试在rvm下通过geminstall安装pg时。我已经非常明确地指定了所有postgres目录的位置可以找到但仍然无法完成安装:$envARCHFLAGS='-archx86_64'geminstallpg--\--with-pg-config=/opt/local/var/db/postgresql90/defaultdb/po
我好像记得Lua有类似Ruby的method_missing的东西。还是我记错了? 最佳答案 表的metatable的__index和__newindex可以用于与Ruby的method_missing相同的效果。 关于ruby-难道Lua没有和Ruby的method_missing相媲美的东西吗?,我们在StackOverflow上找到一个类似的问题: https://stackoverflow.com/questions/7732154/
我打算为ruby脚本创建一个安装程序,但我希望能够确保机器安装了RVM。有没有一种方法可以完全离线安装RVM并且不引人注目(通过不引人注目,就像创建一个可以做所有事情的脚本而不是要求用户向他们的bash_profile或bashrc添加一些东西)我不是要脚本本身,只是一个关于如何走这条路的快速指针(如果可能的话)。我们还研究了这个很有帮助的问题:RVM-isthereawayforsimpleofflineinstall?但有点误导,因为答案只向我们展示了如何离线在RVM中安装ruby。我们需要能够离线安装RVM本身,并查看脚本https://raw.github.com/wayn
我有一个奇怪的问题:我在rvm上安装了rubyonrails。一切正常,我可以创建项目。但是在我输入“railsnew”时重新启动后,我有“程序'rails'当前未安装。”。SystemUbuntu12.04ruby-v"1.9.3p194"gemlistactionmailer(3.2.5)actionpack(3.2.5)activemodel(3.2.5)activerecord(3.2.5)activeresource(3.2.5)activesupport(3.2.5)arel(3.0.2)builder(3.0.0)bundler(1.1.4)coffee-rails(
我刚刚为fedora安装了emacs。我想用emacs编写ruby。为ruby提供代码提示、代码完成类型功能所需的工具、扩展是什么? 最佳答案 ruby-mode已经包含在Emacs23之后的版本中。不过,它也可以通过ELPA获得。您可能感兴趣的其他一些事情是集成RVM、feature-mode(Cucumber)、rspec-mode、ruby-electric、inf-ruby、rinari(用于Rails)等。这是我当前用于Ruby开发的Emacs配置:https://github.com/citizen428/emacs
我正在尝试在我的centos服务器上安装therubyracer,但遇到了麻烦。$geminstalltherubyracerBuildingnativeextensions.Thiscouldtakeawhile...ERROR:Errorinstallingtherubyracer:ERROR:Failedtobuildgemnativeextension./usr/local/rvm/rubies/ruby-1.9.3-p125/bin/rubyextconf.rbcheckingformain()in-lpthread...yescheckingforv8.h...no***e
我的最终目标是安装当前版本的RubyonRails。我在OSXMountainLion上运行。到目前为止,这是我的过程:已安装的RVM$\curl-Lhttps://get.rvm.io|bash-sstable检查已知(我假设已批准)安装$rvmlistknown我看到当前的稳定版本可用[ruby-]2.0.0[-p247]输入命令安装$rvminstall2.0.0-p247注意:我也试过这些安装命令$rvminstallruby-2.0.0-p247$rvminstallruby=2.0.0-p247我很快就无处可去了。结果:$rvminstall2.0.0-p247Search
我实际上是在尝试使用RVM在我的OSX10.7.5上更新ruby,并在输入以下命令后:rvminstallruby我得到了以下回复:Searchingforbinaryrubies,thismighttakesometime.Checkingrequirementsforosx.Installingrequirementsforosx.Updatingsystem.......Errorrunning'requirements_osx_brew_update_systemruby-2.0.0-p247',pleaseread/Users/username/.rvm/log/138121
由于fast-stemmer的问题,我很难安装我想要的任何rubygem。我把我得到的错误放在下面。Buildingnativeextensions.Thiscouldtakeawhile...ERROR:Errorinstallingfast-stemmer:ERROR:Failedtobuildgemnativeextension./System/Library/Frameworks/Ruby.framework/Versions/2.0/usr/bin/rubyextconf.rbcreatingMakefilemake"DESTDIR="cleanmake"DESTDIR=
我是Google云的新手,我正在尝试对其进行首次部署。我的第一个部署是RubyonRails项目。我基本上是在关注thisguideinthegoogleclouddocumentation.唯一的区别是我使用的是我自己的项目,而不是他们提供的“helloworld”项目。这是我的app.yaml文件runtime:customvm:trueentrypoint:bundleexecrackup-p8080-Eproductionconfig.ruresources:cpu:0.5memory_gb:1.3disk_size_gb:10当我转到我的项目目录并运行gcloudprevie
