例子1
package li.jdbc.datasource;

import li.jdbc.utils.JDBCUtils;
import org.junit.Test;

import java.sql.Connection;

public class ConQuestion {
    @Test
    public void testCon(){
        for (int i = 0; i < 5000; i++) {
            //使用传统的jdbc方式得到连接
            Connection connection = JDBCUtils.getConnection();
            //这里做一些工作....
            //不关闭连接资源,使其一直占用
        }
    }
}
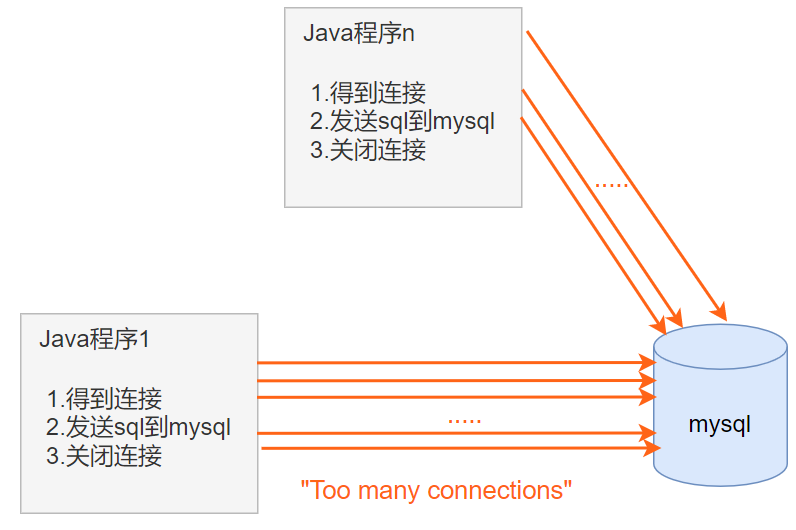
出现的异常:
java.lang.RuntimeException: com.mysql.jdbc.exceptions.jdbc4.MySQLNonTransientConnectionException: Data source rejected establishment of connection, message from server: "Too many connections"

例子2:
package li.jdbc.datasource;
import li.jdbc.utils.JDBCUtils;
import org.junit.Test;
import java.sql.Connection;
public class ConQuestion {
@Test
public void testCon(){
long start = System.currentTimeMillis();
System.out.println("开始连接...");
for (int i = 0; i < 5000; i++) {
//使用传统的jdbc方式得到连接
Connection connection = JDBCUtils.getConnection();
//这里做一些工作....
JDBCUtils.close(null,null,connection);//每次连接完都正常关闭连接资源
}
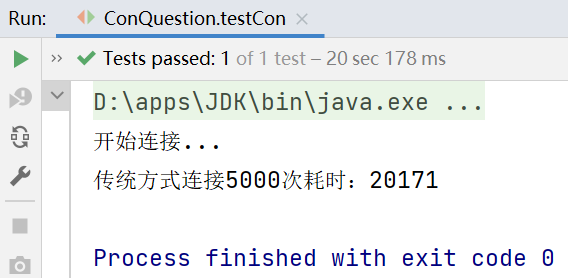
long end = System.currentTimeMillis();
System.out.println("传统方式连接5000次耗时:"+(end-start));//20171ms
}
}
每次连接完都正常关闭连接资源,可以看到5000次连接数据库需要耗时20171ms
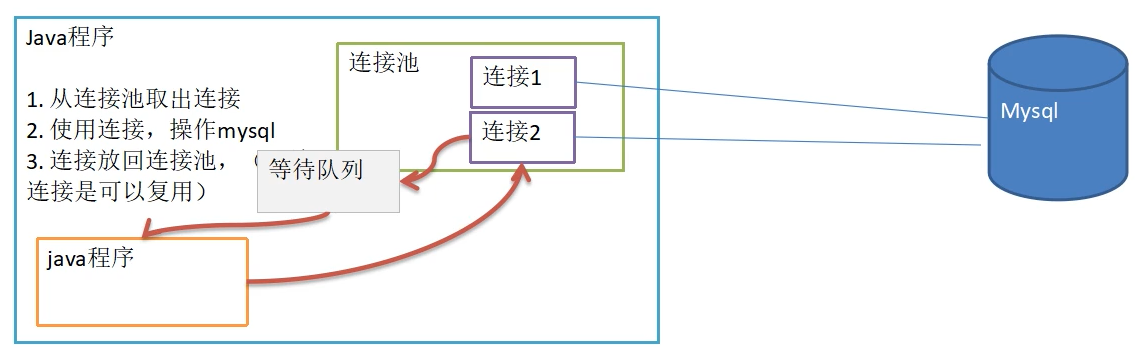
使用代码实现c3p0数据库连接池
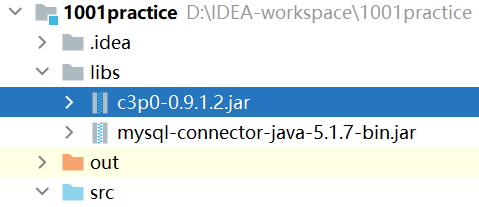
首先在网上下载c3p0jar包,并将其复制到项目的lib文件夹中,右键选择add as library

package li.jdbc.datasource;
import com.mchange.v2.c3p0.ComboPooledDataSource;
import org.junit.Test;
import java.io.FileInputStream;
import java.sql.Connection;
import java.util.Properties;
/**
* 演示c3p0的使用
*/
public class C3P0_ {
//方式1:相关参数在程序中指定,user,url,password等
@Test
public void testC3P0_01() throws Exception {
//1.创建一个数据源对象
ComboPooledDataSource comboPooledDataSource = new ComboPooledDataSource();
//2.通过配置文件mysql.properties获取相关的连接信息
Properties properties = new Properties();
properties.load(new FileInputStream("src\\mysql.properties"));
//读取相关的属性值
String user = properties.getProperty("user");
String password = properties.getProperty("password");
String url = properties.getProperty("url");
String driver = properties.getProperty("driver");
//给数据源 comboPooledDataSource设置相关的参数
//注意:连接管理 是由comboPooledDataSource来管理
comboPooledDataSource.setDriverClass(driver);
comboPooledDataSource.setJdbcUrl(url);
comboPooledDataSource.setUser(user);
comboPooledDataSource.setPassword(password);
//设置初始化连接数
comboPooledDataSource.setInitialPoolSize(10);
//最大连接数--连接请求超过最大连接数据将进入等待队列
comboPooledDataSource.setMaxPoolSize(50);
//测试连接池的效率
long start = System.currentTimeMillis();
for (int i = 0; i < 5000; i++) {
Connection connection = comboPooledDataSource.getConnection();//这个方法就是从DataSource 接口实现的
//System.out.println("连接成功");
connection.close();
}
long end = System.currentTimeMillis();
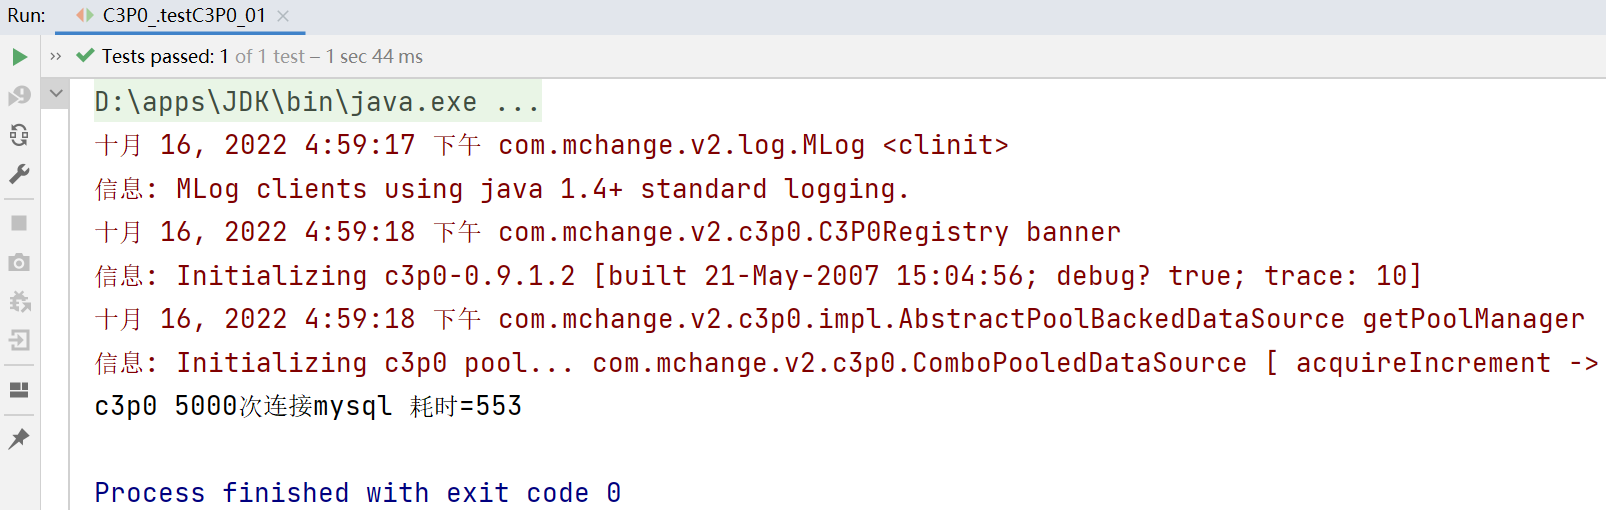
System.out.println("c3p0 5000次连接mysql 耗时=" + (end - start));
}
}
c3p0方式一:5000次的连接耗时553ms
首先如10.3.1一样将jar包加入到项目中
然后将c3p0提供的配置文件c3p0-config.xml复制到src目录下,该文件指定了连接数据库和连接池的相关参数
c3p0-config.xml:
<c3p0-config>

    <!--数据源的名称,代表连接池,名字是随意的  -->
    <named-config name="hello">
        <!-- 驱动类 -->
        <property name="driverClass">com.mysql.jdbc.Driver</property>
        <!-- url-->
        <property name="jdbcUrl">jdbc:mysql://127.0.0.1:3306/hsp_db02</property>
        <!-- 用户名 -->
        <property name="user">root</property>
        <!-- 密码 -->
        <property name="password">123456</property>
        <!-- 每次增长的连接数-->
        <property name="acquireIncrement">5</property>
        <!-- 初始的连接数 -->
        <property name="initialPoolSize">10</property>
        <!-- 最小连接数 -->
        <property name="minPoolSize">5</property>
        <!-- 最大连接数 -->
        <property name="maxPoolSize">50</property>

        <!-- 可连接的最多的命令对象数 -->
        <property name="maxStatements">5</property>

        <!-- 每个连接对象可连接的最多的命令对象数 -->
        <property name="maxStatementsPerConnection">2</property>
    </named-config>
</c3p0-config>
测试程序:
package li.jdbc.datasource;
import com.mchange.v2.c3p0.ComboPooledDataSource;
import org.junit.Test;
import java.sql.Connection;
/**
* 演示c3p0的使用
*/
public class C3P0_ {
//方式2:使用配置文件模板来完成
//将c3p0提供的配置文件c3p0-config.xml复制到src目录下
// 该文件指定了连接数据库和连接池的相关参数
@Test
public void testC3P0_02() throws Exception {
ComboPooledDataSource comboPooledDataSource = new ComboPooledDataSource("hello");
//测试5000次连接诶mysql
long start = System.currentTimeMillis();
System.out.println("开始执行...");
for (int i = 0; i < 5000; i++) {
Connection connection = comboPooledDataSource.getConnection();
//System.out.println("连接成功");
connection.close();
}
long end = System.currentTimeMillis();
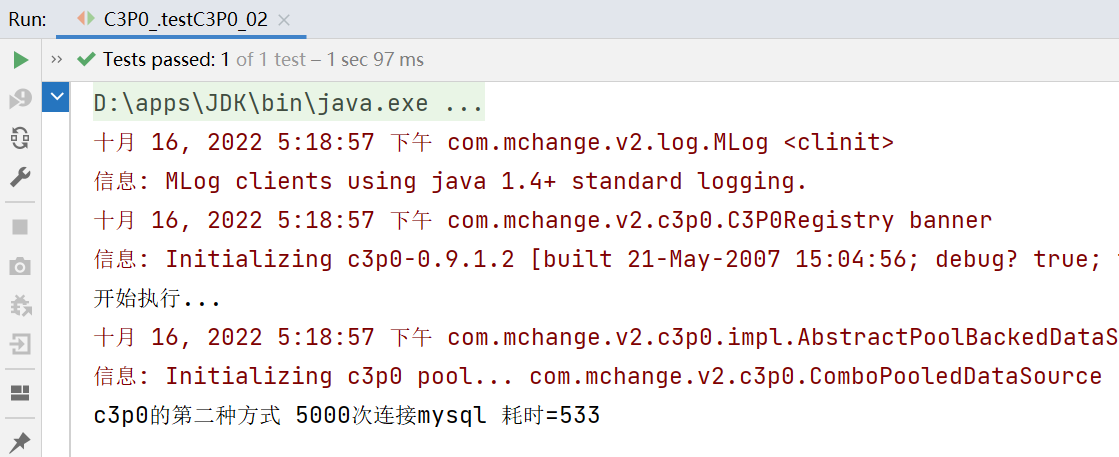
System.out.println("c3p0的第二种方式 5000次连接mysql 耗时=" + (end - start));
}
}
c3p0的第二种方式 5000次连接mysql 耗时=533ms
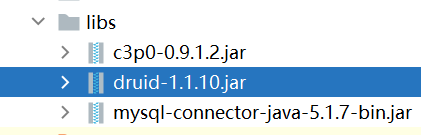
首先将Druid的jar包复制到项目的lib文件夹中,点击右键,选择add as library
jar包在该网站可以下载 Central Repository: com/alibaba/druid (maven.org)
然后将提供的配置文件的druid.properties(文件名可以随意)复制到src目录下
druid.properties:
#key=value
driverClassName=com.mysql.jdbc.Driver
url=jdbc:mysql://localhost:3306/hsp_02?rewriteBatchedStatements=true
#url=jdbc:mysql://localhost:3306/hsp_02
username=root
password=123456
#initial connection Size
initialSize=10
#min idle connecton size
minIdle=5
#max active connection size
maxActive=50
#max wait time (5000 mil seconds) 在等待队列中的最大等待时间
maxWait=5000
测试程序:
package li.jdbc.datasource;
import com.alibaba.druid.pool.DruidDataSourceFactory;
import org.junit.Test;
import javax.sql.DataSource;
import java.io.FileInputStream;
import java.sql.Connection;
import java.util.Properties;
/**
* 测试德鲁伊Druid的使用
*/
public class Druid_ {
@Test
public void testDruid() throws Exception {
//1.加入Druid包
//2.加入配置文件 druid.properties,将该文件复制到项目的src目录下面
//3.创建Properties对象,读取配置文件
Properties properties = new Properties();
properties.load(new FileInputStream("src\\druid.properties"));
//4.创建一个指定参数的数据库连接池,Druid连接池
DataSource dataSource =
DruidDataSourceFactory.createDataSource(properties);
long start = System.currentTimeMillis();
for (int i = 0; i < 5000; i++) {
Connection connection = dataSource.getConnection();
//System.out.println("连接成功!");
connection.close();
}
long end = System.currentTimeMillis();
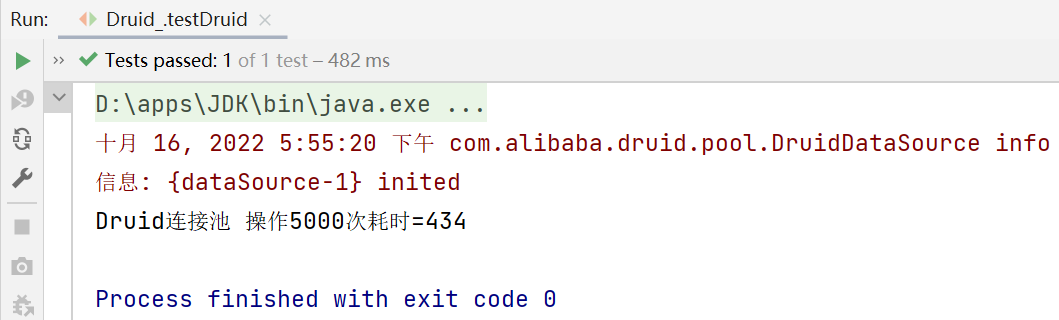
System.out.println("Druid连接池 操作5000次耗时="+(end-start));
}
}
德鲁伊连接池操作5000次的总耗时为434ms
5000次连接池的时间和c3p0的时间差不多,但是当连接数量到50万、500万时差距就会很明显,因此在实际开发中推荐使用Druid连接池。
将之前7.1的JDBCUtils工具类改为Druid(德鲁伊)实现
通过德鲁伊数据库连接池获取连接对象
工具类:JDBCUtilsByDruid
package li.jdbc.datasource;

import com.alibaba.druid.pool.DruidDataSourceFactory;

import javax.sql.DataSource;
import java.io.FileInputStream;
import java.sql.Connection;
import java.sql.ResultSet;
import java.sql.SQLException;
import java.sql.Statement;
import java.util.Properties;

/**
 * 基于Druid数据库连接池的工具类
 */
public class JDBCUtilsByDruid {

    private static DataSource ds;

    //在静态代码块完成ds的初始化
    //静态代码块在加载类的时候只会执行一次,因此数据源也只会初始化一次
    static {
        Properties properties = new Properties();
        try {
            properties.load(new FileInputStream("src\\druid.properties"));
            ds = DruidDataSourceFactory.createDataSource(properties);
        } catch (Exception e) {
            e.printStackTrace();
        }
    }

    //编写getConnection方法
    public static Connection getConnection() throws SQLException {
        return ds.getConnection();
    }

    //关闭连接(注意:在数据库连接池技术中,close不是真的关闭连接,而是将Connection对象放回连接池中)
    public static void close(ResultSet resultSet, Statement statemenat, Connection connection) {
        try {
            if (resultSet != null) {
                resultSet.close();
            }
            if (statemenat != null) {
                statemenat.close();
            }
            if (connection != null) {
                connection.close();
            }
        } catch (SQLException e) {
            throw new RuntimeException(e);
        }
    }
}
测试程序:JDBCUtilsByDruid_Use
package li.jdbc.datasource;
import org.junit.Test;
import java.sql.Connection;
import java.sql.PreparedStatement;
import java.sql.ResultSet;
import java.sql.SQLException;
import java.util.Date;
public class JDBCUtilsByDruid_Use {
@Test
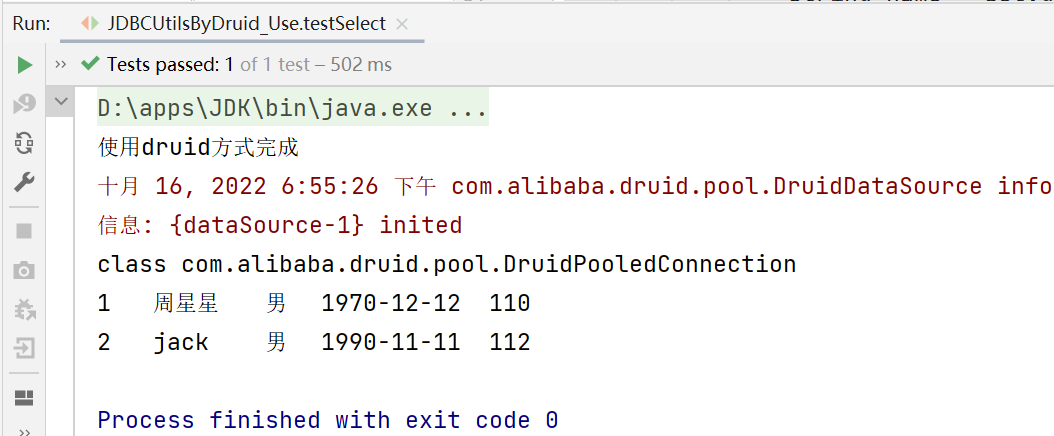
public void testSelect() {
System.out.println("使用druid方式完成");
//1.得到连接
Connection connection = null;
//2.组织一个sql语句
String sql = "Select * from actor where id >=?";
//3.创建PreparedStatement对象
PreparedStatement preparedStatement = null;
ResultSet set = null;
try {
connection = JDBCUtilsByDruid.getConnection();
/**
* Connection是个接口,是由sun公司定义的规范,根据Connection的实现类不同,close方法也不同
* mysql的厂商的实现类是直接把连接关闭,Alibaba的实现是将引用的连接放回到连接池等待下一次引用
* 因此在Druid中的close方法并不是真正地关闭连接
*/
System.out.println(connection.getClass());//运行类型 class com.alibaba.druid.pool.DruidPooledConnection
preparedStatement = connection.prepareStatement(sql);
preparedStatement.setInt(1, 1);//给?号赋值
//执行sql,得到结果集
set = preparedStatement.executeQuery();
//遍历该结果集
while (set.next()) {
int id = set.getInt("id");
String name = set.getString("name");
String sex = set.getString("sex");
Date borndate = set.getDate("borndate");
String phone = set.getString("phone");
System.out.println(id + "\t" + name + "\t" + sex + "\t" + borndate + "\t" + phone);
}
} catch (SQLException e) {
e.printStackTrace();
} finally {
//关闭资源(不是真的关闭连接,而是将Connection对象放回连接池中)
JDBCUtilsByDruid.close(set, preparedStatement, connection);
}
}
}
注意:
Connection是个接口,是由sun公司定义的规范,根据Connection的实现类不同,close方法也不同
mysql的厂商的实现类是直接把连接关闭,Alibaba的实现是将引用的连接放回到连接池等待下一次引用
因此在Druid中的close方法并不是真正地关闭连接,而是将Connection对象放回连接池中
我正在使用Sequel构建一个愿望list系统。我有一个wishlists和itemstable和一个items_wishlists连接表(该名称是续集选择的名称)。items_wishlists表还有一个用于facebookid的额外列(因此我可以存储opengraph操作),这是一个NOTNULL列。我还有Wishlist和Item具有续集many_to_many关联的模型已建立。Wishlist类也有:selectmany_to_many关联的选项设置为select:[:items.*,:items_wishlists__facebook_action_id].有没有一种方法可以
我使用的是Firefox版本36.0.1和Selenium-Webdrivergem版本2.45.0。我能够创建Firefox实例,但无法使用脚本继续进行进一步的操作无法在60秒内获得稳定的Firefox连接(127.0.0.1:7055)错误。有人能帮帮我吗? 最佳答案 我遇到了同样的问题。降级到firefoxv33后一切正常。您可以找到旧版本here 关于ruby-无法在60秒内获得稳定的Firefox连接(127.0.0.1:7055),我们在StackOverflow上找到一个类
需求:要创建虚拟机,就需要给他提供一个虚拟的磁盘,我们就在/opt目录下创建一个10G大小的raw格式的虚拟磁盘CentOS-7-x86_64.raw命令格式:qemu-imgcreate-f磁盘格式磁盘名称磁盘大小qemu-imgcreate-f磁盘格式-o?1.创建磁盘qemu-imgcreate-fraw/opt/CentOS-7-x86_64.raw10G执行效果#ls/opt/CentOS-7-x86_64.raw2.安装虚拟机使用virt-install命令,基于我们提供的系统镜像和虚拟磁盘来创建一个虚拟机,另外在创建虚拟机之前,提前打开vnc客户端,在创建虚拟机的时候,通过vnc
require"socket"server="irc.rizon.net"port="6667"nick="RubyIRCBot"channel="#0x40"s=TCPSocket.open(server,port)s.print("USERTesting",0)s.print("NICK#{nick}",0)s.print("JOIN#{channel}",0)这个IRC机器人没有连接到IRC服务器,我做错了什么? 最佳答案 失败并显示此消息::irc.shakeababy.net461*USER:Notenoughparame
考虑一下:现在这些情况:#output:http://domain.com/?foo=1&bar=2#output:http://domain.com/?foo=1&bar=2#output:http://domain.com/?foo=1&bar=2#output:http://domain.com/?foo=1&bar=2我需要用其他字符串输出URL。我如何保证&符号不会被转义?由于我无法控制的原因,我无法发送&。求助!把我的头发拉到这里:\编辑:为了澄清,我实际上有一个像这样的数组:@images=[{:id=>"fooid",:url=>"http://
我有一个super简单的脚本,它几乎包含了FayeWebSocketGitHub页面上用于处理关闭连接的内容:ws=Faye::WebSocket::Client.new(url,nil,:headers=>headers)ws.on:opendo|event|p[:open]#sendpingcommand#sendtestcommand#ws.send({command:'test'}.to_json)endws.on:messagedo|event|#hereistheentrypointfordatacomingfromtheserver.pJSON.parse(event.d
我试图在Ubuntu14.04中使用Curl安装RVM。我运行了以下命令:\curl-sSLhttps://get.rvm.io|bash-sstable出现如下错误:curl:(7)Failedtoconnecttoget.rvm.ioport80:Networkisunreachable非常感谢解决此问题的任何帮助。谢谢 最佳答案 在执行curl之前尝试这个:echoipv4>>~/.curlrc 关于ruby-在Ubuntu14.04中使用Curl安装RVM时出错,我们在Stack
我有一个ruby脚本可以打开与Apple推送服务器的连接并发送所有待处理的通知。我看不出任何原因,但当Apple断开我的脚本时,我遇到了管道损坏错误。我已经编写了我的脚本来适应这种情况,但我宁愿只是找出它发生的原因,这样我就可以在第一时间避免它。它不会始终根据特定通知断开连接。它不会以特定的字节传输大小断开连接。一切似乎都是零星的。您可以在单个连接上发送的数据传输或有效负载计数是否有某些限制?看到人们的解决方案始终保持一个连接打开,我认为这不是问题所在。我看到连接在3次通知后断开,我看到它在14次通知后断开。我从未见过它能超过14点。有没有人遇到过这种类型的问题?如何处理?
我的意思是之前建立的那个DB=Sequel.sqlite('my_blog.db')或DB=Sequel.connect('postgres://user:password@localhost/my_db')或DB=Sequel.postgres('my_db',:user=>'user',:password=>'password',:host=>'localhost')等等。Sequel::Database类没有名为“disconnect”的公共(public)实例方法,尽管它有一个“connect”。也许有人已经遇到过这个问题。我将不胜感激。 最佳答案
我有一个任务列表(名称、starts_at),我试图在每日View中显示它们(就像iCal)。deftodays_tasks(day)Task.find(:all,:conditions=>["starts_atbetween?and?",day.beginning,day.ending]end我不知道如何将Time.now(例如“2009-04-1210:00:00”)动态转换为一天的开始(和结束),以便进行比较。 最佳答案 deftodays_tasks(now=Time.now)Task.find(:all,:conditio