收获:
1.微信小程序
2.uni-app开发慕课热搜项目
3.构建企业级项目的编程思维
4.上线可商用的企业项目
经过前面四个章节,我们已经完成了 微信小程序 的学习。那么从这一章开始我们就进入 uniapp 的项目开发之中。
整个 uniapp 阶段我们会完成一个正式的项目 慕课热搜 , 以这个项目来作为 uniapp 学习阶段的的最终产出,同时通过这个项目来贯穿所有的 uniapp 知识点,可以让大家在学习的过程中不至于那么枯燥。
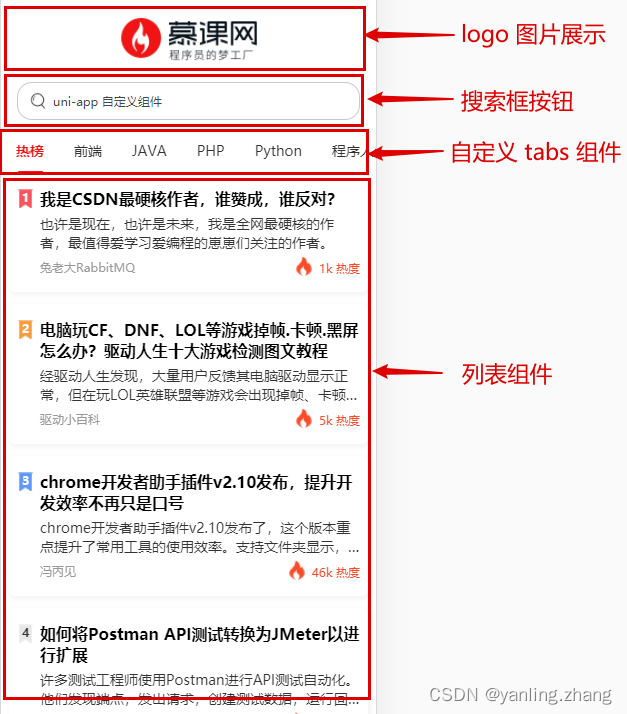
目前我们的项目已经上线了:
H5 :https://imooc.blog.lgdsunday.club/#/两个版本,因为在【第一章】中已经为大家演示了项目,所以这里就不再重复演示了。
那么现在:
各种前置条件已经全部准备就绪,项目开发即可开始!
《慕课热搜》基于 uniapp 进行开发,关于 uniapp 的优点,我们在【课程导学】阶段已经为大家描述过了,忘了的同学可以回过头去看一下。这就不再重复去夸它了。
我们这一小节来点实在的,光知道它好,不行。因为不是你的没啥用对吧。
那么怎么才能学会它呢?它难学吗?这才是这一小节我们需要说明的内容。
想要学习 uniapp 那么需要有三个前置条件:
html + css + js: 这个相信大家都没有问题vue:可能有很多同学一看这个,心就凉了一截。我不会 vue 咋办啊…vue 的理念和 微信小程序 的理念有非常多相同的地方,在我们后面进行项目开发的过程中,遇到一些个别的语法时,我会为大家进行介绍的。总之,对于大家来说,这三个条件,如果你全部具备,那自然是最好的。
如果你只具备前两个条件,也不要担心,甚至可以说是更加幸运。因为接下来你将会在学会 uniapp 的同时,也掌握 vue 的核心使用!
uniapp 同样提供了一个专门的开发工具 HBuilder X ,可以点击 这里直接进入下载页面
点击 DOWNLOAD
选择 App 开发版本
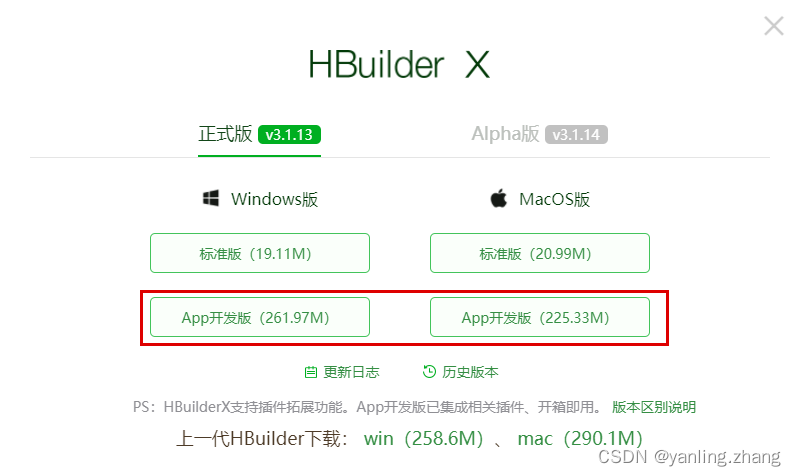
windows 版本下载完成之后会得到一个 zip 的压缩包文件,解压完成即可使用
macos 版本下来完成会得到一个 dmg 的安装包,直接安装即可
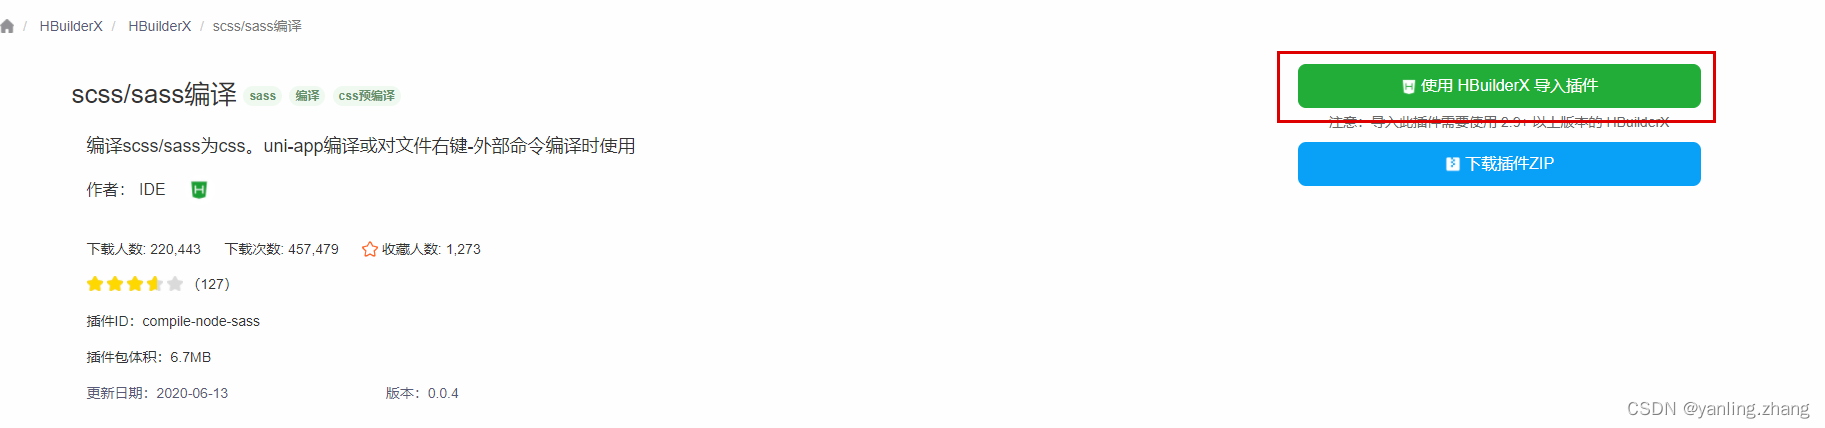
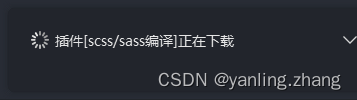
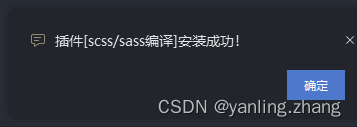
sass 依赖因为我们的项目开发会使用 sass,所以需要为 HBuilder X 安装 sass 编译器。
打开 HBuilder X
打开插件地址:https://ext.dcloud.net.cn/plugin?id=2046
点击【使用 HBuilderX 导入插件】
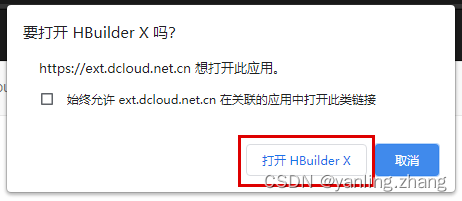
在弹出框中点击【打开 HBuilderX】
点击【是】
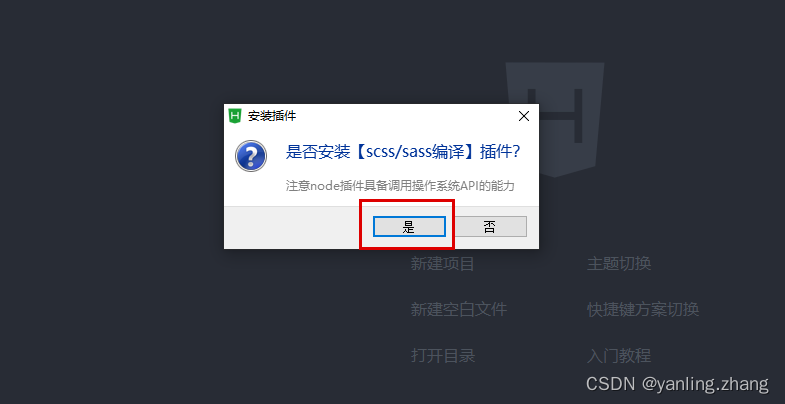
此时会在 HBuilderX 右下角,提示你【正在下载】
等待完成即可
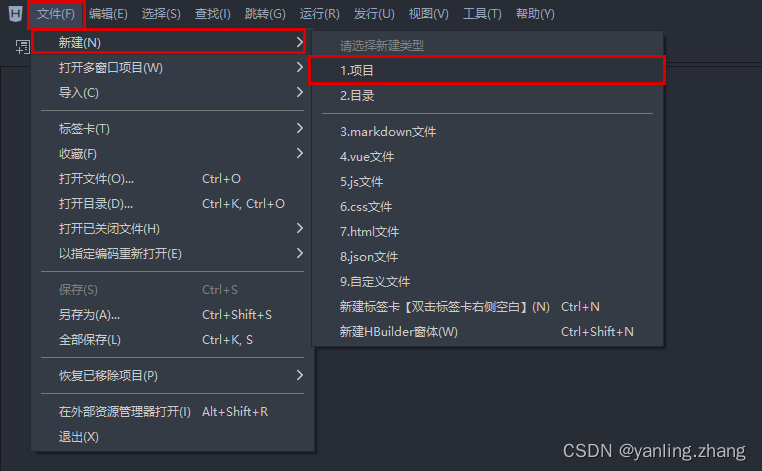
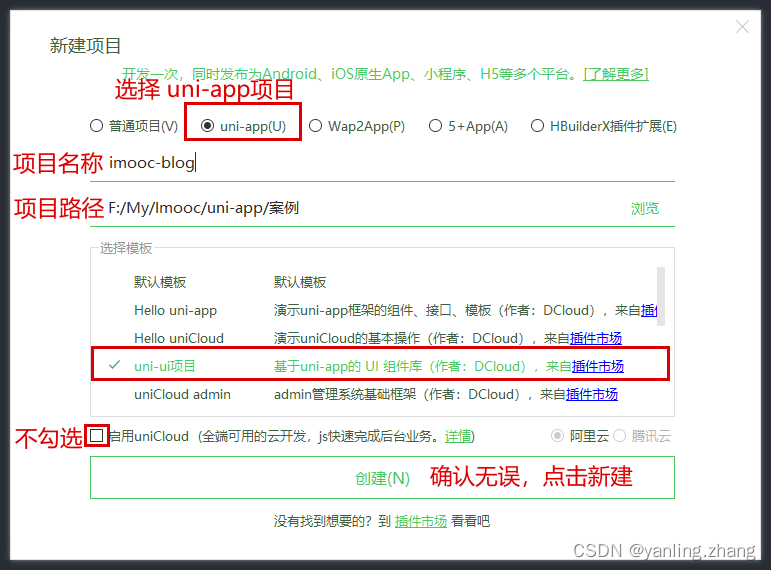
创建项目
├─pages			    // 页面存放文件夹,等同于 微信小程序中的 pages
│  └─index			// 默认生成的页面
├─static			// 静态资源存放文件夹
└─uni_modules		// uni-app组件目录
│  └─uni-xxx		// uni-app 所提供的业务组件,等同于 微信小程序中的组件
├─App.vue			// 应用配置文件,用来配置全局样式、生命周期函数等,等同于 微信小程序中的app.js
└─main.js			// 项目入口文件
├─mainfest.json		 // 配置应用名称、appid、logo、版本等打包信息,
└─pages.json		// 配置页面路径、窗口样式、tabBar 等页面类信息,等同于 微信小程序中的app.json
└─uni.scss			// uni-app内置的常用样式变量
uniapp 支持10个平台,我们已 微信小程序 和 h5 平台为例子,进行演示。
配置【微信开发工具】路径
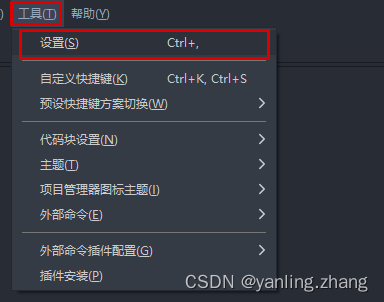
设置【微信开发工具路径】
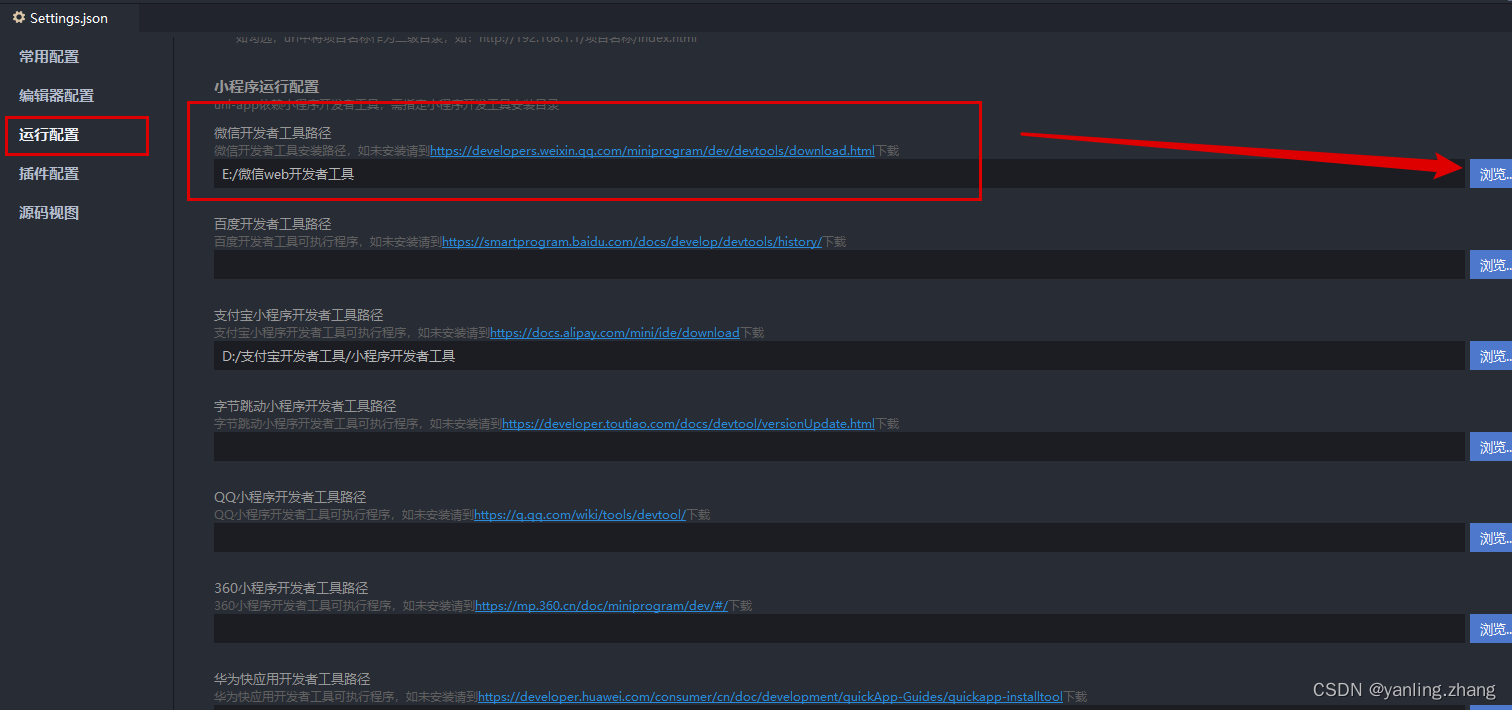
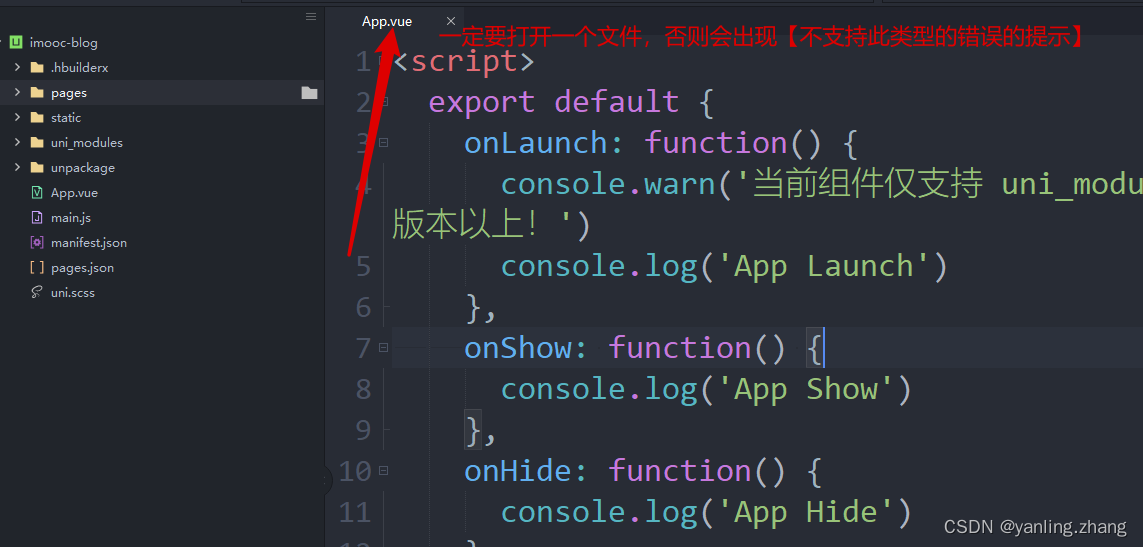
切记: 一定要在 HBuilder X 中双击打开你项目中的某一个文件(比如:App.vue)

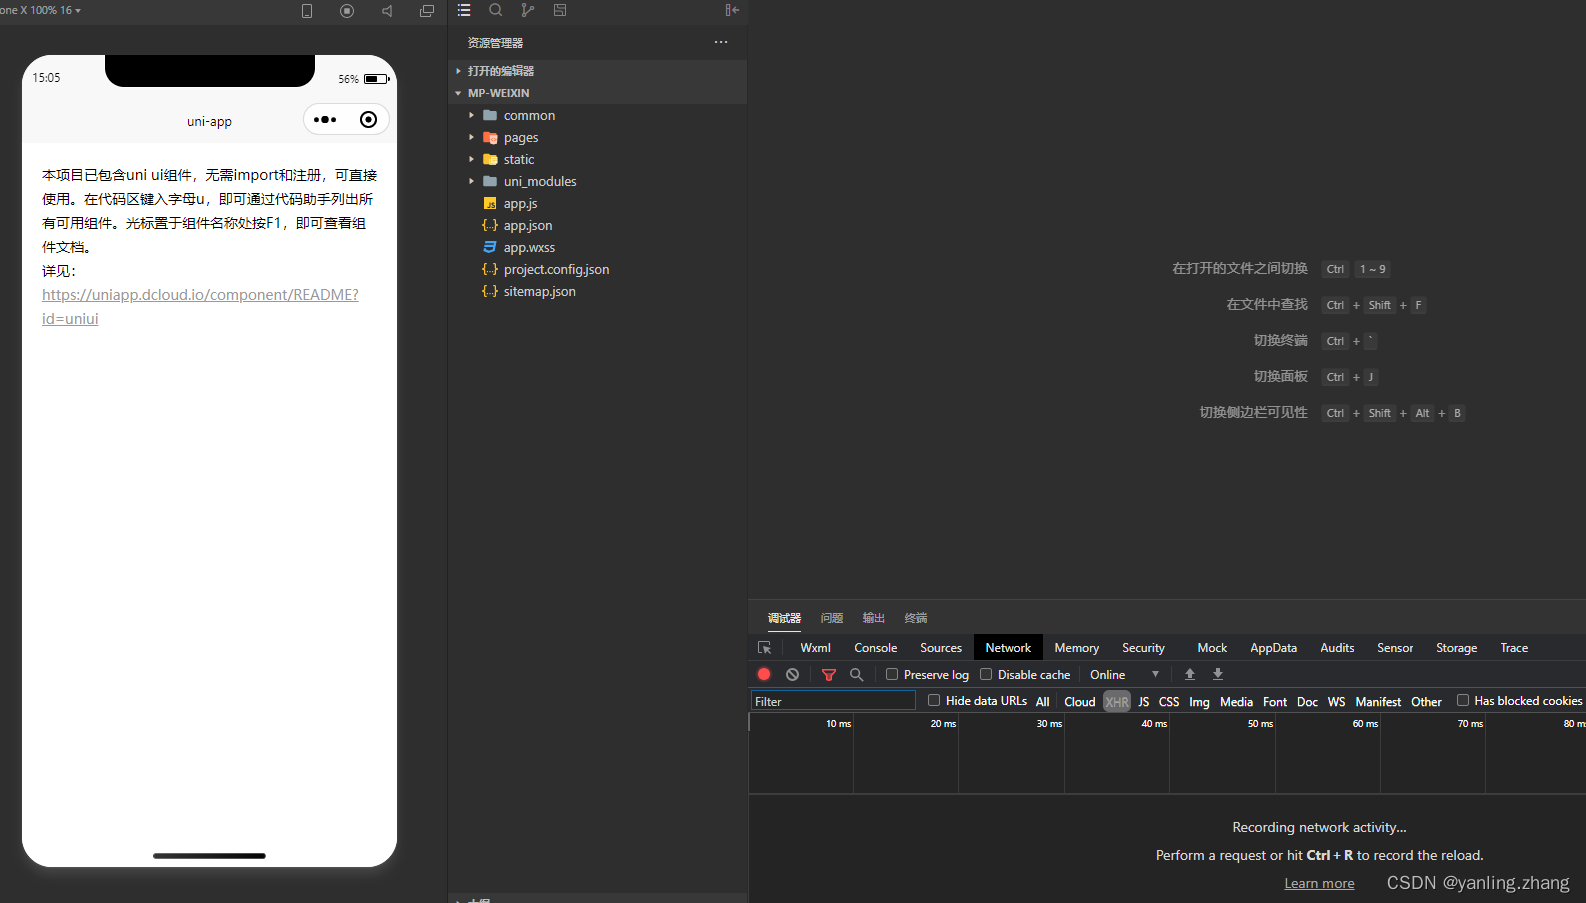
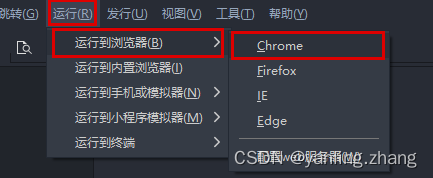
运行到微信小程序
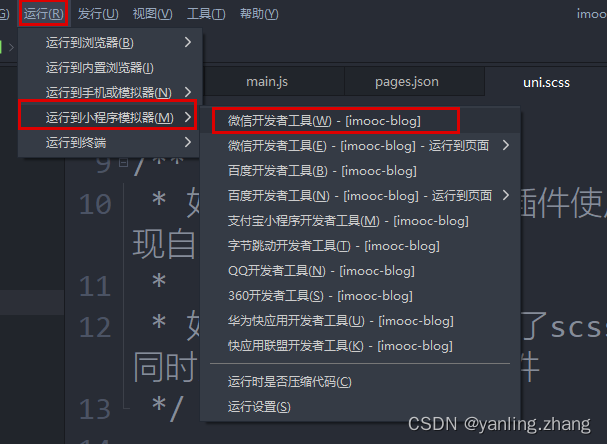
底部会提示编译

切记: 一定要在 HBuilder X 中双击打开你项目中的某一个文件(比如:App.vue)
无需配置,直接运行
VSCode 来开发 uniapp 时,可以查看本小节)虽说 HBuilder X 开发体验还算不错,但是有时候金窝银窝不如自己的狗窝,当我们习惯了 VSCode 之后,有时候不太愿意换开发工具。
那么怎么使用 VSCode 来开发 uniapp 呢? 其实是有办法的。
HBuilder X 运行项目(运行方式,参考上一小节)VSCode 打开项目VSCode 中安装插件:
pages.json 和 manifest.json 简单的格式校验VSCode 中修改代码,运行结果自动发生变化删除 pages 下的 index 文件夹
在 pages 文件夹处,右键 -> 选择新建页面
确认新建页面的信息
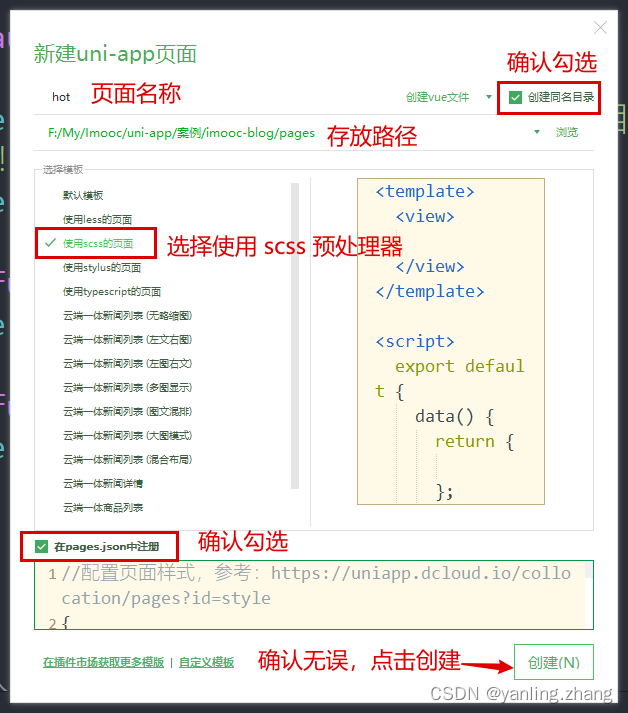
点击创建按钮完成新建。
循环以上顺序,依次完成 hot、hot-video、my 三个页面的创建
pages.json删除 index 路径
新建 tabbar 节点
复制 资源 文件夹下 tab-icons 文件夹到 static 文件夹中
最终代码如下:
  "tabBar": {
    "selectedColor": "#f94d2a",
    "list": [
      {
        "pagePath": "pages/hot/hot",
        "text": "热榜",
        "iconPath": "static/tab-icons/hot.png",
        "selectedIconPath": "static/tab-icons/hot-active.png"
      },
      {
        "pagePath": "pages/hot-video/hot-video",
        "text": "热播",
        "iconPath": "static/tab-icons/hot-video.png",
        "selectedIconPath": "static/tab-icons/hot-video-active.png"
      },
      {
        "pagePath": "pages/my/my",
        "text": "我的",
        "iconPath": "static/tab-icons/my.png",
        "selectedIconPath": "static/tab-icons/my-active.png"
      }
    ]
  }
如果修改完成之后,依然得到了以下错误,那么可以在 HBuilder X 中重新运行项目到微信开发者工具解决


微信小程序默认开启了索引功能,但是因为我们没有配置索引策略,导致出现了这么一个警告的问题。具体情况可以参考:https://developers.weixin.qq.com/miniprogram/dev/framework/sitemap.html
而如果想要解决这个警告也非常简单,因为一般情况项目不需要被微信索引,所以我们只需要 关闭 默认索引功能即可!
双击打开 manifest.json
点击源码试图
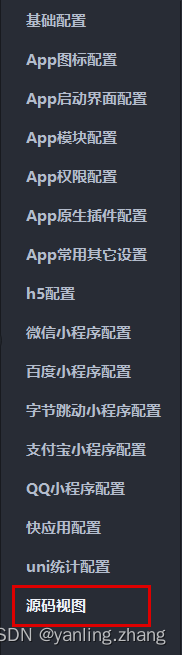
下翻找到 mp-weixin 配置节点
在 settings 下新增 "checkSiteMap" : false
Cannot read property 'forceUpdate' of undefined 的错误这个错误的原因非常简单,是因为我们没有为项目配置 appID 的原因,所以只需要完成 APPID 配置即可。
双击打开 manifest.json
找到 - 【微信小程序配置】
在此处添加 APPID 即可

template:定义当前页面的结构。相当于 wxmlscript:定义当前页面的逻辑。相当于 jsstyle:定义当前页面的样式。相当于 wxss
style 标签增加 scoped 属性:表示当前样式只在当前页面生效<template>
<view class="hot-container">
<!-- logo -->
<image class="logo" mode="aspectFit" src="@/static/images/logo.png" />
</view>
</template>
<style lang="scss" scoped>
.hot-container {
  background-color: $uni-bg-color;
  .logo {
    width: 100%;
    height: 80px;
  }
}
</style>
创建 components 文件夹
右键新建组件
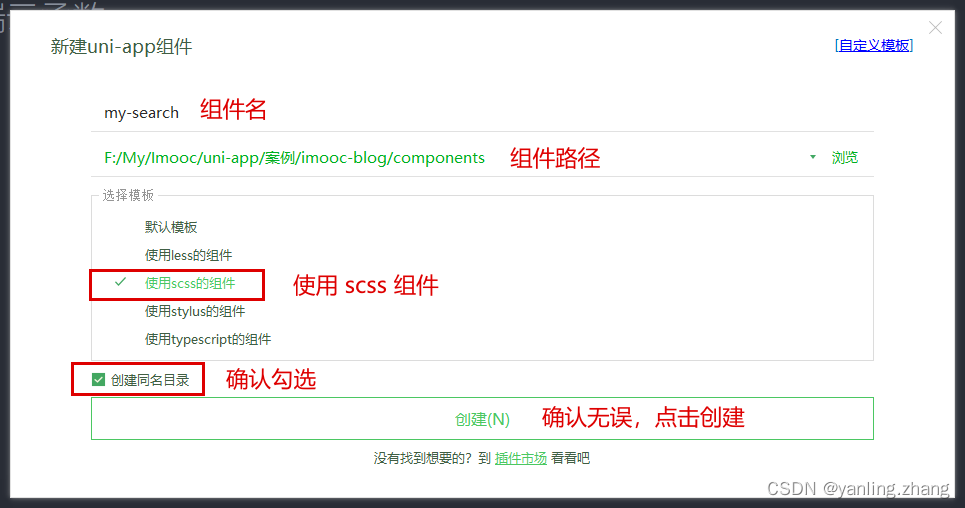
明确当前 my-search 组件的能力(暂时不需要考虑太多之后的能力)
placeholder 内容可以在父组件定义代码实现
my-search.vue
<template>
  <view class="my-search-container">
    <!-- 搜索按钮 -->
    <view class="my-search-box">
      <image class="icon" src="@/static/images/search.png" />
      <text
        class="placeholder"
        :style="{
          color: config.textColor
        }"
        >{{ placeholderText }}</text
      >
    </view>
  </view>
</template>

<script>
export default {
  name: 'my-search',
  props: {
    placeholderText: {
      type: String,
      default: '搜索'
    }
  },
  data() {
    return {};
  }
};
</script>

<style lang="scss">
.my-search-container {
  display: flex;
  align-items: center;
  .my-search-box {
    height: 36px;
    background-color: #ffffff;
    border-radius: 15px;
    border: 1px solid #c9c9c9;
    width: 100%;
    display: flex;
    align-items: center;
    padding: 0 $uni-spacing-row-base;

    .icon {
      width: $uni-img-size-sm;
      height: $uni-img-size-sm;
    }

    .placeholder {
      font-size: $uni-font-size-sm;
      margin-left: $uni-spacing-row-sm;
      color: #454545;
    }
  }
}
</style>
hot.vue
<view class="search-box">
    <!-- 搜索模块 -->
    <my-search placeholderText="uni-app 自定义组件" />
</view>

<style lang="scss" scoped>
.hot-container {
  ...
  .search-box {
    padding: 0 16px;
    margin-bottom: $uni-spacing-col-base;
  }
}
</style>
my-tabs 组件创建 my-tabs 组件
分析 my-tabs 组件的能力 -> 希望创建一个通用的 my-tabs 组件,可以满足各个应用中的需求
可在父组件中定制 my-tabs 样式
可在父组件中设置展示数据
可在父组件中设置默认的激活项
由此分析,定义处以下代码:
<script>
export default {
  name: 'my-tabs',
  props: {
    // 父组件传入的 tabs 数据
    tabData: {
      type: Array,
      default: () => []
    },
    // 默认激活项
    defaultIndex: {
      type: Number,
      default: 0
    },
    // 配置对象
    config: {
      type: Object,
      default: () => {
        return {};
      }
    }
  }
};
</script>
创建 utils 文件夹
创建 request.js ,封装请求对象
const BASE_URL = 'https://api.imooc-blog.lgdsunday.club/api';
function request({ url, data, method }) {
  return new Promise((resolve, reject) => {
    uni.request({
      url: BASE_URL + url,
      data,
      method,
      success: ({ data }) => {
        if (data.success) {
          resolve(data);
        } else {
          uni.showToast({
            title: data.message,
            icon: 'none',
            mask: true,
            duration: 3000
          });
          reject(data.message);
        }
      },
      fail: (error) => {
        reject(error);
      }
    });
  });
}

export default request;
创建 api 文件夹
创建 hot 文件,封装 hot 相关的请求方法
import request from '../utils/request';

export function getHotTabs() {
  return request({
    url: '/hot/tabs'
  });
}
在 hot 中使用
<template>
  <view class="hot-container">
  	...
    <!-- tabs -->
    <my-tabs :tabData="tabData" :defaultIndex="currentIndex"></my-tabs>
  </view>
</template>

<script>
import { getHotTabs } from 'api/hot';
export default {
  data() {
    return {
      // tabs 数据源
      tabData: [],
      // 当前的切换 index
      currentIndex: 0
    };
  },
  // 在实例创建完成后被立即调用
  created() {
    this.getHotTabs();
  },
  // 定义方法
  methods: {
    /**
     * 获取热搜标题数据
     */
    async getHotTabs() {
      // uniapp 支持 async await
      const { data: res } = await getHotTabs();
      this.tabData = res.list;
    }
  }
};
</script>
在 tabs 中展示
<template>
  <view class="tab-container">
    <view class="tab-box">
      <scroll-view id="_scroll" scroll-x class="scroll-view" scroll-with-animation>
        <view class="scroll-content">
          <view class="tab-item-box">
            <block v-for="(item, index) in tabData" :key="index">
              <view class="tab-item">{{ item.label || item }}</view>
            </block>
          </view>
        </view>
      </scroll-view>
    </view>
  </view>
</template>
my-tabs
<style lang="scss" scoped>
.tab-container {
  font-size: $uni-font-size-base;
  height: 45px;
  line-height: 45px;
  background-color: $uni-bg-color;
  .tab-box {
    width: 100%;
    height: 45px;
    display: flex;
    position: relative;
    .scroll-view {
      white-space: nowrap;
      width: 100%;
      height: 100%;
      box-sizing: border-box;
      .scroll-content {
        width: 100%;
        height: 100%;
        position: relative;

        .tab-item-box {
          height: 100%;
          .tab-item {
            height: 100%;
            display: inline-block;
            text-align: center;
            padding: 0 15px;
            position: relative;
            text-align: center;
            color: $uni-text-color;
          }
        }
      }
    }
  }
}
</style>
因为根据 子组件不可以直接修改父组件传递过来的数据 特性,所以可以通过定义一个 data-> activeIndex 来跟随 defaultIndex 的变化
<script>
export default {
    data: () => {
        return {
          // 当前激活项的 index
          activeIndex: -1
        };
      },
        // 侦听器
      watch: {
        // 监听激活项目的变化
        defaultIndex: {
          handler(val) {
            this.activeIndex = val;
          },
          // 该回调将会在侦听开始之后被立即调用
          immediate: true
        }
      },
	}
</script>
找到 tab-item 的 view ,判断 active 的状态。并添加点击事件,修改 activeIndex 的值
<view
      class="tab-item"
      :class="{ 'tab-item-active': activeIndex === index }"
      @click="tabClick(index)"
      >{{ item.label || item }}</view
    >
  methods: {
    /**
     * tab 的点击事件处理
     */
    tabClick(index) {
      this.activeIndex = index;
      // 发送通知
      this.$emit('tabClick', index);
    }
  }
&-active {
    color: $uni-text-color-hot;
    font-weight: bold;
}

$uni-text-color-hot: #f94d2a; // 热点颜色
<!-- 滑块 -->
<view
      class="underLine"
      :style="{
              transform: 'translateX(' + slider.left + 'px)'
              }"
      />
data: () => {
    return {
      // 滑块
      slider: {
        // 距离左侧的距离
        left: 0
      }
    };
  },
.underLine {
    height: 2px;
    width: 25px;
    background-color: #f01414;
    border-radius: 3px;
    transition: 0.5s;
    position: absolute;
    bottom: 0;
}
确定滚动的时机
确定滚动时机后,执行滚动的方法
/**
     * 根据当前的 activeIndex 下标,计算 【滑块】 滚动位置
     */
tabToIndex() {
    // 获取当前的 activeIndex
    const activeIndex = this.activeIndex;
    // 滑块的宽度
    const underLineWidth = this.defaultConfig.underLineWidth;
    // 配置 滚动条 的数据
    this.slider = {
        // TODO:left 如何定义呢?
        left: 0
    };
    console.log('TODO:left 如何定义呢?');
}

data: () => {
    return {
      // 默认配置
      defaultConfig: {
        // 下划线宽度 px
        underLineWidth: 24,
        // 下划线高度 px
        underLineHeight: 2,
        // 下划线颜色
        underLineColor: '#f94d2a'
      }
    };
tabListtabList 的 item 中为一个 _slider 属性item 下 的滑块位置】
滑块左侧位置 = item.left + (item.width - slider.width) / 2data: () => {
return {
// 内部维护的数据对象,为每个 item 单独额外维护一个 slider 的滑块对象
tabList: []
};
},
// 侦听器
watch: {
// 侦听数据的变化
tabData: {
handler(val) {
this.tabList = val;
setTimeout(() => {
this.updateTabWidth();
}, 0);
},
// 该回调将会在侦听开始之后被立即调用
immediate: true
},
},
/**
* 更新 tab item 的宽度
*/
updateTabWidth() {
/**
* 为 tabList 的每个 item 单独额外维护一个 slider 的滑块对象
*/
let data = this.tabList;
if (data.length == 0) return false;
// 获取 dom 的固定写法
const query = uni.createSelectorQuery().in(this);
// 循环数据源
data.forEach((item, index) => {
// 获取 dom 的固定写法
query
.select('#_tab_' + index)
.boundingClientRect((res) => {
// 为数据对象中每一个 item 都维护一个 _slider(滑动条) 对象
item._slider = {
// 当前的 tab 距离左侧的距离
left: res.left + (res.width - this.defaultConfig.underLineWidth) / 2
};
// 运算完成之后,执行一次 【滑块】位置运算
if (data.length - 1 === index) {
this.tabToIndex();
}
})
.exec();
});
},
/**
* 根据当前的 activeIndex 下标,计算 【滑块】 滚动位置
*/
tabToIndex() {
if (this.tabList.length === 0) return;
// 获取当前的 activeIndex
const activeIndex = this.activeIndex;
// 滑块的宽度
const underLineWidth = this.defaultConfig.underLineWidth;
// 配置 滚动条 的数据
this.slider = {
// TODO:left 如何定义呢?
// 1. 维护一个单独的数据对象 `tabList`
// 2. 在 `tabList` 的 `item` 中为一个 `_slider` 属性
// 3. 该属性保存了 【当前 `item` 下 的滑块位置】
// 3.1. 计算公式:`滑块左侧位置 = item.left + (item.width - slider.width) / 2`
left: this.tabList[activeIndex]._slider.left
};
}
当 【选中项】发生变化时,希望 scrollView 也进行对应的位移。
  <scroll-view
        :scroll-left="scrollLeft"
      ></scroll-view>

// scrollView 的横向滚动条位置
scrollLeft: 0,
简单的算法:
this.scrollLeft = this.activeIndex * this.defaultConfig.underLineWidth;
<view
      class="tab-item"
      :id="'_tab_' + index"
      :class="{ 'tab-item-active': activeIndex === index }"
      @click="tabClick(index)"
      :style="{
              color:
              activeIndex === index ? defaultConfig.activeTextColor : defaultConfig.textColor
              }"
      >{{ item.label || item }}</view>
  props: {
    // 配置对象
    config: {
      type: Object,
      default: () => {
        return {};
      }
    }
  },
  data: () => {
    return {
      // 默认配置
      defaultConfig: {
        // 默认的字体颜色
        textColor: '#333333',
        // 高亮字体颜色
        activeTextColor: '#f94d2a',
        // 下划线宽度 px
        underLineWidth: 24,
        // 下划线高度 px
        underLineHeight: 2,
        // 下划线颜色
        underLineColor: '#f94d2a'
      }
    };
  },
  // 侦听器
  watch: {
    // 监听 config
    config: {
      handler(val) {
        this.defaultConfig = { ...this.defaultConfig, ...val };
      },
      // 该回调将会在侦听开始之后被立即调用
      immediate: true
    }
  },
hot.vue
<template>
 	...
    <!-- list -->
    <view>
      <hot-list-item v-for="(item, index) in 50" :key="index"></hot-list-item>
    </view>
  </view>
</template>
hot-list-item.vue
<template>
  <view class="item-container">
    <view class="item-box">
      <view class="item-box-left">
        <hot-ranking />
      </view>
      <view class="item-box-right">
        <!-- 标题 -->
        <view class="item-title line-clamp-2">标题</view>
        <!-- 简介 -->
        <view class="item-desc line-clamp-2">简介</view>
        <view class="item-bottom-box">
          <!-- 作者 -->
          <text class="item-author">作者</text>
          <!-- 热度 -->
          <view class="hot-box">
            <image class="hot-icon" src="@/static/images/hot-icon.png" />
            <text class="hot-text">1000 热度</text>
          </view>
        </view>
      </view>
    </view>
  </view>
</template>

<script>
export default {
  name: 'hot-list-item',
  data() {
    return {};
  }
};
</script>

<style lang="scss" scoped></style>
hot-ranking.vue
<template>
  <view class="ranking">
    <image class="ranking-bg" :src="getRankingBg" />
    <text class="ranking-text">1</text>
  </view>
</template>

<script>
export default {
  name: 'hot-ranking'
};
</script>

<style lang="scss" scoped></style>
hot-list-item.vue
<style lang="scss" scoped>
.item-container {
  padding-bottom: $uni-spacing-col-lg;
  .item-box {
    display: flex;
    margin: 0 $uni-spacing-col-base;
    padding: $uni-spacing-row-lg $uni-spacing-col-base;
    background-color: $uni-bg-color;
    border-radius: $uni-border-radius-lg;
    box-shadow: 2px 2px 5px 1px rgba(143, 143, 143, 0.1);
    .item-box-left {
      margin-right: $uni-spacing-row-sm;
    }
    .item-box-right {
      width: 100%;
      .item-title {
        font-size: $uni-font-size-lg;
        font-weight: bold;
        color: $uni-text-color-title;
      }
      .item-desc {
        padding-top: $uni-spacing-row-sm;
        font-size: $uni-font-size-base;
        color: $uni-text-color;
      }
      .item-bottom-box {
        margin-top: $uni-spacing-col-sm;
        display: flex;
        justify-content: space-between;
        align-items: center;
        .item-author {
          font-size: $uni-font-size-sm;
          color: $uni-text-color-grey;
        }
        .hot-box {
          .hot-icon {
            width: $uni-img-size-sm;
            height: $uni-img-size-sm;
            vertical-align: top;
          }
          .hot-text {
            margin-left: $uni-spacing-row-sm;
            font-size: $uni-font-size-sm;
            color: $uni-text-color-hot;
          }
        }
      }
    }
  }
}
</style>
hot-ranking.vue
<style lang="scss" scoped>
.ranking {
  position: relative;
  text-align: center;
  width: 18px;
  height: 20px;
  .ranking-bg {
    width: 100%;
    height: 100%;
  }
  .ranking-text {
    position: absolute;
    left: 50%;
    top: 50%;
    transform: translate(-55%, -55%);
    font-size: $uni-font-size-sm;
    font-weight: bold;
    color: $uni-text-color;
  }
  .text-white {
    color: white;
  }
}
</style>
hot.js
/**
 * 热搜文章列表
 */
export function getHotListFromTabType(type) {
  return request({
    url: '/hot/list',
    data: {
      type
    }
  });
}
hot.vue
<template>
    <!-- tabs -->
    <my-tabs
      ...
      @tabClick="tabClick"
    ></my-tabs>
	<!-- list -->
    <view>
      <!-- 加载动画 -->
      <uni-load-more status="loading" v-if="isLoading"></uni-load-more>
      <!-- 列表 -->
      <block v-else>
        <hot-list-item v-for="(item, index) in 50" :key="index"></hot-list-item>
      </block>
    </view>
  </view>
</template>

<script>
import { getHotTabs, getHotListFromTabType } from 'api/hot';
export default {
  data() {
    return {
      ...
      // list 列表数据加载过程
      isLoading: true,
      // 以 index 为 key,对应的 list 为 val
      listData: {}
    };
  },
  // 定义方法
  methods: {
    /**
     * 获取热搜标题数据
     */
    async getHotTabs() {
      ...
      // 获取列表数据
      this.getHotListFromTab();
    },
    /**
     * list 列表数据
     */
    async getHotListFromTab() {
      // 展示 loading
      this.isLoading = true;
      // 判断缓存是否有数据,不存在则重新获取数据
      if (!this.listData[this.currentIndex]) {
        // 获取列表数据
        const id = this.tabData[this.currentIndex].id;
        const { data: res } = await getHotListFromTabType(id);
        // 放入数据缓存
        this.listData[this.currentIndex] = res.list;
      }

      // 隐藏 loading
      this.isLoading = false;
    },
    /**
     * tab item 的点击事件
     */
    tabClick(index) {
      this.currentIndex = index;
      // 获取列表数据
      this.getHotListFromTab();
    }
  }
};
</script>
hot.vue
<hot-list-item
    v-for="(item, index) in listData[currentIndex]"
    :key="index"
    :data="item"
    :ranking="index + 1"
></hot-list-item>
hot-list-item.vue
<template>
  <view class="item-container" @click="$emit('click')">
    <view class="item-box">
      <view class="item-box-left">
        <hot-ranking :ranking="ranking" />
      </view>
      <view class="item-box-right">
        <!-- 标题 -->
        <view class="item-title line-clamp-2">{{ data.title }}</view>
        <!-- 简介 -->
        <view class="item-desc line-clamp-2">{{ data.desc }}</view>
        <view class="item-bottom-box">
          <!-- 作者 -->
          <text class="item-author">{{ data.nickname }}</text>
          <!-- 热度 -->
          <view class="hot-box">
            <image class="hot-icon" src="@/static/images/hot-icon.png" />
            <text class="hot-text">{{ data.views }} 热度</text>
          </view>
        </view>
      </view>
    </view>
  </view>
</template>

<script>
export default {
  name: 'hot-list-item',
  props: {
    data: {
      type: Object,
      required: true
    },
    ranking: {
      type: Number,
      required: true
    }
  },
  data() {
    return {};
  }
};
</script>
hot-ranking.vue
<template>
  <view class="ranking">
    <image class="ranking-bg" :src="getRankingBg" />
    <text class="ranking-text" :class="{ 'text-white': ranking <= 3 }">{{ ranking }}</text>
  </view>
</template>

<script>
export default {
  name: 'hot-ranking',
  props: {
    ranking: {
      type: Number,
      required: true
    }
  },
  /**
   * 当依赖值发生变化时,会重新计算
   */
  computed: {
    getRankingBg() {
      if (this.ranking <= 3) {
        return require(`@/static/images/ranking-${this.ranking}.png`);
      }
      return require('@/static/images/ranking-other.png');
    }
  }
};
</script>
style/global.scss
/**
 * 这里是共用样式的定义位置
 */

.line-clamp-2 {
  overflow: hidden;
  text-overflow: ellipsis;
  display: -webkit-box;
  -webkit-box-orient: vertical;
  -webkit-line-clamp: 2;
}
main.js
// 通用样式
import './styles/global.scss';
想要让 list 具备【横向翻页】的效果,那么可以使用 swiper 对其进行改造!
 <!-- 基于 swiper 的 list 列表 -->
    <swiper class="swiper" :current="currentIndex">
      <swiper-item class="swiper-item" v-for="(tabItem, tabIndex) in tabData" :key="tabIndex">
        <view>
          <!-- 加载动画 -->
          <uni-load-more status="loading" v-if="isLoading"></uni-load-more>
          <!-- 列表 -->
          <block v-else>
            <!-- 列表循环数据更改为 listData[tabIndex] -->
            <hot-list-item
              v-for="(item, index) in listData[tabIndex]"
              :key="index"
              :data="item"
              :ranking="index + 1"
            ></hot-list-item>
          </block>
        </view>
      </swiper-item>
    </swiper>
当前的问题:
tab 时的 list 的卡顿问题原因:
没有给 swiper 指定高度。
解决方案:
指定高度即可。
<template>
  <view class="hot-container">
    <!-- 基于 swiper 的 list 列表 -->
    <swiper class="swiper" :current="currentIndex" :style="{ height: currentSwiperHeight + 'px' }">
     ...
            <hot-list-item
              :class="'hot-list-item-' + tabIndex"
              v-for="(item, index) in listData[tabIndex]"
              :key="index"
              :data="item"
              :ranking="index + 1"
            ></hot-list-item>
         ...
    </swiper>
  </view>
</template>

<script>
export default {
  data() {
    return {
      // 当前 swiper 的高度
      currentSwiperHeight: 0,
      // 以 index 为 key,对应的 swiper 的高度 为 val
      swiperHeightData: {}
    };
  },
  // 定义方法
  methods: {
    /**
     * list 列表数据
     */
    async getHotListFromTab() {
      ...
      // 因为 this.$nextTick 存在一定的兼容性问题,所以更加推荐使用 setTimeout
      setTimeout(async () => {
        // 获取当前 swiper 的高度
        this.currentSwiperHeight = await this.getCurrentSwiperHeight();
        // 放入缓存
        this.swiperHeightData[this.currentIndex] = this.currentSwiperHeight;
      }, 0);
    },
    /**
     * 计算当前 swiper 的高度
     */
    getCurrentSwiperHeight() {
      return new Promise((resolve, reject) => {
        let sum = 0;
        const query = uni.createSelectorQuery().in(this);
        query
          .selectAll(`.hot-list-item-${this.currentIndex}`)
          .boundingClientRect((res) => {
            res.forEach((item) => {
              sum += item.height;
            });
            resolve(sum);
          })
          .exec();
      });
    }
  }
};
</script>
tab 时的 list 的卡顿问题原因:
动画未执行完成,DOM 未渲染完成,即获取数据,执行了新的渲染逻辑。
解决方案:
等待 动画执行完成, DOM 渲染完成。之后再获取数据,渲染列表。
<template>
 <swiper
      class="swiper"
      :current="currentIndex"
      :style="{ height: currentSwiperHeight + 'px' }"
      @animationfinish="onSwiperEnd"
    >
</template>

<script>
import { getHotTabs, getHotListFromTabType } from 'api/hot';
export default {
  // 定义方法
  methods:
    /**
     * list 列表数据
     */
    async getHotListFromTab() {
      // 在 onSwiperEnd 中进行判断。【判断缓存是否有数据,不存在则重新获取数据】
    },
    /**
     * tab item 的点击事件
     */
    tabClick(index) {
      this.currentIndex = index;
      // 获取列表数据
      // this.getHotListFromTab();
    },
    /**
     * 解决卡顿问题;等待 swiper 动画完成之后,获取数据
     */
    onSwiperEnd() {
      // 判断缓存是否有数据,不存在则重新获取数据
      if (!this.listData[this.currentIndex]) {
        this.getHotListFromTab();
        return;
      }
      // 未 return ,则证明存在缓存数据,即同时存在 height 的缓存数据
      this.currentSwiperHeight = this.swiperHeightData[this.currentIndex];
    }
};
</script>
问题: swiper 滚动时,tabs 无法产生联动
swiper 和 tabs 联动目前状态:
tabs 切换时,swiper 可以联动。
swiper 切换时,tabs 无法联动。
解决:
让swiper 切换时,tabs 进行联动。
<template>
	<swiper
      class="swiper"
      :current="currentIndex"
      :style="{ height: currentSwiperHeight + 'px' }"
      @animationfinish="onSwiperEnd"
      @change="onSwiperChange"
    >
</template>
<script>
    export default {
    	methods: {
            // 监听 swiper 的切换事件
            onSwiperChange(e) {
              this.currentIndex = e.detail.current;
            },
        }
    }
</script>
watch: {
        // 监听激活项目的变化
    defaultIndex: {
      handler(val) {
        this.activeIndex = val;
        // 定义滑块的位置
        this.tabToIndex();
      },
      // 该回调将会在侦听开始之后被立即调用
      immediate: true
    },

}

tabToIndex() {
      if (this.tabList.length === 0) return;
}
问题: tabs 吸顶
tabs 的吸顶效果<template>
<!-- tabs -->
<view class="tab-sticky">
<my-tabs
:tabData="tabData"
:defaultIndex="currentIndex"
:config="{ textColor: '#333333' }"
@tabClick="tabClick"
></my-tabs>
</view>
</template>
<style lang="scss" scoped>
.tab-sticky {
position: -webkit-sticky;
position: sticky;
z-index: 99;
top: 0;
}
}
</style>
// 当前的滚动距离
currentPageScrollTop: 0

/**
   * 监听页面的滚动
   */
  onPageScroll(res) {
    this.currentPageScrollTop = res.scrollTop;
  },

	// 监听 swiper 的切换事件
    onSwiperChange(e) {
      if (this.currentPageScrollTop > 130) {
        // 控制列表滚动位置
        uni.pageScrollTo({
          scrollTop: 130
        });
      }
      this.currentIndex = e.detail.current;
    },
通过 filters 过滤器 进行处理:创建 filters 文件夹,创建 index.js 文件:
filters/index.js
/**
 * 将字符转化为以千为单位的字符
 * @param {*} val 待转换字符
 * @returns
 */
export function hotNumber(val) {
  const num = parseInt(val);
  if (num < 1000) return val;

  // 将 val 转为字符串
  val = val + '';
  // 获取以 千 为单位的值
  return val.substring(0, val.length - 3) + 'k';
}
main.js
import * as filters from './filters';

// 注册过滤器
Object.keys(filters).forEach((key) => {
  Vue.filter(key, filters[key]);
});
hot-list-item.vue
<text class="hot-text">{{ data.views | hotNumber }} 热度</text>
uniapp 进行了基础的了解imooc-blog 的项目tabbar 的搭建.vue 的单文件组件request API 请求模块tabstabs 和 基于 swiper 的列表联动我收到这个错误:RuntimeError(自动加载常量Apps时检测到循环依赖当我使用多线程时。下面是我的代码。为什么会这样?我尝试多线程的原因是因为我正在编写一个HTML抓取应用程序。对Nokogiri::HTML(open())的调用是一个同步阻塞调用,需要1秒才能返回,我有100,000多个页面要访问,所以我试图运行多个线程来解决这个问题。有更好的方法吗?classToolsController0)app.website=array.join(',')putsapp.websiteelseapp.website="NONE"endapp.saveapps=Apps.order("
我是Google云的新手,我正在尝试对其进行首次部署。我的第一个部署是RubyonRails项目。我基本上是在关注thisguideinthegoogleclouddocumentation.唯一的区别是我使用的是我自己的项目,而不是他们提供的“helloworld”项目。这是我的app.yaml文件runtime:customvm:trueentrypoint:bundleexecrackup-p8080-Eproductionconfig.ruresources:cpu:0.5memory_gb:1.3disk_size_gb:10当我转到我的项目目录并运行gcloudprevie
当我在我的Rails应用程序根目录中运行rakedoc:app时,API文档是使用/doc/README_FOR_APP作为主页生成的。我想向该文件添加.rdoc扩展名,以便它在GitHub上正确呈现。更好的是,我想将它移动到应用程序根目录(/README.rdoc)。有没有办法通过修改包含的rake/rdoctask任务在我的Rakefile中执行此操作?是否有某个地方可以查找可以修改的主页文件的名称?还是我必须编写一个新的Rake任务?额外的问题:Rails应用程序的两个单独文件/README和/doc/README_FOR_APP背后的逻辑是什么?为什么不只有一个?
电脑0x0000001A蓝屏错误怎么U盘重装系统教学分享。有用户电脑开机之后遇到了系统蓝屏的情况。系统蓝屏问题很多时候都是系统bug,只有通过重装系统来进行解决。那么蓝屏问题如何通过U盘重装新系统来解决呢?来看看以下的详细操作方法教学吧。 准备工作: 1、U盘一个(尽量使用8G以上的U盘)。 2、一台正常联网可使用的电脑。 3、ghost或ISO系统镜像文件(Win10系统下载_Win10专业版_windows10正式版下载-系统之家)。 4、在本页面下载U盘启动盘制作工具:系统之家U盘启动工具。 U盘启动盘制作步骤: 注意:制作期间,U盘会被格式化,因此U盘中的重要文件请注
在应用开发中,有时候我们需要获取系统的设备信息,用于数据上报和行为分析。那在鸿蒙系统中,我们应该怎么去获取设备的系统信息呢,比如说获取手机的系统版本号、手机的制造商、手机型号等数据。1、获取方式这里分为两种情况,一种是设备信息的获取,一种是系统信息的获取。1.1、获取设备信息获取设备信息,鸿蒙的SDK包为我们提供了DeviceInfo类,通过该类的一些静态方法,可以获取设备信息,DeviceInfo类的包路径为:ohos.system.DeviceInfo.具体的方法如下:ModifierandTypeMethodDescriptionstatic StringgetAbiList()Obt
目录前言滤波电路科普主要分类实际情况单位的概念常用评价参数函数型滤波器简单分析滤波电路构成低通滤波器RC低通滤波器RL低通滤波器高通滤波器RC高通滤波器RL高通滤波器部分摘自《LC滤波器设计与制作》,侵权删。前言最近需要学习放大电路和滤波电路,但是由于只在之前做音乐频谱分析仪的时候简单了解过一点点运放,所以也是相当从零开始学习了。滤波电路科普主要分类滤波器:主要是从不同频率的成分中提取出特定频率的信号。有源滤波器:由RC元件与运算放大器组成的滤波器。可滤除某一次或多次谐波,最普通易于采用的无源滤波器结构是将电感与电容串联,可对主要次谐波(3、5、7)构成低阻抗旁路。无源滤波器:无源滤波器,又称
我正在使用Postgres.app在OSX(10.8.3)上。我已经修改了我的PATH,以便应用程序的bin文件夹位于所有其他文件夹之前。Rammy:~phrogz$whichpg_config/Applications/Postgres.app/Contents/MacOS/bin/pg_config我已经安装了rvm并且可以毫无错误地安装pggem,但是当我需要它时我得到一个错误:Rammy:~phrogz$gem-v1.8.25Rammy:~phrogz$geminstallpgFetching:pg-0.15.1.gem(100%)Buildingnativeextension
@作者:SYFStrive @博客首页:HomePage📜:微信小程序📌:个人社区(欢迎大佬们加入)👉:社区链接🔗📌:觉得文章不错可以点点关注👉:专栏连接🔗💃:感谢支持,学累了可以先看小段由小胖给大家带来的街舞👉微信小程序(🔥)目录自定义组件-behaviors 1、什么是behaviors 2、behaviors的工作方式 3、创建behavior 4、导入并使用behavior 5、behavior中所有可用的节点 6、同名字段的覆盖和组合规则总结最后自定义组件-behaviors 1、什么是behaviorsbehaviors是小程序中,用于实现
需求:要创建虚拟机,就需要给他提供一个虚拟的磁盘,我们就在/opt目录下创建一个10G大小的raw格式的虚拟磁盘CentOS-7-x86_64.raw命令格式:qemu-imgcreate-f磁盘格式磁盘名称磁盘大小qemu-imgcreate-f磁盘格式-o?1.创建磁盘qemu-imgcreate-fraw/opt/CentOS-7-x86_64.raw10G执行效果#ls/opt/CentOS-7-x86_64.raw2.安装虚拟机使用virt-install命令,基于我们提供的系统镜像和虚拟磁盘来创建一个虚拟机,另外在创建虚拟机之前,提前打开vnc客户端,在创建虚拟机的时候,通过vnc
遍历文件夹我们通常是使用递归进行操作,这种方式比较简单,也比较容易理解。本文为大家介绍另一种不使用递归的方式,由于没有使用递归,只用到了循环和集合,所以效率更高一些!一、使用递归遍历文件夹整体思路1、使用File封装初始目录,2、打印这个目录3、获取这个目录下所有的子文件和子目录的数组。4、遍历这个数组,取出每个File对象4-1、如果File是否是一个文件,打印4-2、否则就是一个目录,递归调用代码实现publicclassSearchFile{publicstaticvoidmain(String[]args){//初始目录Filedir=newFile("d:/Dev");Datebeg