虚拟环境软件VMware Workstation 17 pro,可以根据自身需求来选择,VMware下载链接参考如下:https://customerconnect.vmware.com/en/downloads/search?query=workstation
镜像:CentOS-7-x86_64-DVD-2009.iso
官方下载地址:Download (centos.org) (大家可以自己选择下载的版本)
拷入rpm包解压

安装mysql
cd /opt/package/mysql
rpm -ivh mysql-community-* --force --nodeps
创建存储目录:
mkdir -p /data/mysql
chown mysql:mysql /data/mysql
编辑配置文件:
vim /etc/my.cnf [mysqld]
datadir=/data/mysql
socket=/var/lib/mysql/mysql.sock
log-error=/var/log/mysqld.log
pid-file=/var/run/mysqld/mysqld.pid
character-set-server=utf8mb4
collation-server=utf8mb4_general_ci
port=3306
lower_case_table_names=1
max_connections=500启动服务、设置自启
systemctl start mysqld
systemctl enable mysqld
查找日志中的密码登录数据库,修改密码(先修改密码策略)
cat /var/log/mysqld.log | grep password
alter user 'root'@'localhost' identified by '123456';
flush privileges;

策略:
set global validate_password.policy=0;
set global validate_password.length=4;
set global validate_password.mixed_case_count=0;
创建库
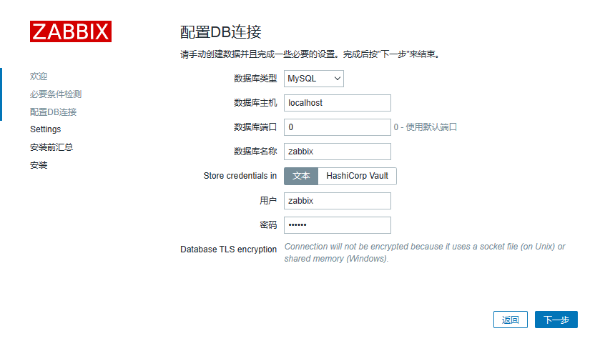
create database zabbix character set utf8 collate utf8_bin;创建用户
create user 'zabbix'@'localhost' identified with mysql_native_password by '123456';授权
grant all privileges on zabbix.* to 'zabbix'@'localhost';
flush privileges;安装rpm包
rpm -ivh nginx-1.20.0-1.el7.ngx.x86_64.rpm创建web目录
mkdir /data/web修改配置文件
vim /etc/nginx/conf.d/zabbix.confserver {
listen 80;
server_name localhost;
root /data/web;
location / {
index index.php index.html index.htm;
}
location ~ \.php$ {
#root /data/web;
fastcgi_pass 127.0.0.1:9000;
fastcgi_index index.php;
fastcgi_param SCRIPT_FILENAME $document_root$fastcgi_script_name;
include fastcgi_params;
}
}启动服务、设置自启
systemctl start nginx
systemctl enable nginx安装epel-release
rpm -ivh epel-release-7-11.noarch.rpm安装webtatic-release
rpm -Uvh webtatic-release.rpm安装php及依赖(按照顺序安装)
rpm -ivh cpp-4.8.5-44.el7.x86_64.rpm
rpm -ivh glibc-* --force --nodaps
rpm -ivh kernel-headers-3.10.0-1160.83.1.el7.x86_64.rpm
rpm -ivh lib*
rpm -ivh php72w-*
rpm -ivh gcc-*
编辑配置文件
vim /etc/php.ini 368:max_execution_time = 300 #最大执行时间
378:max_input_time = 300 #最大输入时间
656:post_max_size = 64M
cd /data/web/
vim index.php #创建php测试页
<?php
phpinfo();
?>启动服务并设置自启
systemctl start php-fpm
systemctl enable php-fpm
此时可以在浏览器验证,输入服务器IP进入php界面

创建zabbix组
groupadd zabbix创建用户
useradd -g zabbix -M -s /sbin/nologin zabbix解压zabbix-server包,进入目录
tar -xf zabbix-6.0.1.tar.gz
cd zabbix-6.0.1
安装依赖
rpm -ivh /opt/package/zabbix/yilai/* --force --nodeps编译、安装
./configure --sysconfdir=/etc/zabbix --enable-server --with-mysql --with-net-snmp --with-libxml2 --with-ssh2 --with-openipmi --with-zlib --with-libpthread --with-libevent --with-openssl --with-ldap --with-libcurl --with-libpcre
make install
修改配置文件
vim /etc/zabbix/zabbix_server.conf12:ListenPort=10051
38:LogFile=/tmp/zabbix_server.log
87:DBHost=localhost
99:DBName=zabbix
115:DBUser=zabbix
123:DBPassword=123456
507:Timeout=4
593:LogSlowQueries=3000
708:StatsAllowedIP=127.0.0.1向数据库中导入zabbix的库表及数据
mysql -uzabbix -p123456 zabbix < /opt/package/zabbix-server/zabbix-6.0.1/database/mysql/schema.sql
mysql -uzabbix -p123456 zabbix < /opt/package/zabbix-server/zabbix-6.0.1/database/mysql/images.sql
mysql -uzabbix -p123456 zabbix < /opt/package/zabbix-server/zabbix-6.0.1/database/mysql/data.sql
移动zabbix前端页面到网站根目录
cp -rp /opt/package/zabbix-server/zabbix-6.0.1/ui/* /data/web/配置zabbix系统启停命令
vim /usr/lib/systemd/system/zabbix.service
        [Unit]
        Description=Zabbix Server with MySQL DB
        After=syslog.target network.target mysqld.service
        [Service]
        Type=simple
        ExecStart=/usr/local/sbin/zabbix_server -f
        User=zabbix
        [Install]
        WantedBy=multi-user.target
加载system文件并启动服务
systemctl daemon-reload
systemctl enable zabbix
systemctl start zabbix
输入IP进入配置界面
如果提示无法创建配置文件

cp /data/web/conf/zabbix.conf.php.example /data/web/conf/zabbix.conf.php
chown zabbix:zabbix /data/web/conf/zabbix.conf.php
vim /data/web/conf/zabbix.conf.php
#只修改PASSWORD的密码
$DB['PASSWORD']            = '123456';
安装成功!
默认用户名密码
Admin zabbix
在需要被监测的客户端安装
rpm -Uvh zabbix-agent-6.0.12-release1.el7.x86_64.rpm修改配置文件
vim /etc/zabbix/zabbix_agentd.conf13:PidFile=/run/zabbix/zabbix_agentd.pid
32:LogFile=/var/log/zabbix/zabbix_agentd.log
43:LogFileSize=0
117:Server=192.168.31.151
171:ServerActive=192.168.31.151
182:Hostname=Zabbix server
323:Include=/etc/zabbix/zabbix_agentd.d/*.conf启动服务加入主机

我想为Heroku构建一个Rails3应用程序。他们使用Postgres作为他们的数据库,所以我通过MacPorts安装了postgres9.0。现在我需要一个postgresgem并且共识是出于性能原因你想要pggem。但是我对我得到的错误感到非常困惑当我尝试在rvm下通过geminstall安装pg时。我已经非常明确地指定了所有postgres目录的位置可以找到但仍然无法完成安装:$envARCHFLAGS='-archx86_64'geminstallpg--\--with-pg-config=/opt/local/var/db/postgresql90/defaultdb/po
我打算为ruby脚本创建一个安装程序,但我希望能够确保机器安装了RVM。有没有一种方法可以完全离线安装RVM并且不引人注目(通过不引人注目,就像创建一个可以做所有事情的脚本而不是要求用户向他们的bash_profile或bashrc添加一些东西)我不是要脚本本身,只是一个关于如何走这条路的快速指针(如果可能的话)。我们还研究了这个很有帮助的问题:RVM-isthereawayforsimpleofflineinstall?但有点误导,因为答案只向我们展示了如何离线在RVM中安装ruby。我们需要能够离线安装RVM本身,并查看脚本https://raw.github.com/wayn
我有一个奇怪的问题:我在rvm上安装了rubyonrails。一切正常,我可以创建项目。但是在我输入“railsnew”时重新启动后,我有“程序'rails'当前未安装。”。SystemUbuntu12.04ruby-v"1.9.3p194"gemlistactionmailer(3.2.5)actionpack(3.2.5)activemodel(3.2.5)activerecord(3.2.5)activeresource(3.2.5)activesupport(3.2.5)arel(3.0.2)builder(3.0.0)bundler(1.1.4)coffee-rails(
我刚刚为fedora安装了emacs。我想用emacs编写ruby。为ruby提供代码提示、代码完成类型功能所需的工具、扩展是什么? 最佳答案 ruby-mode已经包含在Emacs23之后的版本中。不过,它也可以通过ELPA获得。您可能感兴趣的其他一些事情是集成RVM、feature-mode(Cucumber)、rspec-mode、ruby-electric、inf-ruby、rinari(用于Rails)等。这是我当前用于Ruby开发的Emacs配置:https://github.com/citizen428/emacs
我正在尝试在我的centos服务器上安装therubyracer,但遇到了麻烦。$geminstalltherubyracerBuildingnativeextensions.Thiscouldtakeawhile...ERROR:Errorinstallingtherubyracer:ERROR:Failedtobuildgemnativeextension./usr/local/rvm/rubies/ruby-1.9.3-p125/bin/rubyextconf.rbcheckingformain()in-lpthread...yescheckingforv8.h...no***e
我的最终目标是安装当前版本的RubyonRails。我在OSXMountainLion上运行。到目前为止,这是我的过程:已安装的RVM$\curl-Lhttps://get.rvm.io|bash-sstable检查已知(我假设已批准)安装$rvmlistknown我看到当前的稳定版本可用[ruby-]2.0.0[-p247]输入命令安装$rvminstall2.0.0-p247注意:我也试过这些安装命令$rvminstallruby-2.0.0-p247$rvminstallruby=2.0.0-p247我很快就无处可去了。结果:$rvminstall2.0.0-p247Search
我实际上是在尝试使用RVM在我的OSX10.7.5上更新ruby,并在输入以下命令后:rvminstallruby我得到了以下回复:Searchingforbinaryrubies,thismighttakesometime.Checkingrequirementsforosx.Installingrequirementsforosx.Updatingsystem.......Errorrunning'requirements_osx_brew_update_systemruby-2.0.0-p247',pleaseread/Users/username/.rvm/log/138121
由于fast-stemmer的问题,我很难安装我想要的任何rubygem。我把我得到的错误放在下面。Buildingnativeextensions.Thiscouldtakeawhile...ERROR:Errorinstallingfast-stemmer:ERROR:Failedtobuildgemnativeextension./System/Library/Frameworks/Ruby.framework/Versions/2.0/usr/bin/rubyextconf.rbcreatingMakefilemake"DESTDIR="cleanmake"DESTDIR=
当我尝试安装Ruby时遇到此错误。我试过查看this和this但无济于事➜~brewinstallrubyWarning:YouareusingOSX10.12.Wedonotprovidesupportforthispre-releaseversion.Youmayencounterbuildfailuresorotherbreakages.Pleasecreatepull-requestsinsteadoffilingissues.==>Installingdependenciesforruby:readline,libyaml,makedepend==>Installingrub
当我执行>rvminstall1.9.2时一切顺利。然后我做>rvmuse1.9.2也很顺利。但是当涉及到ruby-v时..sam@sjones:~$rvminstall1.9.2/home/sam/.rvm/rubies/ruby-1.9.2-p136,thismaytakeawhiledependingonyourcpu(s)...ruby-1.9.2-p136-#fetchingruby-1.9.2-p136-#downloadingruby-1.9.2-p136,thismaytakeawhiledependingonyourconnection...%Total%Rece