Directory     Usage
BUILD 	      源代码解压以后放的位置,只需提供BUILD目录,具体里面放什么,不用我们管,所以真正的制作车间是BUILD目录
RPMS          制作完成后的rpm包存放目录,为特定平台指定子目录(i386,i686,ppc)
SOURCES       收集的源文件,源材料,补丁文件等存放位置
SPECS         存放spec文件,作为制作rpm包的领岗文件,以 rpm名.spec
SRPMS         src格式的rpm包位置 ,既然是src格式的包,就没有平台的概念了
BuiltRoot     假根,使用install临时安装到这个目录,把这个目录当作根来用的,所以在这个目录下的目录文件,才是真正的目录文件。当打包完成后,在清理阶段,这个目录将被删除
但centos并没有该目录,因此,我们不得不自定义工作车间,即使在redhat下有该目录,一般也是自定义到普通用户的家目录下的rpmbuild --showrc 显示所有的宏,以下划线开头,一个下划线:定义环境的使用情况,二个下划线:通常定义的是命令,为什么要定义宏,因为不同的系统,命令的存放位置可能不同,所以通过宏的定义找到命令的真正存放位置查看默认工作车间,所以只要改变了这个宏,我们就可以自定义工作车间了[root@localhost /]# rpmbuild --showrc | grep topdir
-14: _builddir %{_topdir}/BUILD
-14: _buildrootdir %{_topdir}/BUILDROOT
-14: _desktopdir %{_datadir}/applications
-14: _rpmdir %{_topdir}/RPMS
-14: _sourcedir %{_topdir}/SOURCES
-14: _specdir %{_topdir}/SPECS
-14: _srcrpmdir %{_topdir}/SRPMS
-14: _topdir %{getenv:HOME}/rpmbuild三、rpm包制作原理图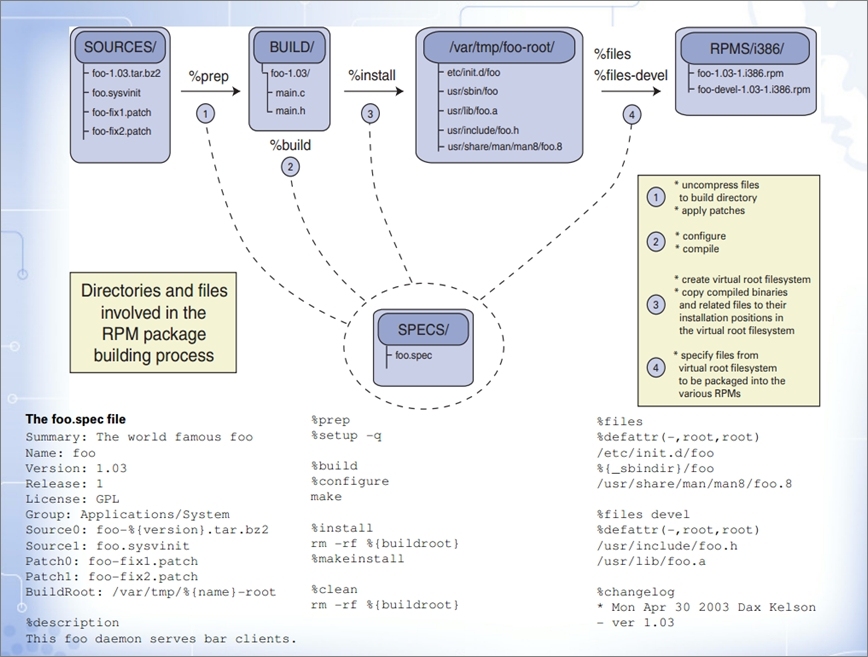 四、制作rpm包1、安装rpm-build
# yum -y install rpm-build2、增加普通用户并修改工作车间目录# useradd hero
# su - hero
$ vim ~/.rpmmacros
%_topdir /home/hero/rpmbuild
# mkdir -pv ~/rpmbuild/{BUILD,RPMS,SOURCES,SPECS,SRPMS}
# rpmbuild --showrc | grep _topdir #会发现,工作车间已然改变:_topdir /home/hero/rpmbuild3、收集源码文件(1)文件列表[root@localhost SOURCES]# pwd
/home/hero/rpmbuild/SOURCES
[root@localhost SOURCES]# ls
fastcgi_params init.nginx nginx-1.7.7.tar.gz nginx.conf(2)nginx-1.7.7.tar.gz 源码包$ cp /opt/src/nginx-1.7.7.tar.gz /home/hero/rpmbuild/SOURCES/(3)init.nginx 脚本文件#!/bin/sh
#
# nginx - this script starts and stops the nginx daemon
#
# chkconfig: - 85 15
# description: Nginx is an HTTP(S) server, HTTP(S) reverse \
# proxy and IMAP/POP3 proxy server
# processname: nginx
## config: /etc/nginx/nginx.conf
# config: /usr/local/nginx/conf/nginx.conf
# config: /etc/sysconfig/nginx
## pidfile: /var/run/nginx/nginx.pid
# pidfile: /usr/local/nginx/logs/nginx.pid
# Source function library.
. /etc/rc.d/init.d/functions
# Source networking configuration.
. /etc/sysconfig/network
# Check that networking is up.
[ "$NETWORKING" = "no" ] && exit 0
nginx="/usr/local/nginx/sbin/nginx"
prog=$(basename $nginx)
#NGINX_CONF_FILE="/etc/nginx/nginx.conf"
NGINX_CONF_FILE="/usr/local/nginx/conf/nginx.conf"
[ -f /etc/sysconfig/nginx ] && . /etc/sysconfig/nginx
lockfile=/var/lock/subsys/nginx
make_dirs() {
# make required directories
user=`nginx -V 2>&1 | grep "configure arguments:" | sed 's/[^*]*--user=\([^ ]*\).*/\1/g' -`
options=`$nginx -V 2>&1 | grep 'configure arguments:'`
for opt in $options; do
if [ `echo $opt | grep '.*-temp-path'` ]; then
value=`echo $opt | cut -d "=" -f 2`
if [ ! -d "$value" ]; then
# echo "creating" $value
mkdir -p $value && chown -R $user $value
fi
fi
done
}
start() {
[ -x $nginx ] || exit 5
[ -f $NGINX_CONF_FILE ] || exit 6
make_dirs
echo -n $"Starting $prog: "
daemon $nginx -c $NGINX_CONF_FILE
retval=$?
echo
[ $retval -eq 0 ] && touch $lockfile
return $retval
}
stop() {
echo -n $"Stopping $prog: "
killproc $prog -QUIT
retval=$?
echo
[ $retval -eq 0 ] && rm -f $lockfile
return $retval
}
restart() {
configtest || return $?
stop
sleep 1
start
}
reload() {
configtest || return $?
echo -n $"Reloading $prog: "
killproc $nginx -HUP
RETVAL=$?
echo
}
force_reload() {
restart
}
configtest() {
$nginx -t -c $NGINX_CONF_FILE
}
rh_status() {
status $prog
}
rh_status_q() {
rh_status >/dev/null 2>&1
}
case "$1" in
start)
rh_status_q && exit 0
$1
;;
stop)
rh_status_q || exit 0
$1
;;
restart|configtest)
$1
;;
reload)
rh_status_q || exit 7
$1
;;
force-reload)
force_reload
;;
status)
rh_status
;;
condrestart|try-restart)
rh_status_q || exit 0
;;
*)
echo $"Usage: $0 {start|stop|status|restart|condrestart|try-restart|reload|force-reload|configtest}"
exit 2
esac(4)fastcgi_params 参数fastcgi_param GATEWAY_INTERFACE CGI/1.1;
fastcgi_param SERVER_SOFTWARE nginx;
fastcgi_param QUERY_STRING $query_string;
fastcgi_param REQUEST_METHOD $request_method;
fastcgi_param CONTENT_TYPE $content_type;
fastcgi_param CONTENT_LENGTH $content_length;
fastcgi_param SCRIPT_FILENAME $document_root$fastcgi_script_name;
fastcgi_param SCRIPT_NAME $fastcgi_script_name;
fastcgi_param REQUEST_URI $request_uri;
fastcgi_param DOCUMENT_URI $document_uri;
fastcgi_param DOCUMENT_ROOT $document_root;
fastcgi_param SERVER_PROTOCOL $server_protocol;
fastcgi_param REMOTE_ADDR $remote_addr;
fastcgi_param REMOTE_PORT $remote_port;
fastcgi_param SERVER_ADDR $server_addr;
fastcgi_param SERVER_PORT $server_port;
fastcgi_param SERVER_NAME $server_name;4、在 SPECS 目录下创建 nginx.spec$ cd rpmbuild/SPECS/
$ vim nginx.spec #此时,里面就是一个模板,直接填就可以了
### 1.The introduction section
Name: nginx # 软件包名称
Version: 1.7.7 # 版本号,(不能使用-)
Release: 3%{?dist} # release号,对应下面的changelog,如 nginx-1.7.7-3.el6.x86_64.rpm
Summary: nginx-1.7.7.tar.gz to nginx-1.7.7.rpm # 简要描述信息,最好不要超过50个字符,如要详述,使用下面的%description
Group: Applications/Archiving # 要全用这里面的一个组:less /usr/share/doc/rpm-version/GROUPS
License: GPLv2 # 一定带上(最好是对方源码包的License)BSD,GPL,GPLv2
URL: http://nmshuishui.blog.51cto.com/
Packager: nmshuishui <353025240@qq.com>
Vendor: nmshuishui
Source0: %{name}-%{version}.tar.gz # source主要是引用一下自己定义好的脚本,配置文件之类的内容。
Source1: init.nginx # nginx在主配置文件里面做了很多优化,包括cpu抢占,各种缓存策略,tcp,进程数等。
Source2: nginx.conf # 每增加一个 Source ,都需要在 %install 段和 %files 段做相应配置,如果是启动脚本的话,最好在脚本段配置一下
Source3: fastcgi_params
BuildRoot: %_topdir/BUILDROOT
BuildRequires: gcc
Requires: openssl,openssl-devel,pcre-devel,pcre # 定义nginx依赖的包,需要yum安装
%description # 软件包详述
Custom a rpm by yourself!Build nginx-1.7.7.tar.gz to nginx-1.7.7.rpm
### 2.The Prep section 准备阶段,主要就是把源码包解压到build目录下,设置一下环境变量,并cd进去
%prep
%setup -q # 这个宏的作用静默模式解压并cd
### 3.The Build Section 编译制作阶段,这一节主要用于编译源码
%build
%configure #在 RMP 创建时候, 由于 nginx 不按照常规定义, 不可以定义 %{_prefix} 之类参数, 也不可以使用 %configure 这个参数进行 rpm 编译
#一旦定义该参数, 会导致编译自动增加下面参数, 导致报错
# + ./configure --build=x86_64-redhat-linux-gnu --host=x86_64-redhat-linux-gnu --target=x86_64-redhat-linux-gnu --program-prefix=
#因此,这里需要 ./configure,且需把%configure删掉
#而且这里需要安装 pcre-devel包,如果没有的话,会提示关于pcre的错误,直接安装此包就可以了
./configure \
--prefix=/usr/local/nginx \
--user=www \
--group=www \
--with-http_ssl_module \
--with-http_flv_module \
--with-http_stub_status_module \
--with-http_gzip_static_module \
--http-client-body-temp-path=/var/tmp/nginx/client/ \
--http-proxy-temp-path=/var/tmp/nginx/proxy/ \
--http-fastcgi-temp-path=/var/tmp/nginx/fcgi/ \
--http-uwsgi-temp-path=/var/tmp/nginx/uwsgi \
--http-scgi-temp-path=/var/tmp/nginx/scgi \
--with-pcre
make %{?_smp_mflags} # make后面的意思是:如果就多处理器的话make时并行编译
### 4.Install section 这一节主要用于完成实际安装软件必须执行的命令,可包含4种类型脚本
%install
rm -rf %{buildroot}
make install DESTDIR=%{buildroot}
%{__install} -p -D -m 0755 %{SOURCE1} %{buildroot}/etc/rc.d/init.d/nginx
%{__install} -p -D %{SOURCE2} %{buildroot}/usr/local/nginx/conf/nginx.conf
%{__install} -p -D %{SOURCE3} %{buildroot}/usr/local/nginx/conf/fastcgi_params
%pre
if [ $1 == 1 ];then # $1有3个值,代表动作,安装类型,处理类型
/usr/sbin/useradd -r www -s /sbin/nologin 2> /dev/null # 1:表示安装
fi # 2:表示升级
# 0:表示卸载
%post
if [ $1 == 1 ];then
/sbin/chkconfig --add %{name}
/sbin/chkconfig %{name} on
echo '# Add #下面主要是内核参数的优化,包括tcp的快速释放和重利用等。
net.ipv4.tcp_max_syn_backlog = 65536
net.core.netdev_max_backlog = 32768
net.core.somaxconn = 32768
net.core.wmem_default = 8388608
net.core.rmem_default = 8388608
net.core.rmem_max = 16777216
net.core.wmem_max = 16777216
net.ipv4.tcp_timestamps = 0
net.ipv4.tcp_synack_retries = 2
net.ipv4.tcp_syn_retries = 2
net.ipv4.tcp_tw_recycle = 1
net.ipv4.tcp_tw_reuse = 1
net.ipv4.tcp_mem = 94500000 915000000927000000
net.ipv4.tcp_max_orphans = 3276800
#net.ipv4.tcp_fin_timeout = 30
#net.ipv4.tcp_keepalive_time = 120
net.ipv4.ip_local_port_range = 1024 65535' >> /etc/sysctl.conf
sysctl -p 2>&1 /dev/null
fi
%preun
if [ $1 == 0 ];then
/usr/sbin/userdel -r www 2> /dev/null
/etc/init.d/nginx stop > /dev/null 2>&1
fi
%postun
### 5.clean section 清理段,clean的主要作用就是删除BUILD
%clean
rm -rf %{buildroot}
### 6.file section 文件列表段,这个阶段是把前面已经编译好的内容要打包了,其中exclude是指要排除什么不打包进来。
%files
%defattr(-,root,root,0755)
/usr/local/nginx/
%attr(0755,root,root) /etc/rc.d/init.d/nginx
%config(noreplace) /usr/local/nginx/conf/nginx.conf
%config(noreplace) /usr/local/nginx/conf/fastcgi_params
### 7.chagelog section 日志改变段, 这一段主要描述软件的开发记录
%changelog
* Thu Wed 26 2014 nmshuishui <353025240@qq.com> - 1.7.7-3
- Initial version5、制作rpm包rpmbuild -bp nginx.spec 制作到%prep段
rpmbuild -bc nginx.spec 制作到%build段
rpmbuild -bi nginx.spec 执行 spec 文件的 "%install" 阶段 (在执行了 %prep 和 %build 阶段之后)。这通常等价于执行了一次 "make install"
rpmbuild -bb nginx.spec 制作二进制包
rpmbuild -ba nginx.spec 表示既制作二进制包又制作src格式包五、rpm包的签名[root@localhost ~]# rpm -qi nginx
Name : nginx Relocations: (not relocatable)
Version : 1.7.7 Vendor: nmshuishui
Release : 3.el6 Build Date: Wed 26 Nov 2014 06:39:00 PM CST
Install Date: Wed 26 Nov 2014 06:42:19 PM CST Build Host: localhost
Group : Applications/Archiving Source RPM: nginx-1.7.7-3.el6.src.rpm
Size : 793593 License: GPLv2
Signature : (none) # rpm包未签名状态
Packager : nmshuishui <353025240@qq.com>
URL : http://nmshuishui.blog.51cto.com/
Summary : nginx-1.7.7.tar.gz to nginx-1.7.7.rpm
Description :
Custom a rpm by yourself!Build nginx-1.7.7.tar.gz to nginx-1.7.7.rpm2、使用gpg方式生成签名密钥[root@localhost ~]# gpg --gen-key
Your selection?1<Enter> #默认即可
What keysize do you want? (2048) 1024<Enter> #选择密钥长度
Key is valid for? (0) 1y<Enter> #有效期
Is this correct? (y/N) y<Enter> #确认
Real name: nmshuishui<Enter> #密钥名称
Email address: 353025240@qq.com<Enter> #邮件
Comment: GPG-RPM-KEY<Enter> #备注
Change (N)ame, (C)omment, (E)mail or (O)kay/(Q)uit? O<ENTER> #okay确认
Enter passphrase OK <Enter> #按Enter输入密码
<Take this one anyway> <Enter> #确认使用此密码
#####
在生成密钥的时候,会报这么一个信息:can't connect to `/root/.gnupg/S.gpg-agent': No such file or directory,可以不用理会它。
接下来就是一些随机数的说明了:We need to generate a lot of random bytes. It is a good idea to perform
some other action (type on the keyboard, move the mouse, utilize the
disks) during the prime generation; this gives the random number
generator a better chance to gain enough entropy.
就狂敲键盘和移动鼠标吧,也可以链接一个伪随机数(不过不安全),接下来的活儿就是等了
生成密钥后会是这样的:
gpg: checking the trustdb
gpg: 3 marginal(s) needed, 1 complete(s) needed, PGP trust model
gpg: depth: 0 valid: 1 signed: 0 trust: 0-, 0q, 0n, 0m, 0f, 1u
pub 2048R/DF63EDFB 2014-11-26
Key fingerprint = 338D 476F 29C9 E2D6 6604 1D96 6F73 1E81 DF63 EDFB
uid nmshuishui (gen-key) <353025240@qq.com>
sub 2048R/263FB359 2014-11-263、查看生成的密钥[root@localhost ~]# gpg --list-keys
/root/.gnupg/pubring.gpg
------------------------
pub 2048R/DF63EDFB 2014-11-26
uid nmshuishui (gen-key) <353025240@qq.com>
sub 2048R/263FB359 2014-11-264、导出公钥以供验证[root@localhost ~]# gpg --export -a "nmshuishui" > RPM-GPG-KEY-nmshuishui5、在~/.rpmmacros宏中定义加密密钥[root@localhost ~]# vim ~/.rpmmacros
%_gpg_name nmshuishui6、为rpm包签名[root@localhost ~]# rpm --addsign /home/hero/rpmbuild/RPMS/x86_64/nginx-1.7.7-3.el6.x86_64.rpm
Enter pass phrase:
Pass phrase is good.
/home/hero/rpmbuild/RPMS/x86_64/nginx-1.7.7-3.el6.x86_64.rpm:7、将公钥导入rpm包[root@localhost ~]# rpm --import RPM-GPG-KEY-nmshuishui8、验证[root@localhost ~]# rpm --checksig /home/hero/rpmbuild/RPMS/x86_64/nginx-1.7.7-3.el6.x86_64.rpm
/home/hero/rpmbuild/RPMS/x86_64/nginx-1.7.7-3.el6.x86_64.rpm: rsa sha1 (md5) pgp md5 OK9、重新安装nginx,验证安装包的签名信息[root@localhost ~]# rpm -ivh /home/hero/rpmbuild/RPMS/x86_64/nginx-1.7.7-3.el6.x86_64.rpm
Preparing... ########################################### [100%]
1:nginx ########################################### [100%]
[root@localhost ~]#
[root@localhost ~]# rpm -qi nginx
Name : nginx Relocations: (not relocatable)
Version : 1.7.7 Vendor: nmshuishui
Release : 3.el6 Build Date: Wed 26 Nov 2014 06:39:00 PM CST
Install Date: Thu 27 Nov 2014 10:58:44 AM CST Build Host: localhost
Group : Applications/Archiving Source RPM: nginx-1.7.7-3.el6.src.rpm
Size : 793593 License: GPLv2
Signature : RSA/SHA1, Thu 27 Nov 2014 10:40:02 AM CST, Key ID 6f731e81df63edfb # 与 1 比起来,多了签名信息
Packager : nmshuishui <353025240@qq.com>
URL : http://nmshuishui.blog.51cto.com/
Summary : nginx-1.7.7.tar.gz to nginx-1.7.7.rpm
Description :
Custom a rpm by yourself!Build nginx-1.7.7.tar.gz to nginx-1.7.7.rpm到这里,一个完整的 rpm 包就制作完成了!我正在学习如何使用Nokogiri,根据这段代码我遇到了一些问题:require'rubygems'require'mechanize'post_agent=WWW::Mechanize.newpost_page=post_agent.get('http://www.vbulletin.org/forum/showthread.php?t=230708')puts"\nabsolutepathwithtbodygivesnil"putspost_page.parser.xpath('/html/body/div/div/div/div/div/table/tbody/tr/td/div
我有一个Ruby程序,它使用rubyzip压缩XML文件的目录树。gem。我的问题是文件开始变得很重,我想提高压缩级别,因为压缩时间不是问题。我在rubyzipdocumentation中找不到一种为创建的ZIP文件指定压缩级别的方法。有人知道如何更改此设置吗?是否有另一个允许指定压缩级别的Ruby库? 最佳答案 这是我通过查看rubyzip内部创建的代码。level=Zlib::BEST_COMPRESSIONZip::ZipOutputStream.open(zip_file)do|zip|Dir.glob("**/*")d
类classAprivatedeffooputs:fooendpublicdefbarputs:barendprivatedefzimputs:zimendprotecteddefdibputs:dibendendA的实例a=A.new测试a.foorescueputs:faila.barrescueputs:faila.zimrescueputs:faila.dibrescueputs:faila.gazrescueputs:fail测试输出failbarfailfailfail.发送测试[:foo,:bar,:zim,:dib,:gaz].each{|m|a.send(m)resc
很好奇,就使用rubyonrails自动化单元测试而言,你们正在做什么?您是否创建了一个脚本来在cron中运行rake作业并将结果邮寄给您?git中的预提交Hook?只是手动调用?我完全理解测试,但想知道在错误发生之前捕获错误的最佳实践是什么。让我们理所当然地认为测试本身是完美无缺的,并且可以正常工作。下一步是什么以确保他们在正确的时间将可能有害的结果传达给您? 最佳答案 不确定您到底想听什么,但是有几个级别的自动代码库控制:在处理某项功能时,您可以使用类似autotest的内容获得关于哪些有效,哪些无效的即时反馈。要确保您的提
假设我做了一个模块如下:m=Module.newdoclassCendend三个问题:除了对m的引用之外,还有什么方法可以访问C和m中的其他内容?我可以在创建匿名模块后为其命名吗(就像我输入“module...”一样)?如何在使用完匿名模块后将其删除,使其定义的常量不再存在? 最佳答案 三个答案:是的,使用ObjectSpace.此代码使c引用你的类(class)C不引用m:c=nilObjectSpace.each_object{|obj|c=objif(Class===objandobj.name=~/::C$/)}当然这取决于
我正在尝试使用ruby和Savon来使用网络服务。测试服务为http://www.webservicex.net/WS/WSDetails.aspx?WSID=9&CATID=2require'rubygems'require'savon'client=Savon::Client.new"http://www.webservicex.net/stockquote.asmx?WSDL"client.get_quotedo|soap|soap.body={:symbol=>"AAPL"}end返回SOAP异常。检查soap信封,在我看来soap请求没有正确的命名空间。任何人都可以建议我
关闭。这个问题是opinion-based.它目前不接受答案。想要改进这个问题?更新问题,以便editingthispost可以用事实和引用来回答它.关闭4年前。Improvethisquestion我想在固定时间创建一系列低音和高音调的哔哔声。例如:在150毫秒时发出高音调的蜂鸣声在151毫秒时发出低音调的蜂鸣声200毫秒时发出低音调的蜂鸣声250毫秒的高音调蜂鸣声有没有办法在Ruby或Python中做到这一点?我真的不在乎输出编码是什么(.wav、.mp3、.ogg等等),但我确实想创建一个输出文件。
我在我的项目目录中完成了compasscreate.和compassinitrails。几个问题:我已将我的.sass文件放在public/stylesheets中。这是放置它们的正确位置吗?当我运行compasswatch时,它不会自动编译这些.sass文件。我必须手动指定文件:compasswatchpublic/stylesheets/myfile.sass等。如何让它自动运行?文件ie.css、print.css和screen.css已放在stylesheets/compiled。如何在编译后不让它们重新出现的情况下删除它们?我自己编译的.sass文件编译成compiled/t
我想将html转换为纯文本。不过,我不想只删除标签,我想智能地保留尽可能多的格式。为插入换行符标签,检测段落并格式化它们等。输入非常简单,通常是格式良好的html(不是整个文档,只是一堆内容,通常没有anchor或图像)。我可以将几个正则表达式放在一起,让我达到80%,但我认为可能有一些现有的解决方案更智能。 最佳答案 首先,不要尝试为此使用正则表达式。很有可能你会想出一个脆弱/脆弱的解决方案,它会随着HTML的变化而崩溃,或者很难管理和维护。您可以使用Nokogiri快速解析HTML并提取文本:require'nokogiri'h
我想为Heroku构建一个Rails3应用程序。他们使用Postgres作为他们的数据库,所以我通过MacPorts安装了postgres9.0。现在我需要一个postgresgem并且共识是出于性能原因你想要pggem。但是我对我得到的错误感到非常困惑当我尝试在rvm下通过geminstall安装pg时。我已经非常明确地指定了所有postgres目录的位置可以找到但仍然无法完成安装:$envARCHFLAGS='-archx86_64'geminstallpg--\--with-pg-config=/opt/local/var/db/postgresql90/defaultdb/po
