是这样的,博主自己有一台树莓派,以前刚入门的时候都不知道换源是什么东西,所以会去百度换源教程,但是因为版本不匹配也让博主吃了不少亏,这篇文章的目的呢也是为了让刚入坑的树莓派小白少走弯路而写(如果你是大佬就可以忽略这篇文章)
首先本次教程给大家换的是清华源,清华源的帮助网站先贴在这里 清华源
当然,国内也有很多源可以选择,像阿里源等等,各位小伙伴可以参照本教程还有网上的教程来更换对应的源,我这里就不多介绍了
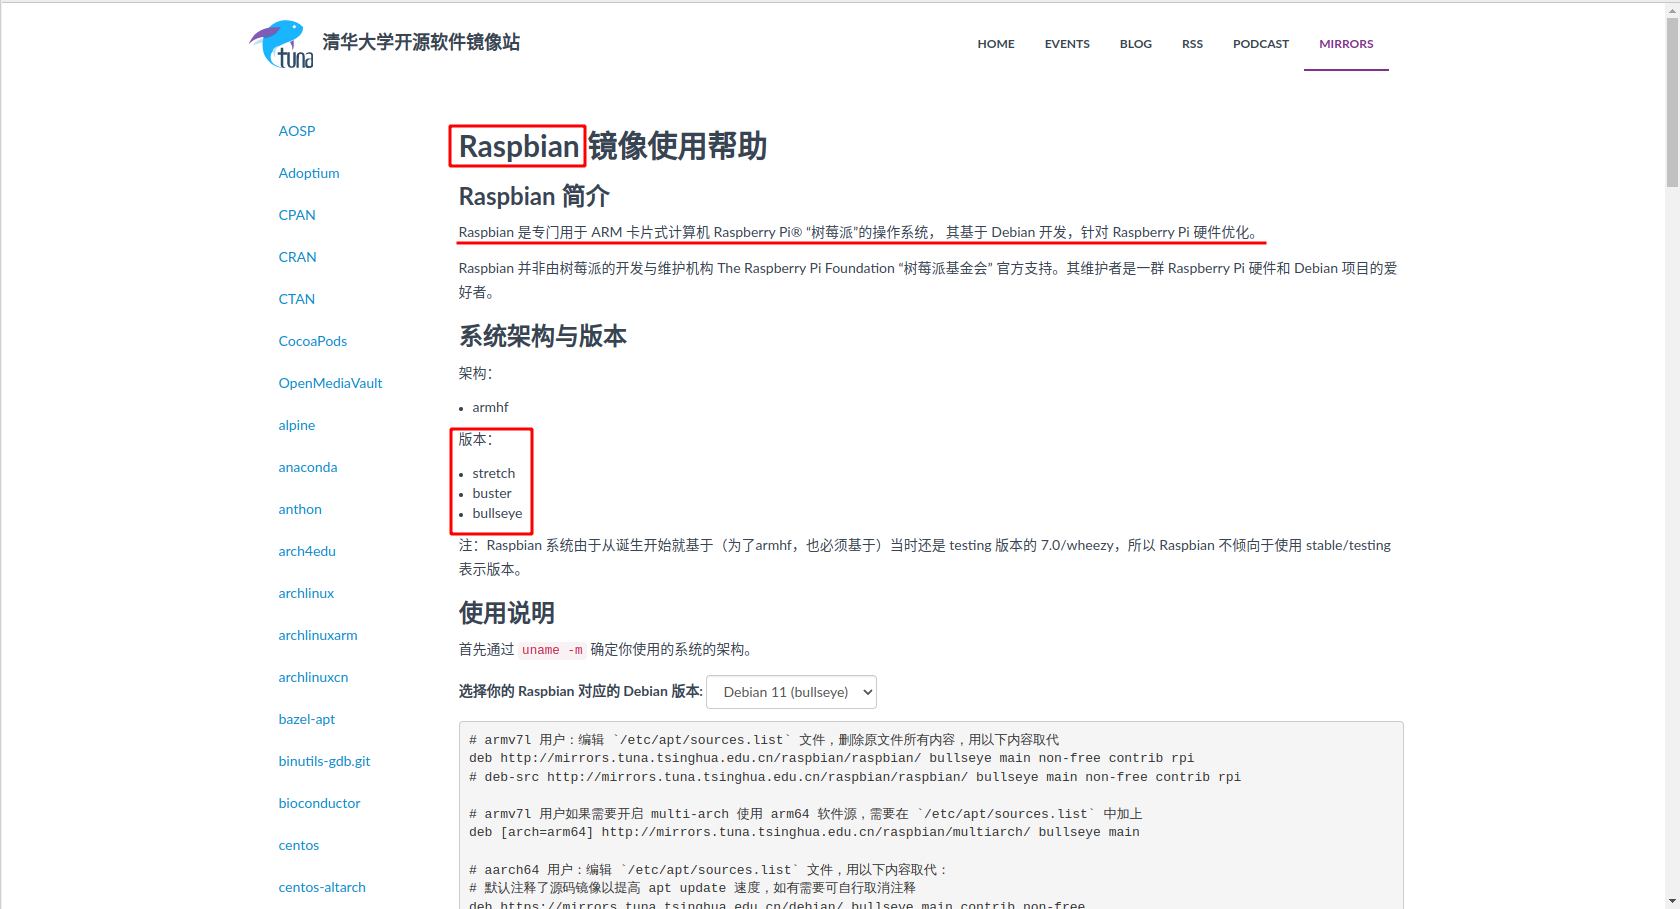
可以看到,这里支持更换
这三种版本的源
系统底层如果是Deebin9相对应的版本就是stretch版本,其他版本系统对应版本可以依次推算
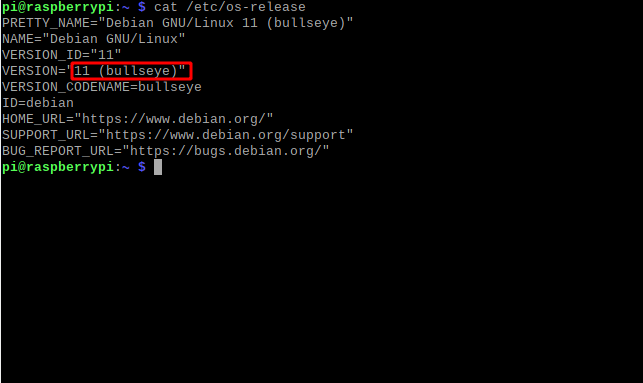
博主使用的是官方的64位操作系统,对应的是Deebin11,bullseye版本
不知道自己系统版本的小伙伴可以用这个命令:cat /etc/os-release
输入下面的命令
sudo nano /etc/apt/sources.list
博主这里使用的是nano编辑器,如果你没有下载可以使用这条命令下载
sudo apt-get install nano当然,如果你有其他编辑器,像vim就替换一下nano像这样sudo vim /etc/apt/sources.list
输入命令你会看到如下画面
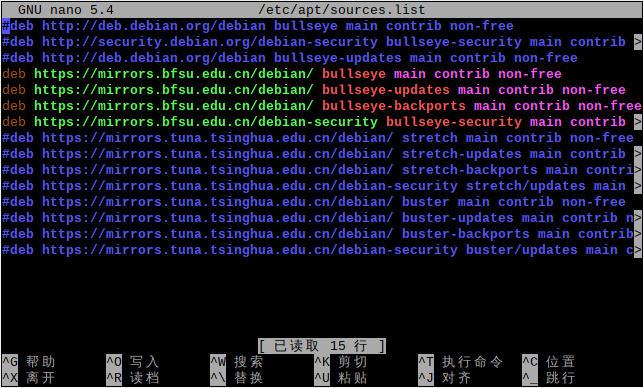
说来惭愧,博主因为懒得删除,所以导致源列表有很多无用的源,各位小伙伴可别学我
如果你是第一次换源,那么你应该只看到博主前面注释的三个源,请你在三个源前面添加 #号,将他们注释掉
换完之后记得 ctrl + O然后回车写入,接着 ctrl + X退出哦
你将用到下列源
1.32位操作系统用这个
deb http://mirrors.tuna.tsinghua.edu.cn/raspbian/raspbian/ stretch main non-free contrib rpi
# deb-src http://mirrors.tuna.tsinghua.edu.cn/raspbian/raspbian/ stretch main non-free contrib rpi
注释的源可以选择使用或者不使用,如需使用请删除
#号
2.64位操作系统用这个
# 默认注释了源码镜像以提高 apt update 速度,如有需要可自行取消注释
deb https://mirrors.tuna.tsinghua.edu.cn/debian/ stretch main contrib non-free
# deb-src https://mirrors.tuna.tsinghua.edu.cn/debian/ stretch main contrib non-free
deb https://mirrors.tuna.tsinghua.edu.cn/debian/ stretch-updates main contrib non-free
# deb-src https://mirrors.tuna.tsinghua.edu.cn/debian/ stretch-updates main contrib non-free
deb https://mirrors.tuna.tsinghua.edu.cn/debian/ stretch-backports main contrib non-free
# deb-src https://mirrors.tuna.tsinghua.edu.cn/debian/ stretch-backports main contrib non-free
deb https://mirrors.tuna.tsinghua.edu.cn/debian-security stretch/updates main contrib non-free
# deb-src https://mirrors.tuna.tsinghua.edu.cn/debian-security stretch/updates main contrib non-free
写入完成后还要修改一个文件
输入下面的命令
sudo nano /etc/apt/sources.list.d/raspi.list
将原来的内容注释掉
加入以下内容
deb http://mirrors.tuna.tsinghua.edu.cn/raspberrypi/ stretch main
如果32位操作系统用户需要开启 multi-arch 使用 arm64 软件源,需要在 /etc/apt/sources.list 中加上
deb [arch=arm64] http://mirrors.tuna.tsinghua.edu.cn/raspbian/multiarch/ stretch main
也就是说在第一步的操作上加上如上的源
你将用到下列源
1.32位操作系统用这个
deb http://mirrors.tuna.tsinghua.edu.cn/raspbian/raspbian/ buster main non-free contrib rpi
# deb-src http://mirrors.tuna.tsinghua.edu.cn/raspbian/raspbian/ buster main non-free contrib rpi
注释的源可以选择使用或者不使用,如需使用请删除
#号
2.64位操作系统用这个
# 默认注释了源码镜像以提高 apt update 速度,如有需要可自行取消注释
deb https://mirrors.tuna.tsinghua.edu.cn/debian/ buster main contrib non-free
# deb-src https://mirrors.tuna.tsinghua.edu.cn/debian/ buster main contrib non-free
deb https://mirrors.tuna.tsinghua.edu.cn/debian/ buster-updates main contrib non-free
# deb-src https://mirrors.tuna.tsinghua.edu.cn/debian/ buster-updates main contrib non-free
deb https://mirrors.tuna.tsinghua.edu.cn/debian/ buster-backports main contrib non-free
# deb-src https://mirrors.tuna.tsinghua.edu.cn/debian/ buster-backports main contrib non-free
deb https://mirrors.tuna.tsinghua.edu.cn/debian-security buster/updates main contrib non-free
# deb-src https://mirrors.tuna.tsinghua.edu.cn/debian-security buster/updates main contrib non-free
写入完成后还要修改一个文件
输入下面的命令
sudo nano /etc/apt/sources.list.d/raspi.list
将原来的内容注释掉
加入以下内容
deb http://mirrors.tuna.tsinghua.edu.cn/raspberrypi/ buster main
如果32位操作系统用户需要开启 multi-arch 使用 arm64 软件源,需要在 /etc/apt/sources.list 中加上
deb [arch=arm64] http://mirrors.tuna.tsinghua.edu.cn/raspbian/multiarch/ buster main
也就是说在第一步的操作上加上如上的源
你将用到下列源
1.32位操作系统用这个
deb http://mirrors.tuna.tsinghua.edu.cn/raspbian/raspbian/ bullseye main non-free contrib rpi
# deb-src http://mirrors.tuna.tsinghua.edu.cn/raspbian/raspbian/ bullseye main non-free contrib rpi
注释的源可以选择使用或者不使用,如需使用请删除
#号
2.64位操作系统用这个
# 默认注释了源码镜像以提高 apt update 速度,如有需要可自行取消注释
deb https://mirrors.tuna.tsinghua.edu.cn/debian/ bullseye main contrib non-free
# deb-src https://mirrors.tuna.tsinghua.edu.cn/debian/ bullseye main contrib non-free
deb https://mirrors.tuna.tsinghua.edu.cn/debian/ bullseye-updates main contrib non-free
# deb-src https://mirrors.tuna.tsinghua.edu.cn/debian/ bullseye-updates main contrib non-free
deb https://mirrors.tuna.tsinghua.edu.cn/debian/ bullseye-backports main contrib non-free
# deb-src https://mirrors.tuna.tsinghua.edu.cn/debian/ bullseye-backports main contrib non-free
deb https://mirrors.tuna.tsinghua.edu.cn/debian-security bullseye-security main contrib non-free
# deb-src https://mirrors.tuna.tsinghua.edu.cn/debian-security bullseye-security main contrib non-free
写入完成后还要修改一个文件
输入下面的命令
sudo nano /etc/apt/sources.list.d/raspi.list
将原来的内容注释掉
加入以下内容
deb http://mirrors.tuna.tsinghua.edu.cn/raspberrypi/ bullseye main
如果32位操作系统用户需要开启 multi-arch 使用 arm64 软件源,需要在 /etc/apt/sources.list 中加上
deb [arch=arm64] http://mirrors.tuna.tsinghua.edu.cn/raspbian/multiarch/ bullseye main
也就是说在第一步的操作上加上如上的源
换完源之后记得要更新源
输入这个命令 sudo apt update
如图所示就是更新成功
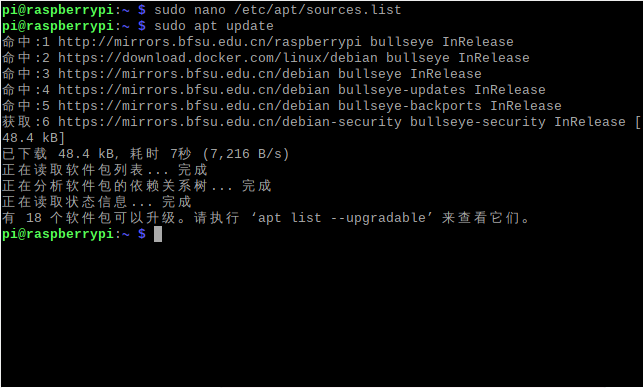
如果有软件包可以更新也可以输入 sudo apt upgrade 来进行更新
恭喜你,至此你已经完成了源的更换,掌握了换源的方法,希望小伙伴们日后都能成为超级巨佬
结尾撒花aaa=“o((>ω< ))o”
1.postman介绍Postman一款非常流行的API调试工具。其实,开发人员用的更多。因为测试人员做接口测试会有更多选择,例如Jmeter、soapUI等。不过,对于开发过程中去调试接口,Postman确实足够的简单方便,而且功能强大。2.下载安装官网地址:https://www.postman.com/下载完成后双击安装吧,安装过程极其简单,无需任何操作3.使用教程这里以百度为例,工具使用简单,填写URL地址即可发送请求,在下方查看响应结果和响应状态码常用方法都有支持请求方法:getpostputdeleteGet、Post、Put与Delete的作用get:请求方法一般是用于数据查询,
在VMware16.2.4安装Ubuntu一、安装VMware1.打开VMwareWorkstationPro官网,点击即可进入。2.进入后向下滑动找到Workstation16ProforWindows,点击立即下载。3.下载完成,文件大小615MB,如下图:4.鼠标右击,以管理员身份运行。5.点击下一步6.勾选条款,点击下一步7.先勾选,再点击下一步8.去掉勾选,点击下一步9.点击下一步10.点击安装11.点击许可证12.在百度上搜索VM16许可证,复制填入,然后点击输入即可,亲测有效。13.点击完成14.重启系统,点击是15.双击VMwareWorkstationPro图标,进入虚拟机主
1.1.1 YARN的介绍 为克服Hadoop1.0中HDFS和MapReduce存在的各种问题⽽提出的,针对Hadoop1.0中的MapReduce在扩展性和多框架⽀持⽅⾯的不⾜,提出了全新的资源管理框架YARN. ApacheYARN(YetanotherResourceNegotiator的缩写)是Hadoop集群的资源管理系统,负责为计算程序提供服务器计算资源,相当于⼀个分布式的操作系统平台,⽽MapReduce等计算程序则相当于运⾏于操作系统之上的应⽤程序。 YARN被引⼊Hadoop2,最初是为了改善MapReduce的实现,但是因为具有⾜够的通⽤性,同样可以⽀持其他的分布式计算模
我是Ruby新手,并被要求在我们的新项目中使用它。我们还被要求使用Padrino(Sinatra)作为后端/框架。我们被要求使用Rspec进行测试。我一直在寻找可以指导在Padrino上使用RspecforRuby的教程。我得到的主要是引用RoR。但是,我需要RubyonPadrino。请在任何入门/指南/引用/讨论等方面指导我。如有不妥之处请指正。可能是我没有针对我的问题搜索正确的词/短语组合。我正在使用Ruby1.9.3和Padrinov.0.10.6。注意:我还提到了SOquestion,但它没有帮助。 最佳答案 我没用过Pa
文章目录1.任务背景2.任务目标3.相关知识点4.任务实操4.1安装配置JDK4.2启动FISCOBCOS4.3下载解压WeBASE-Front4.4拷贝sdk证书文件4.5启动节点4.6访问节点4.7检查运行状态5.任务总结1.任务背景FISCOBCOS其实是有控制台管理工具,用来对区块链系统进行各种管理操作。但是对于初学者来说,还是可视化界面更友好,本节就来介绍WeBASE管理平台,这是一款微众银行开源的自研区块链中间件平台,可以降低区块链使用的门槛,大幅提高区块链应用的开发效率。微众银行是腾讯牵头设立的民营银行,在国内民营银行里还是比较出名的。微众银行参与FISCOBCOS生态建设,一定
这个问题在这里已经有了答案:关闭10年前。PossibleDuplicate:FlashMessagesinPartials(Rails3)我正在做MichaelHartl的Railstutorial和listing7.26将flash消息添加到应用程序布局:...">...这很好用。但是,我试图通过在我的部分文件夹中创建一个_flash.html.erb来清理这段代码...">-->...并且比使用......在我的应用程序布局中,我的所有Rspec测试开始失败,每个测试都显示以下消息:Failure/Error:before{visitsignup_path}ActionView:
我正在使用SublimeText2,同时遵循MichaelHartl的RubyonRails教程。可以在http://ruby.railstutorial.org/book/ruby-on-rails-tutorial找到我所指的教程的具体部分。(ctrl+F“list5.26”)。我能够创建规范/支持文件。但是,在尝试创建spec/support/utilities.rb文件时,我收到消息“无法保存~/rails_projects/sample_app/spec/support/utilities.rb”。有人知道为什么会这样吗?SublimeText论坛上有人似乎遇到了完全相同的问
目录一、安装包链接二、安装详细步骤1.安装Wireshark和WinPcap2.安装OracleVMVirtualBox3.安装ensp三、安装后注册四、启动路由器出现40错误怎么解决一、安装包链接二、安装详细步骤链接:https://pan.baidu.com/s/1QbUUYMOMIV2oeIKHWP1SpA?pwd=xftx提取码:xftx1.安装Wireshark和WinPcap找到Wireshark安装包所在文件夹,双击它,按照以下步骤安装。2.安装OracleVMVirtualBox找到OracleVMVirtualBox安装包所在文件夹,双击它,按照以下步骤安装。注:可自定义安装
【适用平台】私有云 说明:完成私有云部分是需要两台虚拟机的,分别为controller、compute两个节点,但我们只需配置一台,然后克隆就方便多啦!需要用到的映射文件:关于vm的安装我就不介绍的,毕竟挺简单的,下面让我们看看基于私有云模块中,虚拟机的搭建吧。1、创建新的虚拟机,这里一般我会选择自定义,毕竟后面的配置都要根据私有云相关来进行搭建,会比较复杂。(如果是基础的可以选择典型,典型的满足一般虚拟机的配置) 2、选择稍后安装操作系统会比较方便后续的选择,这里你也可以自己选择自己的映像文件(但不建议) 3、我们是基于Linux下操作的,所以选择Linux客户机操作系统,版本选择自己
听说PostgreSQL的可以用Ruby写存储过程但我一直没能找到更多关于它的信息,教人们如何实际去做。有人可以为此推荐好的资源。谢谢 最佳答案 显然,您需要安装PL/Ruby。之后,你可以写:CREATEFUNCTIONruby_max(int4,int4)RETURNSint4AS'ifargs[0].to_i>args[1].to_ireturnargs[0]elsereturnargs[1]end'LANGUAGE'plruby';查看其GitHubrepository安装说明。