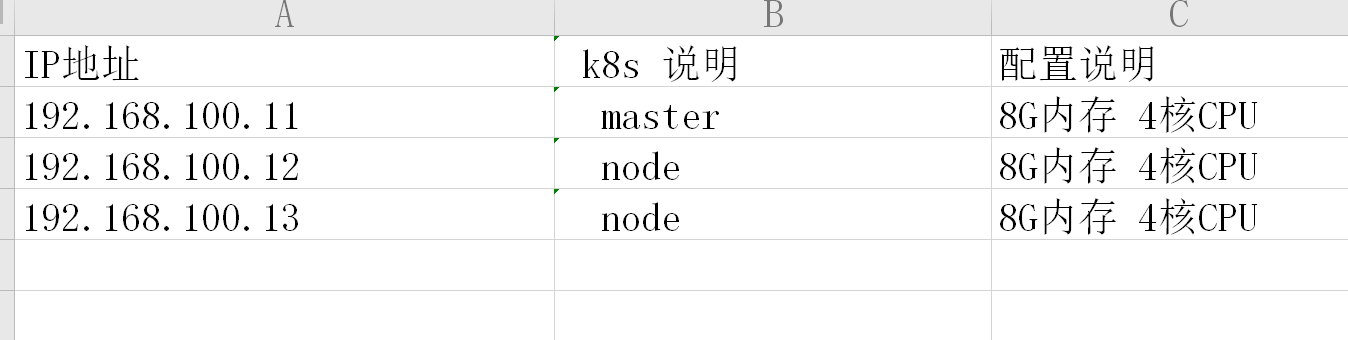
系统:Centos7.8x64

cat /etc/hosts
-----
192.168.100.11  node01.flyfish.cn
192.168.100.12  node02.flyfish.cn
192.168.100.13  node03.flyfish.cn
192.168.100.14  node04.flyfish.cn
192.168.100.15  node05.flyfish.cn
192.168.100.16  node06.flyfish.cn
192.168.100.17  node07.flyfish.cn
192.168.100.18  node08.flyfish.cn
-----

本次安装以 前三台部署
k8s 部署说明
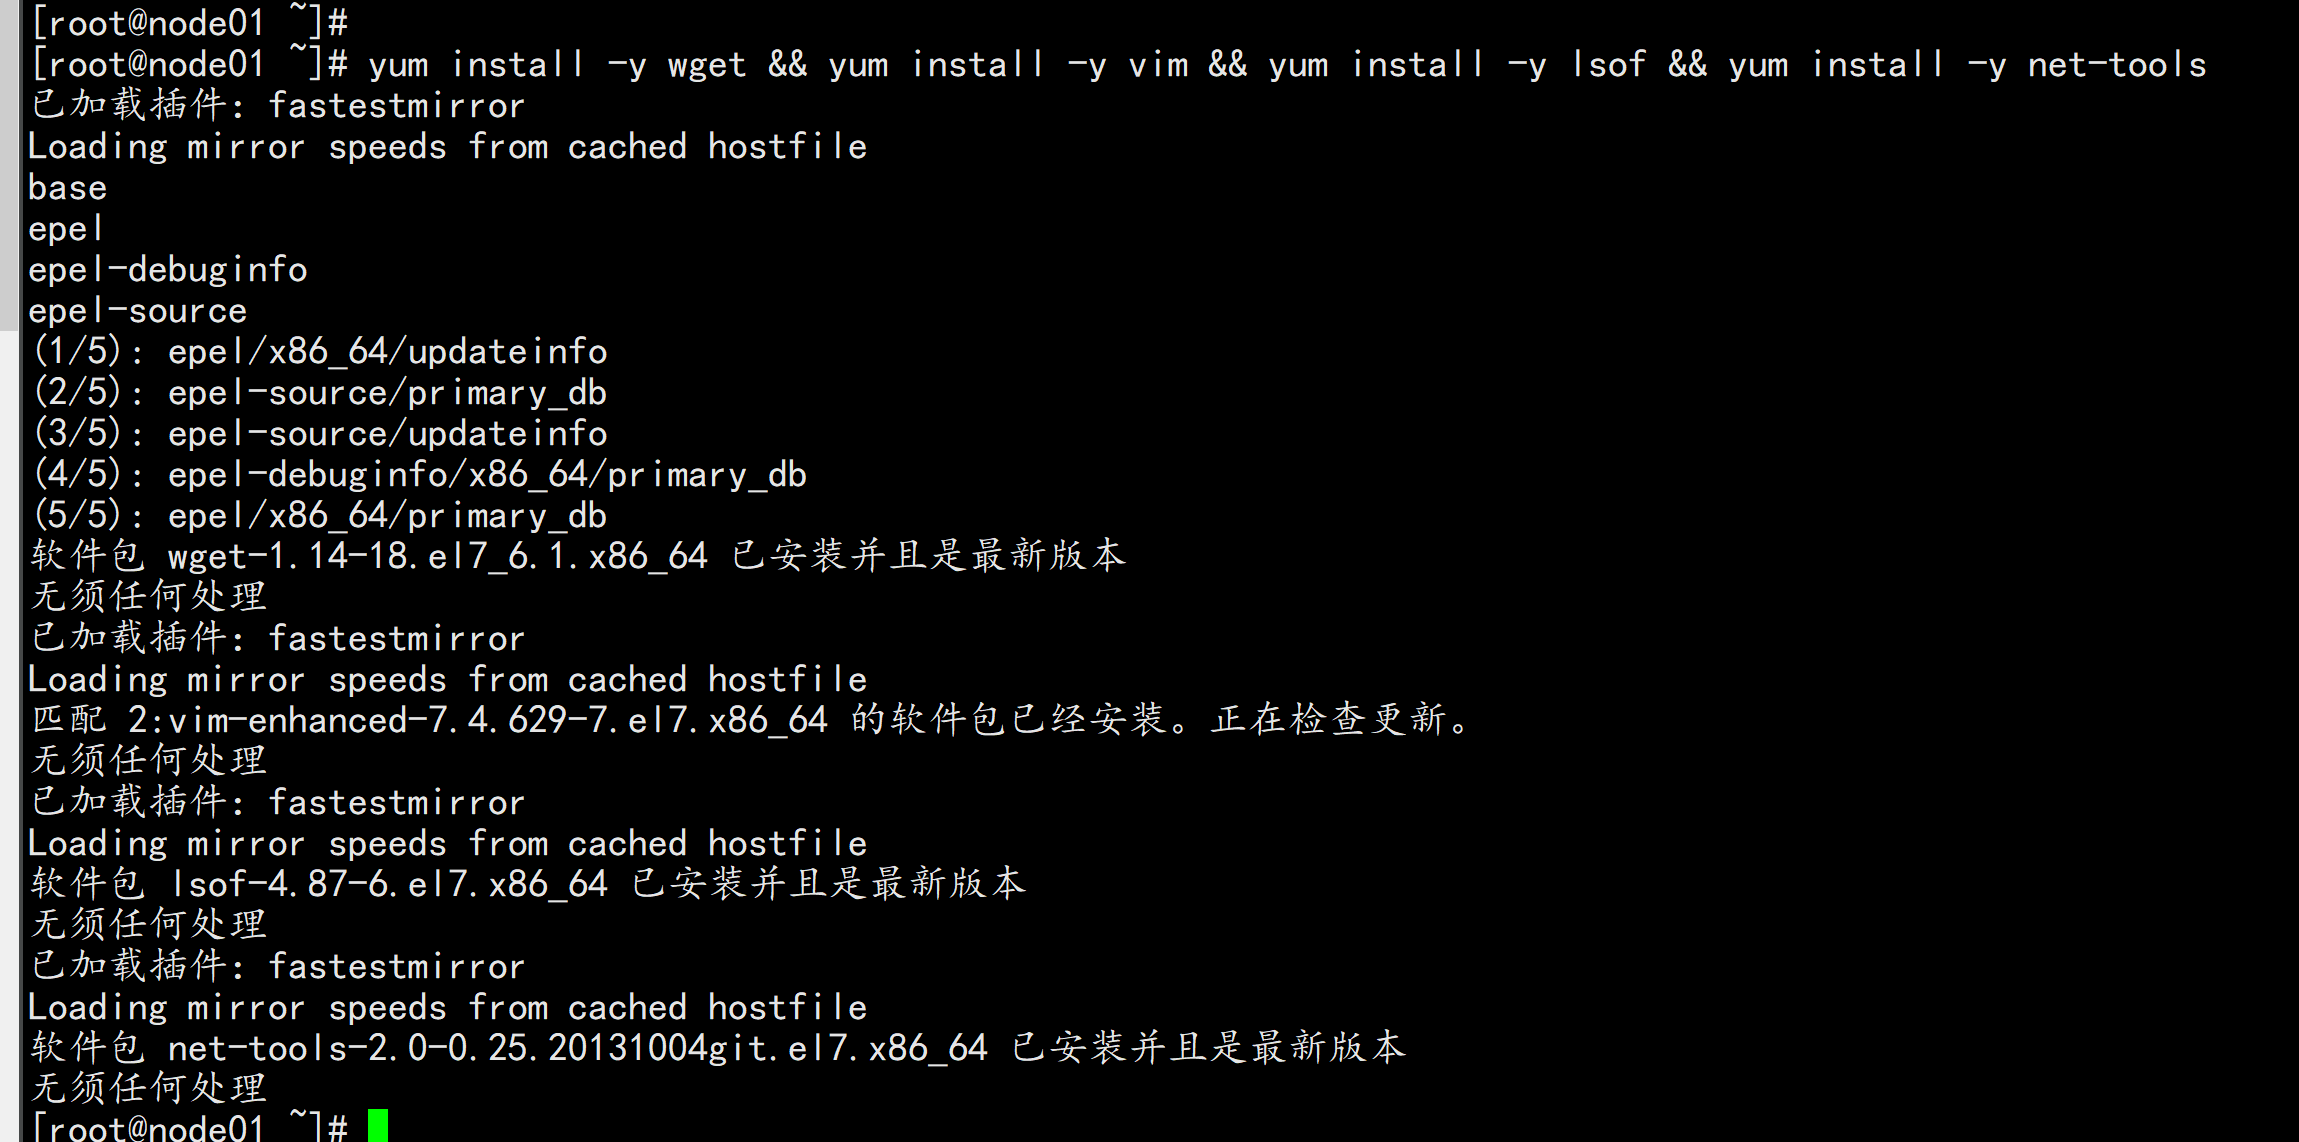
安装基础工具
  yum install -y wget && yum install -y vim && yum install -y lsof && yum install -y net-tools
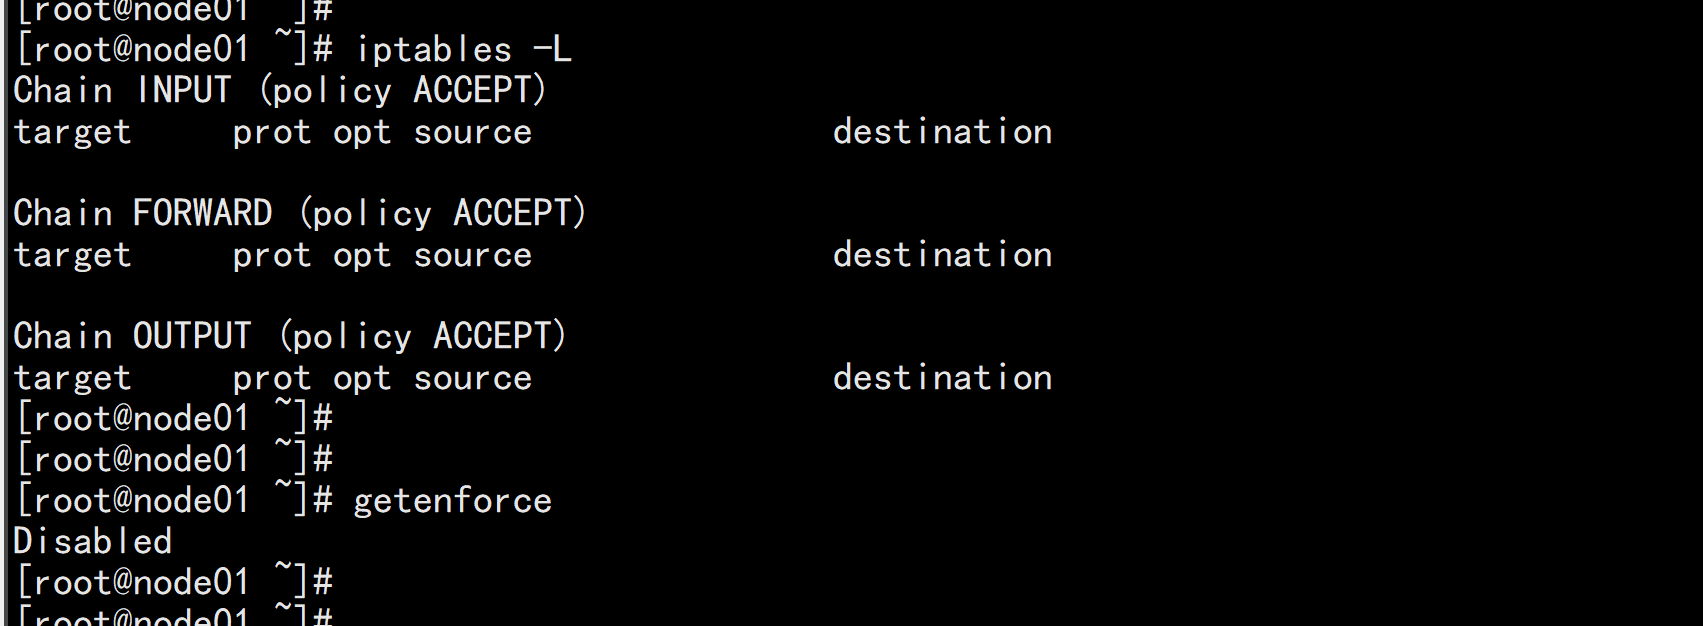
关闭防火墙或者阿里云开通安全组端口访问

systemctl stop firewalld

systemctl disable firewalld

执行关闭命令: systemctl stop firewalld.service

再次执行查看防火墙命令:systemctl status firewalld.service

执行开机禁用防火墙自启命令  : systemctl disable firewalld.service
关闭 selinux:

sed -i 's/enforcing/disabled/' /etc/selinux/config

setenforce 0

cat /etc/selinux/config
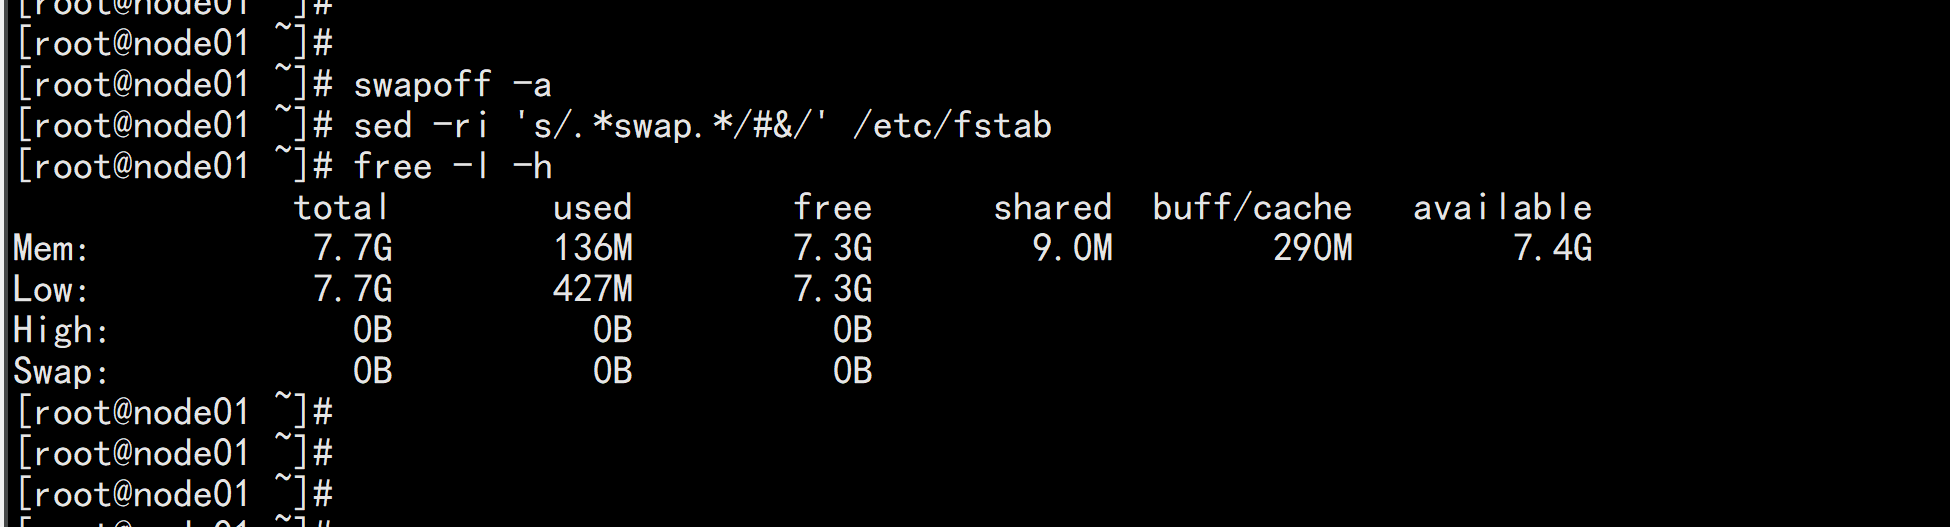
关闭 swap

swapoff -a  #临时

sed -ri 's/.*swap.*/#&/' /etc/fstab  #永久

free -l -h
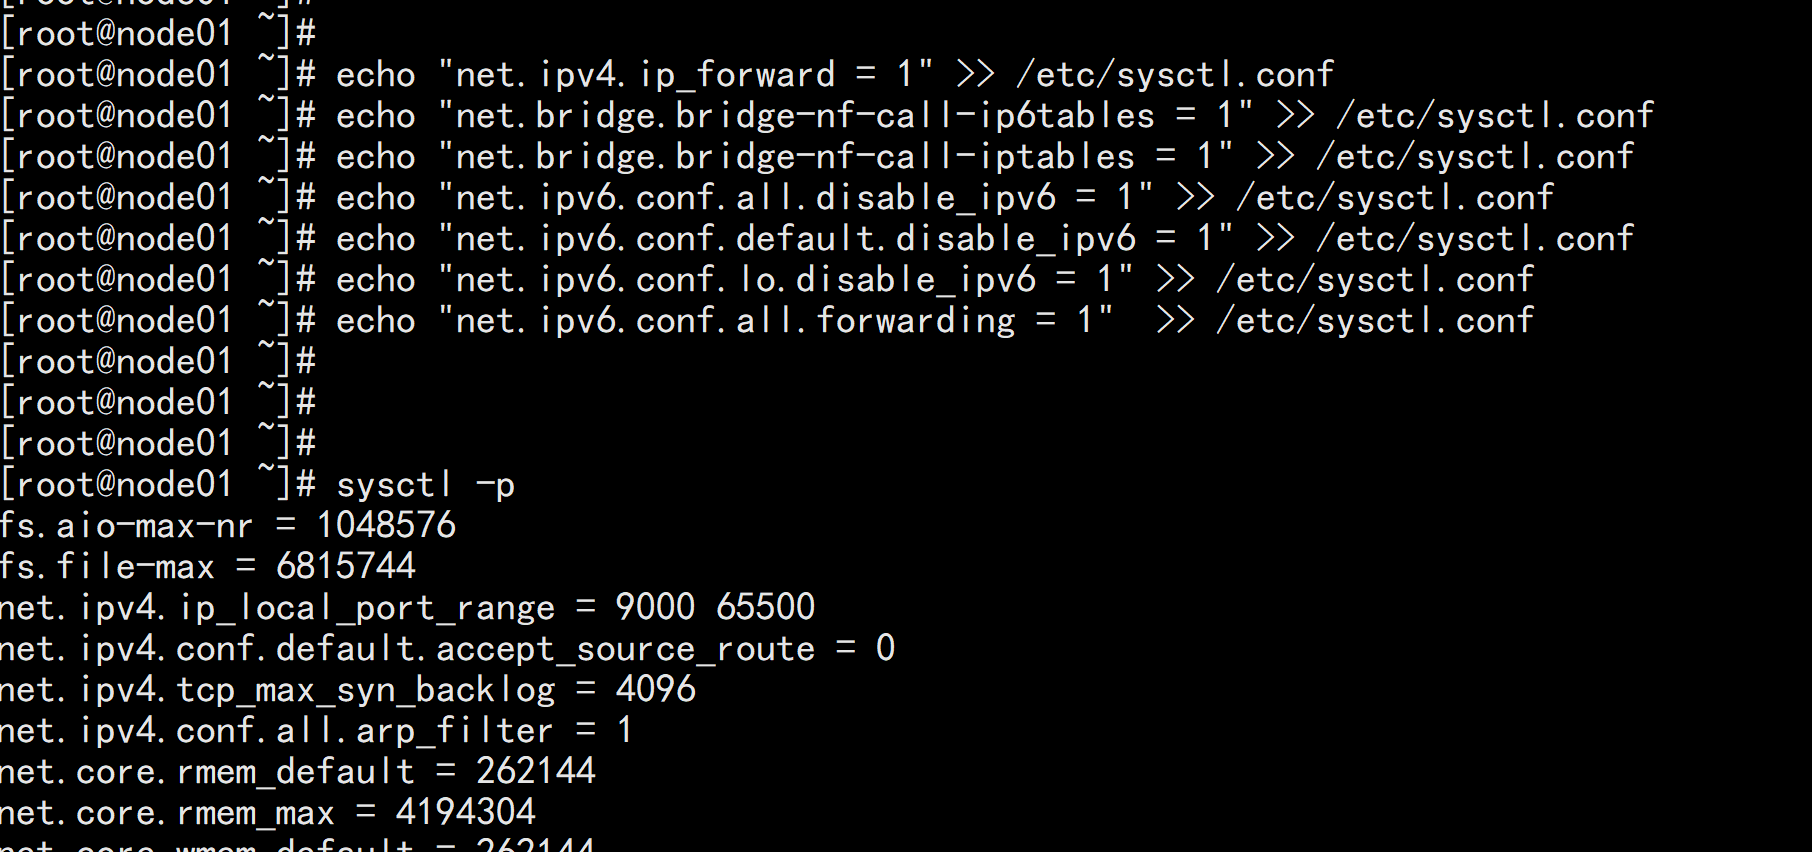
将桥接的 IPv4 流量传递到 iptables 的链
   如果没有/etc/sysctl.conf文件的话直接执行
echo "net.ipv4.ip_forward = 1" >> /etc/sysctl.conf
echo "net.bridge.bridge-nf-call-ip6tables = 1" >> /etc/sysctl.conf
echo "net.bridge.bridge-nf-call-iptables = 1" >> /etc/sysctl.conf
echo "net.ipv6.conf.all.disable_ipv6 = 1" >> /etc/sysctl.conf
echo "net.ipv6.conf.default.disable_ipv6 = 1" >> /etc/sysctl.conf
echo "net.ipv6.conf.lo.disable_ipv6 = 1" >> /etc/sysctl.conf
echo "net.ipv6.conf.all.forwarding = 1"  >> /etc/sysctl.conf
下载地址:https://download.docker.com/linux/static/stable/x86_64/docker-19.03.9.tgz

以下在所有节点操作。这里采用二进制安装,用yum安装也一样。
在 node01.flyfish,node02.flyfish 与 node03.flyfish 节点上面安装
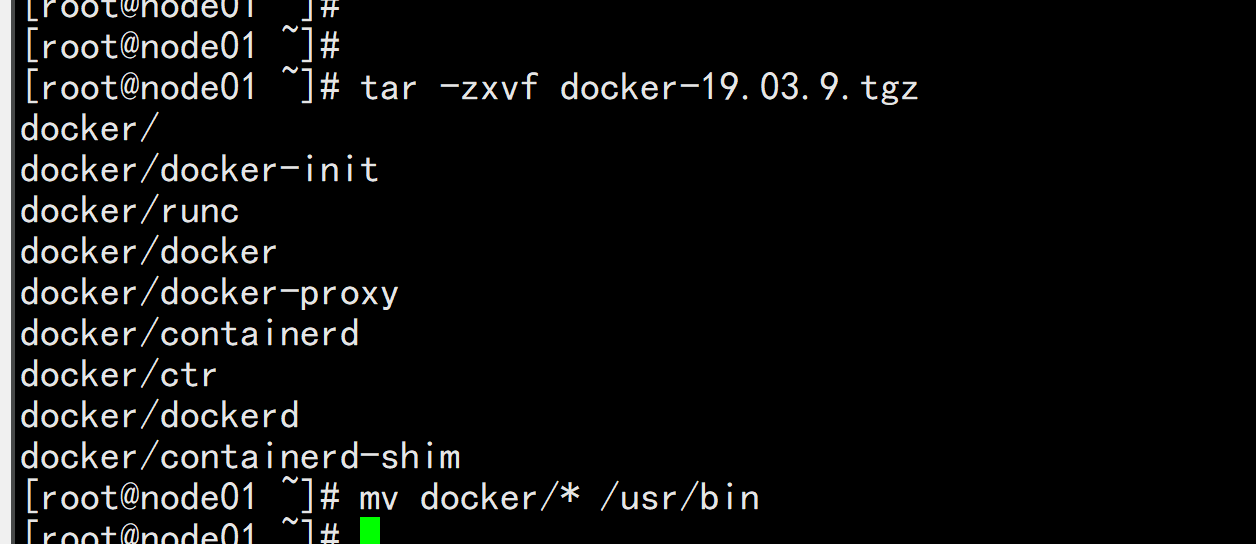
3.1 解压二进制包

tar zxvf docker-19.03.9.tgz
mv docker/* /usr/bin
3.2 systemd管理docker
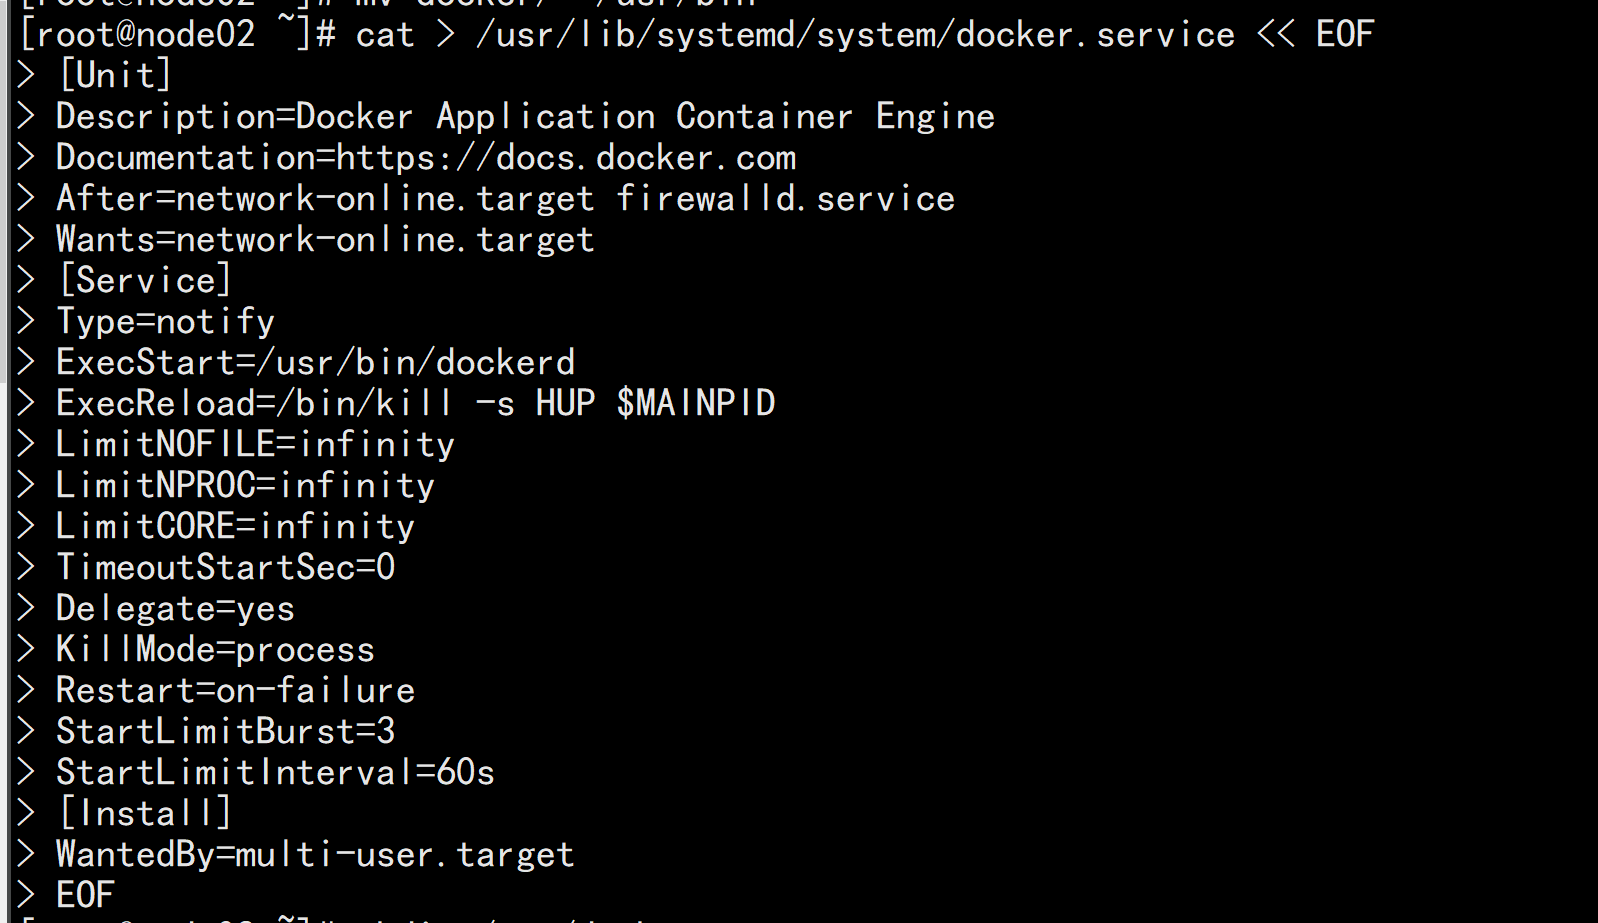
cat > /usr/lib/systemd/system/docker.service << EOF
[Unit]
Description=Docker Application Container Engine
Documentation=https://docs.docker.com
After=network-online.target firewalld.service
Wants=network-online.target
[Service]
Type=notify
ExecStart=/usr/bin/dockerd
ExecReload=/bin/kill -s HUP $MAINPID
LimitNOFILE=infinity
LimitNPROC=infinity
LimitCORE=infinity
TimeoutStartSec=0
Delegate=yes
KillMode=process
Restart=on-failure
StartLimitBurst=3
StartLimitInterval=60s
[Install]
WantedBy=multi-user.target
EOF
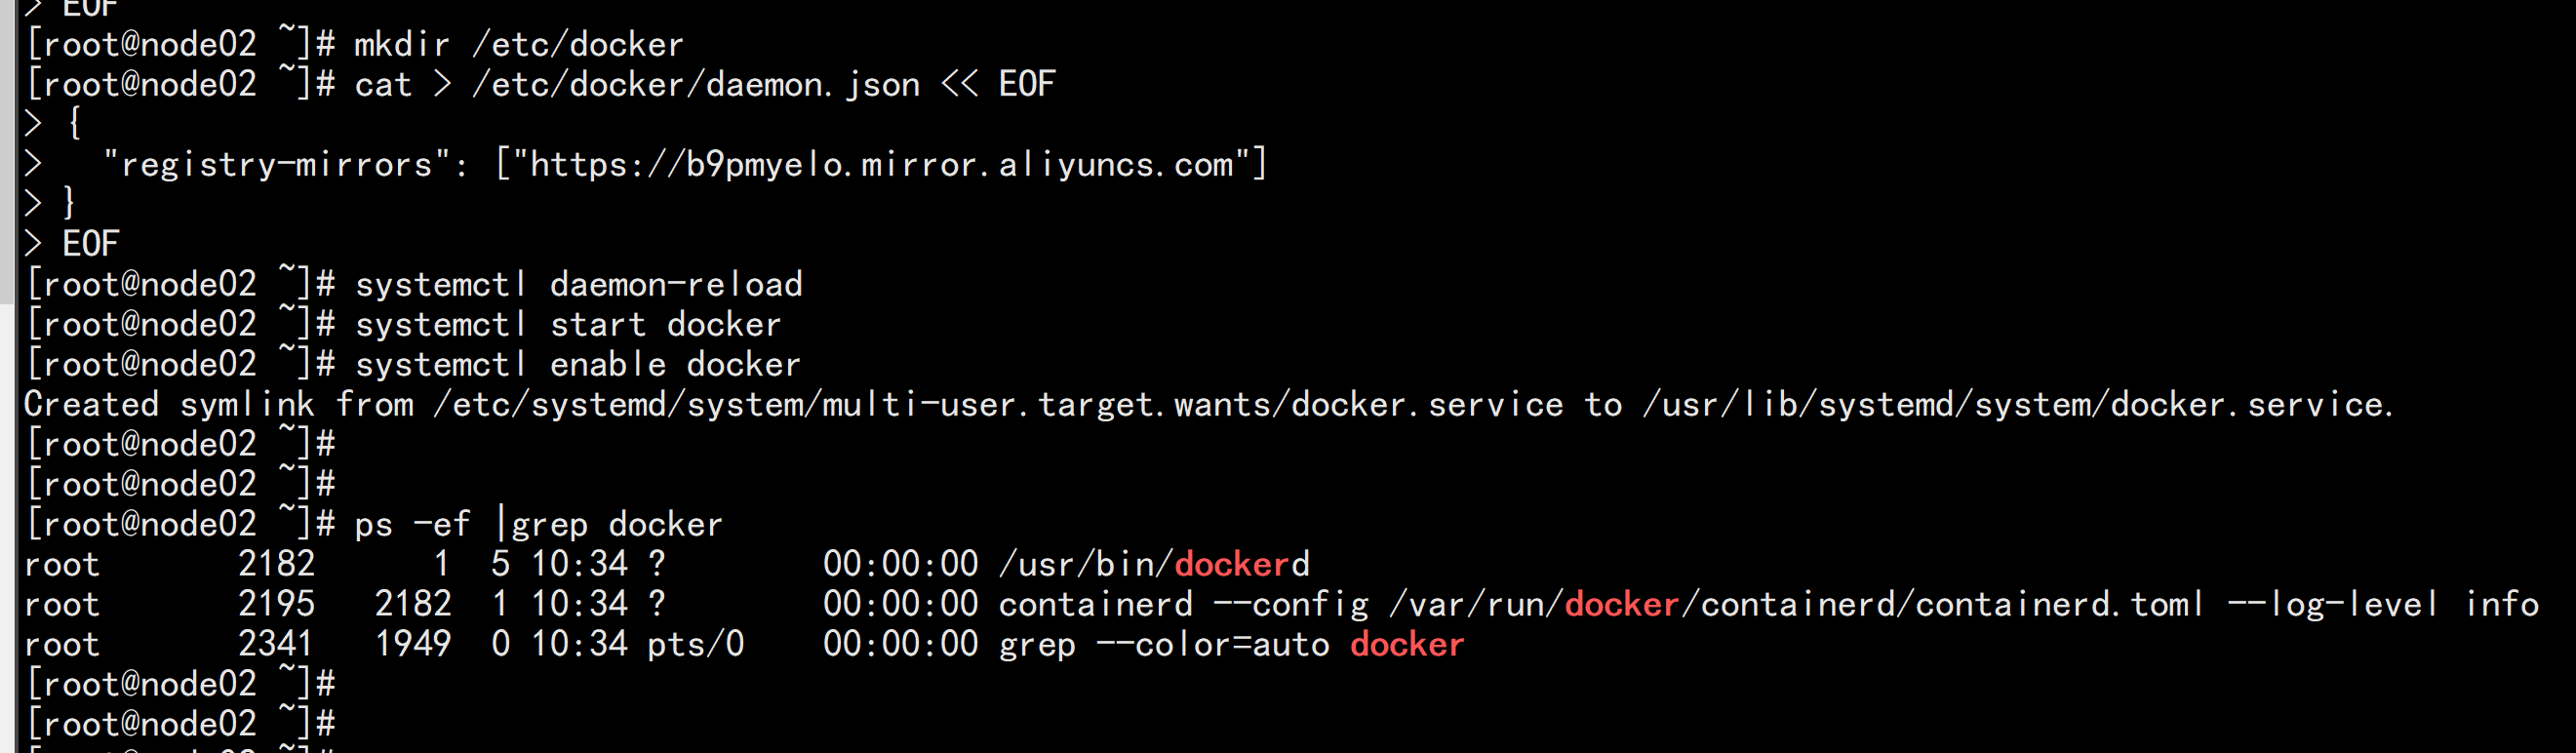
3.3 创建配置文件

mkdir /etc/docker
cat > /etc/docker/daemon.json << EOF
{
  "registry-mirrors": ["https://b9pmyelo.mirror.aliyuncs.com"]
}
EOF

registry-mirrors 阿里云镜像加速器
3.4 启动并设置开机启动

systemctl daemon-reload
systemctl start docker
systemctl enable docker
安装k8s、kubelet、kubeadm、kubectl(所有节点)
配置K8S的yum源

cat <<EOF > /etc/yum.repos.d/kubernetes.repo

[kubernetes]

name=Kubernetes

baseurl=http://mirrors.aliyun.com/kubernetes/yum/repos/kubernetes-el7-x86_64

enabled=1

gpgcheck=0

repo_gpgcheck=0

gpgkey=http://mirrors.aliyun.com/kubernetes/yum/doc/yum-key.gpg

       http://mirrors.aliyun.com/kubernetes/yum/doc/rpm-package-key.gpg

EOF
安装kubelet、kubeadm、kubectl
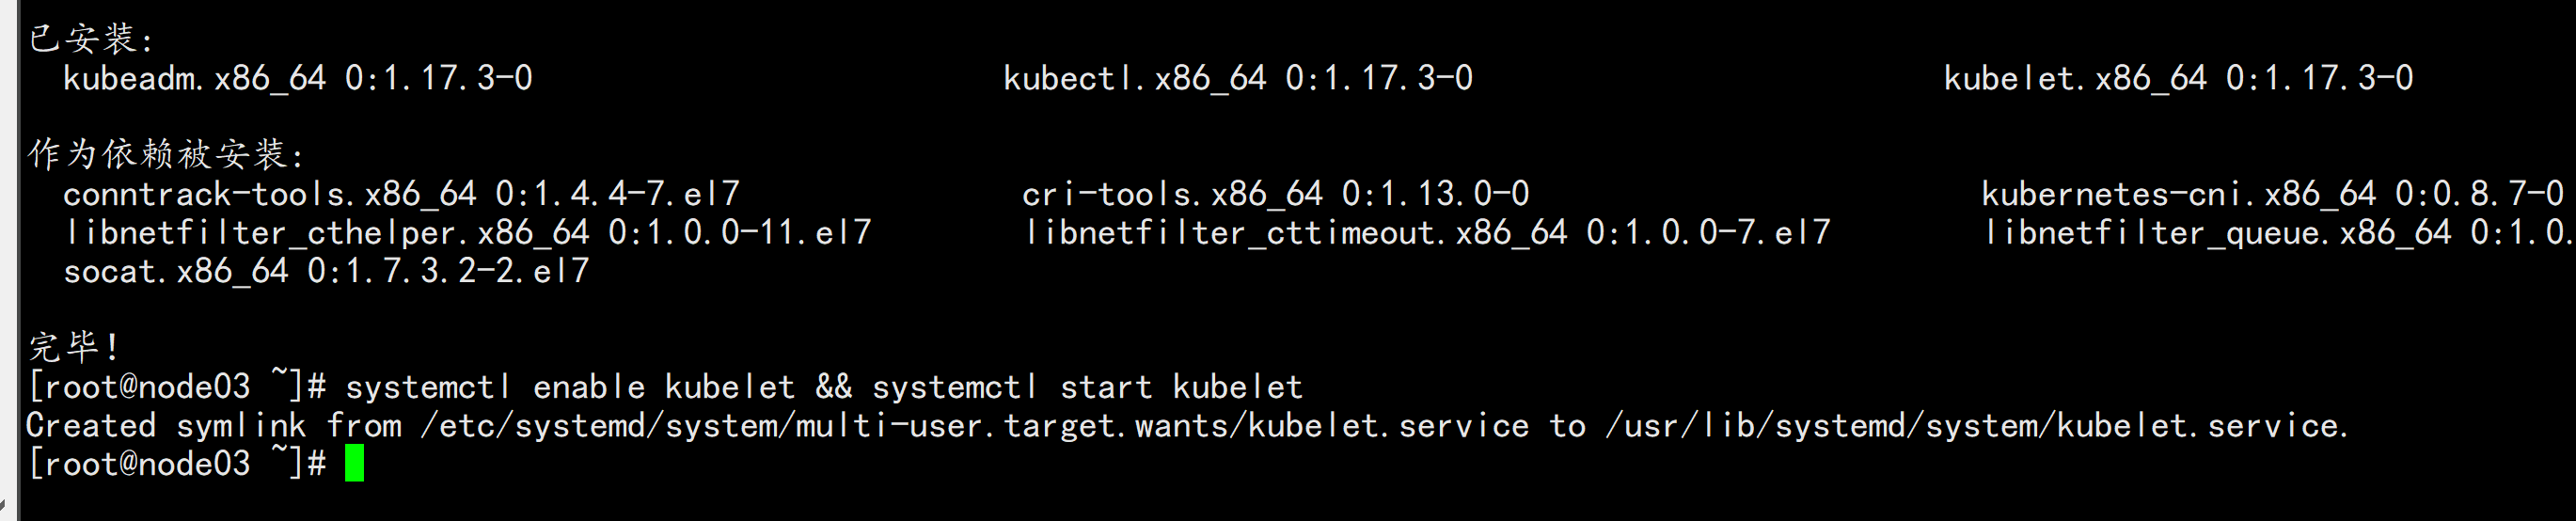
yum install -y kubelet-1.17.3 kubeadm-1.17.3 kubectl-1.17.3
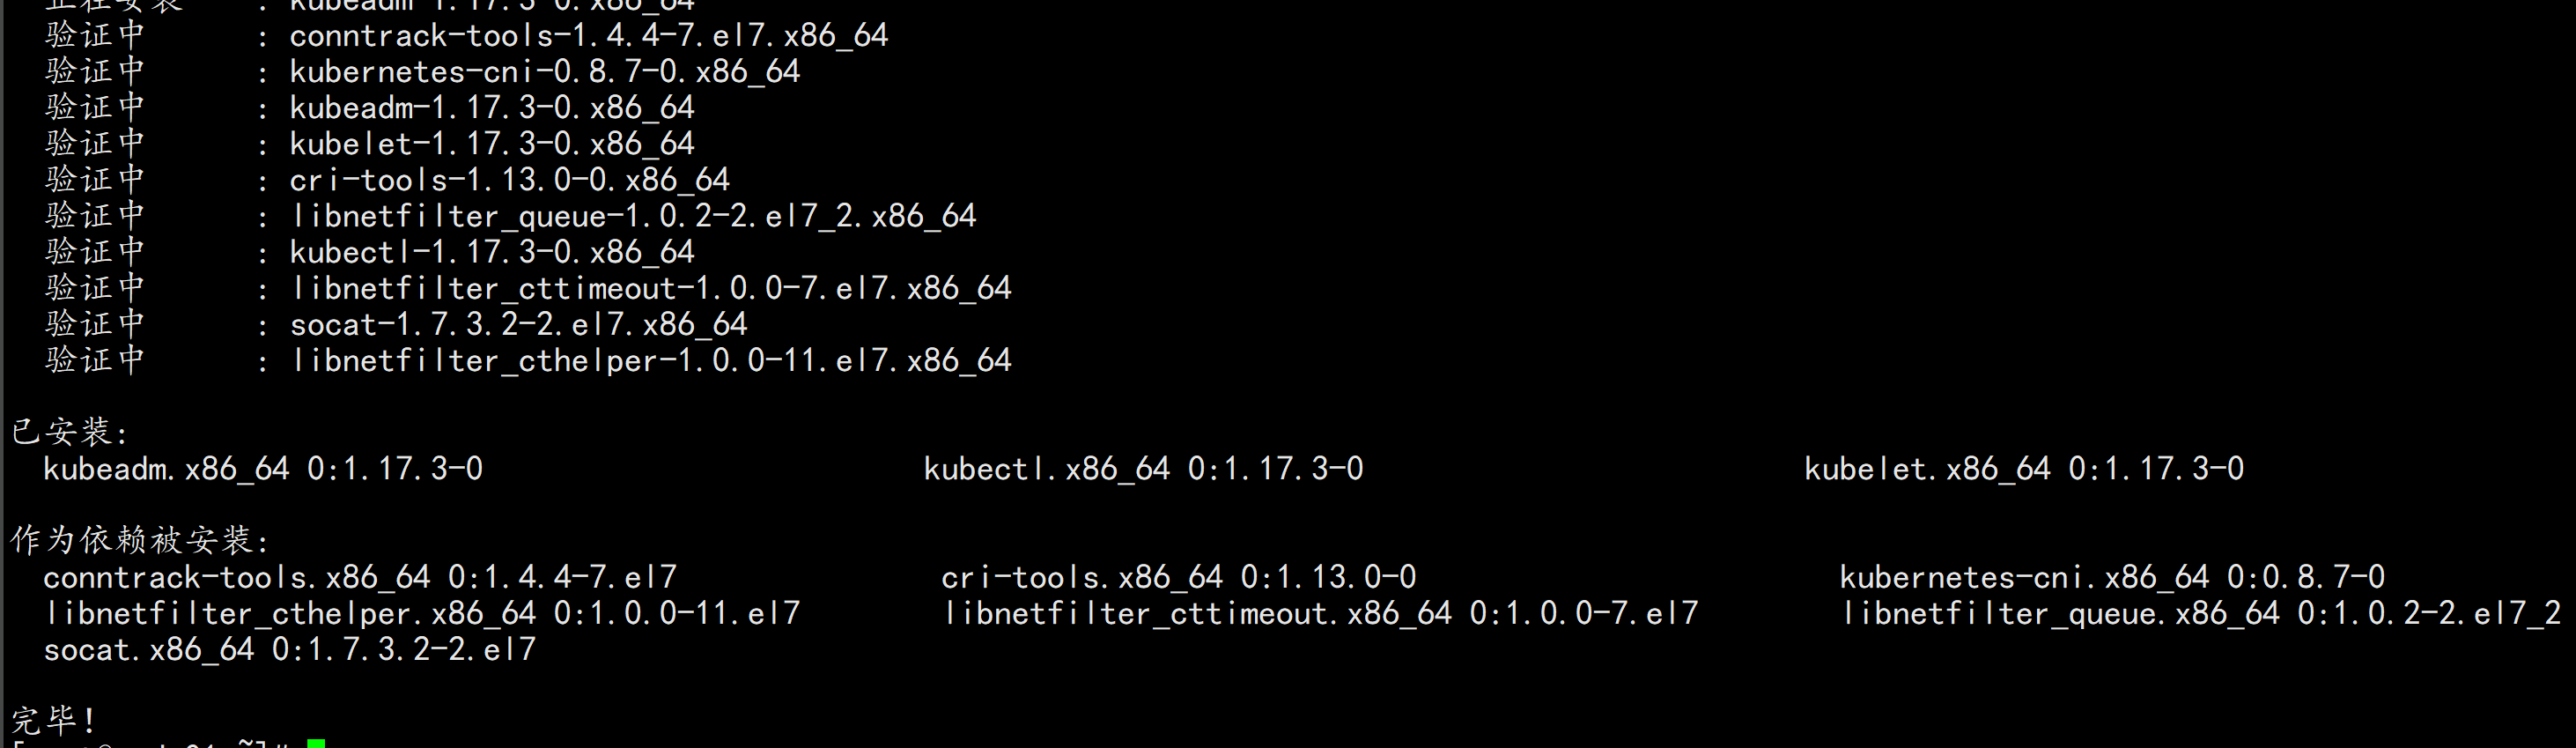
systemctl enable kubelet && systemctl start kubelet
初始化所有节点:
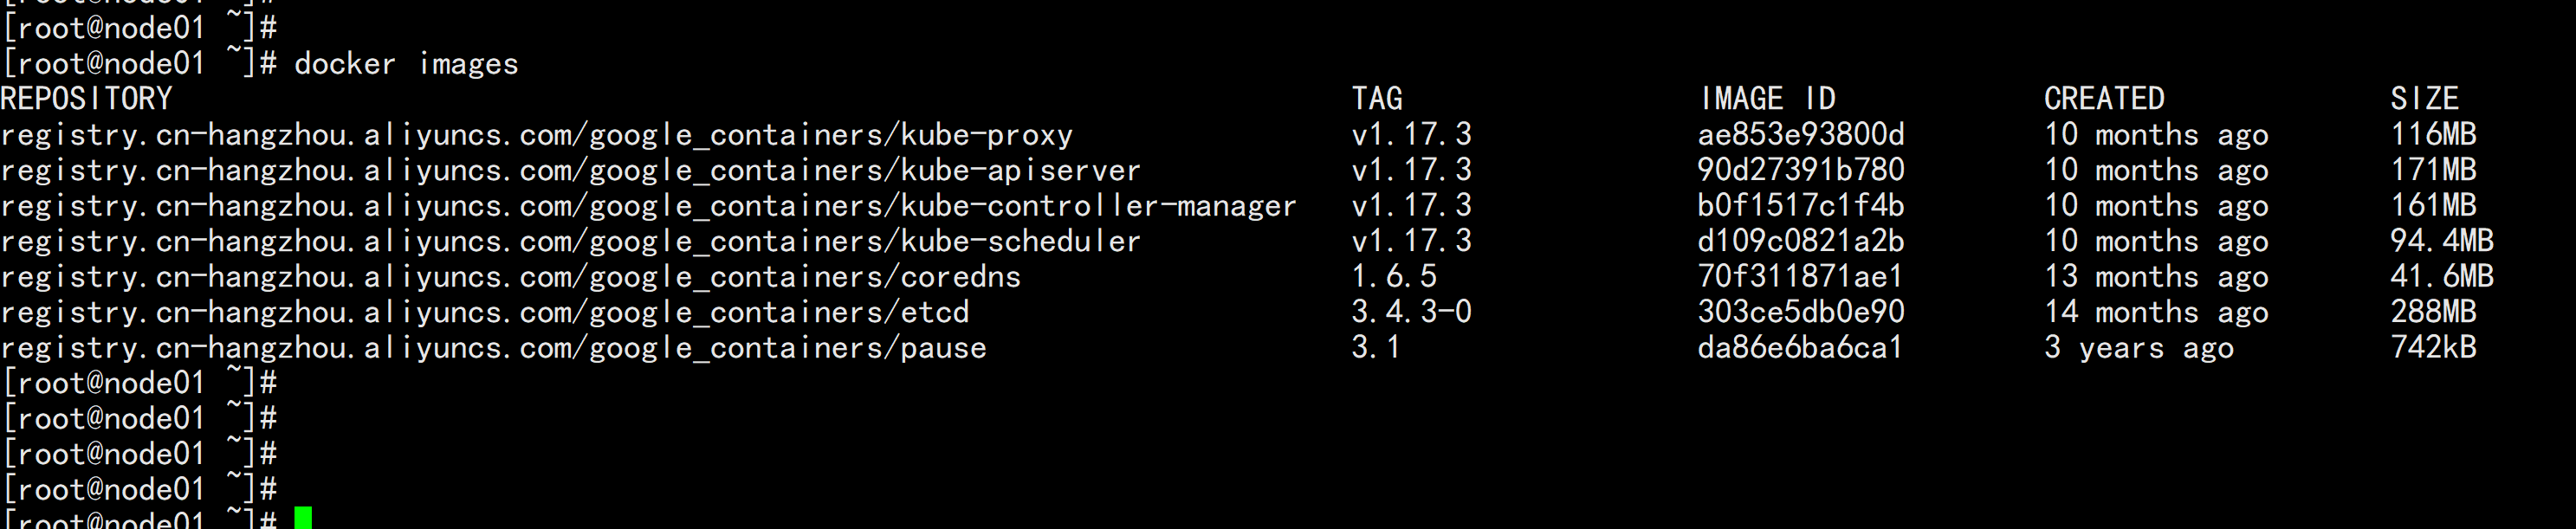
下载镜像脚本:
vim image.sh
----
#!/bin/bash
images=(
kube-apiserver:v1.17.3
kube-proxy:v1.17.3
kube-controller-manager:v1.17.3
kube-scheduler:v1.17.3
coredns:1.6.5
etcd:3.4.3-0
pause:3.1
)
for imageName in ${images[@]} ; do
docker pull registry.cn-hangzhou.aliyuncs.com/google_containers/$imageName
done
-----
初始化 master节点:
注意,该操作只是在master节点之后构建环境。
kubeadm init \
--apiserver-advertise-address=192.168.100.11 \
--image-repository registry.cn-hangzhou.aliyuncs.com/google_containers \
--kubernetes-version v1.17.3 \
--service-cidr=10.96.0.0/16 \
--pod-network-cidr=10.244.0.0/16
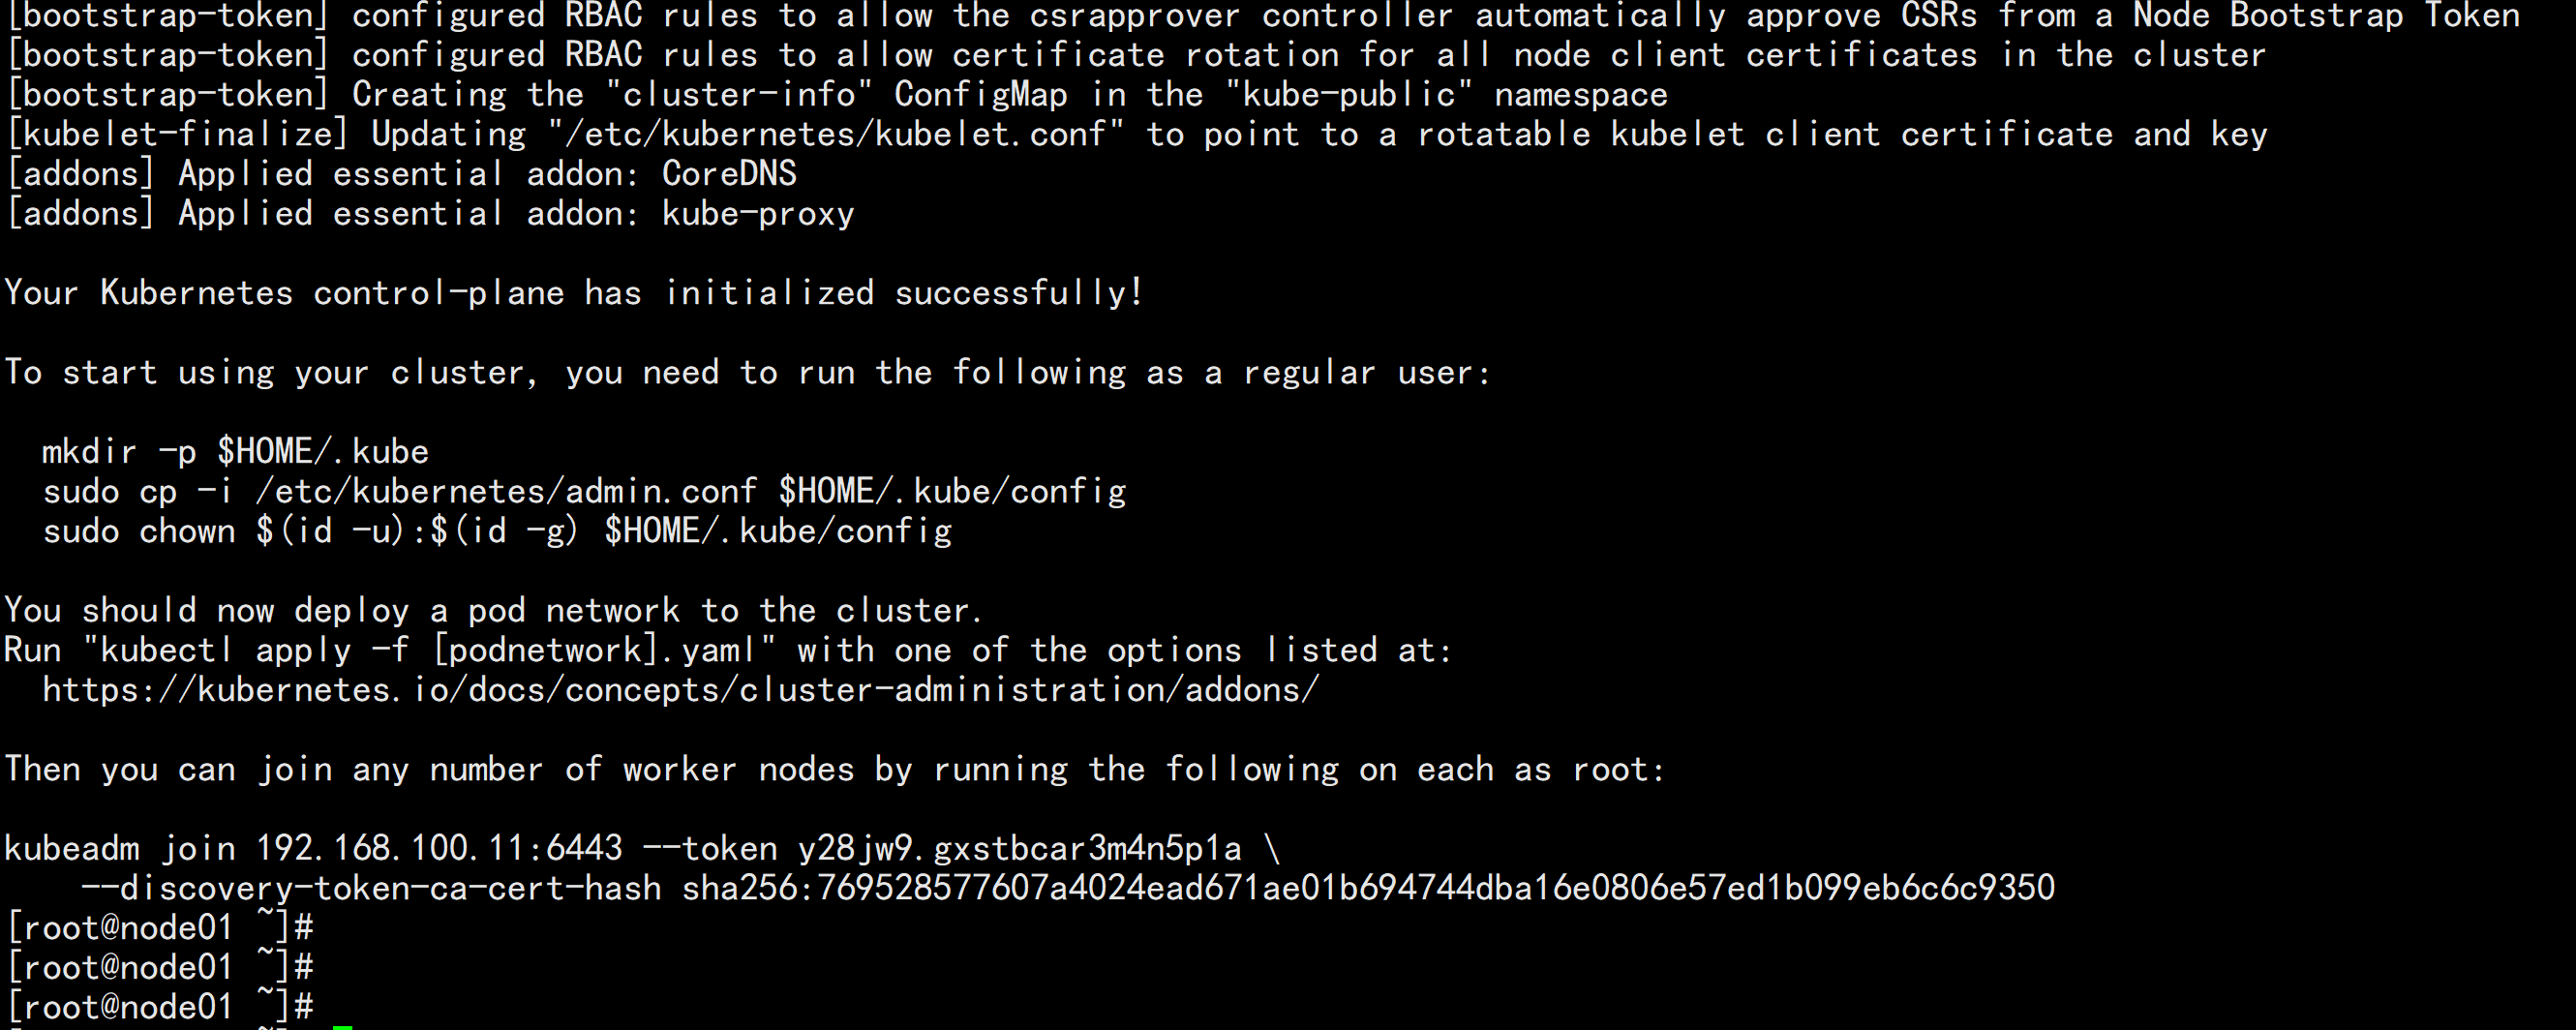
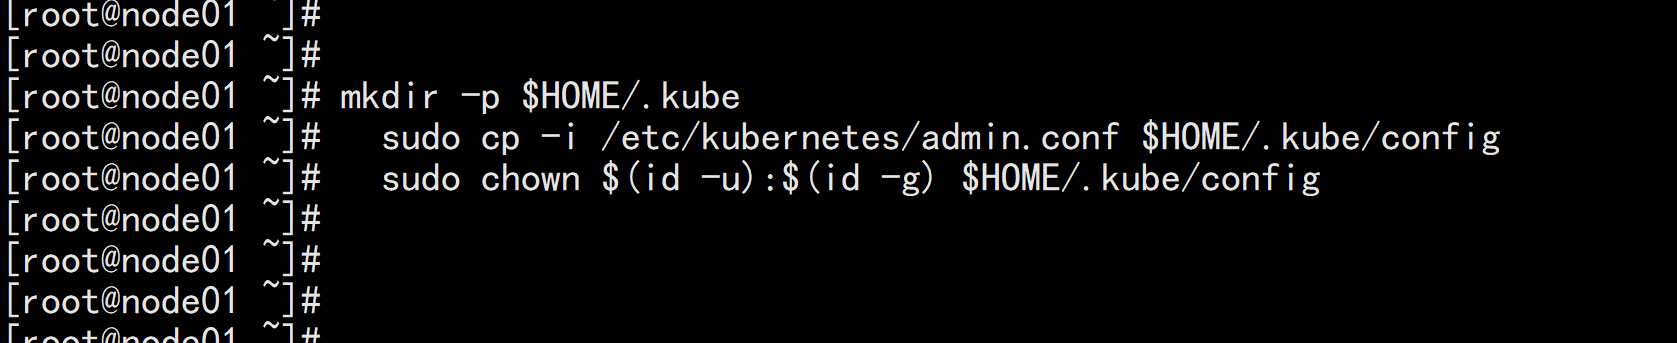
mkdir -p $HOME/.kube
sudo cp -i /etc/kubernetes/admin.conf $HOME/.kube/config
sudo chown $(id -u):$(id -g) $HOME/.kube/config
部署网络插件
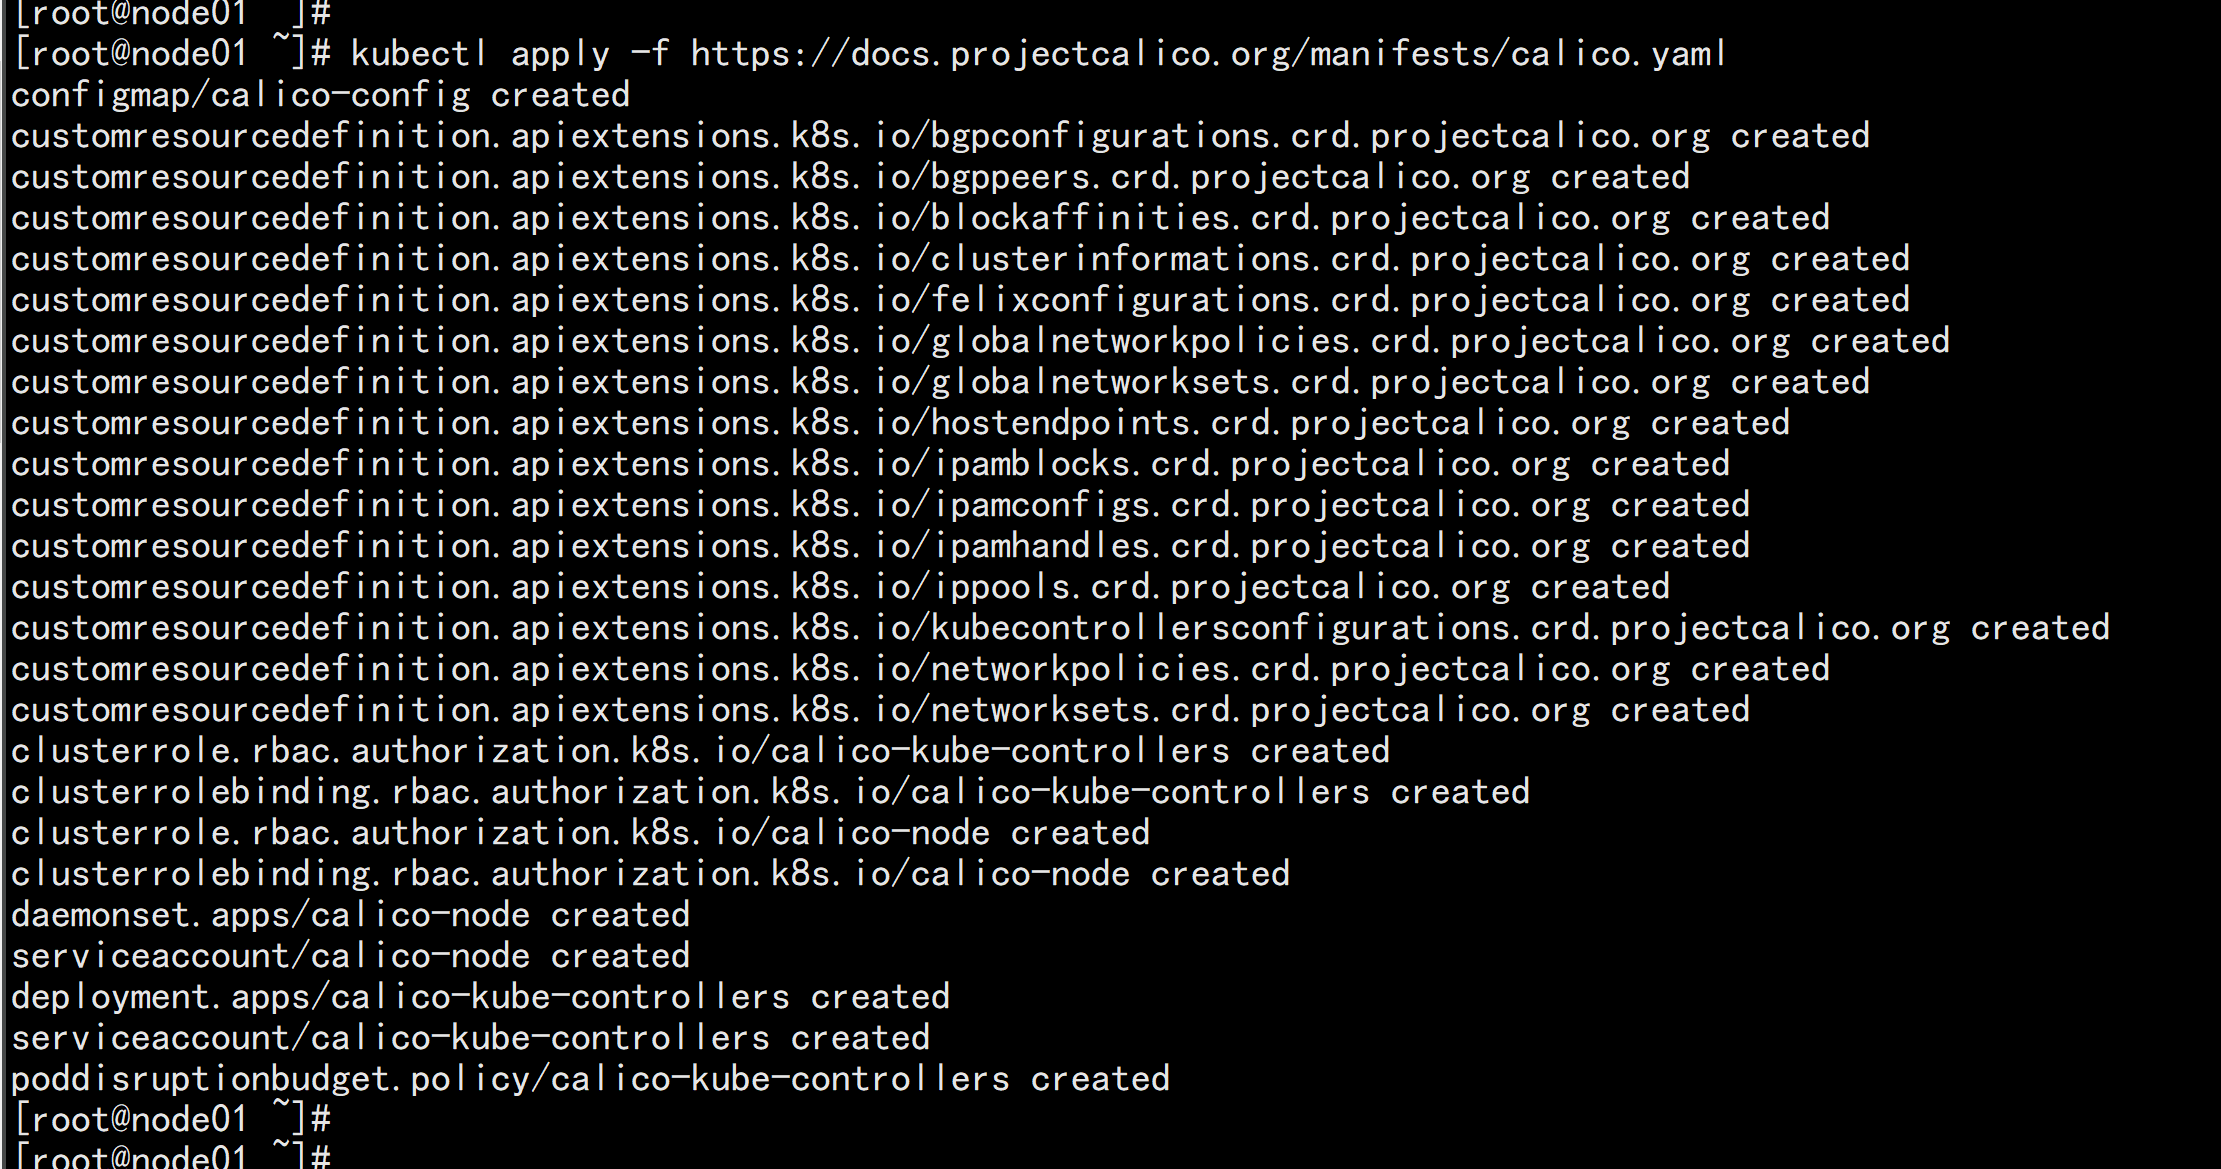
kubectl apply -f https://docs.projectcalico.org/manifests/calico.yaml


其他节点加入:
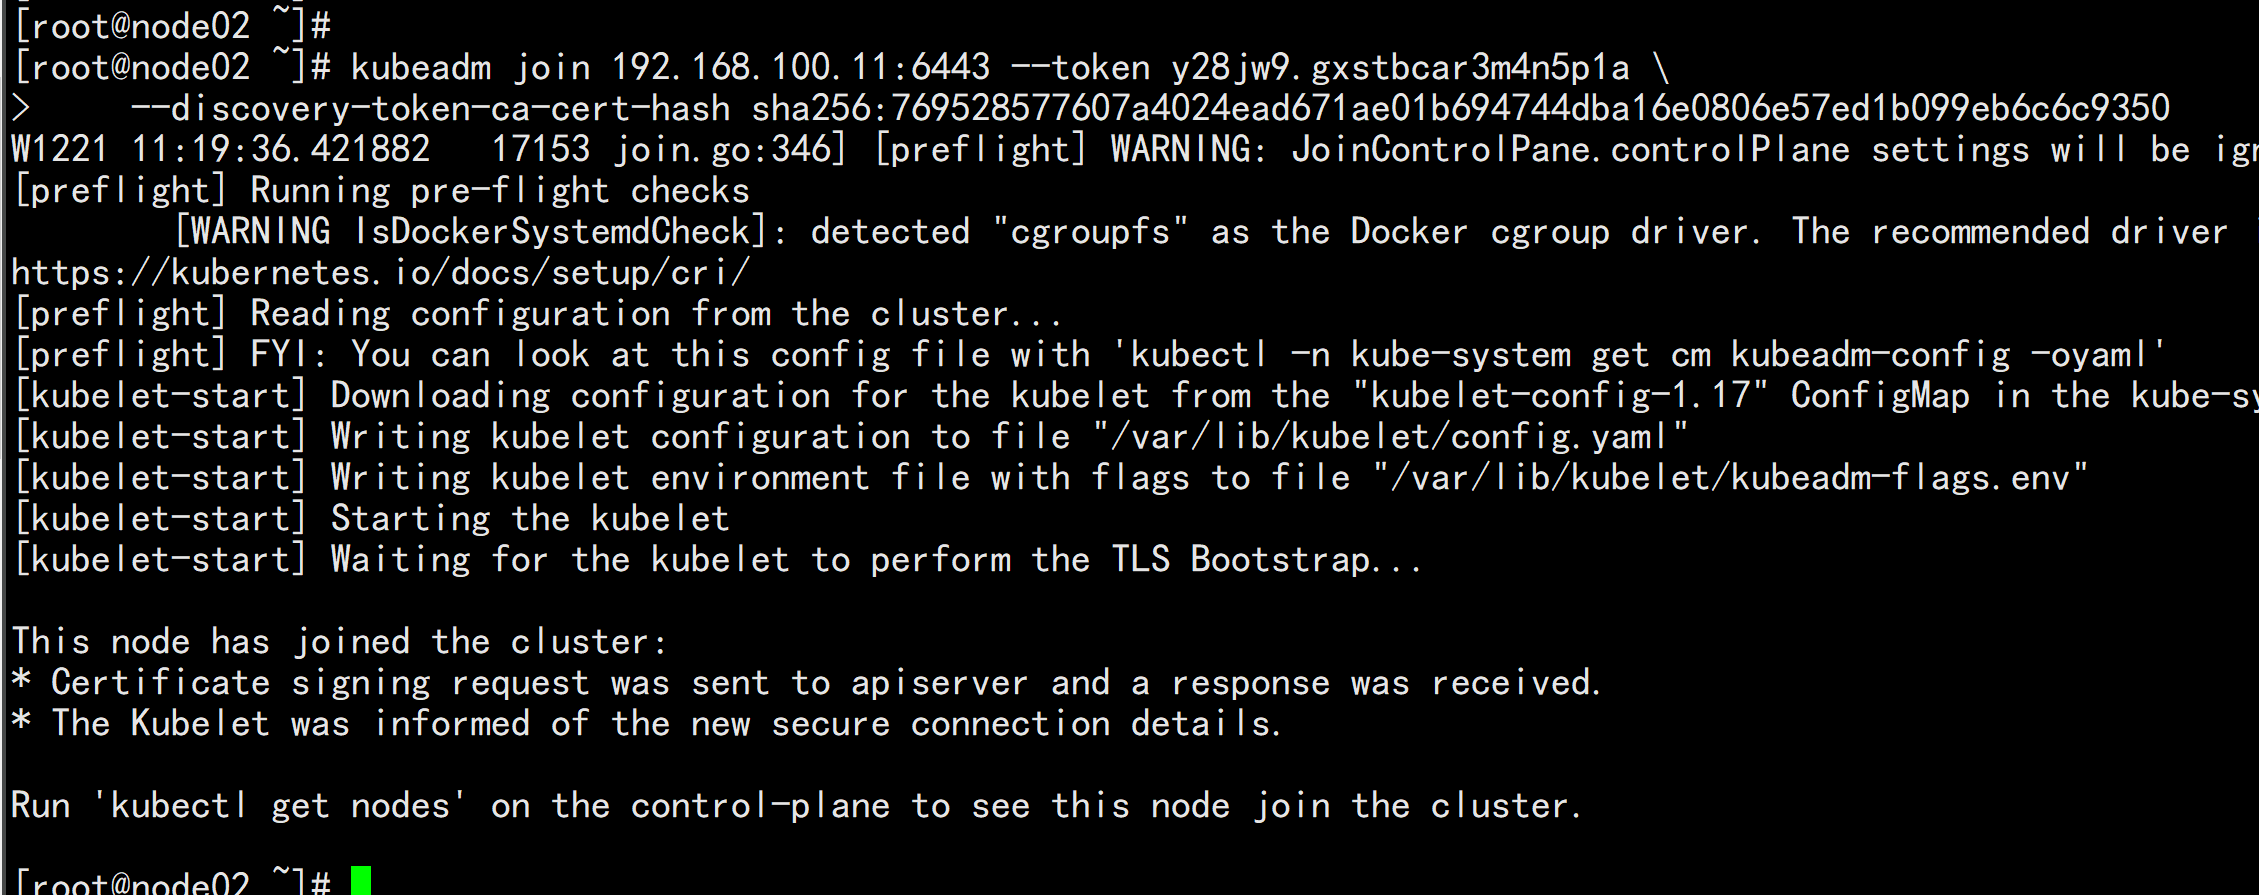
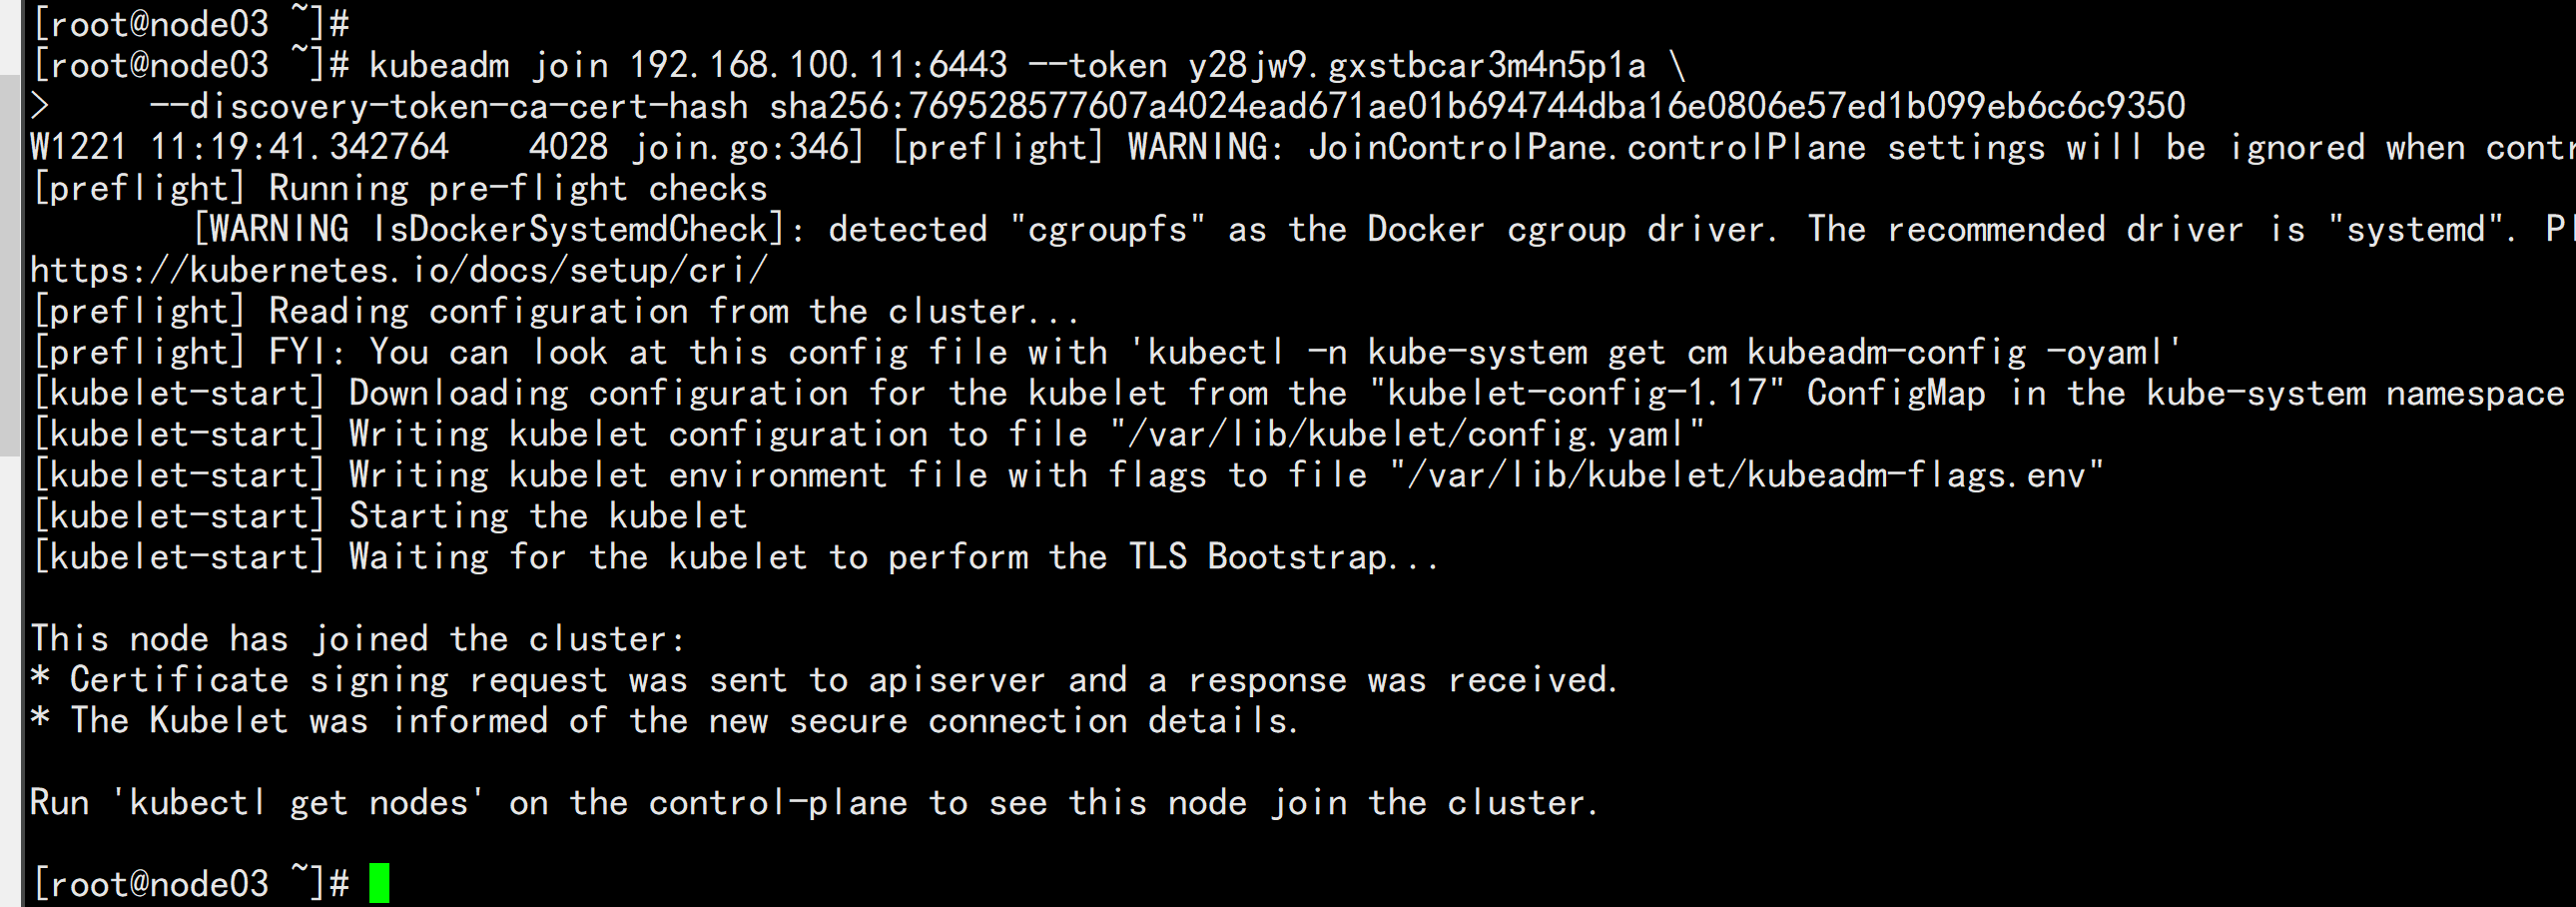
kubeadm join 192.168.100.11:6443 --token y28jw9.gxstbcar3m4n5p1a \
--discovery-token-ca-cert-hash sha256:769528577607a4024ead671ae01b694744dba16e0806e57ed1b099eb6c6c9350

yum install -y nfs-utils

echo "/nfs/data/ *(insecure,rw,sync,no_root_squash)" > /etc/exports
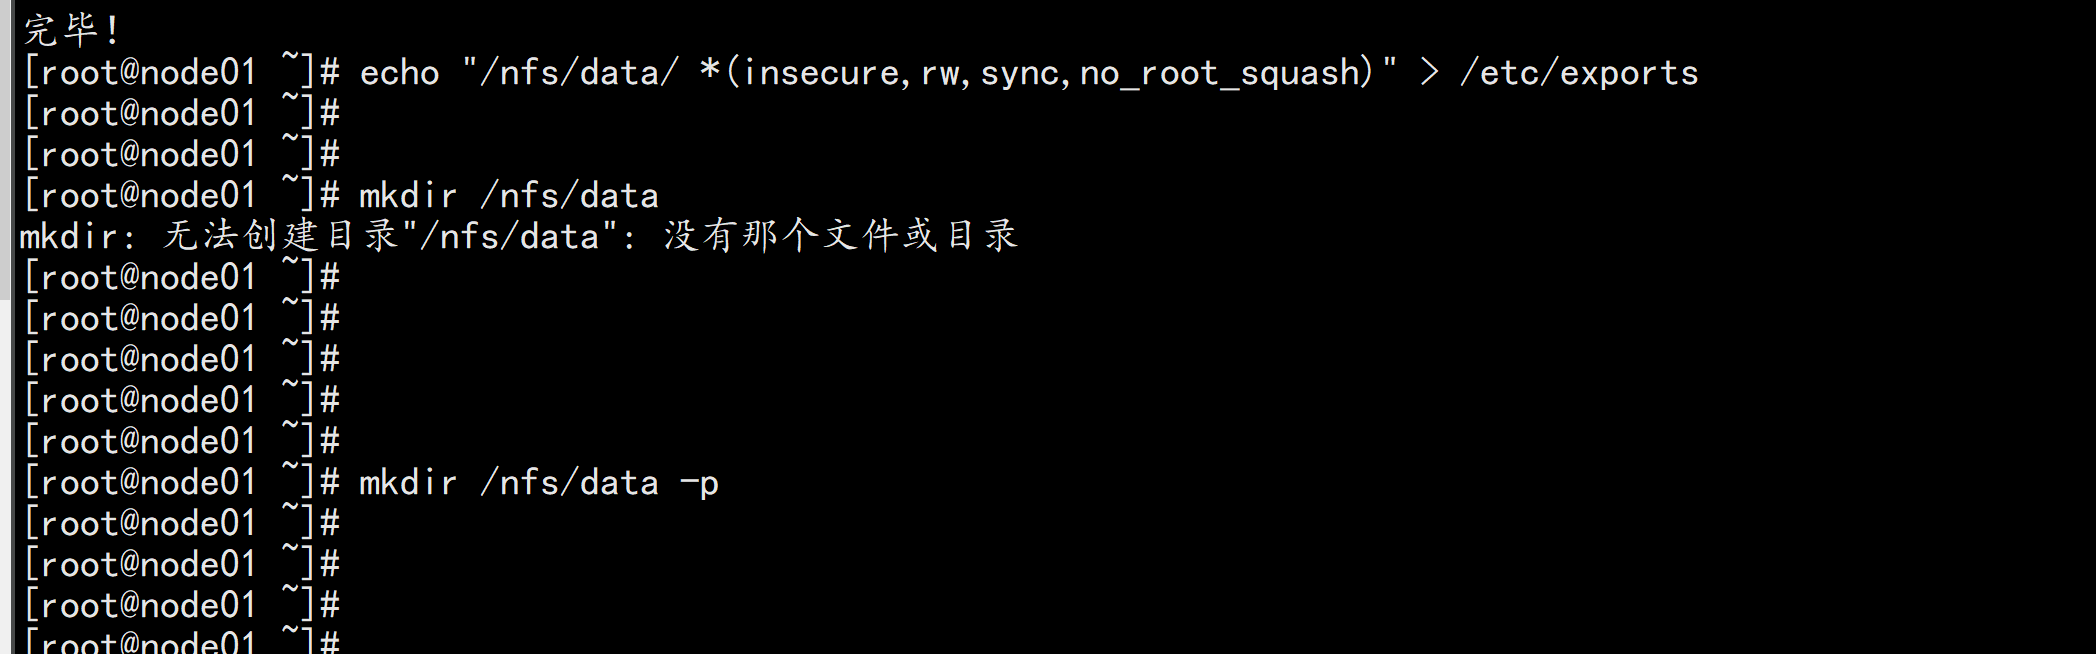
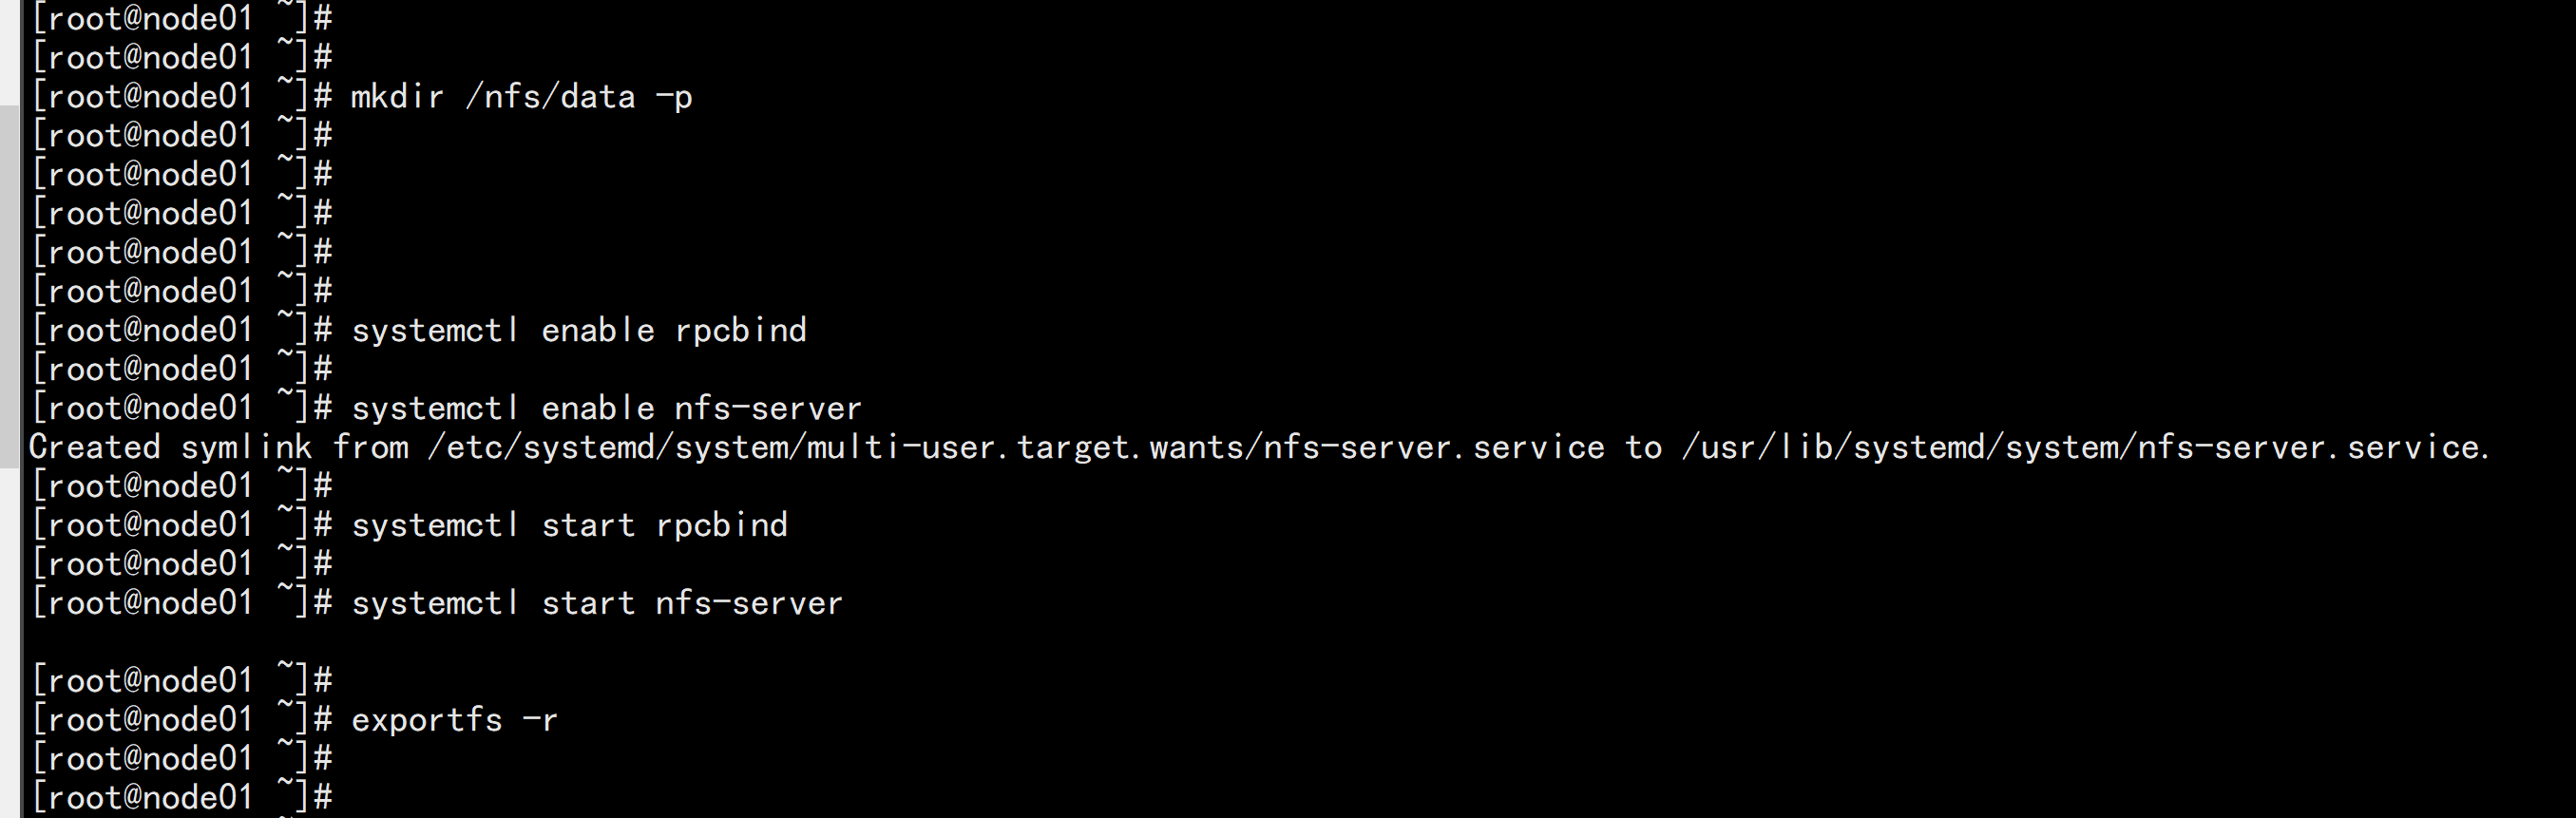
mkdir -p /nfs/data

systemctl enable rpcbind

systemctl enable nfs-server

systemctl start rpcbind

systemctl start nfs-server

exportfs -r

测试Pod直接挂载NFS了(主节点操作)
在opt目录下创建一个nginx.yaml的文件
vim nginx.yaml
----
apiVersion: v1
kind: Pod
metadata:
name: vol-nfs
namespace: default
spec:
volumes:
- name: html
nfs:
path: /nfs/data #1000G
server: 192.168.100.11 #自己的nfs服务器地址
containers:
- name: myapp
image: nginx
volumeMounts:
- name: html
mountPath: /usr/share/nginx/html/
----
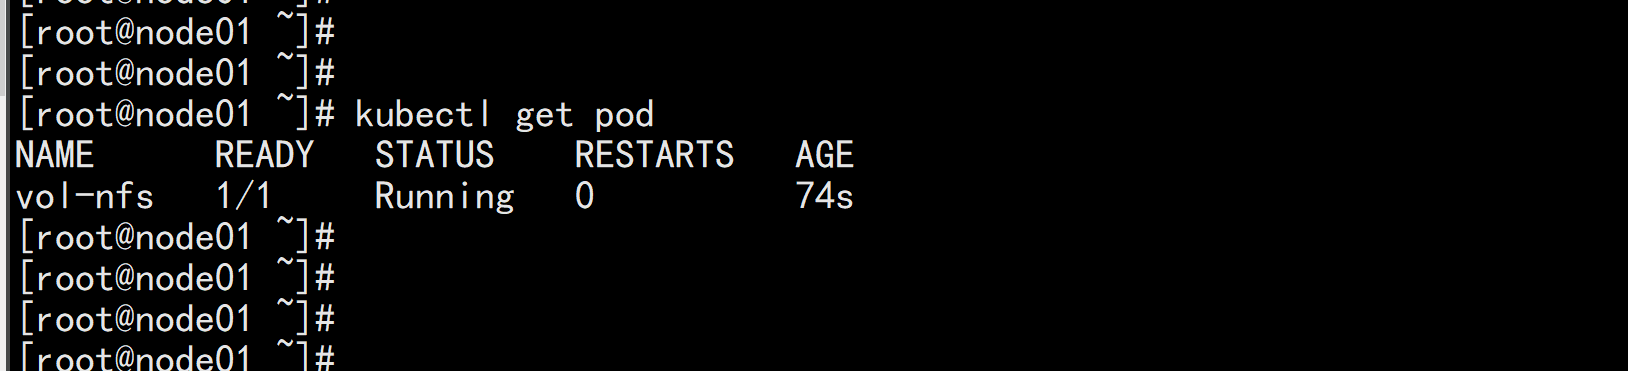
kubectl apply -f nginx.yaml
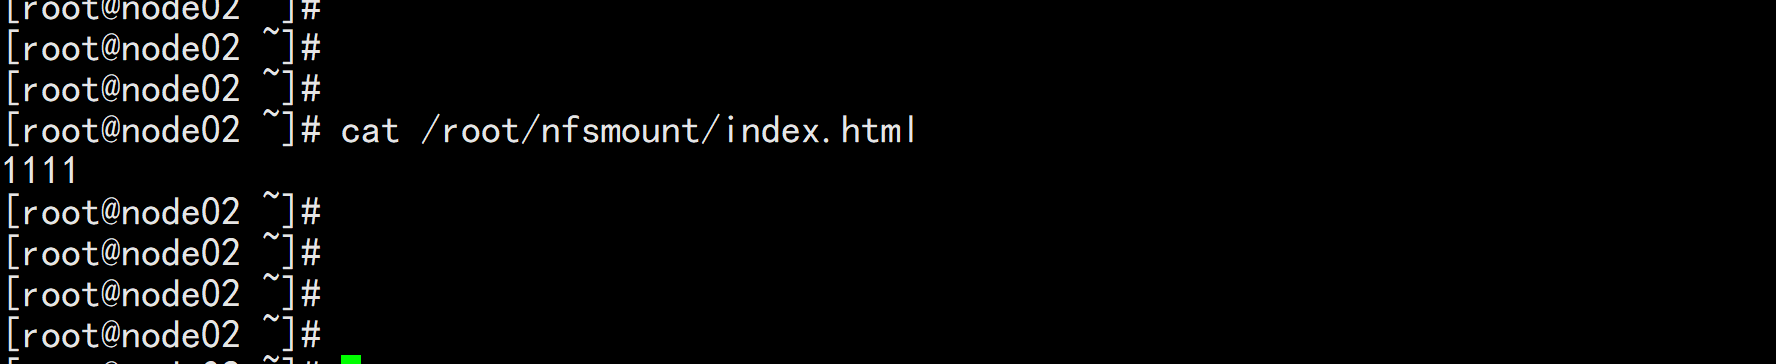
cd /nfs/data/
echo " 11111" >>> index.html
安装客户端工具(node节点操作)
node02.flyfish.cn

showmount -e 192.168.100.11

创建同步文件夹
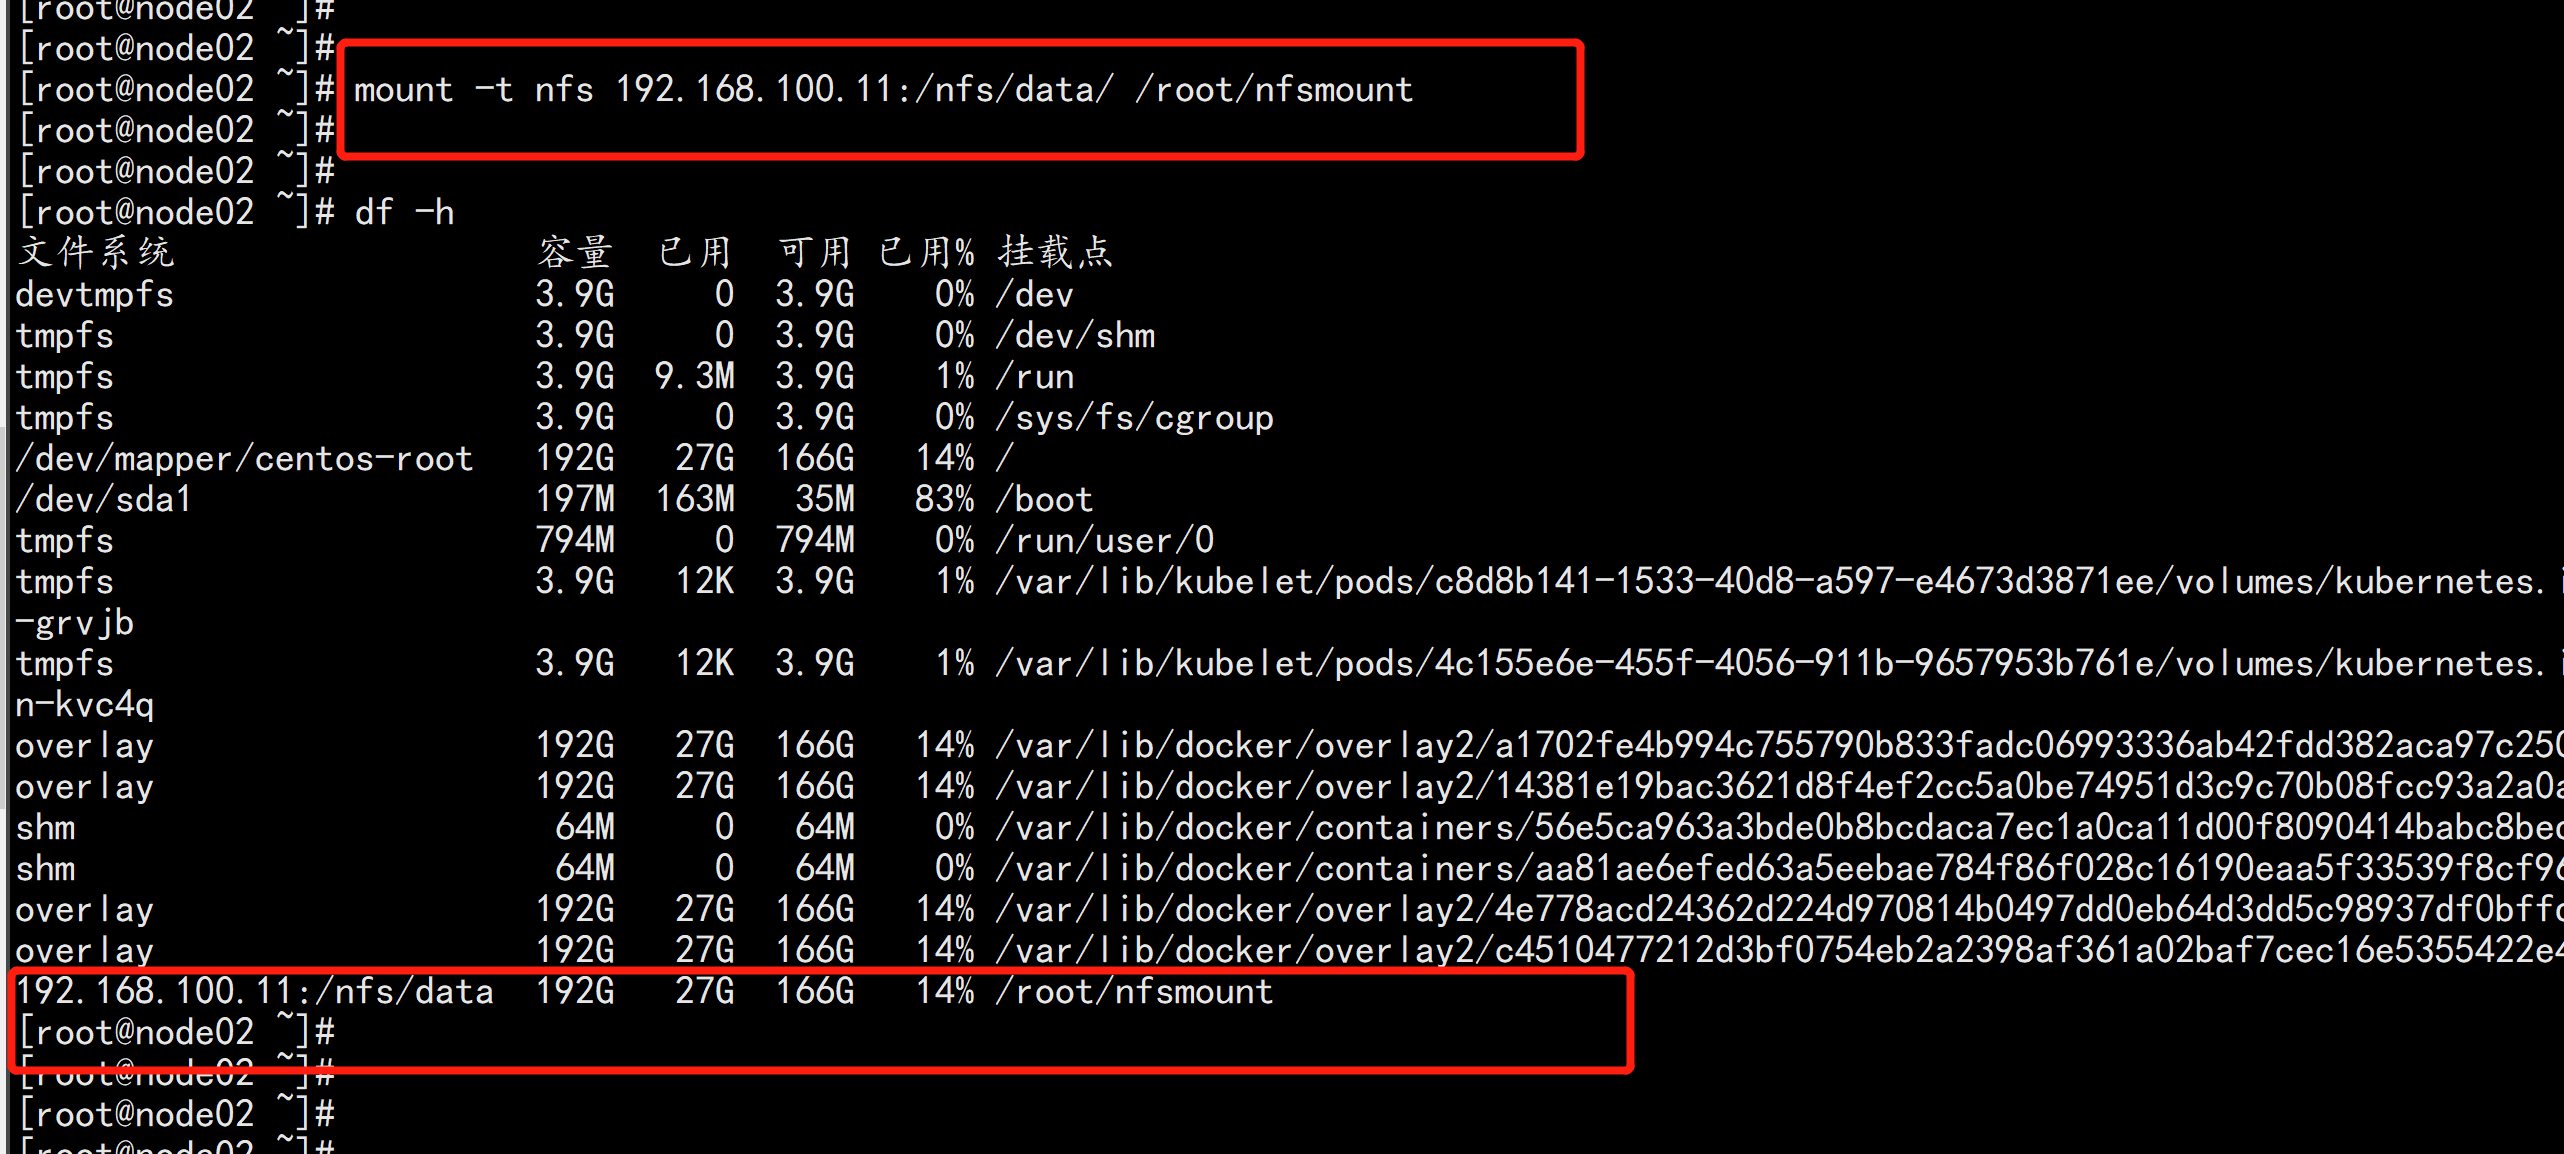
mkdir /root/nfsmount
将客户端的/root/nfsmount和/nfs/data/做同步(node节点操作)
mount -t nfs 192.168.100.11:/nfs/data/ /root/nfsmount

vim nfs-rbac.yaml
----
apiVersion: v1
kind: ServiceAccount
metadata:
name: nfs-provisioner
---
kind: ClusterRole
apiVersion: rbac.authorization.k8s.io/v1
metadata:
name: nfs-provisioner-runner
rules:
- apiGroups: [""]
resources: ["persistentvolumes"]
verbs: ["get", "list", "watch", "create", "delete"]
- apiGroups: [""]
resources: ["persistentvolumeclaims"]
verbs: ["get", "list", "watch", "update"]
- apiGroups: ["storage.k8s.io"]
resources: ["storageclasses"]
verbs: ["get", "list", "watch"]
- apiGroups: [""]
resources: ["events"]
verbs: ["watch", "create", "update", "patch"]
- apiGroups: [""]
resources: ["services", "endpoints"]
verbs: ["get","create","list", "watch","update"]
- apiGroups: ["extensions"]
resources: ["podsecuritypolicies"]
resourceNames: ["nfs-provisioner"]
verbs: ["use"]
---
kind: ClusterRoleBinding
apiVersion: rbac.authorization.k8s.io/v1
metadata:
name: run-nfs-provisioner
subjects:
- kind: ServiceAccount
name: nfs-provisioner
namespace: default
roleRef:
kind: ClusterRole
name: nfs-provisioner-runner
apiGroup: rbac.authorization.k8s.io
---
kind: Deployment
apiVersion: apps/v1
metadata:
name: nfs-client-provisioner
spec:
replicas: 1
strategy:
type: Recreate
selector:
matchLabels:
app: nfs-client-provisioner
template:
metadata:
labels:
app: nfs-client-provisioner
spec:
serviceAccount: nfs-provisioner
containers:
- name: nfs-client-provisioner
image: lizhenliang/nfs-client-provisioner
volumeMounts:
- name: nfs-client-root
mountPath: /persistentvolumes
env:
- name: PROVISIONER_NAME
value: storage.pri/nfs
- name: NFS_SERVER
value: 192.168.100.11
- name: NFS_PATH
value: /nfs/data
volumes:
- name: nfs-client-root
nfs:
server: 192.168.100.11
path: /nfs/data
----
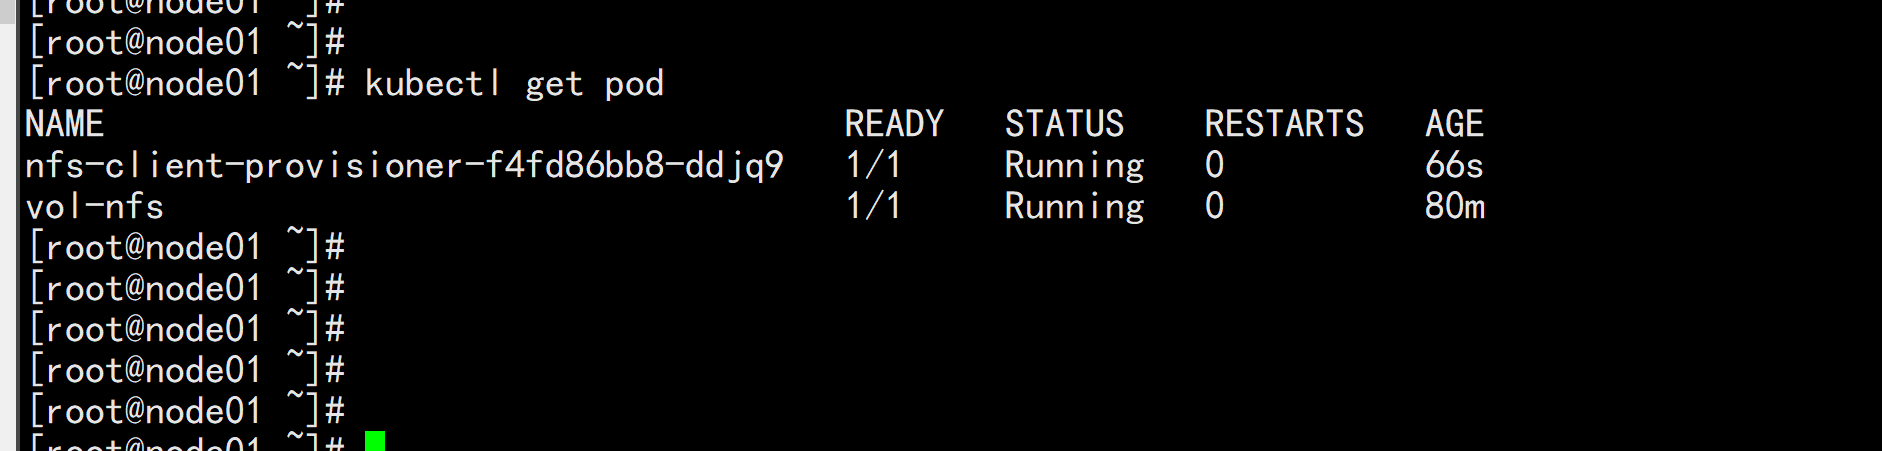
kubectl apply -f nfs-rbac.yaml
kubectl get pod

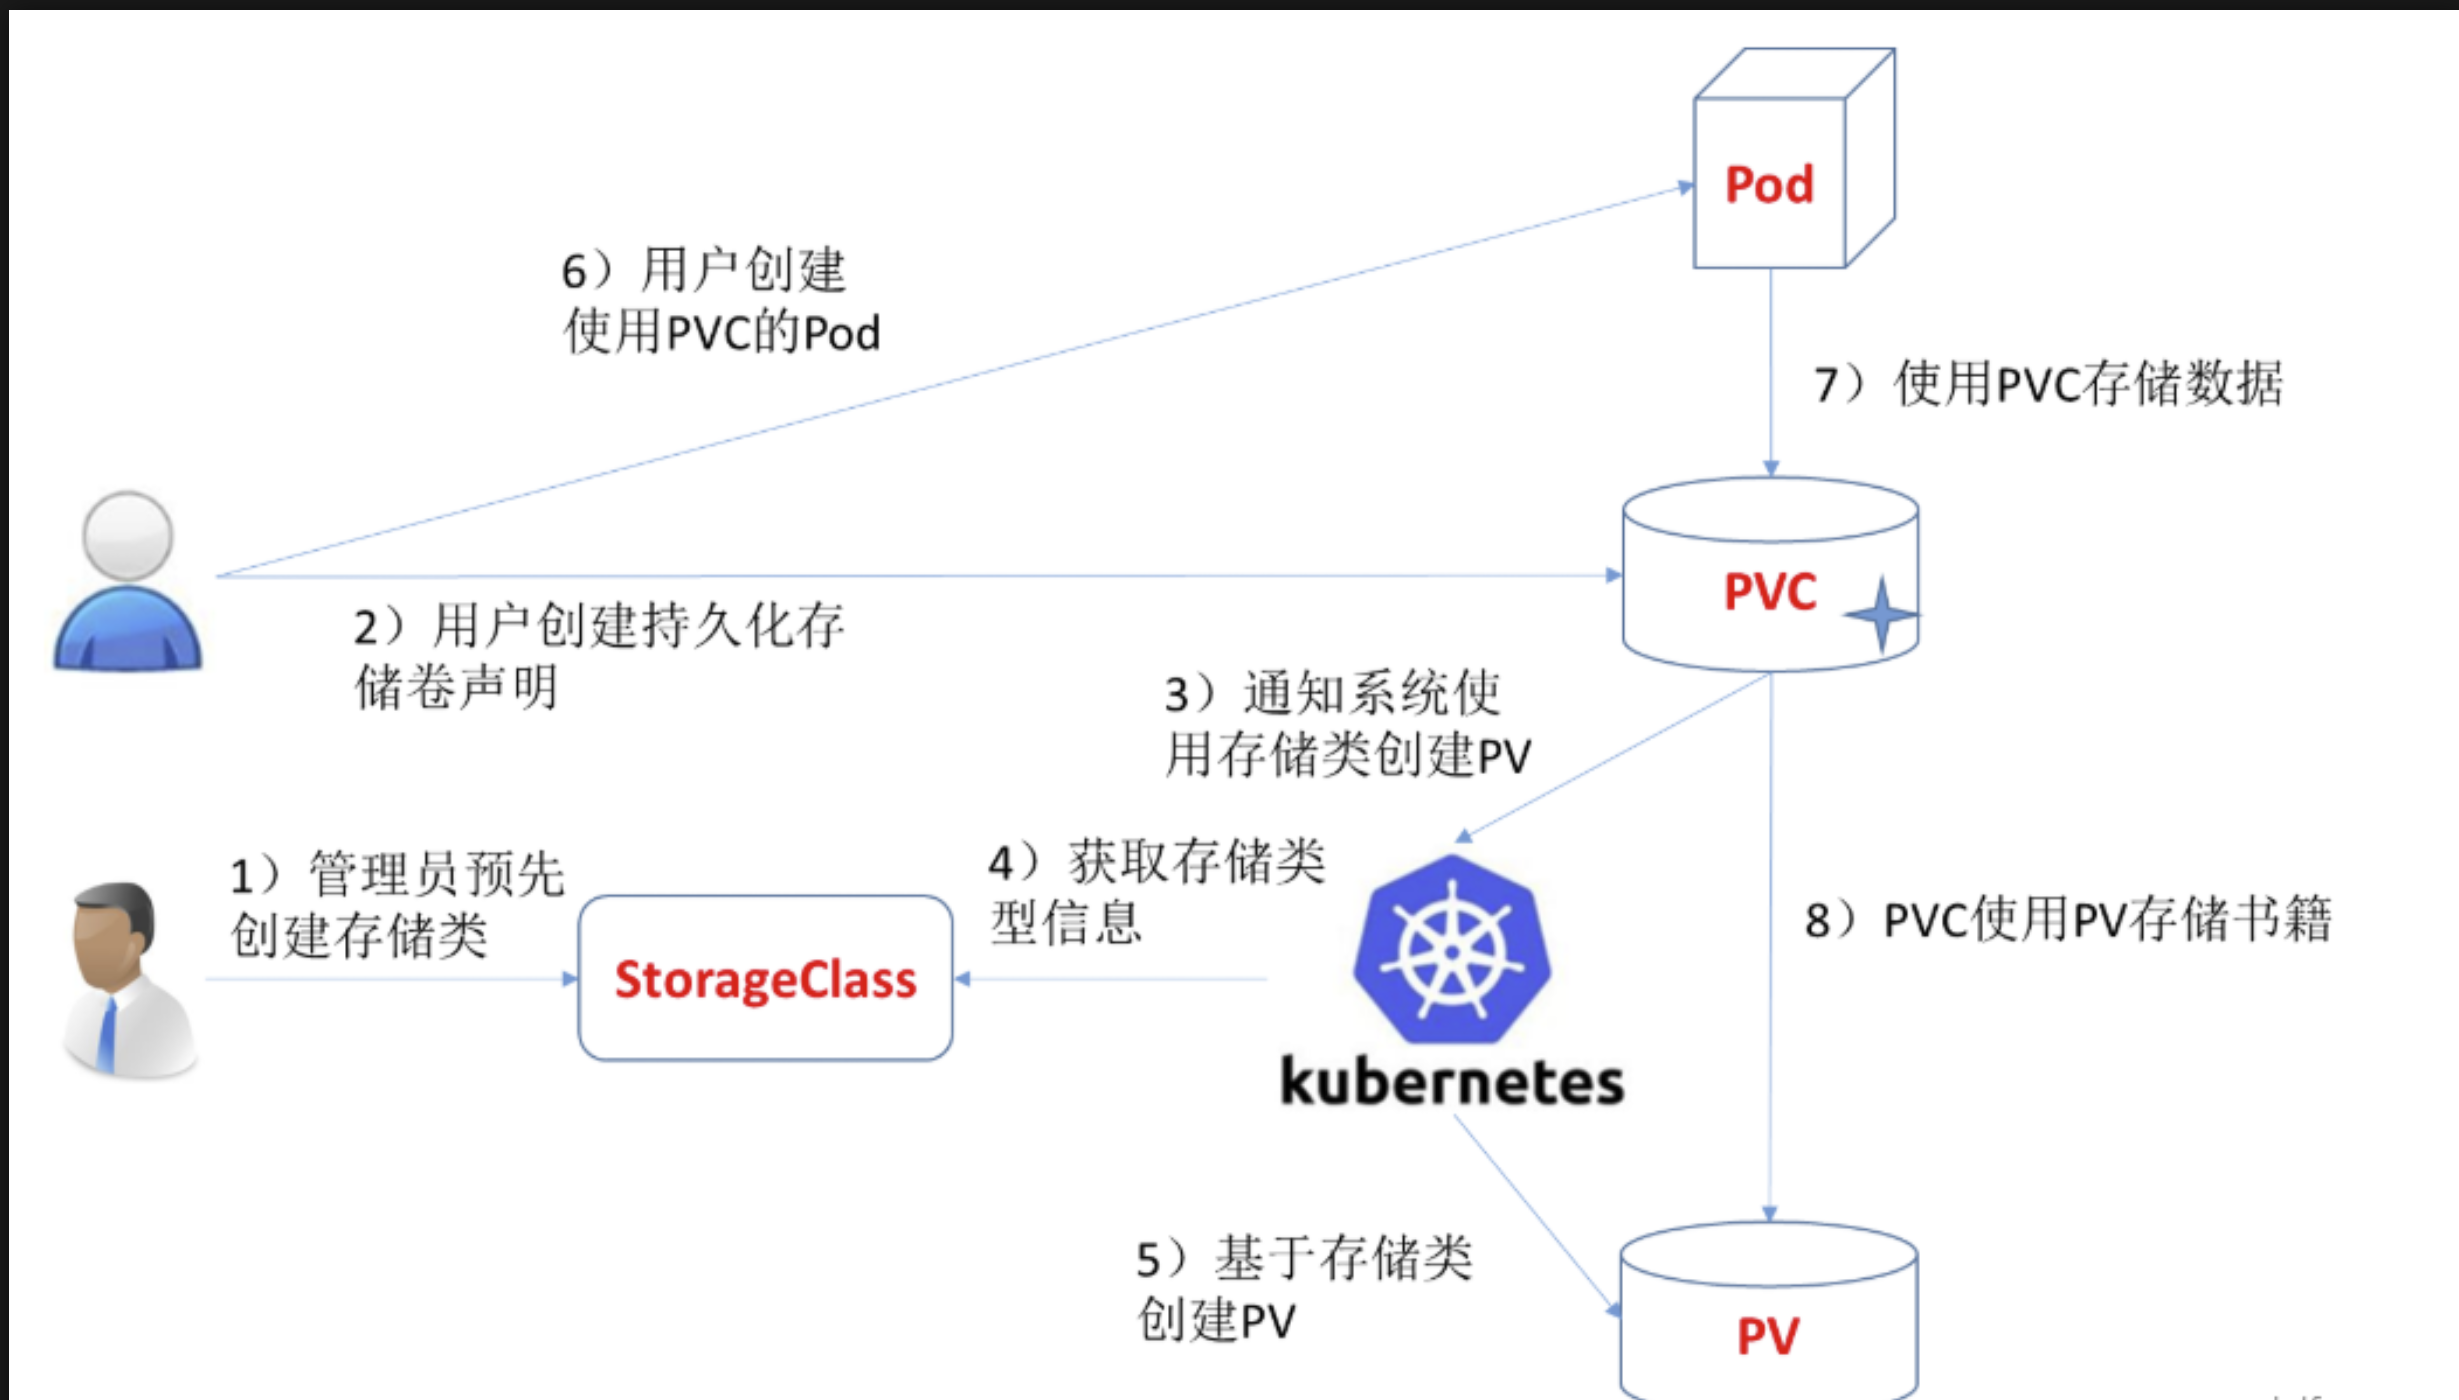
创建storageclass
vi storageclass-nfs.yaml
----
apiVersion: storage.k8s.io/v1
kind: StorageClass
metadata:
  name: storage-nfs
provisioner: storage.pri/nfs
reclaimPolicy: Delete
----
kubectl apply -f storageclass-nfs.yaml

#扩展"reclaim policy"有三种方式:Retain、Recycle、Deleted。
Retain
#保护被PVC释放的PV及其上数据,并将PV状态改成"released",不将被其它PVC绑定。集群管理员手动通过如下步骤释放存储资源:
手动删除PV,但与其相关的后端存储资源如(AWS EBS, GCE PD, Azure Disk, or Cinder volume)仍然存在。
手动清空后端存储volume上的数据。
手动删除后端存储volume,或者重复使用后端volume,为其创建新的PV。

Delete
删除被PVC释放的PV及其后端存储volume。对于动态PV其"reclaim policy"继承自其"storage class",
默认是Delete。集群管理员负责将"storage class"的"reclaim policy"设置成用户期望的形式,否则需要用
户手动为创建后的动态PV编辑"reclaim policy"

Recycle
保留PV,但清空其上数据,已废弃
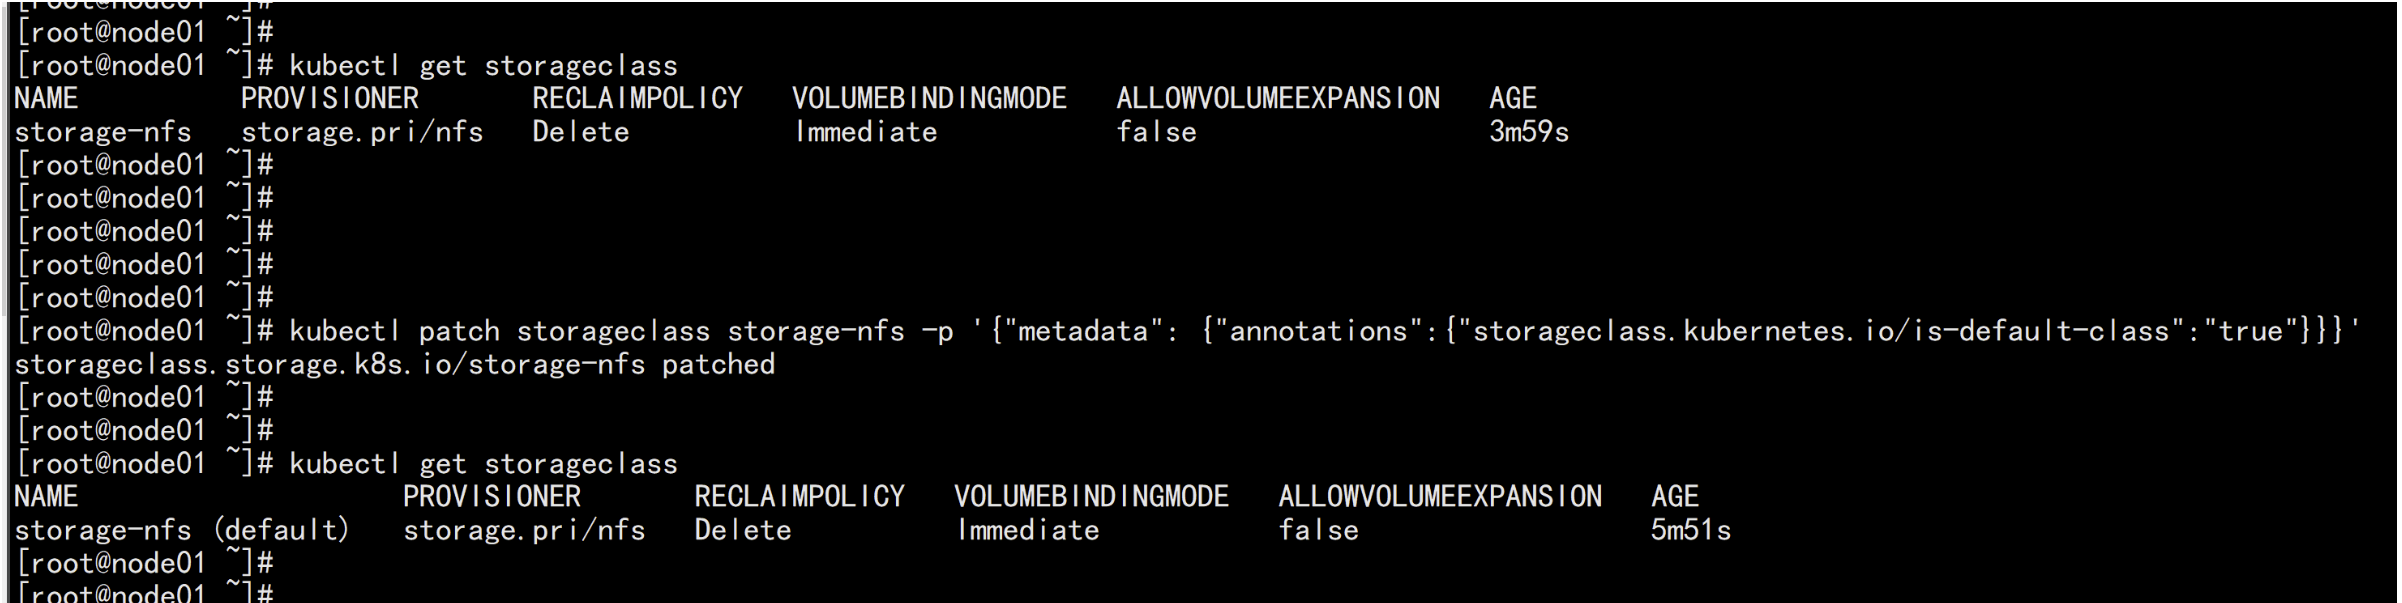
kubectl get storageclass

改变默认sc
https://kubernetes.io/zh/docs/tasks/administer-cluster/change-default-storage-class/#%e4%b8%ba%e4%bb%80%e4%b9%88%e8%a6%81%e6%94%b9%e5%8f%98%e9%bb%98%e8%ae%a4-storage-class

kubectl patch storageclass storage-nfs -p '{"metadata": {"annotations":{"storageclass.kubernetes.io/is-default-class":"true"}}}'
验证nfs动态供应
创建pvc
vim pvc.yaml
-----
apiVersion: v1
kind: PersistentVolumeClaim
metadata:
name: pvc-claim-01
#annotations:
# volume.beta.kubernetes.io/storage-class: "storage-nfs"
spec:
storageClassName: storage-nfs #这个class一定注意要和sc的名字一样
accessModes:
- ReadWriteMany
resources:
requests:
storage: 1Mi
-----
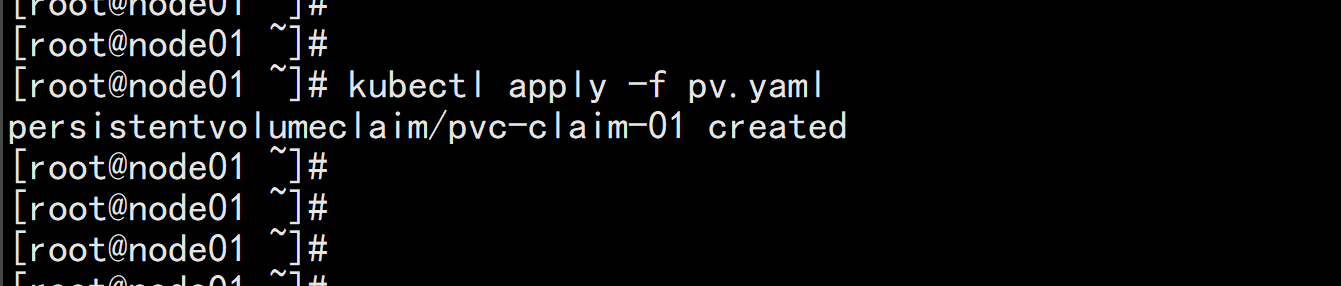
kubectl apply -f pvc.yaml
使用pvc
vi testpod.yaml
----
kind: Pod
apiVersion: v1
metadata:
name: test-pod
spec:
containers:
- name: test-pod
image: busybox
command:
- "/bin/sh"
args:
- "-c"
- "touch /mnt/SUCCESS && exit 0 || exit 1"
volumeMounts:
- name: nfs-pvc
mountPath: "/mnt"
restartPolicy: "Never"
volumes:
- name: nfs-pvc
persistentVolumeClaim:
claimName: pvc-claim-01
-----
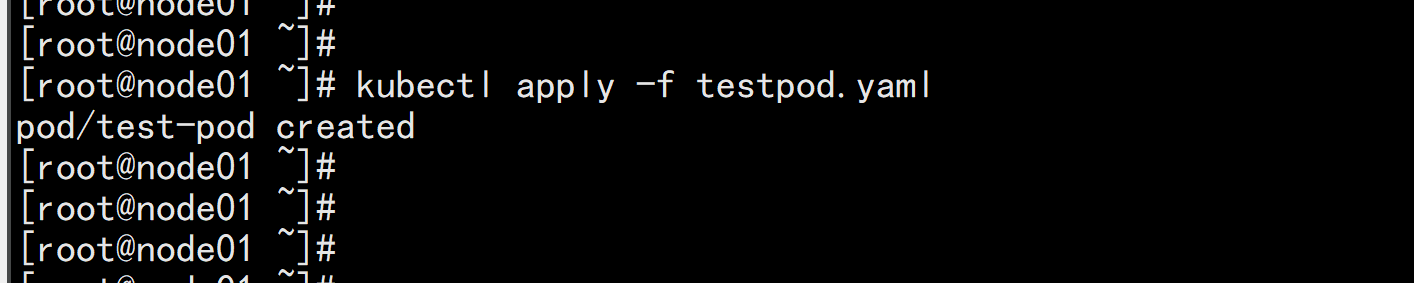
kubectl apply -f testpod.yaml
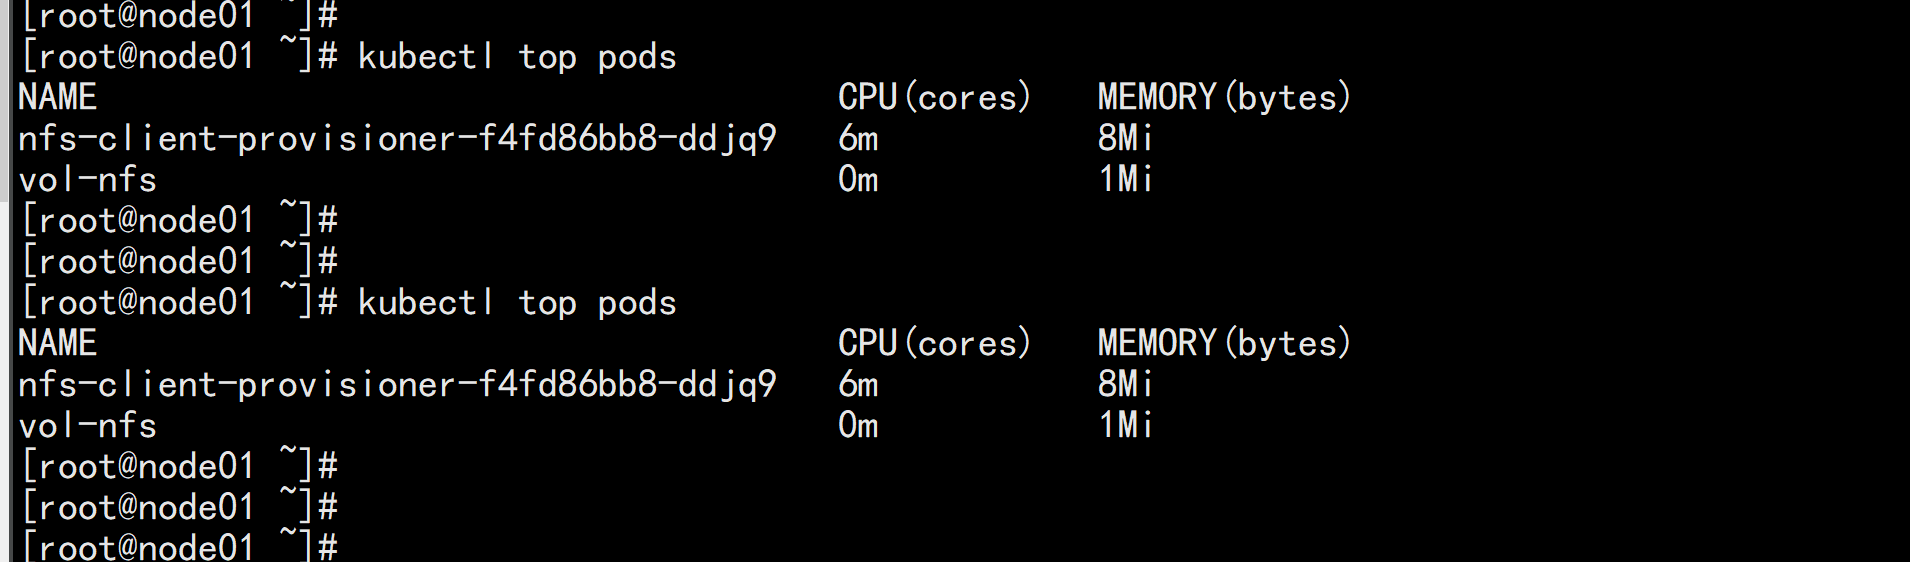
1、先安装metrics-server(yaml如下,已经改好了镜像和配置,可以直接使用),这样就能监控到pod。node的资源情况(默认只有cpu、memory的资源审计信息哟,更专业的我们后面对接 Prometheus)
vim 2222.yaml
----
apiVersion: rbac.authorization.k8s.io/v1
kind: ClusterRole
metadata:
name: system:aggregated-metrics-reader
labels:
rbac.authorization.k8s.io/aggregate-to-view: "true"
rbac.authorization.k8s.io/aggregate-to-edit: "true"
rbac.authorization.k8s.io/aggregate-to-admin: "true"
rules:
- apiGroups: ["metrics.k8s.io"]
resources: ["pods", "nodes"]
verbs: ["get", "list", "watch"]
---
apiVersion: rbac.authorization.k8s.io/v1
kind: ClusterRoleBinding
metadata:
name: metrics-server:system:auth-delegator
roleRef:
apiGroup: rbac.authorization.k8s.io
kind: ClusterRole
name: system:auth-delegator
subjects:
- kind: ServiceAccount
name: metrics-server
namespace: kube-system
---
apiVersion: rbac.authorization.k8s.io/v1
kind: RoleBinding
metadata:
name: metrics-server-auth-reader
namespace: kube-system
roleRef:
apiGroup: rbac.authorization.k8s.io
kind: Role
name: extension-apiserver-authentication-reader
subjects:
- kind: ServiceAccount
name: metrics-server
namespace: kube-system
---
apiVersion: apiregistration.k8s.io/v1beta1
kind: APIService
metadata:
name: v1beta1.metrics.k8s.io
spec:
service:
name: metrics-server
namespace: kube-system
group: metrics.k8s.io
version: v1beta1
insecureSkipTLSVerify: true
groupPriorityMinimum: 100
versionPriority: 100
---
apiVersion: v1
kind: ServiceAccount
metadata:
name: metrics-server
namespace: kube-system
---
apiVersion: apps/v1
kind: Deployment
metadata:
name: metrics-server
namespace: kube-system
labels:
k8s-app: metrics-server
spec:
selector:
matchLabels:
k8s-app: metrics-server
template:
metadata:
name: metrics-server
labels:
k8s-app: metrics-server
spec:
serviceAccountName: metrics-server
volumes:
# mount in tmp so we can safely use from-scratch images and/or read-only containers
- name: tmp-dir
emptyDir: {}
containers:
- name: metrics-server
image: mirrorgooglecontainers/metrics-server-amd64:v0.3.6
imagePullPolicy: IfNotPresent
args:
- --cert-dir=/tmp
- --secure-port=4443
- --kubelet-insecure-tls
- --kubelet-preferred-address-types=InternalIP,ExternalIP,Hostname
ports:
- name: main-port
containerPort: 4443
protocol: TCP
securityContext:
readOnlyRootFilesystem: true
runAsNonRoot: true
runAsUser: 1000
volumeMounts:
- name: tmp-dir
mountPath: /tmp
nodeSelector:
kubernetes.io/os: linux
kubernetes.io/arch: "amd64"
---
apiVersion: v1
kind: Service
metadata:
name: metrics-server
namespace: kube-system
labels:
kubernetes.io/name: "Metrics-server"
kubernetes.io/cluster-service: "true"
spec:
selector:
k8s-app: metrics-server
ports:
- port: 443
protocol: TCP
targetPort: main-port
---
apiVersion: rbac.authorization.k8s.io/v1
kind: ClusterRole
metadata:
name: system:metrics-server
rules:
- apiGroups:
- ""
resources:
- pods
- nodes
- nodes/stats
- namespaces
- configmaps
verbs:
- get
- list
- watch
---
apiVersion: rbac.authorization.k8s.io/v1
kind: ClusterRoleBinding
metadata:
name: system:metrics-server
roleRef:
apiGroup: rbac.authorization.k8s.io
kind: ClusterRole
name: system:metrics-server
subjects:
- kind: ServiceAccount
name: metrics-server
namespace: kube-system
---
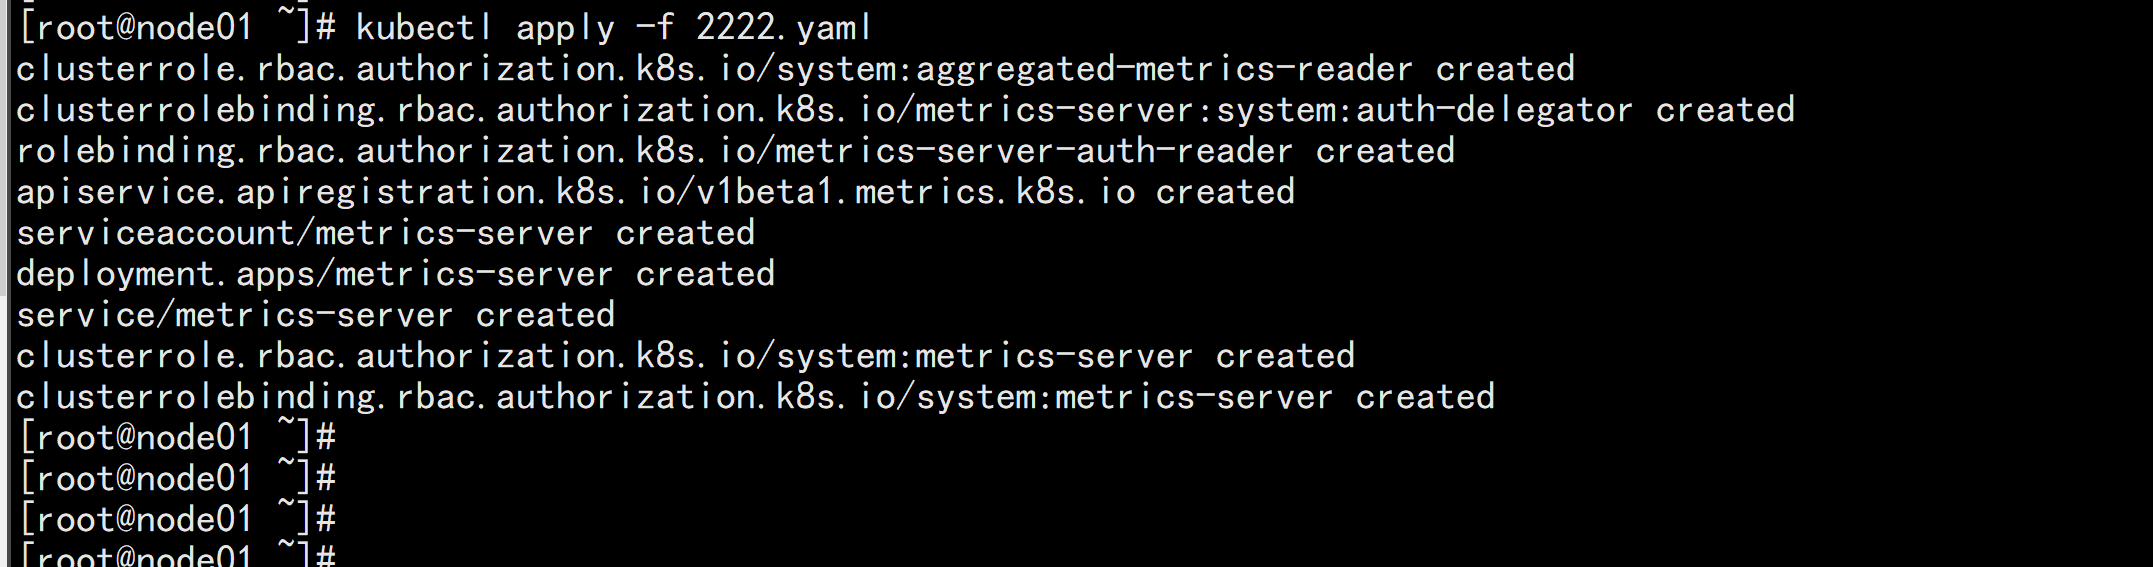
kubectl apply -f 2222.yaml
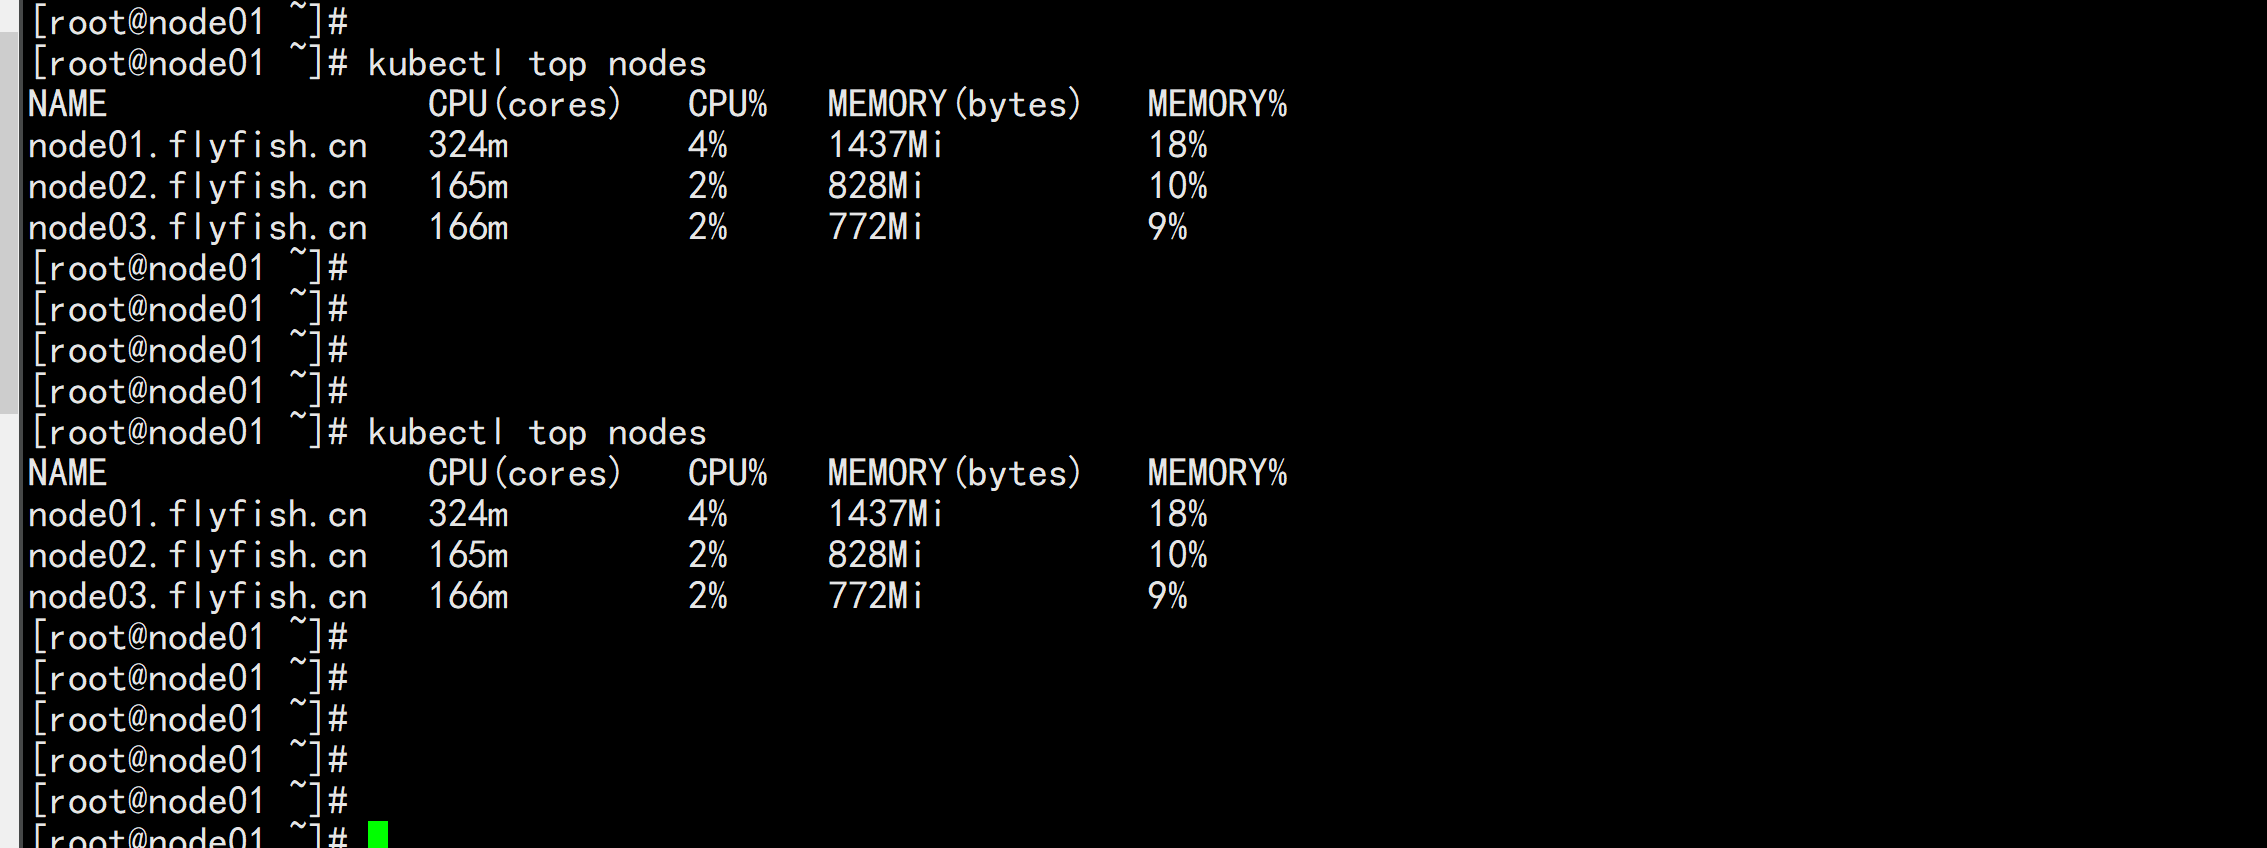
kubetl top nodes

kubectl top nodes
https://kubesphere.com.cn/docs/quick-start/minimal-kubesphere-on-k8s/

wget https://github.com/kubesphere/ks-installer/releases/download/v3.0.0/kubesphere-installer.yaml


wget https://github.com/kubesphere/ks-installer/releases/download/v3.0.0/cluster-configuration.yaml

vim cluster-configuration.yaml
----
apiVersion: installer.kubesphere.io/v1alpha1
kind: ClusterConfiguration
metadata:
  name: ks-installer
  namespace: kubesphere-system
  labels:
    version: v3.0.0
spec:
  persistence:
    storageClass: ""        # If there is not a default StorageClass in your cluster, you need to specify an existing StorageClass here.
  authentication:
    jwtSecret: ""           # Keep the jwtSecret consistent with the host cluster. Retrive the jwtSecret by executing "kubectl -n kubesphere-system get cm kubesphere-config -o yaml | grep -v "apiVersion" | grep jwtSecret" on the host cluster.
  etcd:
    monitoring: true       # Whether to enable etcd monitoring dashboard installation. You have to create a secret for etcd before you enable it.
    endpointIps: 192.168.100.11  # etcd cluster EndpointIps, it can be a bunch of IPs here.
    port: 2379              # etcd port
    tlsEnable: true
  common:
    mysqlVolumeSize: 20Gi # MySQL PVC size.
    minioVolumeSize: 20Gi # Minio PVC size.
    etcdVolumeSize: 20Gi  # etcd PVC size.
    openldapVolumeSize: 2Gi   # openldap PVC size.
    redisVolumSize: 2Gi # Redis PVC size.
    es:   # Storage backend for logging, events and auditing.
      # elasticsearchMasterReplicas: 1   # total number of master nodes, it's not allowed to use even number
      # elasticsearchDataReplicas: 1     # total number of data nodes.
      elasticsearchMasterVolumeSize: 4Gi   # Volume size of Elasticsearch master nodes.
      elasticsearchDataVolumeSize: 20Gi    # Volume size of Elasticsearch data nodes.
      logMaxAge: 7                     # Log retention time in built-in Elasticsearch, it is 7 days by default.
      elkPrefix: logstash              # The string making up index names. The index name will be formatted as ks-<elk_prefix>-log.
  console:
    enableMultiLogin: true  # enable/disable multiple sing on, it allows an account can be used by different users at the same time.
    port: 30880
  alerting:                # (CPU: 0.3 Core, Memory: 300 MiB) Whether to install KubeSphere alerting system. It enables Users to customize alerting policies to send messages to receivers in time with different time intervals and alerting levels to choose from.
    enabled: true
  auditing:                # Whether to install KubeSphere audit log system. It provides a security-relevant chronological set of records,recording the sequence of activities happened in platform, initiated by different tenants.
    enabled: true
  devops:                  # (CPU: 0.47 Core, Memory: 8.6 G) Whether to install KubeSphere DevOps System. It provides out-of-box CI/CD system based on Jenkins, and automated workflow tools including Source-to-Image & Binary-to-Image.
    enabled: true
    jenkinsMemoryLim: 2Gi      # Jenkins memory limit.
    jenkinsMemoryReq: 1500Mi   # Jenkins memory request.
    jenkinsVolumeSize: 8Gi     # Jenkins volume size.
    jenkinsJavaOpts_Xms: 512m  # The following three fields are JVM parameters.
    jenkinsJavaOpts_Xmx: 512m
    jenkinsJavaOpts_MaxRAM: 2g
  events:                  # Whether to install KubeSphere events system. It provides a graphical web console for Kubernetes Events exporting, filtering and alerting in multi-tenant Kubernetes clusters.
    enabled: true
    ruler:
      enabled: true
      replicas: 2
  logging:                 # (CPU: 57 m, Memory: 2.76 G) Whether to install KubeSphere logging system. Flexible logging functions are provided for log query, collection and management in a unified console. Additional log collectors can be added, such as Elasticsearch, Kafka and Fluentd.
    enabled: true
    logsidecarReplicas: 2
  metrics_server:                    # (CPU: 56 m, Memory: 44.35 MiB) Whether to install metrics-server. IT enables HPA (Horizontal Pod Autoscaler).
    enabled: false
  monitoring:
    # prometheusReplicas: 1            # Prometheus replicas are responsible for monitoring different segments of data source and provide high availability as well.
    prometheusMemoryRequest: 400Mi   # Prometheus request memory.
    prometheusVolumeSize: 20Gi       # Prometheus PVC size.
    # alertmanagerReplicas: 1          # AlertManager Replicas.
  multicluster:
    clusterRole: none  # host | member | none  # You can install a solo cluster, or specify it as the role of host or member cluster.
  networkpolicy:       # Network policies allow network isolation within the same cluster, which means firewalls can be set up between certain instances (Pods).
    # Make sure that the CNI network plugin used by the cluster supports NetworkPolicy. There are a number of CNI network plugins that support NetworkPolicy, including Calico, Cilium, Kube-router, Romana and Weave Net.
    enabled: true
  notification:        # Email Notification support for the legacy alerting system, should be enabled/disabled together with the above alerting option.
    enabled: true
  openpitrix:          # (2 Core, 3.6 G) Whether to install KubeSphere Application Store. It provides an application store for Helm-based applications, and offer application lifecycle management.
    enabled: true
  servicemesh:         # (0.3 Core, 300 MiB) Whether to install KubeSphere Service Mesh (Istio-based). It provides fine-grained traffic management, observability and tracing, and offer visualization for traffic topology.
    enabled: true
----

kubectl apply -f kubesphere-installer.yaml

kubectl apply -f cluster-configuration1.yaml

查看安装进度:
   kubectl logs -n kubesphere-system $(kubectl get pod -n kubesphere-system -l app=ks-install -o jsonpath='{.items[0].metadata.name}') -f
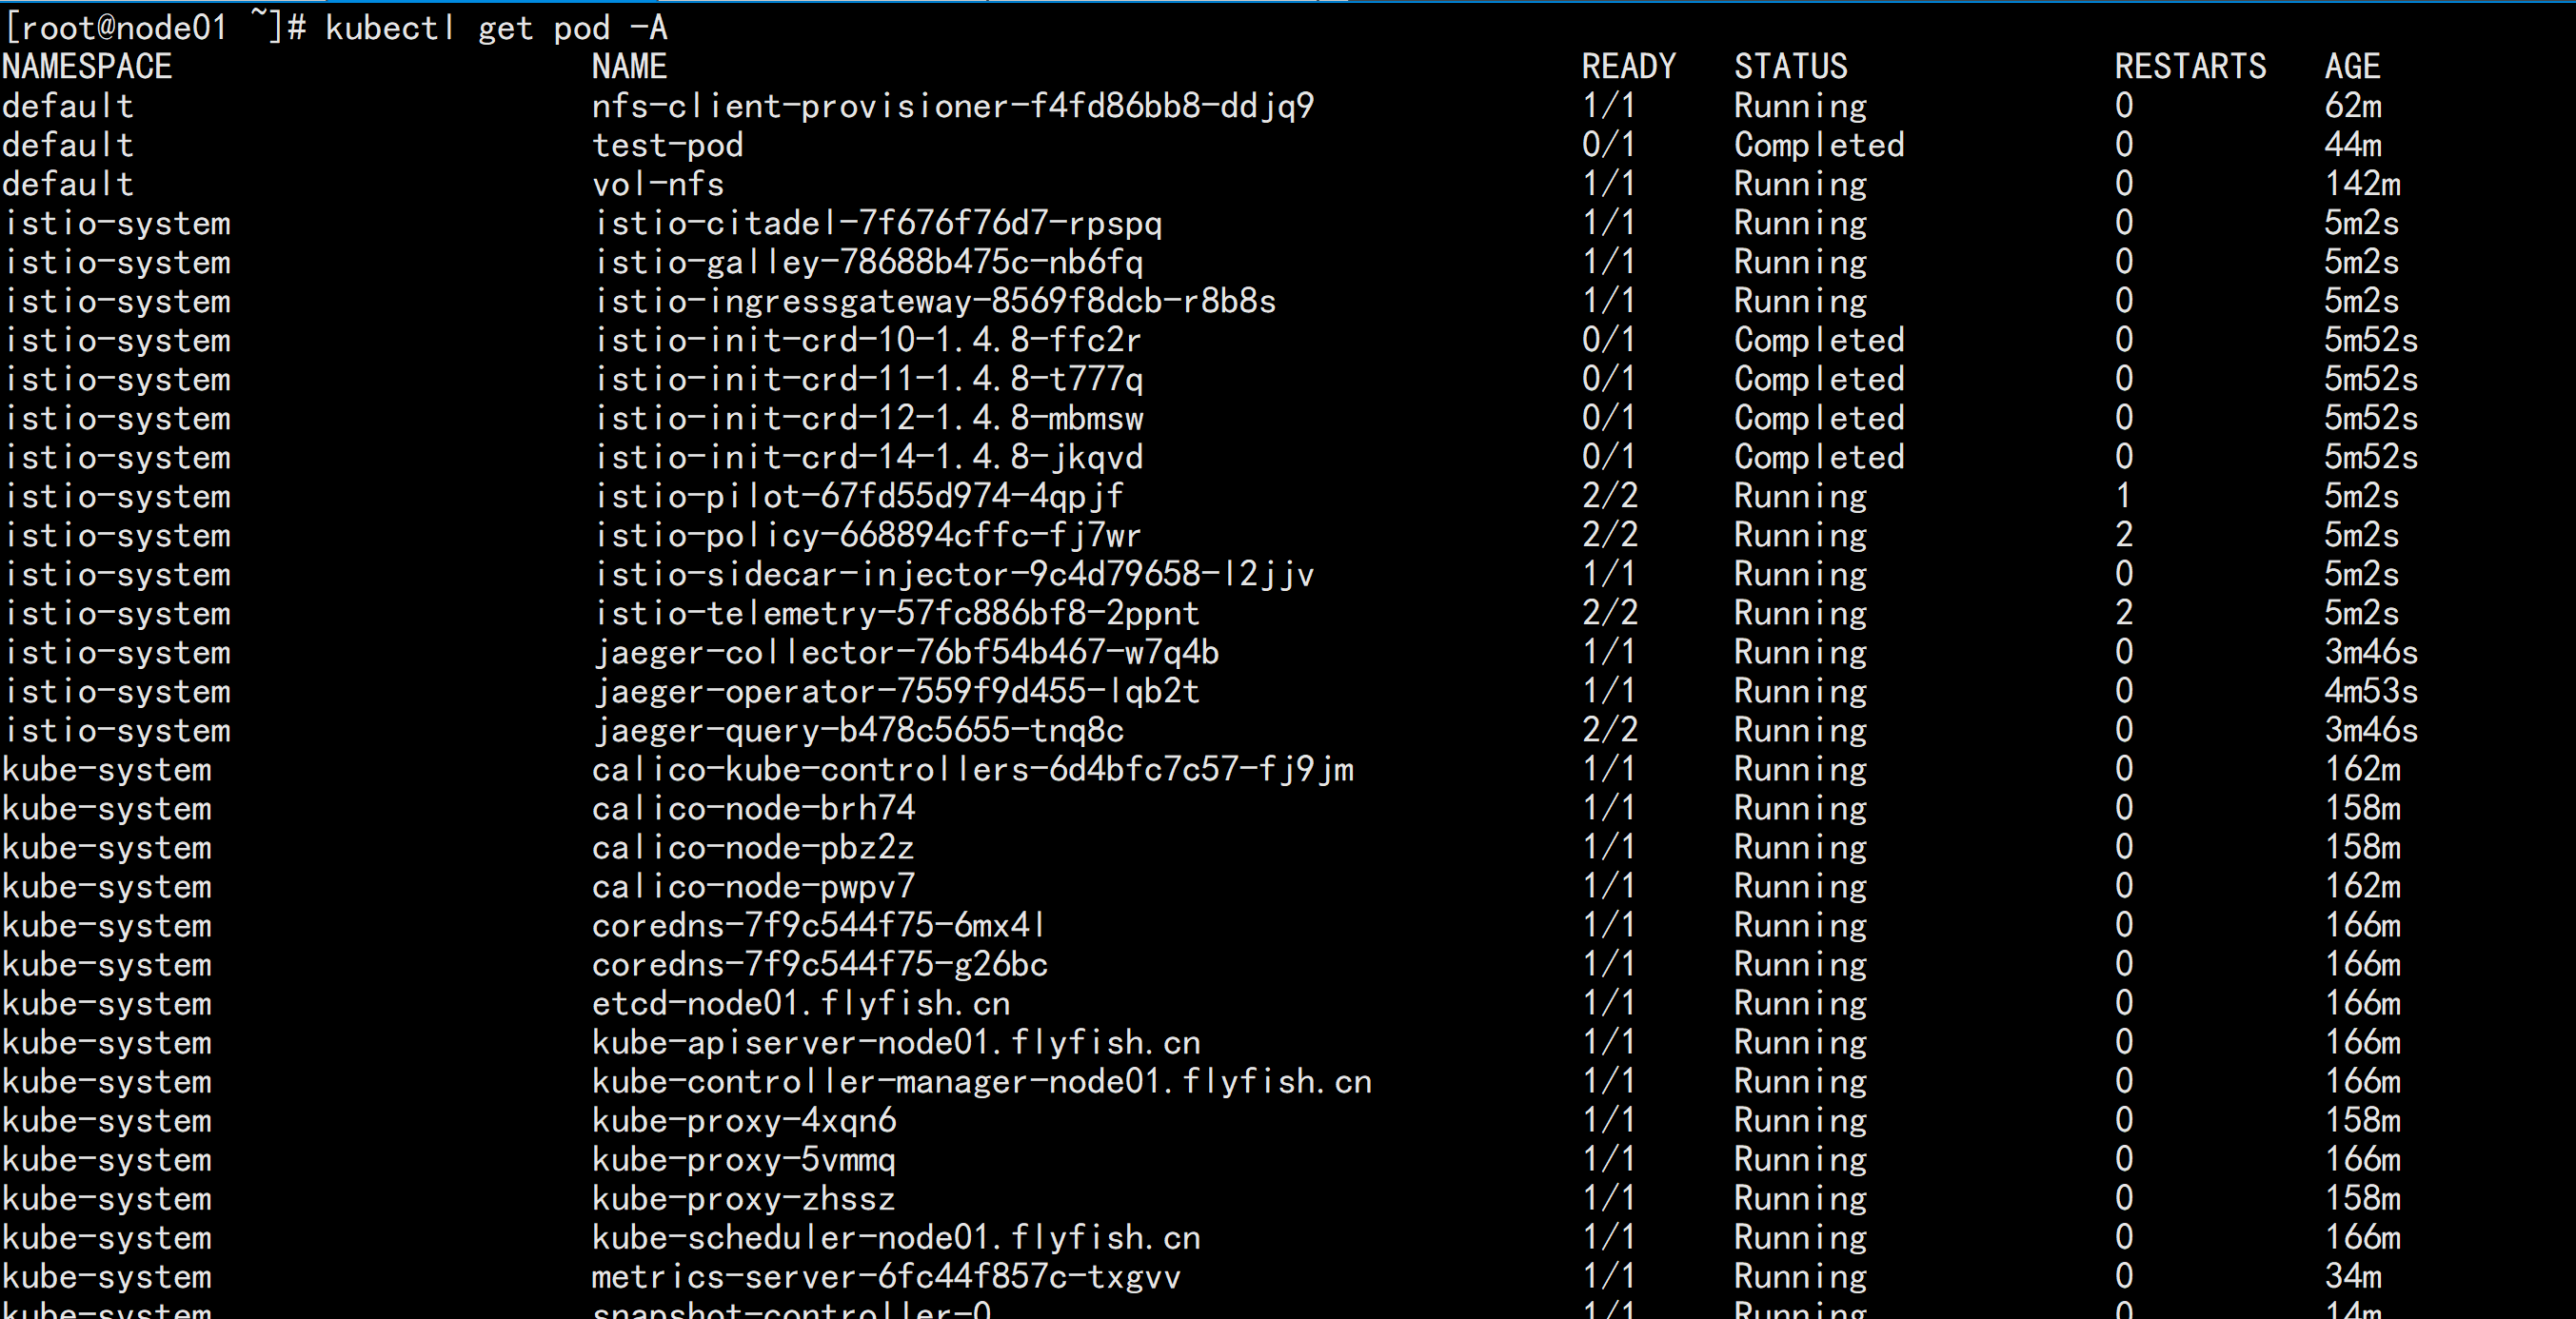
kubectl get pod -A
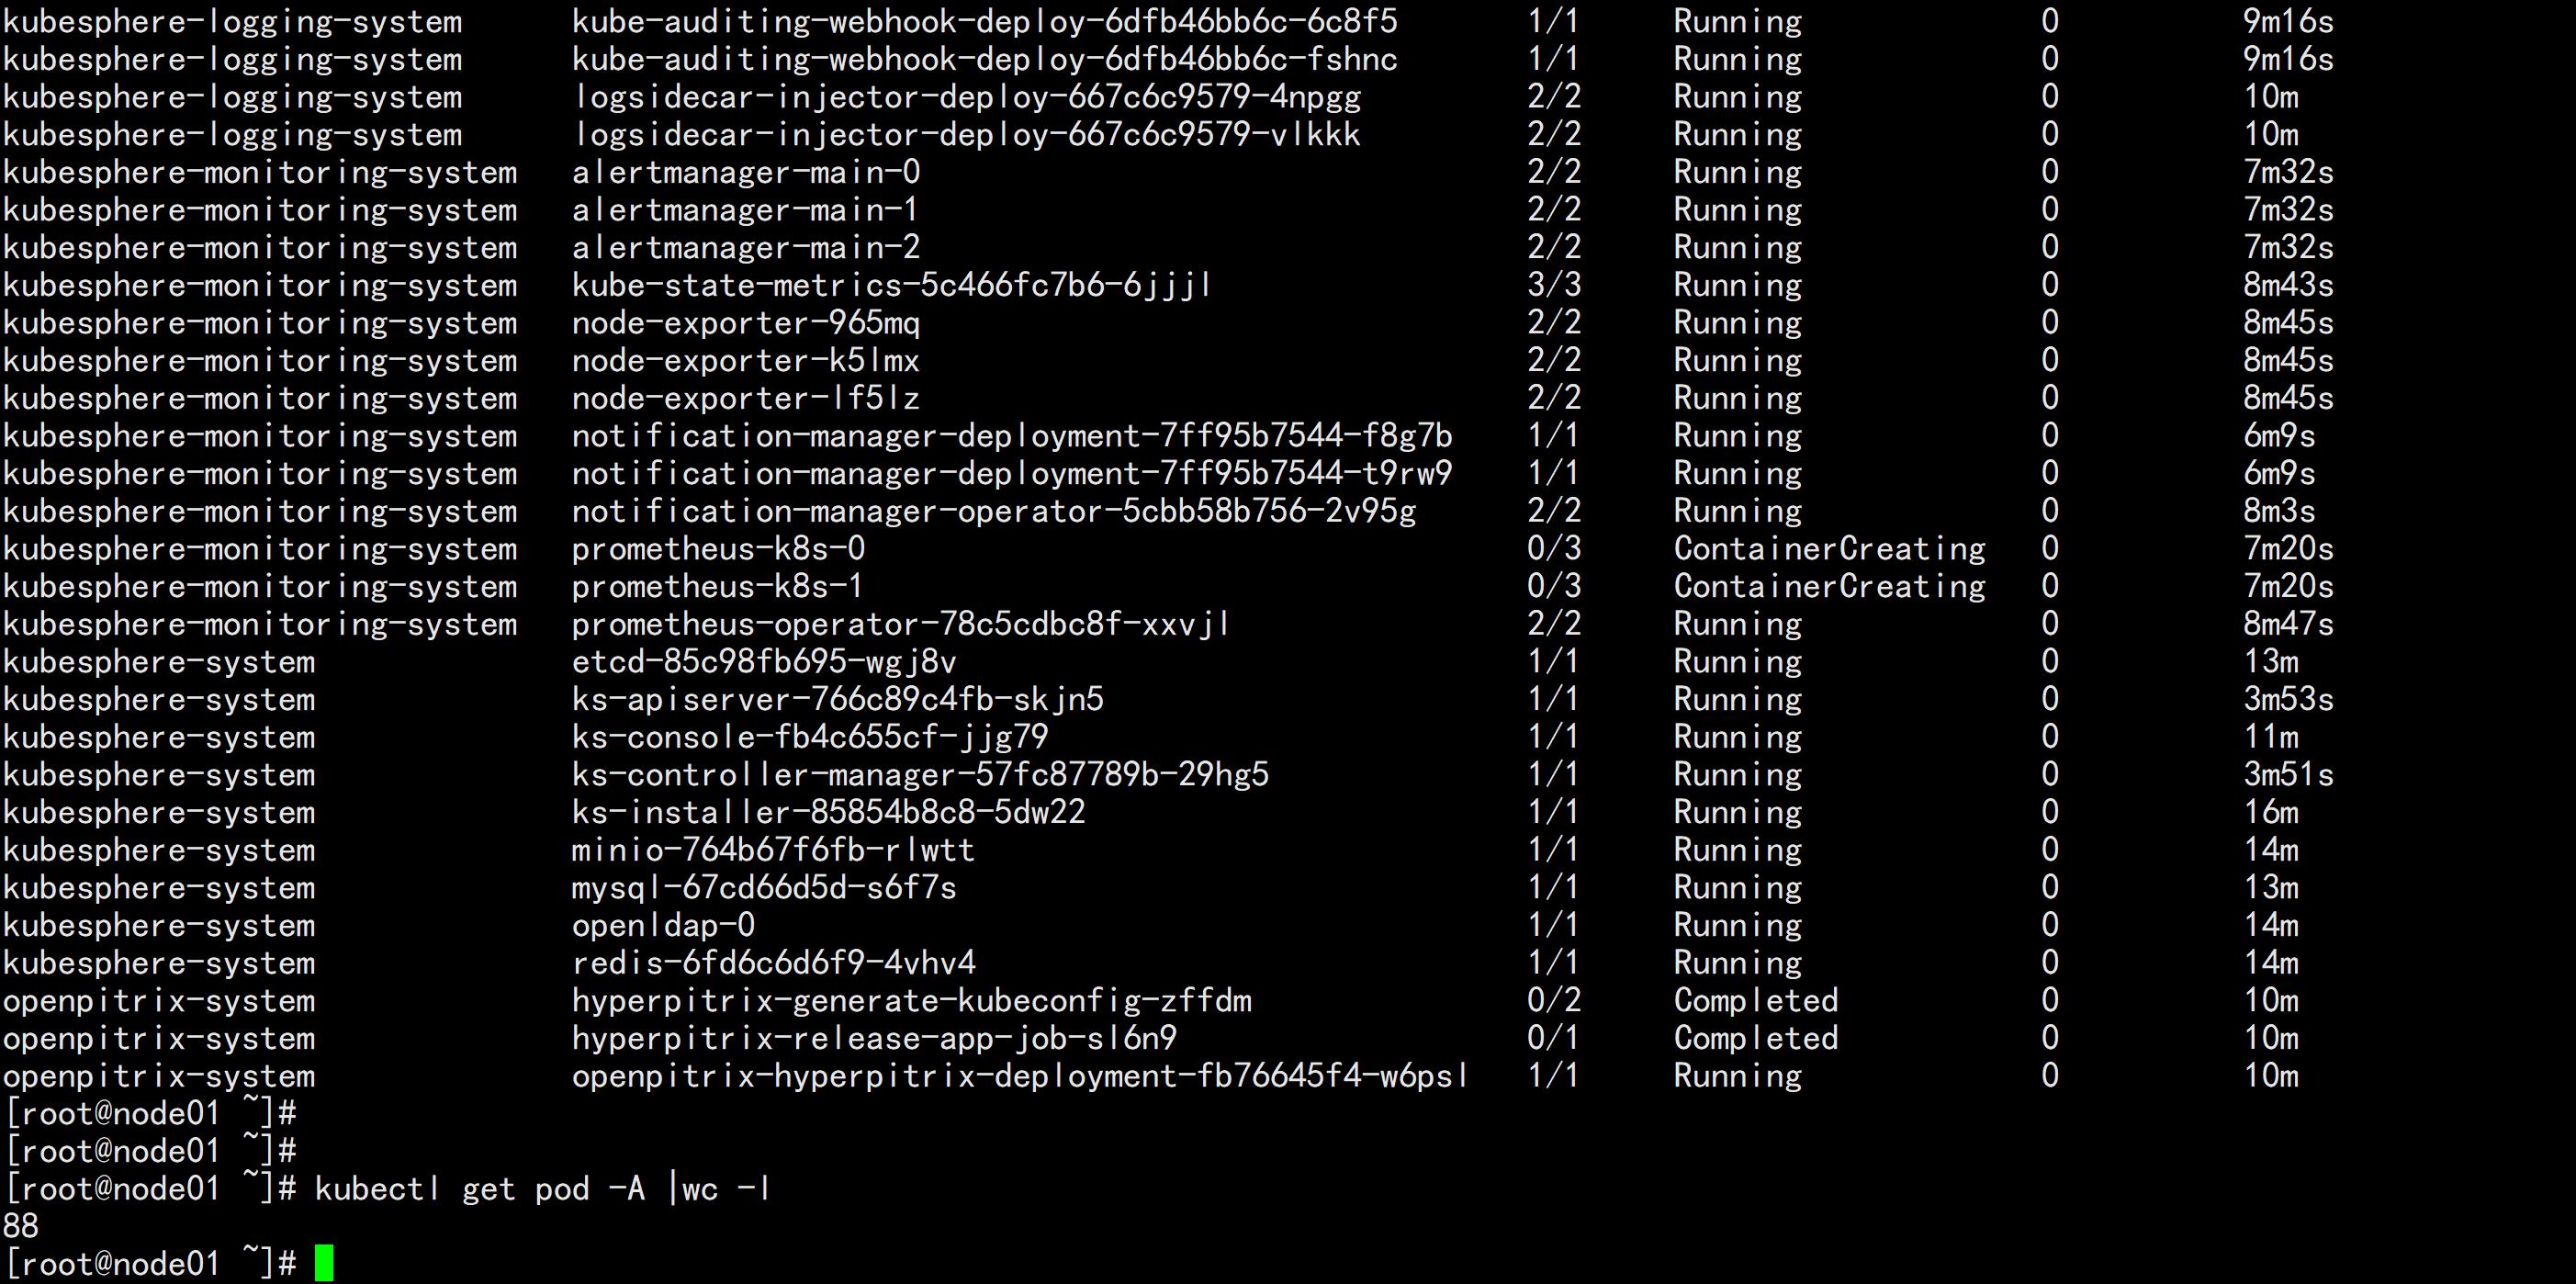
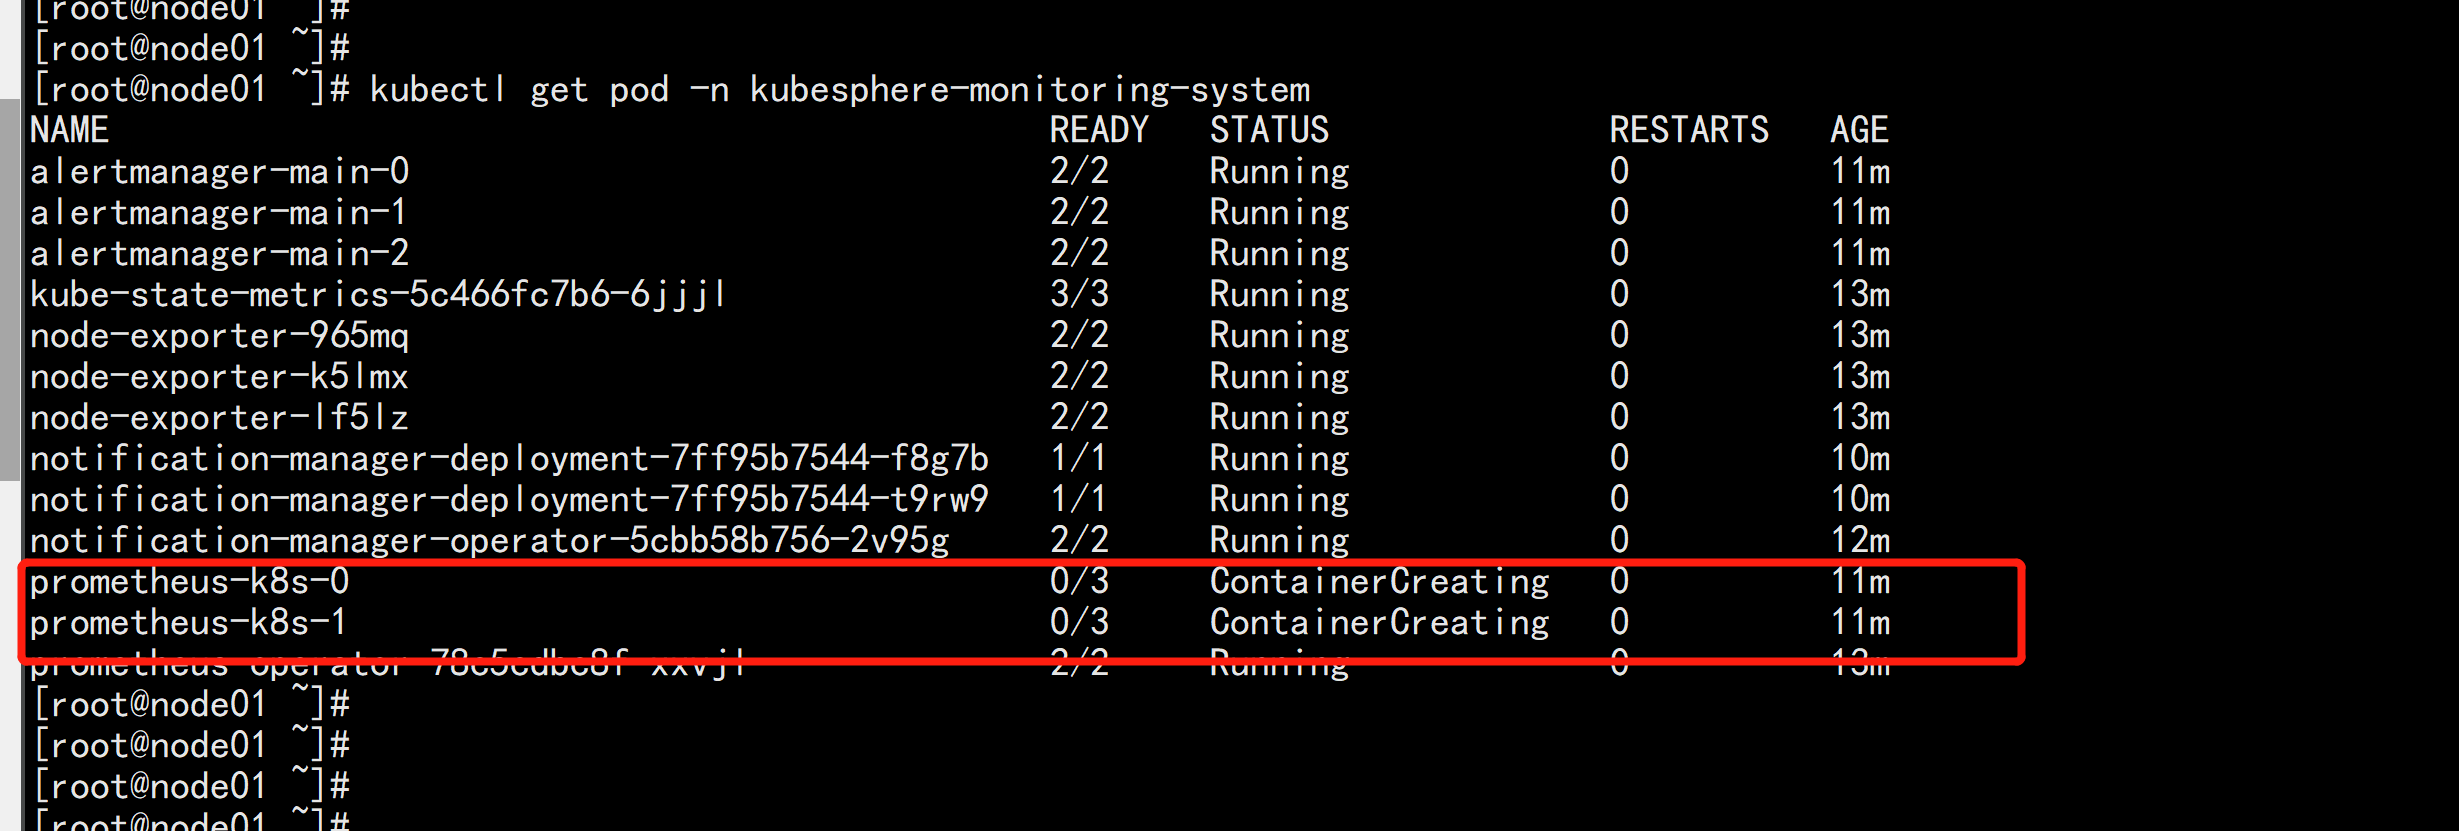
kubesphere-monitoring-system   prometheus-k8s-0                                    0/3     ContainerCreating   0          7m20s
kubesphere-monitoring-system   prometheus-k8s-1                                    0/3     ContainerCreating   0          7m20s

prometheus-k8s-1 这个一直在 ContainerCreating  这个 状态
kubectl describe pod prometheus-k8s-0 -n kubesphere-monitoring-system

kube-etcd-client-certs 这个证书没有找到:
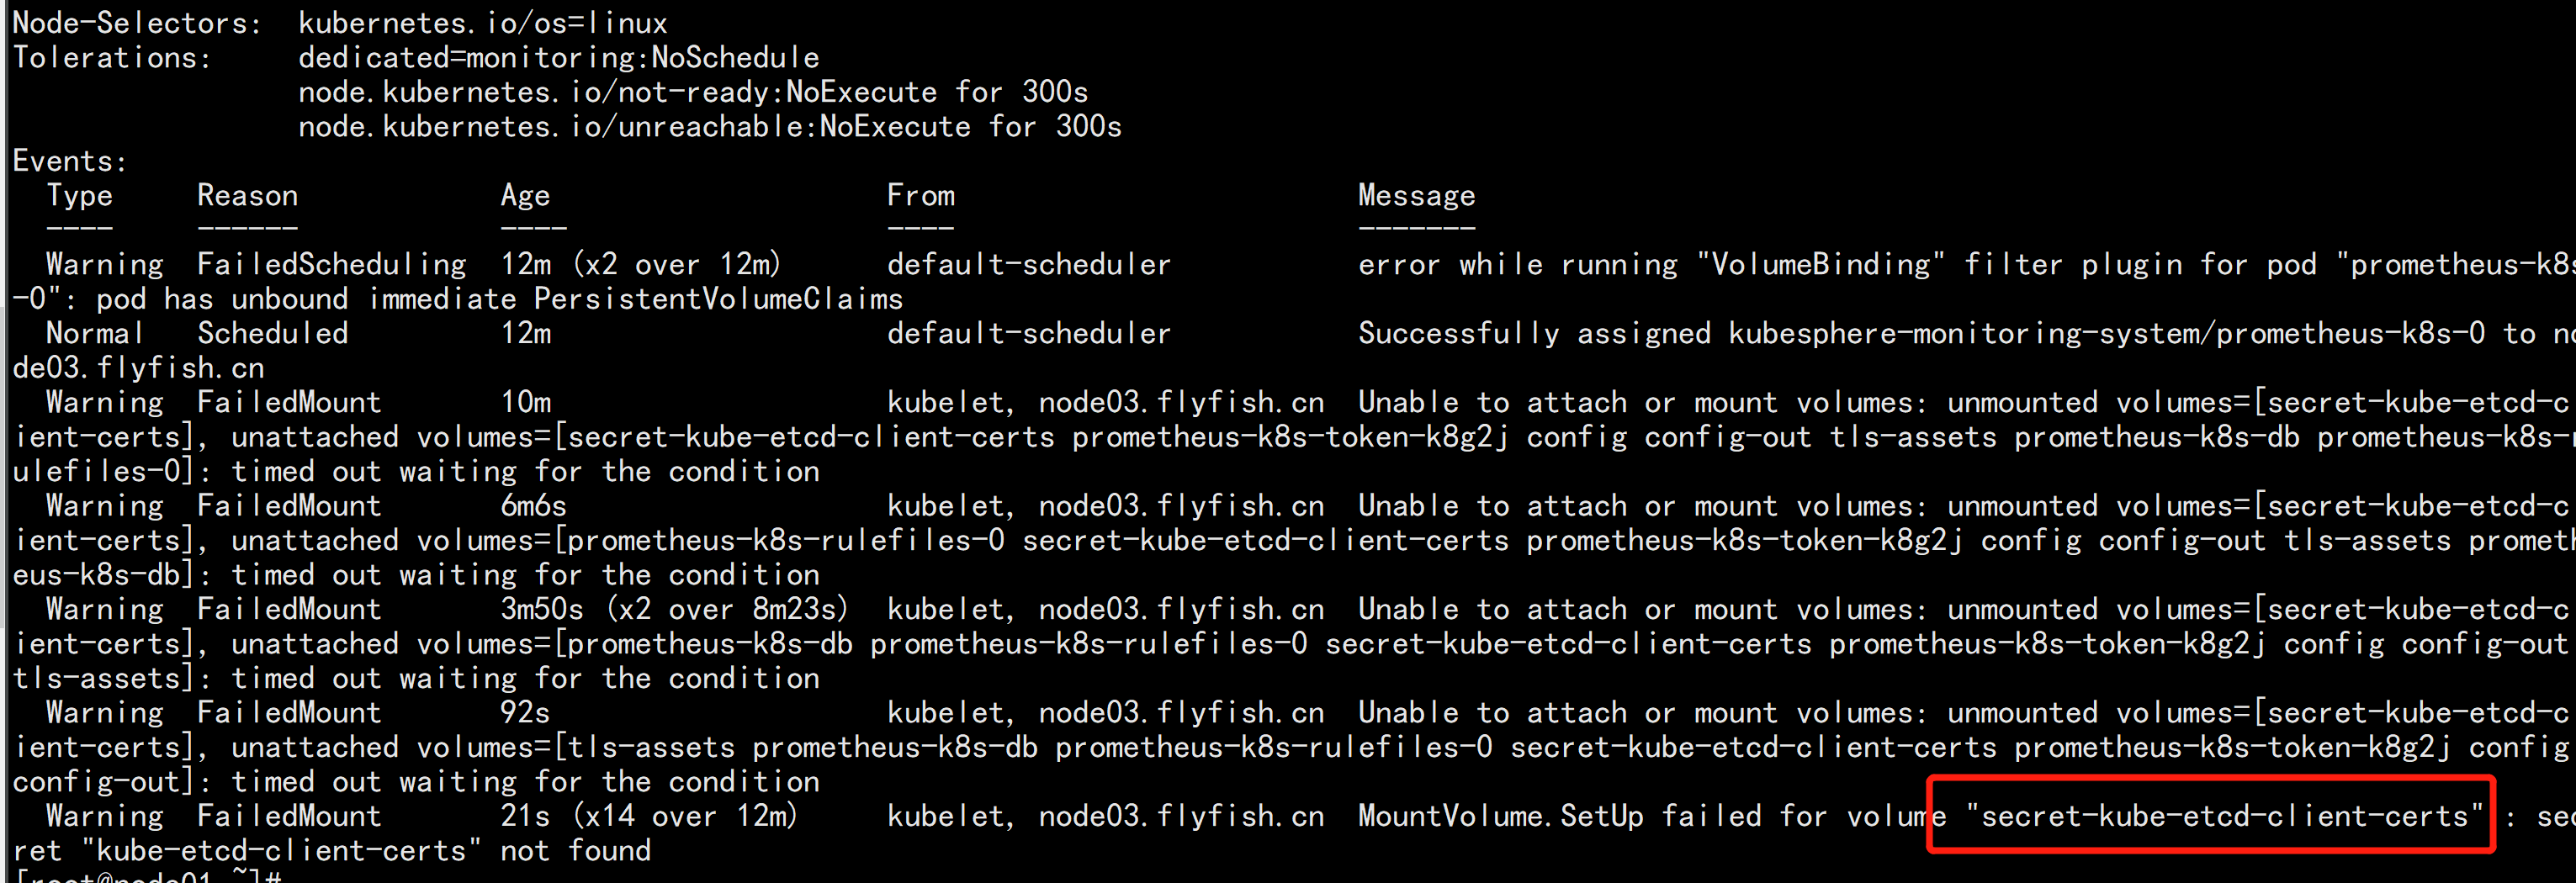
kubectl -n kubesphere-monitoring-system create secret generic kube-etcd-client-certs  --from-file=etcd-client-ca.crt=/etc/kubernetes/pki/etcd/ca.crt  --from-file=etcd-client.crt=/etc/kubernetes/pki/apiserver-etcd-client.crt  --from-file=etcd-client.key=/etc/kubernetes/pki/apiserver-etcd-client.key


 kubectl get secret -A |grep etcd

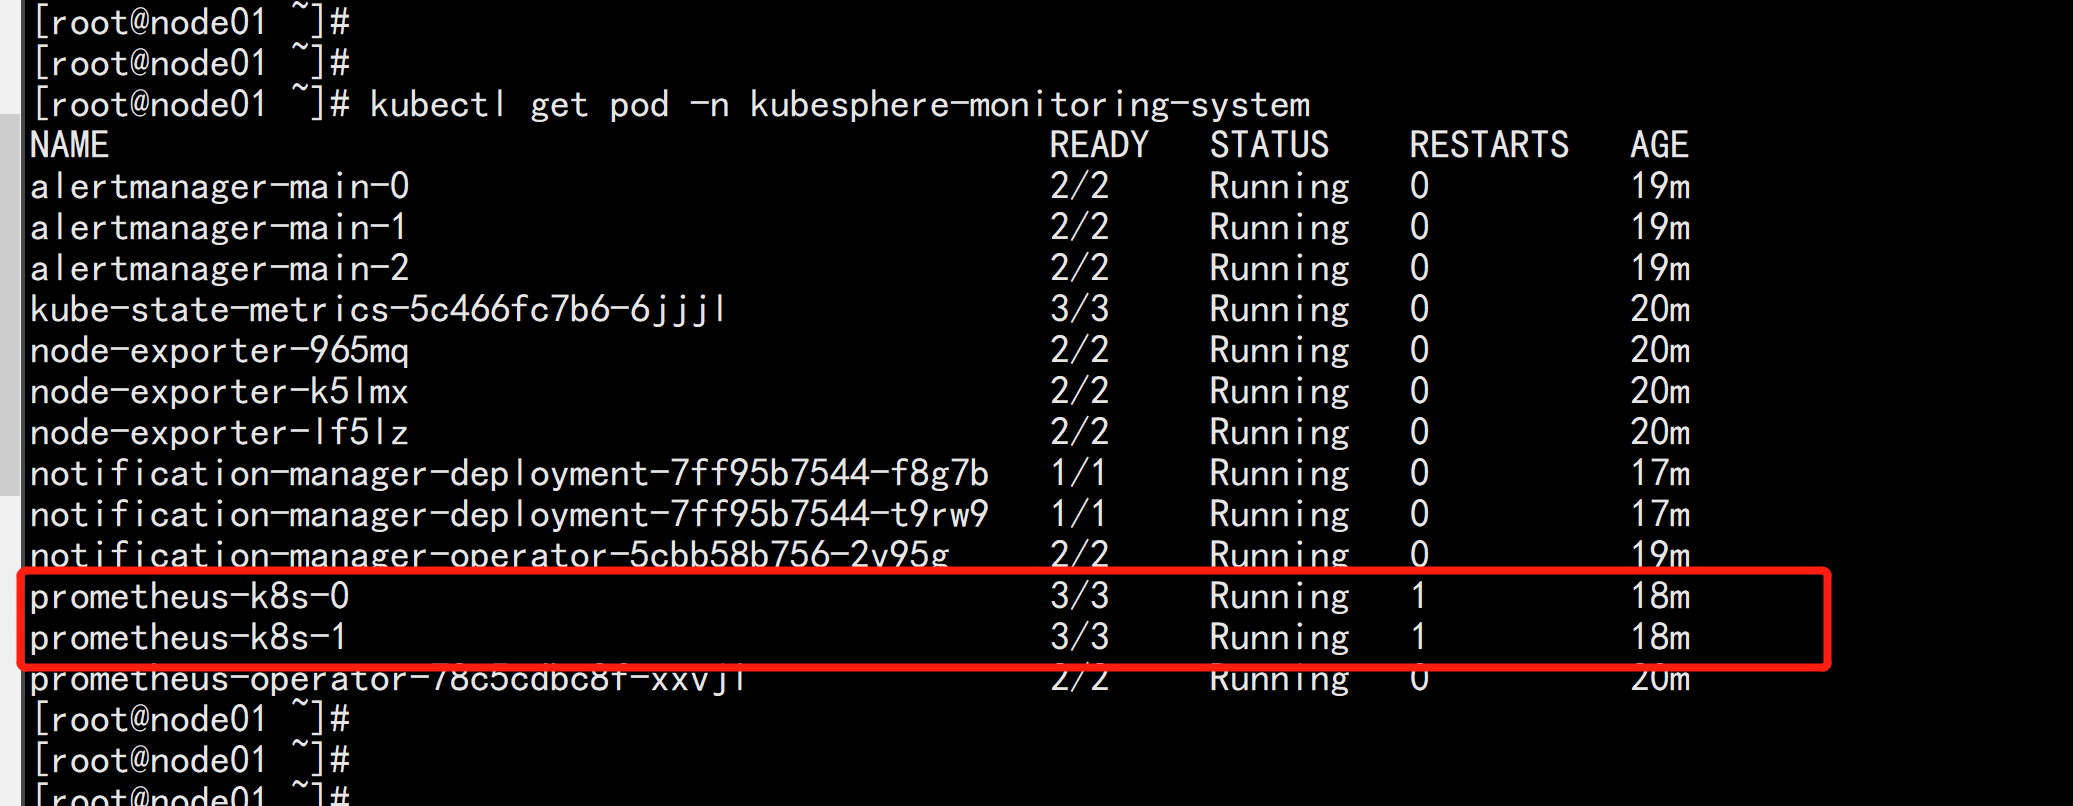
kubectl get pod -n kubesphere-monitoring-system

prometheus-k8s-1 这个pod 就变成Running 状态了
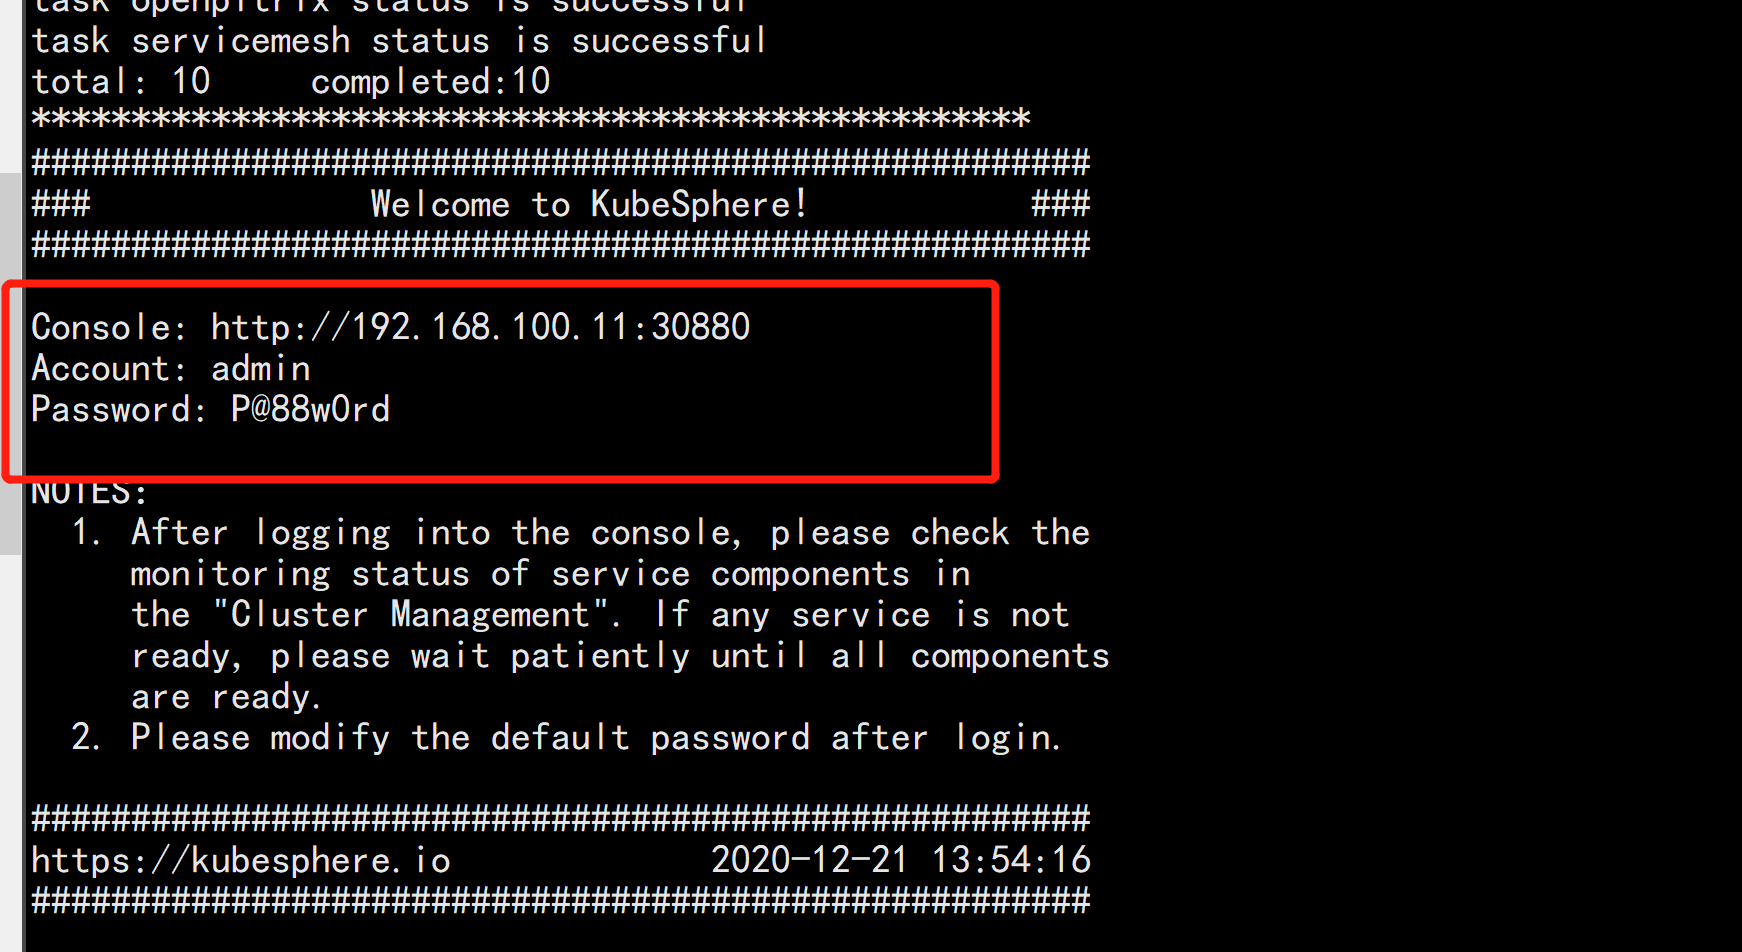
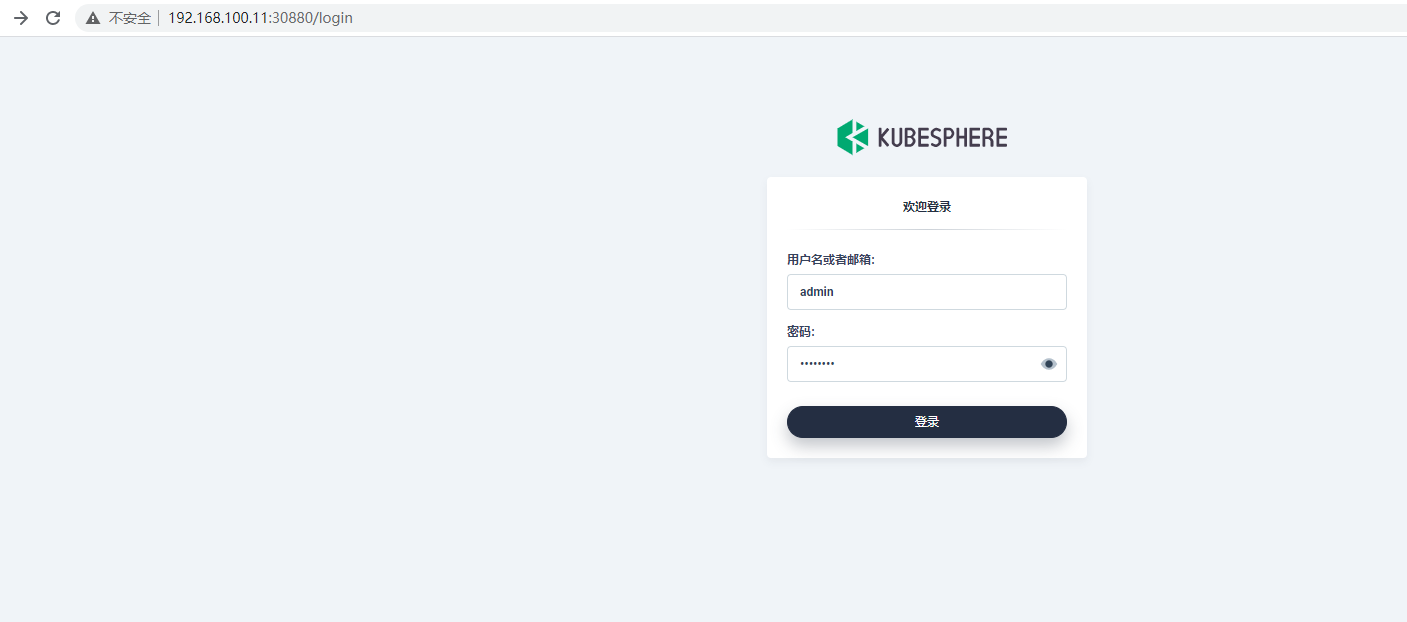
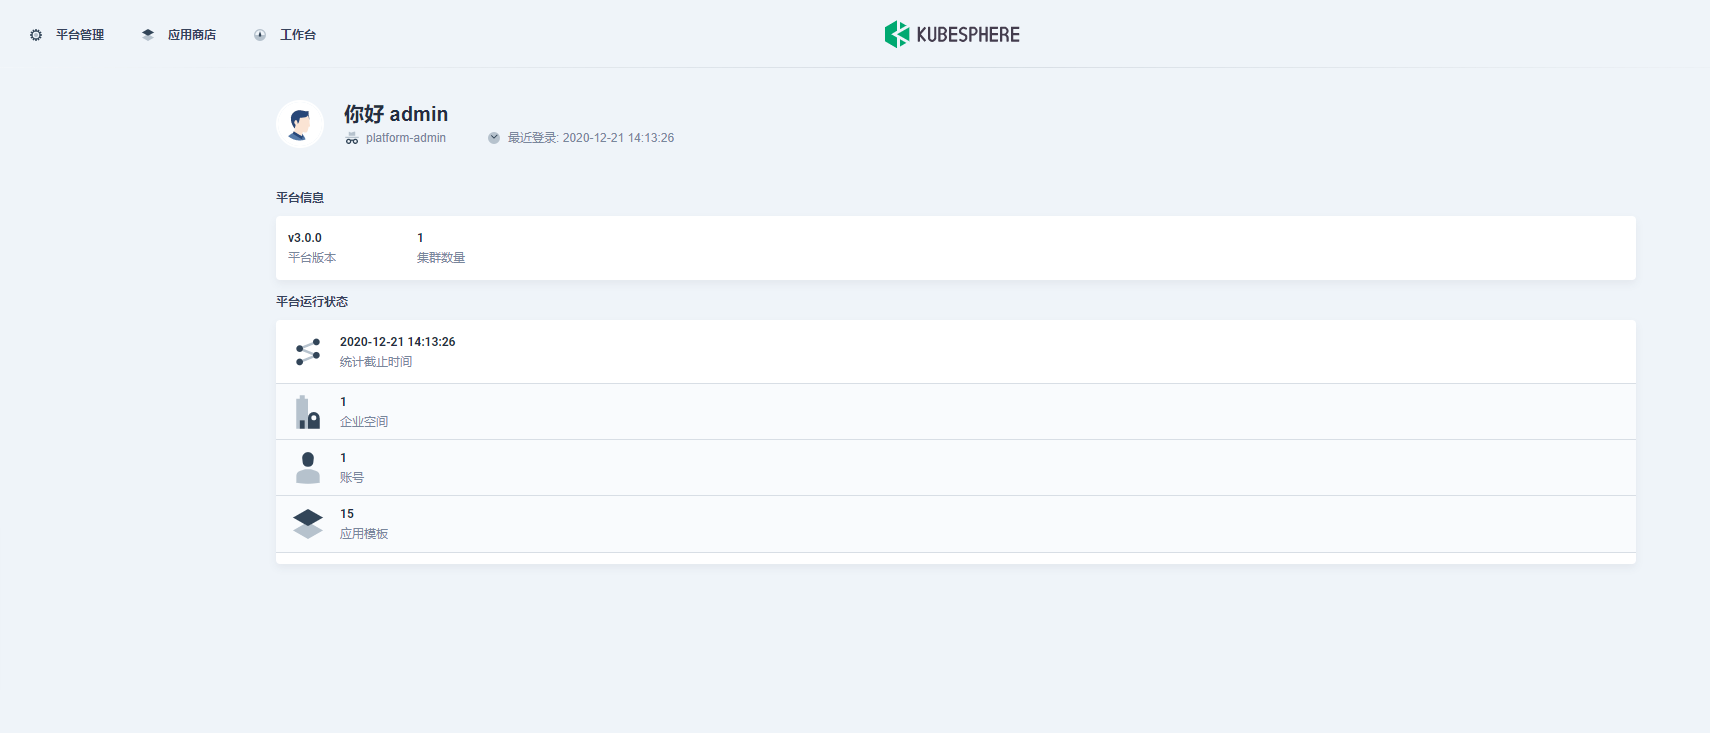
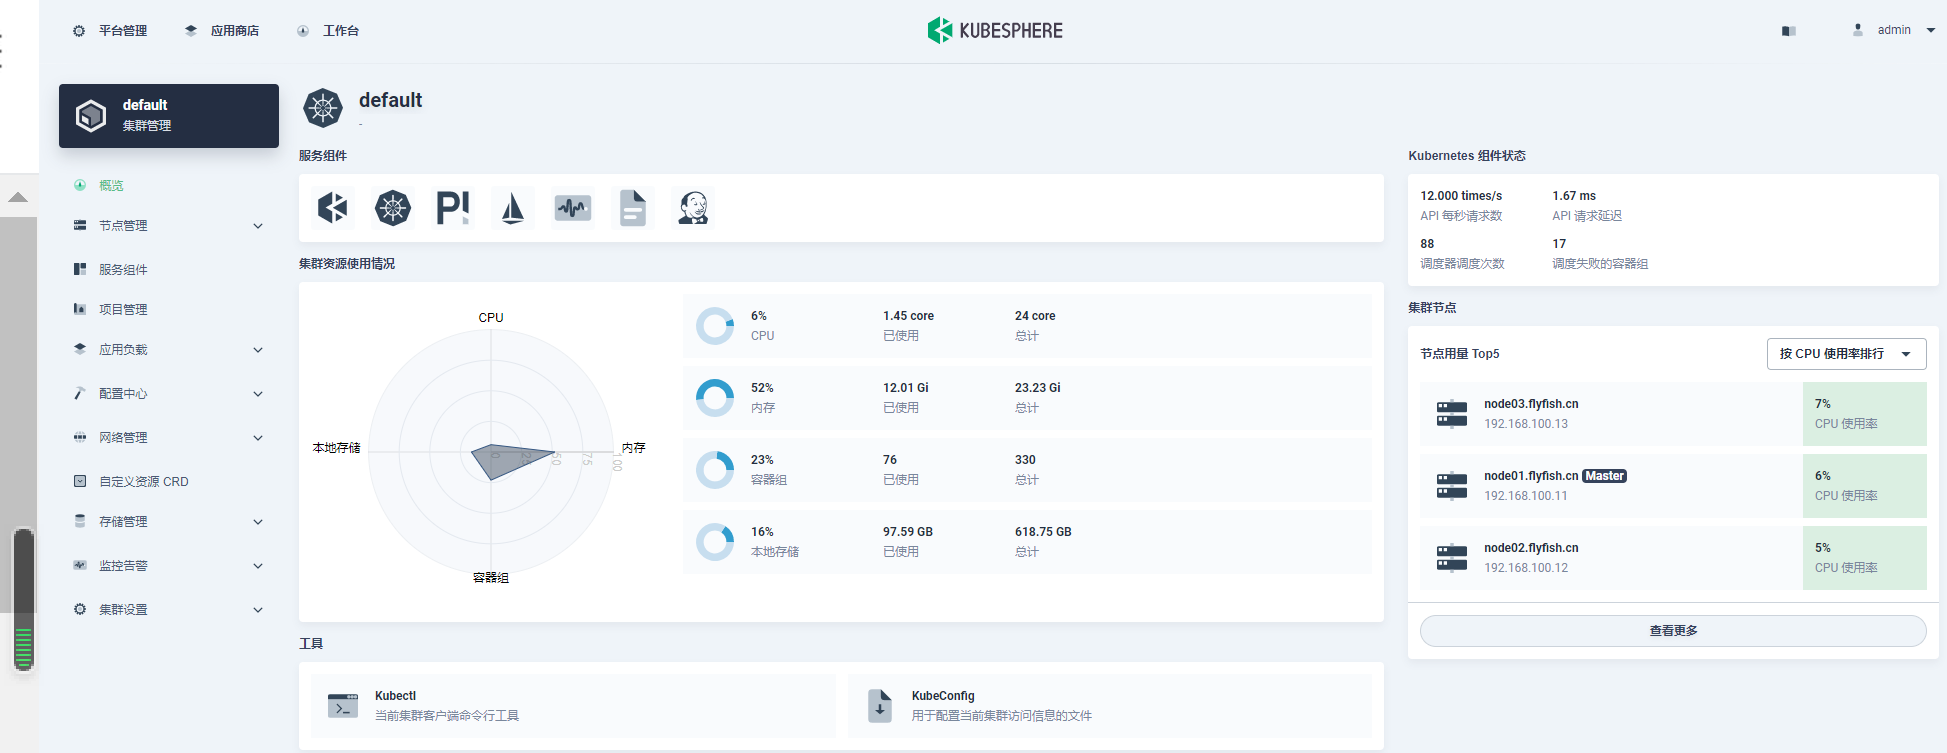
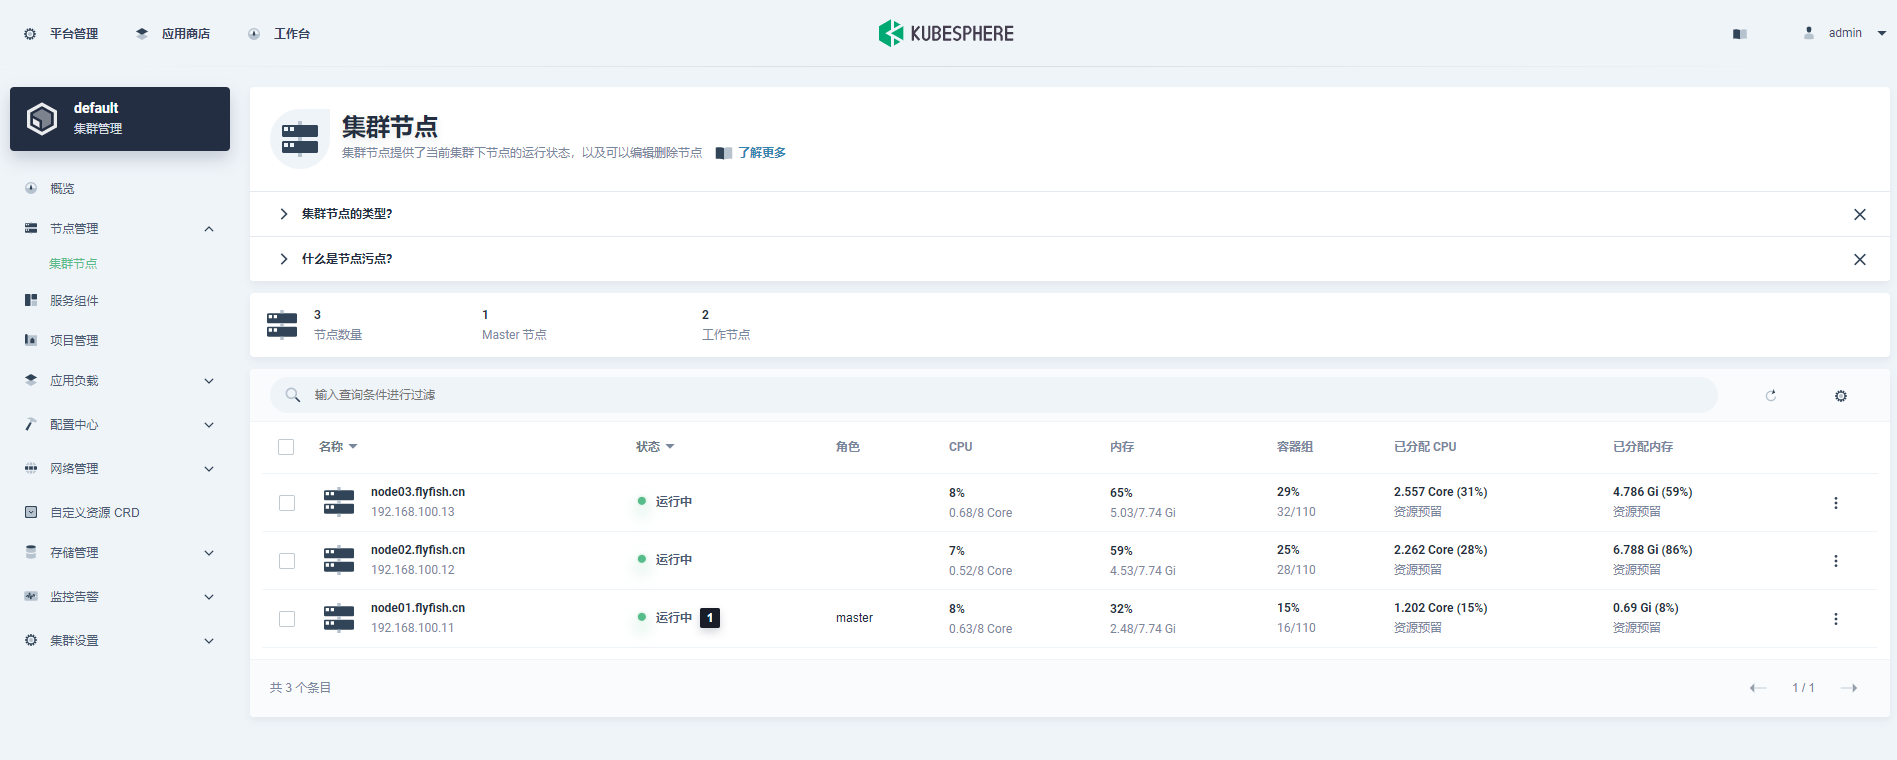
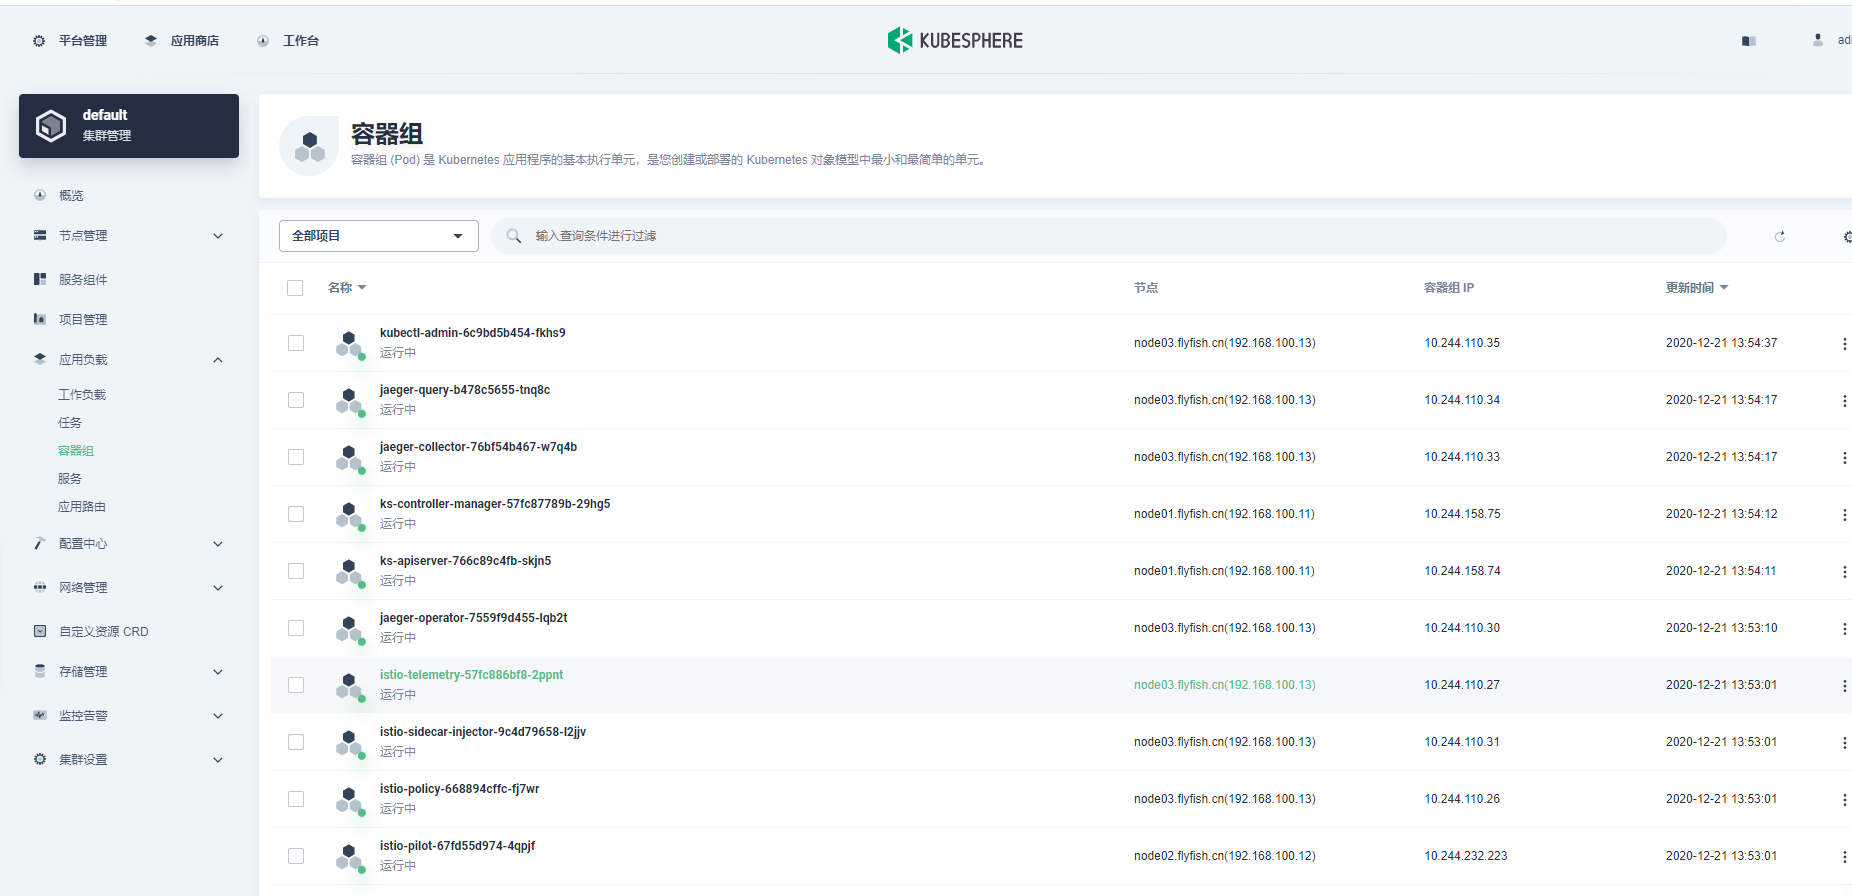
下面根据日志提示打开kubesphere 的web 页面:
我想为Heroku构建一个Rails3应用程序。他们使用Postgres作为他们的数据库,所以我通过MacPorts安装了postgres9.0。现在我需要一个postgresgem并且共识是出于性能原因你想要pggem。但是我对我得到的错误感到非常困惑当我尝试在rvm下通过geminstall安装pg时。我已经非常明确地指定了所有postgres目录的位置可以找到但仍然无法完成安装:$envARCHFLAGS='-archx86_64'geminstallpg--\--with-pg-config=/opt/local/var/db/postgresql90/defaultdb/po
我打算为ruby脚本创建一个安装程序,但我希望能够确保机器安装了RVM。有没有一种方法可以完全离线安装RVM并且不引人注目(通过不引人注目,就像创建一个可以做所有事情的脚本而不是要求用户向他们的bash_profile或bashrc添加一些东西)我不是要脚本本身,只是一个关于如何走这条路的快速指针(如果可能的话)。我们还研究了这个很有帮助的问题:RVM-isthereawayforsimpleofflineinstall?但有点误导,因为答案只向我们展示了如何离线在RVM中安装ruby。我们需要能够离线安装RVM本身,并查看脚本https://raw.github.com/wayn
我有一个奇怪的问题:我在rvm上安装了rubyonrails。一切正常,我可以创建项目。但是在我输入“railsnew”时重新启动后,我有“程序'rails'当前未安装。”。SystemUbuntu12.04ruby-v"1.9.3p194"gemlistactionmailer(3.2.5)actionpack(3.2.5)activemodel(3.2.5)activerecord(3.2.5)activeresource(3.2.5)activesupport(3.2.5)arel(3.0.2)builder(3.0.0)bundler(1.1.4)coffee-rails(
我刚刚为fedora安装了emacs。我想用emacs编写ruby。为ruby提供代码提示、代码完成类型功能所需的工具、扩展是什么? 最佳答案 ruby-mode已经包含在Emacs23之后的版本中。不过,它也可以通过ELPA获得。您可能感兴趣的其他一些事情是集成RVM、feature-mode(Cucumber)、rspec-mode、ruby-electric、inf-ruby、rinari(用于Rails)等。这是我当前用于Ruby开发的Emacs配置:https://github.com/citizen428/emacs
我正在尝试在我的centos服务器上安装therubyracer,但遇到了麻烦。$geminstalltherubyracerBuildingnativeextensions.Thiscouldtakeawhile...ERROR:Errorinstallingtherubyracer:ERROR:Failedtobuildgemnativeextension./usr/local/rvm/rubies/ruby-1.9.3-p125/bin/rubyextconf.rbcheckingformain()in-lpthread...yescheckingforv8.h...no***e
我的最终目标是安装当前版本的RubyonRails。我在OSXMountainLion上运行。到目前为止,这是我的过程:已安装的RVM$\curl-Lhttps://get.rvm.io|bash-sstable检查已知(我假设已批准)安装$rvmlistknown我看到当前的稳定版本可用[ruby-]2.0.0[-p247]输入命令安装$rvminstall2.0.0-p247注意:我也试过这些安装命令$rvminstallruby-2.0.0-p247$rvminstallruby=2.0.0-p247我很快就无处可去了。结果:$rvminstall2.0.0-p247Search
我实际上是在尝试使用RVM在我的OSX10.7.5上更新ruby,并在输入以下命令后:rvminstallruby我得到了以下回复:Searchingforbinaryrubies,thismighttakesometime.Checkingrequirementsforosx.Installingrequirementsforosx.Updatingsystem.......Errorrunning'requirements_osx_brew_update_systemruby-2.0.0-p247',pleaseread/Users/username/.rvm/log/138121
Sinatra新手;我正在运行一些rspec测试,但在日志中收到了一堆不需要的噪音。如何消除日志中过多的噪音?我仔细检查了环境是否设置为:test,这意味着记录器级别应设置为WARN而不是DEBUG。spec_helper:require"./app"require"sinatra"require"rspec"require"rack/test"require"database_cleaner"require"factory_girl"set:environment,:testFactoryGirl.definition_file_paths=%w{./factories./test/
由于fast-stemmer的问题,我很难安装我想要的任何rubygem。我把我得到的错误放在下面。Buildingnativeextensions.Thiscouldtakeawhile...ERROR:Errorinstallingfast-stemmer:ERROR:Failedtobuildgemnativeextension./System/Library/Frameworks/Ruby.framework/Versions/2.0/usr/bin/rubyextconf.rbcreatingMakefilemake"DESTDIR="cleanmake"DESTDIR=
我是Google云的新手,我正在尝试对其进行首次部署。我的第一个部署是RubyonRails项目。我基本上是在关注thisguideinthegoogleclouddocumentation.唯一的区别是我使用的是我自己的项目,而不是他们提供的“helloworld”项目。这是我的app.yaml文件runtime:customvm:trueentrypoint:bundleexecrackup-p8080-Eproductionconfig.ruresources:cpu:0.5memory_gb:1.3disk_size_gb:10当我转到我的项目目录并运行gcloudprevie