为了这个系列,我的代码已经准备到了第150天了。接下来的内容会越来越精彩,我们也越来越开始进入Android的一些高级功能上的编程了。今天我们就要讲Android中对本地文件进行读写的全过程。
以上一共我们有3个目标,根据目标下面开始教程。
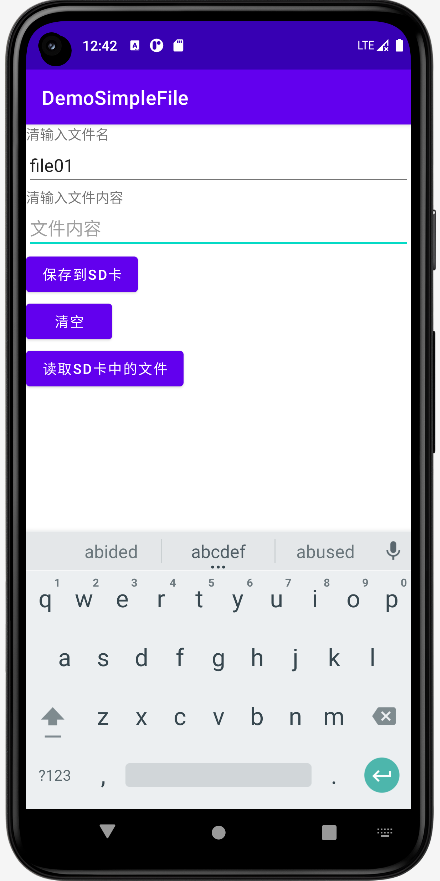
activity_main.xml
<?xml version="1.0" encoding="utf-8"?>
<LinearLayout xmlns:android="http://schemas.android.com/apk/res/android"
    xmlns:tools="http://schemas.android.com/tools"
    android:id="@+id/LinearLayout1"
    android:layout_width="match_parent"
    android:layout_height="match_parent"
    android:orientation="vertical"
    tools:context=".MainActivity">

    <TextView
        android:layout_width="wrap_content"
        android:layout_height="wrap_content"
        android:text="清输入文件名" />

    <EditText
        android:id="@+id/editFileName"
        android:layout_width="match_parent"
        android:layout_height="wrap_content"
        android:hint="文件名" />

    <TextView
        android:layout_width="wrap_content"
        android:layout_height="wrap_content"
        android:text="清输入文件内容" />

    <EditText
        android:id="@+id/editFileContents"
        android:layout_width="match_parent"
        android:layout_height="wrap_content"
        android:hint="文件内容" />

    <Button
        android:id="@+id/buttonSave"
        android:layout_width="wrap_content"
        android:layout_height="wrap_content"
        android:text="保存到SD卡" />

    <Button
        android:id="@+id/buttonClean"
        android:layout_width="wrap_content"
        android:layout_height="wrap_content"
        android:text="清空" />

    <Button
        android:id="@+id/buttonRead"
        android:layout_width="wrap_content"
        android:layout_height="wrap_content"
        android:text="读取sd卡中的文件" />

</LinearLayout>
我们的UI端很简单,用LinearLayout从上到下依次把一系列元素都设置好。接着我们来看我们的后端代码。
<?xml version="1.0" encoding="utf-8"?>
<manifest xmlns:android="http://schemas.android.com/apk/res/android"
xmlns:tools="http://schemas.android.com/tools">
<!-- 在SDCard中创建与删除文件权限 -->
<uses-permission android:name="android.permission.MOUNT_UNMOUNT_FILESYSTEMS"
tools:ignore="ProtectedPermissions" />
<!-- 往SDCard写入数据权限 -->
<uses-permission android:name="android.permission.ACCESS_MEDIA_LOCATION"/>
<uses-permission android:name="android.permission.MANAGE_EXTERNAL_STORAGE"
tools:ignore="ScopedStorage" />
<!--外部存储的写权限-->
<uses-permission android:name="android.permission.WRITE_EXTERNAL_STORAGE" />
<!--外部存储的读权限-->
<uses-permission android:name="android.permission.READ_EXTERNAL_STORAGE" />
<uses-permission android:name="android.permission.WAKE_LOCK" />
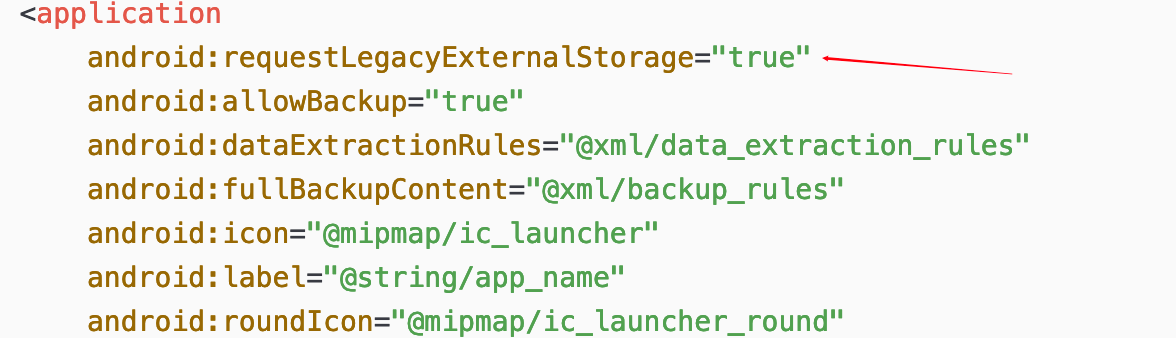
<application
android:requestLegacyExternalStorage="true"
android:allowBackup="true"
android:dataExtractionRules="@xml/data_extraction_rules"
android:fullBackupContent="@xml/backup_rules"
android:icon="@mipmap/ic_launcher"
android:label="@string/app_name"
android:roundIcon="@mipmap/ic_launcher_round"
android:supportsRtl="true"
android:theme="@style/Theme.DemoSimpleFile"
tools:targetApi="31">
<activity
android:name=".MainActivity"
android:exported="true">
<intent-filter>
<action android:name="android.intent.action.MAIN" />
<category android:name="android.intent.category.LAUNCHER" />
</intent-filter>
<meta-data
android:name="android.app.lib_name"
android:value="" />
<meta-data
android:name="ScopedStorage"
android:value="true" />
</activity>
</application>
</manifest>注意以上的6行<uses-permission>以及AndroidManifest.xml文件中这一句,都必须加上。
package org.mk.android.demo;

import android.content.Context;
import android.os.Environment;
import android.util.Log;
import android.widget.Toast;

import java.io.FileInputStream;
import java.io.FileOutputStream;
import java.io.IOException;

public class SDFileUtility {
    private final static String TAG = "DemoSimpleFile";
    private Context context;

    public SDFileUtility() {
    }

    public SDFileUtility(Context context) {
        super();
        this.context = context;
    }

    //往SD卡写入文件的方法
    public void savaFileToSD(String fileName, String fileContents) throws Exception {
        //如果手机已插入sd卡,且app具有读写sd卡的权限
        if (Environment.getExternalStorageState().equals(Environment.MEDIA_MOUNTED)) {
            fileName = Environment.getExternalStorageDirectory().getCanonicalPath() + "/" + fileName;
            //这里就不要用openFileOutput了,那个是往手机内存中写数据的
            FileOutputStream output = null;
            try {
                output = new FileOutputStream(fileName);
                output.write(fileContents.getBytes());
                //将String字符串以字节流的形式写入到输出流中
            } catch (Exception e) {
                Log.e(TAG, "saveFileTOSD error: " + e.getMessage(), e);
            } finally {
                try {
                    output.close();
                    //关闭输出流
                } catch (Exception e) {
                }
            }

        } else Toast.makeText(context, "SD卡不存在或者不可读写", Toast.LENGTH_SHORT).show();
    }

    //读取SD卡中文件的方法
    //定义读取文件的方法:
    public String readFromSD(String fileName) throws IOException {
        StringBuilder sb = new StringBuilder("");
        if (Environment.getExternalStorageState().equals(Environment.MEDIA_MOUNTED)) {
            fileName = Environment.getExternalStorageDirectory().getCanonicalPath() + "/" + fileName;
            FileInputStream input = null;
            try {
                //打开文件输入流
                input = new FileInputStream(fileName);
                byte[] temp = new byte[1024];

                int len = 0;
                //读取文件内容:
                while ((len = input.read(temp)) > 0) {
                    sb.append(new String(temp, 0, len));
                }
            } catch (Exception e) {
                Log.e(TAG, "readFromSD error: " + e.getMessage(), e);
            } finally {
                try {
                    //关闭输入流
                    input.close();
                } catch (Exception e) {
                }
            }

        }
        return sb.toString();
    }
}
package org.mk.android.demo;
import androidx.annotation.NonNull;
import androidx.appcompat.app.AppCompatActivity;
import androidx.core.app.ActivityCompat;
import androidx.core.content.ContextCompat;
import android.Manifest;
import android.app.AlertDialog;
import android.content.Context;
import android.content.DialogInterface;
import android.content.Intent;
import android.content.pm.PackageManager;
import android.os.Build;
import android.os.Bundle;
import android.os.Environment;
import android.provider.Settings;
import android.util.Log;
import android.view.View;
import android.widget.Button;
import android.widget.EditText;
import android.widget.Toast;
public class MainActivity extends AppCompatActivity implements View.OnClickListener {
private EditText editFileName;
private EditText editContents;
private Button buttonSave;
private Button buttonClean;
private Button buttonRead;
private Context mContext;
private final static String TAG = "DemoSimpleFile";
@Override
protected void onCreate(Bundle savedInstanceState) {
super.onCreate(savedInstanceState);
setContentView(R.layout.activity_main);
mContext = getApplicationContext();
bindViews();
}
private void bindViews() {
editFileName = (EditText) findViewById(R.id.editFileName);
editContents = (EditText) findViewById(R.id.editFileContents);
buttonSave = (Button) findViewById(R.id.buttonSave);
buttonClean = (Button) findViewById(R.id.buttonClean);
buttonRead = (Button) findViewById(R.id.buttonRead);
buttonSave.setOnClickListener(this);
buttonClean.setOnClickListener(this);
buttonRead.setOnClickListener(this);
}
@Override
public void onClick(View v) {
switch (v.getId()) {
case R.id.buttonClean:
editContents.setText("");
editFileName.setText("");
break;
case R.id.buttonSave:
if (Build.VERSION.SDK_INT>=Build.VERSION_CODES.R) {
Log.i(TAG,">>>>>>version.SDK->"+Build.VERSION.SDK_INT);
if (!Environment.isExternalStorageManager()) {
Intent intent = new Intent(Settings.ACTION_MANAGE_ALL_FILES_ACCESS_PERMISSION);
this.startActivity(intent);
return;
}
}
Log.i(TAG,">>>>>>start to writeFile");
writeFile();
Log.i(TAG,">>>>>>write success");
break;
case R.id.buttonRead:
if (Build.VERSION.SDK_INT>=Build.VERSION_CODES.R) {
Log.i(TAG,">>>>>>version.SDK->"+Build.VERSION.SDK_INT);
if (!Environment.isExternalStorageManager()) {
Intent intent = new Intent(Settings.ACTION_MANAGE_ALL_FILES_ACCESS_PERMISSION);
this.startActivity(intent);
return;
}
}
Log.i(TAG,">>>>>>start to readFile");
readFile();
Log.i(TAG,">>>>>>read success");
break;
}
}
@Override
public void onRequestPermissionsResult(int requestCode, @NonNull String[] permissions, @NonNull int[] grantResults) {
super.onRequestPermissionsResult(requestCode, permissions, grantResults);
if (requestCode == 1 && (grantResults[0] == PackageManager.PERMISSION_GRANTED)) {
//writeFile();
Log.i(TAG,">>>>>>onRequestPermissionsResult");
}
}
private void writeFile() {
String fileName = editFileName.getText().toString();
String fileContents = editContents.getText().toString();
SDFileUtility sdHelper = new SDFileUtility(mContext);
try {
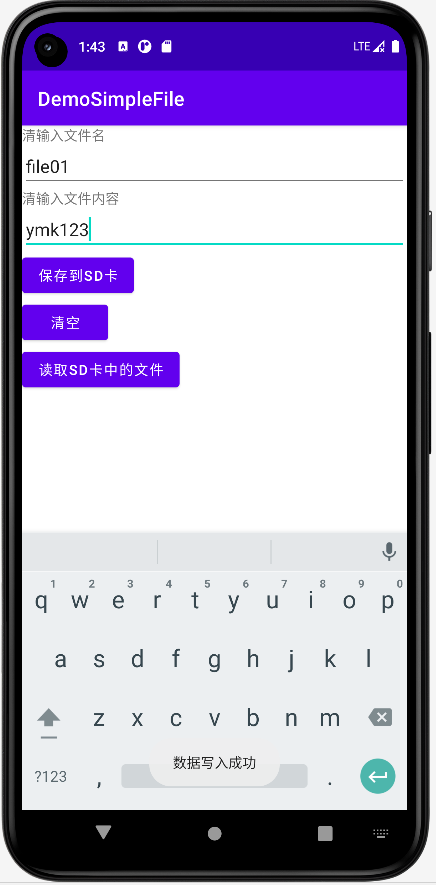
sdHelper.savaFileToSD(fileName, fileContents);
Toast.makeText(getApplicationContext(), "数据写入成功", Toast.LENGTH_SHORT).show();
} catch (Exception e) {
Log.e(TAG, "save contents into file has errors: " + e.getMessage(), e);
Toast.makeText(getApplicationContext(), "数据写入失败", Toast.LENGTH_SHORT).show();
}
}
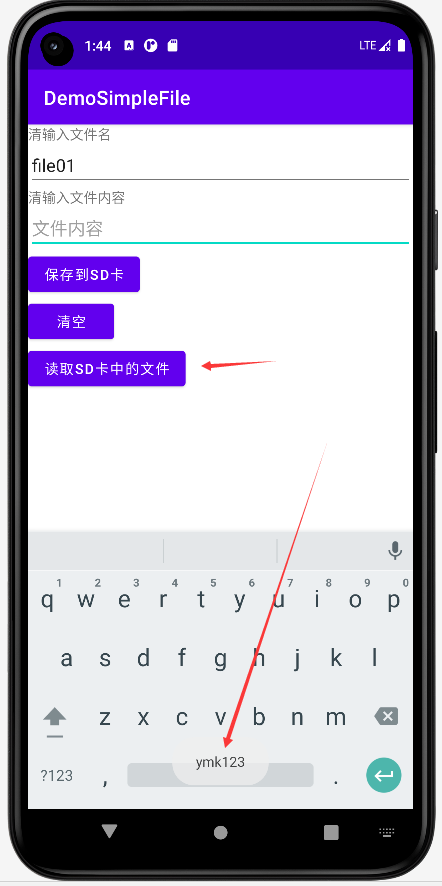
private void readFile() {
String detail = "";
SDFileUtility sdHelper2 = new SDFileUtility(mContext);
try {
String fileName2 = editFileName.getText().toString();
detail = sdHelper2.readFromSD(fileName2);
} catch (Exception e) {
Log.e(TAG, "read contents from file has errors: " + e.getMessage(), e);
}
Toast.makeText(getApplicationContext(), detail, Toast.LENGTH_SHORT).show();
}
}核心代码导读
读写手机SD卡,我们除了在AndroidManifest.xml文件中静态申请权限外还需要使用代码动态申请权限,这是Android6后的权限限制带来的问题。
case R.id.buttonSave:
     if (Build.VERSION.SDK_INT>=Build.VERSION_CODES.R) {
       Log.i(TAG,">>>>>>version.SDK->"+Build.VERSION.SDK_INT);
       if (!Environment.isExternalStorageManager()) {
         Intent intent = new Intent(Settings.ACTION_MANAGE_ALL_FILES_ACCESS_PERMISSION);
         his.startActivity(intent);
         return;
       }
     }
这一段代码就是使用代码在写文件前动态申请权限用的,当这段代码执行后会弹出以下这样的一个对话框
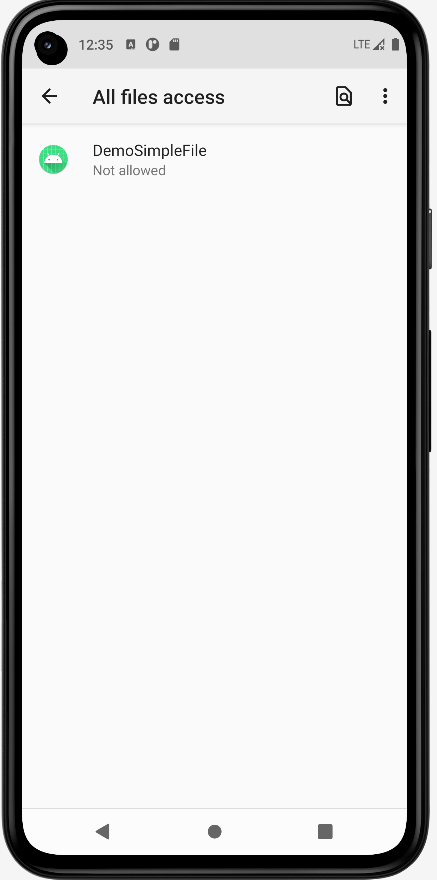
点击这个APP应用,然后来到第二个对话框
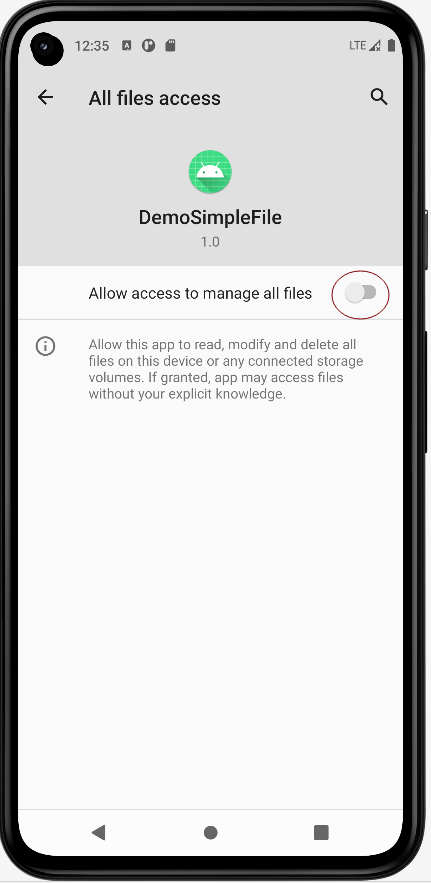
点击我红圈处标出的开关按钮
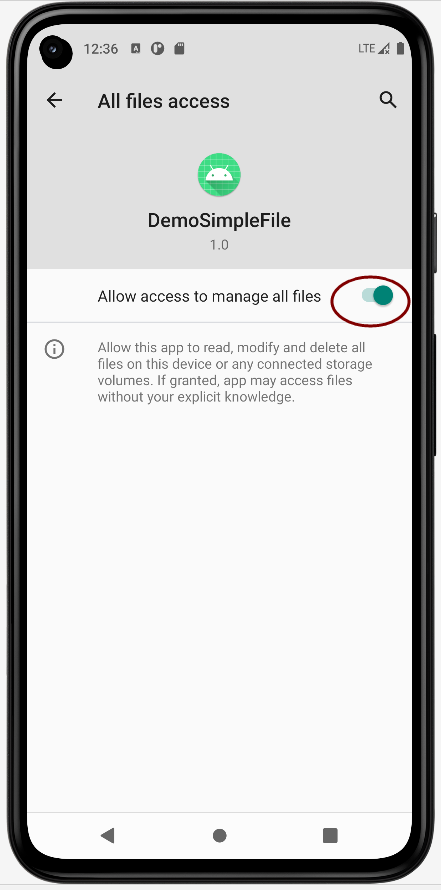
然后重新运行APP即可。
我有一个Ruby程序,它使用rubyzip压缩XML文件的目录树。gem。我的问题是文件开始变得很重,我想提高压缩级别,因为压缩时间不是问题。我在rubyzipdocumentation中找不到一种为创建的ZIP文件指定压缩级别的方法。有人知道如何更改此设置吗?是否有另一个允许指定压缩级别的Ruby库? 最佳答案 这是我通过查看rubyzip内部创建的代码。level=Zlib::BEST_COMPRESSIONZip::ZipOutputStream.open(zip_file)do|zip|Dir.glob("**/*")d
我试图在一个项目中使用rake,如果我把所有东西都放到Rakefile中,它会很大并且很难读取/找到东西,所以我试着将每个命名空间放在lib/rake中它自己的文件中,我添加了这个到我的rake文件的顶部:Dir['#{File.dirname(__FILE__)}/lib/rake/*.rake'].map{|f|requiref}它加载文件没问题,但没有任务。我现在只有一个.rake文件作为测试,名为“servers.rake”,它看起来像这样:namespace:serverdotask:testdoputs"test"endend所以当我运行rakeserver:testid时
我的目标是转换表单输入,例如“100兆字节”或“1GB”,并将其转换为我可以存储在数据库中的文件大小(以千字节为单位)。目前,我有这个:defquota_convert@regex=/([0-9]+)(.*)s/@sizes=%w{kilobytemegabytegigabyte}m=self.quota.match(@regex)if@sizes.include?m[2]eval("self.quota=#{m[1]}.#{m[2]}")endend这有效,但前提是输入是倍数(“gigabytes”,而不是“gigabyte”)并且由于使用了eval看起来疯狂不安全。所以,功能正常,
Rails2.3可以选择随时使用RouteSet#add_configuration_file添加更多路由。是否可以在Rails3项目中做同样的事情? 最佳答案 在config/application.rb中:config.paths.config.routes在Rails3.2(也可能是Rails3.1)中,使用:config.paths["config/routes"] 关于ruby-on-rails-Rails3中的多个路由文件,我们在StackOverflow上找到一个类似的问题
对于具有离线功能的智能手机应用程序,我正在为Xml文件创建单向文本同步。我希望我的服务器将增量/差异(例如GNU差异补丁)发送到目标设备。这是计划:Time=0Server:hasversion_1ofXmlfile(~800kiB)Client:hasversion_1ofXmlfile(~800kiB)Time=1Server:hasversion_1andversion_2ofXmlfile(each~800kiB)computesdeltaoftheseversions(=patch)(~10kiB)sendspatchtoClient(~10kiBtransferred)Cl
我正在寻找执行以下操作的正确语法(在Perl、Shell或Ruby中):#variabletoaccessthedatalinesappendedasafileEND_OF_SCRIPT_MARKERrawdatastartshereanditcontinues. 最佳答案 Perl用__DATA__做这个:#!/usr/bin/perlusestrict;usewarnings;while(){print;}__DATA__Texttoprintgoeshere 关于ruby-如何将脚
使用带有Rails插件的vim,您可以创建一个迁移文件,然后一次性打开该文件吗?textmate也可以这样吗? 最佳答案 你可以使用rails.vim然后做类似的事情::Rgeneratemigratonadd_foo_to_bar插件将打开迁移生成的文件,这正是您想要的。我不能代表textmate。 关于ruby-使用VimRails,您可以创建一个新的迁移文件并一次性打开它吗?,我们在StackOverflow上找到一个类似的问题: https://sta
我正在编写一个包含C扩展的gem。通常当我写一个gem时,我会遵循TDD的过程,我会写一个失败的规范,然后处理代码直到它通过,等等......在“ext/mygem/mygem.c”中我的C扩展和在gemspec的“扩展”中配置的有效extconf.rb,如何运行我的规范并仍然加载我的C扩展?当我更改C代码时,我需要采取哪些步骤来重新编译代码?这可能是个愚蠢的问题,但是从我的gem的开发源代码树中输入“bundleinstall”不会构建任何native扩展。当我手动运行rubyext/mygem/extconf.rb时,我确实得到了一个Makefile(在整个项目的根目录中),然后当
好的,所以我的目标是轻松地将一些数据保存到磁盘以备后用。您如何简单地写入然后读取一个对象?所以如果我有一个简单的类classCattr_accessor:a,:bdefinitialize(a,b)@a,@b=a,bendend所以如果我从中非常快地制作一个objobj=C.new("foo","bar")#justgaveitsomerandomvalues然后我可以把它变成一个kindaidstring=obj.to_s#whichreturns""我终于可以将此字符串打印到文件或其他内容中。我的问题是,我该如何再次将这个id变回一个对象?我知道我可以自己挑选信息并制作一个接受该信
我正在编写一个小脚本来定位aws存储桶中的特定文件,并创建一个临时验证的url以发送给同事。(理想情况下,这将创建类似于在控制台上右键单击存储桶中的文件并复制链接地址的结果)。我研究过回形针,它似乎不符合这个标准,但我可能只是不知道它的全部功能。我尝试了以下方法:defauthenticated_url(file_name,bucket)AWS::S3::S3Object.url_for(file_name,bucket,:secure=>true,:expires=>20*60)end产生这种类型的结果:...-1.amazonaws.com/file_path/file.zip.A