在java项目部署过程中,由于内外部各种因素,可能会遇到一些感觉操作不便捷的场景,例如
在工作中之前也总结了windows的Jar包部署工具与linux下的jar包自动化部署脚本,这次就想着否能将二者统一结合,本着简单/高效/功能专一的原则,做出一
个可视化jar包部署平台,JarManage应运而生
项目地址:https://gitee.com/code2roc/jar-manage
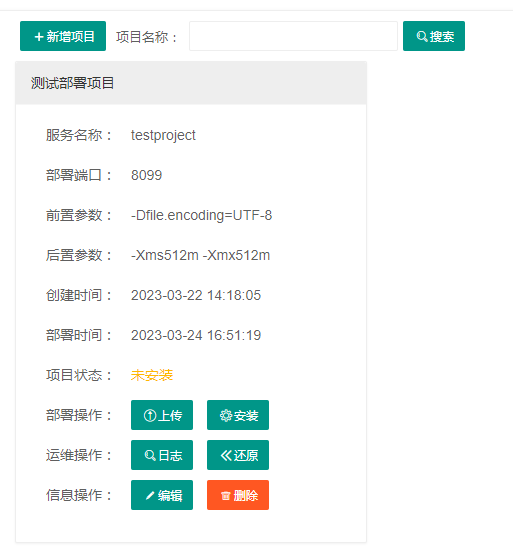
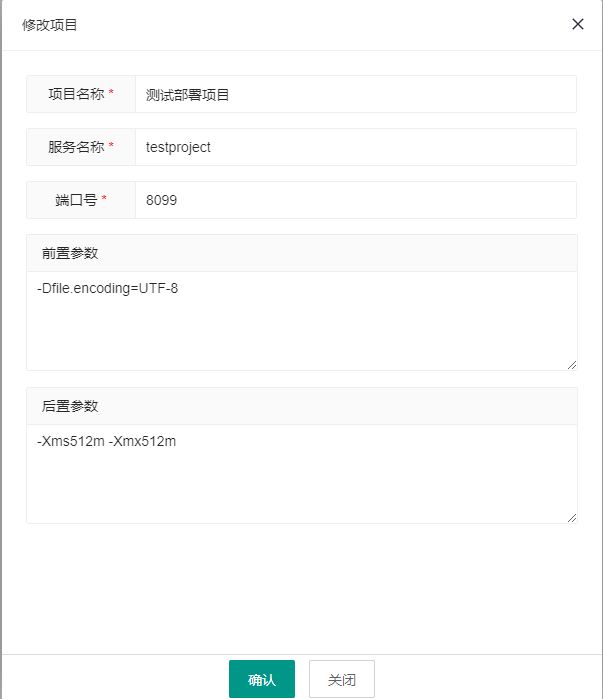
支持在线创建项目,上传Jar包,自动备份,配置启动参数,注册系统服务,查看启动日志等功能,具有以下优点
系统架构图如下
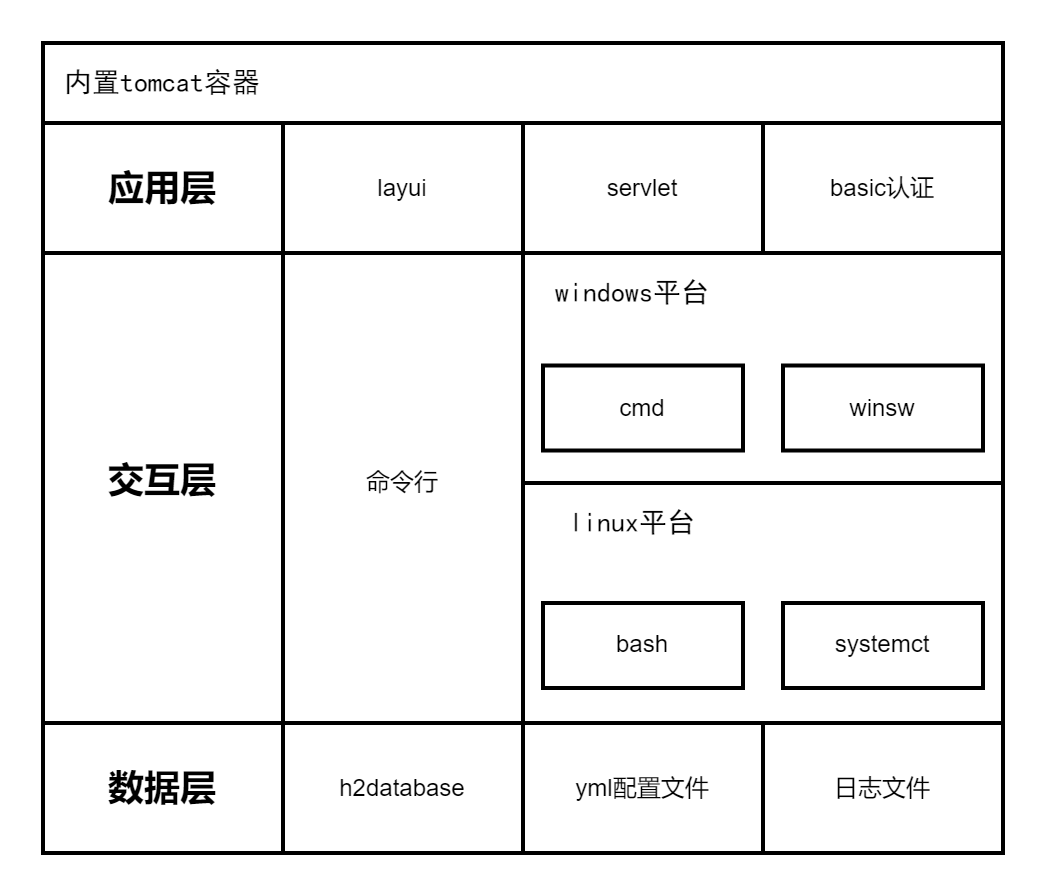
系统截图展示
首先通过系统os识别是windows平台还是linux平台
String os = System.getProperty("os.name").toLowerCase();
if (os.startsWith("win")) {
   platform = DepolyPlatform.Windows;
}
通过system-release文件识别部分基于CentOS开发的Linux系统
String command = "cat /etc/system-release";
String result = CMDUtil.executeLinuxCommand(command);
if (result.startsWith("Red Hat")) {
   platform = DepolyPlatform.LinuxRedHat;
} else if (result.startsWith("CentOS")) {
   platform = DepolyPlatform.LinuxCentOS;
} else if (result.startsWith("openEuler")) {
   platform = DepolyPlatform.LinuxOpenEuler;
}
通过issue文件识别部分基于Ubuntu/Debian开发的Linux系统
command = "cat /etc/issue";
result = CMDUtil.executeLinuxCommand(command);
if (!StringUtil.isEmpty(result)) {
  if (result.startsWith("Ubuntu")) {
     platform = DepolyPlatform.LinuxUbuntu;
} else if (result.startsWith("Debian")) {
      platform = DepolyPlatform.LinuxDebian;
   }
}
通过sc query命令判断服务状态
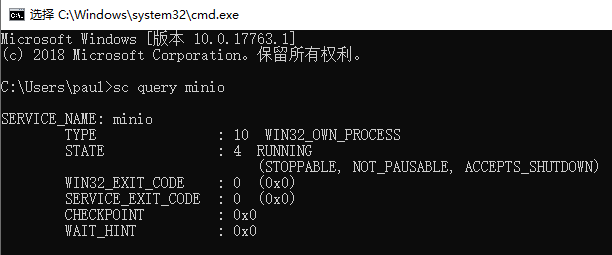
    public String getStatus(String serviceName) {
        String status = DepolyStatus.UnInstall;
        try {
            String command = "sc query " + serviceName;
            String commandResultFilePath = CMDUtil.executeWindowCommandStoreFile(command);
            BufferedReader reader = new BufferedReader(new InputStreamReader(new FileInputStream(commandResultFilePath)));
            String line = reader.readLine();
            while (line != null) {
                if (line.trim().startsWith("STATE")) {
                    if (line.trim().substring(line.trim().indexOf(":") + 1, line.trim().indexOf(":") + 4).trim().equals("1"))
                        status = DepolyStatus.Stopped;
                    else if (line.trim().substring(line.trim().indexOf(":") + 1, line.trim().indexOf(":") + 4).trim().equals("2"))
                        status = DepolyStatus.Startting;
                    else if (line.trim().substring(line.trim().indexOf(":") + 1, line.trim().indexOf(":") + 4).trim().equals("3"))
                        status = DepolyStatus.Stopping;
                    else if (line.trim().substring(line.trim().indexOf(":") + 1, line.trim().indexOf(":") + 4).trim().equals("4"))
                        status = DepolyStatus.Running;
                }
                line = reader.readLine();
            }
        } catch (IOException e) {
            LogUtil.error(e);
        }
        return status;
    }
通过winsw这个开源项目配置exe和xml文件将jar包注册为windows服务,项目地址:https://github.com/winsw/winsw/
通过systemctl status命令判断服务状态
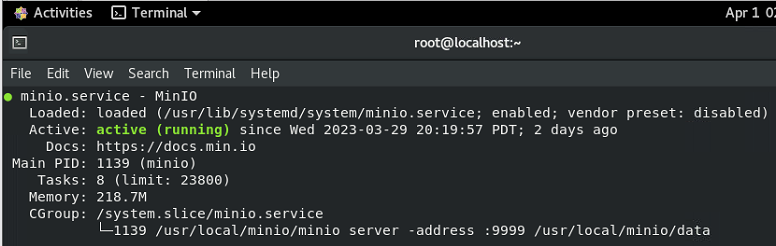
    public String getStatus(String serviceName) {
        String status = DepolyStatus.UnInstall;
        try {
            String command = "systemctl status " + serviceName;
            String commandResultFilePath = CMDUtil.executeLinuxCommandWithStore(command);
            BufferedReader reader = new BufferedReader(new InputStreamReader(new FileInputStream(commandResultFilePath)));
            String line = reader.readLine();
            while (line != null) {
                if (line.trim().startsWith("Active")) {
                    if (line.trim().indexOf("inactive (dead)") > 0)
                        status = DepolyStatus.Stopped;
                    else if (line.trim().indexOf("active (running)") > 0)
                        status = DepolyStatus.Running;
                    else if (line.trim().indexOf("failed") > 0)
                        status = DepolyStatus.Stopped;
                }
                line = reader.readLine();
            }
        } catch (IOException e) {
            LogUtil.error(e);
        }
        return status;
    }
通过拷贝service文件到systemd/system目录下注册linux服务
        <dependency>
            <groupId>org.yaml</groupId>
            <artifactId>snakeyaml</artifactId>
            <version>1.26</version>
        </dependency>
jarmanage:
  port: 8555
  username: admin
  password: abcd@1234
  backupcount: 5
    public static String getConfigValue(String configName){
        String configValue = "";
        try{
            Yaml yaml = new Yaml();
            InputStream resourceAsStream = new FileInputStream(new File("resources"+File.separator+"application.yml"));
            Map obj = yaml.load(resourceAsStream);
            Map<String,Object> param = (Map) obj.get("jarmanage");
            configValue = ConvertUtil.convert2String(param.get(configName));
        }catch (Exception e){
            LogUtil.error(e);
        }
        return configValue;
    }
        <dependency>
            <groupId>com.h2database</groupId>
            <artifactId>h2</artifactId>
            <version>2.1.214</version>
        </dependency>
    public static Connection getConnection() throws Exception {
        File file = new File("database");
        Connection conn = DriverManager.getConnection("jdbc:h2:file:" + file.getAbsolutePath() + File.separator + "manage", "root", "abcd@1234");
        return conn;
    }

    public static void executeSQL(String sql) {
        try {
            Connection conn = getConnection();
            Statement stmt = conn.createStatement();
            stmt.execute(sql);
            stmt.close();
            conn.close();
        } catch (Exception e) {
            LogUtil.error(e);
        }
    }
        <dependency>
            <groupId>org.apache.tomcat.embed</groupId>
            <artifactId>tomcat-embed-core</artifactId>
            <version>9.0.35</version>
        </dependency>
        <dependency>
            <groupId>org.apache.tomcat.embed</groupId>
            <artifactId>tomcat-embed-el</artifactId>
            <version>9.0.35</version>
        </dependency>
        <dependency>
            <groupId>org.apache.tomcat.embed</groupId>
            <artifactId>tomcat-embed-jasper</artifactId>
            <version>9.0.35</version>
        </dependency>
            //启动tomcat服务
            // 1.创建一个内嵌的Tomcat
            Tomcat tomcat = new Tomcat();
            // 2.设置Tomcat端口
            tomcat.setPort(8555);
            // 3.设置工作目录,tomcat需要使用这个目录进行写一些东西
            final String baseDir = "workspace" + File.separator;
            tomcat.setBaseDir(baseDir);
            tomcat.getHost().setAutoDeploy(false);
            // 4. 设置webapp资源路径
            String webappDirLocation = "webapp" + File.separator;
            StandardContext ctx = (StandardContext) tomcat.addWebapp("/", new File(webappDirLocation).getAbsolutePath());
            // 5. 设置上下文路每径
            String contextPath = "";
            ctx.setPath(contextPath);
            ctx.addLifecycleListener(new Tomcat.FixContextListener());
            ctx.setName("jar-manage");
            tomcat.getHost().addChild(ctx);
            //6.启动
            tomcat.getConnector();
            tomcat.start();
            tomcat.getServer().await();
        <plugins>
            <plugin>
                <!-- 打包包含引用 -->
                <artifactId>maven-assembly-plugin</artifactId>
                <configuration>
                    <descriptors>
                        <!-- 自定义配置 -->
                        <descriptor>package.xml</descriptor>
                    </descriptors>
                    <archive>
                        <manifest>
                            <!-- 运行类 -->
                            <mainClass>com.code2roc.jarmanage.Application</mainClass>
                        </manifest>
                    </archive>
                </configuration>
                <executions>
                    <execution>
                        <id>make-assembly</id>
                        <phase>package</phase>
                        <goals>
                            <goal>single</goal>
                        </goals>
                    </execution>
                </executions>
            </plugin>
            <plugin>
                <groupId>org.apache.maven.plugins</groupId>
                <artifactId>maven-compiler-plugin</artifactId>
                <configuration>
                    <source>8</source>
                    <target>8</target>
                </configuration>
            </plugin>
        </plugins>
<assembly xmlns="http://maven.apache.org/ASSEMBLY/2.1.1"
          xmlns:xsi="http://www.w3.org/2001/XMLSchema-instance"
          xsi:schemaLocation="http://maven.apache.org/ASSEMBLY/2.1.1 https://maven.apache.org/xsd/assembly-2.1.1.xsd">
    <!-- TODO: a jarjar format would be better -->
    <id>depoly</id>
    <formats>
        <format>jar</format>
    </formats>
    <includeBaseDirectory>false</includeBaseDirectory>
    <dependencySets>
        <dependencySet>
            <outputDirectory>/</outputDirectory>
            <useProjectArtifact>true</useProjectArtifact>
            <unpack>true</unpack>
            <scope>runtime</scope>
        </dependencySet>
    </dependencySets>
    <fileSets>
        <fileSet>
            <directory>src/main/webapp/</directory>
            <outputDirectory>/webapp</outputDirectory>
            <includes>
                <include>**/**</include>
            </includes>
        </fileSet>
        <fileSet>
            <directory>src/main/resources/</directory>
            <outputDirectory>/resources</outputDirectory>
            <includes>
                <include>**/**</include>
            </includes>
        </fileSet>
    </fileSets>
</assembly>
我是Google云的新手,我正在尝试对其进行首次部署。我的第一个部署是RubyonRails项目。我基本上是在关注thisguideinthegoogleclouddocumentation.唯一的区别是我使用的是我自己的项目,而不是他们提供的“helloworld”项目。这是我的app.yaml文件runtime:customvm:trueentrypoint:bundleexecrackup-p8080-Eproductionconfig.ruresources:cpu:0.5memory_gb:1.3disk_size_gb:10当我转到我的项目目录并运行gcloudprevie
我即将开始一个将录制和编辑音频文件的项目,我正在寻找一个好的库(最好是Ruby,但会考虑Java或.NET以外的任何库)以进行实时可视化波形。有人知道我应该从哪里开始搜索吗? 最佳答案 要流入浏览器的数据量很大。Flash或Flex图表可能是唯一能提高内存效率的解决方案。Javascript图表往往会因大型数据集而崩溃。 关于ruby-Ruby中的波形可视化,我们在StackOverflow上找到一个类似的问题: https://stackoverflow.c
我可以在Azure网站上部署RubyonRails吗? 最佳答案 还没有。目前仅支持.NET和PHP。 关于ruby-on-rails-RubyonRails可以部署在Azure网站上吗?,我们在StackOverflow上找到一个类似的问题: https://stackoverflow.com/questions/12964010/
在编写Ruby(客户端脚本)时,我看到了三种构建更长字符串的方法,包括行尾,所有这些对我来说“闻起来”有点难看。有没有更干净、更好的方法?变量递增。ifrender_quote?quote="NowthatthereistheTec-9,acrappyspraygunfromSouthMiami."quote+="ThisgunisadvertisedasthemostpopularguninAmericancrime.Doyoubelievethatshit?"quote+="Itactuallysaysthatinthelittlebookthatcomeswithit:themo
这篇文章是继上一篇文章“Observability:从零开始创建Java微服务并监控它(一)”的续篇。在上一篇文章中,我们讲述了如何创建一个Javaweb应用,并使用Filebeat来收集应用所生成的日志。在今天的文章中,我来详述如何收集应用的指标,使用APM来监控应用并监督web服务的在线情况。源码可以在地址 https://github.com/liu-xiao-guo/java_observability 进行下载。摄入指标指标被视为可以随时更改的时间点值。当前请求的数量可以改变任何毫秒。你可能有1000个请求的峰值,然后一切都回到一个请求。这也意味着这些指标可能不准确,你还想提取最小/
前置步骤我们都操作完了,这篇开始介绍jenkins的集成。话不多说,看操作1、登录进入jenkins后会让你选择安装插件,选择第一个默认的就行。安装完成后设置账号密码,重新登录。2、配置JDK和Git都需要执行路径,所以需要先把执行路径找到,先进入服务器的docker容器,2.1JDK的路径root@69eef9ee86cf:/usr/bin#echo$JAVA_HOME/usr/local/openjdk-82.2Git的路径root@69eef9ee86cf:/#whichgit/usr/bin/git3、先配置JDK和Git。点击:ManageJenkins>>GlobalToolCon
深度学习部署:Windows安装pycocotools报错解决方法1.pycocotools库的简介2.pycocotools安装的坑3.解决办法更多Ai资讯:公主号AiCharm本系列是作者在跑一些深度学习实例时,遇到的各种各样的问题及解决办法,希望能够帮助到大家。ERROR:Commanderroredoutwithexitstatus1:'D:\Anaconda3\python.exe'-u-c'importsys,setuptools,tokenize;sys.argv[0]='"'"'C:\\Users\\46653\\AppData\\Local\\Temp\\pip-instal
我正在尝试在配备ARMv7处理器的SynologyDS215j上安装ruby2.2.4或2.3.0。我用了optware-ng安装gcc、make、openssl、openssl-dev和zlib。我根据README中的说明安装了rbenv(版本1.0.0-19-g29b4da7)和ruby-build插件。.这些是随optware-ng安装的软件包及其版本binutils-2.25.1-1gcc-5.3.0-6gconv-modules-2.21-3glibc-opt-2.21-4libc-dev-2.21-1libgmp-6.0.0a-1libmpc-1.0.2-1libm
Ocra无法处理需要“tk”的应用程序require'tk'puts'nope'用奥克拉http://github.com/larsch/ocra不起作用(如链接中的一个问题所述)问题:https://github.com/larsch/ocra/issues/29(Ocra是1.9的"new"rubyscript2exe,本质上它用于将rb脚本部署为可执行文件)唯一的问题似乎是缺少tcl的DLL文件我不认为这是一个问题据我所知,问题是缺少tk的DLL文件如果它们是已知的,则可以在执行ocra时将它们包括在内有没有办法知道tk工作所需的DLL依赖项? 最佳答
我有一个类unzipper.rb,它使用Rubyzip解压文件。在我的本地环境中,我可以成功解压缩文件,而无需使用require'zip'明确包含依赖项但是在Heroku上,我得到一个NameError(uninitializedconstantUnzipper::Zip)我只能通过使用明确的require来解决问题:为什么这在Heroku环境中是必需的,但在本地主机上却不是?我的印象是Rails自动需要所有gem。app/services/unzipper.rbrequire'zip'#OnlyrequiredforHeroku.Workslocallywithout!class