aqs,它是抽象队列同步器AbstractQueuedSynchronizer ,是juc包下的核心组件。
aqs,是AbstractQueuedSynchronizer 的简称,位于juc包下。在jdk1.5后,提供了针对并发处理的一些工具。
通过aqs,其实它提供了实现锁和线程同步机制的上层抽象能力,在aqs中通过volidate修饰的共享变量status状态、和一个队列模型,(FIFO先进先出)线程等待队列,主要处理在多线程竞争时阻塞。
我们通过源码来分析aqs的能力,默认以8版本为主:
public abstract class AbstractQueuedSynchronizer
    extends AbstractOwnableSynchronizer
    implements java.io.Serializable {

    private static final long serialVersionUID = 7373984972572414691L;

    /**
     * Creates a new {@code AbstractQueuedSynchronizer} instance
     * with initial synchronization state of zero.
     */
    protected AbstractQueuedSynchronizer() { }

    static final class Node {
        /** 共享节点的引用 */
        static final Node SHARED = new Node();
        /** 独占节点的引用 */
        static final Node EXCLUSIVE = null;

        /** cancelled 取消节点 */
        static final int CANCELLED =  1;
        /** signal 唤醒后续节点 */
        static final int SIGNAL    = -1;
        /** condition 等待节点 */
        static final int CONDITION = -2;
        /**
         * 传播节点
         */
        static final int PROPAGATE = -3;

        /** CLH等待队列中的等待状态 */
        volatile int waitStatus;

        //当前node的上一个节点
        volatile Node prev;

        //当前node的下一个节点
        volatile Node next;

        //CLH中每个节点持有的thread
        volatile Thread thread;

        //如果是共享节点,就会持有它的引用,并且是SHARED?
        Node nextWaiter;

        //是否是共享节点
        final boolean isShared() {
            return nextWaiter == SHARED;
        }

        //获取上一个节点,上一个节点可能为空?
        final Node predecessor() throws NullPointerException {
            Node p = prev;
            if (p == null)
                throw new NullPointerException();
            else
                return p;
        }

        Node() {    // Used to establish initial head or SHARED marker
        }

        //node的构造
        Node(Thread thread, Node mode) {     // Used by addWaiter
            this.nextWaiter = mode;
            this.thread = thread;
        }

        Node(Thread thread, int waitStatus) { // Used by Condition
            this.waitStatus = waitStatus;
            this.thread = thread;
        }
    }

    //AQS中CLH的中的头节点
    private transient volatile Node head;

    //AQS中CLH的中的尾节点
    private transient volatile Node tail;

    //当前的同步状态
    private volatile int state;

    /**
     * Returns the current value of synchronization state.
     * This operation has memory semantics of a {@code volatile} read.
     * @return current state value
     */
    protected final int getState() {
        return state;
    }

    /**
     * Sets the value of synchronization state.
     * This operation has memory semantics of a {@code volatile} write.
     * @param newState the new state value
     */
    protected final void setState(int newState) {
        state = newState;
    }

    /**
     * Atomically sets synchronization state to the given updated
     * value if the current state value equals the expected value.
     * This operation has memory semantics of a {@code volatile} read
     * and write.
     *
     * @param expect the expected value
     * @param update the new value
     * @return {@code true} if successful. False return indicates that the actual
     *         value was not equal to the expected value.
     */
    protected final boolean compareAndSetState(int expect, int update) {
        // See below for intrinsics setup to support this
        return unsafe.compareAndSwapInt(this, stateOffset, expect, update);
    }

    //设置超时时间的锁定,最大时间,超时后进行休眠
    static final long spinForTimeoutThreshold = 1000L;
那么,aqs的基本结构应该是这样的:
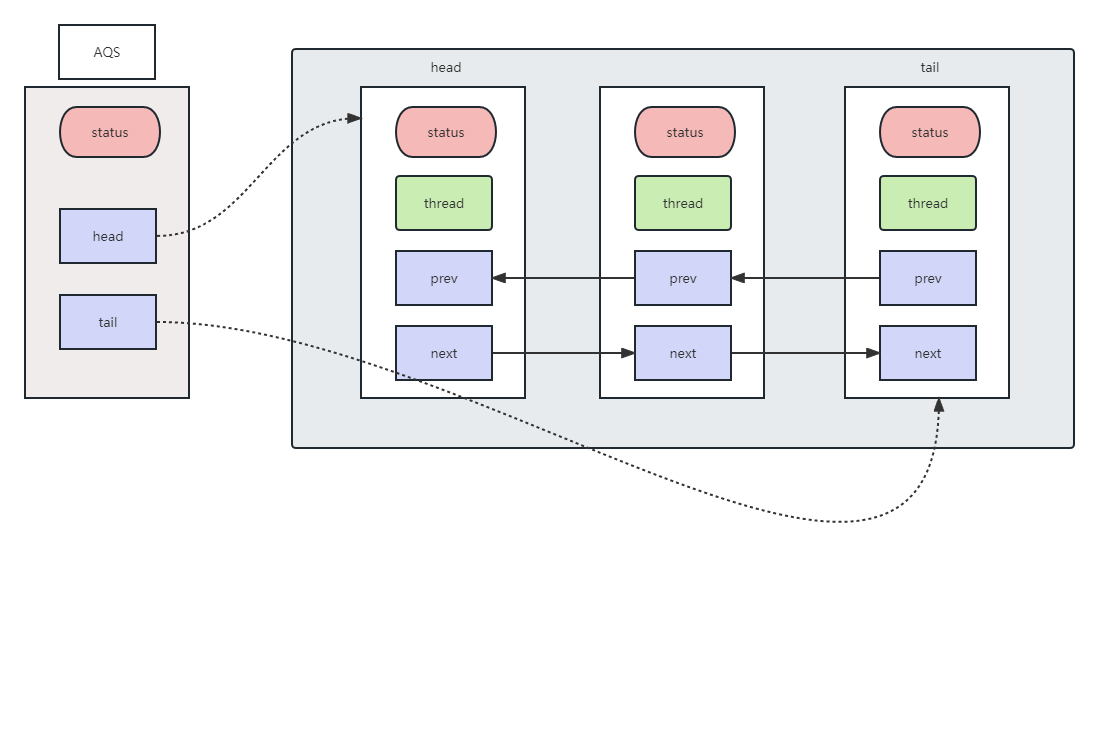
AQS的实现内部依赖同步队列,可以理解成一个FIFO双向队列,其中队列的元素以Node形式体现,如果线程竞争锁失败,AQS将当前线程通过Node的构建加入到队列中,同时阻塞当前线程,当获取锁的线程释放锁时,会从队列中唤醒下一个符合条件的Node。这种结构的特点是FIFO双向链表,即当前节点包含上一个节点和下一个节点的指针,对于Node来说其实就是包装了Thread的节点信息。每个节点又包含了volidate的state状态量,对节点线程的操作其实也依赖了volidate的状态量。
其中,state包含:
CANCELLED :节点取消运行,这种状态下上一个节点释放后不会唤醒当前节点,而是寻找下一个符合条件的节点,这种类型的节点也会通过补偿机制被移除
SIGNAL :当前节点释放后,唤醒next节点
PROPAGATE :独占锁中,表示当前传播状态
CONDITION:处于等待状态
除此之外,还有不指定state默认为0,代表当前是初始化节点
同时,AQS提供了对state的操作的方法:
protected final int getState() {
        return state;
    }

    /**
     * Sets the value of synchronization state.
     * This operation has memory semantics of a {@code volatile} write.
     * @param newState the new state value
     */
    protected final void setState(int newState) {
        state = newState;
    }

    /**
     * Atomically sets synchronization state to the given updated
     * value if the current state value equals the expected value.
     * This operation has memory semantics of a {@code volatile} read
     * and write.
     *
     * @param expect the expected value
     * @param update the new value
     * @return {@code true} if successful. False return indicates that the actual
     *         value was not equal to the expected value.
     */
    protected final boolean compareAndSetState(int expect, int update) {
        // See below for intrinsics setup to support this
        return unsafe.compareAndSwapInt(this, stateOffset, expect, update);
} 其中,在AQS中修改state的值,大多采用compareAndSetWaitStatus,通过unsafe的native方法。unsafe这里不做过多描述。
AQS的原理,可以理解为,将暂时无法请求到共享资源的线程封装成Node,将Node加入双向队列来实现分配锁。根据volidate,线程根据CAS去改变对应的状态,如果当前请求的资源空闲,则将当前线程操作共享资源并锁定;如果当前已经是锁定状态获取锁失败,就将请求分配到队列中阻塞,等待其他线程完成操作并释放锁,并通知后续节点进行操作。
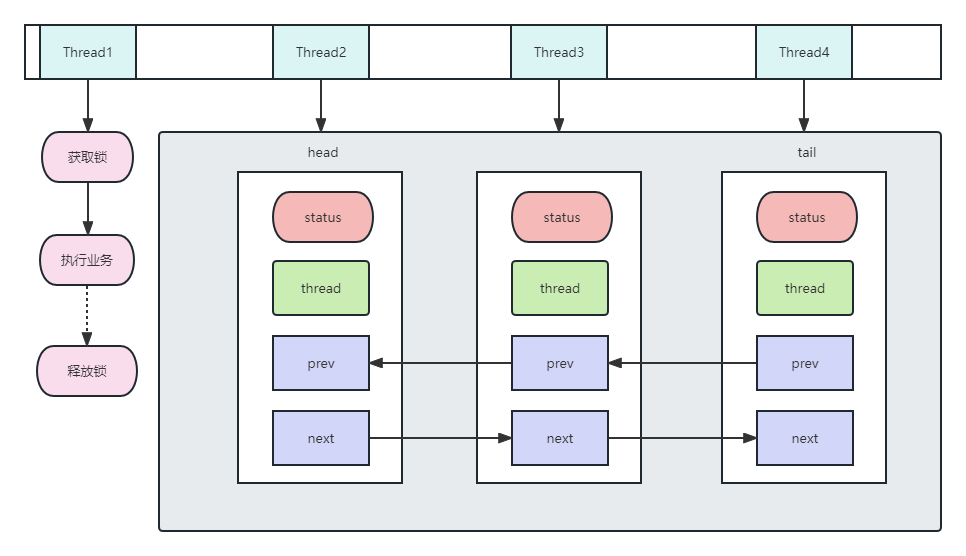
例如上图中Thread,如果Thread1获取到锁进行操作,那么其余Thread就被封装成Node进行阻塞,等待Thread1操作完成释放锁并唤醒后续节点进行消费。
AbstractQueuedSynchronizer是整个同步机制的基类,如果需要实现同步,一般来说继承AbstractQueuedSynchronizer并重写对应的方法,例如tryAcquire、tryRelease等方法:
| tryAcquire(int) | 独占方式。尝试获取资源,成功则返回true,失败则返回false |
| tryRelease(int) | 独占方式。尝试释放资源,成功则返回true, 失败则返回false |
| tryAcquireShared(int) | 共享方式。尝试获取资源。负数表示失败;大于等于0表示成功,其中0表示没有剩余可用资源 |
| tryReleaseShared(int) | tryReleaseShared(int):共享方式。尝试释放资源,如果释放后允许唤醒后续等待结点返回true,否则返回false |
那对于独占锁和共享锁,又有什么区别呢?
常见的AQS锁有:ReentrantLock、 Semaphore、 CountDownLatch、 CyclicBarrier、ReentrantReadWritelock 等;
独占锁:表示只有一个线程能操作共享资源,例如ReentrantLock
共享锁:多个线程可以同时操作一个共享资源,例如Semaphore,CountDownLatch,CyclicBarrier
独占+共享:ReentrantReadWritelock,又称为读写锁,读锁是共享锁,写锁是独占锁。
那么公平锁和非公平锁,又怎么理解呢?
公平锁:以队列线程的顺序保证,先入列的线程应该更先获取到锁
非公平锁:没有线程的顺序优先级,靠竞争获取锁
public final void acquire(int arg) {
        if (!tryAcquire(arg) &&
            acquireQueued(addWaiter(Node.EXCLUSIVE), arg))
            selfInterrupt();
}
首先 tryAcquire和 tryRelease都是模板方法,需要实现AQS的类去具体实现
针对获取锁的方法,如果tryAcquire获取锁成功了,那么就直接返回了,如果获取失败了,就要加入双端阻塞队列,然后通过 acquireQueued自旋。
private Node addWaiter(Node mode) {
     //通过构造包装当前Node
        Node node = new Node(Thread.currentThread(), mode);
        // Try the fast path of enq; backup to full enq on failure
        Node pred = tail;
        if (pred != null) {
            node.prev = pred;
            if (compareAndSetTail(pred, node)) {
                pred.next = node;
                return node;
            }
        }
        enq(node);
        return node;
}
首先,addWaiter将当前节点包装成Node,然后将它放在tail的尾部,然后通过自旋入队;如果tail是空的,比如第一个节点,就通过enq的方式入队
private Node enq(final Node node) {
        for (;;) {
            Node t = tail;
            if (t == null) { // Must initialize
                if (compareAndSetHead(new Node()))
                    tail = head;
            } else {
                node.prev = t;
                if (compareAndSetTail(t, node)) {
                    t.next = node;
                    return t;
                }
            }
        }
    }
enq的方式,就是通过自旋的方式入队。
final boolean acquireQueued(final Node node, int arg) {

        boolean failed = true;
        try {
       //是否中断
            boolean interrupted = false;
       //自旋
            for (;;) {
          //获取node的上一个节点
                final Node p = node.predecessor();
          //上一节点必须是头节点并获取锁成功
                if (p == head && tryAcquire(arg)) {
                    setHead(node);
                    p.next = null; // help GC
                    failed = false;
                    return interrupted;
                }
          //中断
                if (shouldParkAfterFailedAcquire(p, node) &&
                    parkAndCheckInterrupt())
                    interrupted = true;
            }
        } finally {
            if (failed)
                cancelAcquire(node);
        }
    }
acquireQueued 也是自旋设置header,首先自旋获取上一个node,如果这个node是头节点才有资格获取独占锁,并等待前一个节点状态为SIGNAL,并且tryAcquire成功,否则将当前线程休眠,等待release唤醒。
如果当前节点处理成功,那么当前的node就会被设置为header,共享锁的获取,需要依赖前一个节点的状态推动。只有当前一个节点处于SIGNAL并且是head的时候当前节点才有机会被处理。
private static boolean shouldParkAfterFailedAcquire(Node pred, Node node) {
        /** 获取上一个节点的状态,如果是SIGNAL,那么直接返回等待被唤醒*/
        int ws = pred.waitStatus;
        if (ws == Node.SIGNAL)
            /*
             * 等待被唤醒
             */
            return true;
        if (ws > 0) {
            /*
             如果大于0 那么只能是CANCELLED 那么就要将node之前所有CANCELLED都移除
             */
            do {
                node.prev = pred = pred.prev;
            } while (pred.waitStatus > 0);
            pred.next = node;
        } else {
            /*
             将前一个node状态改为SIGNAL
             */
            compareAndSetWaitStatus(pred, ws, Node.SIGNAL);
        }
        return false;
    }
根据上一个节点的状态,处理。如果上一个节点处于SIGNAL,那么就阻塞等待,如果上一个节点已经被取消,那么清除不需要的Node并将当前Node指向上一节点的prev。
private final boolean parkAndCheckInterrupt() {
        LockSupport.park(this);
        return Thread.interrupted();
    }
如果上一节点是SIGNAL,那么让当前节点休眠,等待被唤醒后执行return。
 public final boolean release(int arg) {
        if (tryRelease(arg)) {
            Node h = head;
            if (h != null && h.waitStatus != 0)
                unparkSuccessor(h);
            return true;
        }
        return false;
    }
释放的流程可以看出,首先通过 tryRelease模板方法,然后根据head节点
只有当head不为空,并且head不是初始状态时才会释放。
    private void unparkSuccessor(Node node) {
        /*
         根据head节点状态
         */
        int ws = node.waitStatus;
        if (ws < 0)
            //小于0 可能为SIGNAL, PROPAGATE 那么就直接设置为初始状态
            compareAndSetWaitStatus(node, ws, 0);

        /*
            获取head的下一个节点.
         */
        Node s = node.next;
        //如果下一节点时空或者已经被取消
        if (s == null || s.waitStatus > 0) {
            s = null;
            //这里是从 tail 尾部开始找的 ?
            for (Node t = tail; t != null && t != node; t = t.prev)
                //找到最靠后的状态小于0 的节点
                if (t.waitStatus <= 0)
                    s = t;
        }
        if (s != null)
            //唤醒线程
            LockSupport.unpark(s.thread);
    }
释放,就是先通过 release尝试,如果成功并且head可用,就找到符合条件的当前节点的后面一个节点进行唤醒。
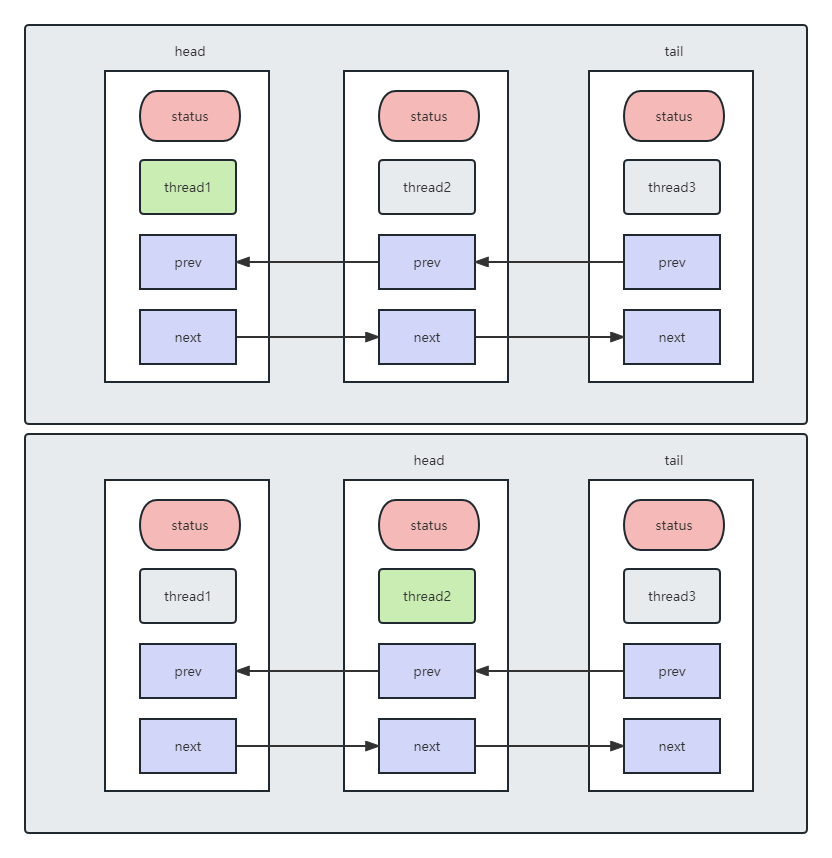
例如现在有三个Thread,首先Thread1通过tryAcquire成功,并且获取锁运行,Thread2和3就包装成了Node入队。同时,通过shouldParkAfterFailedAcquire调整状态、修改为SIGNAL;
如果Thread1通过release,这时如果Thread2也通过tryAcquire成功,并且它的上一节点是header,那么Thread2也会被运行,同时Thread2成为了新的header;Thread1的status就会变为0;
如果Thread2也进行release,那么接下来就应该是Thread3 tryAcquire。如果Thread3被取消了,那么就会从后面选择一个新的Node并清除取消的节点。
    public final void acquireShared(int arg) {
        if (tryAcquireShared(arg) < 0)
            doAcquireShared(arg);
    }
根据 tryAcquireShared子类对应的实现,这里返回的应该是可用的资源数。实际获取在 doAcquireShared中。
    private void doAcquireSharedInterruptibly(int arg)
        throws InterruptedException {
        //包装成SHARED节点的Node
        final Node node = addWaiter(Node.SHARED);
        boolean failed = true;
        try {
            for (;;) {
                //根据上一节点处理
                final Node p = node.predecessor();
                if (p == head) {
                    int r = tryAcquireShared(arg);
                    if (r >= 0) {
                        setHeadAndPropagate(node, r);
                        p.next = null; // help GC
                        failed = false;
                        return;
                    }
                }
                if (shouldParkAfterFailedAcquire(p, node) &&
                    parkAndCheckInterrupt())
                    throw new InterruptedException();
            }
        } finally {
            if (failed)
                cancelAcquire(node);
        }
    }
首先获取的上一节点是否是头节点,只有前置节点是头节点才能做后续的处理。如果可用资源r > 0,那么才会设置为header并且唤醒,如果r = 0那不会唤醒其他节点。
独占锁这里,只是设置了head,没有唤醒的操作。
共享锁这里,可能会唤醒多个线程,这里取决于可用资源的数量。
如果它的前置节点不是head,与独占锁同理,线程休眠。
    private void setHeadAndPropagate(Node node, int propagate) {
        Node h = head; // Record old head for check below
        //设置node为head
        setHead(node);

        //如果可用资源大于0 或者头节点状态是SIGNAL,PROPAGATE 或者头节点是初始化的
        if (propagate > 0 || h == null || h.waitStatus < 0 ||
            (h = head) == null || h.waitStatus < 0) {
            Node s = node.next;

            //如果是共享节点 或者 当前节点是最后一个节点了 那就释放
            if (s == null || s.isShared())
                doReleaseShared();
        }
    }
那么,如果说可用资源不够了,< 0 , 那么就需要等待,先将Node添加到对应的队列中,当自己被唤醒的时候,再去唤醒后面的节点进行竞争,一直到没有可以再分配的资源,循环往复。
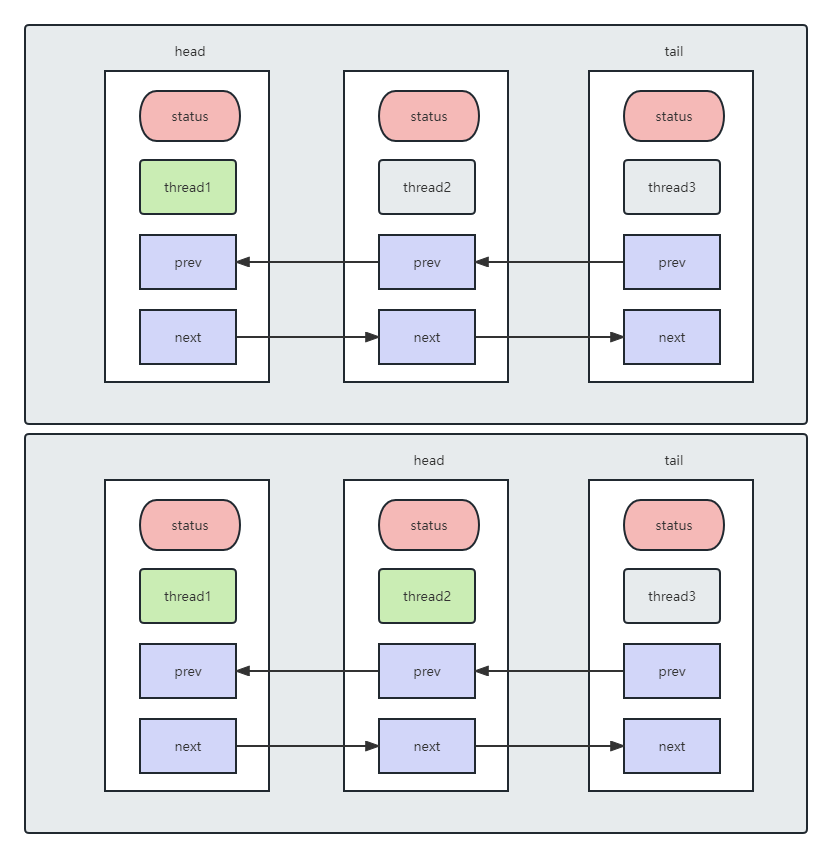
这时,如果Thread1先获取到资源,并且会把当前资源设置为head,并且当前状态会变为SIGNAL。如果这时还有空闲资源,即propagate>0,Thread1会尝试唤醒Thread2,Thread2被正常唤醒后,则尝试唤醒Thread3。
共享锁释放
    private void doReleaseShared() {

        for (;;) {
            //找到对应的头节点
            Node h = head;
            if (h != null && h != tail) {
                int ws = h.waitStatus;
                if (ws == Node.SIGNAL) {
                    //如果是SIGNAL 说明可以唤醒后续节点
                    if (!compareAndSetWaitStatus(h, Node.SIGNAL, 0))
                        continue;            // loop to recheck cases
                    //唤醒后续节点
                    unparkSuccessor(h);
                }
                else if (ws == 0 &&
                         !compareAndSetWaitStatus(h, 0, Node.PROPAGATE))
                    continue;                // loop on failed CAS
            }
            if (h == head)                   // loop if head changed
                break;
        }
    }
共享锁释放,主要考虑的是释放唤醒其他线程竞争设置head节点,会释放最新的head后继节点。
不管哪种锁,都会在自旋竞争中失败,对于处理失败的节点,需要取消竞争。
    private void cancelAcquire(Node node) {
        // 如果当前节点已经不存在了,那就没有处理它的意义了
        if (node == null)
            return;

        node.thread = null;

        // 将已经取消的节点移除, state>0说明是一个被取消的节点 那么让当前节点直接连接到上一个可用的节点
        Node pred = node.prev;
        while (pred.waitStatus > 0)
            node.prev = pred = pred.prev;

        // predNext is the apparent node to unsplice. CASes below will
        // fail if not, in which case, we lost race vs another cancel
        // or signal, so no further action is necessary.
        Node predNext = pred.next;

        //将当前状态设置为取消
        node.waitStatus = Node.CANCELLED;

        //如果当前节点已经是tail了 那么说明它就是最后的一个节点了,那么就将它的上一个节点设置为最后一个tail
        if (node == tail && compareAndSetTail(node, pred)) {
            compareAndSetNext(pred, predNext, null);
        } else {
            // If successor needs signal, try to set pred's next-link
            // so it will get one. Otherwise wake it up to propagate.
            int ws;
            //如果前置节点不是头节点,并且前置状态为SIGNAL或者可以修改为SIGNAL, 就移除node,并设置前置节点状态为SIGNAL
            if (pred != head &&
                ((ws = pred.waitStatus) == Node.SIGNAL ||
                 (ws <= 0 && compareAndSetWaitStatus(pred, ws, Node.SIGNAL))) &&
                pred.thread != null) {
                Node next = node.next;
                if (next != null && next.waitStatus <= 0)
                    compareAndSetNext(pred, predNext, next);
            } else {
                //唤醒node的下一个可用的节点
                unparkSuccessor(node);
            }

            node.next = node; // help GC
        }
    }
其实它的处理流程是:
取消当前节点的状态;
将当前取消的节点的前后符合条件的节点连接起来;
如果前置节点释放锁,那么同时唤醒后续节点;
独占锁中断
public final void acquireInterruptibly(int arg)
            throws InterruptedException {
        if (Thread.interrupted())
            throw new InterruptedException();
        if (!tryAcquire(arg))
            doAcquireInterruptibly(arg);
    }
private void doAcquireInterruptibly(int arg)
throws InterruptedException {
final Node node = addWaiter(Node.EXCLUSIVE);
boolean failed = true;
try {
for (;;) {
final Node p = node.predecessor();
if (p == head && tryAcquire(arg)) {
setHead(node);
p.next = null; // help GC
failed = false;
return;
}
if (shouldParkAfterFailedAcquire(p, node) &&
parkAndCheckInterrupt())
throw new InterruptedException();
}
} finally {
if (failed)
cancelAcquire(node);
}
}可以看到,中断的逻辑主要是处理了中断异常,其中共享锁的处理方式也类似
    public final void acquireSharedInterruptibly(int arg)
            throws InterruptedException {
        if (Thread.interrupted())
            throw new InterruptedException();
        if (tryAcquireShared(arg) < 0)
            doAcquireSharedInterruptibly(arg);
    }
private void doAcquireSharedInterruptibly(int arg)
throws InterruptedException {
final Node node = addWaiter(Node.SHARED);
boolean failed = true;
try {
for (;;) {
final Node p = node.predecessor();
if (p == head) {
int r = tryAcquireShared(arg);
if (r >= 0) {
setHeadAndPropagate(node, r);
p.next = null; // help GC
failed = false;
return;
}
}
if (shouldParkAfterFailedAcquire(p, node) &&
parkAndCheckInterrupt())
throw new InterruptedException();
}
} finally {
if (failed)
cancelAcquire(node);
}
}
acquire在处理竞争时,会一直阻塞等待,AQS提供了获取锁超时的机制:超过最大时间后直接失败,不参与竞争。
    public final boolean tryAcquireSharedNanos(int arg, long nanosTimeout)
            throws InterruptedException {
        //处理中断状态
        if (Thread.interrupted())
            throw new InterruptedException();
        //竞争下处理
        return tryAcquireShared(arg) >= 0 ||
            doAcquireSharedNanos(arg, nanosTimeout);
    }

    public final void acquireInterruptibly(int arg)
            throws InterruptedException {
        if (Thread.interrupted())
            throw new InterruptedException();
        if (!tryAcquire(arg))
            doAcquireInterruptibly(arg);
    }
private boolean doAcquireNanos(int arg, long nanosTimeout)
throws InterruptedException {
//如果没有设置超时时间,放弃获取锁
if (nanosTimeout <= 0L)
return false;
//计算超时时间
final long deadline = System.nanoTime() + nanosTimeout;
//同时将node入队
final Node node = addWaiter(Node.EXCLUSIVE);
boolean failed = true;
try {
for (;;) {
final Node p = node.predecessor();
if (p == head && tryAcquire(arg)) {
setHead(node);
p.next = null; // help GC
failed = false;
return true;
}
//计算时间是否超时,如果超过了就放弃
nanosTimeout = deadline - System.nanoTime();
if (nanosTimeout <= 0L)
return false;
//当前程应该被休眠并且时间应该大于指定的时间时,设置时间的park
if (shouldParkAfterFailedAcquire(p, node) &&
nanosTimeout > spinForTimeoutThreshold)
LockSupport.parkNanos(this, nanosTimeout);
if (Thread.interrupted())
throw new InterruptedException();
}
} finally {
if (failed)
cancelAcquire(node);
}
}
private boolean doAcquireSharedNanos(int arg, long nanosTimeout)
throws InterruptedException {
if (nanosTimeout <= 0L)
return false;
final long deadline = System.nanoTime() + nanosTimeout;
final Node node = addWaiter(Node.SHARED);
boolean failed = true;
try {
for (;;) {
final Node p = node.predecessor();
if (p == head) {
int r = tryAcquireShared(arg);
if (r >= 0) {
setHeadAndPropagate(node, r);
p.next = null; // help GC
failed = false;
return true;
}
}
nanosTimeout = deadline - System.nanoTime();
if (nanosTimeout <= 0L)
return false;
if (shouldParkAfterFailedAcquire(p, node) &&
nanosTimeout > spinForTimeoutThreshold)
LockSupport.parkNanos(this, nanosTimeout);
if (Thread.interrupted())
throw new InterruptedException();
}
} finally {
if (failed)
cancelAcquire(node);
}
}
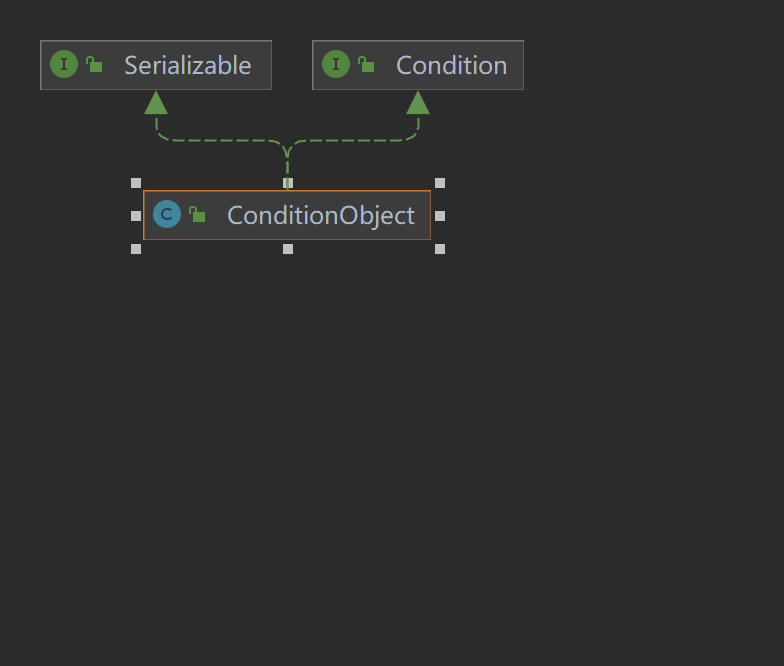
ConditionObject作为AQS下的一个内部类,通过Node的格式定义了一个单向队列,并且它实现了Condition, 实现了线程通信的wait和signal
    public class ConditionObject implements Condition, java.io.Serializable {
        private static final long serialVersionUID = 1173984872572414699L;
        /** First node of condition queue. */
        private transient Node firstWaiter;
        /** Last node of condition queue. */
        private transient Node lastWaiter;

        //等待队列是一个单向队列,内部维护了队列的首节点和尾节点
        //

        /**
         * Creates a new {@code ConditionObject} instance.
         */
        public ConditionObject() { }
    }
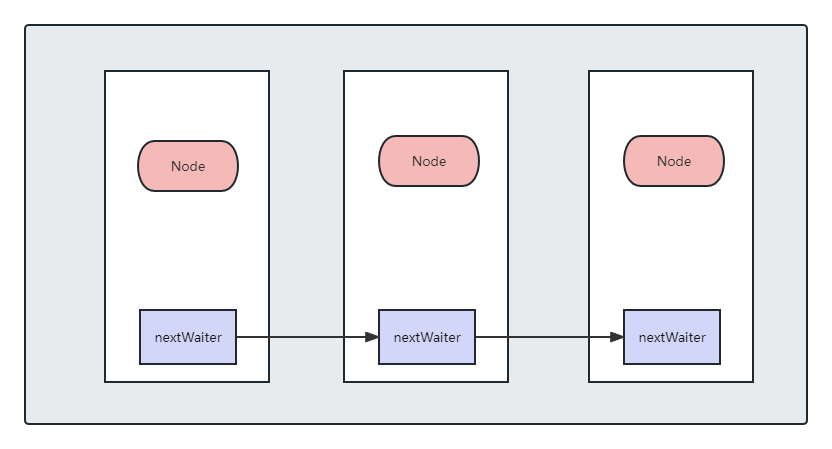
其中,每个节点还是对应的Node节点,只是根据Node中的nextWaiter进行连接、每个Node上还是有一个waitStatus。在 ConditionObject中的state的范围:
CONDITION :等待中
CANCELLED :取消
SIGNAL :加入阻塞队列
        /** Mode meaning to reinterrupt on exit from wait */
        private static final int REINTERRUPT =  1;
        /** Mode meaning to throw InterruptedException on exit from wait */
        private static final int THROW_IE    = -1;
REINTERRUPT :返回不抛出异常
THROW_IE:抛出中断异常
        public final void await() throws InterruptedException {
            //中断线程
            if (Thread.interrupted())
                throw new InterruptedException();
            //添加到Condition
            Node node =    addConditionWaiter();
            //释放资源
            long savedState    = fullyRelease(node);
            int    interruptMode =    0;
            //节点不在阻塞队列
            while (!isOnSyncQueue(node)) {
                LockSupport.park(this);
                //节点加入同步队列后退出循环
                if ((interruptMode = checkInterruptWhileWaiting(node)) != 0)
                    break;
            }
            if (acquireQueued(node,    savedState)    && interruptMode !=    THROW_IE)
                interruptMode =    REINTERRUPT;
            if (node.nextWaiter    != null) //    clean up if    cancelled
                unlinkCancelledWaiters();
            if (interruptMode != 0)
                reportInterruptAfterWait(interruptMode);
        }


        //首先加入节点
        private Node addConditionWaiter() {
            Node t = lastWaiter;
            // 如果最后一个节点不是空且不是CONDITION状态
            if (t != null && t.waitStatus != Node.CONDITION) {
                //取消链接
                unlinkCancelledWaiters();
                t = lastWaiter;
            }
            //创建一个新的节点
            Node node = new Node(Thread.currentThread(), Node.CONDITION);
            if (t == null)
                //t为空说明目前还没有last,将node设置为头?初始化?否则就放在队尾去
                firstWaiter = node;
            else
                t.nextWaiter = node;
            //队尾指向node
            lastWaiter = node;
            return node;
        }

        final long fullyRelease(Node node) {
            boolean failed = true;
            try {
                long savedState = getState();
                //这里认为它就处于 head节点 就进行释放
                if (release(savedState)) {
                    failed = false;
                    return savedState;
                } else {
                    throw new IllegalMonitorStateException();
                }
            } finally {
                //如果释放失败 那么将节点状态设置为CANCELLED
                if (failed)
                    node.waitStatus = Node.CANCELLED;
            }
        }

        //是否是在同步队列中
        final boolean isOnSyncQueue(Node node) {
            if (node.waitStatus == Node.CONDITION || node.prev == null)
                return false;
            if (node.next != null) // If has successor, it must be on queue
                return true;
            /*
             * node.prev can be non-null, but not yet on queue because
             * the CAS to place it on queue can fail. So we have to
             * traverse from tail to make sure it actually made it.  It
             * will always be near the tail in calls to this method, and
             * unless the CAS failed (which is unlikely), it will be
             * there, so we hardly ever traverse much.
             */
            return findNodeFromTail(node);
        }

        //依次查找 找到了就返回
        private boolean findNodeFromTail(Node node) {
            Node t = tail;
            for (;;) {
                if (t == node)
                    return true;
                if (t == null)
                    return false;
                t = t.prev;
            }
        }

        private int checkInterruptWhileWaiting(Node node) {
            return Thread.interrupted() ?
                (transferAfterCancelledWait(node) ? THROW_IE : REINTERRUPT) :
                0;
        }

        private void reportInterruptAfterWait(int interruptMode)
            throws InterruptedException {
            if (interruptMode == THROW_IE)
                throw new InterruptedException();
            else if (interruptMode == REINTERRUPT)
                selfInterrupt();
        }

        final boolean transferAfterCancelledWait(Node node) {
            if (compareAndSetWaitStatus(node, Node.CONDITION, 0)) {
                enq(node);
                return true;
            }
            /*
             * If we lost out to a signal(), then we can't proceed
             * until it finishes its enq().  Cancelling during an
             * incomplete transfer is both rare and transient, so just
             * spin.
             */
            while (!isOnSyncQueue(node))
                Thread.yield();
            return false;
        }
针对 await其实是在多个Thread调用后创建 addConditionWaiter加入队列,同时释放持有的资源,即先放弃资源后再进行等待。如何同步到AQS?如何唤醒?
再await的while中,如果它不在同步队列中,就要阻塞直到它被唤醒、再加入同步队列
唤醒
        public final void signal() {
            if (!isHeldExclusively())
                throw new IllegalMonitorStateException();

            //获取第一个Node
            Node first = firstWaiter;
            if (first != null)
                //唤醒
                doSignal(first);
        }

        private void doSignal(Node first) {
            do {
                //first之后还有节点吗 如果没有了就把last设置为空
                if ( (firstWaiter = first.nextWaiter) == null)
                    lastWaiter = null;
                //取消first的指针
                first.nextWaiter = null;
            } while (!transferForSignal(first) &&
                     (first = firstWaiter) != null);
        }

        //
        final boolean transferForSignal(Node node) {
            /*
             * If cannot change waitStatus, the node has been cancelled.
             */
            //先将节点从CONDITION状态改变为0 如果失败可能是节点已经被取消
            if (!compareAndSetWaitStatus(node, Node.CONDITION, 0))
                return false;

            //自旋加入阻塞队列
            Node p = enq(node);
            int ws = p.waitStatus;
            //如果上一个节点已经取消或者被唤醒了 那就尝试把当前节点也唤醒
            if (ws > 0 || !compareAndSetWaitStatus(p, ws, Node.SIGNAL))
                LockSupport.unpark(node.thread);
            return true;
        }
这里唤醒其实就是把Condition的最近的一个休眠的节点加入阻塞队列,并且唤醒竞争
        public final void signalAll() {
            if (!isHeldExclusively())
                throw new IllegalMonitorStateException();
            Node first = firstWaiter;
            if (first != null)
                doSignalAll(first);
        }

        private void doSignalAll(Node first) {
            lastWaiter = firstWaiter = null;
            //这里跟单独的节点不一样的是 这里会依次找到所有的节点 从first一直找到last
            do {
                Node next = first.nextWaiter;
                first.nextWaiter = null;
                transferForSignal(first);
                first = next;
            } while (first != null);
        }
尝试通过RVM将RubyGems升级到版本1.8.10并出现此错误:$rvmrubygemslatestRemovingoldRubygemsfiles...Installingrubygems-1.8.10forruby-1.9.2-p180...ERROR:Errorrunning'GEM_PATH="/Users/foo/.rvm/gems/ruby-1.9.2-p180:/Users/foo/.rvm/gems/ruby-1.9.2-p180@global:/Users/foo/.rvm/gems/ruby-1.9.2-p180:/Users/foo/.rvm/gems/rub
我在我的Rails项目中使用Pow和powifygem。现在我尝试升级我的ruby版本(从1.9.3到2.0.0,我使用RVM)当我切换ruby版本、安装所有gem依赖项时,我通过运行railss并访问localhost:3000确保该应用程序正常运行以前,我通过使用pow访问http://my_app.dev来浏览我的应用程序。升级后,由于错误Bundler::RubyVersionMismatch:YourRubyversionis1.9.3,butyourGemfilespecified2.0.0,此url不起作用我尝试过的:重新创建pow应用程序重启pow服务器更新战俘
我实际上是在尝试使用RVM在我的OSX10.7.5上更新ruby,并在输入以下命令后:rvminstallruby我得到了以下回复:Searchingforbinaryrubies,thismighttakesometime.Checkingrequirementsforosx.Installingrequirementsforosx.Updatingsystem.......Errorrunning'requirements_osx_brew_update_systemruby-2.0.0-p247',pleaseread/Users/username/.rvm/log/138121
我最近决定从我的系统中卸载RVM。在thispage提出的一些论点说服我:实际上,我的决定是,我根本不想担心Ruby的多个版本。我只想使用1.9.2-p290版本而不用担心其他任何事情。但是,当我在我的Mac上运行ruby--version时,它告诉我我的版本是1.8.7。我四处寻找如何简单地从我的Mac上卸载这个Ruby,但奇怪的是我没有找到任何东西。似乎唯一想卸载Ruby的人运行linux,而使用Mac的每个人都推荐RVM。如何从我的Mac上卸载Ruby1.8.7?我想升级到1.9.2-p290版本,并且我希望我的系统上只有一个版本。 最佳答案
我完全不是程序员,正在学习使用Ruby和Rails框架进行编程。我目前正在使用Ruby1.8.7和Rails3.0.3,但我想知道我是否应该升级到Ruby1.9,因为我真的没有任何升级的“遗留”成本。缺点是什么?我是否会遇到与普通gem的兼容性问题,或者甚至其他我不太了解甚至无法预料的问题? 最佳答案 你应该升级。不要坚持从1.8.7开始。如果您发现不支持1.9.2的gem,请避免使用它们(因为它们很可能不被维护)。如果您对gem是否兼容1.9.2有任何疑问,您可以在以下位置查看:http://www.railsplugins.or
我在我的rails应用程序中安装了来自github.com的acts_as_versioned插件,但有一段代码我不完全理解,我希望有人能帮我解决这个问题class_eval我知道block内的方法(或任何它是什么)被定义为类内的实例方法,但我在插件的任何地方都找不到定义为常量的CLASS_METHODS,而且我也不确定是什么here,并且有问题的代码从lib/acts_as_versioned.rb的第199行开始。如果有人愿意告诉我这里的内幕,我将不胜感激。谢谢-C 最佳答案 这是一个异端。http://en.wikipedia
我们有一个目前在Rails2.3.12版和Ruby1.8.7版上运行的应用程序。我们想将我们的应用程序更新到Rails4.0和Ruby2.1.0。我们有大约200个模型和150个Controller。我想知道升级过程需要多大的努力。您还可以提供升级可以遵循的步骤。我们应该先升级Ruby然后再升级Rails还是相反? 最佳答案 您想要实现的目标将是史诗般的努力。我无法为您提供分步说明,因为不可能在一个答案中涵盖所有情况。我建议不要同时升级Ruby和Rails,而是分步升级。升级本身的复杂性是巨大的,但只要您的应用程序具有合理的测试覆盖
按照目前的情况,这个问题不适合我们的问答形式。我们希望答案得到事实、引用或专业知识的支持,但这个问题可能会引发辩论、争论、投票或扩展讨论。如果您觉得这个问题可以改进并可能重新打开,visitthehelpcenter指导。关闭9年前。我最近开始学习Ruby,这是我的第一门编程语言。我对语法感到满意,并且我已经完成了许多只教授相同基础知识的教程。我已经写了一些小程序(包括我自己的数组排序方法,在有人告诉我谷歌“冒泡排序”之前我认为它非常聪明),但我觉得我需要尝试更大更难的东西来理解更多关于Ruby.关于如何执行此操作的任何想法?
我在Ruby中遇到了一个关于Dir[]和File.join()的简单程序,blobs_dir='/path/to/dir'Dir[File.join(blobs_dir,"**","*")].eachdo|file|FileUtils.rm_rf(file)ifFile.symlink?(file)我有两个困惑:首先,File.join(@blobs_dir,"**","*")中的第二个和第三个参数是什么意思?其次,Dir[]在Ruby中有什么用?我只知道它等价于Dir.glob(),但是,我对Dir.glob()确实不是很清楚。 最佳答案
1.回顾.TransportServicepublicclassTransportServiceextendsAbstractLifecycleComponentTransportService:方法:1publicfinalTextendsTransportResponse>voidsendRequest(finalTransport.Connectionconnection,finalStringaction,finalTransportRequestrequest,finalTransportRequestOptionsoptions,TransportResponseHandlerT>
