基于防火墙双击热备三层网络规划_ensp综合实验
有什么问题可以在评论区说明自己遇到的情况,博主看到会第一时间回复,希望其他人也可以回复别人的问题。
(后期有什么内容会在博文中进行修改和更新的)
可根据以下所提供的设计与实现步骤过程一步一步自行实现(每一条命令都是关键的命令);但是如果有需要的也可以根据以下地址进行下载完整的topo图和完整的配置进行参考与借鉴,如若拿到topo图可多display查看配置,查看相应的命令,配套资源连接如下,相应的内容如下图所示:
基于防火墙双击热备三层网络规划_ensp综合实验topo和完整配置+一步步的所有配置命令(ensp)+全程的配置视频

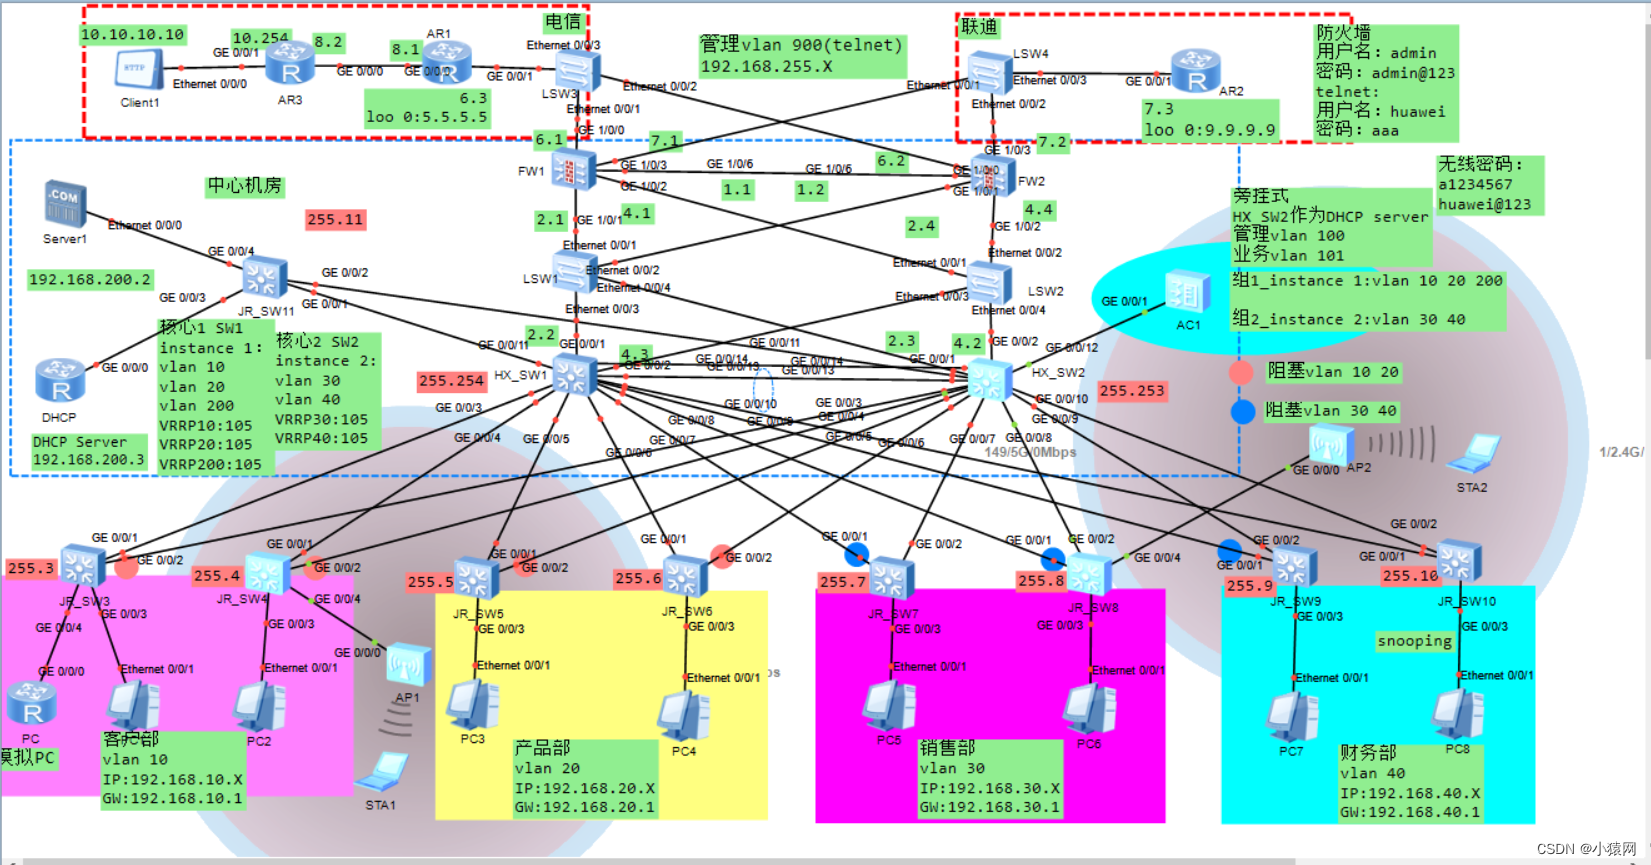
以上也就是topo图的规划,相应的地址规划和路由规划大部分都在图中明确的标注了
该实验中用到的技术有相应的vlan划分、链路捆绑、MSTP、VRRP、DHCP、OSPF、防火墙基本配置、防火墙的安全策略、防火墙双击热备、NAT配置这些技术。对于视频的话可以开启1.25倍速观看。有什么问题的话,都可以在平台中私信于我。该实验非常适合于把相应的单个技术学完想把这些技术综合起来的小伙伴,且对于毕设课设的小伙伴可以进行参考,进行自己的规划与设计,最后对于软考网络工程师/网络规划设计的小伙伴来说个人建议是有必要抽个时间好好的做一下这个实验的,最后说明该topo规划最后的作者权归于:BSXY_信息学院_19计科_陈永跃
之前规划的topo图如下图所示(核心交换机和防火墙之间就不需要交换机了,防火墙的外部也不需要交换机了,直接接ISP路由器即可),可参考一下
插曲部分:基于eNSP中大型校园/企业网络规划与设计_综合大作业 如下图所示(但是并不在该篇文章中做详细介绍和说明,如查看可点击连接自行查看阅读):
	sw1:
<Huawei>sys
[Huawei]un in en
[Huawei]sysname SW1
[SW1]vlan 10
[SW1-vlan10]qui
[SW1]int e0/0/1
[SW1-Ethernet0/0/1]port link-type trunk
[SW1-Ethernet0/0/1]port trunk allow-pass vlan all
[SW1-Ethernet0/0/1]qui
[SW1]int e0/0/2
[SW1-Ethernet0/0/2]port link-type access
[SW1-Ethernet0/0/2]port default vlan 10
[SW1-Ethernet0/0/2]qui
[SW1]int e0/0/3
[SW1-Ethernet0/0/3]port link-type access
[SW1-Ethernet0/0/3]port default vlan 10
--------------------------------------

    SW2:
<Huawei>sys
[Huawei]un in en
[Huawei]sysname SW2
[SW2]vlan 20
[SW2-vlan20]qui
[SW2]int e0/0/1
[SW2-Ethernet0/0/1]port link-type trunk
[SW2-Ethernet0/0/1]port trunk allow-pass vlan all
[SW2-Ethernet0/0/1]qui
[SW2]int e0/0/2
[SW2-Ethernet0/0/2]port link-type access
[SW2-Ethernet0/0/2]port default vlan 20
[SW2-Ethernet0/0/2]qui
[SW2]int e0/0/3
[SW2-Ethernet0/0/3]port link-type access
[SW2-Ethernet0/0/3]port default vlan 20
--------------------------------------

    SW3:
<Huawei>sys
[Huawei]un in en
[Huawei]sysname SW3
[SW3]vlan 30
[SW3-vlan30]qui
[SW3]int e0/0/1
[SW3-Ethernet0/0/1]port link-type trunk
[SW3-Ethernet0/0/1]port trunk allow-pass vlan all
[SW3-Ethernet0/0/1]int e0/0/2
[SW3-Ethernet0/0/2]port link-type access
[SW3-Ethernet0/0/2]port default vlan 30
[SW3-Ethernet0/0/2]int e0/0/3
[SW3-Ethernet0/0/3]port link-type access
[SW3-Ethernet0/0/3]port default vlan 30
--------------------------------------

    SW4:
<Huawei>sys
[Huawei]un in en
[Huawei]sysname SW4
[SW4]vlan batch 40 50
[SW4]int e0/0/1
[SW4-Ethernet0/0/1]port link-type trunk
[SW4-Ethernet0/0/1]port trunk allow-pass vlan all
[SW4-Ethernet0/0/1]int e0/0/2
[SW4-Ethernet0/0/2]port link-type access
[SW4-Ethernet0/0/2]port default vlan 40
[SW4-Ethernet0/0/2]int e0/0/3
[SW4-Ethernet0/0/3]port link-type access
[SW4-Ethernet0/0/3]port default vlan 50
--------------------------------------

    SW9:
<Huawei>sys
[Huawei]un in en
[Huawei]sysname SW9
[SW9]vlan 60
[SW9-vlan60]qui
[SW9]int g0/0/4
[SW9-GigabitEthernet0/0/4]port link-type trunk
[SW9-GigabitEthernet0/0/4]port trunk allow-pass vlan all
[SW9-GigabitEthernet0/0/4]qui
[SW9]int g0/0/5
[SW9-GigabitEthernet0/0/5]port link-type trunk
[SW9-GigabitEthernet0/0/5]port trunk allow-pass vlan all
[SW9-GigabitEthernet0/0/5]qui
[SW9]port-group g g0/0/1 to g0/0/3
[SW9-port-group]port link-type access
[SW9-port-group]port default vlan 60
[SW9-port-group]qui
--------------------------------------

    SW5:
<Huawei>sys
[Huawei]un in en
[Huawei]sysname SW5
[SW5]vlan batch 10 20 30 40 50
[SW5]port-group group-member g0/0/1 to g0/0/4
[SW5-port-group]port link-type trunk
[SW5-port-group]port trunk allow-pass vlan all
[SW5-port-group]qui
--------------------------------------

    SW6:
<Huawei>sys
[Huawei]un in en
[Huawei]sysname SW6
[SW6]vlan batch 10 20 30 40 50
[SW6]port-group group-member g0/0/1 to g0/0/4
[SW6-port-group]port link-type trunk
[SW6-port-group]port trunk allow-pass vlan all
[SW6-port-group]qui
--------------------------------------

    SW7:
<Huawei>sys
[Huawei]un in en
[Huawei]sysname SW7
[SW7]vlan batch 10 20 30 40 50 60
[SW7]port-group group-member g0/0/1 g0/0/2 g0/0/9
[SW7-port-group]port link-type trunk
[SW7-port-group]port trunk allow-pass vlan all
[SW7-port-group]qui
[SW7]int eth-trunk 1
[SW7-Eth-Trunk1]mode lacp-static
[SW7-Eth-Trunk1]trunkport g0/0/10
[SW7-Eth-Trunk1]trunkport g0/0/11
[SW7-Eth-Trunk1]port link-type trunk
[SW7-Eth-Trunk1]port trunk allow-pass vlan all
[SW7-Eth-Trunk1]dis this
#
interface Eth-Trunk1
 port link-type trunk
 port trunk allow-pass vlan 2 to 4094
 mode lacp-static
#
return
[SW7-Eth-Trunk1]qui
--------------------------------------

    SW8:
<Huawei>sys
[Huawei]un in en
[Huawei]sysname SW8
[SW8]vlan batch 10 20 30 40 50 60
[SW8]int eth-trunk 1
[SW8-Eth-Trunk1]mode lacp-static
[SW8-Eth-Trunk1]trunkport g0/0/10
[SW8-Eth-Trunk1]trunkport g0/0/11
[SW8-Eth-Trunk1]port link-type trunk
[SW8-Eth-Trunk1]port trunk allow-pass vlan all
[SW8-Eth-Trunk1]dis this
#
interface Eth-Trunk1
 port link-type trunk
 port trunk allow-pass vlan 2 to 4094
 mode lacp-static
#
return
[SW8-Eth-Trunk1]qui
[SW8]port-group group-member g0/0/1 g0/0/2 g0/0/9
[SW8-port-group]port link-type trunk
[SW8-port-group]port trunk allow-pass vlan all
[SW8-port-group]qui
[SW8]dis eth-trunk 1
	SW5:
[SW5]stp region-configuration
[SW5-mst-region]region-name HUAWEI
[SW5-mst-region]revision-level 1
[SW5-mst-region]instance 1 vlan 10 20 30
[SW5-mst-region]instance 2 vlan 40 50 60
[SW5-mst-region]active region-configuration
[SW5-mst-region]dis this
#
stp region-configuration
 region-name HUAWEI
 revision-level 1
 instance 1 vlan 10 20 30
 instance 2 vlan 40 50 60
 active region-configuration
#
return
[SW5-mst-region]
--------------------------------------

    SW6:
[SW6]stp region-configuration
[SW6-mst-region]region-name HUAWEI
[SW6-mst-region]revision-level 1
[SW6-mst-region]instance 1 vlan 10 20 30
[SW6-mst-region]instance 2 vlan 40 50 60
[SW6-mst-region]active region-configuration
[SW6-mst-region]dis this
[SW6-mst-region]qui
--------------------------------------

    SW9:
[SW9]stp region-configuration
[SW9-mst-region]region-name HUAWEI
[SW9-mst-region]revision-level 1
[SW9-mst-region]instance 1 vlan 10 20 30
[SW9-mst-region]instance 2 vlan 40 50 60
[SW9-mst-region]active region-configuration
[SW9-mst-region]qui
--------------------------------------

    SW7:
[SW7]stp region-configuration
[SW7-mst-region]region-name HUAWEI
[SW7-mst-region]revision-level 1
[SW7-mst-region]instance 1 vlan 10 20 30
[SW7-mst-region]instance 2 vlan 40 50 60
[SW7-mst-region]active region-configuration
[SW7-mst-region]dis this
#
stp region-configuration
 region-name HUAWEI
 revision-level 1
 instance 1 vlan 10 20 30
 instance 2 vlan 40 50 60
 active region-configuration
#
return
[SW7-mst-region]qui
[SW7]stp instance 1 root primary
[SW7]stp instance 2 root secondary
--------------------------------------

    SW8:
[SW8]stp region-configuration
[SW8-mst-region]region-name HUAWEI
[SW8-mst-region]revision-level 1
[SW8-mst-region]instance 1 vlan 10 20 30
[SW8-mst-region]instance 2 vlan 40 50 60
[SW8-mst-region]active region-configuration
[SW8-mst-region]dis this
[SW8-mst-region]qui
[SW8]stp instance 2 root primary
[SW8]stp instance 1 root secondary
[SW8]dis this
#
sysname SW8
#
undo info-center enable
#
vlan batch 10 20 30 40 50 60
#
stp instance 1 root secondary
stp instance 2 root primary
#
[SW8]
[SW5]dis stp br
 MSTID  Port                        Role  STP State     Protection
   0    GigabitEthernet0/0/1        DESI  FORWARDING      NONE
   0    GigabitEthernet0/0/2        ROOT  FORWARDING      NONE
   1    GigabitEthernet0/0/2        MAST  FORWARDING      NONE
   1    GigabitEthernet0/0/4        ALTE  DISCARDING      NONE
   2    GigabitEthernet0/0/1        DESI  FORWARDING      NONE
   2    GigabitEthernet0/0/3        ALTE  DISCARDING      NONE
[SW5]
--------------------------------------
[SW6]dis stp br
	SW7:
[SW7]dhcp enable
[SW7]ip pool vlan10
Info:It's successful to create an IP address pool.
[SW7-ip-pool-vlan10]network 192.168.1.0  mask 24
[SW7-ip-pool-vlan10]gateway-list 192.168.1.254
[SW7-ip-pool-vlan10]qui
[SW7]ip pool vlan20
Info:It's successful to create an IP address pool.
[SW7-ip-pool-vlan20]network 192.168.2.0  mask 24
[SW7-ip-pool-vlan20]gateway-list 192.168.2.254
[SW7-ip-pool-vlan20]qui
[SW7]ip pool vlan30
Info:It's successful to create an IP address pool.
[SW7-ip-pool-vlan30]network 192.168.3.0  mask 24
[SW7-ip-pool-vlan30]gateway-list 192.168.3.254
[SW7-ip-pool-vlan30]qui
[SW7]int vlan 10
[SW7-Vlanif10]ip add 192.168.1.100 24
[SW7-Vlanif10]vrrp vrid 1 virtual-ip 192.168.1.254
[SW7-Vlanif10]vrrp vrid 1 priority 120
[SW7-Vlanif10]dhcp select global
[SW7-Vlanif10]qui
[SW7]int vlan 20
[SW7-Vlanif20]ip add 192.168.2.100 24
[SW7-Vlanif20]vrrp vrid 2 virtual-ip 192.168.2.254
[SW7-Vlanif20]vrrp vrid 2 priority 120
[SW7-Vlanif20]dhcp select global
[SW7-Vlanif20]qui
[SW7]int vlan 30
[SW7-Vlanif30]ip add 192.168.3.100 24
[SW7-Vlanif30]vrrp vrid 3 virtual-ip 192.168.3.254
[SW7-Vlanif30]vrrp vrid 3 priority 120
[SW7-Vlanif30]dhcp select global
[SW7-Vlanif30]qui
[SW7]int vlan 40
[SW7-Vlanif40]ip add 192.168.4.100 24
[SW7-Vlanif40]vrrp vrid 4 virtual-ip 192.168.4.254
[SW7-Vlanif40]qui
[SW7]int vlan 50
[SW7-Vlanif50]ip add 192.168.5.100 24
[SW7-Vlanif50]vrrp vrid 5 virtual-ip 192.168.5.254
[SW7-Vlanif50]qui
[SW7]int vlan 60
[SW7-Vlanif60]ip add 192.168.6.100 24
[SW7-Vlanif60]vrrp vrid 6 virtual-ip 192.168.6.254
[SW7-Vlanif60]qui
[SW7]
--------------------------------------

    SW8:
[SW8]dhcp enable
[SW8]ip pool vlan40
Info:It's successful to create an IP address pool.
[SW8-ip-pool-vlan40]network 192.168.4.0  mask 24
[SW8-ip-pool-vlan40]gateway-list 192.168.4.254
[SW8-ip-pool-vlan40]qui
[SW8]ip pool vlan50
Info:It's successful to create an IP address pool.
[SW8-ip-pool-vlan50]network 192.168.5.0  mask 24
[SW8-ip-pool-vlan50]gateway-list 192.168.5.254
[SW8-ip-pool-vlan50]qui
[SW8]int vlan 10
[SW8-Vlanif10]ip add 192.168.1.200 24
[SW8-Vlanif10]vrrp vrid 1 virtual-ip 192.168.1.254
[SW8-Vlanif10]qui
[SW8]int vlan 20
[SW8-Vlanif20]ip add 192.168.2.200 24
[SW8-Vlanif20]vrrp vrid 2 virtual-ip 192.168.2.254
[SW8-Vlanif20]qui
[SW8]int vlan 30
[SW8-Vlanif30]ip add 192.168.3.200 24
[SW8-Vlanif30]vrrp vrid 3 virtual-ip 192.168.3.254
[SW8-Vlanif30]qui
[SW8]int vlan 40
[SW8-Vlanif40]ip add 192.168.4.200 24
[SW8-Vlanif40]vrrp vrid 4 virtual-ip 192.168.4.254
[SW8-Vlanif40]vrrp vrid 4 priority 120
[SW8-Vlanif40]dhcp select global
[SW8-Vlanif40]qui
[SW8]int vlan 50
[SW8-Vlanif50]ip add 192.168.5.200 24
[SW8-Vlanif50]vrrp vrid 5 virtual-ip 192.168.5.254
[SW8-Vlanif50]vrrp vrid 5 priority 120
[SW8-Vlanif50]dhcp select global
[SW8-Vlanif50]qui
[SW8]int vlan 60
[SW8-Vlanif60]ip add 192.168.6.200 24
[SW8-Vlanif60]vrrp vrid 6 virtual-ip 192.168.6.254
[SW8-Vlanif60]vrrp vrid 6 priority 120
[SW8-Vlanif60]qui
[SW8]
[SW7]dis vrrp br
VRID  State        Interface                Type     Virtual IP
----------------------------------------------------------------
1     Master       Vlanif10                 Normal   192.168.1.254
2     Master       Vlanif20                 Normal   192.168.2.254
3     Master       Vlanif30                 Normal   192.168.3.254
4     Backup       Vlanif40                 Normal   192.168.4.254
5     Backup       Vlanif50                 Normal   192.168.5.254
6     Backup       Vlanif60                 Normal   192.168.6.254
----------------------------------------------------------------
Total:6     Master:3     Backup:3     Non-active:0
[SW7]
--------------------------------------

[SW8]dis vrrp br
VRID  State        Interface                Type     Virtual IP
----------------------------------------------------------------
1     Backup       Vlanif10                 Normal   192.168.1.254
2     Backup       Vlanif20                 Normal   192.168.2.254
3     Backup       Vlanif30                 Normal   192.168.3.254
4     Master       Vlanif40                 Normal   192.168.4.254
5     Master       Vlanif50                 Normal   192.168.5.254
6     Master       Vlanif60                 Normal   192.168.6.254
----------------------------------------------------------------
Total:6     Master:3     Backup:3     Non-active:0
[SW8]
PC2/PC3:
PC>ping 192.168.1.254

PC4/PC5:
PC>ping 192.168.2.254

server:
ping 192.168.6.254
	SW7:
[SW7]vlan 77
[SW7-vlan77]qui
[SW7]int vlan 77
[SW7-Vlanif77]ip add 10.1.10.7 24
[SW7-Vlanif77]qui
[SW7]int g0/0/3
[SW7-GigabitEthernet0/0/3]port link-type access
[SW7-GigabitEthernet0/0/3]port default vlan 77
[SW7-GigabitEthernet0/0/3]qui
[SW7]ospf
[SW7-ospf-1]area 0
[SW7-ospf-1-area-0.0.0.0]network 192.168.1.0 0.0.0.255
[SW7-ospf-1-area-0.0.0.0]network 192.168.2.0 0.0.0.255
[SW7-ospf-1-area-0.0.0.0]network 192.168.3.0 0.0.0.255
[SW7-ospf-1-area-0.0.0.0]network 192.168.4.0 0.0.0.255
[SW7-ospf-1-area-0.0.0.0]network 192.168.5.0 0.0.0.255
[SW7-ospf-1-area-0.0.0.0]network 192.168.6.0 0.0.0.255
[SW7-ospf-1-area-0.0.0.0]network 10.1.10.0 0.0.0.255
[SW7-ospf-1-area-0.0.0.0]dis this
#
 area 0.0.0.0
  network 192.168.1.0 0.0.0.255
  network 192.168.2.0 0.0.0.255
  network 192.168.3.0 0.0.0.255
  network 192.168.4.0 0.0.0.255
  network 192.168.5.0 0.0.0.255
  network 192.168.6.0 0.0.0.255
  network 10.1.10.0 0.0.0.255
#
return
[SW7-ospf-1-area-0.0.0.0]qui
[SW7-ospf-1]qui
[SW7]
--------------------------------------

    SW8:
[SW8]vlan 88
[SW8-vlan88]qui
[SW8]int vlan 88
[SW8-Vlanif88]ip add 10.1.12.8 24
[SW8-Vlanif88]qui
[SW8]int g0/0/3
[SW8-GigabitEthernet0/0/3]port link-type access
[SW8-GigabitEthernet0/0/3]port default vlan 88
[SW8-GigabitEthernet0/0/3]qui
[SW8]ospf
[SW8-ospf-1]area 0
[SW8-ospf-1-area-0.0.0.0]network 192.168.1.0 0.0.0.255
[SW8-ospf-1-area-0.0.0.0]network 192.168.2.0 0.0.0.255
[SW8-ospf-1-area-0.0.0.0]network 192.168.3.0 0.0.0.255
[SW8-ospf-1-area-0.0.0.0]network 192.168.4.0 0.0.0.255
[SW8-ospf-1-area-0.0.0.0]network 192.168.5.0 0.0.0.255
[SW8-ospf-1-area-0.0.0.0]network 192.168.6.0 0.0.0.255
[SW8-ospf-1-area-0.0.0.0]network 10.1.12.0 0.0.0.255
[SW8-ospf-1-area-0.0.0.0]qui
[SW8-ospf-1]qui
[SW8]dis ospf peer br
 ----------------------------------------------
 Area Id       Interface          Neighbor id      State
 0.0.0.0       Vlanif10            192.168.1.100    Full
 0.0.0.0       Vlanif20            192.168.1.100    Full
 0.0.0.0       Vlanif30            192.168.1.100    Full
 0.0.0.0       Vlanif40            192.168.1.100    Full
 0.0.0.0       Vlanif50            192.168.1.100    Full
 0.0.0.0       Vlanif60            192.168.1.100    Full
 -----------------------------------------------
[SW8]
	FW1:
<USG6000V1>sys
[USG6000V1]un in en
[USG6000V1]sysname FW1
[FW1]int g1/0/1
[FW1-GigabitEthernet1/0/1]ip add 10.1.13.1 24
[FW1-GigabitEthernet1/0/1]int g1/0/0
[FW1-GigabitEthernet1/0/0]ip add 10.1.10.1 24
[FW1-GigabitEthernet1/0/0]int g1/0/2
[FW1-GigabitEthernet1/0/2]ip add 10.1.11.1 24
[FW1-GigabitEthernet1/0/2]qui
[FW1]firewall zone trust
[FW1-zone-trust]add int g1/0/0
[FW1-zone-trust]qui
[FW1]firewall zone untrust
[FW1-zone-untrust]add int g1/0/1
[FW1-zone-untrust]qui
[FW1]firewall zone dmz
[FW1-zone-dmz]add int g1/0/2
[FW1-zone-dmz]qui
[FW1]ospf
[FW1-ospf-1]area 0
[FW1-ospf-1-area-0.0.0.0]net 10.1.10.0 0.0.0.255
[FW1-ospf-1-area-0.0.0.0]net 10.1.13.0 0.0.0.255
[FW1-ospf-1-area-0.0.0.0]qui
[FW1-ospf-1]qui
[FW1]
------------------------------------

    FW2:
<USG6000V1>sys
[USG6000V1]un in en
[USG6000V1]sysname FW2
[FW2]int g1/0/1
[FW2-GigabitEthernet1/0/1]ip add 10.1.14.2 24
[FW2-GigabitEthernet1/0/1]int g1/0/2
[FW2-GigabitEthernet1/0/2]ip add 10.1.11.2 24
[FW2-GigabitEthernet1/0/2]int g1/0/0
[FW2-GigabitEthernet1/0/0]ip add 10.1.12.2 24
[FW2-GigabitEthernet1/0/0]qui
[FW2]firewall zone trust
[FW2-zone-trust]add int g1/0/0
[FW2-zone-trust]qui
[FW2]firewall zone untrust
[FW2-zone-untrust]add int g1/0/1
[FW2-zone-untrust]qui
[FW2]firewall zone dmz
[FW2-zone-dmz]add int g1/0/2
[FW2-zone-dmz]qui
[FW2]ospf
[FW2-ospf-1]area 0
[FW2-ospf-1-area-0.0.0.0]net 10.1.12.0 0.0.0.255
[FW2-ospf-1-area-0.0.0.0]net 10.1.14.0 0.0.0.255
[FW2-ospf-1-area-0.0.0.0]qui
[FW2-ospf-1]qui
	FW1:
[FW1]hrp track int g1/0/0
[FW1]hrp track int g1/0/1
[FW1]hrp int g1/0/2 remote 10.1.11.2
[FW1]hrp mirror session enable
[FW1]hrp enable
HRP_S[FW1]
------------------------------------

    FW2:
[FW2]hrp track int g1/0/1
[FW2]hrp track int g1/0/0
[FW2]hrp int g1/0/2 remote 10.1.11.1
[FW2]hrp mirror session enable
[FW2]hrp enable
HRP_S[FW2]
	R1:
<Huawei>sys
[Huawei]un in en
[Huawei]sysname R1
[R1]int g0/0/0
[R1-GigabitEthernet0/0/0]ip add 10.1.15.1 24
[R1-GigabitEthernet0/0/0]int g0/0/1
[R1-GigabitEthernet0/0/1]ip add 10.1.13.2 24
[R1-GigabitEthernet0/0/1]int g0/0/2
[R1-GigabitEthernet0/0/2]ip add 100.1.1.1 24
[R1-GigabitEthernet0/0/2]qui
[R1]ospf
[R1-ospf-1]area 0
[R1-ospf-1-area-0.0.0.0]net 10.1.15.0 0.0.0.255
[R1-ospf-1-area-0.0.0.0]net 10.1.13.0 0.0.0.255
[R1-ospf-1-area-0.0.0.0]qui
[R1-ospf-1]qui
[R1]
------------------------------------

    R2:
<Huawei>sys
[Huawei]un in en
[Huawei]sysname R2
[R2]int g0/0/2
[R2-GigabitEthernet0/0/2]ip add 200.1.1.2 24
[R2-GigabitEthernet0/0/2]int g0/0/0
[R2-GigabitEthernet0/0/0]ip add 10.1.15.2 24
[R2-GigabitEthernet0/0/0]int g0/0/1
[R2-GigabitEthernet0/0/1]ip add 10.1.14.4 24
[R2-GigabitEthernet0/0/1]qui
[R2]ospf
[R2-ospf-1]area 0
[R2-ospf-1-area-0.0.0.0]net 10.1.15.0 0.0.0.255
[R2-ospf-1-area-0.0.0.0]net 10.1.14.0 0.0.0.255
[R2-ospf-1-area-0.0.0.0]qui
[R2-ospf-1]qui
[R2]
------------------------------------

    R3:
<Huawei>sys
[Huawei]un in en
[Huawei]sysname R3
[R3]int g0/0/0
[R3-GigabitEthernet0/0/0]ip add 100.1.1.3 24
[R3-GigabitEthernet0/0/0]int g0/0/1
[R3-GigabitEthernet0/0/1]ip add 200.1.1.3 24
[R3-GigabitEthernet0/0/1]int g0/0/2
[R3-GigabitEthernet0/0/2]ip add 34.1.1.3 24
[R3-GigabitEthernet0/0/2]int g4/0/1
[R3-GigabitEthernet4/0/1]ip add 172.16.1.254 24
[R3-GigabitEthernet4/0/1]qui
[R3]ip route-static 0.0.0.0 0.0.0.0 100.1.1.1
[R3]ip route-static 0.0.0.0 0.0.0.0 200.1.1.2 preference 70
------------------------------------

    R4:
<Huawei>sys
[Huawei]un in en
[Huawei]sysname R4
[R4]int g0/0/0
[R4-GigabitEthernet0/0/0]ip add 34.1.1.4 24
[R4-GigabitEthernet0/0/0]int g0/0/2
[R4-GigabitEthernet0/0/2]ip add 192.168.100.254 24
[R4-GigabitEthernet0/0/2]qui
[R4]ip route-static 0.0.0.0 0 34.1.1.3
	R1:
[R1]ip route-static 0.0.0.0 0 100.1.1.3
[R1]ospf
[R1-ospf-1]default-route-advertise
[R1-ospf-1]qui
[R1]
------------------------------------

    R2:
[R2]ip route-static 0.0.0.0 0 200.1.1.3
[R2]ospf
[R2-ospf-1]default-route-advertise
[R2-ospf-1]qui
[R2]
	R1:
[R1]acl 2000
[R1-acl-basic-2000]rule permit
[R1-acl-basic-2000]qui
[R1]int g0/0/2
[R1-GigabitEthernet0/0/2]nat outbound 2000
[R1-GigabitEthernet0/0/2]dis this
#
interface GigabitEthernet0/0/2
 ip address 100.1.1.1 255.255.255.0
 nat outbound 2000
#
return
[R1-GigabitEthernet0/0/2]qui
[R1]acl 2001
[R1-acl-basic-2001]rule permit
[R1-acl-basic-2001]qui
[R1]int g0/0/1
[R1-GigabitEthernet0/0/1]nat outbound 2001
[R1-GigabitEthernet0/0/1]dis this
[V200R003C00]
#
interface GigabitEthernet0/0/1
 ip address 10.1.13.2 255.255.255.0
 nat outbound 2001
#
return
[R1-GigabitEthernet0/0/1]
------------------------------------

	R2:
[R2]acl 2000
[R2-acl-basic-2000]rule permit
[R2-acl-basic-2000]qui
[R2]int g0/0/2
[R2-GigabitEthernet0/0/2]nat outbound 2000
[R2-GigabitEthernet0/0/2]qui
[R2]acl 2001
[R2-acl-basic-2001]rule permit
[R2-acl-basic-2001]qui
[R2]int g0/0/1
[R2-GigabitEthernet0/0/1]nat outbound 2001
[R2-GigabitEthernet0/0/1]
------------------------------------

    R4:
[R4]acl 2000
[R4-acl-basic-2000]rule permit
[R4-acl-basic-2000]qui
[R4]int g0/0/0
[R4-GigabitEthernet0/0/0]nat outbound 2000
[R4-GigabitEthernet0/0/0]qui
[R4]
这一部分要不我就先不放在文章中,配置
的设备只有FW1,因为做了双击热备所以
配置的过程中的安全策略只需要在FW1配
置,会自动同步到FW2中,在视频中的配
置的安全策略是
可自己配的,也可以参考视频中的安全
策略来配置,但是需要视频的话可能得
收费下载,
实在抱歉了
导读:随着叮咚买菜业务的发展,不同的业务场景对数据分析提出了不同的需求,他们希望引入一款实时OLAP数据库,构建一个灵活的多维实时查询和分析的平台,统一数据的接入和查询方案,解决各业务线对数据高效实时查询和精细化运营的需求。经过调研选型,最终引入ApacheDoris作为最终的OLAP分析引擎,Doris作为核心的OLAP引擎支持复杂地分析操作、提供多维的数据视图,在叮咚买菜数十个业务场景中广泛应用。作者|叮咚买菜资深数据工程师韩青叮咚买菜创立于2017年5月,是一家专注美好食物的创业公司。叮咚买菜专注吃的事业,为满足更多人“想吃什么”而努力,通过美好食材的供应、美好滋味的开发以及美食品牌的孵
C#实现简易绘图工具一.引言实验目的:通过制作窗体应用程序(C#画图软件),熟悉基本的窗体设计过程以及控件设计,事件处理等,熟悉使用C#的winform窗体进行绘图的基本步骤,对于面向对象编程有更加深刻的体会.Tutorial任务设计一个具有基本功能的画图软件**·包括简单的新建文件,保存,重新绘图等功能**·实现一些基本图形的绘制,包括铅笔和基本形状等,学习橡皮工具的创建**·设计一个合理舒适的UI界面**注明:你可能需要先了解一些关于winform窗体应用程序绘图的基本知识,以及关于GDI+类和结构的知识二.实验环境Windows系统下的visualstudio2017C#窗体应用程序三.
需求:要创建虚拟机,就需要给他提供一个虚拟的磁盘,我们就在/opt目录下创建一个10G大小的raw格式的虚拟磁盘CentOS-7-x86_64.raw命令格式:qemu-imgcreate-f磁盘格式磁盘名称磁盘大小qemu-imgcreate-f磁盘格式-o?1.创建磁盘qemu-imgcreate-fraw/opt/CentOS-7-x86_64.raw10G执行效果#ls/opt/CentOS-7-x86_64.raw2.安装虚拟机使用virt-install命令,基于我们提供的系统镜像和虚拟磁盘来创建一个虚拟机,另外在创建虚拟机之前,提前打开vnc客户端,在创建虚拟机的时候,通过vnc
我是一名决定学习Ruby和RubyonRails的ASP.NETMVC开发人员。我已经有所了解并在RoR上创建了一个网站。在ASP.NETMVC上开发,我一直使用三层架构:数据层、业务层和UI(或表示)层。尝试在RubyonRails应用程序中使用这种方法,我发现没有关于它的信息(或者也许我只是找不到它?)。也许有人可以建议我如何在RubyonRails上创建或使用三层架构?附言我使用ruby1.9.3和RubyonRails3.2.3。 最佳答案 我建议在制作RoR应用程序时遵循RubyonRails(RoR)风格。Rails
我正在寻找用于Rails的优质管理插件。似乎大多数现有的插件/gem(例如“restful_authentication”、“acts_as_authenticated”)都围绕着self注册等展开。但是,我正在寻找一种功能齐全的基于管理/管理角色的解决方案——但不是简单地附加到另一个非基于角色的解决方案。如果我找不到,我想我会自己动手......只是不想重新发明轮子。 最佳答案 RyanBates最近做了两个关于授权的railscast(注意身份验证和授权之间的区别;身份验证检查用户是否如她所说的那样,授权检查用户是否有权访问资源
我正在根据Rakefile中的现有测试文件动态生成测试任务。假设您有各种以模式命名的单元测试文件test_.rb.所以我正在做的是创建一个以“测试”命名空间内的文件名命名的任务。使用下面的代码,我可以用raketest:调用所有测试require'rake/testtask'task:default=>'test:all'namespace:testdodesc"Runalltests"Rake::TestTask.new(:all)do|t|t.test_files=FileList['test_*.rb']endFileList['test_*.rb'].eachdo|task|n
我想要像“嘿那里”这样的东西变成,例如,#316583。我希望将任意长度的字符串“归结”为十六进制颜色。我不知道从哪里开始。我在想,每个字符串的MD5散列都是不同的-但如何将该散列转换为十六进制颜色数字? 最佳答案 你可以只取几位前几位:require'digest/md5'color=Digest::MD5.hexdigest('Mytext')[0..5] 关于ruby-如何使用Ruby基于字母数字字符串生成颜色?,我们在StackOverflow上找到一个类似的问题:
第一步,先创建一个回环端口,不要用自己的网卡,很不稳定,会断的。①先找到“设备管理器”,点击②进入设备管理器点击“操作”,然后再点击“添加过时硬盘”,记得点击“操作”前先随便在空白处点击一下,不然点击“点击操作”会出现第二张图的内容。 ③点击“下一页”④点击“手动”,然后再点击下一页。 ⑤点击“网络适配器”,点击下一页 ⑥点击“Microsoft”,然后点击“环回适配器”。 创建完成后,在下图中会有一个“环回适配器”, 第二步,ensp和真机进行桥接①打开ensp,并且配置一个“云”②先添加一个内网接口,点击添加③选择“绑定信息”中的以太网2,点击“增加”,添加外网。如果找不到你的环回网卡
文章目录1.自动驾驶实战:基于Paddle3D的点云障碍物检测1.1环境信息1.2准备点云数据1.3安装Paddle3D1.4模型训练1.5模型评估1.6模型导出1.7模型部署效果附录show_lidar_pred_on_image.py1.自动驾驶实战:基于Paddle3D的点云障碍物检测项目地址——自动驾驶实战:基于Paddle3D的点云障碍物检测课程地址——自动驾驶感知系统揭秘1.1环境信息硬件信息CPU:2核AI加速卡:v100总显存:16GB总内存:16GB总硬盘:100GB环境配置Python:3.7.4框架信息框架版本:PaddlePaddle2.4.0(项目默认框架版本为2.3
我正在尝试整个BDD方法并想测试AMQP基于Vanilla的方面Ruby我正在写的应用程序。选择Minitest后作为与其他名副其实的蔬菜框架不同的平衡功能和表现力的测试框架,我着手编写此规范:#File./test/specs/services/my_service_spec.rb#Requirementsfortestrunningandconfigurationrequire"minitest/autorun"require"./test/specs/spec_helper"#Externalrequires#MinitestSpecsforEventMachinerequire