
最近项目需要快速出一版卡通渲染风格进行吸量测试。但是原来的模型非常不适合使用back face 的描边方案(很难看),不得已寻求其他的描边方案,于是有了现在这篇基于法线和深度的后处理描边。
优点:
本文是基于buildin 渲染管线,非URP。(老项目,没办法)
本文会使用自定义post-processing,目的是可以和其他的post-processing效果结合,方便使用。
不熟悉post-processing 的同学可以看下面这个文章:
PostProcessing的使用
using System;
using UnityEngine;
using UnityEngine.Rendering.PostProcessing;

[Serializable]
[PostProcess(typeof(PostProcessOutlineRenderer), PostProcessEvent.BeforeStack, "Post Process Outline")]
public sealed class PostProcessOutline : PostProcessEffectSettings
{
    //声明变量
    public IntParameter scale = new IntParameter { value = 1 };
    public FloatParameter  depthThreshold = new FloatParameter  { value = 1 };
    [Range(0, 1)]
    public FloatParameter normalThreshold = new FloatParameter { value = 0.4f };
    [Range(0, 1)]
    public FloatParameter depthNormalThreshold = new FloatParameter { value = 0.5f };
    public FloatParameter depthNormalThresholdScale = new FloatParameter { value = 7 };
    public ColorParameter color = new ColorParameter { value = Color.white };
}

public sealed class PostProcessOutlineRenderer : PostProcessEffectRenderer<PostProcessOutline>
{
    public override void Render(PostProcessRenderContext context)
    {
    //将面板变量对Outline shader赋值
        var sheet = context.propertySheets.Get(Shader.Find("Hidden/Outline Post Process"));
        sheet.properties.SetFloat("_Scale", settings.scale);
        sheet.properties.SetFloat("_DepthThreshold", settings.depthThreshold);
        sheet.properties.SetFloat("_NormalThreshold", settings.normalThreshold);
        Matrix4x4 clipToView = GL.GetGPUProjectionMatrix(context.camera.projectionMatrix, true).inverse;
        sheet.properties.SetMatrix("_ClipToView", clipToView);
        sheet.properties.SetFloat("_DepthNormalThreshold", settings.depthNormalThreshold);
        sheet.properties.SetFloat("_DepthNormalThresholdScale", settings.depthNormalThresholdScale);
        sheet.properties.SetColor("_Color", settings.color);
        context.command.BlitFullscreenTriangle(context.source, context.destination, sheet, 0);
    }
}
添加这个脚本后,我们就可以在PostProcess面板上进行输入参数控制
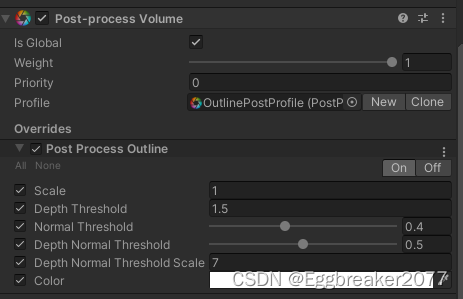
使用properties.SetXXX 将数据传入后处理Shader中
sheet.properties.SetFloat("_Scale", settings.scale);
后面Shader所使用的外部数据基本都由这里输入。
完整的Shader代码会放在最后。
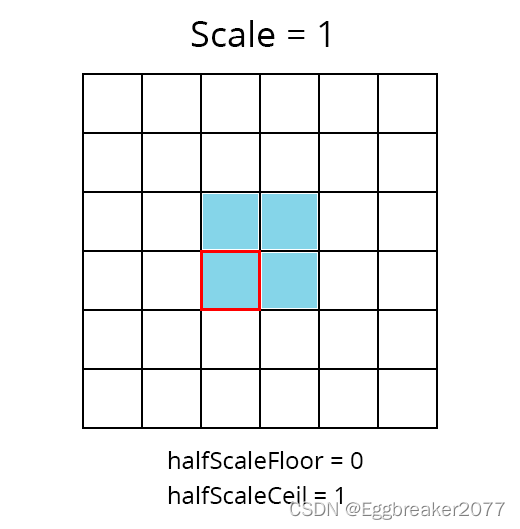
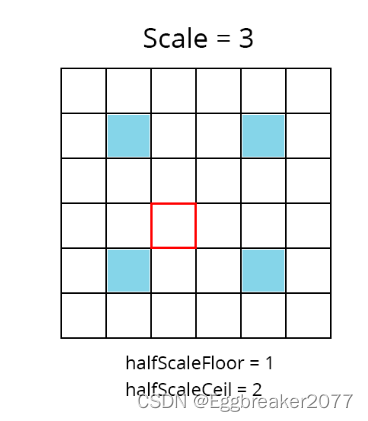
float halfScaleFloor = floor(_Scale * 0.5);
float halfScaleCeil = ceil(_Scale * 0.5);

float2 bottomLeftUV = i.texcoord - float2(_MainTex_TexelSize.x, _MainTex_TexelSize.y) * halfScaleFloor;
float2 topRightUV = i.texcoord + float2(_MainTex_TexelSize.x, _MainTex_TexelSize.y) * halfScaleCeil;
float2 bottomRightUV = i.texcoord + float2(_MainTex_TexelSize.x * halfScaleCeil, -_MainTex_TexelSize.y * halfScaleFloor);
float2 topLeftUV = i.texcoord + float2(-_MainTex_TexelSize.x * halfScaleFloor, _MainTex_TexelSize.y * halfScaleCeil);
i.texcoord 是屏幕UV
_Scale 是我们用来调整描边粗细的参数。通过floor 和ceil, 使得halfScaleFloor 和 halfScaleCeil 在调整_Scale时,以整数改变。通过这种方式,我们就可以让边缘检测像素以原UV位置向4个斜方向每次增加1像素。(因为深度和法线图是用point filtering采样的,不存在插值,所以我们使用整数增加)
float depth0 = SAMPLE_DEPTH_TEXTURE(_CameraDepthTexture, sampler_CameraDepthTexture, bottomLeftUV).r;
float depth1 = SAMPLE_DEPTH_TEXTURE(_CameraDepthTexture, sampler_CameraDepthTexture, topRightUV).r;
float depth2 = SAMPLE_DEPTH_TEXTURE(_CameraDepthTexture, sampler_CameraDepthTexture, bottomRightUV).r;
float depth3 = SAMPLE_DEPTH_TEXTURE(_CameraDepthTexture, sampler_CameraDepthTexture, topLeftUV).r;
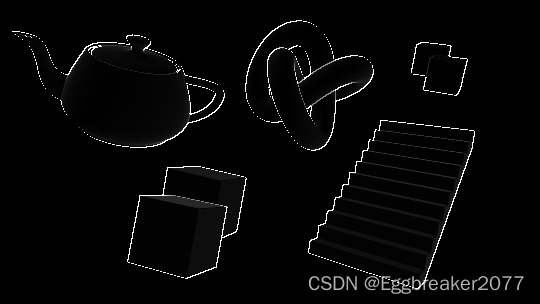
如果我们查看depth0的结果,可以看到下图
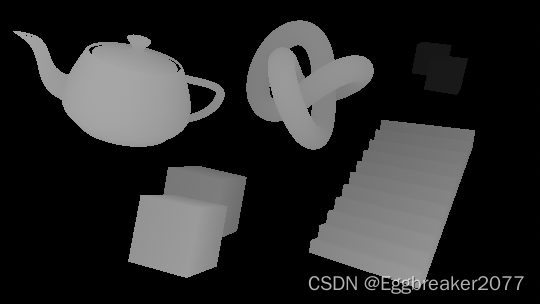
离摄像机越近,颜色越亮,越远则越暗。
这时我们就可以用两两深度图相减,这样两图深度相近的地方颜色值就非常小。深度差别大的地方则相反。
float depthFiniteDifference0 = depth1 - depth0;
float depthFiniteDifference1 = depth3 - depth2;

return abs(depthFiniteDifference0) * 100;//为了方便查看结果扩大100倍
得到下图:
现在将两张深度图的平方相加再开方(The Roberts Cross 边缘检测方法)
float edgeDepth = sqrt(pow(depthFiniteDifference0, 2) + pow(depthFiniteDifference1, 2)) * 100;
return edgeDepth;
获得下图:
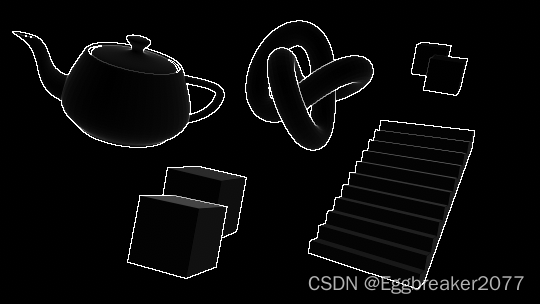
这个时候,一些外围边缘已经清晰可见。但是我们还是能在物体表面看到一些灰色区域。所以我们需要把较低的深度值过滤掉。
使用阈值_DepthThreshold
edgeDepth = edgeDepth > _DepthThreshold ? 1 : 0;
return edgeDepth;
在_DepthThreshold 值设定为0.2时,得到下图
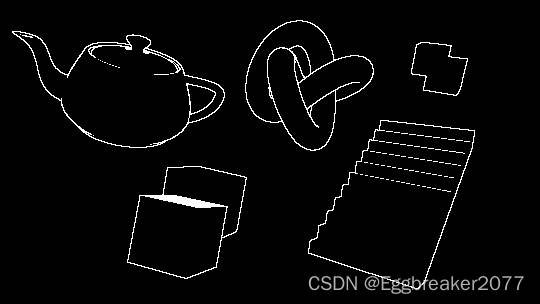
这样,我们就解决了灰色区域。但是我们也注意到前方有一个Cube的顶部全部填充的白色,后方的两个Cube重叠区域没有描边,梯子和前方方块有些边缘没有绘制。
我们先解决后方Cube的问题。
因为深度值是非线性的,越到后面深度相差就越小。那么我们就要根据深度值改变阈值大小。
float depthThreshold = _DepthThreshold * depth0;
edgeDepth = edgeDepth > depthThreshold ? 1 : 0;
再将_DepthThreshold 改到1.5 我们可以看到
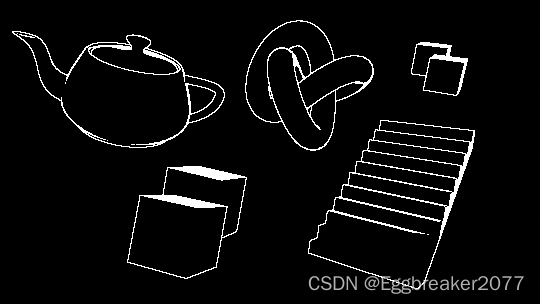
这样,后面重叠的Cube也能看到边缘了。
接下来我们要解决一些边缘缺失的问题。
为了获得所有物体法线数据,我们需要一个摄像机,来绘制法线图。然后将法线图保存到一个Shader全局变量中:_CameraNormalsTexture
为主摄像机添加脚本:
using UnityEngine;

public class RenderReplacementShaderToTexture : MonoBehaviour
{
    [SerializeField]
    Shader replacementShader;

    [SerializeField]
    RenderTextureFormat renderTextureFormat = RenderTextureFormat.ARGB32;

    [SerializeField]
    FilterMode filterMode = FilterMode.Point;

    [SerializeField]
    int renderTextureDepth = 24;

    [SerializeField]
    CameraClearFlags cameraClearFlags = CameraClearFlags.Color;

    [SerializeField]
    Color background = Color.black;

    [SerializeField]
    string targetTexture = "_RenderTexture";

    private RenderTexture renderTexture;
    private new Camera camera;

    private void Start()
    {
        foreach (Transform t in transform)
        {
            DestroyImmediate(t.gameObject);
        }

        Camera thisCamera = GetComponent<Camera>();

        // Create a render texture matching the main camera's current dimensions.
        renderTexture = new RenderTexture(thisCamera.pixelWidth, thisCamera.pixelHeight, renderTextureDepth, renderTextureFormat);
        renderTexture.filterMode = filterMode;
        // Surface the render texture as a global variable, available to all shaders.
        Shader.SetGlobalTexture(targetTexture, renderTexture);

        // Setup a copy of the camera to render the scene using the normals shader.
        GameObject copy = new GameObject("Camera" + targetTexture);
        camera = copy.AddComponent<Camera>();
        camera.CopyFrom(thisCamera);
        camera.transform.SetParent(transform);
        camera.targetTexture = renderTexture;
        camera.SetReplacementShader(replacementShader, "RenderType");
        camera.depth = thisCamera.depth - 1;
        camera.clearFlags = cameraClearFlags;
        camera.backgroundColor = background;
    }
}
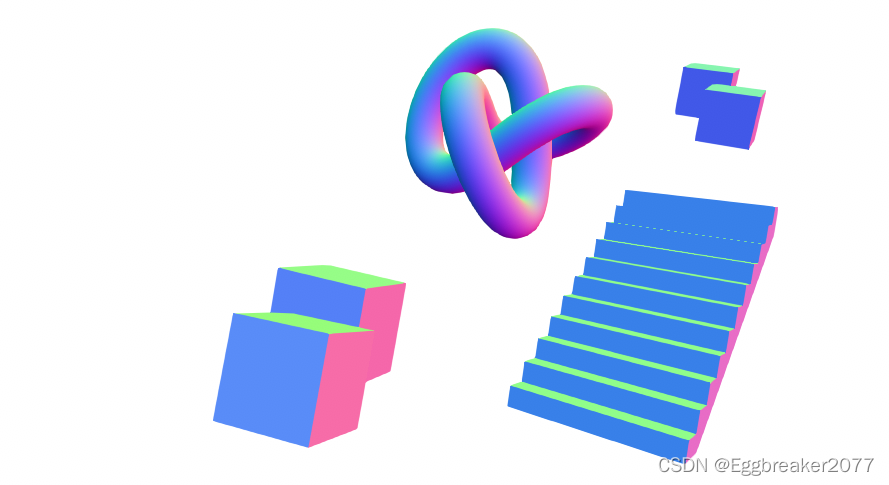
通过SetReplacementShader,将场景中物体替换为绘制法线的Shader。得到法线图。
绘制法线Shader:
Shader "Hidden/Normals Texture"
{
    Properties
    {
    }
    SubShader
    {
        Tags
		{
			"RenderType" = "Opaque"
		}

        Pass
        {
            CGPROGRAM
            #pragma vertex vert
            #pragma fragment frag

            #include "UnityCG.cginc"

            struct appdata
            {
                float4 vertex : POSITION;
				float3 normal : NORMAL;
            };

            struct v2f
            {
                float4 vertex : SV_POSITION;
				float3 viewNormal : NORMAL;
            };

            sampler2D _MainTex;
            float4 _MainTex_ST;

            v2f vert (appdata v)
            {
                v2f o;
                o.vertex = UnityObjectToClipPos(v.vertex);
                o.viewNormal = COMPUTE_VIEW_NORMAL;
				//o.viewNormal = mul((float3x3)UNITY_MATRIX_M, v.normal);
                return o;
            }

            float4 frag (v2f i) : SV_Target
            {
                return float4(normalize(i.viewNormal) * 0.5 + 0.5, 0);
            }
            ENDCG
        }
    }
}
点击Play按钮,我们能在生成的法线摄像机中看到下图:
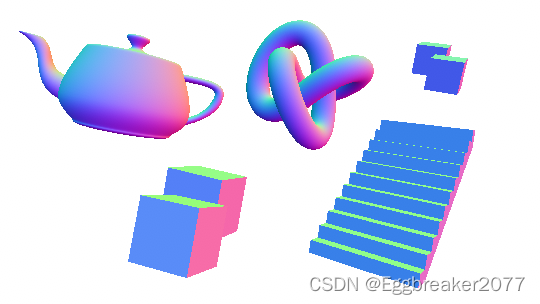
这时,我们就可以在Outline Shader中使用法线数据了。
同样,我们进行斜四方向采样。
float3 normal0 = SAMPLE_TEXTURE2D(_CameraNormalsTexture, sampler_CameraNormalsTexture, bottomLeftUV).rgb;
float3 normal1 = SAMPLE_TEXTURE2D(_CameraNormalsTexture, sampler_CameraNormalsTexture, topRightUV).rgb;
float3 normal2 = SAMPLE_TEXTURE2D(_CameraNormalsTexture, sampler_CameraNormalsTexture, bottomRightUV).rgb;
float3 normal3 = SAMPLE_TEXTURE2D(_CameraNormalsTexture, sampler_CameraNormalsTexture, topLeftUV).rgb;
然后继续使用The Roberts Cross 方法计算边缘:
float3 normalFiniteDifference0 = normal1 - normal0;
float3 normalFiniteDifference1 = normal3 - normal2;

float edgeNormal = sqrt(dot(normalFiniteDifference0, normalFiniteDifference0) + dot(normalFiniteDifference1, normalFiniteDifference1));
edgeNormal = edgeNormal > _NormalThreshold ? 1 : 0;

return edgeNormal;
由于 normalFiniteDifference0 是个float3 向量,所以使用点乘Dot来代替平方。得到下图:
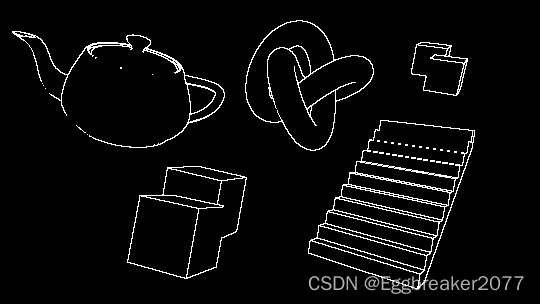
可以看到,通过法线比较获得的边缘,不会有一块白的区域。
并且我们得到了一些深度检测没有获得的边缘。
现将两个结果合并:
float edge = max(edgeDepth, edgeNormal);
return edge;
得到下图:
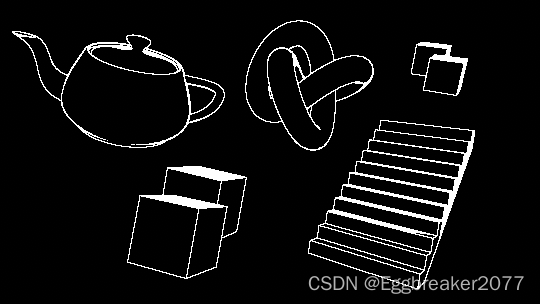
因为深度检测的原因,倾斜表面像素间会有很大的深度差。所以容易产生白块。为了解决这个问题,我们还需要知道摄像机到表面的方向(view direction 视方向)
由于我们采样的法线图是在视空间(view space),那么我们也需要在视空间的视方向。为了得到它,我们需要摄像机的 裁减到视空间(clip to view) 或者 逆投影(inverse projection) 矩阵。
但是这个矩阵在默认的屏幕shader中是不能获得的,所以我们通过C#将矩阵传递进来。
在custom postprocess中的代码:
Matrix4x4 clipToView = GL.GetGPUProjectionMatrix(context.camera.projectionMatrix, true).inverse;
sheet.properties.SetMatrix("_ClipToView", clipToView);
于是,我们就可以在vert着色器中计算视空间中的视方向了。
o.vertex = float4(v.vertex.xy, 0.0, 1.0);
o.viewSpaceDir = mul(_ClipToView, o.vertex).xyz;
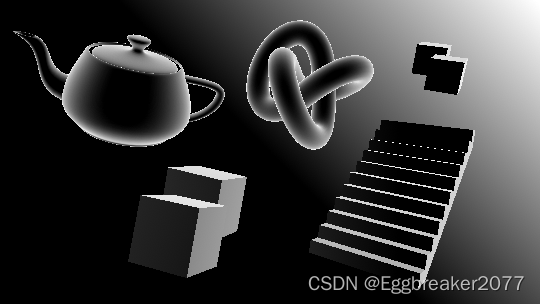
得到视方向后,我们就可以得到NdotV(也成为菲列尔),表示法线和视方向的重合度。
//法线在0...1范围, 视方向在 -1...1范围,需要统一范围
float3 viewNormal = normal0 * 2 - 1;
float NdotV = 1 - dot(viewNormal, -i.viewSpaceDir);

return NdotV;
得到下图:
我们引入阈值_DepthNormalThreshold 来控制NdotV的影响范围
同时引入_DepthNormalThresholdScale控制调节范围在0 - 1之间
float normalThreshold01 = saturate((NdotV - _DepthNormalThreshold) / (1 - _DepthNormalThreshold));
float normalThreshold = normalThreshold01 * _DepthNormalThresholdScale + 1;
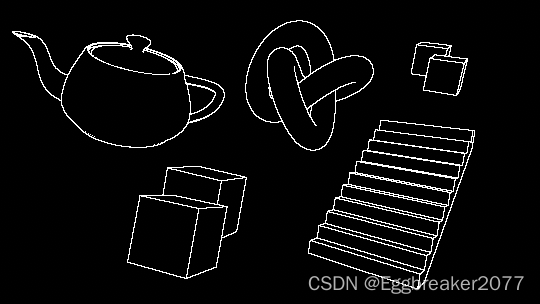
然后将新的法线阈值和深度阈值结合:
float depthThreshold = _DepthThreshold * depth0 * normalThreshold;
得到一个较完美的描边
最后合并图像原有颜色:
float4 color = SAMPLE_TEXTURE2D(_MainTex, sampler_MainTex, i.texcoord);
float4 edgeColor = float4(_Color.rgb, _Color.a * edge);

return alphaBlend(edgeColor, color);
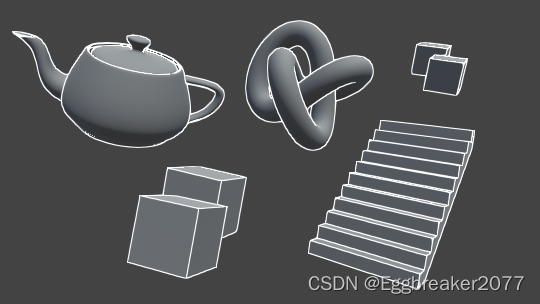
得到最终效果图。
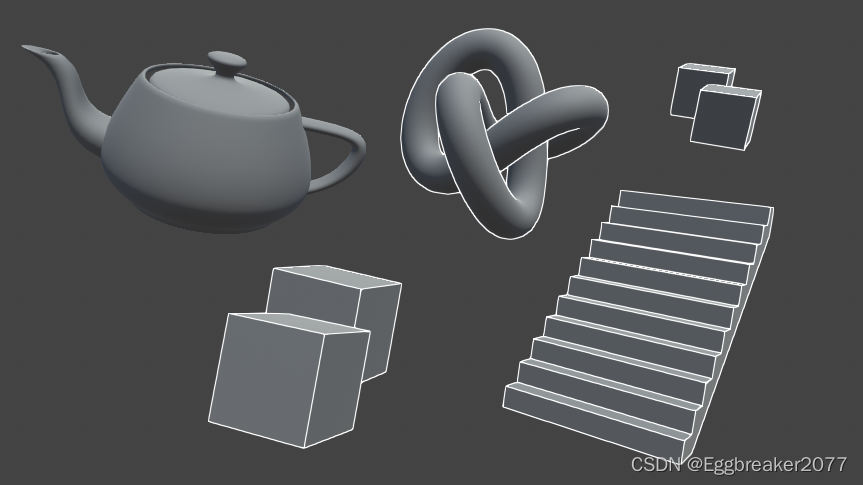
因为是后处理,通常情况下,看到的物体都会被描边。但是我们有时候又需要排除一些不需要描边的物体。这时我们可以通过控制材质球的shaderPassEnable来实现。
public class ShaderPassController : MonoBehaviour
{
    public bool value;
    public string passName = "Always";
    // Start is called before the first frame update
    void Start()
    {
        var mat = GetComponent<Renderer>().material;
        mat.SetShaderPassEnabled(passName, value);
    }
}
用于绘制法线的Shader 没有声明Tag。此时,Unity会默认设置Tag{“LightModel”=“Always”}
此时,我们可以通过SetShaderPassEnabled 关闭Shader中Tag为"Always"的Pass. 关闭后,此物体的Shader对于法线摄像机等于没有任何Pass,所以不会被绘制。当我们给茶壶添加ShaderPassController脚本后,法线摄像机如下图:
如果物体原本的shader使用的是“Always”Tag,为了防止被关闭Pass,可以添加tags {“LightModel”=“ForwardBase”} 来规避
此时,我们只需判断没有法线数据的点就是没有描边就可以了。
if (normal3.r == 1 && normal3.g == 1 && normal3.b == 1
	&& normal0.r == 1 && normal0.g == 1 && normal0.b == 1
	&& normal1.r == 1 && normal1.g == 1 && normal1.b == 1
	&& normal2.r == 1 && normal2.g == 1 && normal2.b == 1)
	{
		edge = 0;
	}
得到下图:
Shader "Hidden/Outline Post Process"
{
    SubShader
    {
        Cull Off ZWrite Off ZTest Always

        Pass
        {
			// Custom post processing effects are written in HLSL blocks,
			// with lots of macros to aid with platform differences.
			// https://github.com/Unity-Technologies/PostProcessing/wiki/Writing-Custom-Effects#shader
            HLSLPROGRAM
            #pragma vertex Vert
            #pragma fragment Frag

			#include "Packages/com.unity.postprocessing/PostProcessing/Shaders/StdLib.hlsl"

			TEXTURE2D_SAMPLER2D(_MainTex, sampler_MainTex);
			// _CameraNormalsTexture contains the view space normals transformed
			// to be in the 0...1 range.
			TEXTURE2D_SAMPLER2D(_CameraNormalsTexture, sampler_CameraNormalsTexture);
			TEXTURE2D_SAMPLER2D(_CameraDepthTexture, sampler_CameraDepthTexture);

			// Data pertaining to _MainTex's dimensions.
			// https://docs.unity3d.com/Manual/SL-PropertiesInPrograms.html
			float4 _MainTex_TexelSize;
            float _Scale;
            float _DepthThreshold;
            float _NormalThreshold;
            float4x4 _ClipToView;
            float _DepthNormalThreshold;
			float _DepthNormalThresholdScale;
            float4 _Color;

			// Combines the top and bottom colors using normal blending.
			// https://en.wikipedia.org/wiki/Blend_modes#Normal_blend_mode
			// This performs the same operation as Blend SrcAlpha OneMinusSrcAlpha.
			float4 alphaBlend(float4 top, float4 bottom)
			{
				float3 color = (top.rgb * top.a) + (bottom.rgb * (1 - top.a));
				float alpha = top.a + bottom.a * (1 - top.a);

				return float4(color, alpha);
			}
            struct Varyings
			{
				float4 vertex : SV_POSITION;
				float2 texcoord : TEXCOORD0;
				float2 texcoordStereo : TEXCOORD1;
				float3 viewSpaceDir : TEXCOORD2;
				#if STEREO_INSTANCING_ENABLED
					uint stereoTargetEyeIndex : SV_RenderTargetArrayIndex;
				#endif
			};

            Varyings Vert(AttributesDefault v)
			{
				Varyings o;
				o.vertex = float4(v.vertex.xy, 0.0, 1.0);
            	o.viewSpaceDir = mul(_ClipToView, o.vertex).xyz;
				o.texcoord = TransformTriangleVertexToUV(v.vertex.xy);

			#if UNITY_UV_STARTS_AT_TOP
				o.texcoord = o.texcoord * float2(1.0, -1.0) + float2(0.0, 1.0);
			#endif

				o.texcoordStereo = TransformStereoScreenSpaceTex(o.texcoord, 1.0);

				return o;
			}


			float4 Frag(Varyings i) : SV_Target
			{

				float halfScaleFloor = floor(_Scale * 0.5);
				float halfScaleCeil = ceil(_Scale * 0.5);

				float2 bottomLeftUV = i.texcoord - float2(_MainTex_TexelSize.x, _MainTex_TexelSize.y) * halfScaleFloor;
				float2 topRightUV = i.texcoord + float2(_MainTex_TexelSize.x, _MainTex_TexelSize.y) * halfScaleCeil;
				float2 bottomRightUV = i.texcoord + float2(_MainTex_TexelSize.x * halfScaleCeil, -_MainTex_TexelSize.y * halfScaleFloor);
				float2 topLeftUV = i.texcoord + float2(-_MainTex_TexelSize.x * halfScaleFloor, _MainTex_TexelSize.y * halfScaleCeil);

				float depth0 = SAMPLE_DEPTH_TEXTURE(_CameraDepthTexture, sampler_CameraDepthTexture, bottomLeftUV).r;
				float depth1 = SAMPLE_DEPTH_TEXTURE(_CameraDepthTexture, sampler_CameraDepthTexture, topRightUV).r;
				float depth2 = SAMPLE_DEPTH_TEXTURE(_CameraDepthTexture, sampler_CameraDepthTexture, bottomRightUV).r;
				float depth3 = SAMPLE_DEPTH_TEXTURE(_CameraDepthTexture, sampler_CameraDepthTexture, topLeftUV).r;

				float3 normal0 = SAMPLE_TEXTURE2D(_CameraNormalsTexture, sampler_CameraNormalsTexture, bottomLeftUV).rgb;
				float3 normal1 = SAMPLE_TEXTURE2D(_CameraNormalsTexture, sampler_CameraNormalsTexture, topRightUV).rgb;
				float3 normal2 = SAMPLE_TEXTURE2D(_CameraNormalsTexture, sampler_CameraNormalsTexture, bottomRightUV).rgb;
				float3 normal3 = SAMPLE_TEXTURE2D(_CameraNormalsTexture, sampler_CameraNormalsTexture, topLeftUV).rgb;

				float3 normalFiniteDifference0 = normal1 - normal0;
				float3 normalFiniteDifference1 = normal3 - normal2;

				float edgeNormal = sqrt(dot(normalFiniteDifference0, normalFiniteDifference0) + dot(normalFiniteDifference1, normalFiniteDifference1));
				edgeNormal = edgeNormal > _NormalThreshold ? 1 : 0;

				float depthFiniteDifference0 = depth1 - depth0;
				float depthFiniteDifference1 = depth3 - depth2;
				float edgeDepth = sqrt(pow(depthFiniteDifference0, 2) + pow(depthFiniteDifference1, 2)) * 100;

				float3 viewNormal = normal0 * 2 - 1;
				float NdotV = 1 - dot(viewNormal, -i.viewSpaceDir);
				float normalThreshold01 = saturate((NdotV - _DepthNormalThreshold) / (1 - _DepthNormalThreshold));
				float normalThreshold = normalThreshold01 * _DepthNormalThresholdScale + 1;

				float depthThreshold = _DepthThreshold * depth0 * normalThreshold;
				edgeDepth = edgeDepth > depthThreshold ? 1 : 0;

				float edge = max(edgeDepth, edgeNormal);

				if (normal3.r == 1 && normal3.g == 1 && normal3.b == 1
					&& normal0.r == 1 && normal0.g == 1 && normal0.b == 1
					&& normal1.r == 1 && normal1.g == 1 && normal1.b == 1
					&& normal2.r == 1 && normal2.g == 1 && normal2.b == 1)
				{
					edge = 0;
				}

				float4 color = SAMPLE_TEXTURE2D(_MainTex, sampler_MainTex, i.texcoord);
				float4 edgeColor = float4(_Color.rgb, _Color.a * edge);

				return alphaBlend(edgeColor, color);
			}
			ENDHLSL
		}
    }
}
当我在Rails控制台中按向上或向左箭头时,出现此错误:irb(main):001:0>/Users/me/.rvm/gems/ruby-2.0.0-p247/gems/rb-readline-0.4.2/lib/rbreadline.rb:4269:in`blockin_rl_dispatch_subseq':invalidbytesequenceinUTF-8(ArgumentError)我使用rvm来管理我的ruby安装。我正在使用=>ruby-2.0.0-p247[x86_64]我使用bundle来管理我的gem,并且我有rb-readline(0.4.2)(人们推荐的最少
我有一个在Linux服务器上运行的ruby脚本。它不使用rails或任何东西。它基本上是一个命令行ruby脚本,可以像这样传递参数:./ruby_script.rbarg1arg2如何将参数抽象到配置文件(例如yaml文件或其他文件)中?您能否举例说明如何做到这一点?提前谢谢你。 最佳答案 首先,您可以运行一个写入YAML配置文件的独立脚本:require"yaml"File.write("path_to_yaml_file",[arg1,arg2].to_yaml)然后,在您的应用中阅读它:require"yaml"arg
我正在使用Ruby2.1.1和Rails4.1.0.rc1。当执行railsc时,它被锁定了。使用Ctrl-C停止,我得到以下错误日志:~/.rvm/gems/ruby-2.1.1/gems/spring-1.1.2/lib/spring/client/run.rb:47:in`gets':Interruptfrom~/.rvm/gems/ruby-2.1.1/gems/spring-1.1.2/lib/spring/client/run.rb:47:in`verify_server_version'from~/.rvm/gems/ruby-2.1.1/gems/spring-1.1.
我将我的Rails应用程序部署到OpenShift,它运行良好,但我无法在生产服务器上运行“Rails控制台”。它给了我这个错误。我该如何解决这个问题?我尝试更新rubygems,但它也给出了权限被拒绝的错误,我也无法做到。railsc错误:Warning:You'reusingRubygems1.8.24withSpring.UpgradetoatleastRubygems2.1.0andrun`gempristine--all`forbetterstartupperformance./opt/rh/ruby193/root/usr/share/rubygems/rubygems
我有一个用户工厂。我希望默认情况下确认用户。但是鉴于unconfirmed特征,我不希望它们被确认。虽然我有一个基于实现细节而不是抽象的工作实现,但我想知道如何正确地做到这一点。factory:userdoafter(:create)do|user,evaluator|#unwantedimplementationdetailshereunlessFactoryGirl.factories[:user].defined_traits.map(&:name).include?(:unconfirmed)user.confirm!endendtrait:unconfirmeddoenden
导读:随着叮咚买菜业务的发展,不同的业务场景对数据分析提出了不同的需求,他们希望引入一款实时OLAP数据库,构建一个灵活的多维实时查询和分析的平台,统一数据的接入和查询方案,解决各业务线对数据高效实时查询和精细化运营的需求。经过调研选型,最终引入ApacheDoris作为最终的OLAP分析引擎,Doris作为核心的OLAP引擎支持复杂地分析操作、提供多维的数据视图,在叮咚买菜数十个业务场景中广泛应用。作者|叮咚买菜资深数据工程师韩青叮咚买菜创立于2017年5月,是一家专注美好食物的创业公司。叮咚买菜专注吃的事业,为满足更多人“想吃什么”而努力,通过美好食材的供应、美好滋味的开发以及美食品牌的孵
华为OD机试题本篇题目:明明的随机数题目输入描述输出描述:示例1输入输出说明代码编写思路最近更新的博客华为od2023|什么是华为od,od薪资待遇,od机试题清单华为OD机试真题大全,用Python解华为机试题|机试宝典【华为OD机试】全流程解析+经验分享,题型分享,防作弊指南华为o
?博客主页:https://xiaoy.blog.csdn.net?本文由呆呆敲代码的小Y原创,首发于CSDN??学习专栏推荐:Unity系统学习专栏?游戏制作专栏推荐:游戏制作?Unity实战100例专栏推荐:Unity实战100例教程?欢迎点赞?收藏⭐留言?如有错误敬请指正!?未来很长,值得我们全力奔赴更美好的生活✨------------------❤️分割线❤️-------------------------
本教程将在Unity3D中混合Optitrack与数据手套的数据流,在人体运动的基础上,添加双手手指部分的运动。双手手背的角度仍由Optitrack提供,数据手套提供双手手指的角度。 01 客户端软件分别安装MotiveBody与MotionVenus并校准人体与数据手套。MotiveBodyMotionVenus数据手套使用、校准流程参照:https://gitee.com/foheart_1/foheart-h1-data-summary.git02 数据转发打开MotiveBody软件的Streaming,开始向Unity3D广播数据;MotionVenus中设置->选项选择Unit
目录1.AdmobSDK下载地址2.将下载好的unityPackagesdk导入到unity里编辑 3.解析依赖到项目中
