目录
本文主要内容
JMockit 之所以强大,是因其使用了 javaagent 对类的字节码做了修改,在 JVM 的所有 mock 工具中,它是功能最强大的。同时注解又是最少的。
在 SpringBoot 项目中使用 JMockit 隔离代码做单元测试,需要做以下配置
<dependencies>
   <dependency>
      <groupId>org.jmockit</groupId>
      <artifactId>jmockit</artifactId>
      <version>${jmockit.version}</version>
      <scope>test</scope>
   </dependency>
</dependencies>
<plugins>
   <plugin>
      <artifactId>maven-surefire-plugin</artifactId>
      <version>2.22.2</version> <!-- or some other version -->
      <configuration>
         <argLine>
            -javaagent:"${settings.localRepository}"/org/jmockit/jmockit/${jmockit.version}/jmockit-${jmockit.version}.jar
         </argLine>
      </configuration>
   </plugin>
</plugins>
注意 {jmockit.version} 配置在 properties 标签下
<properties>
    <jmockit.version>1.49</jmockit.version>
    <skipTests>true</skipTests>    <!--同时加上这个,在 compile 过程中,将忽略测试代码编译-->
</properties>
模拟提供一种将被测对象与其依赖隔离开来的机制。在单元测试时,仅需使用注解的方式将被测对象的依赖作为测试类的 field 属性或测试类中某个方法的参数引入到测试类。在执行单元测试时,被测对象的依赖将被重定向到 mock 对象中。如
class TheTestClass() {

    @Mocked
    private FirstDependency firstDependency;  // 作为 field 被引入到测试类

    // Note: the test method can not have a return value.
    @Test
    void testMethod(@Mocked SecondDenpency seconDependency) {  // 作为参数被引入到测试类
        // your test code
        ...
    }
}
使用 JMockit 模拟的对象作为方法参数在测试类使用时,该模拟对象会被自动创建并传递给当前使用的单元测试框架,如 JUnit/TestNG,因此当模拟对象作为参数时,该参数永不为 null。
JMockit 共提供 3 种不同的注解用于模拟被测对象的依赖。
@Mocked 注解的类型的所有实例都将被 mock ,以及该类的所有父类(除 java.lang.Object 外)都会被递归 mock,所有子类也将被递归 mock,除 private 修饰的方法外,所有方法也将被 mock。如public abstract class AbsDemoClass {
public void handle() {}
}
@Slf4j
public class DemoClass extend AbsDemoClass {

	@Override
	public void handle(String args) {
		log.info("args length is {}", args.length());
	}
}
@ExtendWith(JMockitExtension.class)
class DemoClassTest {

    @Mocked
    private TargetMockClass instance1;

    @Test
    public void testPublish() {
        AbsDemoClass demo1 = new DemoClass();
        AbsDemoClass demo2 = new DemoClass();
        demo1.handle(null); // demo1 为用户 new 的对象,但是自动被 mock 对象覆盖了,不执行真实方法
        demo2.handle(null); // demo2 为用户 new 的对象,但是自动被 mock 对象覆盖了,不执行真实方法
        instance1.handle(null);
    }
}
@ExtendWith(JMockitExtension.class)
class DemoClassTest {

    @Mocked
    private TargetMockClass instance1;

    @Test
    public void testPublish() {
        AbsDemoClass demo1 = new DemoClass();
        AbsDemoClass demo2 = new DemoClass();
        demo1.handle(null);  // 调用真实方法,抛出了异常
        demo2.handle(null);
        instance1.handle(null);
    }
}
mock。如当我们就仅知道父类或接口,但需要控制它的所有子类行为、或子类存在多个实现时,就使用 @Capturing。建本节最后一小节——模拟未实现的类。在测试类中,被模拟的对象未使用会报错么?
答:不会
期望是指一组与测试相关的特定模拟方法 / 构造函数的调用。期望可能涵盖对同一方法或构造函数的多个不同调用,但无需涵盖该类的所有方法调用,换句话说需要什么方法即对该方法建立期望即可。特定调用是否与给定期望匹配不仅取决于方法/构造函数签名,还取决于运行时,例如调用方法的实例、参数值、已匹配的调用数量。因此,可以为给定的期望指定几种类型的匹配约束。
当我们涉及一个或多个调用参数时,可以为每个参数指定一个确切的参数值。如可以为 String 参数指定值 “test string”,从而导致期望仅匹配那些在相应参数中具有此精确值的调用。我们也可以指定更宽松的约束来匹配整组不同的参数值,而不是指定精确的参数值。
如下代码片段显示了对 Dependency#someMethod(int, String) 的期望,它将使用指定的确切参数值匹配对此方法的调用。
@Test
void testMethod(@Mocked Dependency mockInstance) {
   ...
   new Expectations() {{
      ...
      // An expectation for an instance method:
      mockInstance.someMethod(1, "test"); result = "mocked";
      ...
   }};
   // 注意,这里仅是建立了一个期望(stub),并不会发生真实的调用
}
在测试类中,建立了期望的方法未使用,会报错么?
答:会,将抛出 miss invocations 异常
任何一个单元测试用例都可以被划分为三个互相独立的阶段,每个按顺序依次执行,任意时刻仅会执行其中一个。分别为
在代码块中的表现形式如
@Test
void testMethod() {
   // 1. 准备,测试所需数据及依赖对象
   ...
   // 2. 回放,即调用真实的方法进行测试,通常调用的是 public方法,切记不要调用 private 方法。
   ...
   // 3. 验证,验证方法调用次数,执行结果等
   //    the test did its job.
   ...
}
录制技巧
DemoClass#doSomething(String args)。class DemoClass {
public String doSomething(String args) {
// process args
// do something with args
try {
...
return "string value"
} catch (YourException e) {
throw new YourException("exception message");
}
}
}
对该方法建立期望并获得返回值可使用如下方式。
@Test
void testDoSomething(@Mocked DemoClass demoClass){

    new Expectations() {
        {
            demoClass.doSomething(anyString);   // 注意该处的参数,可以是 anyString,也可以是精确值
            result = "your expectation value";
        }
        ...
    };

    // replay
}
@Test
void testDoSomething(@Mocked DemoClass demoClass){

    new Expectations() {
        {
            demoClass.doSomething(anyString);
            result = new YourException();
        }
        ...
    };

    // replay
}
JMockit提供了如 any、with 等前缀对象对方法进行灵活 mock。如上述用例中,当希望传入任何字符串时均返回同一指定值,可使用 anyString,以 any 前缀开始的类型还有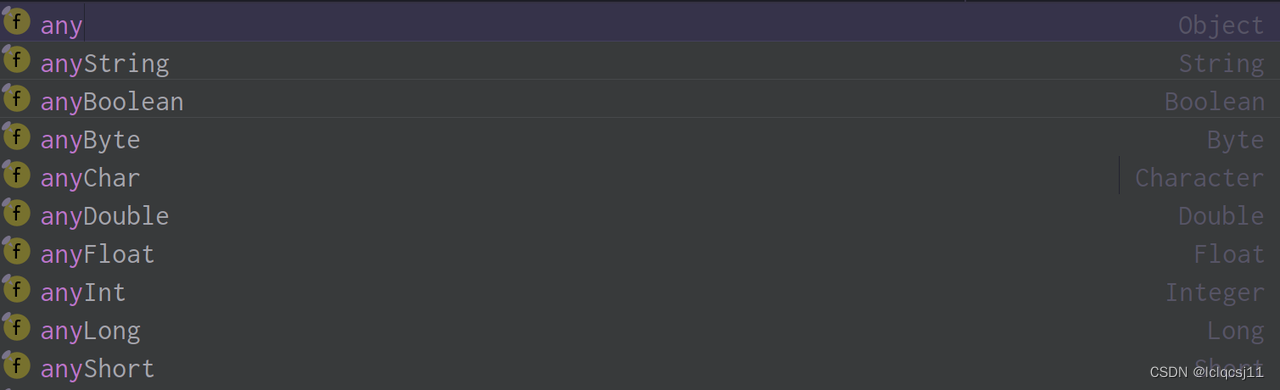
withInstanceOf(Class<T> clazz),以 with 为前缀的类型还有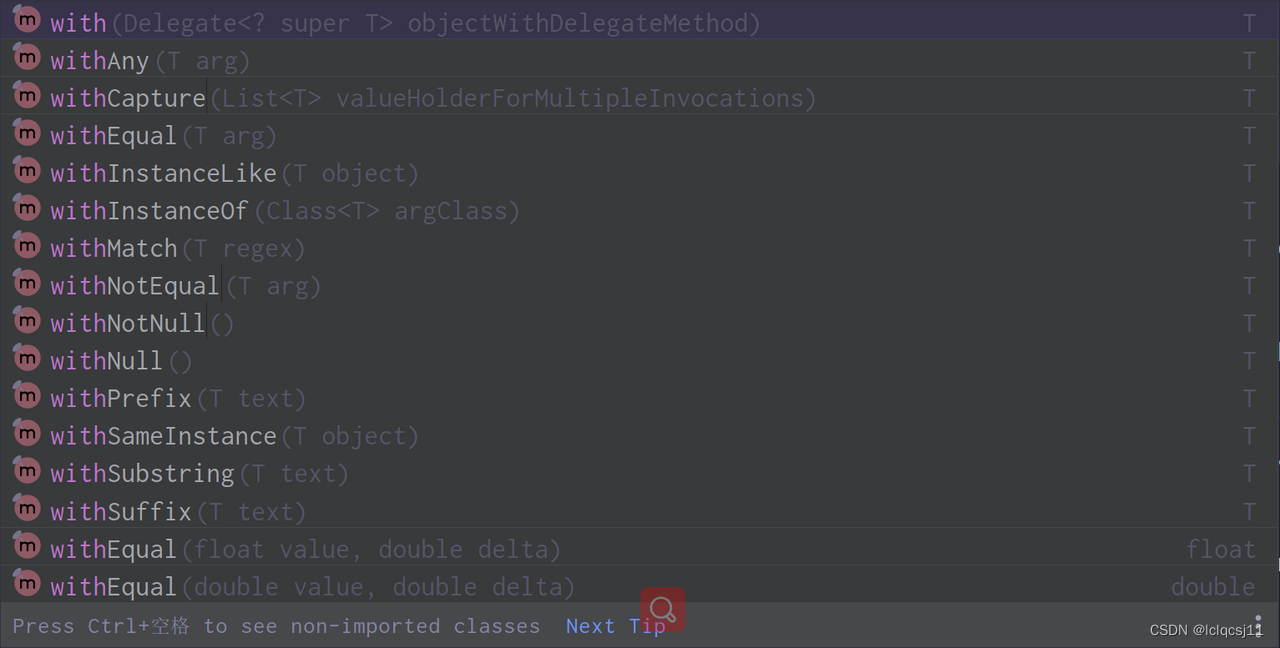
调用计数约束可用于建立期望时或验证结果时,Jmockit 提供了三个特殊字段用于计数约束。分别为:
new Verifications() {
  {
      instance1.method(args...);
      times = your specified value;
  }
  {
      instance2.method(args...);
      times = your specified value;
  }
  ...
}
@Test
void verifyingExpectationsInOrder(@Mocked DependencyAbc abc) {
   // Somewhere inside the tested code:
   abc.aMethod();
   abc.doSomething("blah", 123);
   abc.anotherMethod(5);
   ...

   new VerificationsInOrder() {{
      // The order of these invocations must be the same as the order
      // of occurrence during replay of the matching invocations.
      abc.aMethod();
      abc.anotherMethod(anyInt);
   }};
}
new FullVerifications() {...} 块将确保没有未验证的调用。如@Test
void verifyAllInvocations(@Mocked Dependency mock) {
// Code under test included here for easy reference:
mock.setSomething(123);
mock.setSomethingElse("anotherValue");
mock.setSomething(45);
mock.save();
new FullVerifications() {{
mock.setSomething(anyInt); // verifies two actual invocations
mock.setSomethingElse(anyString);
mock.save(); // if this verification (or any other above) is removed the test will fail
}};
}
假设有一种场景,我们需要根据回放时接收到的参数来决定记录期望值的结果,应该要怎么做?答案是使用 Delegate()。如
@Tested CodeUnderTest cut;

@Test
void delegatingInvocationsToACustomDelegate(@Mocked DependencyAbc anyAbc) {
   new Expectations() {
       {
          anyAbc.intReturningMethod(anyInt, anyString);
          result = new Delegate() {
             int aDelegateMethod(int i, String s) {
                return i == 1 ? i : s.length();
             }
          };
       }
   };

   // Calls to "intReturningMethod(int, String)" will execute the delegate method above.
   cut.doSomething();
}
Delegate 接口是空的,仅用于告诉 JMockit 在重放时的实际调用应该委托给分配对象中的“委托”方法。该方法可以有任何名称,只要它是委托对象中唯一的非私有方法。至于委托方法的参数,要么与记录方法的参数相匹配,要么不存在。在任何情况下,委托方法都可以有一个 Invocation 类型的附加参数作为其第一个参数。在重放期间收到的 Invocation 对象将提供对被调用实例和实际调用参数以及其他功能的访问。委托方法的返回类型不必与记录的方法相同,但它应该兼容以避免以后发生 ClassCastException。
除此之外,构造方法也可以通过委托方法处理。如
@Test
void delegatingConstructorInvocations(@Mocked Collaborator anyCollaboratorInstance) {
   new Expectations() {{
      new Collaborator(anyInt);
      result = new Delegate() {
         void delegate(int i) { if (i < 1) throw new IllegalArgumentException(); }
      };
   }};

   // The first instantiation using "Collaborator(int)" will execute the delegate above.
   new Collaborator(4);
}
可以通过一组特殊的 withCapture(...) 方法捕获调用参数以供以后验证。有三种不同的情况,每种都有自己特定的捕获方法:
T withCapture()@Test
void capturingArgumentsFromSingleInvocation(@Mocked Collaborator mock) {
// Inside tested code:
...
new Collaborator().doSomething(0.5, new int[2], "test");
// Back in test code:
new Verifications() {{
double d;
String s;
mock.doSomething(d = withCapture(), null, s = withCapture());
assertTrue(d > 0.0);
assertTrue(s.length() > 1);
}};
}
在多次调用中验证传递给模拟方法的参数: T withCapture(List<T>)
@Test
void capturingArgumentsFromMultipleInvocations(@Mocked Collaborator mock) {
   // Inside tested code:
   mock.doSomething(dataObject1);
   mock.doSomething(dataObject2);
   ...

   // Back in test code:
   new Verifications() {{
      List<DataObject> dataObjects = new ArrayList<>();
      mock.doSomething(withCapture(dataObjects));

      assertEquals(2, dataObjects.size());
      DataObject data1 = dataObjects.get(0);
      DataObject data2 = dataObjects.get(1);
      // Perform arbitrary assertions on data1 and data2.
   }};
}
List<T> withCapture(T)@Test
void capturingNewInstances(@Mocked Person mockedPerson) {
// From the code under test:
dao.create(new Person("Paul", 10));
dao.create(new Person("Mary", 15));
dao.create(new Person("Joe", 20));
...
// Back in test code:
new Verifications() {{
// Captures the new instances created with a specific constructor.
List<Person> personsInstantiated = withCapture(new Person(anyString, anyInt));
// Now captures the instances of the same type passed to a method.
List<Person> personsCreated = new ArrayList<>();
dao.create(withCapture(personsCreated));
// Finally, verifies both lists are the same.
assertEquals(personsInstantiated, personsCreated);
}};
}
存在这样的情况,联级创建一个自身对象,如
result = HttpUtil.createPost(url).addHeaders(header).setConnectionTimeout(2000).setReadTimeout(3000).body(params.toJSONString()).execute().body();
前半部分是创建一个 httpRequest 对象,后半部分是 http 执行并获取响应内容。在这种情况下,我们仅需 mock httpRequest 的 execute 方法,并返回一个 httpResponse 内容即可。
部分模拟有两种方式,一种是建立期望,但对于构造方法、静态方法不能使用期望方式实现,需使用
MockUp<T>(Class<T> argsClass) 的方式来模拟。
如存在一个接口
public interface Service {
    int doSomething();
}
及一个实现了该接口的实现类
final class ServiceImpl implements Service {

    @Override
    public int doSomething() {
        return 1;
    }
}
public final class DemoClass {
   private final Service service1 = new ServiceImpl();
   private final Service service2 = new Service() {
       public int doSomething() {
           return 2;
       }
   };

   public int businessOperation() {
      return service1.doSomething() + service2.doSomething();
   }
}
如果不知道 Service 的具体实现(或 Service 是一个 abstract classs)时,要测试 businessOperation方法应当如何测试?
final class DemoClassTest {
   @Capturing Service anyService;

   @Test
   void mockingImplementationClassesFromAGivenBaseType() {
      new Expectations() {{ anyService.doSomething(); returns(3, 4); }};

      int result = new TestedUnit().businessOperation();

      assertEquals(7, result);
   }
}
当被测对象中存在 @Value("${xxx}") 时,该如何 mock ?
由于当前我们单元测试并不加载任何 SpringBoot 上下文以及配置文件,因此针对这类私有属性,可以通过反射方式来赋值。如被测对象存在以下两个属性需要从配置文件获取。
@Value("${xxx.xxx.xxx}")
private String apiGatewayIdcs;

@Value("${spring.profiles.active}")
private String currentEnv;
可通过反射方式设定值,如
Field apiGatewayIdcs = SuperAndSubPermissionUtil.class.getDeclaredField("apiGatewayIdcs");
apiGatewayIdcs.setAccessible(true);
ReflectionUtils.setField(apiGatewayIdcs, superAndSubPermissionUtil, "wj");

Field currentEnv = SuperAndSubPermissionUtil.class.getDeclaredField("currentEnv");
currentEnv.setAccessible(true);
ReflectionUtils.setField(currentEnv, superAndSubPermissionUtil, "prd");
在 JMockit 工具包中,Faking API 支持创建假实现。通常,伪造的目标是要伪造的类中的某些些方法或某些构造函数,而大多数其他方法和构造函数保持不变。
假实现在依赖于外部组件或资源(如电子邮件或 Web 服务服务器、复杂库等)的测试中特别有用。通常,假实现将来自可重用的测试基础设施组件,而不是直接来自测试类。
用假实现替换真实实现对于使用这些依赖项的代码是完全透明的,并且可以在单个测试的范围内、单个测试类中的所有测试或整个测试运行中打开和关闭。
在 Faking API 的上下文中,假方法是假类中使用 @Mock 注释的任何方法。伪类是扩展 mockit.MockUp<T> 泛型基类的任何类,其中 T 是要伪造的类型。如伪造 javax.security.auth.login.LoginContext 类的若干方法。
public final class FakeLoginContext extends MockUp<LoginContext> {
   @Mock
   public void $init(String name, CallbackHandler callback) {
      assertEquals("test", name);
      assertNotNull(callback);
   }

   @Mock
   public void login() {}

   @Mock
   public Subject getSubject() { return null; }
}
每个 @Mock 方法必须有一个对应的“真实方法 / 构造函数”,在目标真实类中具有相同的签名。对于一个方法,签名由方法名和参数组成;对于构造函数,它只是参数,假方法具有特殊名称 “$init”。
注意 :没有必要为真实类中的所有方法和构造函数使用假方法。任何此类方法或构造函数,如果在假类中不存在相应的假方法,则将简单地保持“原样”,也就是说,它不会被伪造。
应用伪装类
给定的假类必须应用于相应的真实类才能产生任何效果。这通常针对整个测试类或测试套件进行,但也可以针对单个测试进行。可以从测试类中的任何位置应用伪造:@BeforeClass 方法、@BeforeMethod / @Before / @BeforeEach 方法(TestNG / JUnit 4 / JUnit 5)或来自 @Test 方法。一旦应用了假类,所有假方法和真实类的构造函数的执行都会自动重定向到相应的假方法。如要应用上面的 FakeLoginContext 假类,我们只需实例化它:
@Test
public void applyingAFakeClass() throws Exception {
   new FakeLoginContext());

   // Inside an application class which creates a suitable CallbackHandler:
   new LoginContext("test", callbackHandler).login();

   ...
}
由于在测试方法中应用了伪造类,因此 FakeLoginContext 对 LoginContext 的伪造将仅对该特定测试有效。
当实例化 LoginContext 的构造函数调用执行时,会执行 FakeLoginContext 中对应的“$init”假方法。同样,当调用 LoginContext#login 方法时,会执行相应的 fake 方法,在这种情况下,由于该方法没有参数且返回类型为 void,因此它什么也不做。发生这些调用的假类实例是在测试的第一部分中创建的。
如上述 Service 接口,我们可以使用一下方式伪装并测试
@Test
public <T extends Service> void fakingImplementationClassesFromAGivenBaseType() {
   new MockUp<T>() {
      @Mock int doSomething() { return 7; }
   };

   int result = new DemoClass().businessOperation();

   assertEquals(14, result);
}
我正在学习如何使用Nokogiri,根据这段代码我遇到了一些问题:require'rubygems'require'mechanize'post_agent=WWW::Mechanize.newpost_page=post_agent.get('http://www.vbulletin.org/forum/showthread.php?t=230708')puts"\nabsolutepathwithtbodygivesnil"putspost_page.parser.xpath('/html/body/div/div/div/div/div/table/tbody/tr/td/div
我有一个Ruby程序,它使用rubyzip压缩XML文件的目录树。gem。我的问题是文件开始变得很重,我想提高压缩级别,因为压缩时间不是问题。我在rubyzipdocumentation中找不到一种为创建的ZIP文件指定压缩级别的方法。有人知道如何更改此设置吗?是否有另一个允许指定压缩级别的Ruby库? 最佳答案 这是我通过查看rubyzip内部创建的代码。level=Zlib::BEST_COMPRESSIONZip::ZipOutputStream.open(zip_file)do|zip|Dir.glob("**/*")d
类classAprivatedeffooputs:fooendpublicdefbarputs:barendprivatedefzimputs:zimendprotecteddefdibputs:dibendendA的实例a=A.new测试a.foorescueputs:faila.barrescueputs:faila.zimrescueputs:faila.dibrescueputs:faila.gazrescueputs:fail测试输出failbarfailfailfail.发送测试[:foo,:bar,:zim,:dib,:gaz].each{|m|a.send(m)resc
很好奇,就使用rubyonrails自动化单元测试而言,你们正在做什么?您是否创建了一个脚本来在cron中运行rake作业并将结果邮寄给您?git中的预提交Hook?只是手动调用?我完全理解测试,但想知道在错误发生之前捕获错误的最佳实践是什么。让我们理所当然地认为测试本身是完美无缺的,并且可以正常工作。下一步是什么以确保他们在正确的时间将可能有害的结果传达给您? 最佳答案 不确定您到底想听什么,但是有几个级别的自动代码库控制:在处理某项功能时,您可以使用类似autotest的内容获得关于哪些有效,哪些无效的即时反馈。要确保您的提
假设我做了一个模块如下:m=Module.newdoclassCendend三个问题:除了对m的引用之外,还有什么方法可以访问C和m中的其他内容?我可以在创建匿名模块后为其命名吗(就像我输入“module...”一样)?如何在使用完匿名模块后将其删除,使其定义的常量不再存在? 最佳答案 三个答案:是的,使用ObjectSpace.此代码使c引用你的类(class)C不引用m:c=nilObjectSpace.each_object{|obj|c=objif(Class===objandobj.name=~/::C$/)}当然这取决于
我正在尝试使用ruby和Savon来使用网络服务。测试服务为http://www.webservicex.net/WS/WSDetails.aspx?WSID=9&CATID=2require'rubygems'require'savon'client=Savon::Client.new"http://www.webservicex.net/stockquote.asmx?WSDL"client.get_quotedo|soap|soap.body={:symbol=>"AAPL"}end返回SOAP异常。检查soap信封,在我看来soap请求没有正确的命名空间。任何人都可以建议我
关闭。这个问题是opinion-based.它目前不接受答案。想要改进这个问题?更新问题,以便editingthispost可以用事实和引用来回答它.关闭4年前。Improvethisquestion我想在固定时间创建一系列低音和高音调的哔哔声。例如:在150毫秒时发出高音调的蜂鸣声在151毫秒时发出低音调的蜂鸣声200毫秒时发出低音调的蜂鸣声250毫秒的高音调蜂鸣声有没有办法在Ruby或Python中做到这一点?我真的不在乎输出编码是什么(.wav、.mp3、.ogg等等),但我确实想创建一个输出文件。
我在我的项目目录中完成了compasscreate.和compassinitrails。几个问题:我已将我的.sass文件放在public/stylesheets中。这是放置它们的正确位置吗?当我运行compasswatch时,它不会自动编译这些.sass文件。我必须手动指定文件:compasswatchpublic/stylesheets/myfile.sass等。如何让它自动运行?文件ie.css、print.css和screen.css已放在stylesheets/compiled。如何在编译后不让它们重新出现的情况下删除它们?我自己编译的.sass文件编译成compiled/t
我想将html转换为纯文本。不过,我不想只删除标签,我想智能地保留尽可能多的格式。为插入换行符标签,检测段落并格式化它们等。输入非常简单,通常是格式良好的html(不是整个文档,只是一堆内容,通常没有anchor或图像)。我可以将几个正则表达式放在一起,让我达到80%,但我认为可能有一些现有的解决方案更智能。 最佳答案 首先,不要尝试为此使用正则表达式。很有可能你会想出一个脆弱/脆弱的解决方案,它会随着HTML的变化而崩溃,或者很难管理和维护。您可以使用Nokogiri快速解析HTML并提取文本:require'nokogiri'h
我想为Heroku构建一个Rails3应用程序。他们使用Postgres作为他们的数据库,所以我通过MacPorts安装了postgres9.0。现在我需要一个postgresgem并且共识是出于性能原因你想要pggem。但是我对我得到的错误感到非常困惑当我尝试在rvm下通过geminstall安装pg时。我已经非常明确地指定了所有postgres目录的位置可以找到但仍然无法完成安装:$envARCHFLAGS='-archx86_64'geminstallpg--\--with-pg-config=/opt/local/var/db/postgresql90/defaultdb/po
