以下是一个 Dubbo 属性配置的例子 dubbo-spring-boot-samples
  ## application.properties

  # Spring boot application
  spring.application.name=dubbo-externalized-configuration-provider-sample

  # Base packages to scan Dubbo Component: @com.alibaba.dubbo.config.annotation.Service
  dubbo.scan.base-packages=com.alibaba.boot.dubbo.demo.provider.service

  # Dubbo Application
  ## The default value of dubbo.application.name is ${spring.application.name}
  ## dubbo.application.name=${spring.application.name}

  # Dubbo Protocol
  dubbo.protocol.name=dubbo
  dubbo.protocol.port=12345

  ## Dubbo Registry
  dubbo.registry.address=N/A

  ## service default version
  dubbo.provider.version=1.0.0
接下来,我们就围绕这个示例,分别从配置格式、配置来源、加载流程三个方面对 Dubbo 配置的工作原理进行分析。
目前Dubbo支持的所有配置都是.properties格式的,包括-D、Externalized Configuration等,.properties中的所有配置项遵循一种path-based的配置格式。
在Spring应用中也可以将属性配置放到application.yml中,其树层次结构的方式可读性更好一些。
# 应用级配置(无id)
dubbo.{config-type}.{config-item}={config-item-value}

# 实例级配置(指定id或name)
dubbo.{config-type}s.{config-id}.{config-item}={config-item-value}
dubbo.{config-type}s.{config-name}.{config-item}={config-item-value}

# 服务接口配置
dubbo.service.{interface-name}.{config-item}={config-item-value}
dubbo.reference.{interface-name}.{config-item}={config-item-value}

# 方法配置
dubbo.service.{interface-name}.{method-name}.{config-item}={config-item-value}
dubbo.reference.{interface-name}.{method-name}.{config-item}={config-item-value}

# 方法argument配置
dubbo.reference.{interface-name}.{method-name}.{argument-index}.{config-item}={config-item-value}
应用级配置的格式为:配置类型单数前缀,无id/name。
# 应用级配置(无id)
dubbo.{config-type}.{config-item}={config-item-value}
类似 application、monitor、metrics 等都属于应用级别组件,因此仅允许配置单个实例;而 protocol、registry 等允许配置多个的组件,在仅需要进行单例配置时,可采用此节描述的格式。常见示例如下:
dubbo.application.name=demo-provider
dubbo.application.qos-enable=false

dubbo.registry.address=zookeeper://127.0.0.1:2181

dubbo.protocol.name=dubbo
dubbo.protocol.port=-1
针对某个实例的属性配置需要指定id或者name,其前缀格式为:配置类型复数前缀 + id/name。适用于 protocol、registry 等支持多例配置的组件。
# 实例级配置(指定id或name)
dubbo.{config-type}s.{config-id}.{config-item}={config-item-value}
dubbo.{config-type}s.{config-name}.{config-item}={config-item-value}
配置示例:
dubbo.registries.unit1.address=zookeeper://127.0.0.1:2181
dubbo.registries.unit2.address=zookeeper://127.0.0.1:2182

dubbo.protocols.dubbo.name=dubbo
dubbo.protocols.dubbo.port=20880

dubbo.protocols.hessian.name=hessian
dubbo.protocols.hessian.port=8089
dubbo.service.org.apache.dubbo.samples.api.DemoService.timeout=5000
dubbo.reference.org.apache.dubbo.samples.api.DemoService.timeout=6000
方法配置格式:
# 方法配置
dubbo.service.{interface-name}.{method-name}.{config-item}={config-item-value}
dubbo.reference.{interface-name}.{method-name}.{config-item}={config-item-value}

# 方法argument配置
dubbo.reference.{interface-name}.{method-name}.{argument-index}.{config-item}={config-item-value}
方法配置示例:
dubbo.reference.org.apache.dubbo.samples.api.DemoService.sayHello.timeout=7000
dubbo.reference.org.apache.dubbo.samples.api.DemoService.sayHello.oninvoke=notifyService.onInvoke
dubbo.reference.org.apache.dubbo.samples.api.DemoService.sayHello.onreturn=notifyService.onReturn
dubbo.reference.org.apache.dubbo.samples.api.DemoService.sayHello.onthrow=notifyService.onThrow
dubbo.reference.org.apache.dubbo.samples.api.DemoService.sayHello.0.callback=true
等价于XML配置:
<dubbo:reference interface="org.apache.dubbo.samples.api.DemoService" >
    <dubbo:method name="sayHello" timeout="7000" oninvoke="notifyService.onInvoke"
                  onreturn="notifyService.onReturn" onthrow="notifyService.onThrow">
        <dubbo:argument index="0" callback="true" />
    </dubbo:method>
</dubbo:reference>
parameters参数为map对象,支持xxx.parameters=[{key:value},{key:value}]方式进行配置。
dubbo.application.parameters=[{item1:value1},{item2:value2}]
dubbo.reference.org.apache.dubbo.samples.api.DemoService.parameters=[{item3:value3}]
triple协议采用Http2做底层通信协议,允许使用者自定义Http2的6个settings参数
配置格式如下:
# 通知对端header压缩索引表的上限个数
dubbo.rpc.tri.header-table-size=4096

# 启用服务端推送功能
dubbo.rpc.tri.enable-push=false

# 通知对端允许的最大并发流数
dubbo.rpc.tri.max-concurrent-streams=2147483647

# 声明发送端的窗口大小
dubbo.rpc.tri.initial-window-size=1048576

# 设置帧的最大字节数
dubbo.rpc.tri.max-frame-size=32768

# 通知对端header未压缩的最大字节数
dubbo.rpc.tri.max-header-list-size=8192
等价于yml配置:
dubbo:
  rpc:
    tri:
      header-table-size: 4096
      enable-push: false
      max-concurrent-streams: 2147483647
      initial-window-size: 1048576
      max-frame-size: 32768
      max-header-list-size: 8192
可以将 xml 的 tag 名和属性名组合起来,用 ‘.’ 分隔。每行一个属性。
dubbo.application.name=foo 相当于 <dubbo:application name="foo" />dubbo.registry.address=10.20.153.10:9090 相当于 <dubbo:registry address="10.20.153.10:9090" /> 如果在 xml 配置中有超过一个的 tag,那么你可以使用 ‘id’ 进行区分。如果你不指定id,它将作用于所有 tag。
dubbo.protocols.rmi.port=1099 相当于 <dubbo:protocol id="rmi" name="rmi" port="1099" /> dubbo.registries.china.address=10.20.153.10:9090 相当于 <dubbo:registry id="china" address="10.20.153.10:9090" />复数配置的命名与普通单词变复数的规则相同:
| Config Type | 单数配置 | 复数配置 |
|---|---|---|
| application | dubbo.application.xxx=xxx | dubbo.applications.{id}.xxx=xxx dubbo.applications.{name}.xxx=xxx |
| protocol | dubbo.protocol.xxx=xxx | dubbo.protocols.{id}.xxx=xxx dubbo.protocols.{name}.xxx=xxx |
| module | dubbo.module.xxx=xxx | dubbo.modules.{id}.xxx=xxx dubbo.modules.{name}.xxx=xxx |
| registry | dubbo.registry.xxx=xxx | dubbo.registries.{id}.xxx=xxx |
| monitor | dubbo.monitor.xxx=xxx | dubbo.monitors.{id}.xxx=xxx |
| config-center | dubbo.config-center.xxx=xxx | dubbo.config-centers.{id}.xxx=xxx |
| metadata-report | dubbo.metadata-report.xxx=xxx | dubbo.metadata-reports.{id}.xxx=xxx |
| ssl | dubbo.ssl.xxx=xxx | dubbo.ssls.{id}.xxx=xxx |
| metrics | dubbo.metrics.xxx=xxx | dubbo.metricses.{id}.xxx=xxx |
| provider | dubbo.provider.xxx=xxx | dubbo.providers.{id}.xxx=xxx |
| consumer | dubbo.consumer.xxx=xxx | dubbo.consumers.{id}.xxx=xxx |
| service | dubbo.service.{interfaceName}.xxx=xxx | 无 |
| reference | dubbo.reference.{interfaceName}.xxx=xxx | 无 |
| method | dubbo.service.{interfaceName}.{methodName}.xxx=xxx dubbo.reference.{interfaceName}.{methodName}.xxx=xxx |
无 |
| argument | dubbo.service.{interfaceName}.{methodName}.{arg-index}.xxx=xxx | 无 |
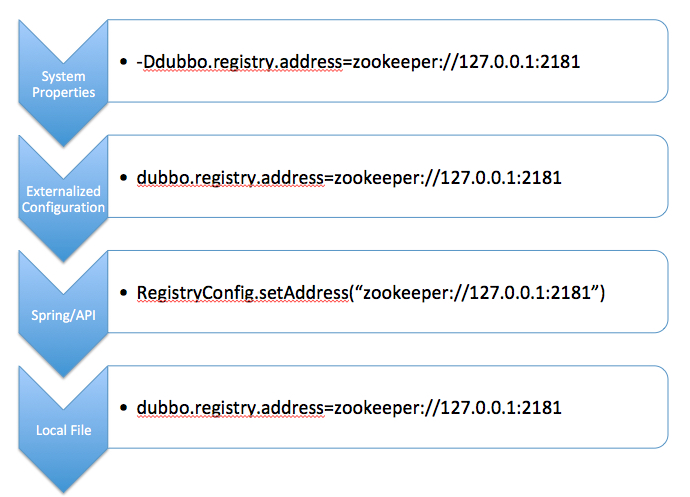
Dubbo 默认支持 6 种配置来源:
关于dubbo.properties属性:
-Ddubbo.properties.file=xxx.properties。如果通过多种配置来源指定了相同的配置项,则会出现配置项的互相覆盖,具体覆盖关系和优先级请参考下一小节。
Dubbo 配置加载大概分为两个阶段:

发生属性覆盖可能有两种情况,并且二者可能是会同时发生的:
属性覆盖是指用配置的属性值覆盖config bean实例的属性,类似Spring PropertyOverrideConfigurer 的作用。
Property resource configurer that overrides bean property values in an application context definition. It pushes values from a properties file into bean definitions.
Configuration lines are expected to be of the following form:beanName.property=value
但与PropertyOverrideConfigurer的不同之处是,Dubbo的属性覆盖有多个匹配格式,优先级从高到低依次是:
#1. 指定id的实例级配置
dubbo.{config-type}s.{config-id}.{config-item}={config-item-value}

#2. 指定name的实例级配置
dubbo.{config-type}s.{config-name}.{config-item}={config-item-value}

#3. 应用级配置(单数配置)
dubbo.{config-type}.{config-item}={config-item-value}
属性覆盖处理流程:
按照优先级从高到低依次查找,如果找到此前缀开头的属性,则选定使用这个前缀提取属性,忽略后面的配置。

外部化配置目的之一是实现配置的集中式管理,这部分业界已经有很多成熟的专业配置系统如 Apollo, Nacos 等,Dubbo 所做的主要是保证能配合这些系统正常工作。
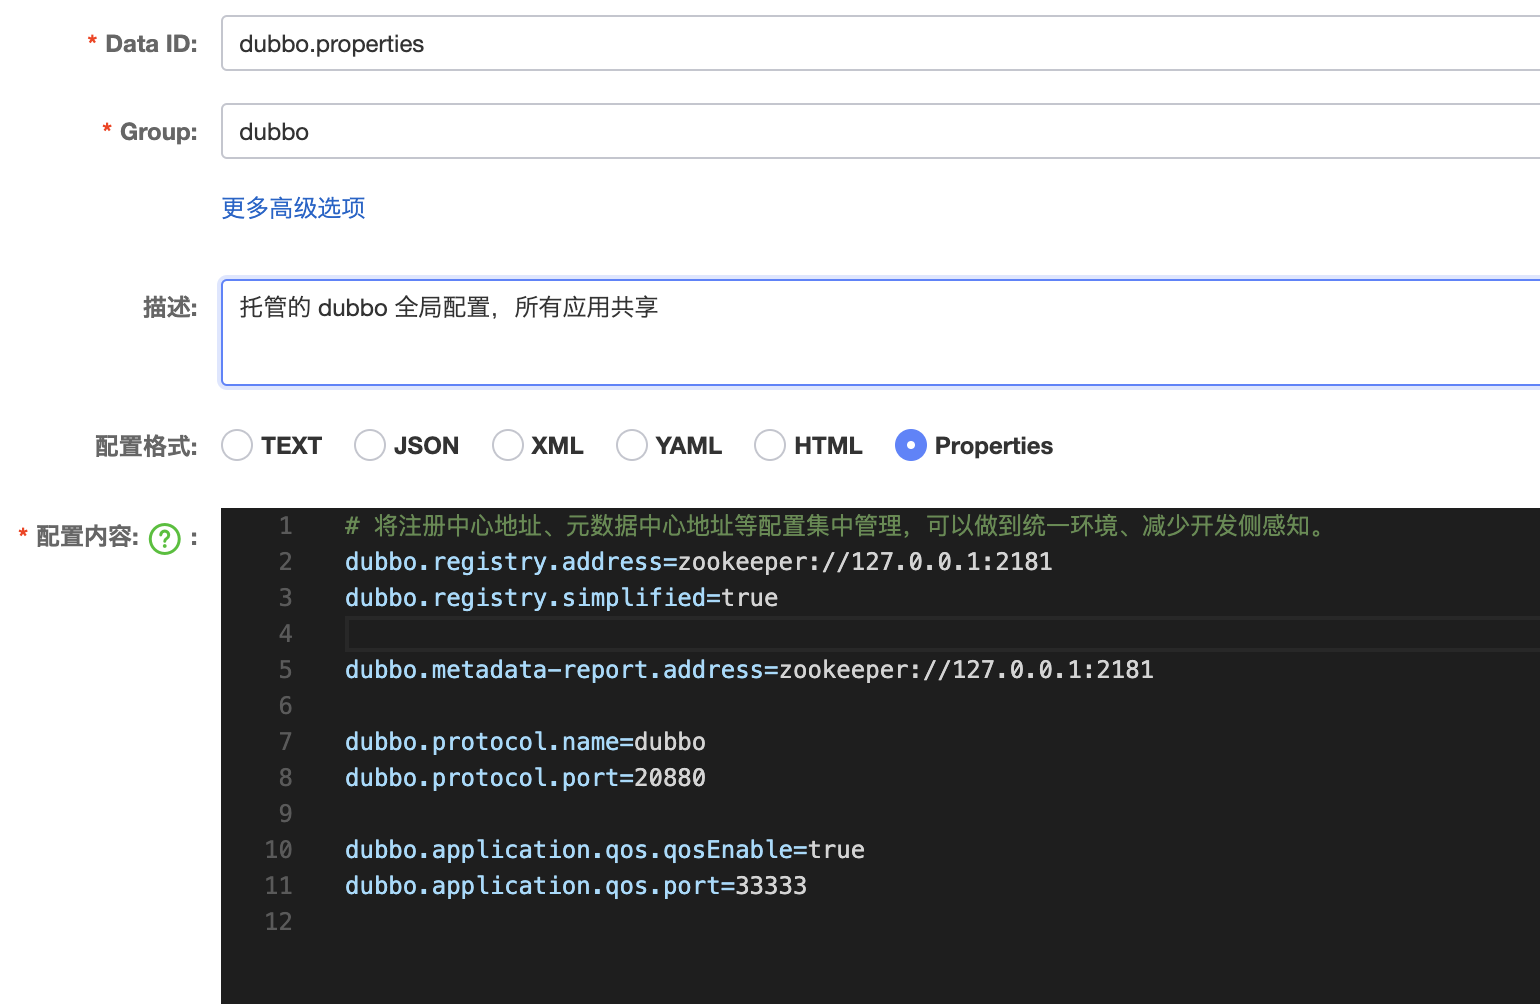
外部化配置和其他本地配置在内容和格式上并无区别,可以简单理解为 dubbo.properties 的外部化存储,配置中心更适合将一些公共配置如注册中心、元数据中心配置等抽取以便做集中管理。
# 将注册中心地址、元数据中心地址等配置集中管理,可以做到统一环境、减少开发侧感知。
dubbo.registry.address=zookeeper://127.0.0.1:2181
dubbo.registry.simplified=true

dubbo.metadata-report.address=zookeeper://127.0.0.1:2181

dubbo.protocol.name=dubbo
dubbo.protocol.port=20880

dubbo.application.qos.port=33333
优先级
外部化配置默认较本地配置有更高的优先级,因此这里配置的内容会覆盖本地配置值,关于各配置形式间的覆盖关系 有单独一章说明。
作用域
外部化配置有全局和应用两个级别,全局配置是所有应用共享的,应用级配置是由每个应用自己维护且只对自身可见的。当前已支持的扩展实现有 Zookeeper、Apollo、Nacos。
<dubbo:config-center address="zookeeper://127.0.0.1:2181"/>
开启外部化配置后,registry、metadata-report、protocol、qos 等全局范围的配置理论上都不再需要在应用中配置,应用开发侧专注业务服务配置,一些全局共享的全局配置转而由运维人员统一配置在远端配置中心。
这样能做到的效果就是,应用只需要关心:
举例来说,每个应用中 Dubbo 相关的配置只有以下内容可能就足够了,其余的都托管给相应环境下的配置中心:
dubbo
  application
    name: demo
  config-center
    address: nacos://127.0.0.1:8848
所谓 Dubbo 对配置中心的支持,本质上就是把 .properties 从远程拉取到本地,然后和本地的配置做一次融合。理论上只要 Dubbo 框架能拿到需要的配置就可以正常的启动,它并不关心这些配置是自己加载到的还是应用直接塞给它的,所以Dubbo还提供了以下API,让用户将自己组织好的配置塞给 Dubbo 框架(配置加载的过程是用户要完成的),这样 Dubbo 框架就不再直接和 Apollo 或 Zookeeper 做读取配置交互。
// 应用自行加载配置
Map<String, String> dubboConfigurations = new HashMap<>();
dubboConfigurations.put("dubbo.registry.address", "zookeeper://127.0.0.1:2181");
dubboConfigurations.put("dubbo.registry.simplified", "true");

//将组织好的配置塞给Dubbo框架
ConfigCenterConfig configCenter = new ConfigCenterConfig();
configCenter.setExternalConfig(dubboConfigurations);
欢迎在 https://github.com/apache/dubbo 给 Dubbo Star。
搜索关注官方微信公众号:Apache Dubbo,了解更多业界最新动态,掌握大厂面试必备 Dubbo 技能
我在从html页面生成PDF时遇到问题。我正在使用PDFkit。在安装它的过程中,我注意到我需要wkhtmltopdf。所以我也安装了它。我做了PDFkit的文档所说的一切......现在我在尝试加载PDF时遇到了这个错误。这里是错误:commandfailed:"/usr/local/bin/wkhtmltopdf""--margin-right""0.75in""--page-size""Letter""--margin-top""0.75in""--margin-bottom""0.75in""--encoding""UTF-8""--margin-left""0.75in""-
我在我的项目目录中完成了compasscreate.和compassinitrails。几个问题:我已将我的.sass文件放在public/stylesheets中。这是放置它们的正确位置吗?当我运行compasswatch时,它不会自动编译这些.sass文件。我必须手动指定文件:compasswatchpublic/stylesheets/myfile.sass等。如何让它自动运行?文件ie.css、print.css和screen.css已放在stylesheets/compiled。如何在编译后不让它们重新出现的情况下删除它们?我自己编译的.sass文件编译成compiled/t
我花了三天的时间用头撞墙,试图弄清楚为什么简单的“rake”不能通过我的规范文件。如果您遇到这种情况:任何文件夹路径中都不要有空格!。严重地。事实上,从现在开始,您命名的任何内容都没有空格。这是我的控制台输出:(在/Users/*****/Desktop/LearningRuby/learn_ruby)$rake/Users/*******/Desktop/LearningRuby/learn_ruby/00_hello/hello_spec.rb:116:in`require':cannotloadsuchfile--hello(LoadError) 最佳
我有一个在Linux服务器上运行的ruby脚本。它不使用rails或任何东西。它基本上是一个命令行ruby脚本,可以像这样传递参数:./ruby_script.rbarg1arg2如何将参数抽象到配置文件(例如yaml文件或其他文件)中?您能否举例说明如何做到这一点?提前谢谢你。 最佳答案 首先,您可以运行一个写入YAML配置文件的独立脚本:require"yaml"File.write("path_to_yaml_file",[arg1,arg2].to_yaml)然后,在您的应用中阅读它:require"yaml"arg
关闭。这个问题需要detailsorclarity.它目前不接受答案。想改进这个问题吗?通过editingthispost添加细节并澄清问题.关闭8年前。Improvethisquestion在首页我有:汽车:VolvoSaabMercedesAudistatic_pages_spec.rb中的测试代码:it"shouldhavetherightselect"dovisithome_pathit{shouldhave_select('cars',:options=>['volvo','saab','mercedes','audi'])}end响应是rspec./spec/request
在Rails4.0.2中,我使用s3_direct_upload和aws-sdkgems直接为s3存储桶上传文件。在开发环境中它工作正常,但在生产环境中它会抛出如下错误,ActionView::Template::Error(noimplicitconversionofnilintoString)在View中,create_cv_url,:id=>"s3_uploader",:key=>"cv_uploads/{unique_id}/${filename}",:key_starts_with=>"cv_uploads/",:callback_param=>"cv[direct_uplo
我已经在Sinatra上创建了应用程序,它代表了一个简单的API。我想在生产和开发上进行部署。我想在部署时选择,是开发还是生产,一些方法的逻辑应该改变,这取决于部署类型。是否有任何想法,如何完成以及解决此问题的一些示例。例子:我有代码get'/api/test'doreturn"Itisdev"end但是在部署到生产环境之后我想在运行/api/test之后看到ItisPROD如何实现? 最佳答案 根据SinatraDocumentation:EnvironmentscanbesetthroughtheRACK_ENVenvironm
使用Ruby1.9.2运行IDE提示说需要gemruby-debug-base19x并提供安装它。但是,在尝试安装它时会显示消息Failedtoinstallgems.Followinggemswerenotinstalled:C:/ProgramFiles(x86)/JetBrains/RubyMine3.2.4/rb/gems/ruby-debug-base19x-0.11.30.pre2.gem:Errorinstallingruby-debug-base19x-0.11.30.pre2.gem:The'linecache19'nativegemrequiresinstall
之前在培训新生的时候,windows环境下配置opencv环境一直教的都是网上主流的vsstudio配置属性表,但是这个似乎对新生来说难度略高(虽然个人觉得完全是他们自己的问题),加之暑假之后对cmake实在是爱不释手,且这样配置确实十分简单(其实都不需要配置),故斗胆妄言vscode下配置CV之法。其实极为简单,图比较多所以很长。如果你看此文还配不好,你应该思考一下是不是自己的问题。闲话少说,直接开始。0.CMkae简介有的人到大二了都不知道cmake是什么,我不说是谁。CMake是一个开源免费并且跨平台的构建工具,可以用简单的语句来描述所有平台的编译过程。它能够根据当前所在平台输出对应的m
我知道全局变量$!包含最新的异常对象,但我对下面的语法感到困惑。谁能帮助我理解以下语法?rescue$! 最佳答案 此构造可防止异常停止您的程序并使堆栈跟踪冒泡。它还会将该异常作为值返回,这很有用。a=get_me_datarescue$!在此行之后,a将保存请求的数据或异常。然后您可以分析该异常并采取相应措施。defget_me_dataraise'Nodataforyou'enda=get_me_datarescue$!puts"Executioncarrieson"pa#>>Executioncarrieson#>>#更现实的