废话不多说,咱们直接接上回
上一篇我们讲了如何使用Springboot框架整合Nosql,并于文章最后部分引入了服务端Session的概念
而早在上上一篇中,我们则已经讲到了如何使用Springboot框架整合Mybatis/MybatisPlus实现业务数据的持久化(写入数据库)
本篇我们把关注点放在一个于这两部分有共同交集的内容——安全管理,并且引入我们今天的主角——Shiro框架
Apache Shiro是一个强大且易用的Java安全框架,执行身份验证、授权、密码和会话管理。使用Shiro的易于理解的API,您可以快速、轻松地获得任何应用程序,从最小的移动应用程序到最大的网络和企业应用程序。
—— 来自百度百科
Shiro框架包含三个核心组件:
Subject —— 泛指当前与Shiro交互中的实体,可以是用户或者某后台进程
SecurityManager —— Shiro的核心组件,对内管理各种组件实例,对外提供各种安全服务
Realm —— Shiro与安全数据之间的桥接器
Shiro框架还包含有其他诸多概念,为降低大家的心智负担,这些我们暂且不谈,文末会给大家推荐延展阅读的相关文章
还是老规矩直接上干货,以完整的实例让大家对【如何基于Shiro实现权限的细粒度控制】有一个整体上的认知
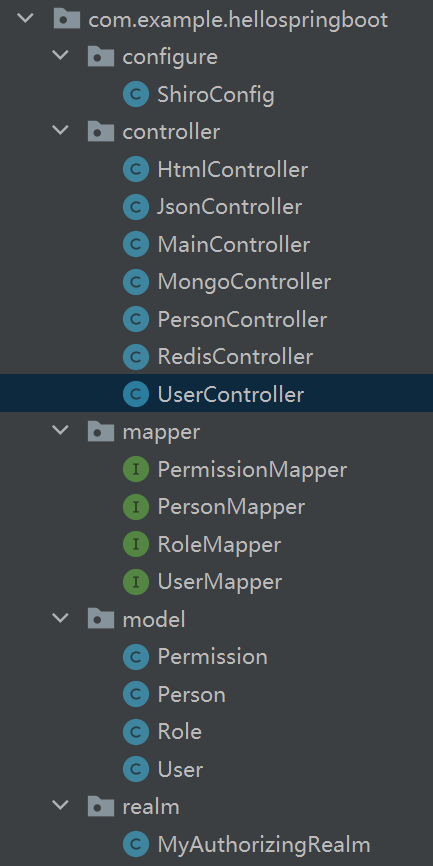
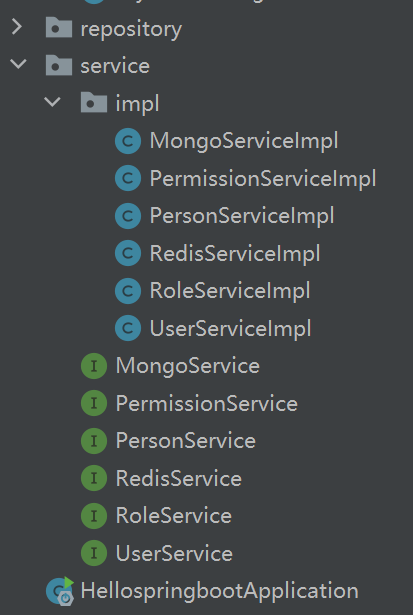
不知道大家会不会觉得项目结构突然变复杂?别担心,接下来我会给大家逐一拆解


package com.example.hellospringboot.mapper;

import com.baomidou.mybatisplus.core.mapper.BaseMapper;
import com.example.hellospringboot.model.Role;
import org.apache.ibatis.annotations.Mapper;
import org.springframework.stereotype.Repository;

@Mapper
@Repository
public interface RoleMapper extends BaseMapper<Role> {
}
package com.example.hellospringboot.mapper;
import com.baomidou.mybatisplus.core.mapper.BaseMapper;
import com.example.hellospringboot.model.User;
import org.apache.ibatis.annotations.Mapper;
import org.springframework.stereotype.Repository;
@Mapper
@Repository
public interface UserMapper extends BaseMapper<User> {
}package com.example.hellospringboot.mapper;
import com.baomidou.mybatisplus.core.mapper.BaseMapper;
import com.example.hellospringboot.model.Permission;
import org.apache.ibatis.annotations.Mapper;
import org.springframework.stereotype.Repository;
@Mapper
@Repository
public interface PermissionMapper extends BaseMapper<Permission> {
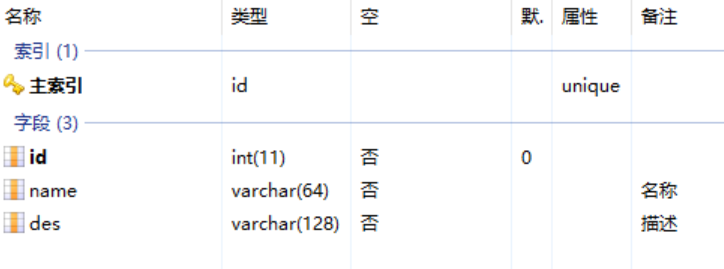
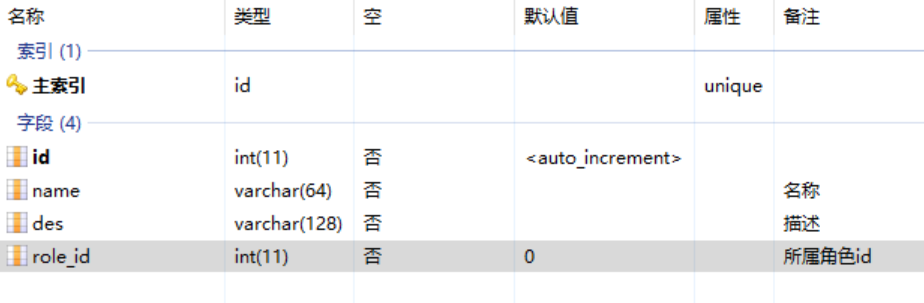
}这里我们用到了上上一节讲到的内容
这里的Mapper会辅助于后续的安全数据读取
package com.example.hellospringboot.service;

import com.example.hellospringboot.model.Role;

public interface RoleService {
    Role findRoleById(int id);
}
package com.example.hellospringboot.service.impl;
import com.example.hellospringboot.mapper.RoleMapper;
import com.example.hellospringboot.model.Role;
import com.example.hellospringboot.service.RoleService;
import org.springframework.beans.factory.annotation.Autowired;
import org.springframework.stereotype.Service;
@Service
public class RoleServiceImpl implements RoleService {
@Autowired
RoleMapper mapper;
public Role findRoleById(int id){
Role role = mapper.selectById(id);
return role;
}
}package com.example.hellospringboot.service;
import com.example.hellospringboot.model.User;
public interface UserService {
boolean checkUserByUsernameAndPassword(String userName, String passWord);
User findUserByUserName(String userName);
}package com.example.hellospringboot.service.impl;
import com.baomidou.mybatisplus.core.conditions.query.QueryWrapper;
import com.example.hellospringboot.mapper.UserMapper;
import com.example.hellospringboot.model.User;
import com.example.hellospringboot.service.UserService;
import org.springframework.beans.factory.annotation.Autowired;
import org.springframework.stereotype.Service;
import java.util.List;
@Service
public class UserServiceImpl implements UserService {
@Autowired
UserMapper mapper;
public boolean checkUserByUsernameAndPassword(String userName, String passWord){
QueryWrapper<User> wrapper = new QueryWrapper<User>();
wrapper = wrapper.eq("user_name", userName).eq("pass_word",passWord);
List<User> userList = mapper.selectList(wrapper);
return userList.size() > 0;
}
public User findUserByUserName(String userName){
QueryWrapper<User> wrapper = new QueryWrapper<User>();
wrapper = wrapper.eq("user_name", userName);
User user = mapper.selectOne(wrapper);
return user;
}
}package com.example.hellospringboot.service;
import com.example.hellospringboot.model.Permission;
import java.util.List;
public interface PermissionService {
List<Permission> findPermissionsByRoleId(int roleId);
}package com.example.hellospringboot.service.impl;
import com.baomidou.mybatisplus.core.conditions.Wrapper;
import com.baomidou.mybatisplus.core.conditions.query.QueryWrapper;
import com.example.hellospringboot.mapper.PermissionMapper;
import com.example.hellospringboot.model.Permission;
import com.example.hellospringboot.service.PermissionService;
import org.springframework.beans.factory.annotation.Autowired;
import org.springframework.stereotype.Service;
import java.util.List;
@Service
public class PermissionServiceImpl implements PermissionService {
@Autowired
PermissionMapper mapper;
public List<Permission> findPermissionsByRoleId(int roleId){
QueryWrapper<Permission> wrapper = new QueryWrapper<>();
wrapper = wrapper.eq("role_id", roleId);
List<Permission> list = mapper.selectList(wrapper);
return list;
}
}ok,我们已经准备好了所有的安全数据,及对应的读取方法
到这里,我们就算是做好了所有的准备工作
接下来看我们如何通过Shiro框架来运用这些已经装配好的枪炮子弹
        <!-- 引入shiro框架依赖 -->
        <dependency>
            <groupId>org.apache.shiro</groupId>
            <artifactId>shiro-spring</artifactId>
            <version>1.10.0</version>
        </dependency>
这次pom.xml终于不是第一步了,哈哈哈。。。
package com.example.hellospringboot.realm;

import com.example.hellospringboot.model.Permission;
import com.example.hellospringboot.model.Role;
import com.example.hellospringboot.model.User;
import com.example.hellospringboot.service.PermissionService;
import com.example.hellospringboot.service.RoleService;
import com.example.hellospringboot.service.UserService;
import org.apache.shiro.authc.*;
import org.apache.shiro.authz.AuthorizationInfo;
import org.apache.shiro.authz.SimpleAuthorizationInfo;
import org.apache.shiro.realm.AuthorizingRealm;
import org.apache.shiro.subject.PrincipalCollection;
import org.springframework.beans.factory.annotation.Autowired;

import java.util.HashSet;
import java.util.List;
import java.util.Set;

public class MyAuthorizingRealm extends AuthorizingRealm {

    @Autowired
    UserService userService;

    @Autowired
    RoleService roleService;

    @Autowired
    PermissionService permissionService;

    @Override
    protected AuthenticationInfo doGetAuthenticationInfo(AuthenticationToken authenticationToken) {
        UsernamePasswordToken token = (UsernamePasswordToken) authenticationToken;
        String userName = token.getUsername();
        String passWord = String.valueOf(token.getPassword());
        if (!userService.checkUserByUsernameAndPassword(userName, passWord)) {//判断用户账号是否正确
            throw new UnknownAccountException("用户名或密码错误!");
        }
        return new SimpleAuthenticationInfo(userName, passWord, getName());
    }

    @Override
    protected AuthorizationInfo doGetAuthorizationInfo(PrincipalCollection principalCollection) {
        SimpleAuthorizationInfo info = new SimpleAuthorizationInfo();
        String userName = principalCollection.getPrimaryPrincipal().toString();
        User user = userService.findUserByUserName(userName);
        if (user == null) {
            throw new UnknownAccountException("用户名或密码错误!");
        }
        List<Integer> rolesList = user.rolesList();
        Set<String> roles = new HashSet<>();
        Set<String> permissions = new HashSet<>();
        for (Integer roleId : rolesList) {
            Role role = roleService.findRoleById(roleId);
            roles.add(role.getName());
            List<Permission> permissionList = permissionService.findPermissionsByRoleId(roleId);
            for (Permission permission : permissionList) {
                permissions.add(permission.getName());
            }
        }
        info.setRoles(roles);
        info.setStringPermissions(permissions);
        return info;
    }
}
Realm的创建对于整个Shiro安全验证体系搭建而言是至关重要的一步!
其中两个抽象方法
doGetAuthenticationInfo —— 用于校验用户名及密码的合法性
doGetAuthorizationInfo —— 用于赋予实体对应的角色及交互权限
package com.example.hellospringboot.controller;
import org.apache.shiro.SecurityUtils;
import org.apache.shiro.authc.AuthenticationException;
import org.apache.shiro.authc.UsernamePasswordToken;
import org.apache.shiro.subject.Subject;
import org.springframework.web.bind.annotation.GetMapping;
import org.springframework.web.bind.annotation.PostMapping;
import org.springframework.web.bind.annotation.RequestMapping;
import org.springframework.web.bind.annotation.RestController;
@RequestMapping("/user")
@RestController
public class UserController {
@PostMapping("/login")
public String login(String user, String pass) {
UsernamePasswordToken token = new UsernamePasswordToken(user, pass);
Subject subject = SecurityUtils.getSubject();
if(!subject.isAuthenticated()) {
try {
subject.login(token);
} catch (AuthenticationException e) {
return e.getMessage();
}
}
return "ok";
}
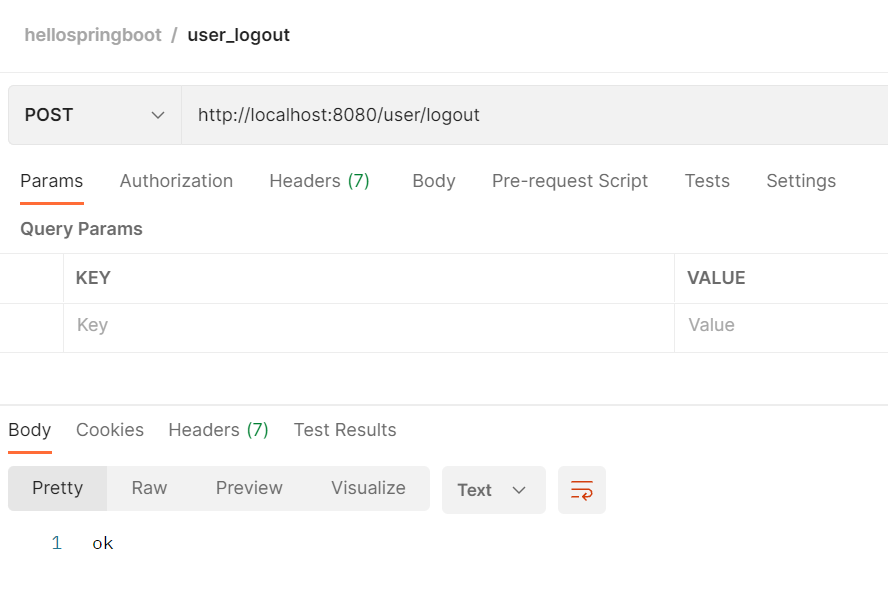
@PostMapping("/logout")
public String logout(){
Subject subject = SecurityUtils.getSubject();
if(subject.isAuthenticated()) {
try {
subject.logout();
} catch (AuthenticationException e) {
return e.getMessage();
}
}
return "ok";
}
@GetMapping("/admin")
public String admin() {
return "admin";
}
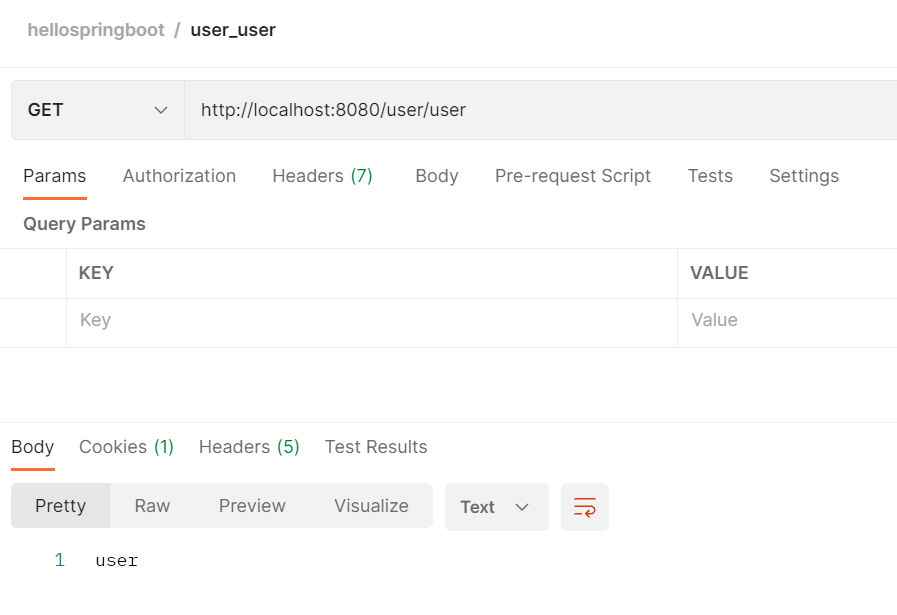
@GetMapping("/user")
public String user() {
return "user";
}
}内容很简单:
login——登录方法
logout——登出方法
admin、user——两个测试方法,用于测试不同角色对于不同方法可访问的细粒度控制
package com.example.hellospringboot.configure;

import com.example.hellospringboot.realm.MyAuthorizingRealm;
import org.apache.shiro.mgt.SecurityManager;
import org.apache.shiro.realm.Realm;
import org.apache.shiro.spring.web.ShiroFilterFactoryBean;
import org.apache.shiro.web.mgt.DefaultWebSecurityManager;
import org.springframework.context.annotation.Bean;
import org.springframework.context.annotation.Configuration;

import java.util.LinkedHashMap;
import java.util.Map;

@Configuration
public class ShiroConfig {

    @Bean
    public SecurityManager securityManager(Realm realm) {
        DefaultWebSecurityManager securityManager = new DefaultWebSecurityManager();
        securityManager.setRealm(realm);
        return securityManager;
    }

    @Bean
    public MyAuthorizingRealm getRealm() {
        MyAuthorizingRealm realm = new MyAuthorizingRealm();
        return realm;
    }

    @Bean
    public ShiroFilterFactoryBean shiroFilterFactoryBean(SecurityManager securityManager) {
        ShiroFilterFactoryBean shiroFilter = new ShiroFilterFactoryBean();
        shiroFilter.setSecurityManager(securityManager);
        Map<String, String> filterChainMap = new LinkedHashMap<String, String>();
        filterChainMap.put("/user/login", "anon");
        filterChainMap.put("/user/logout", "anon");
        filterChainMap.put("/user/admin", "authc,roles[admin],perms[admin:read]");
        filterChainMap.put("/user/user", "authc,roles[user],perms[user:read]");
        shiroFilter.setFilterChainDefinitionMap(filterChainMap);
        return shiroFilter;
    }
}
securityManager 和 getRealm 显示指定了Shiro两大组件的实例声明
shiroFilterFactoryBean 则是实现角色访问权限控制的重要方法
filterChainMap.put("/user/login", "anon"); // 代表login方法可以匿名访问
filterChainMap.put("/user/logout", "anon"); // 代表logout方法可以匿名访问
filterChainMap.put("/user/admin", "authc,roles[admin],perms[admin:read]"); // 代表admin方法需要用户满足admin角色,同时具备admin:read权限
filterChainMap.put("/user/user", "authc,roles[user],perms[user:read]"); // 代表user方法需要用户满足user角色,同时具备user:read权限
至此,整个接入流程便结束了
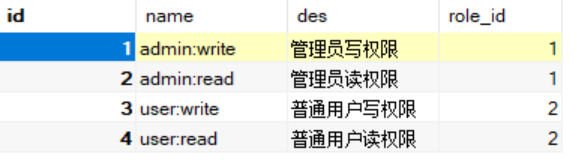
我们再次结合最开始我们配置的数据来对业务逻辑进行分析
用户 admin,同时具备admin、user两种角色
用户 juste,仅具备user一种角色
角色 admin,同时具备admin:write、admin:read两种权限
角色 user,同时具备user:write、user:read两种权限
因此
用户 admin,同时具备admin:write、admin:read、user:write、user:read 四种操作权限
用户 juste,同时具备user:write、user:read两种操作权限
大家理清楚这其中的关系了吗?^ ^
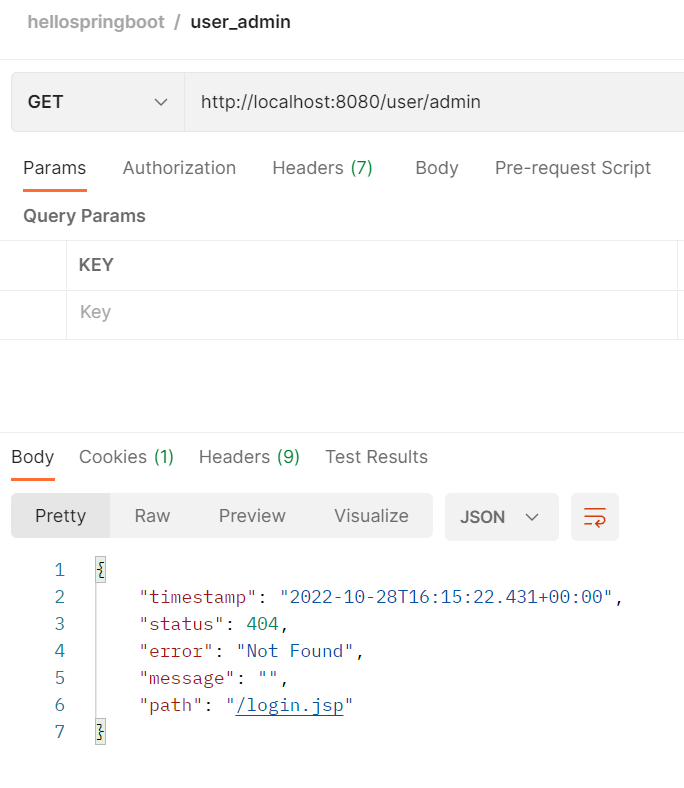
我们在执行login之前,admin方法无权访问
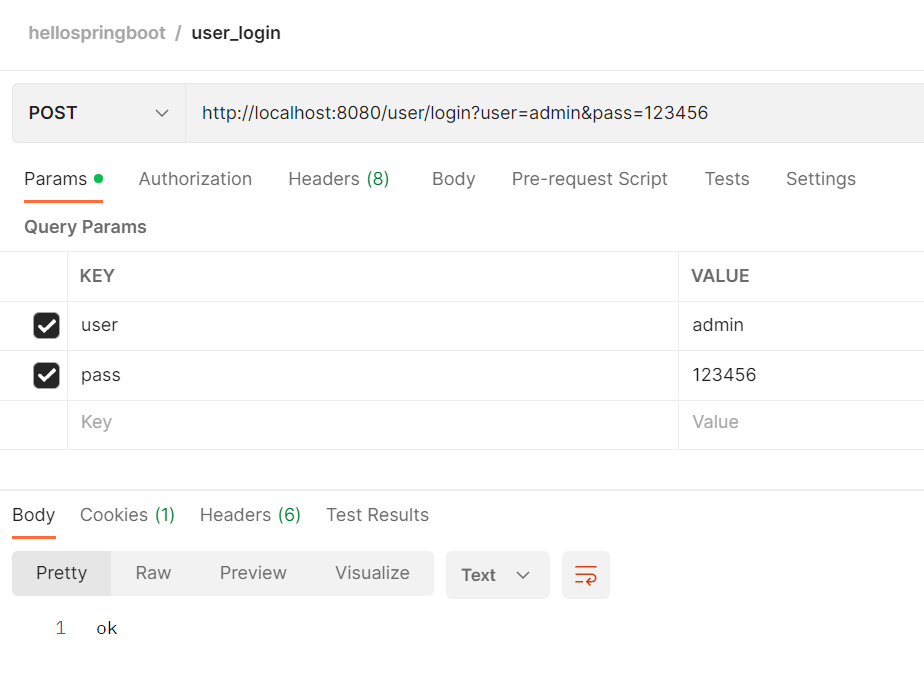

登录admin之后,同时具备admin和user方法的访问权限


logout登出,然后login登录普通用户juste
会发现依然具备user方法的访问权限,但是失去了admin方法的访问权限
到此,验证我们基于Shiro框架的细粒度权限控制已经实现
除了Shiro框架,我们还有另一个选择,那就是同样可以通过集成Spring Security框架来达成相同的目的
关于更多Shiro框架的内容,及其和Spring Security之间的异同,大家感兴趣可以参考这篇文章:
对于Spring Security框架,我们暂且留个悬念,以后会专门再给大家讲解这部分内容
下一节,我们将把关注点投向微服务领域,SpringCloudAlibaba将会是接下来几个章节的重头戏,敬请期待~
MyAuthorizingRealm
我正在编写一个小脚本来定位aws存储桶中的特定文件,并创建一个临时验证的url以发送给同事。(理想情况下,这将创建类似于在控制台上右键单击存储桶中的文件并复制链接地址的结果)。我研究过回形针,它似乎不符合这个标准,但我可能只是不知道它的全部功能。我尝试了以下方法:defauthenticated_url(file_name,bucket)AWS::S3::S3Object.url_for(file_name,bucket,:secure=>true,:expires=>20*60)end产生这种类型的结果:...-1.amazonaws.com/file_path/file.zip.A
我有一个用户工厂。我希望默认情况下确认用户。但是鉴于unconfirmed特征,我不希望它们被确认。虽然我有一个基于实现细节而不是抽象的工作实现,但我想知道如何正确地做到这一点。factory:userdoafter(:create)do|user,evaluator|#unwantedimplementationdetailshereunlessFactoryGirl.factories[:user].defined_traits.map(&:name).include?(:unconfirmed)user.confirm!endendtrait:unconfirmeddoenden
在Ruby中是否有Gem或安全删除文件的方法?我想避免系统上可能不存在的外部程序。“安全删除”指的是覆盖文件内容。 最佳答案 如果您使用的是*nix,一个很好的方法是使用exec/open3/open4调用shred:`shred-fxuz#{filename}`http://www.gnu.org/s/coreutils/manual/html_node/shred-invocation.html检查这个类似的帖子:Writingafileshredderinpythonorruby?
华为OD机试题本篇题目:明明的随机数题目输入描述输出描述:示例1输入输出说明代码编写思路最近更新的博客华为od2023|什么是华为od,od薪资待遇,od机试题清单华为OD机试真题大全,用Python解华为机试题|机试宝典【华为OD机试】全流程解析+经验分享,题型分享,防作弊指南华为o
C#实现简易绘图工具一.引言实验目的:通过制作窗体应用程序(C#画图软件),熟悉基本的窗体设计过程以及控件设计,事件处理等,熟悉使用C#的winform窗体进行绘图的基本步骤,对于面向对象编程有更加深刻的体会.Tutorial任务设计一个具有基本功能的画图软件**·包括简单的新建文件,保存,重新绘图等功能**·实现一些基本图形的绘制,包括铅笔和基本形状等,学习橡皮工具的创建**·设计一个合理舒适的UI界面**注明:你可能需要先了解一些关于winform窗体应用程序绘图的基本知识,以及关于GDI+类和结构的知识二.实验环境Windows系统下的visualstudio2017C#窗体应用程序三.
MIMO技术的优缺点优点通过下面三个增益来总体概括:阵列增益。阵列增益是指由于接收机通过对接收信号的相干合并而活得的平均SNR的提高。在发射机不知道信道信息的情况下,MIMO系统可以获得的阵列增益与接收天线数成正比复用增益。在采用空间复用方案的MIMO系统中,可以获得复用增益,即信道容量成倍增加。信道容量的增加与min(Nt,Nr)成正比分集增益。在采用空间分集方案的MIMO系统中,可以获得分集增益,即可靠性性能的改善。分集增益用独立衰落支路数来描述,即分集指数。在使用了空时编码的MIMO系统中,由于接收天线或发射天线之间的间距较远,可认为它们各自的大尺度衰落是相互独立的,因此分布式MIMO
遍历文件夹我们通常是使用递归进行操作,这种方式比较简单,也比较容易理解。本文为大家介绍另一种不使用递归的方式,由于没有使用递归,只用到了循环和集合,所以效率更高一些!一、使用递归遍历文件夹整体思路1、使用File封装初始目录,2、打印这个目录3、获取这个目录下所有的子文件和子目录的数组。4、遍历这个数组,取出每个File对象4-1、如果File是否是一个文件,打印4-2、否则就是一个目录,递归调用代码实现publicclassSearchFile{publicstaticvoidmain(String[]args){//初始目录Filedir=newFile("d:/Dev");Datebeg
我正在使用ruby2.1.0我有一个json文件。例如:test.json{"item":[{"apple":1},{"banana":2}]}用YAML.load加载这个文件安全吗?YAML.load(File.read('test.json'))我正在尝试加载一个json或yaml格式的文件。 最佳答案 YAML可以加载JSONYAML.load('{"something":"test","other":4}')=>{"something"=>"test","other"=>4}JSON将无法加载YAML。JSON.load("
通常,数组被实现为内存块,集合被实现为HashMap,有序集合被实现为跳跃列表。在Ruby中也是如此吗?我正在尝试从性能和内存占用方面评估Ruby中不同容器的使用情况 最佳答案 数组是Ruby核心库的一部分。每个Ruby实现都有自己的数组实现。Ruby语言规范只规定了Ruby数组的行为,并没有规定任何特定的实现策略。它甚至没有指定任何会强制或至少建议特定实现策略的性能约束。然而,大多数Rubyist对数组的性能特征有一些期望,这会迫使不符合它们的实现变得默默无闻,因为实际上没有人会使用它:插入、前置或追加以及删除元素的最坏情况步骤复
在ruby中,你可以这样做:classThingpublicdeff1puts"f1"endprivatedeff2puts"f2"endpublicdeff3puts"f3"endprivatedeff4puts"f4"endend现在f1和f3是公共(public)的,f2和f4是私有(private)的。内部发生了什么,允许您调用一个类方法,然后更改方法定义?我怎样才能实现相同的功能(表面上是创建我自己的java之类的注释)例如...classThingfundeff1puts"hey"endnotfundeff2puts"hey"endendfun和notfun将更改以下函数定