| ip | hostname |
|---|---|
| 192.168.137.133 | k8smaster |
| 192.168.137.132 | k8snode1 |
| 192.168.137.134 | k8snode2 |
每个机器设置对应的hostname,并查看
 hostnamectl set-hostname k8smaster
 hostname
在master机器配置host文件
 echo '''
192.168.137.131 k8smaster
192.168.137.129 k8snode1
192.168.137.131 k8snode2
''' >> /etc/hosts
每台机器都设置 转发 IPv4 并让 iptables 看到桥接流量
cat <<EOF | sudo tee /etc/modules-load.d/k8s.conf
overlay
br_netfilter
EOF

sudo modprobe overlay
sudo modprobe br_netfilter

# 设置所需的 sysctl 参数,参数在重新启动后保持不变
cat <<EOF | sudo tee /etc/sysctl.d/k8s.conf
net.bridge.bridge-nf-call-iptables  = 1
net.bridge.bridge-nf-call-ip6tables = 1
net.ipv4.ip_forward                 = 1
EOF

# 应用 sysctl 参数而不重新启动
sudo sysctl --system
如果想要更好的网络性能就配置ipvs,自行在网上搜索。
每台机器都设置 时间同步
yum install chrony -y
systemctl start chronyd
systemctl enable chronyd
chronyc sources
每台机器 如果有防火墙关闭防火墙
systemctl stop firewalld
systemctl disable firewalld
每台机器 关闭 swap
# 临时关闭;关闭swap主要是为了性能考虑
swapoff -a
# 可以通过这个命令查看swap是否关闭了
free
# 永久关闭
sed -ri 's/.*swap.*/#&/' /etc/fstab
每台机器 禁用 SELinux
# 临时关闭
setenforce 0
# 永久禁用
sed -i 's/^SELINUX=enforcing$/SELINUX=disabled/' /etc/selinux/config
# 添加docker源
curl -L -o /etc/yum.repos.d/docker-ce.repo https://mirrors.aliyun.com/docker-ce/linux/centos/docker-ce.repo
# 安装containerd
yum install -y containerd.io
# 创建默认配置文件
containerd config default > /etc/containerd/config.toml
# 设置aliyun地址,不设置会连接不上
sed -i "s#registry.k8s.io/pause#registry.aliyuncs.com/google_containers/pause#g" /etc/containerd/config.toml
# 设置驱动为systemd
sed -i 's/SystemdCgroup = false/SystemdCgroup = true/g' /etc/containerd/config.toml
# 设置dicker地址为aliyun镜像地址
vi /etc/containerd/config.toml
# 文件内容为
   [plugins."io.containerd.grpc.v1.cri".registry]
     [plugins."io.containerd.grpc.v1.cri".registry.mirrors]
       [plugins."io.containerd.grpc.v1.cri".registry.mirrors."docker.io"]
         endpoint = ["https://8aj710su.mirror.aliyuncs.com" ,"https://registry-1.docker.io"]

# 重启服务
systemctl daemon-reload
systemctl enable --now containerd
systemctl restart containerd
cat <<EOF > /etc/yum.repos.d/kubernetes.repo
[kubernetes]
name=Kubernetes
baseurl=https://mirrors.aliyun.com/kubernetes/yum/repos/kubernetes-el7-x86_64/
enabled=1
gpgcheck=1
repo_gpgcheck=1
gpgkey=https://mirrors.aliyun.com/kubernetes/yum/doc/yum-key.gpg https://mirrors.aliyun.com/kubernetes/yum/doc/rpm-package-key.gpg
EOF
setenforce 0

# 安装crictl工具
yum install -y cri-tools
# 生成配置文件
crictl config runtime-endpoint
# 编辑配置文件
cat << EOF | tee /etc/crictl.yaml
runtime-endpoint: "unix:///run/containerd/containerd.sock"
image-endpoint: "unix:///run/containerd/containerd.sock"
timeout: 10
debug: false
pull-image-on-create: false
disable-pull-on-run: false
EOF

# 安装kub软件
yum install -y kubelet kubeadm kubectl
systemctl enable kubelet && systemctl start kubelet
在master执行初始化
kubeadm init \
  --apiserver-advertise-address=192.168.137.131 \
  --image-repository registry.aliyuncs.com/google_containers \
  --kubernetes-version v1.26.0 \
  --service-cidr=10.96.0.0/12 \
  --pod-network-cidr=10.244.0.0/16 \
  --ignore-preflight-errors=all
如果kubelet启动失败查看启动文件
cat /usr/lib/systemd/system/kubelet.service.d/10-kubeadm.conf
cat /var/lib/kubelet/kubeadm-flags.env
如果初始化出错重置命令
kubeadm reset

rm -fr ~/.kube/  /etc/kubernetes/* var/lib/etcd/*
出现如图表示成功
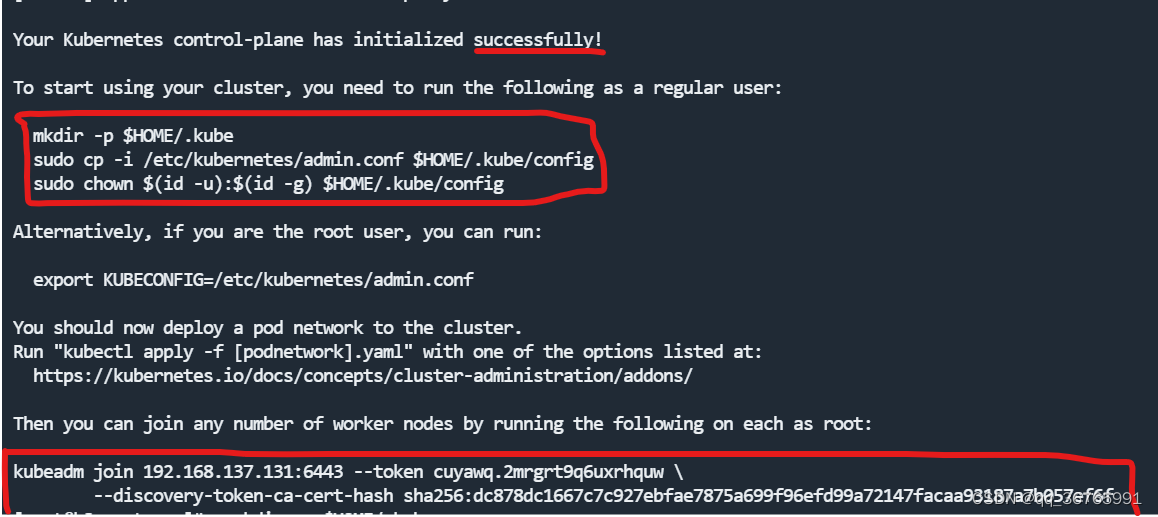
然后执行第一个红框语句
mkdir -p $HOME/.kube
sudo cp -i /etc/kubernetes/admin.conf $HOME/.kube/config
sudo chown $(id -u):$(id -g) $HOME/.kube/config
在node节点机器执行第二个语句
kubeadm join 192.168.137.131:6443 --token cuyawq.2mrgrt9q6uxrhquw \
        --discovery-token-ca-cert-hash sha256:dc878dc1667c7c927ebfae7875a699f96efd99a72147facaa93187a7b057ef6f
在master配置CNI
cat > kube-flannel.yaml << EOF
---
kind: Namespace
apiVersion: v1
metadata:
  name: kube-flannel
  labels:
    pod-security.kubernetes.io/enforce: privileged
---
kind: ClusterRole
apiVersion: rbac.authorization.k8s.io/v1
metadata:
  name: flannel
rules:
- apiGroups:
  - ""
  resources:
  - pods
  verbs:
  - get
- apiGroups:
  - ""
  resources:
  - nodes
  verbs:
  - list
  - watch
- apiGroups:
  - ""
  resources:
  - nodes/status
  verbs:
  - patch
---
kind: ClusterRoleBinding
apiVersion: rbac.authorization.k8s.io/v1
metadata:
  name: flannel
roleRef:
  apiGroup: rbac.authorization.k8s.io
  kind: ClusterRole
  name: flannel
subjects:
- kind: ServiceAccount
  name: flannel
  namespace: kube-flannel
---
apiVersion: v1
kind: ServiceAccount
metadata:
  name: flannel
  namespace: kube-flannel
---
kind: ConfigMap
apiVersion: v1
metadata:
  name: kube-flannel-cfg
  namespace: kube-flannel
  labels:
    tier: node
    app: flannel
data:
  cni-conf.json: |
    {
      "name": "cbr0",
      "cniVersion": "0.3.1",
      "plugins": [
        {
          "type": "flannel",
          "delegate": {
            "hairpinMode": true,
            "isDefaultGateway": true
          }
        },
        {
          "type": "portmap",
          "capabilities": {
            "portMappings": true
          }
        }
      ]
    }
  net-conf.json: |
    {
      "Network": "10.244.0.0/16",
      "Backend": {
        "Type": "vxlan"
      }
    }
---
apiVersion: apps/v1
kind: DaemonSet
metadata:
  name: kube-flannel-ds
  namespace: kube-flannel
  labels:
    tier: node
    app: flannel
spec:
  selector:
    matchLabels:
      app: flannel
  template:
    metadata:
      labels:
        tier: node
        app: flannel
    spec:
      affinity:
        nodeAffinity:
          requiredDuringSchedulingIgnoredDuringExecution:
            nodeSelectorTerms:
            - matchExpressions:
              - key: kubernetes.io/os
                operator: In
                values:
                - linux
      hostNetwork: true
      priorityClassName: system-node-critical
      tolerations:
      - operator: Exists
        effect: NoSchedule
      serviceAccountName: flannel
      initContainers:
      - name: install-cni-plugin
       #image: flannelcni/flannel-cni-plugin:v1.1.0 for ppc64le and mips64le (dockerhub limitations may apply)
        image: docker.io/rancher/mirrored-flannelcni-flannel-cni-plugin:v1.1.0
        command:
        - cp
        args:
        - -f
        - /flannel
        - /opt/cni/bin/flannel
        volumeMounts:
        - name: cni-plugin
          mountPath: /opt/cni/bin
      - name: install-cni
       #image: flannelcni/flannel:v0.19.0 for ppc64le and mips64le (dockerhub limitations may apply)
        image: docker.io/rancher/mirrored-flannelcni-flannel:v0.19.0
        command:
        - cp
        args:
        - -f
        - /etc/kube-flannel/cni-conf.json
        - /etc/cni/net.d/10-flannel.conflist
        volumeMounts:
        - name: cni
          mountPath: /etc/cni/net.d
        - name: flannel-cfg
          mountPath: /etc/kube-flannel/
      containers:
      - name: kube-flannel
       #image: flannelcni/flannel:v0.19.0 for ppc64le and mips64le (dockerhub limitations may apply)
        image: docker.io/rancher/mirrored-flannelcni-flannel:v0.19.0
        command:
        - /opt/bin/flanneld
        args:
        - --ip-masq
        - --kube-subnet-mgr
        resources:
          requests:
            cpu: "100m"
            memory: "50Mi"
          limits:
            cpu: "100m"
            memory: "50Mi"
        securityContext:
          privileged: false
          capabilities:
            add: ["NET_ADMIN", "NET_RAW"]
        env:
        - name: POD_NAME
          valueFrom:
            fieldRef:
              fieldPath: metadata.name
        - name: POD_NAMESPACE
          valueFrom:
            fieldRef:
              fieldPath: metadata.namespace
        - name: EVENT_QUEUE_DEPTH
          value: "5000"
        volumeMounts:
        - name: run
          mountPath: /run/flannel
        - name: flannel-cfg
          mountPath: /etc/kube-flannel/
        - name: xtables-lock
          mountPath: /run/xtables.lock
      volumes:
      - name: run
        hostPath:
          path: /run/flannel
      - name: cni-plugin
        hostPath:
          path: /opt/cni/bin
      - name: cni
        hostPath:
          path: /etc/cni/net.d
      - name: flannel-cfg
        configMap:
          name: kube-flannel-cfg
      - name: xtables-lock
        hostPath:
          path: /run/xtables.lock
          type: FileOrCreate
EOF
kubectl apply -f kube-flannel.yml
添加之后执行命令查看是否添加成功
kubectl get node
kubectl get pods -n kube-system
测试创建容器
kubectl create deployment nginx --image=nginx
kubectl expose deployment nginx --port=80 --type=NodePort
# 查看
kubectl get pod,svc
使用任意一个node节点ip访问查询出来的端口
我想为Heroku构建一个Rails3应用程序。他们使用Postgres作为他们的数据库,所以我通过MacPorts安装了postgres9.0。现在我需要一个postgresgem并且共识是出于性能原因你想要pggem。但是我对我得到的错误感到非常困惑当我尝试在rvm下通过geminstall安装pg时。我已经非常明确地指定了所有postgres目录的位置可以找到但仍然无法完成安装:$envARCHFLAGS='-archx86_64'geminstallpg--\--with-pg-config=/opt/local/var/db/postgresql90/defaultdb/po
我打算为ruby脚本创建一个安装程序,但我希望能够确保机器安装了RVM。有没有一种方法可以完全离线安装RVM并且不引人注目(通过不引人注目,就像创建一个可以做所有事情的脚本而不是要求用户向他们的bash_profile或bashrc添加一些东西)我不是要脚本本身,只是一个关于如何走这条路的快速指针(如果可能的话)。我们还研究了这个很有帮助的问题:RVM-isthereawayforsimpleofflineinstall?但有点误导,因为答案只向我们展示了如何离线在RVM中安装ruby。我们需要能够离线安装RVM本身,并查看脚本https://raw.github.com/wayn
我有一个奇怪的问题:我在rvm上安装了rubyonrails。一切正常,我可以创建项目。但是在我输入“railsnew”时重新启动后,我有“程序'rails'当前未安装。”。SystemUbuntu12.04ruby-v"1.9.3p194"gemlistactionmailer(3.2.5)actionpack(3.2.5)activemodel(3.2.5)activerecord(3.2.5)activeresource(3.2.5)activesupport(3.2.5)arel(3.0.2)builder(3.0.0)bundler(1.1.4)coffee-rails(
我刚刚为fedora安装了emacs。我想用emacs编写ruby。为ruby提供代码提示、代码完成类型功能所需的工具、扩展是什么? 最佳答案 ruby-mode已经包含在Emacs23之后的版本中。不过,它也可以通过ELPA获得。您可能感兴趣的其他一些事情是集成RVM、feature-mode(Cucumber)、rspec-mode、ruby-electric、inf-ruby、rinari(用于Rails)等。这是我当前用于Ruby开发的Emacs配置:https://github.com/citizen428/emacs
我正在尝试在我的centos服务器上安装therubyracer,但遇到了麻烦。$geminstalltherubyracerBuildingnativeextensions.Thiscouldtakeawhile...ERROR:Errorinstallingtherubyracer:ERROR:Failedtobuildgemnativeextension./usr/local/rvm/rubies/ruby-1.9.3-p125/bin/rubyextconf.rbcheckingformain()in-lpthread...yescheckingforv8.h...no***e
我的最终目标是安装当前版本的RubyonRails。我在OSXMountainLion上运行。到目前为止,这是我的过程:已安装的RVM$\curl-Lhttps://get.rvm.io|bash-sstable检查已知(我假设已批准)安装$rvmlistknown我看到当前的稳定版本可用[ruby-]2.0.0[-p247]输入命令安装$rvminstall2.0.0-p247注意:我也试过这些安装命令$rvminstallruby-2.0.0-p247$rvminstallruby=2.0.0-p247我很快就无处可去了。结果:$rvminstall2.0.0-p247Search
我实际上是在尝试使用RVM在我的OSX10.7.5上更新ruby,并在输入以下命令后:rvminstallruby我得到了以下回复:Searchingforbinaryrubies,thismighttakesometime.Checkingrequirementsforosx.Installingrequirementsforosx.Updatingsystem.......Errorrunning'requirements_osx_brew_update_systemruby-2.0.0-p247',pleaseread/Users/username/.rvm/log/138121
由于fast-stemmer的问题,我很难安装我想要的任何rubygem。我把我得到的错误放在下面。Buildingnativeextensions.Thiscouldtakeawhile...ERROR:Errorinstallingfast-stemmer:ERROR:Failedtobuildgemnativeextension./System/Library/Frameworks/Ruby.framework/Versions/2.0/usr/bin/rubyextconf.rbcreatingMakefilemake"DESTDIR="cleanmake"DESTDIR=
当我尝试安装Ruby时遇到此错误。我试过查看this和this但无济于事➜~brewinstallrubyWarning:YouareusingOSX10.12.Wedonotprovidesupportforthispre-releaseversion.Youmayencounterbuildfailuresorotherbreakages.Pleasecreatepull-requestsinsteadoffilingissues.==>Installingdependenciesforruby:readline,libyaml,makedepend==>Installingrub
当我执行>rvminstall1.9.2时一切顺利。然后我做>rvmuse1.9.2也很顺利。但是当涉及到ruby-v时..sam@sjones:~$rvminstall1.9.2/home/sam/.rvm/rubies/ruby-1.9.2-p136,thismaytakeawhiledependingonyourcpu(s)...ruby-1.9.2-p136-#fetchingruby-1.9.2-p136-#downloadingruby-1.9.2-p136,thismaytakeawhiledependingonyourconnection...%Total%Rece