1. vmware esxi安装centos8,开启内核虚拟化
2. 安装qemu-system-arrch64
操作:
wget https://download.qemu.org/qemu-2.11.0.tar.xz
tar xvJf qemu-2.11.0.tar.xz
cd qemu-2.11.0
./configure –-target-list=aarch64-softmmu
make
make install
报错1:Python not found. Use --python=/path/to/python
#  ./configure --target-list=aarch64-softmmu

ERROR: Python not found. Use --python=/path/to/python

#解决1,指定python路径,提示当前python版本过高:
# ./configure --target-list=aarch64-softmmu --python=/usr/bin/python3.6

ERROR: Cannot use '/usr/bin/python3.6', Python 2.6 or later is required.
       Note that Python 3 or later is not yet supported.
       Use --python=/path/to/python to specify a supported Python.
#解决2,下载python2,再次尝试遇到新的报错
# ./configure --target-list=aarch64-softmmu --python=/usr/bin/python2

ERROR: "cc" either does not exist or does not work
报错2:ERROR: "cc" either does not exist or does not work
下载gcc解决该报错,然后提示依然是缺包
# ./configure --target-list=aarch64-softmmu --python=/usr/bin/python2

ERROR: zlib check failed
       Make sure to have the zlib libs and headers installed.
报错3:ERROR: zlib check failed Make sure to have the zlib libs and headers installed.
下载zlib zlib-devel,然后再次提示缺包
# ./configure --target-list=aarch64-softmmu --python=/usr/bin/python2

ERROR: glib-2.22 gthread-2.0 is required to compile QEMU
下载glib2 glib2-devel,提示还是缺包
下载pixman pixman-devel
./config成功
make告警:缺少命令:flex bison
下载flex,bison
然后还是失败:
util/memfd.c:40:12: error: static declaration of ‘memfd_create’ follows non-static declaration
 static int memfd_create(const char *name, unsigned int flags)
            ^~~~~~~~~~~~
In file included from /usr/include/bits/mman-linux.h:117,
                 from /usr/include/bits/mman.h:49,
                 from /usr/include/sys/mman.h:41,
                 from /root/qemu-2.11.0/include/sysemu/os-posix.h:29,
                 from /root/qemu-2.11.0/include/qemu/osdep.h:104,
                 from util/memfd.c:28:
/usr/include/bits/mman-shared.h:46:5: note: previous declaration of ‘memfd_create’ was here
 int memfd_create (const char *__name, unsigned int __flags) __THROW;
     ^~~~~~~~~~~~
make: *** [/root/qemu-2.11.0/rules.mak:66: util/memfd.o] Error 1
看百度上各种解决办法,懒得去一个一个验证,直接换最新的包
wget https://download.qemu.org/qemu-7.2.0.tar.xz
查看README文件,根据提示操作
 mkdir build
  cd build
  ../configure
  make
提示缺包ninjia
yum --enablerepo=powertools install ninja-build这次提示python版本过低
Found ninja-1.8.2 at /usr/bin/ninja
Running postconf script '/usr/bin/python3 /root/qemu-7.2.0/scripts/symlink-install-tree.py'
NOTICE: You are using Python 3.6 which is EOL. Starting with v0.62.0, Meson will require Python 3.7 or newer
安装一个python3.9 然后把/usr/bin/python3指向python3.9
然后再次执行
 mkdir build
  cd build
  ../configure --target-list=aarch64-softmmu
  make
无报错
make install缺包就装包:perl
然后make install成功
# which qemu-system-aarch64
/usr/local/bin/qemu-system-aarch64
#理论上一切OK,除非包有问题
qemu-img create -f raw -o size=30G test.img
qemu-system-aarch64 -m 2048 -cpu cortex-a57 -smp 2 -M virt -bios QEMU_EFI.fd -nographic -drive if=none,file=/var/lib/libvirt/images/Kylin-Server-10-SP1-Release-Build04-20200711-arm64.iso,id=cdrom,media=cdrom -device virtio-scsi-device -device scsi-cd,drive=cdrom -drive if=none,file=test.img,id=hd0 -device virtio-blk-device,drive=hd0
果然还是报错了
#报错:EFI stub: Exiting boot services and installing virtual address map
查了一下,是EFI固件包的问题,重新下载UEFI固件
wget https://www.kraxel.org/repos/firmware.repo

yum install edk2.git-aarch64
然后再试一次
qemu-img create -f qcow2 KylinV10sp2.qcow2 64G
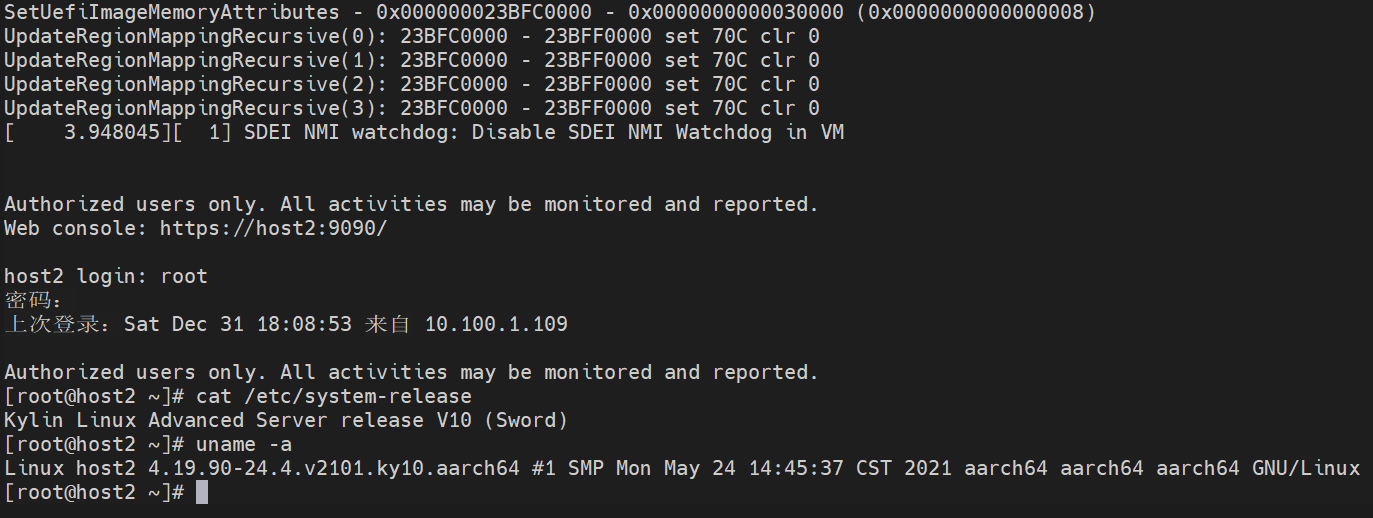
qemu-system-aarch64 -m 8192 -cpu cortex-a57 -smp 2 -M virt -bios /usr/share/edk2.git/aarch64/QEMU_EFI-pflash.raw -nographic -drive if=none,file=/var/lib/libvirt/images/Kylin-Server-10-SP2-aarch64-Release-Build09-20210524.iso,id=cdrom,media=cdrom -device virtio-scsi-device -device scsi-cd,drive=cdrom -drive if=none,file=KylinV10sp2.qcow2,id=hd0 -device virtio-blk-device,drive=hd0 -net none这次一切正常,直到。。。这。。。直接让打电话,再试了一次,还是卡在这里下不去了。。。
[ 325.623043][ 1] Authorization warning: Authorization binary is corrupted, Please call 400-089-1870 for help.既然跑流程没问题,装系统卡iso镜像,那就试试直接从现成的arm虚拟机镜像文件起给虚机试试吧
qemu-system-aarch64 -m 8192 -cpu cortex-a57 -smp 2 -M virt -bios /usr/share/edk2.git/aarch64/QEMU_EFI.fd -nographic -device e1000e,netdev=dev0,mac='00:00:00:01:00:01' -netdev tap,ifname=tap-int,id=dev0,script=no,downscript=no,vhost=on -device virtio-net-pci,netdev=dev1,mac='00:00:00:01:00:02',vectors=32,mq=on -netdev tap,ifname=tap-0,id=dev1,script=no,downscript=no,vhost=on,queues=16 -drive format=raw,file=test-kylin10-2.raw终于成功了,也就是说卡的是这一个iso镜像,换一家不那么"高贵"的iso应该也能行。
该走的流程先走完,记下后续笔记(虽然没什么用,我的virt-manager就默认了一个x64的qemu,arm64的qemu没对接上)
安装virt-manager组件,编辑/etc/libvirt/qemu.conf最后一行添加
nvram = [
   "/usr/share/edk2.git/aarch64/QEMU_EFI-pflash.raw:/usr/share/edk2.git/aarch64/vars-template-pflash.raw"
]
然后开始尝试使用virt-manager管理服务。
其他
qemu基础
1. ttyS0串口重定向
qemu启动一个Linux Guest,如果只需要这个Guest的终端,不需要图形用户界面,可将Linux Guest的输出重定向至虚拟串口(最终是重定向到终端)。下面以Fedora Guest为例说明用法。不同发行版和版本设置方法可能不同(如grub、grub2就不一样,debian这样的发行版需要配置/etc/inittab)。
重定向虚拟串口到console,有两种用法


    内核不在虚拟机镜像文件里头
qemu -kernel arch/i386/boot/bzImage -hda root-2.4.20.img -append "root=/dev/hda console=ttyS0" -nographic

    参考:http://blog.csdn.net/defeattroy/article/details/5257323


    内核在虚拟机镜像文件里头

    先畸形启动Guest,如果是grub2,编辑文件 /etc/default/grub

GRUB_TIMEOUT=5
GRUB_DISTRIBUTOR="Fedora"
GRUB_DEFAULT=saved
GRUB_CMDLINE_LINUX="rd.md=0 rd.lvm=0 rd.dm=0 SYSFONT=True  KEYTABLE=us rd.luks=0 LANG=en_US.UTF-8 rhgb quiet console=tty0 console=ttyS0,9600n8"


GRUB_TERMINAL=serial
GRUB_SERIAL_COMMAND="serial --speed=9600 --unit=0 --word=8 --parity=no --stop=1"
 生成的/boot/grub2/grub.cfg文件应有如下配置

serial --speed=9600 --unit=0 --word=8 --parity=no --stop=1
terminal_input serial
terminal_output serial
......
    linux    /vmlinuz-3.6.11-rt32 root=UUID=0ff1fb64-4e8d-44bf-87f7-8a2f111159d8 ro rd.md=0 rd.lvm=0 rd.dm=0 SYSFONT=True  KEYTABLE=us rd.luks=0 LANG=en_US.UTF-8 rhgb quiet console=tty0 console=ttyS0,9600n8


    然后用-nographic参数启动qemu

    qemu-kvm -enable-kvm -m 1024 -nographic -drive file=/mnt/sdb/vms/testfc/testfc.qcow2,if=virtio,index=0,format=qcow2
参考链接:https://wiki.ubuntu.com/UEFI/virt-install
https://www.txisfine.cn/archives/a0d5fa12
https://www.cnblogs.com/linuxxl/p/11658387.html
https://zhuanlan.zhihu.com/p/353547345
https://jgsun.github.io/2018/12/17/qemu-virt-arm64/
https://blog.csdn.net/qq_42001403/article/details/100532861
https://luomuxiaoxiao.com/?p=743
https://wiki.qemu.org/Documentation/Networking
https://blog.csdn.net/richardysteven/article/details/54807927 #关于vnc,kvm与网络
--enable-kvm ,-serial telent:localhost:4321,server,nowait,-vnc :port
https://www.cnblogs.com/schips/p/15489856.html #关于串口重定向与自动登录
https://fadeevab.com/build-android-kernel-and-run-on-qemu-minimal-step-by-step/ #qemu虚拟化安卓
以下转载自:https://fadeevab.com/how-to-setup-qemu-output-to-console-and-automate-using-shell-script/
qemu-system-x86_64 -serial stdio wheezy.qcow2
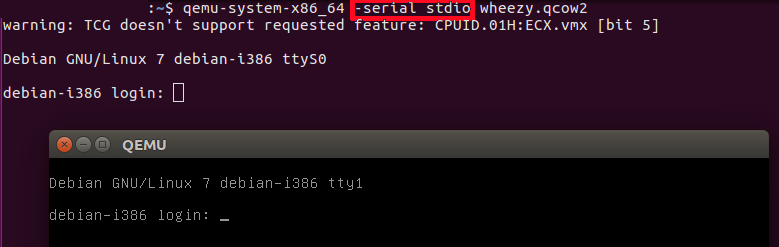
-serial stdio redirects the virtual serial port to the host's terminal input/output. You will see a welcome string after a successful boot.
qemu-system-x86_64 -nographic wheezy.qcow2
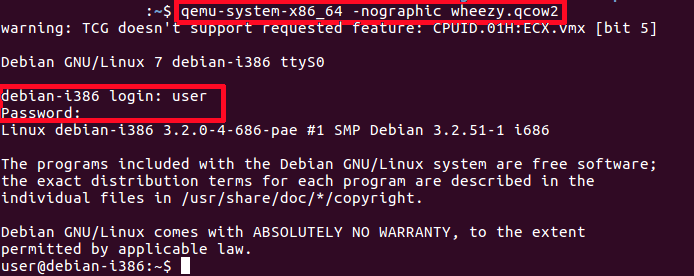
-nographic does the same as "-serial stdio" and also hides a QEMU's graphical window.
Cautions:
# Guest
shutdown -h now
If you want to see early boot logs, you should pass console=ttyS0 parameter to a Linux kernel command line:
qemu-system-x86_64 -nographic -kernel vmlinuz -hda wheezy.img -append "root=/dev/sda console=ttyS0"
or
qemu-system-x86_64 -serial stdio -kernel vmlinuz -hda wheezy.img -append "root=/dev/sda console=ttyS0"
or
qemu-system-x86_64 -serial stdio wheezy.qcow2
 # 1. Wait for a GRUB menu to show.
 # 2. Press `e`.
 # 3. Find the line starting with "linux".
 # 4. Add "console=ttyS0".
qemu-system-x86_64 -serial stdio -kernel vmlinuz -hda wheezy.img -append "root=/dev/sda console=ttyS0":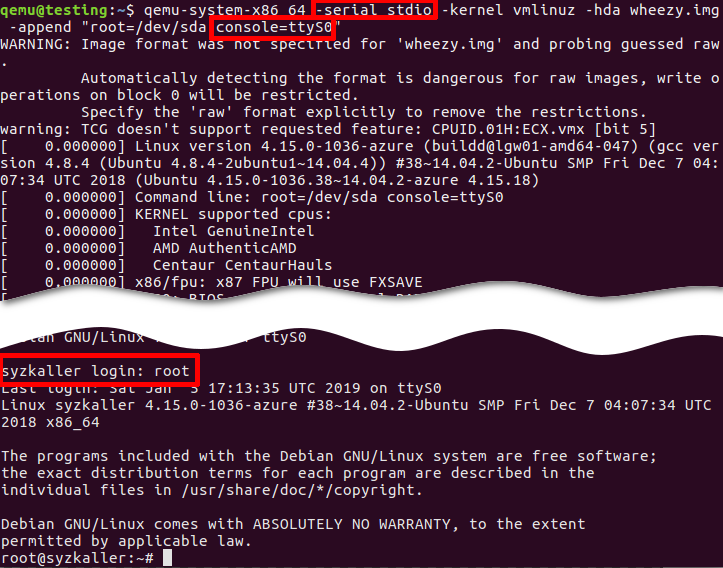
console=ttyS0 forces the guest kernel to send output to the first UART serial port ttyS0, which is redirected to the host by the -serial stdio option, and root=/dev/sda points the kernel to use a /dev/sda device to load the wheezy.img.Other options:
mkfifo /tmp/guest.in /tmp/guest.out
qemu-system-x86_64 -serial pipe:/tmp/guest -kernel vmlinuz -hda wheezy.img -append "root=/dev/sda console=ttyS0"
-serial pipe:/tmp/guest redirects a guest's output to a /tmp/guest.out and allows to send input from host to guest via /tmp/guest.in.
cat /tmp/guest.out
When login screen appears, send a login string:
printf "root\n" > /tmp/guest.in
Wait until SSH Daemon starts.
while read line; do
  echo "${line}"
  if [[ ${line} == *"Secure Shell server: sshd"* ]]; then
    break;
  fi
done < /tmp/quest.out
expect toolsudo apt install expect
example.exp:
#!/usr/bin/expect -f

# Wait enough (forever) until a long-time boot
set timeout -1

# Start the guest VM
spawn qemu-system-x86_64 -serial stdio wheezy.qcow2

expect "login: "
send "root\n"

expect "Password: "
send "root\n"

expect "# "
send "shutdown -h now"
Original script is found there: https://stacoverflow.com/questions/314613/qemu-guest-automation, but be careful, symbol of quotes “ (which is not a ") in the original stackoverflow answer cannot be recognized by the expect utility (send "root\n").
chmod +x example.exp
./example.exp
sshqemu-system-x86_64 -netdev user,id=net0,hostfwd=tcp::10022-:22 -device e1000,netdev=net0 wheezy.qcow2
ssh root@localhost -p 10022 'uptime; ls; echo Test;'
-o "StrictHostKeyChecking no":
ssh root@localhost -p 10022 -o "StrictHostKeyChecking no" 'uptime; ls; echo Test;'
-netdev user,id=net0 -device e1000,netdev=net0.
# Without port forwarding
qemu-system-x86_64 -netdev user,id=net0 -device e1000,netdev=net0 wheezy.qcow2
# Guest
ifconfig -a
10022 port on the host:
# Host
netstat -tanp | grep 10022
   tcp  0  0 0.0.0.0:10022   0.0.0.0:*  LISTEN  16589/qemu-system-x
22 port on the guest:
# Guest
netstat -tanp | grep 22
    tcp  0  0 0.0.0.0:22      0.0.0.0:*  LISTEN  2430/sshd
23 and verify the connection:
qemu-system-x86_64 -netdev user,id=net0,hostfwd=tcp::10023-:23 -device e1000,netdev=net0 wheezy.qcow2
# Guest
nc -v -l -p 23
    Listening on [0.0.0.0] (family 0, port 23)
# Host
echo asdf | nc localhost 10023
# Host
ssh-keygen -b 2048 -t rsa -q -N "" -f ./qemukey
ssh-copy-id
# Guest
sudo passwd
# Host
ssh-copy-id -p 10022 -i ~/.ssh/qemukey root@localhost
# Guest
sudo passwd -l root
scp:
# Host
scp -P 10022 ./qemukey.pub root@localhost:/root/.ssh/
# Guest
cat /root/.ssh/qemukey.pub >> /root/.ssh/authorized_keys
/etc/init.d/ssh restart
/etc/ssh/sshd_config on the guest:
PasswordAuthentication no
PermitRootLogin without-password
# Guest
/etc/init.d/ssh restart
# Host
ssh root@localhost -p 10022 -i ./qemukey
wget https://people.debian.org/~aurel32/qemu/i386/debian_wheezy_i386_standard.qcow2 -O wheezy.qcow2
wget https://storage.googleapis.com/syzkaller/wheezy.img
wget http://security.ubuntu.com/ubuntu/pool/main/l/linux-signed-azure/linux-image-4.15.0-1036-azure_4.15.0-1036.38~14.04.2_amd64.deb
ar x linux-image-4.15.0-1036-azure_4.15.0-1036.38~14.04.2_amd64.deb
tar xf data.tar.xz ./boot/vmlinuz-4.15.0-1036-azure
cp ./boot/vmlinuz-4.15.0-1036-azure ./vmlinuz
sudo cp /boot/vmlinuz-$(uname -r) ./
我想为Heroku构建一个Rails3应用程序。他们使用Postgres作为他们的数据库,所以我通过MacPorts安装了postgres9.0。现在我需要一个postgresgem并且共识是出于性能原因你想要pggem。但是我对我得到的错误感到非常困惑当我尝试在rvm下通过geminstall安装pg时。我已经非常明确地指定了所有postgres目录的位置可以找到但仍然无法完成安装:$envARCHFLAGS='-archx86_64'geminstallpg--\--with-pg-config=/opt/local/var/db/postgresql90/defaultdb/po
我正在使用的第三方API的文档状态:"[O]urAPIonlyacceptspaddedBase64encodedstrings."什么是“填充的Base64编码字符串”以及如何在Ruby中生成它们。下面的代码是我第一次尝试创建转换为Base64的JSON格式数据。xa=Base64.encode64(a.to_json) 最佳答案 他们说的padding其实就是Base64本身的一部分。它是末尾的“=”和“==”。Base64将3个字节的数据包编码为4个编码字符。所以如果你的输入数据有长度n和n%3=1=>"=="末尾用于填充n%
我正在尝试在我的centos服务器上安装therubyracer,但遇到了麻烦。$geminstalltherubyracerBuildingnativeextensions.Thiscouldtakeawhile...ERROR:Errorinstallingtherubyracer:ERROR:Failedtobuildgemnativeextension./usr/local/rvm/rubies/ruby-1.9.3-p125/bin/rubyextconf.rbcheckingformain()in-lpthread...yescheckingforv8.h...no***e
我正在尝试在Ruby中复制Convert.ToBase64String()行为。这是我的C#代码:varsha1=newSHA1CryptoServiceProvider();varpasswordBytes=Encoding.UTF8.GetBytes("password");varpasswordHash=sha1.ComputeHash(passwordBytes);returnConvert.ToBase64String(passwordHash);//returns"W6ph5Mm5Pz8GgiULbPgzG37mj9g="当我在Ruby中尝试同样的事情时,我得到了相同sha
需求:要创建虚拟机,就需要给他提供一个虚拟的磁盘,我们就在/opt目录下创建一个10G大小的raw格式的虚拟磁盘CentOS-7-x86_64.raw命令格式:qemu-imgcreate-f磁盘格式磁盘名称磁盘大小qemu-imgcreate-f磁盘格式-o?1.创建磁盘qemu-imgcreate-fraw/opt/CentOS-7-x86_64.raw10G执行效果#ls/opt/CentOS-7-x86_64.raw2.安装虚拟机使用virt-install命令,基于我们提供的系统镜像和虚拟磁盘来创建一个虚拟机,另外在创建虚拟机之前,提前打开vnc客户端,在创建虚拟机的时候,通过vnc
我正在尝试复制此GETcurl请求:curl-D--XGET-H"Authorization:BasicdGVzdEB0YXByZXNlYXJjaC5jb206NGMzMTg2Mjg4YWUyM2ZkOTY2MWNiNWRmY2NlMTkzMGU="-H"Content-Type:application/json"http://staging.example.com/api/v1/campaigns在Ruby中,通过电子邮件+apikey生成身份验证:auth="Basic"+Base64::encode64("test@example.com:4c3186288ae23fd9661c
我正在向我的Controller发送一个base64图像并按原样保存它。现在我需要显示该图像。这是我要显示的内容,但未显示图像:"/>为了编码,我使用了这个java脚本函数encodeURIComponent();我的编码图像格式:data:image/jpeg;base64,/9j/4AAQSkZJRgABAQAAAQABAAD/........ 最佳答案 你不需要解码base64应该可以 关于ruby-on-rails-在rails中显示base64编码的图像,我们在StackOve
在我的mac上安装几个东西时遇到这个问题,我认为这个问题来自将我的豹子升级到雪豹。我认为这个问题也与macports有关。/usr/local/lib/libz.1.dylib,filewasbuiltfori386whichisnotthearchitecturebeinglinked(x86_64)有什么想法吗?更新更具体地说,这发生在安装nokogirigem时日志看起来像:xslt_stylesheet.c:127:warning:passingargument1of‘Nokogiri_wrap_xml_document’withdifferentwidthduetoproto
我们在服务器端遇到libxml-rubygem的问题可能是因为它使用x86_64架构:$uname-aLinuxip-10-228-171-642.6.21.7-2.fc8xen-ec2-v1.0#1SMPTueSep110:25:30EDT2009x86_64GNU/Linuxrequire'libxml'LoadError:/usr/local/ruby-enterprise/lib/ruby/gems/1.8/gems/libxml-ruby-1.1.4/lib/libxml_ruby.so:invalidELFheader-/usr/local/ruby-enterprise/
我正在尝试检索以base64编码格式接收的图像的内容类型和文件名。这是使用base64编码图像执行POST请求的代码require'net/http'require"rubygems"require'active_support'url=URI.parse('http://localhost:3000/')image=ActiveSupport::Base64.encode64(open("public/images/rails.png").to_a.join)post_params={'image'=>image}Net::HTTP.post_form(url,post_params