文章目录
在我们日常开发中,无论是内部服务之间的调用,还是调用第三方服务,都免不了发起Http请求,在Java中发起Http请求常见的方式大致有原生HttpURLConnection、Apache的HttpClient、Spring的RestTemplate等,如果您基于Spring框架,那么强烈推荐使用RestTemplate,理由很简单:非常符合我们发起http请求的习惯,就像使用postman,只需要关心具体的url、header、body等即可,对于繁琐的细节RestTemplate都帮我们安排(封装)的明明白白,无关的细节我们统统不用操心! 尤其是RestTemplate.exchange方法,可以称的上是单靠一招就可以吊打其它方式。。。 所以本文就来详细介绍一下RestTemplate.exchange各种用法,力求覆盖日常开发中的各种场景,Let’s start~~
exchange有多个重载,我们常用的掌握以下这两个就够了:
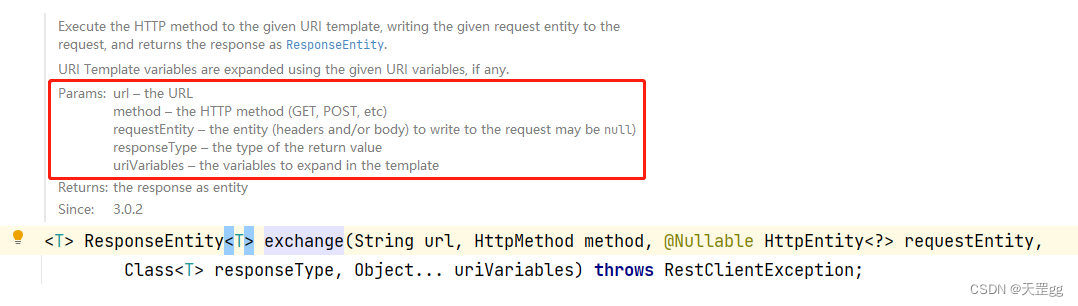
<T> ResponseEntity<T> exchange(String url
	, HttpMethod method
	, @Nullable HttpEntity<?> requestEntity
	, Class<T> responseType
	, Object... uriVariables) throws RestClientException;
| 参数 | 说明 |
|---|---|
| url | 调用的url地址 |
| method | 枚举值,HTTP方法:GET、POST、PUT、DELETE等 |
| requestEntity | 发起请求时携带的对象:请求头header 和/或 请求体body |
| responseType | 请求响应对象的类型 |
| uriVariables | 就是针对url中的@PathVariable参数,可变长度参数列表 |
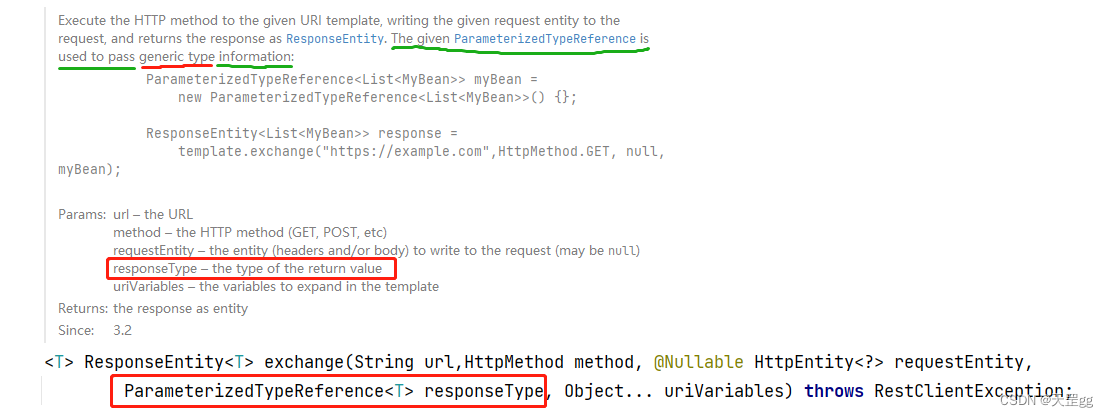
<T> ResponseEntity<T> exchange(String url
	, HttpMethod method
	, @Nullable HttpEntity<?> requestEntity
	, ParameterizedTypeReference<T> responseType
	, Object... uriVariables) throws RestClientException;
与上面重载的唯一区别是responseType类型变成了ParameterizedTypeReference<T>,其它参数说明不变.
设计这个类的目的:是允许传递泛型类型。用法建议是使用匿名类,像这样:
ParameterizedTypeReference<List<String>> typeRef = new ParameterizedTypeReference<List<String>>() {};
好了,不多做介绍,我们直接上案例:
这里准备了5个常见场景:
1.1 返回基本类型
1.2 返回自定义对象类型
1.3 返回List<T>类型
1.4 返回Map<K,V>类型
1.5 返回自定义泛型类型
场景模拟:根据用户id获取name
发起exchange的代码:
    // 1.1 get请求返回基本类型
    @GetMapping("/name")
    public String getName(@RequestParam("id") Integer id) {
        String url = "http://localhost:8080/demo/name/mock?id=" + id;
        return restTemplate.exchange(url, HttpMethod.GET, null, String.class).getBody();
    }
    @GetMapping("/name/mock")
    public String mockName(@RequestParam("id") Integer id) {
        return "天罡" + id;
    }
验证:
如期望一样,不得不说就应该这么简洁,good~~ 💪💪💪
请求url地址: http://localhost:8080/demo/name?id=123返回: 天罡123这里用的重载是:responseType是Class<T>
其实自定义的对象和String调用是一样的,只需要将返回类型String.class改成DTO.class即可.
根据用户id获取用户信息@Data
@NoArgsConstructor
@AllArgsConstructor
@Builder
public class UserDto implements Serializable {
private Integer id;
private String name;
private Integer age;
@JsonFormat(pattern = "yyyy-MM-dd HH:mm:ss")
private Date birthday;
}
    // 1.2 get请求返回对象类型
    @GetMapping("/user")
    public UserDto getUser(@RequestParam("id") Integer id) {
        String url = "http://localhost:8080/demo/user/mock?id=" + id;
        return restTemplate.exchange(url, HttpMethod.GET, null, UserDto.class).getBody();
    }
    @GetMapping("/user/mock")
    public UserDto mockUser(@RequestParam("id") Integer id) {
        return UserDto.builder().id(id)
                .name("天罡" + id)
                .age(id + 18)
                .birthday(new Date()).build();
    }
请求url地址: http://localhost:8080/demo/user?id=1返回:{
"id": 1,
"name": "天罡",
"age": 19,
"birthday": "2022-11-06 05:35:43"
}
这里用的重载也是:responseType是Class<T>
对于泛型类型,我们需要使用exchange的另一个针对泛型的重载方法,即将responseType换成ParameterizedTypeReference<T>,
场景模拟:根据用户name 查找 匹配的用户
这里可能返回多条结果,所以返回类型我们使用泛型List
发起exchange的代码:
通过ParameterizedTypeReference指定返回的List
    // 1.3 get请求返回List<T>类型
    @GetMapping("/user/list")
    public List<UserDto> getUserList(@RequestParam("name") String name) {
        String url = "http://localhost:8080/demo/user/list/mock?name=" + name;
        ParameterizedTypeReference<List<UserDto>> responseBodyType = new ParameterizedTypeReference<List<UserDto>>() {};
        return restTemplate.exchange(url, HttpMethod.GET, null, responseBodyType).getBody();
    }
    @GetMapping("/user/list/mock")
    public List<UserDto> mockUserList(@RequestParam("name") String name) {
        List<UserDto> list = new ArrayList<>();
        for (int i = 1; i < 3; i++) {
            list.add(UserDto.builder().id(i)
                    .name(name + i)
                    .age(i + 10)
                    .birthday(new Date()).build());
        }
        return list;
    }
请求url地址: http://localhost:8080/demo/user/list?name=天罡返回:[{
"id": 1,
"name": "天罡1",
"age": 11,
"birthday": "2022-11-06 21:44:24"
},
{
"id": 2,
"name": "天罡2",
"age": 12,
"birthday": "2022-11-06 21:44:24"
}]
List<T>只有一个参数,我们来试试有两个参数的Map<K,V>
场景模拟:根据关键字查找,不同的类型,返回不同字段
因为返回结果字段不固定,所以万能的Map绝对是首选,来吧~
发起exchange的代码:
依然通过ParameterizedTypeReference指定返回的Map
    // 1.4 get请求返回Map类型
    @GetMapping("/user/map")
    public Map<String, Object> getUserMap(@RequestParam(value = "type", required = true) Integer type, @RequestParam("key") String key) {
        String url = "http://localhost:8080/demo/user/map/mock?type=" + type + "&key=" + key;
        ParameterizedTypeReference<Map<String, Object>> responseBodyType = new ParameterizedTypeReference<Map<String, Object>>() {};
        return restTemplate.exchange(url, HttpMethod.GET, null, responseBodyType).getBody();
    }
    @GetMapping("/user/map/mock")
    public Map<String, Object> mockUserMap(@RequestParam(value = "type", required = true) Integer type, @RequestParam("key") String key) {
        Map<String, Object> map = new HashMap<>();
        if (type.equals(1)) {
            map.put("id", 1);
            map.put("name" + type, "hello" + key);
        } else {
            map.put("id", 2);
            map.put("name" + type, "hello" + key);
        }
        return map;
    }
验证:
根据不同类型返回不同字段了, 漂亮~~💪💪💪 仔细看两次请求返回的字段,一次是name1,一次是name2,
示例1:请求类型=1
请求url地址1: http://localhost:8080/demo/user/map?type=1&key=123返回:{
"id": 1,
"`name1`": "hello123"
}
示例2:请求类型=2
请求url地址2: http://localhost:8080/demo/user/map?type=2&key=456返回:{
"id": 2,
"`name2`": "hello456"
}
这应该是在项目中用的最多的一种,就是
自定义包装类型,而不是直接返回单一对象,而是返回统一的对象。
我们在1.2 返回自定义对象类型模拟过根据用户id获取用户信息的场景,但未处理非法请求、异常等情况,所以接下来我们自定一个通用的自定义Code的泛型返回结果,对1.2做一下增强。
根据用户id获取用户信息,根据不同情况返回不同编码我们新建一个Result<T>类:
@Data
public class Result<T extends Serializable> implements Serializable {
    private boolean success;
    private String code;
    private String message;
    private T data;

    public static <T extends Serializable> Result<T> success(String code, String message, T data) {
        Result<T> result = new Result<>();
        result.setCode(code);
        result.setMessage(message);
        result.setData(data);
        result.setSuccess(true);
        return result;
    }

    public static <T extends Serializable> Result<T> success(T data) {
        return success("200", "成功", data);
    }

    public static <T extends Serializable> Result<T> fail(String code, String message) {
        Result<T> result = new Result<>();
        result.setCode(code);
        result.setMessage(message);
        result.setSuccess(false);
        return result;
    }
}
依然通过ParameterizedTypeReference指定返回的Result<T> // 1.5 get请求返回自定义泛型类型
@GetMapping("/user/result")
public Result<UserDto> getUserResult(@RequestParam("id") Integer id) {
String url = "http://localhost:8080/demo/user/result/mock?id=" + id;
ParameterizedTypeReference<Result<UserDto>> responseBodyType = new ParameterizedTypeReference<Result<UserDto>>() {};
return restTemplate.exchange(url, HttpMethod.GET, null, responseBodyType).getBody();
}
	@GetMapping("/user/result/mock")
    public Result<UserDto> mockUserResult(@RequestParam("id") Integer id) {
        if (id == null || id <= 0) {
            return Result.fail("400", "id不合法!");
        }
        if (id % 2 == 0) {
            // 这里只是模拟异常情况
            return Result.fail("500", "操作失败,访问量太大了!");
        }
        UserDto userDto = UserDto.builder().id(id)
                .name("天罡" + id)
                .age(id + 18)
                .birthday(new Date()).build();
        return Result.success("200", "成功", userDto);
    }
验证:
正是我们想要的,完全符合预期!💪💪💪
示例1:请求返回400
请求url地址1: http://localhost:8080/demo/user/result?id=0返回: {
"success": false,
"code": "400",
"message": "id不合法!",
"data": null
}
示例2:请求返回200
请求url地址2: http://localhost:8080/demo/user/result?id=1返回:{
"success": true,
"code": "200",
"message": "成功",
"data": {
"id": 1,
"name": "天罡1",
"age": 19,
"birthday": "2022-11-07 04:03:09"
}
}
示例3:请求返回500
请求url地址3: http://localhost:8080/demo/user/result?id=2返回:{
"success": false,
"code": "500",
"message": "操作失败,访问量太大了!",
"data": null
}
实际上对于exchange来说,POST与GET的使用方式基本一样,所以这里只准备2个demo主要演示如何传header和body。
2.1 传header+body返回对象类型
2.2 传header+body返回自定义泛型类型
通过@RequestBody传参,[可选]指定header,获取用户信息 @GetMapping("/user/body")
public UserDto postUser(@RequestParam("id") Integer id) {
String url = "http://localhost:8080/demo/user/body/mock";
UserDto body = UserDto.builder().id(id)
.name("body" + id)
.age(id + 18)
.birthday(new Date()).build();
// header根据实际情况设置,没有就空着
HttpHeaders headers = new HttpHeaders();
headers.add("AccessKey", "自定义的API访问key");
headers.add("Content-Type", "application/json");
HttpEntity<?> requestEntity = new HttpEntity<>(body, headers);
return restTemplate.exchange(url, HttpMethod.POST, requestEntity, UserDto.class).getBody();
}
    @PostMapping("/user/body/mock")
    public UserDto mockPostUser(@RequestBody UserDto userParam) {
        return userParam;
    }
验证:
如期望一样,good~~ 💪💪💪
请求url地址: http://localhost:8080/demo/user/body?id=1返回:{
"id": 1,
"name": "body1",
"age": 19,
"birthday": "2022-11-06 21:20:41"
}
和返回普通类型的区别还是将responseType换成ParameterizedTypeReference
场景模拟:通过@RequestBody传参,[可选]指定header,获取自定义包装类型的用户信息
发起exchange的代码:
@GetMapping("/user/result/body")
public Result<UserDto> postUserResult(@RequestParam("id") Integer id) {
    String url = "http://localhost:8080/demo/user/result/body/mock";
    UserDto body = UserDto.builder().id(id)
            .name("body" + id)
            .age(id + 10)
            .birthday(new Date()).build();
    // header根据实际情况设置,没有就空着
    HttpHeaders headers = new HttpHeaders();
    headers.add("AccessKey", "自定义的API访问key");
    headers.add("Content-Type", "application/json");
    HttpEntity<?> requestEntity = new HttpEntity<>(body, headers);
    ParameterizedTypeReference<Result<UserDto>> responseBodyType = new ParameterizedTypeReference<Result<UserDto>>(){};
    return restTemplate.exchange(url, HttpMethod.POST, requestEntity, responseBodyType).getBody();
}
    @PostMapping("/user/result/body/mock")
    public Result<UserDto> mockPostUserResult(@RequestBody UserDto userParam) {
        return Result.success("200", "成功", userParam);
    }
验证:
不出所料,如期望一样,good~~ 💪💪💪
请求url地址: http://localhost:8080/demo/user/result/body?id=1返回:{
"success": true,
"code": "200",
"message": "成功",
"data": {
"id": 1,
"name": "body1",
"age": 11,
"birthday": "2022-11-06 21:25:25"
}
}
上面例子均未做异常处理,在这项目中使用难免不够健壮,所以我们通常会处理两种异常情况:
public <T> T exchangeForEntity(HttpMethod httpMethod, String url, HttpHeaders headers, Object body
			, Class<T> responseType) {
    HttpEntity<?> requestEntity = null;
    if (headers != null || body != null) {
        requestEntity = new HttpEntity<>(body, headers);
    }
    try {
        ResponseEntity<T> responseEntity = restTemplate.exchange(url, httpMethod, requestEntity, responseType);
        if (responseEntity.getStatusCode().equals(HttpStatus.OK)) {
            return responseEntity.getBody();
        } else {
            // 处理Code不等于200的情况, 这里只简单打印,你需要根据你们项目的情况修改合适的处理方式
            System.out.println("返回结果不等于200:code=" + responseEntity.getStatusCode().value()
                    + " reason=" + responseEntity.getStatusCode().getReasonPhrase());
        }
    } catch (RestClientException e) {
        // 处理RestClientException
        e.printStackTrace();
    }
    return null;
}
只需要将普通类型的入参Class<T>改成 ParameterizedTypeReference<T> public <T> T exchangeForWarpEntity(HttpMethod httpMethod, String url, HttpHeaders headers, Object body
, ParameterizedTypeReference<T> responseBodyType) {
HttpEntity<?> requestEntity = null;
if (headers != null || body != null) {
requestEntity = new HttpEntity<>(body, headers);
}
try {
ResponseEntity<T> responseEntity = restTemplate.exchange(url, httpMethod, requestEntity, responseBodyType);
if (responseEntity.getStatusCode().equals(HttpStatus.OK)) {
return responseEntity.getBody();
} else {
// 处理Code不等于200的情况, 这里只简单打印,你需要根据你们项目的情况修改合适的处理方式
System.out.println("返回结果不等于200:code=" + responseEntity.getStatusCode().value()
+ " reason=" + responseEntity.getStatusCode().getReasonPhrase());
}
} catch (RestClientException e) {
// 处理RestClientException, 这里只简单打印
e.printStackTrace();
}
return null;
}
如果觉得这样重复代码太多了,那就在内部实现一个方法,对外开放两个方法即可,内部实现的方法类似这样,具体不做赘述!
private <T> T exchangeInternal(HttpMethod httpMethod, String url, HttpHeaders headers, Object body
				, Class<T> responseType1, ParameterizedTypeReference<T> responseType2)
@Configuration
public class RestTemplateConfig {
    @Bean
    public RestTemplate restTemplate(ClientHttpRequestFactory clientHttpRequestFactory) {
        RestTemplate restTemplate = new RestTemplate(clientHttpRequestFactory);
        restTemplate.getMessageConverters()
                .stream()
                .filter(MappingJackson2HttpMessageConverter.class::isInstance)
                .map(MappingJackson2HttpMessageConverter.class::cast)
                .findFirst()
                .map(MappingJackson2HttpMessageConverter::getObjectMapper)
                .ifPresent(objectMapper -> {
                    // 去掉默认的时间戳格式
                    objectMapper.configure(SerializationFeature.WRITE_DATES_AS_TIMESTAMPS, false);
                    // 设置为东八区
                    objectMapper.setTimeZone(TimeZone.getTimeZone("GMT+8"));
                    // 序列化时,日期的统一格式
                    objectMapper.setDateFormat(new SimpleDateFormat("yyyy-MM-dd HH:mm:ss"));
                    // 忽略大小写
                    objectMapper.configure(MapperFeature.ACCEPT_CASE_INSENSITIVE_PROPERTIES, true);
                });

        return restTemplate;
    }

    @Bean
    public ClientHttpRequestFactory clientHttpRequestFactory(){
        // 如果使用okHttpClient需要引入jar包:okhttp
        // OkHttp3ClientHttpRequestFactory factory = new OkHttp3ClientHttpRequestFactory();
        SimpleClientHttpRequestFactory factory = new SimpleClientHttpRequestFactory();
        factory.setConnectTimeout(15000);
        factory.setReadTimeout(30000);
        return factory;
    }
}
在实际开发中,如果想自定义RestTemplate序列化,或者对于结果有相关处理,我们也可以取出来结果,然后再自己做序列化或验证,可以参考这位大佬的优质文章:RestTemplate使用实战-exchange方法讲解
对于更多原理性分析,可以参考这位大佬的优质文章:RestTemplate总结
除了Get和Post,我们常用的还有Put和Delete,由于Delete可以参考Get的用法,Put可以参考Post的用法,所以就不做赘述,如果您觉得还有哪些场景是没有覆盖到的,欢迎留言或私信~~
注:如果本篇博客有任何错误和建议,欢迎评论指正!
如果感觉不错,请收藏。
关注我 天罡gg 分享更多干货: https://blog.csdn.net/scm_2008
大家的「关注 + 点赞 + 收藏」就是我创作的最大动力!谢谢大家的支持,我们下文见!
给定一个复杂的对象层次结构,幸运的是它不包含循环引用,我如何实现支持各种格式的序列化?我不是来讨论实际实现的。相反,我正在寻找可能会派上用场的设计模式提示。更准确地说:我正在使用Ruby,我想解析XML和JSON数据以构建复杂的对象层次结构。此外,应该可以将该层次结构序列化为JSON、XML和可能的HTML。我可以为此使用Builder模式吗?在任何提到的情况下,我都有某种结构化数据-无论是在内存中还是文本中-我想用它来构建其他东西。我认为将序列化逻辑与实际业务逻辑分开会很好,这样我以后就可以轻松支持多种XML格式。 最佳答案 我最
我想编写一个ruby脚本来递归复制目录结构,但排除某些文件类型。因此,给定以下目录结构:folder1folder2file1.txtfile2.txtfile3.csfile4.htmlfolder2folder3file4.dll我想复制这个结构,但不包含.txt和.cs文件。因此,生成的目录结构应如下所示:folder1folder2file4.htmlfolder2folder3file4.dll 最佳答案 您可以使用查找模块。这是一个代码片段:require"find"ignored_extensions=[".cs"
我想写一点“Deprecate-It”库并经常使用“method_added”回调。但是现在我注意到在包含模块时不会触发此回调。是否有任何回调或变通方法,以便在某些内容包含到自身时通知类“Foobar”?用于演示的小Demo:#IncludingModulswon'ttriggermethod_addedcallbackmoduleInvisibleMethoddefinvisible"Youwon'tgetacallbackfromme"endendclassFoobardefself.method_added(m)puts"InstanceMethod:'#{m}'addedto'
我正在学习Ruby,遇到了inject。我正处于理解它的风口浪尖,但当我是那种需要真实世界的例子来学习一些东西的人时。我遇到的最常见的例子是人们使用inject来添加一个(1..10)范围的总和,我不太关心这个。这是一个任意的例子。在实际程序中我会用它做什么?我正在学习,所以我可以继续使用Rails,但我不必有一个以Web为中心的示例。我只需要一些我可以全神贯注的目标。谢谢大家。 最佳答案 inject有时可以通过它的“其他”名称reduce更好地理解。它是一个对Enumerable进行操作(迭代一次)并返回单个值的函数。它有许多有
我有一个正则表达式来获取"*"之间的所有内容:str="Donecsedodiodui.*Nullamiddoloridnibhultriciesvehiculaut*"str.match(/\*(.*)\*/)[1]我希望匹配能够包含换行符。我该怎么做? 最佳答案 您需要使用允许点匹配新行的m选项:Donecsedodiodui.*Nullamiddoloridnibhultriciesvehiculaut*regexstr.match(/\*(.*)\*/m)[1]实例:http://www.rubular.com/r/11u9
我在尝试使用Faraday将文件上传到网络服务时遇到问题。我的代码:conn=Faraday.new('http://myapi')do|f|f.request:multipartendpayload={:file=>Faraday::UploadIO.new('...','image/jpeg')}conn.post('/',payload)尝试发布后似乎没有任何反应。当我检查响应时this是我所看到的:#:post,:body=>#,#,@opts={}>,#],@index=0>>,#>],@ios=[#,#,@opts={}>,#],@index=0>,#],@index=0>
我使用raise(ConfigurationError.new(msg))引发错误我试着用rspec测试一下:expect{Base.configuration.username}.toraise_error(ConfigurationError,message)但这行不通。我该如何测试呢?目标是匹配message。 最佳答案 您可以使用正则表达式匹配错误消息:it{expect{Foo.bar}.toraise_error(NoMethodError,/private/)}这将检查NoMethodError是否由privateme
目录ChatGPT简介技术原理应用未来发展ChatGPT的10 种用法ChatGPT简介ChatGPT是一种基于深度学习的大型语言模型,由OpenAI公司开发。技术原理GPT是GenerativePre-trainedTransformer的缩写,意为生成式预训练变压器。它的技术原理是使用了一个基于注意力机制的变压器(Trans
有没有办法在ruby中生成介于1-100但不包括20、30和40之间的随机数?我可以做类似的事情defrandom_numberrandom_number=rand(100)whilerandom_number==20||30||40random_number=rand(100)endreturnrandom_numberend...但这似乎不是很有效(再加上那个特定的例子可能根本行不通)。有没有更简单的方法?任何帮助深表感谢! 最佳答案 创建一个1到100的数组。从该数组中删除不需要的元素。然后从数组中选择一个随机数。([*1
我找不到任何使用Rack::Session::Cookie的简单示例,并且希望能够将信息存储在cookie中,并在以后的请求中访问它并让它过期.这些是我能找到的唯一示例:HowdoIset/getsessionvarsinaRackapp?http://rack.rubyforge.org/doc/classes/Rack/Session/Cookie.html这是我得到的:useRack::Session::Cookie,:key=>'rack.session',:domain=>'foo.com',:path=>'/',:expire_after=>2592000,:secret=