信科公司的WLAN集群管理采用AC+FitAP的模式。在AC上面可以对AP进行基本的配置管理操作,包括向Valided AP表中添加AP、配置AP的位置信息。本任务介绍了在AC上配置AP的具体操作,网络拓扑图如图4-1所示。

步骤1 安装无线路由器和无线AP,连接方式如下网络拓扑图
进行终端登录,Windows XP可以使用系统自带的管理终端进行登录,Windows 7可下载软件“SecureCRT”进行登录。登录前在“快速连接”对话框中设置软件参数并点击“连接”,如图4-3所示。

步骤2 在AC上面对与之关联的AP进行配置。配置AP的位置信息为“cn”,代码如下:
sys   /*进入系统视图/
             wlan  /*进入到wlan视图下/

             regulatory-domain-profile  name  domain1  /*创建域管理的模板,名称为domain1/
             country-code  cn   /*国家编码为cn(中国)/

             quit  /*返回到wlan视图下/
             ap-group  name  apg-lhh  /*创建ap管理组,组名为apg-lhh/

             regulatory-domain-profile  domain1  /*将域管理模板引入到apg-lhh组里/
             /返回系统视图下/

             wlan  /*进入到wlan视图下/
             ap  auth-mode  mac-auth  /*ap的认证方式为mac认证/

             ap-id  1  ap-mac  00e0-fcc6-2a10  /*ap序号为1,mac地址为00e0-fcc6-2a10 /
             ap-name  ap-wifi1  /*将此ap命名为ap-wifi1 /

             ap-group  apg-lhh  /*将此ap放入到apg-lhh组里/
             /返回系统视图下/
信科公司部署无线网络之后,陆续因无线接入出现网络故障,影响了网络的稳定。经过分析研究,公司决定把办公无线接入和来宾接入隔离,使用两个SSID标识,负载均衡,提高网络安全,网络拓扑图如图4-4所示。具体操作如下:
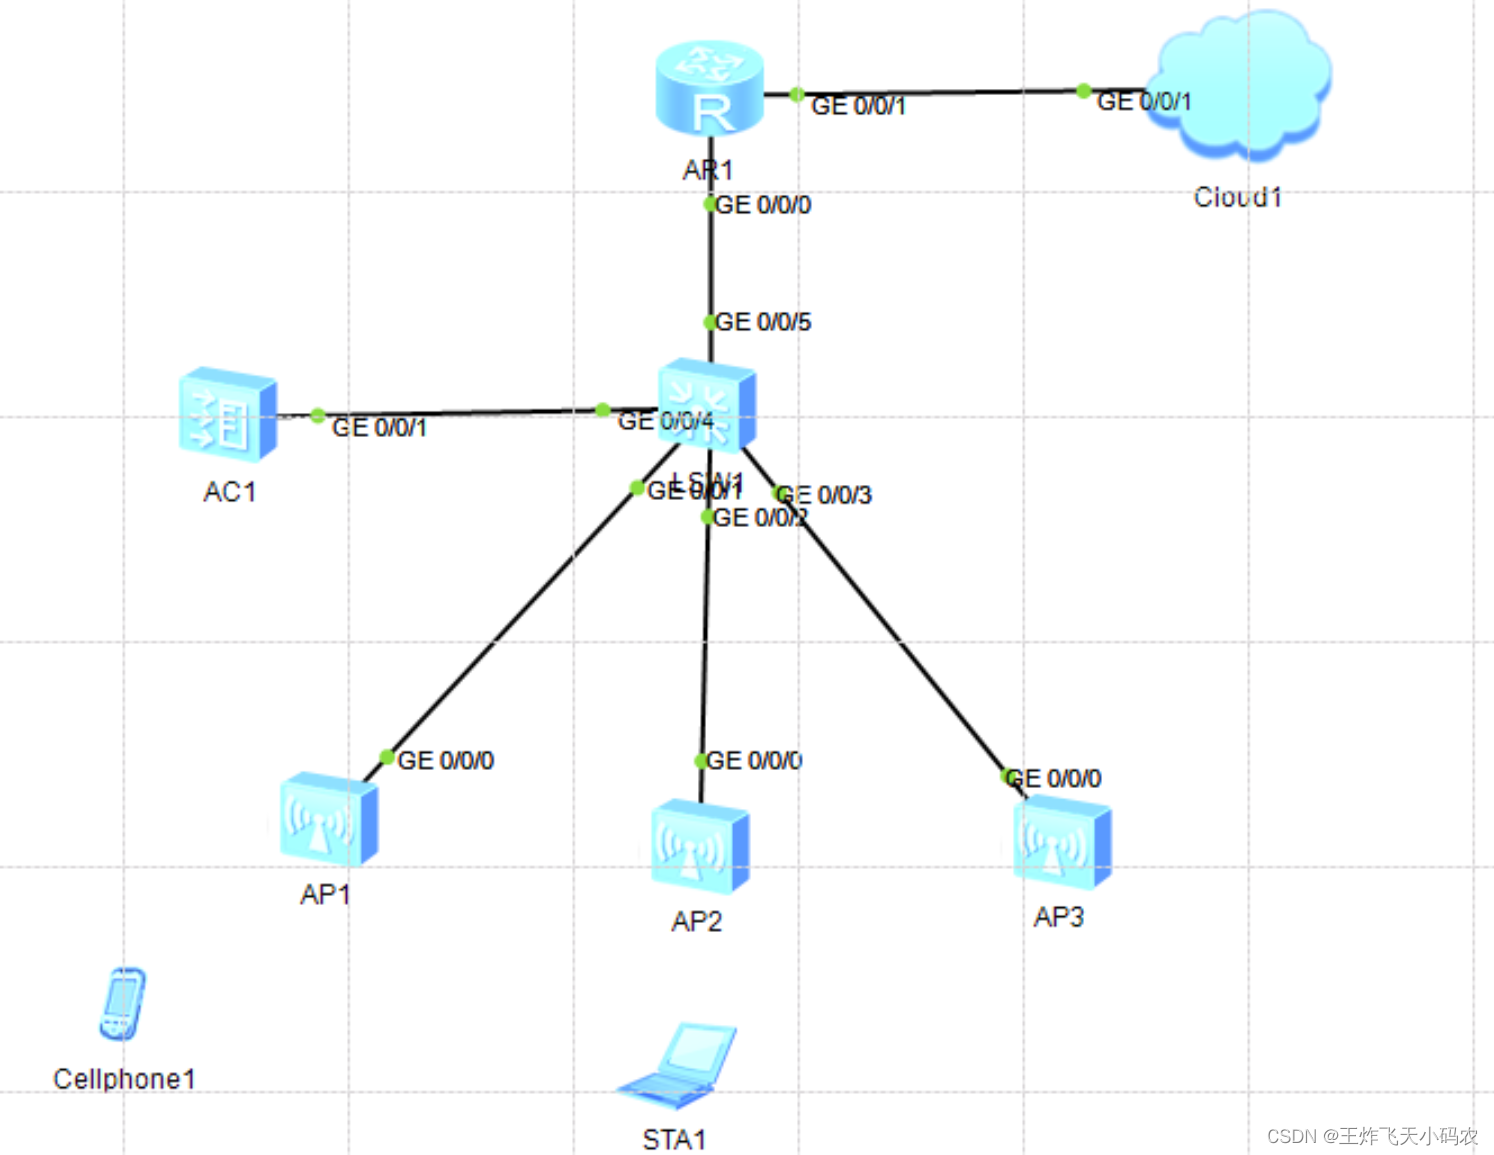
图4-4 网络拓扑图
注:云端开启步骤:
(1)双击“云朵”,使用端口选项选择GE


(2)端口映射设置

(1)配置出口路由器端口

<Huawei>sys
Enter system view, return user view with Ctrl+Z.
[Huawei]sysname AR
[AR]int g0/0/0
[AR-GigabitEthernet0/0/0]ip add 10.0.0.2 24
Oct  4 2022 19:50:58-08:00 AR %%01IFNET/4/LINK_STATE(l)[0]:The line protocol IP
on the interface GigabitEthernet0/0/0 has entered the UP state.
[AR-GigabitEthernet0/0/0]q
[AR]
(2)配置AC

<AC6005>sys
Enter system view, return user view with Ctrl+Z.
[AC6005]sysname AC1
[AC1]vlan ba
[AC1]vlan batch 10
Info: This operation may take a few seconds. Please wait for a moment...done.
[AC1]int vlan
[AC1]int Vlanif 10
[AC1-Vlanif10]ip add 172.16.1.2 24    # 与核心交换机直连的IP地址
[AC1-Vlanif10]int g0/0/1
[AC1-GigabitEthernet0/0/1]port link-type trunk
[AC1-GigabitEthernet0/0/1]port trunk allow-pass vlan all
[AC1-GigabitEthernet0/0/1]q
[AC1]
(3) 配置核心交换机
<Huawei>sys

[Huawei]sysname LSW1
[LSW1]vlan batch 5 10


[LSW1]int vlanif 1
[LSW1-Vlanif1]ip add 10.0.0.1 24


[LSW1-Vlanif1]int vlanif 5
[LSW1-Vlanif5]ip add 192.168.0.1 24


[LSW1-Vlanif5]int vlanif 10
[LSW1-Vlanif10]ip add 172.16.1.1 24

[LSW1-Vlanif10]int g0/0/4
[LSW1-GigabitEthernet0/0/4]port link-type trunk
[LSW1-GigabitEthernet0/0/4]port trunk allow-pass vlan all

(1)首先AC设置静态路由
<AC1>sys
Enter system view, return user view with Ctrl+Z.
[AC1]ip route-static 0.0.0.0 0 172.16.1.1
[AC1]
(2)其次 路由器设置静态路由
<AR>sys
Enter system view, return user view with Ctrl+Z.
[AR]ip route-static 0.0.0.0 0 10.0.0.1
[AR]
(3)最后 在AC上测试连通性
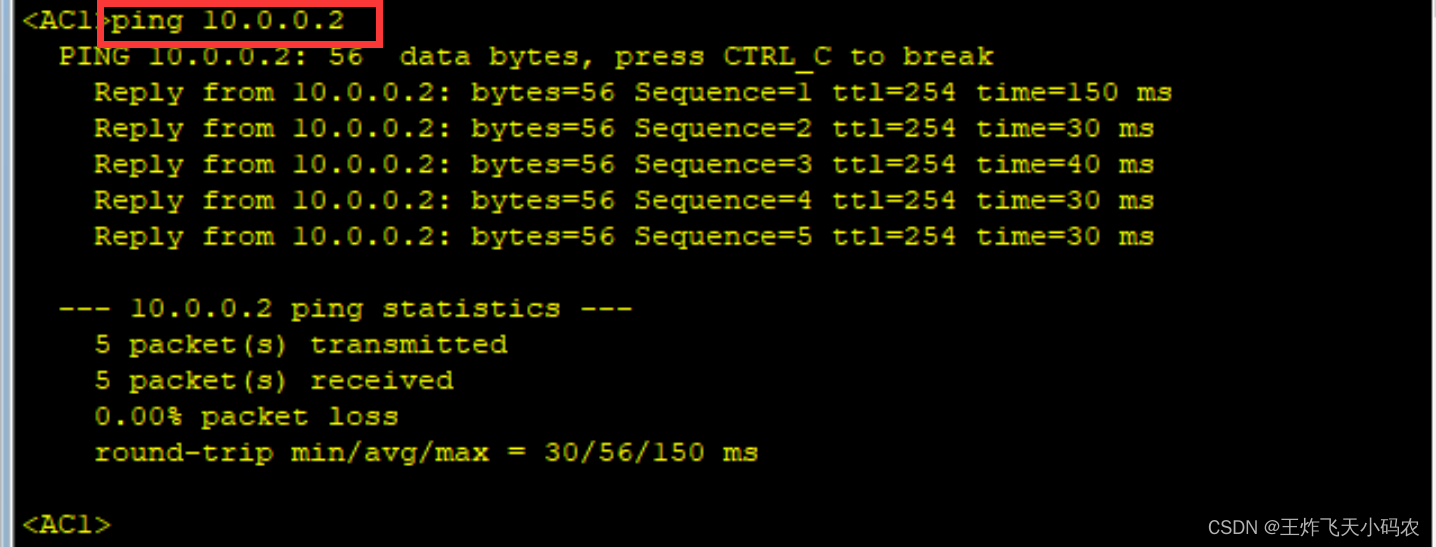
## 在AC上ping一下路由器,测试网络是否联通:
<AC1>ping 10.0.0.2
PING 10.0.0.2: 56  data bytes, press CTRL_C to break
  Reply from 10.0.0.2: bytes=56 Sequence=1 ttl=254 time=60 ms
  Reply from 10.0.0.2: bytes=56 Sequence=2 ttl=254 time=30 ms
  Reply from 10.0.0.2: bytes=56 Sequence=3 ttl=254 time=40 ms
  Reply from 10.0.0.2: bytes=56 Sequence=4 ttl=254 time=40 ms
  Reply from 10.0.0.2: bytes=56 Sequence=5 ttl=254 time=50 ms

## 确认无误再进行下一步
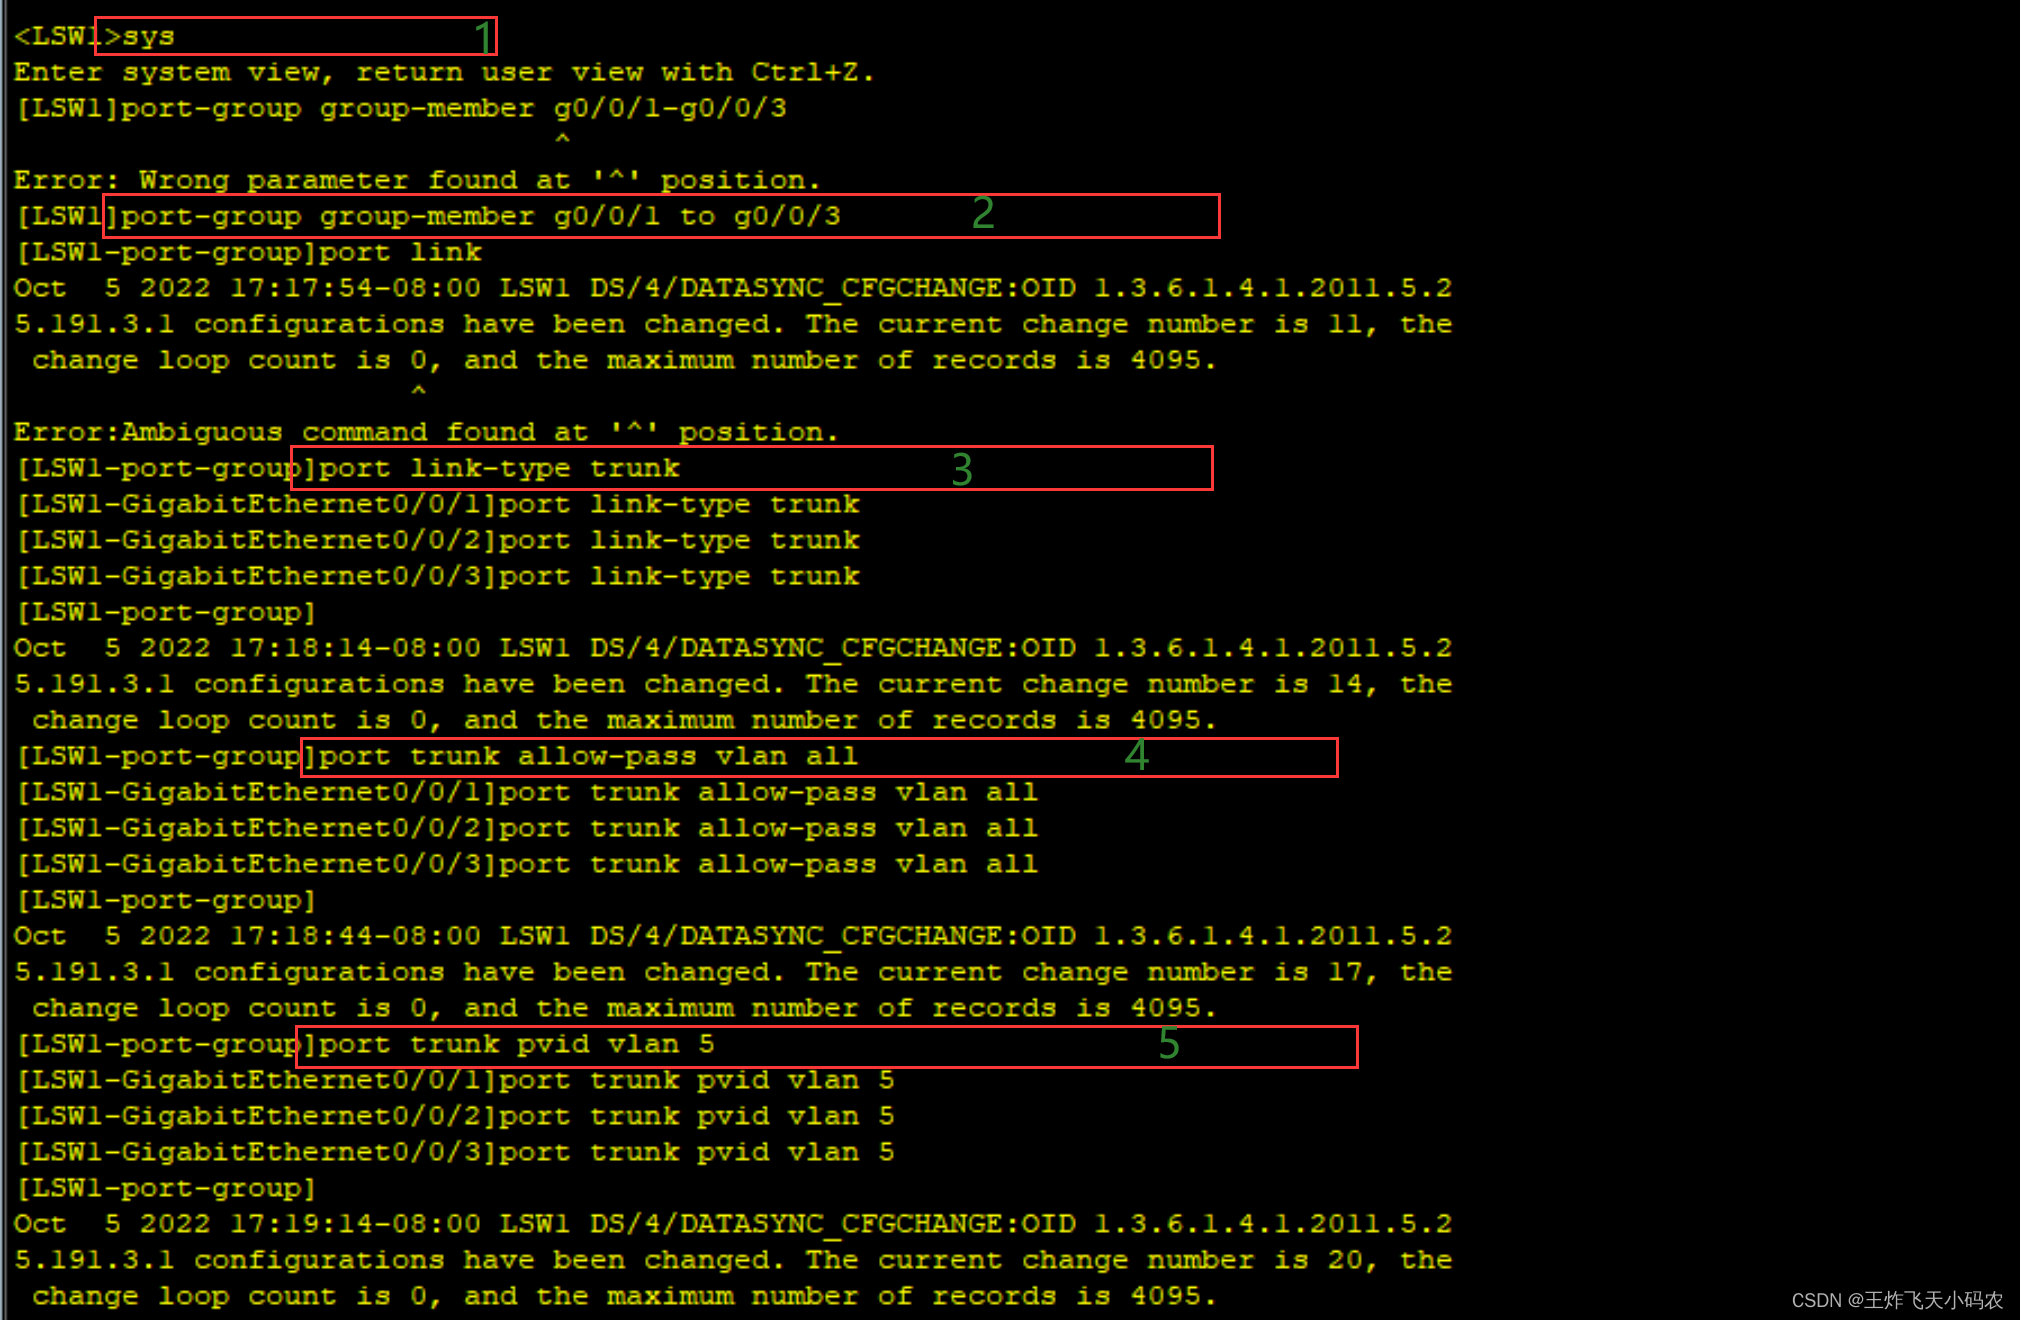
## 配置与AP相连的端口
<Huawei>sys
[LSW1]port-group group-member g0/0/1 to g0/0/3 # 端口组
[LSW1-port-group]port link-type trunk
[LSW1-port-group]port trunk allow-pass vlan all
[LSW1-port-group]port trunk pvid vlan 5
[LSW1-port-group]quit
## 配置DHCP地址池
[LSW1]dhcp enable # 使能DHCP
[LSW1]ip pool vlan5 # 创建地址池
[LSW1-ip-pool-vlan5]network 192.168.0.0 mask 24 # 配置要分配的网段
[LSW1-ip-pool-vlan5]gateway-list 192.168.0.1 # 配置要分配的网关地址
[LSW1-ip-pool-vlan5]option 43 sub-option 3 ascii 172.16.1.2 # 将AC的IP地址下发给AP
[LSW1-ip-pool-vlan5]quit

[LSW1]int vlanif 5
[LSW1-Vlanif5]dhcp select global #在接口上下发IP地址 
查看AP的地址有没有上来;以AP1为例,双击AP设备,输入以下代码:
<Huawei>dis ip int bri

ping一下AC看看通不通

<Huawei>ping 172.16.1.2
  PING 172.16.1.2: 56  data bytes, press CTRL_C to break
    Reply from 172.16.1.2: bytes=56 Sequence=1 ttl=254 time=30 ms
    Reply from 172.16.1.2: bytes=56 Sequence=2 ttl=254 time=30 ms
    Reply from 172.16.1.2: bytes=56 Sequence=3 ttl=254 time=20 ms
    Reply from 172.16.1.2: bytes=56 Sequence=4 ttl=254 time=40 ms
    Reply from 172.16.1.2: bytes=56 Sequence=5 ttl=254 time=30 ms

  --- 172.16.1.2 ping statistics ---
    5 packet(s) transmitted
    5 packet(s) received
    0.00% packet loss
    round-trip min/avg/max = 20/30/40 ms
确认无误,进行下一步
注:以下配置,可能会弹出的警告,都选Y。
<AC1>sys
Enter system view, return user view with Ctrl+Z.
#指定capwap协议的信令源地址
[AC1]capwap source interface Vlanif 10
[AC1]wlan   # 进入wlan视图
[AC1-wlan-view]ap auth-mode mac-auth  # 配置AC的验证方式为MAC验证

## 创建域配置并配置国家码,使AP的射频特性符合国家的法律法规要求
[AC1-wlan-view]regulatory-domain-profile name CN  # 创建域配置

[AC1-wlan-regulate-domain-CN]country-code CN  # 国家码:中国
Info: The current country code is same with the input country code.
[AC1-wlan-regulate-domain-CN]q

## 创建AP-group

[AC1-wlan-view]ap-group name guest    # 创建guest组


[AC1-wlan-ap-group-guest]regulatory-domain-profile CN  # 关联刚才的域配置
Warning: Modifying the country code will clear channel, power and antenna gain c
onfigurations of the radio and reset the AP. Continue?[Y/N]:y
[AC1-wlan-ap-group-guest]q

[AC1-wlan-view]ap-group name work  # 创建work组
Info: This operation may take a few seconds. Please wait for a moment.done.

[AC1-wlan-ap-group-work]regulatory-domain-profile CN  # 关联刚才的域配置
Warning: Modifying the country code will clear channel, power and antenna gain c
onfigurations of the radio and reset the AP. Continue?[Y/N]:y
[AC1-wlan-ap-group-work]q

查看AP的MAC地址如下:
(1)依次双击AP1,AP2,AP3,输入指令:
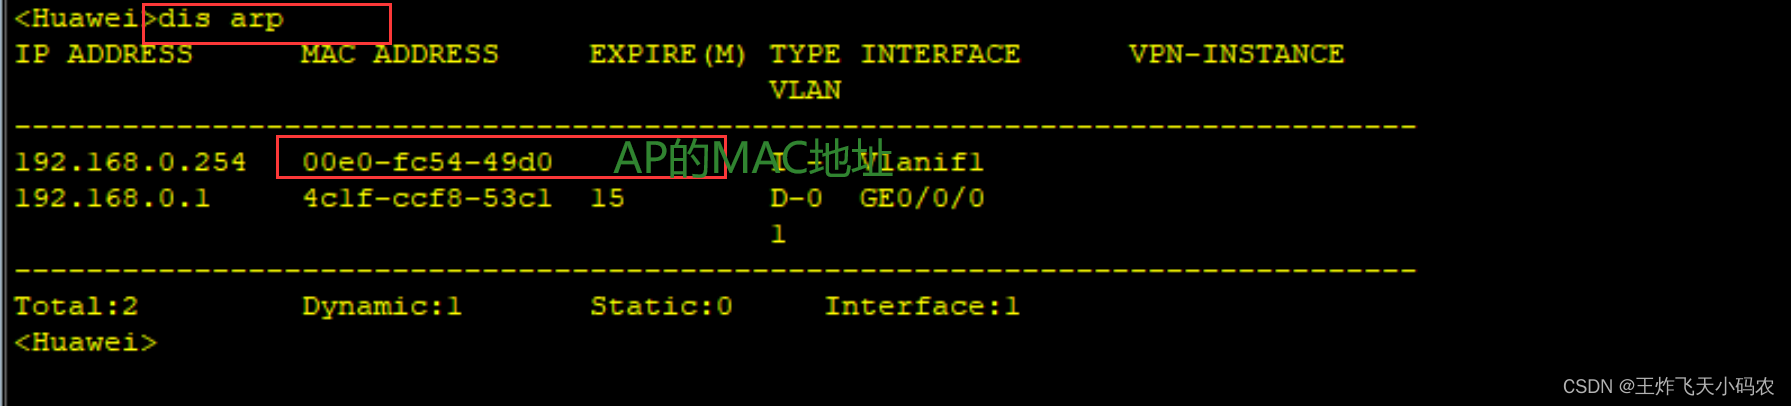


将mac地址复制备用:
AP1:00e0-fc54-49d0
AP2: 00e0-fc4d-4a80
AP3: 00e0-fc15-5570
## 基于mac地址注册AP
<AC1>sys
Enter system view, return user view with Ctrl+Z.
[AC1]wlan
[AC1-wlan-view]ap-id 1 ap-mac 00e0-fc54-49d0    # 加入AP。mac地址可以通过查看核心交换机的mac地址表,或者右键AP打开设置查看
[AC1-wlan-ap-1]ap-name guest1  # 将AP名字更改为guest1
[AC1-wlan-ap-1]ap-group guest  # 将AP加入刚才配置的guest组
Warning: This operation may cause AP reset. If the country code changes, it will
 clear channel, power and antenna gain configurations of the radio, Whether to c
ontinue? [Y/N]:y
Info: This operation may take a few seconds. Please wait for a moment.. done.
[AC1-wlan-ap-1]q
[AC1-wlan-view]ap-id 2 ap-mac 00e0-fc4d-4a80
[AC1-wlan-ap-2]ap-name guest2
[AC1-wlan-ap-2]ap-group guest
Warning: This operation may cause AP reset. If the country code changes, it will
 clear channel, power and antenna gain configurations of the radio, Whether to c
ontinue? [Y/N]:y
Info: This operation may take a few seconds. Please wait for a moment.. done.
[AC1-wlan-ap-2]q
[AC1-wlan-view]ap-id 3 ap-mac 00e0-fc15-5570
[AC1-wlan-ap-3]ap-name work1
[AC1-wlan-ap-3]ap-group work
Warning: This operation may cause AP reset. If the country code changes, it will
 clear channel, power and antenna gain configurations of the radio, Whether to c
ontinue? [Y/N]:y
Info: This operation may take a few seconds. Please wait for a moment.. done.
[AC1-wlan-ap-3]q
[AC1-wlan-view]
注: 到此处AP会自动重启,且AP名字会被更改(如果没有自动重启,可以自己手动重启) ; 重启完在AC上查看AP是否注册成功:
<AC1>
<AC1>sys
Enter system view, return user view with Ctrl+Z.
[AC1]wlan
[AC1-wlan-view]dis ap all
Info: This operation may take a few seconds. Please wait for a moment.done.
Total AP information:
nor  : normal          [3]
--------------------------------------------------------------------------------
----------
ID   MAC            Name   Group IP            Type            State STA Uptime
--------------------------------------------------------------------------------
----------
1    00e0-fc54-49d0 guest1 guest 192.168.0.254 AP2050DN        nor   0   9M:21S
2    00e0-fc4d-4a80 guest2 guest 192.168.0.253 AP2050DN        nor   0   8M:15S
3    00e0-fc15-5570 work1  work  192.168.0.252 AP2050DN        nor   0   7M:14S
--------------------------------------------------------------------------------
----------
Total: 3
[AC1-wlan-view] 
可以看到state为nor,说明注册成功;
等三台设备全部上线,确认无误再进行下一步
[AC1]vlan pool sta-pool101 # 新建vlan地址池,名称为sta-pool101
[AC1-vlan-pool-sta-pool101]vlan 101
[AC1-vlan-pool-sta-pool101]quit

[AC1]vlan pool sta-pool102
[AC1-vlan-pool-sta-pool102]vlan 102
[AC1-vlan-pool-sta-pool102]quit

## 安全配置(WIFI密码)
[AC1]wlan
[AC1-wlan-view]security-profile name guest # 新建安全配置,名称为guest
[AC1-wlan-sec-prof-guest]security wpa2 psk pass-phrase a12345678 aes # 配置加密方式为wpa2-psk,aes密文存放
[AC1-wlan-sec-prof-guest]quit

[AC1-wlan-view]security-profile name work
[AC1-wlan-sec-prof-work]security wpa2 psk pass-phrase a12345678 aes
[AC1-wlan-sec-prof-work]quit

## SSID配置(WIFI名称)
[AC1-wlan-view]ssid-profile name guest # 新建SSID配置,名称为guest
[AC1-wlan-ssid-prof-guest]ssid guest # 配置SSID名为guest
[AC1-wlan-ssid-prof-guest]quit

[AC1-wlan-view]ssid-profile name work
[AC1-wlan-ssid-prof-work]ssid work
[AC1-wlan-ssid-prof-work]quit

## 虚拟接入点(vpa)配置
[AC1-wlan-view]vap-profile name guest # 新建vap配置,名称为guest
[AC1-wlan-vap-prof-guest]service-vlan vlan-pool sta-pool101  # 应用vlan地址池
[AC1-wlan-vap-prof-guest]security-profile guest # 应用安全配置
[AC1-wlan-vap-prof-guest]ssid-profile guest # 应用SSID
[AC1-wlan-vap-prof-guest]quit

[AC1-wlan-view]vap-profile name work
[AC1-wlan-vap-prof-work]service-vlan vlan-pool sta-pool102
[AC1-wlan-vap-prof-work]security-profile work
[AC1-wlan-vap-prof-work]ssid-profile work
[AC1-wlan-vap-prof-work]quit

## 开启无线电信号
[AC1-wlan-view]ap-group name guest
[AC1-wlan-ap-group-guest]vap-profile guest wlan 1 radio 0 # 应用虚拟接入点配置,wlanid为1,radio 0意思是使用2.4GHz的频段
[AC1-wlan-ap-group-guest]vap-profile guest wlan 1 radio 1 # 配置双射频,radio 1=5GHz
[AC1-wlan-ap-group-guest]quit

[AC1-wlan-view]ap-group name work
[AC1-wlan-ap-group-work]vap-profile work wlan 1 radio 0
[AC1-wlan-ap-group-work]vap-profile work wlan 1 radio 1 

此时 网络拓扑图显示信号覆盖范围,如下图所示:

## 配置核心交换机
[LSW1]vlan batch 101 102
[LSW1]ip pool 101
[LSW1-ip-pool-101]network 192.168.10.0 mask 24
[LSW1-ip-pool-101]gateway-list 192.168.10.1
[LSW1-ip-pool-101]quit

[LSW1]ip pool 102
[LSW1-ip-pool-102]network 192.168.20.0 mask 24
[LSW1-ip-pool-102]gateway-list 192.168.20.1
[LSW1-ip-pool-102]quit

[LSW1]int vlanif 101
[LSW1-Vlanif101]ip ad 192.168.10.1 24
[LSW1-Vlanif101]dhcp select global

[LSW1]int vlanif 102
[LSW1-Vlanif102]ip ad 192.168.20.1 24
[LSW1-Vlanif102]dhcp select global 

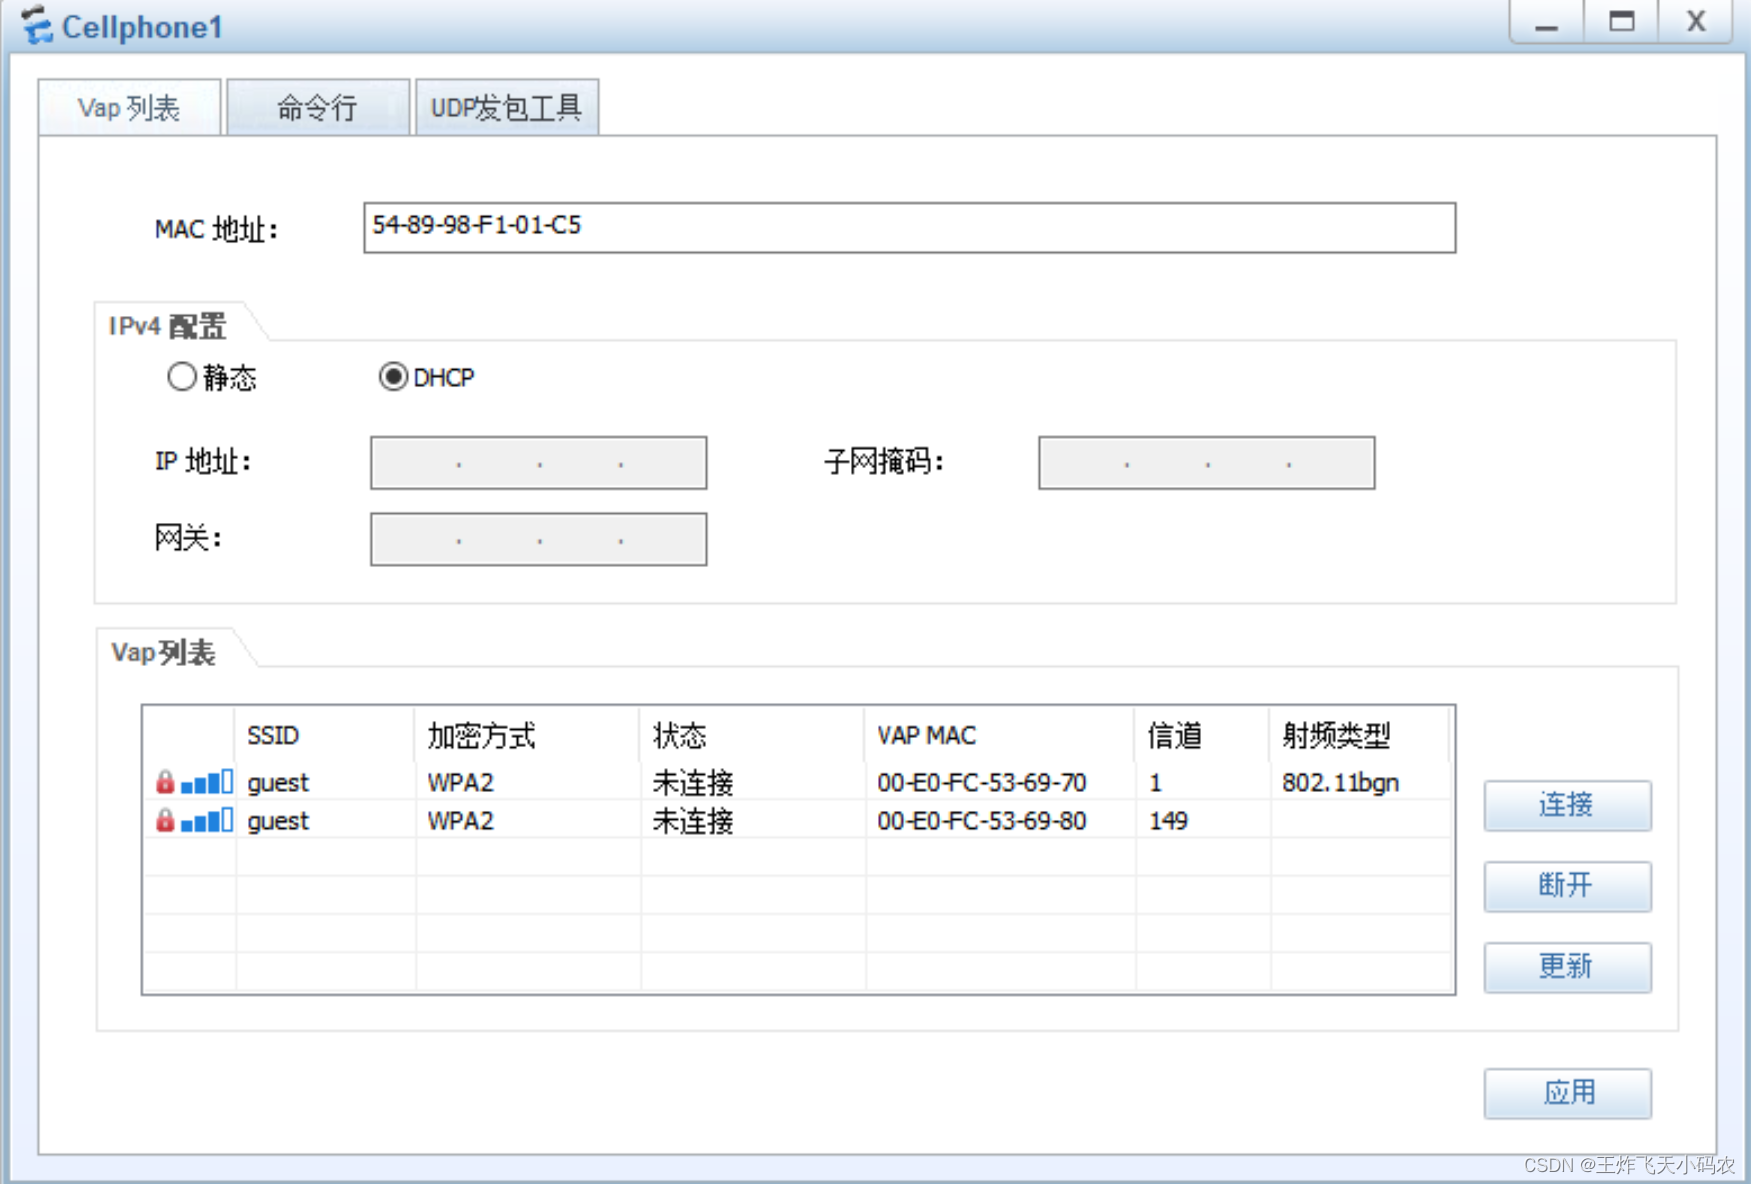
步骤7 在终端设备连接AP,并输入密码
双击 phone,具体链接过程如下图:


笔记本联网模拟:


笔记本单独联通后拓扑图如下图:

有时间的话可以测试一下网络连通性:
STA>ipconfig
Link local IPv6 address...........: ::
IPv6 address......................: :: / 128
IPv6 gateway......................: ::
IPv4 address......................: 192.168.10.254
Subnet mask.......................: 255.255.255.0
Gateway...........................: 192.168.10.1
Physical address..................: 54-89-98-F0-37-1A
DNS server........................:

## 以上可以看到终端自动获取的IP地址信息是正确的
## 再ping一下出口路由器和AC:
STA>ping 10.0.0.2
Ping 10.0.0.2: 32 data bytes, Press Ctrl_C to break
From 10.0.0.2: bytes=32 seq=1 ttl=254 time=219 ms
From 10.0.0.2: bytes=32 seq=2 ttl=254 time=282 ms
From 10.0.0.2: bytes=32 seq=3 ttl=254 time=203 ms
From 10.0.0.2: bytes=32 seq=4 ttl=254 time=204 ms
From 10.0.0.2: bytes=32 seq=5 ttl=254 time=218 ms

STA>ping 172.16.1.2
Ping 172.16.1.2: 32 data bytes, Press Ctrl_C to break
From 172.16.1.2: bytes=32 seq=1 ttl=254 time=266 ms
From 172.16.1.2: bytes=32 seq=2 ttl=254 time=218 ms
From 172.16.1.2: bytes=32 seq=3 ttl=254 time=203 ms
From 172.16.1.2: bytes=32 seq=4 ttl=254 time=266 ms
From 172.16.1.2: bytes=32 seq=5 ttl=254 time=203 ms
我正在学习如何使用Nokogiri,根据这段代码我遇到了一些问题:require'rubygems'require'mechanize'post_agent=WWW::Mechanize.newpost_page=post_agent.get('http://www.vbulletin.org/forum/showthread.php?t=230708')puts"\nabsolutepathwithtbodygivesnil"putspost_page.parser.xpath('/html/body/div/div/div/div/div/table/tbody/tr/td/div
我有一个Ruby程序,它使用rubyzip压缩XML文件的目录树。gem。我的问题是文件开始变得很重,我想提高压缩级别,因为压缩时间不是问题。我在rubyzipdocumentation中找不到一种为创建的ZIP文件指定压缩级别的方法。有人知道如何更改此设置吗?是否有另一个允许指定压缩级别的Ruby库? 最佳答案 这是我通过查看rubyzip内部创建的代码。level=Zlib::BEST_COMPRESSIONZip::ZipOutputStream.open(zip_file)do|zip|Dir.glob("**/*")d
类classAprivatedeffooputs:fooendpublicdefbarputs:barendprivatedefzimputs:zimendprotecteddefdibputs:dibendendA的实例a=A.new测试a.foorescueputs:faila.barrescueputs:faila.zimrescueputs:faila.dibrescueputs:faila.gazrescueputs:fail测试输出failbarfailfailfail.发送测试[:foo,:bar,:zim,:dib,:gaz].each{|m|a.send(m)resc
很好奇,就使用rubyonrails自动化单元测试而言,你们正在做什么?您是否创建了一个脚本来在cron中运行rake作业并将结果邮寄给您?git中的预提交Hook?只是手动调用?我完全理解测试,但想知道在错误发生之前捕获错误的最佳实践是什么。让我们理所当然地认为测试本身是完美无缺的,并且可以正常工作。下一步是什么以确保他们在正确的时间将可能有害的结果传达给您? 最佳答案 不确定您到底想听什么,但是有几个级别的自动代码库控制:在处理某项功能时,您可以使用类似autotest的内容获得关于哪些有效,哪些无效的即时反馈。要确保您的提
假设我做了一个模块如下:m=Module.newdoclassCendend三个问题:除了对m的引用之外,还有什么方法可以访问C和m中的其他内容?我可以在创建匿名模块后为其命名吗(就像我输入“module...”一样)?如何在使用完匿名模块后将其删除,使其定义的常量不再存在? 最佳答案 三个答案:是的,使用ObjectSpace.此代码使c引用你的类(class)C不引用m:c=nilObjectSpace.each_object{|obj|c=objif(Class===objandobj.name=~/::C$/)}当然这取决于
我正在尝试使用ruby和Savon来使用网络服务。测试服务为http://www.webservicex.net/WS/WSDetails.aspx?WSID=9&CATID=2require'rubygems'require'savon'client=Savon::Client.new"http://www.webservicex.net/stockquote.asmx?WSDL"client.get_quotedo|soap|soap.body={:symbol=>"AAPL"}end返回SOAP异常。检查soap信封,在我看来soap请求没有正确的命名空间。任何人都可以建议我
关闭。这个问题是opinion-based.它目前不接受答案。想要改进这个问题?更新问题,以便editingthispost可以用事实和引用来回答它.关闭4年前。Improvethisquestion我想在固定时间创建一系列低音和高音调的哔哔声。例如:在150毫秒时发出高音调的蜂鸣声在151毫秒时发出低音调的蜂鸣声200毫秒时发出低音调的蜂鸣声250毫秒的高音调蜂鸣声有没有办法在Ruby或Python中做到这一点?我真的不在乎输出编码是什么(.wav、.mp3、.ogg等等),但我确实想创建一个输出文件。
我在我的项目目录中完成了compasscreate.和compassinitrails。几个问题:我已将我的.sass文件放在public/stylesheets中。这是放置它们的正确位置吗?当我运行compasswatch时,它不会自动编译这些.sass文件。我必须手动指定文件:compasswatchpublic/stylesheets/myfile.sass等。如何让它自动运行?文件ie.css、print.css和screen.css已放在stylesheets/compiled。如何在编译后不让它们重新出现的情况下删除它们?我自己编译的.sass文件编译成compiled/t
我想将html转换为纯文本。不过,我不想只删除标签,我想智能地保留尽可能多的格式。为插入换行符标签,检测段落并格式化它们等。输入非常简单,通常是格式良好的html(不是整个文档,只是一堆内容,通常没有anchor或图像)。我可以将几个正则表达式放在一起,让我达到80%,但我认为可能有一些现有的解决方案更智能。 最佳答案 首先,不要尝试为此使用正则表达式。很有可能你会想出一个脆弱/脆弱的解决方案,它会随着HTML的变化而崩溃,或者很难管理和维护。您可以使用Nokogiri快速解析HTML并提取文本:require'nokogiri'h
我想为Heroku构建一个Rails3应用程序。他们使用Postgres作为他们的数据库,所以我通过MacPorts安装了postgres9.0。现在我需要一个postgresgem并且共识是出于性能原因你想要pggem。但是我对我得到的错误感到非常困惑当我尝试在rvm下通过geminstall安装pg时。我已经非常明确地指定了所有postgres目录的位置可以找到但仍然无法完成安装:$envARCHFLAGS='-archx86_64'geminstallpg--\--with-pg-config=/opt/local/var/db/postgresql90/defaultdb/po