跟着班导师做项目的时候遇到社交网络的部分,而传统的关系数据库不能很好解决数据之间的关系,因此采用图数据的方式进行存储。Neo4j算是主流的图数据库,多应用于知识图谱、社交网络等。
这两天学习SpringBoot时碰到了很多问题
看了(128条消息) 【最新】Neo4j官方建议Spring Boot 2.4.及以上版本用Neo4j Java Driver代替The Spring Boot starter_学到一寸是一寸的博客-CSDN博客的博客后才知道是因为SpringBoot版本较高(2.4以上)时集成的Neo4j的API规则方法在变化。但是他的博客还是没有说明如何使用类似@Node的注解,自己特意去查了Neo4j官方文档和Spring Neo4j的官方文档并进行总结整理发出来。
本文将解决的问题
TODO
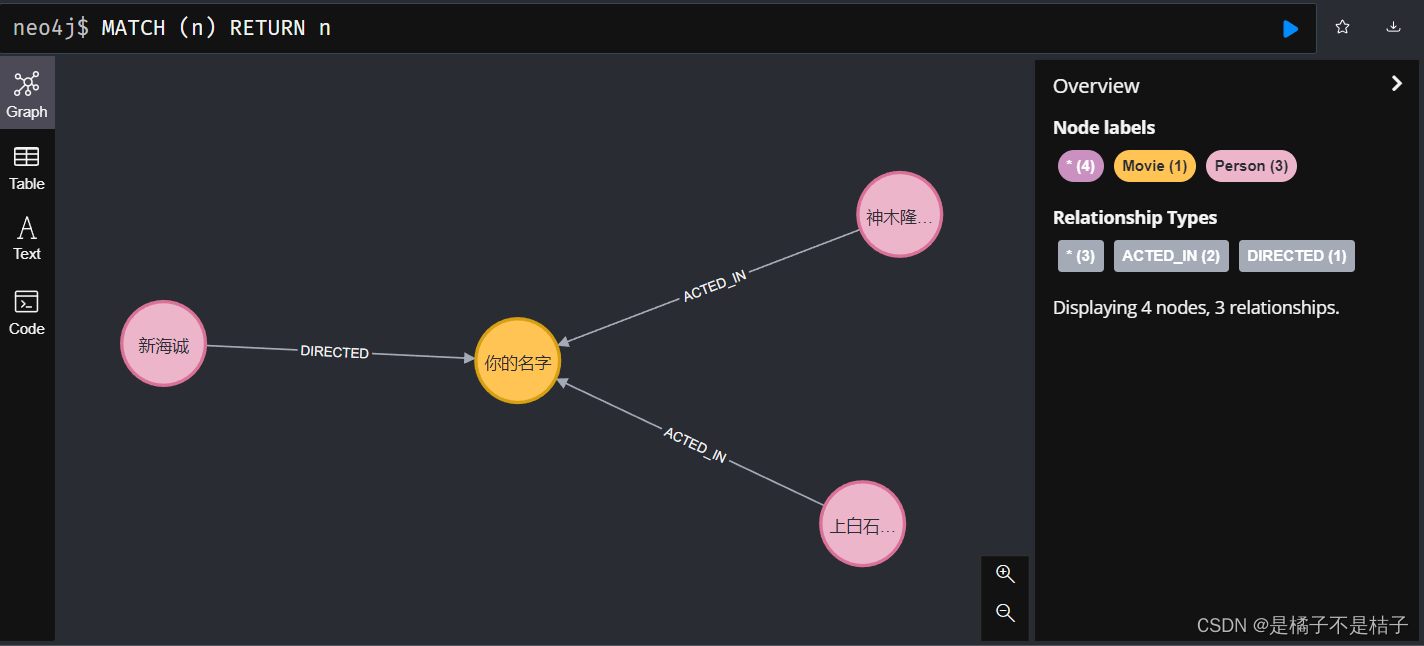
本文将会结合官网的一个 【导演-电影-演员】关系图来进行实现。以新海诚导演的《你的名字》为例。
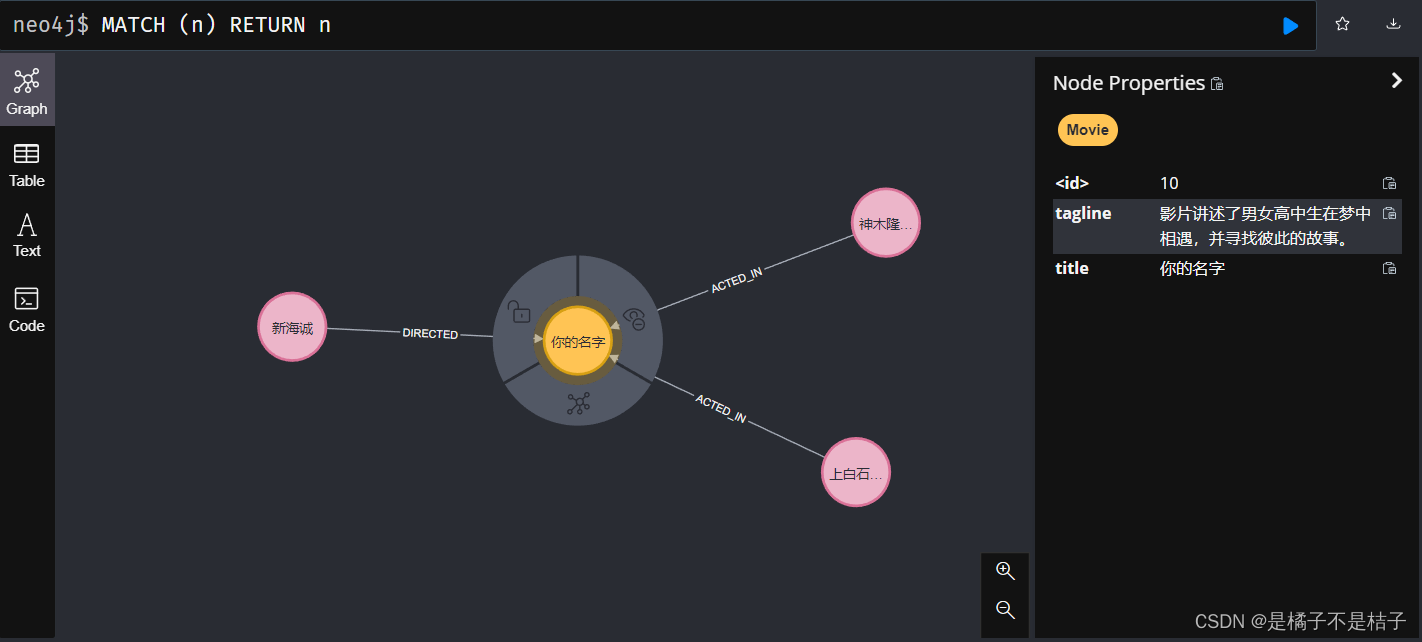
[
  {
    "n": {
"identity": 10,
"labels": [
        "Movie"
      ],
"properties": {
"tagline": "影片讲述了男女高中生在梦中相遇,并寻找彼此的故事。",
"title": "你的名字"
      }
    }
  },
  {
    "n": {
"identity": 11,
"labels": [
        "Person"
      ],
"properties": {
"born": 1997,
"name": "上白石萌音"
      }
    }
  },
  {
    "n": {
"identity": 12,
"labels": [
        "Person"
      ],
"properties": {
"born": 1993,
"name": "神木隆之介"
      }
    }
  },
  {
    "n": {
"identity": 13,
"labels": [
        "Person"
      ],
"properties": {
"born": 1973,
"name": "新海诚"
      }
    }
  }
]
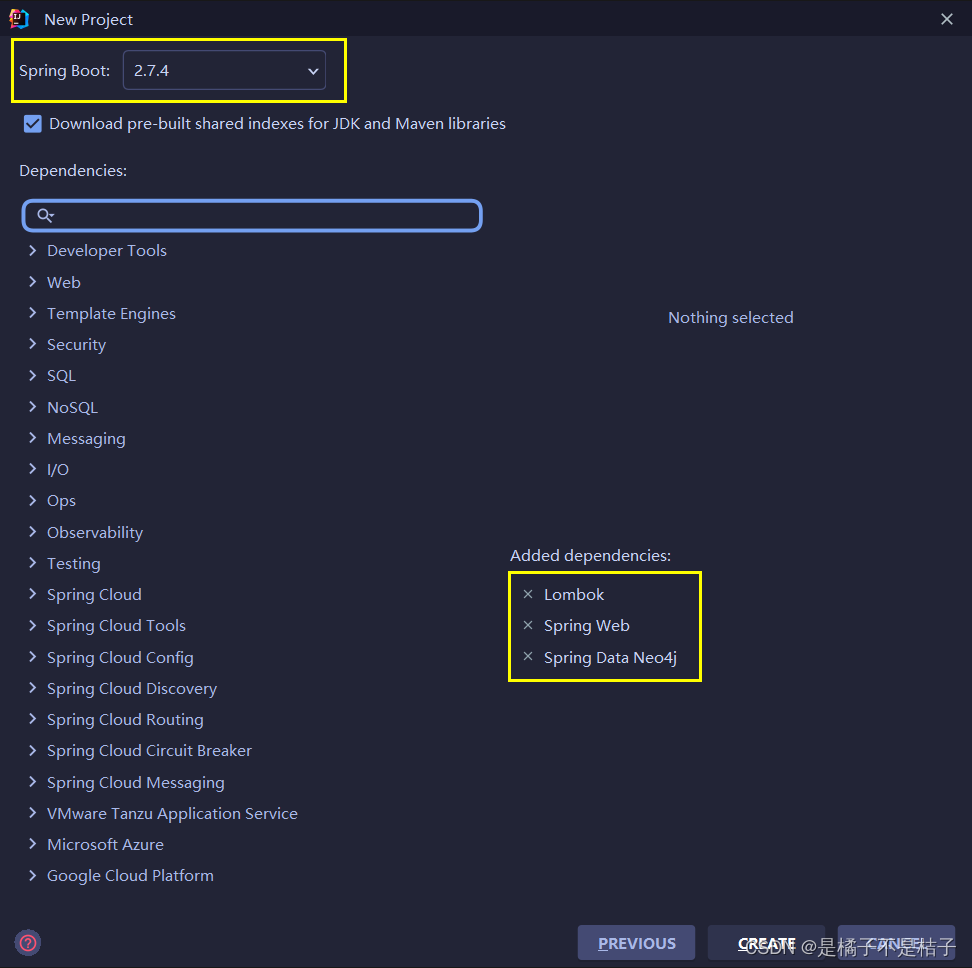
注:本文所使用SpringBoot版本为2.7.4,Java8;(Java8+均可),neo4j的安装不再赘述,请提前安装配置好
指定对应的SpringBoot版本(注意本文适配2.4版本及以上)和相应的依赖,当然也可以后续pom依赖中添加坐标(注意pom有两个neo4j相关的依赖)
    <parent>
        <groupId>org.springframework.boot</groupId>
        <artifactId>spring-boot-starter-parent</artifactId>
        <version>2.7.4</version>
        <relativePath/> <!-- lookup parent from repository -->
    </parent>
    <groupId>com.example</groupId>
    <artifactId>Neo4jDemo</artifactId>
    <version>0.0.1-SNAPSHOT</version>
    <name>Neo4jDemo</name>
    <description>Neo4jDemo</description>
    <properties>
        <java.version>8</java.version>
    </properties>

    <dependencies>
        <!-- neo4j 驱动 这个需要自己手动添加一下 -->
        <dependency>
            <groupId>org.neo4j.driver</groupId>
            <artifactId>neo4j-java-driver</artifactId>
        </dependency>
        <!-- neo4j 操作实体注解需要 -->
        <dependency>
            <groupId>org.springframework.boot</groupId>
            <artifactId>spring-boot-starter-data-neo4j</artifactId>
        </dependency>

        <dependency>
            <groupId>org.projectlombok</groupId>
            <artifactId>lombok</artifactId>
            <optional>true</optional>
        </dependency>
        <dependency>
            <groupId>org.springframework.boot</groupId>
            <artifactId>spring-boot-starter-test</artifactId>
            <scope>test</scope>
        </dependency>
    </dependencies>
spring:
  neo4j:
    uri: bolt://<YourNeo4jIpAddress>:7687
    authentication:
      username: <yourUserName>
      password: <yourPassword>
# 指定数据库
  data:
    neo4j:
      database: <yourDatabase>
创建utils包,并在该包下创建ExampleCommandLineRunner来装配Driver和Session
package com.example.neo4jdemo.utils;

import lombok.extern.slf4j.Slf4j;
import org.neo4j.driver.*;
import org.springframework.boot.CommandLineRunner;
import org.springframework.context.ConfigurableApplicationContext;
import org.springframework.context.annotation.Bean;
import org.springframework.stereotype.Component;

@Component
@Slf4j
public class ExampleCommandLineRunner implements CommandLineRunner {

    private final Driver driver;
    private final ConfigurableApplicationContext applicationContext;
    public final Session session;

    @Bean
    Session session(){
        return session;
    }

    // Autowire the Driver bean by constructor injection
    public ExampleCommandLineRunner(Driver driver, ConfigurableApplicationContext applicationContext) {
        this.driver = driver;
        this.applicationContext = applicationContext;
        this.session = driver.session();

    }

    @Override
    public void run(String... args) throws Exception {
    }
}
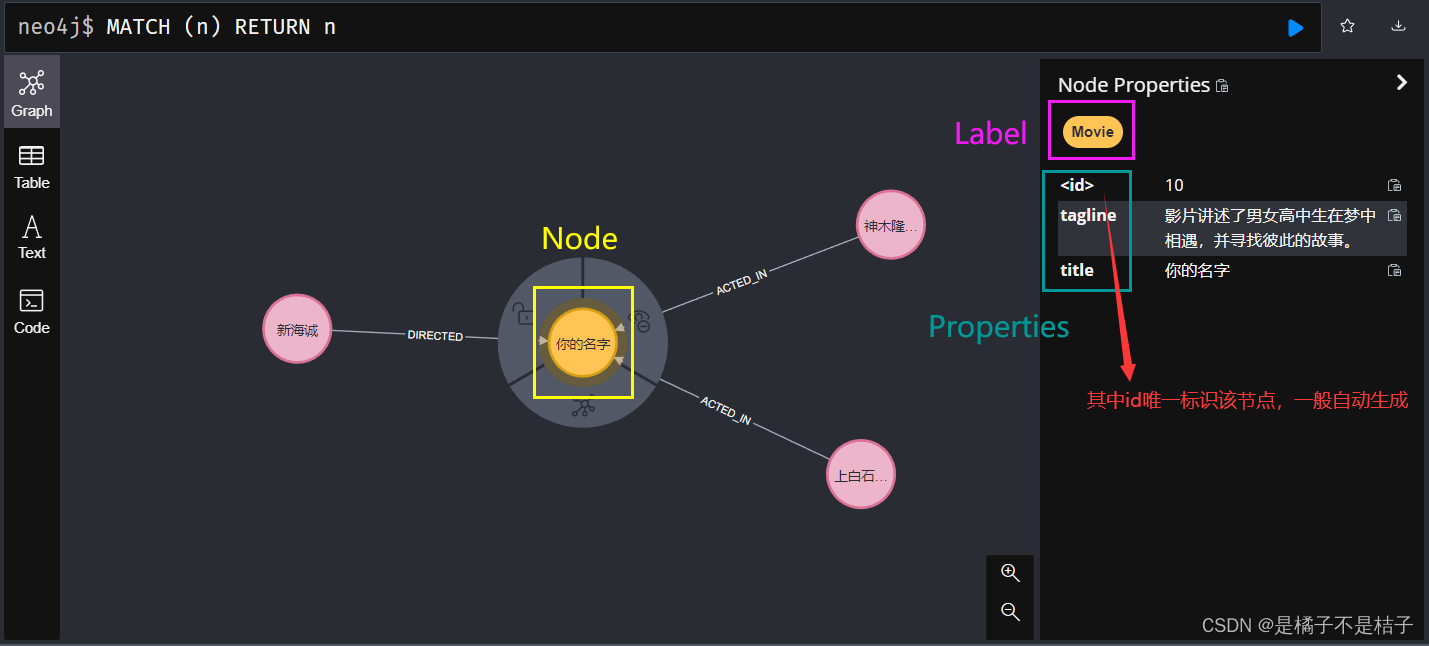
节点介绍:
创建entity包,添加实体类:PersonEntity和MovieEntity
package com.example.neo4jdemo.entity;

import lombok.Data;
import org.springframework.data.neo4j.core.schema.GeneratedValue;
import org.springframework.data.neo4j.core.schema.Id;
import org.springframework.data.neo4j.core.schema.Node;


@Node("Person")
@Data
public class PersonEntity {
    @Id
    @GeneratedValue
    private Long id;
    private String name;
    private Integer born;
    public PersonEntity(Integer born, String name) {
        this.name = name;
        this.born = born;
    }
}
package com.example.neo4jdemo.entity;

import lombok.Data;
import org.springframework.data.neo4j.core.schema.*;

import java.util.ArrayList;
import java.util.List;

/**
 * Movie实体类,一个neo4j的节点
 */
@Node(labels = "Movie") // 标签名,labels可以缺省
@Data
public class MovieEntity {

    @Id
    @GeneratedValue // Id自增
    private Long id;

    private final String title;

    @Property("tagline") // 映射到neo4j的属性名
    private final String description;

    public MovieEntity(String title, String description) {
        this.id = null;// 生成node时自动生成
        this.title = title;
        this.description = description;
    }

    // 用户指定特定的Id
    public MovieEntity withId(Long id) {
        if (this.id!= null && this.id.equals(id)) {
            return this;
        } else {
            MovieEntity newObject = new MovieEntity(this.title, this.description);
            newObject.id = id;
            return newObject;
        }
    }
}
1.withId在需要指定节点id而非自动生成时使用。
2.注意到除了id外的属性均被final修饰,一种构造优化,提高执行效率:(来自Spring Data Neo4j)
This gives us a roundabout 25% performance boost over reflection. For the domain class to be eligible for such optimization, it needs to adhere to a set of constraints:
- Types must not reside in the default or under the
javapackage.- Types and their constructors must be
public- Types that are inner classes must be
static.- The used Java Runtime must allow for declaring classes in the originating
ClassLoader. Java 9 and newer impose certain limitations.By default, Spring Data attempts to use generated property accessors and falls back to reflection-based ones if a limitation is detected.
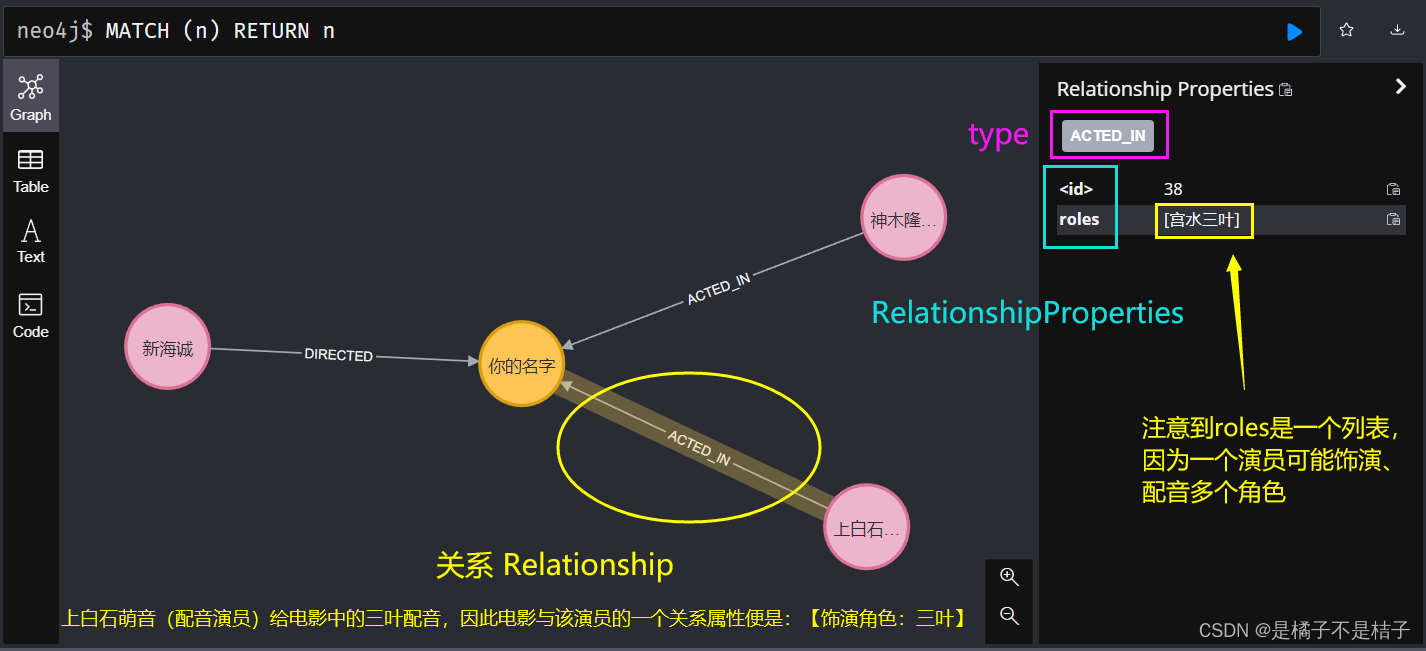
关系解释:(以ACTED_IN即参演关系为例)
创建Roles和完善MovieEntity
package com.example.neo4jdemo.entity;

import org.springframework.data.neo4j.core.schema.RelationshipId;
import org.springframework.data.neo4j.core.schema.RelationshipProperties;
import org.springframework.data.neo4j.core.schema.TargetNode;

import java.util.List;

/**
 * 定义一个关系属性
 */
@RelationshipProperties
public class Roles {

    @RelationshipId
    private Long id;

    private final List<String> roles;

    @TargetNode // 相当于@StartNode
    private final PersonEntity person;

    // 参数1是目标关系实体节点 参数2是关系属性
    //    Roles 参数1:Person实体,演员的出生年和姓名;参数2:演员名字列表(考虑到一个演员可能参演多个角色)
    public Roles(PersonEntity person, List<String> roles) {
        this.person = person;
        this.roles = roles;
    }

    public List<String> getRoles() {
        return roles;
    }
}
注意这些关系**@TargetNode修饰的是关系箭头的尾部, 最终的箭头指向是当前实体**,即TargetNode(PersonEntity)->当前定义Relationship的实体(MovieEntity)
package com.example.neo4jdemo.entity;

import lombok.Data;
import org.springframework.data.neo4j.core.schema.*;

import java.util.ArrayList;
import java.util.List;

/**
 * Movie实体类,一个neo4j的节点
 */
@Node(labels = "Movie") // 标签名,labels可以缺省
@Data
public class MovieEntity {

    ...(上面 1.节点 有)

    // 定义一个关系(参演)[direction]
    @Relationship(type = "ACTED_IN", direction = Relationship.Direction.INCOMING)
    private List<Roles> actorsAndRoles = new ArrayList<>();
    // 定义一个关系(导演)
    @Relationship(type = "DIRECTED", direction = Relationship.Direction.INCOMING)
    private List<PersonEntity> directors = new ArrayList<>();
    // 注意这些关系最终的箭头指向是当前实体,即TargetNode(PersonEntity)->当前定义Relationship的实体(MovieEntity)

}
了解即可,有封装好的api使用,可以先跳过不看,看3.b部分。
- 创建
# 查询name等于 $name 的 label为Person的实体类集合
MATCH (n:Person {name: $name}) RETURN n
或者
MATCH (n:Person) WHERE n.name = $name RETURN n
n是一个变量
$name 对应map的key
{ } 是 where 筛选的简写
Return 返回符合筛选条件的变量n
查找
# 查询Person和Movie之间 关系种类为ACTED_IN且关系属性role = $roles 的实体类集合
MATCH (person:Person) -[ relation:ACTED_IN ]-> (movie:Movie)
WHERE relation.roles = $roles
RETURN person
等价于
MATCH (person:Person) -[ relation:ACTED_IN ]-> (:Movie)
WHERE relation.roles = $roles
RETURN person
person、relation、movie是变量
:Person 、:Movie 用:后面接Label,
person:Person有点类似变量声明,如果不使用完全可以省略不写用-[]-> 来表示关系的type以及指向
修改
# 新增属性(Person本来只有name和born属性,新增age属性,一般不用)
MATCH (n:Person)
WHERE n.name = '新海诚'
SET n.age = 50

# 修改属性
MATCH (n:Person)
WHERE n.name = "新津城"
SET n.name = "新海诚"

# 新增/修改多个属性
MATCH (n:Person)
WHERE n.name = '新海诚'
SET n.age = 50, n.name="新津城"
- 删除
# 删除属性(一般不用)
MATCH (n:Person)
WHERE n.name = "新津城"
REMOVE n.age
# 删除关系(新海诚的导演关系删除)
MATCH (n:Person) -[k:DIRECTED]-> (m:Movie)
WHERE n="新海诚"
DELETE k
# 删除节点
MATCH (n:Person)
WHERE n.name = "新海诚"
DELETE n // 当该实体仍有关系时会报错,必须先删除关系再删除节点

# 删除节点(会删除节点实体和他关联的属性)
MATCH (n:Person)
WHERE n.name = "新海诚"
DETACH DELETE n
// 创建节点实体

MovieEntity movie = new MovieEntity("你的名字","影片讲述了男女高中生在梦中相遇,并寻找彼此的故事。");// 电影实体节点

// 定义(参演)关系
// new Roles 参数1:Person实体,演员的出生年和姓名;参数2:演员名字列表(考虑到一个演员可能参演多个角色)
// 参数1是目标关系实体节点 参数2是关系属性
Roles roles1 = new Roles(new PersonEntity(1998,"上白石萌音"), Collections.singletonList("宫水三叶"));
Roles roles2 = new Roles(new PersonEntity(1993,"神木隆之介"), Collections.singletonList("立花泷"));
PersonEntity director = new PersonEntity(1973,"新海诚");

// 添加movie的演员实体,加入(参演)关系
movie.getActorsAndRoles().add(roles1);
movie.getActorsAndRoles().add(roles2);
movie.getDirectors().add(director);

// 存入图数据库持久化
neo4jTemplate.save(movie);
结果:
// 查询(不太推荐用Neo4jTemplate进行过滤查询,因为需要手动写cypherQuery,需要开发人员了解一下cypherQuery的写法)
Optional<PersonEntity> person;
// 1. 通过id查询
person = neo4jTemplate.findById(12, PersonEntity.class);
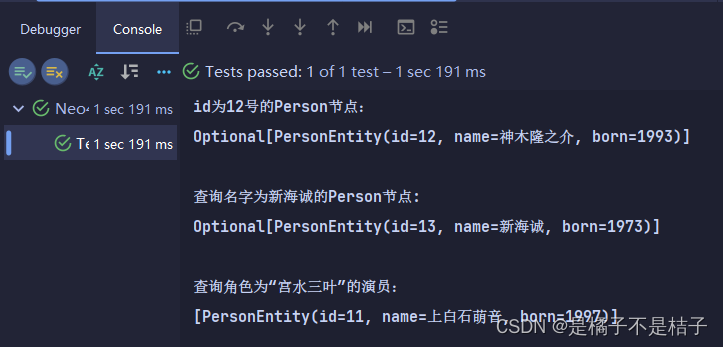
System.out.println("id为12号的Person节点:\n"+person);
// 2. 通过属性查询节点,如name 需要手写cypherQuery语句
Map<String,Object> map = new HashMap<>();
map.put("name","新海诚");
// 两种写法都对,看个人喜好 n是一个变量随意取,{}或者where填写query的filter过滤条件
person = neo4jTemplate.findOne("MATCH (n:Person {name: $name}) RETURN n",map, PersonEntity.class);
// person = neo4jTemplate.findOne("MATCH (n:Person) WHERE n.name = $name RETURN n",map, PersonEntity.class);
System.out.println("\n查询名字为新海诚的Person节点:\n"+person);
// 3. 通过属性关系查询节点
map = new HashMap<>();
map.put("roles",Collections.singletonList("宫水三叶"));
// 方法1.使用toExecutableQuery查询
QueryFragmentsAndParameters parameters = new QueryFragmentsAndParameters(
"MATCH (person:Person) -[ relation:ACTED_IN]-> (movie:Movie) \n" +
"WHERE relation.roles = $roles\n" +
"RETURN person",map);
List<PersonEntity> roles = neo4jTemplate.toExecutableQuery(PersonEntity.class, parameters).getResults();
// 方法2.使用findOne查询
// Optional<PersonEntity> roles = neo4jTemplate.findOne(
// "MATCH (person:Person) -[ relation:ACTED_IN]-> (movie:Movie) \n" +
// "WHERE relation.roles = $roles\n" +
// "RETURN person",map,PersonEntity.class);
System.out.println("\n查询角色为“宫水三叶”的演员:\n"+roles);
结果:
Long userId = person.get().getId();// 记录当前查询的"新海诚"的节点id
// 更新①---------更新“新海诚”的name为曾用名“新津诚”(这是他的曾用名)
map.put("name","新海诚");
map.put("usedName","新津诚");
QueryFragmentsAndParameters queryFragmentsAndParameters =
new QueryFragmentsAndParameters(
"MATCH (n:Person{name: $name}) SET n.name = $usedName",
map);
neo4jTemplate.toExecutableQuery(
PersonEntity.class,
queryFragmentsAndParameters).getResults();
Optional<PersonEntity> person1 = neo4jTemplate.findById(userId, PersonEntity.class);
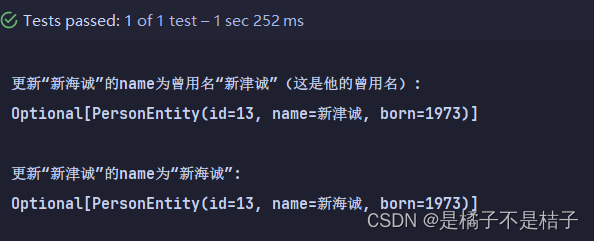
System.out.println("\n更新“新海诚”的name为曾用名“新津诚”(这是他的曾用名):\n"+person1);
// 更新②---------更新“新津诚”的name为“新海诚”
person.get().setName("新海诚");
neo4jTemplate.save(person.get());
Optional<PersonEntity> person2 = neo4jTemplate.findById(userId, PersonEntity.class);
System.out.println("\n更新“新津诚”的name为“新海诚”:\n"+person2);
结果:
        // 删除所有节点和关系(删除节点会响应删除关联关系)[也可以用cypherQuery执行,不再赘述]
        neo4jTemplate.deleteAll(MovieEntity.class);
        neo4jTemplate.deleteAll(PersonEntity.class);
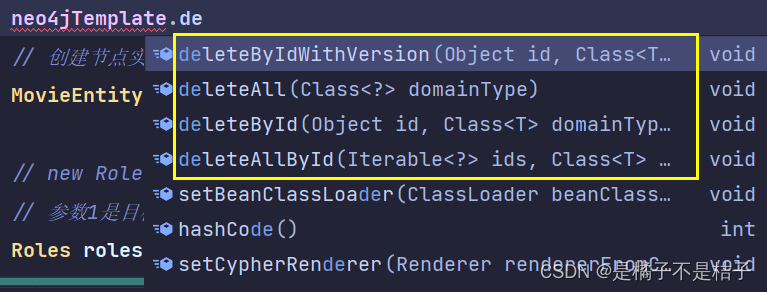
上方的api根据实际情况使用,不再赘述。
/**
     * 没有Repository情况下使用Neo4jTemplate操作数据
     * @param neo4jTemplate
     */
    @Test
    void TestNoRepository(@Autowired Neo4jTemplate neo4jTemplate){
        // 删除所有节点和关系(删除节点会响应删除关联关系),避免后续创建节点重复影响
        neo4jTemplate.deleteAll(MovieEntity.class);
        neo4jTemplate.deleteAll(PersonEntity.class);
        // 创建节点实体
        MovieEntity movie = new MovieEntity("你的名字","影片讲述了男女高中生在梦中相遇,并寻找彼此的故事。");

        // new Roles 参数1:Person实体,演员的出生年和姓名;参数2:演员名字列表(考虑到一个演员可能参演多个角色)
        // 参数1是目标关系实体节点 参数2是关系属性
        Roles roles1 = new Roles(new PersonEntity(1998,"上白石萌音"), Collections.singletonList("宫水三叶"));
        Roles roles2 = new Roles(new PersonEntity(1993,"神木隆之介"), Collections.singletonList("立花泷"));
        PersonEntity director = new PersonEntity(1973,"新海诚");
        // 添加movie的演员实体,加入(参演)关系
        movie.getActorsAndRoles().add(roles1);
        movie.getActorsAndRoles().add(roles2);
        movie.getDirectors().add(director);

        // 存入图数据库持久化
        neo4jTemplate.save(movie);

        // 查询(不太推荐用Neo4jTemplate进行过滤查询,因为需要手动写cypherQuery,需要开发人员了解一下cypherQuery的写法)
        Optional<PersonEntity> person;
        // 1. 通过id查询
        person = neo4jTemplate.findById(12, PersonEntity.class);
        System.out.println("id为12号的Person节点:\n"+person);

        // 2. 通过属性查询节点,如name 需要手写cypherQuery语句
        Map<String,Object> map = new HashMap<>();
        map.put("name","新海诚");
        // 两种写法都对,看个人喜好 n是一个变量随意取,{}或者where填写query的filter过滤条件
        person = neo4jTemplate.findOne("MATCH (n:Person {name: $name}) RETURN n",map, PersonEntity.class);
//        person = neo4jTemplate.findOne("MATCH (n:Person) WHERE n.name = $name RETURN n",map, PersonEntity.class);
        System.out.println("\n查询名字为新海诚的Person节点:\n"+person);

        // 3. 通过属性关系查询节点
        map = new HashMap<>();
        map.put("roles",Collections.singletonList("宫水三叶"));
        // 方法1.使用toExecutableQuery查询
        QueryFragmentsAndParameters parameters = new QueryFragmentsAndParameters(
                "MATCH (person:Person) -[ relation:ACTED_IN]-> (movie:Movie) \n" +
                "WHERE relation.roles = $roles\n" +
                "RETURN person",map);
        List<PersonEntity> roles = neo4jTemplate.toExecutableQuery(PersonEntity.class, parameters).getResults();
        // 方法2.使用findOne查询
//        Optional<PersonEntity> roles = neo4jTemplate.findOne(
//                "MATCH (person:Person) -[ relation:ACTED_IN]-> (movie:Movie) \n" +
//                "WHERE relation.roles = $roles\n" +
//                "RETURN person",map,PersonEntity.class);
        System.out.println("\n查询角色为“宫水三叶”的演员:\n"+roles);

        Long userId = person.get().getId();// 记录当前查询的"新海诚"的节点id
        // 更新①---------更新“新海诚”的name为曾用名“新津诚”(这是他的曾用名)
        map.put("name","新海诚");
        map.put("usedName","新津诚");
        QueryFragmentsAndParameters queryFragmentsAndParameters =
                new QueryFragmentsAndParameters(
                        "MATCH (n:Person{name: $name}) SET n.name = $usedName",
                        map);
        neo4jTemplate.toExecutableQuery(
                PersonEntity.class,
                queryFragmentsAndParameters).getResults();
        Optional<PersonEntity> person1 = neo4jTemplate.findById(userId, PersonEntity.class);
        System.out.println("\n更新“新海诚”的name为曾用名“新津诚”(这是他的曾用名):\n"+person1);
        // 更新②---------更新“新津诚”的name为“新海诚”
        person.get().setName("新海诚");
        neo4jTemplate.save(person.get());
        Optional<PersonEntity> person2 = neo4jTemplate.findById(userId, PersonEntity.class);
        System.out.println("\n更新“新津诚”的name为“新海诚”:\n"+person2);

    }
新建repository包,创建PersonRepository和MovieRepository
package com.example.neo4jdemo.repository;

import com.example.neo4jdemo.entity.PersonEntity;
import org.springframework.data.neo4j.repository.Neo4jRepository;
import org.springframework.stereotype.Repository;

@Repository
public interface PersonRepository extends Neo4jRepository<PersonEntity, Long> {
}
package com.example.neo4jdemo.repository;

import com.example.neo4jdemo.entity.MovieEntity;
import org.springframework.data.neo4j.repository.Neo4jRepository;
import org.springframework.data.neo4j.repository.query.Query;
import org.springframework.stereotype.Repository;

import java.util.List;

@Repository
public interface MovieRepository extends Neo4jRepository<MovieEntity, Long> {
}
// 创建节点
MovieEntity movie = new MovieEntity("你的名字","影片讲述了男女高中生在梦中相遇,并寻找彼此的故事。");
Roles roles1 = new Roles(new PersonEntity(1998,"上白石萌音"), Collections.singletonList("宫水三叶"));
Roles roles2 = new Roles(new PersonEntity(1993,"神木隆之介"), Collections.singletonList("立花泷"));
PersonEntity director = new PersonEntity(1973,"新海诚");
// 添加关系
movie.getActorsAndRoles().add(roles1);
movie.getActorsAndRoles().add(roles2);
movie.getDirectors().add(director);
// 存入图数据库持久化
movieRepository.save(movie);
需求:根据Person的名字查询对应节点
在PersonRepository中添加方法:
@Repository
public interface PersonRepository extends Neo4jRepository<PersonEntity, Long> {
    PersonEntity findPersonEntityByName(String name);
}
在MovieRepository中添加方法:
@Repository
public interface MovieRepository extends Neo4jRepository<MovieEntity, Long> {

//    @Query("MATCH (n:Movie) WHERE id(n) = $0 RETURN n") 这种方法是自己写Query语句进行查询
    List<MovieEntity> findMovieEntitiesById(Long id);
    MovieEntity findMovieEntityByTitle(String title);
}
查询:
// 查询
        // 查询
        PersonEntity person = personRepository.findPersonEntityByName("上白石萌音");
        System.out.println("查询名字为“上白石萌音”的PersonEntity:"+person);
        MovieEntity movieQueried = movieRepository.findMovieEntityByTitle("你的名字");
        System.out.println("查询名字为“你的名字”的MovieEntity:"+movieQueried);
结果:
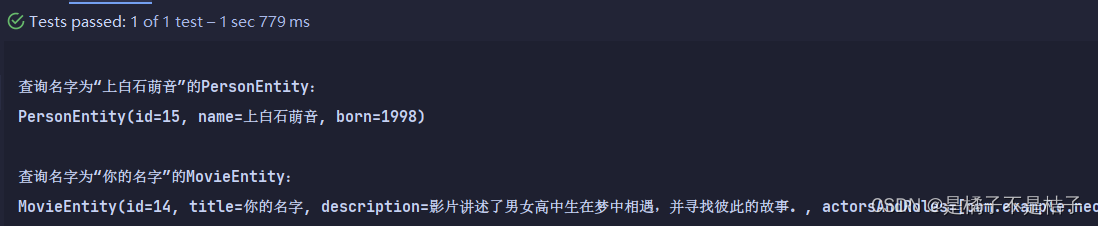
查询名字为“上白石萌音”的PersonEntity:
PersonEntity(id=15, name=上白石萌音, born=1998)

查询名字为“你的名字”的MovieEntity:
MovieEntity(id=14, title=你的名字, description=影片讲述了男女高中生在梦中相遇,并寻找彼此的故事。, actorsAndRoles=[com.example.neo4jdemo.entity.Roles@d902300, com.example.neo4jdemo.entity.Roles@2db33feb], directors=[PersonEntity(id=17, name=新海诚, born=1973)])
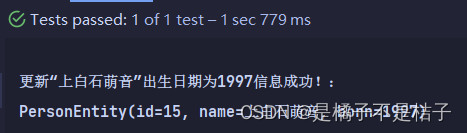
        // 更新(更新主要是三步:1.获取实体id;2.修改实体属性;3.更新实体)
        // 注意:repository的save方法【对应的实体若id一致】则为修改,否则为新建。
        Long personId = person.getId();
        person.setBorn(1997);
        personRepository.save(person);
        person = personRepository.findPersonEntityByName("上白石萌音");
        System.out.println(personId == person.getId()?"\n更新“上白石萌音”出生日期为1997信息成功!:\n"+person:"更新信息失败!");
        // 删除所有节点和关系
        movieRepository.deleteAll();
        personRepository.deleteAll();
/**
 * 使用repository操作图数据
 */
@Test
void testByRepository(@Autowired MovieRepository movieRepository, @Autowired PersonRepository personRepository){
    // 删除所有节点和关系(删除节点会响应删除关联关系),避免后续创建节点重复影响
    movieRepository.deleteAll();
    personRepository.deleteAll();

    // 创建节点
    MovieEntity movie = new MovieEntity("你的名字","影片讲述了男女高中生在梦中相遇,并寻找彼此的故事。");
    Roles roles1 = new Roles(new PersonEntity(1998,"上白石萌音"), Collections.singletonList("宫水三叶"));
    Roles roles2 = new Roles(new PersonEntity(1993,"神木隆之介"), Collections.singletonList("立花泷"));
    PersonEntity director = new PersonEntity(1973,"新海诚");
    // 添加关系
    movie.getActorsAndRoles().add(roles1);
    movie.getActorsAndRoles().add(roles2);
    movie.getDirectors().add(director);
    // 存入图数据库持久化
    movieRepository.save(movie);

    // 查询
    PersonEntity person = personRepository.findPersonEntityByName("上白石萌音");
    System.out.println("\n查询名字为“上白石萌音”的PersonEntity:\n"+person);
    MovieEntity movieQueried = movieRepository.findMovieEntityByTitle("你的名字");
    System.out.println("\n查询名字为“你的名字”的MovieEntity:\n"+movieQueried);

    // 更新(更新主要是三步:1.获取实体id;2.修改实体属性;3.更新实体)
    // 注意:repository的save方法【对应的实体若id一致】则为修改,否则为新建。
    Long personId = person.getId();
    person.setBorn(1997);
    personRepository.save(person);
    person = personRepository.findPersonEntityByName("上白石萌音");
    System.out.println(personId == person.getId()?"\n更新“上白石萌音”出生日期为1997信息成功!:\n"+person:"更新信息失败!");
}
案例来自官方文档:
https://docs.spring.io/spring-data/neo4j/docs/current/reference/html/#conversions
https://neo4j.com/docs/aura/auradb/connecting-applications/spring-boot/
源码戳这里:
https://github.com/WuYiheng-Og/neo4j_springboot
我在app/helpers/sessions_helper.rb中有一个帮助程序文件,其中包含一个方法my_preference,它返回当前登录用户的首选项。我想在集成测试中访问该方法。例如,这样我就可以在测试中使用getuser_path(my_preference)。在其他帖子中,我读到这可以通过在测试文件中包含requiresessions_helper来实现,但我仍然收到错误NameError:undefinedlocalvariableormethod'my_preference'.我做错了什么?require'test_helper'require'sessions_hel
我一直很高兴地使用DelayedJob习惯用法:foo.send_later(:bar)这会调用DelayedJob进程中对象foo的方法bar。我一直在使用DaemonSpawn在我的服务器上启动DelayedJob进程。但是...如果foo抛出异常,Hoptoad不会捕获它。这是任何这些包中的错误...还是我需要更改某些配置...或者我是否需要在DS或DJ中插入一些异常处理来调用Hoptoad通知程序?回应下面的第一条评论。classDelayedJobWorker 最佳答案 尝试monkeypatchingDelayed::W
前置步骤我们都操作完了,这篇开始介绍jenkins的集成。话不多说,看操作1、登录进入jenkins后会让你选择安装插件,选择第一个默认的就行。安装完成后设置账号密码,重新登录。2、配置JDK和Git都需要执行路径,所以需要先把执行路径找到,先进入服务器的docker容器,2.1JDK的路径root@69eef9ee86cf:/usr/bin#echo$JAVA_HOME/usr/local/openjdk-82.2Git的路径root@69eef9ee86cf:/#whichgit/usr/bin/git3、先配置JDK和Git。点击:ManageJenkins>>GlobalToolCon
我正在学习Ruby,遇到了inject。我正处于理解它的风口浪尖,但当我是那种需要真实世界的例子来学习一些东西的人时。我遇到的最常见的例子是人们使用inject来添加一个(1..10)范围的总和,我不太关心这个。这是一个任意的例子。在实际程序中我会用它做什么?我正在学习,所以我可以继续使用Rails,但我不必有一个以Web为中心的示例。我只需要一些我可以全神贯注的目标。谢谢大家。 最佳答案 inject有时可以通过它的“其他”名称reduce更好地理解。它是一个对Enumerable进行操作(迭代一次)并返回单个值的函数。它有许多有
三分钟集成Tap防沉迷SDK(Unity版)一、SDK介绍基于国家对上线所有游戏必须增加防沉迷功能的政策下,TapTap推出防沉迷SDK,供游戏开发者进行接入;允许未成年用户在周五、六、日以及法定节假日晚上8:00-9:00进行游戏,防沉谜时间段进入游戏会弹窗进行提示!开发环境要求:Unity2019.4或更高版本iOS10或更高版本Android5.0(APIlevel21)或更高版本🔗Unity集成Demo参考链接🔗UnityTapSDK功能体验APK下载链接二、集成前准备1.创建应用进入开发者后台,按照提示开始创建应用;2.开通服务在使用TDS实名认证和防沉迷服务之前,需要在上面创建的应
我被这个难住了。到目前为止教程中的一切都进行得很顺利,但是当我将这段代码添加到我的/spec/requests/users_spec.rb文件中时,事情开始变得糟糕:describe"success"doit"shouldmakeanewuser"dolambdadovisitsignup_pathfill_in"Name",:with=>"ExampleUser"fill_in"Email",:with=>"ryan@example.com"fill_in"Password",:with=>"foobar"fill_in"Confirmation",:with=>"foobar"cl
我需要一些指导来了解如何将Angular整合到rails中。选择Rails的原因:我喜欢他们偏执的做事方式。还有迁移,gem真的很酷。使用angular的原因:我正在研究和寻找最适合SPA的框架。Backbone似乎太抽象了。我不得不在Angular和Ember之间做出选择。我首先开始阅读Angular,它对我来说很有意义。所以我从来没有去读过关于ember的文章。使用Angular和Rails的原因:我研究并尝试使用小型框架,例如grape、slim(是的,我也使用php)。但我觉得需要坚持项目的长期范围。我个人喜欢用Rails的方式做事。这就是我需要帮助的地方,我在Rails4中有
有没有人有在Maven中运行用Ruby编写的单元测试的经验。任何输入,如要使用的库/maven插件,将不胜感激!我们已经在使用Maven+hudson+Junit。但是我们正在引入Ruby单元测试,找不到任何同样好的组合。 最佳答案 我建议让Maven使用ExecMavenPlugin启动rake测试(exec:exec目标)并使用ci_reportergem生成单元测试结果的XML文件,Hudson、Bamboo等可以读取该文件,以与JUnit测试相同的格式显示测试结果。如果您不需要使用mvntest运行Ruby测试,您也可以只使
目前我有一小套针对我的网络服务器运行的集成测试,它发出请求并断言一些关于响应应该是什么的假设。这些是用Ruby编写的,生成http请求。我一直在看Gatling作为压力测试工具,但我想知道它是否也可以用于集成测试。这样,所有端点请求都可以在压力测试和集成测试中重复使用。我可能在这里失去了一些东西,因为没有RSpec的BDD,但不必两次创建相同的测试。有没有人有这样使用gatling的经验? 最佳答案 您可以使用AssertionAPI并设置验收标准。但是,Gatling不是浏览器,不会运行/测试您的Javascript,因此这种方法
文章目录前言一、Elasticsearch版本介绍二、客户端种类三、客户端与版本兼容性四、引入Elasticsearch依赖包五、客户端配置六、Elasticsearch使用前言ElasticSearch是Elastic公司出品的一款功能强大的搜索引擎,被广泛的应用于各大IT公司,它的代码位于https://github.com/elastic/elasticsearch,目前是一个开源项目。ElasticSearch公司的另外两个开源产品Logstash、Kibana与ElasticSearch构成了著名的ELK技术栈。。他们三个共同形成了一个强大的生态圈。简单地说,Logstash负责数据