今天和大家一起分享如何使用LabVIEW调用pb模型实现物体识别,本博客中使用的智能工具包可到主页置顶博客
物体识别也称目标检测,目标检测所要解决的问题是目标在哪里以及其状态的问题。但是,这个问题并不是很容易解决。形态不合理,对象出现的区域不确定,更不用说对象也可以是多个类别。 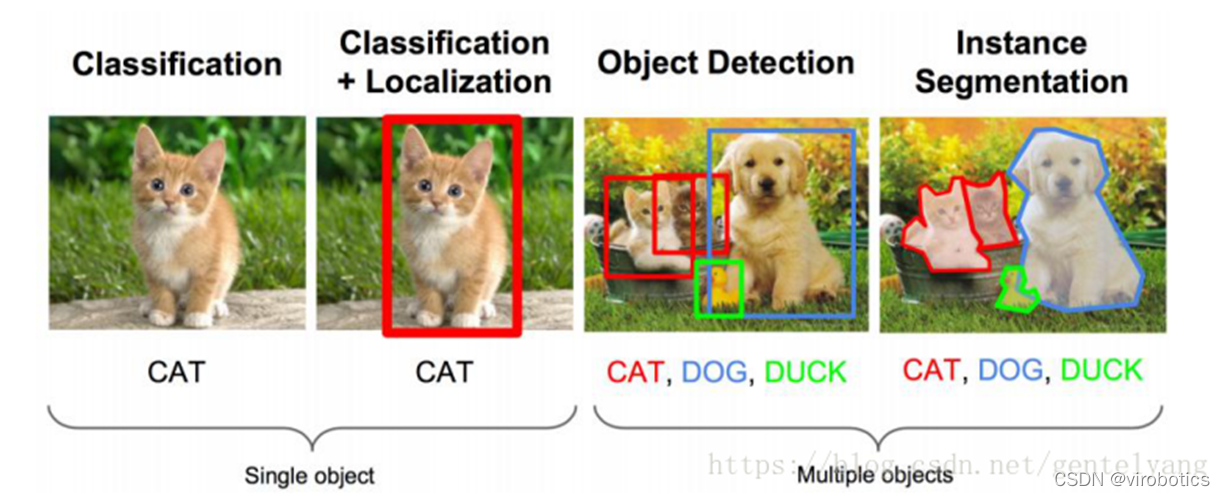
目标检测用的比较多的主要是RCNN,spp- net,fast- rcnn,faster- rcnn;YOLO系列,如YOLOV3和YOLOV4;除此之外还有SSD,ResNet等。
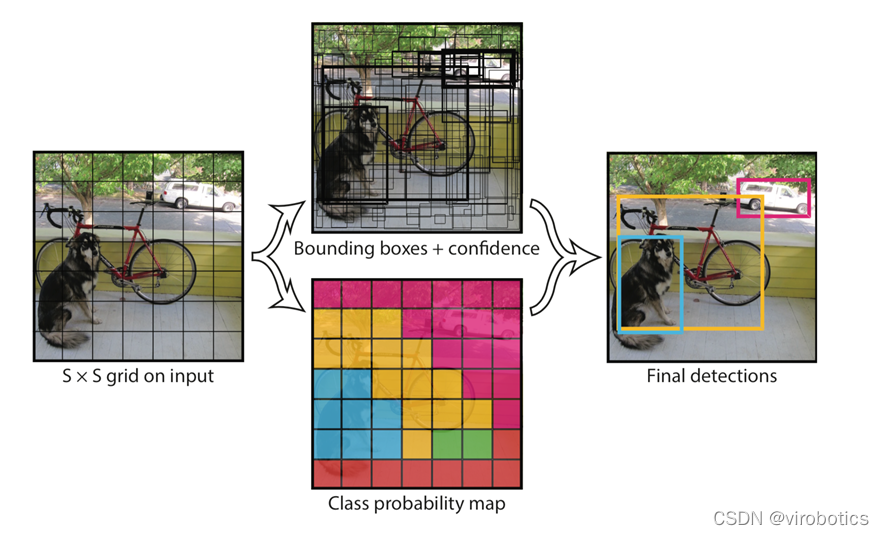
Yolo的识别原理简单清晰。对于输入的图片,将整张图片分为7×7(7为参数,可调)个方格。当某个物体的中心点落在了某个方格中,该方格则负责预测该物体。每个方格会为被预测物体产生2(参数,可调)个候选框并生成每个框的置信度。最后选取置信度较高的方框作为预测结果。
相关源码及模型在darknt文件夹下

使用darknet训练yolo的模型,生成weights文件。使用opencv调用生成的模型
文件含义:
cfg文件:模型描述文件
weights文件:模型权重文件
Yolov3获取链接:
https://github.com/pjreddie/darknet/blob/master/cfg/yolov3.cfg
https://pjreddie.com/media/files/yolov3.weights
Yolov4获取链接:
https://github.com/AlexeyAB/darknet/releases/download/darknet_yolo_v3_optimal/yolov4.cfg
https://github.com/AlexeyAB/darknet/releases/download/darknet_yolo_v3_optimal/yolov4.weights
(1)dnn模块调用darknet模型
net = cv2.dnn.readNetFromDarknet("yolov3/yolov3.cfg", "yolov3/yolov3.weights")(2)获取三个输出端的LayerName
使用getUnconnectedOutLayer获取三个只有输入,没有输出的层的名字,Yolov3的三个输出端层名为:['yolo_82', 'yolo_94', 'yolo_106']
def getOutputsNames(net):
    # Get the names of all the layers in the network
    layersNames = net.getLayerNames()
    # Get the names of the output layers, i.e. the layers with unconnected outputs
    return [layersNames[i - 1] for i in net.getUnconnectedOutLayers()]
(3)图像预处理
使用blobFromImage将图像转为image Size=(416,416)或(608,608) Scale=1/255 Means=[0,0,0]
blob = cv2.dnn.blobFromImage(frame, 1/255, (416, 416), [0,0,0], 1, crop=False)(4)推理
使用net.forward(multiNames)获取多个层的结果,其中getOutputsNames(net)=['yolo_82', 'yolo_94', 'yolo_106']
net.setInput(blob)
outs = net.forward(getOutputsNames(net))
(5)后处理(postrocess)
获取的结果(outs)里面有三个矩阵(out),每个矩阵的大小为85*n,n表示检测到了n个物体,85的排列顺序是这样的:
第0列代表物体中心x在图中的位置(0~1)
第1列表示物体中心y在图中的位置(0~1)
第2列表示物体的宽度
第3列表示物体的高度
第4列是置信概率,值域为[0-1],用来与阈值作比较决定是否标记目标
第5~84列为基于COCO数据集的80分类的标记权重,最大的为输出分类。使用这些参数保留置信度高的识别结果(confidence>confThreshold)
def postprocess(frame, outs):
    frameHeight = frame.shape[0]
    frameWidth = frame.shape[1]
    classIds = []
    confidences = []
    boxes = []
    classIds = []
    confidences = []
    boxes = []
    for out in outs:
        for detection in out:
            scores = detection[5:]
            classId = np.argmax(scores)
            confidence = scores[classId]
            if confidence > confThreshold:
                center_x = int(detection[0] * frameWidth)
                center_y = int(detection[1] * frameHeight)
                width = int(detection[2] * frameWidth)
                height = int(detection[3] * frameHeight)
                left = int(center_x - width / 2)
                top = int(center_y - height / 2)
                classIds.append(classId)
                confidences.append(float(confidence))
                boxes.append([left, top, width, height])
    print(boxes)
    print(confidences)
(6)后处理(postrocess)
使用NMSBoxes函数过滤掉重复识别的区域。
    indices = cv.dnn.NMSBoxes(boxes, confidences, confThreshold, nmsThreshold)
    for i in indices:
        box = boxes[i]
        left = box[0]
        top = box[1]
        width = box[2]
        height = box[3]
        drawPred(classIds[i], confidences[i], left, top, left + width, top + height)
(7)画出检测到的对象
def drawPred(classId, conf, left, top, right, bottom):
    # Draw a bounding box.
    cv.rectangle(frame, (left, top), (right, bottom), (0, 0, 255))

    label = '%.2f' % conf

    # Get the label for the class name and its confidence
    if classes:
        assert(classId < len(classes))
        label = '%s:%s' % (classes[classId], label)

    #Display the label at the top of the bounding box
    labelSize, baseLine = cv.getTextSize(label, cv.FONT_HERSHEY_SIMPLEX, 0.5, 1)
    top = max(top, labelSize[1])
    cv.putText(frame, label, (left, top), cv.FONT_HERSHEY_SIMPLEX, 0.5, (255,255,255))
(8)完整源码及检测结果(cv_call_yolo.py)
import cv2
cv=cv2
import numpy as np
import time
net = cv2.dnn.readNetFromDarknet("yolov3/yolov3.cfg", "yolov3/yolov3.weights")
net.setPreferableBackend(cv2.dnn.DNN_BACKEND_CUDA)
net.setPreferableTarget(cv2.dnn.DNN_TARGET_CUDA)
confThreshold = 0.5 #Confidence threshold
nmsThreshold = 0.4 #Non-maximum suppression threshold
frame=cv2.imread("dog.jpg")
classesFile = "coco.names";
classes = None
with open(classesFile, 'rt') as f:
classes = f.read().rstrip('\n').split('\n')
def getOutputsNames(net):
# Get the names of all the layers in the network
layersNames = net.getLayerNames()
# Get the names of the output layers, i.e. the layers with unconnected outputs
return [layersNames[i - 1] for i in net.getUnconnectedOutLayers()]
print(getOutputsNames(net))
# Remove the bounding boxes with low confidence using non-maxima suppression
def postprocess(frame, outs):
frameHeight = frame.shape[0]
frameWidth = frame.shape[1]
classIds = []
confidences = []
boxes = []
# Scan through all the bounding boxes output from the network and keep only the
# ones with high confidence scores. Assign the box's class label as the class with the highest score.
classIds = []
confidences = []
boxes = []
for out in outs:
for detection in out:
scores = detection[5:]
classId = np.argmax(scores)
confidence = scores[classId]
if confidence > confThreshold:
center_x = int(detection[0] * frameWidth)
center_y = int(detection[1] * frameHeight)
width = int(detection[2] * frameWidth)
height = int(detection[3] * frameHeight)
left = int(center_x - width / 2)
top = int(center_y - height / 2)
classIds.append(classId)
confidences.append(float(confidence))
boxes.append([left, top, width, height])
# Perform non maximum suppression to eliminate redundant overlapping boxes with
# lower confidences.
print(boxes)
print(confidences)
indices = cv.dnn.NMSBoxes(boxes, confidences, confThreshold, nmsThreshold)
for i in indices:
#print(i)
#i = i[0]
box = boxes[i]
left = box[0]
top = box[1]
width = box[2]
height = box[3]
drawPred(classIds[i], confidences[i], left, top, left + width, top + height)
# Draw the predicted bounding box
def drawPred(classId, conf, left, top, right, bottom):
# Draw a bounding box.
cv.rectangle(frame, (left, top), (right, bottom), (0, 0, 255))
label = '%.2f' % conf
# Get the label for the class name and its confidence
if classes:
assert(classId < len(classes))
label = '%s:%s' % (classes[classId], label)
#Display the label at the top of the bounding box
labelSize, baseLine = cv.getTextSize(label, cv.FONT_HERSHEY_SIMPLEX, 0.5, 1)
top = max(top, labelSize[1])
cv.putText(frame, label, (left, top), cv.FONT_HERSHEY_SIMPLEX, 0.5, (255,255,255))
blob = cv2.dnn.blobFromImage(frame, 1/255, (416, 416), [0,0,0], 1, crop=False)
t1=time.time()
net.setInput(blob)
outs = net.forward(getOutputsNames(net))
print(time.time()-t1)
postprocess(frame, outs)
t, _ = net.getPerfProfile()
label = 'Inference time: %.2f ms' % (t * 1000.0 / cv.getTickFrequency())
cv.putText(frame, label, (0, 15), cv.FONT_HERSHEY_SIMPLEX, 0.5, (0, 0, 255))
cv2.imshow("result",frame)
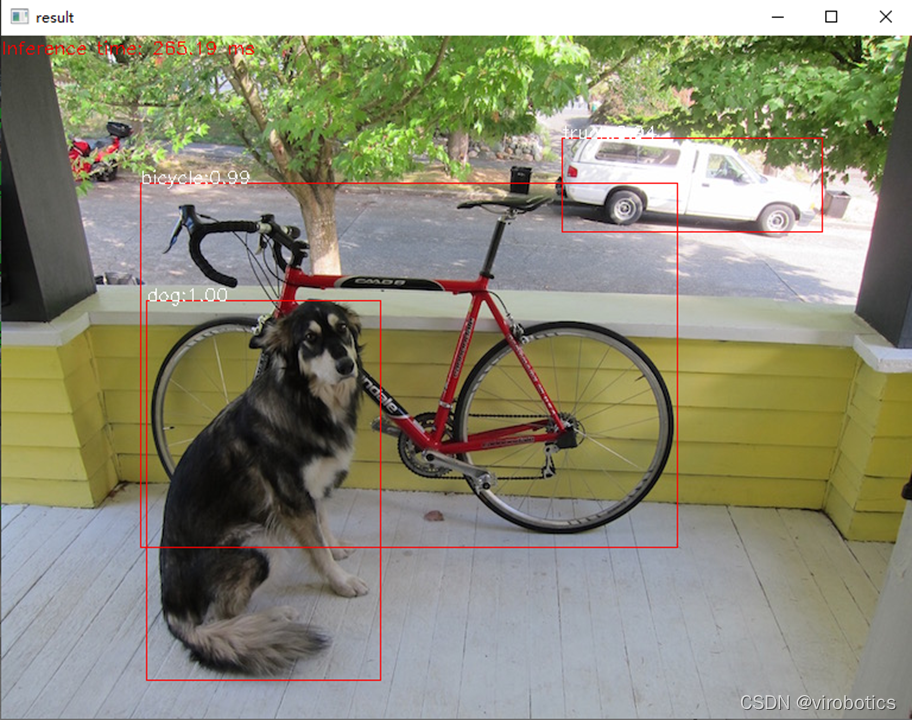
(1)LabVIEW调用yolov3的方式及步骤和python类似,源码如下所示:  将带识别图片与yolo_example.vi置于同一路径下,即可进行物体识别
(2)识别结果如下:

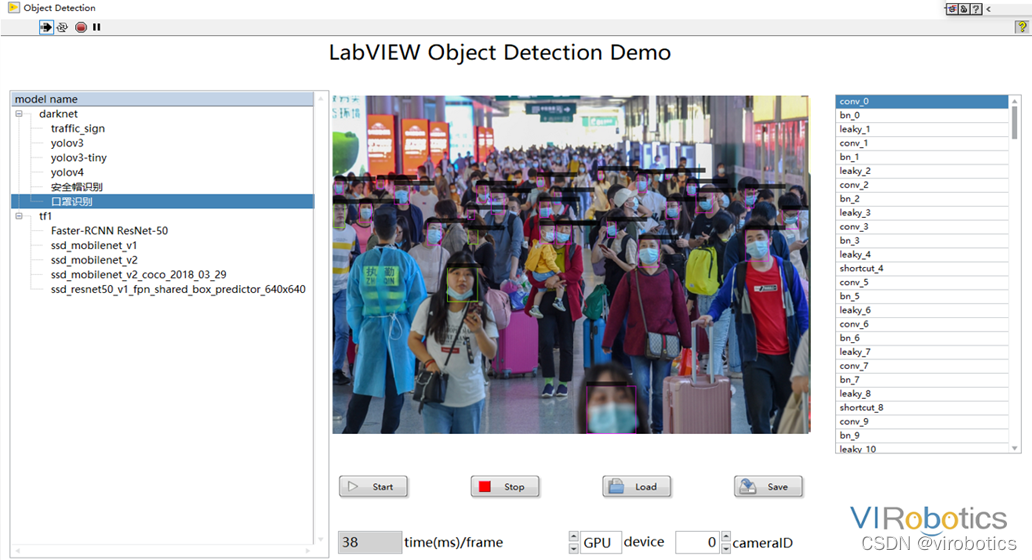
(1)使用GPU加速
使用顺序结构检测神经网络推理的时间

比较使用GPU和不使用GPU两种情况下的推理速度
普通模式:net.serPerferenceBackend(0),net.serPerferenceTarget(0)
Nvidia GPU模式:net.serPreferenceBackend(5), net.serPerferenceTarget(6)

注:普通的c++、python、LabVIEW版本的opencv,即便选了GPU模式也没用,程序仍然运行在CPU上,需要安装CUDA和CUDNN后重新从源码编译opencv
(2)程序源码如下:
 (3)物体识别结果如下:

注意,使用如上程序,可以点击STOP按钮,停止本次物体识别,也可勾选使用GPU进行加速
(4)使用GPU加速结果:

相关源码及模型在tf1文件夹下

(1)下载ssd_mobilenet_v2_coco,下载地址如下: http://download.tensorflow.org/models/object_detection/ssd_mobilenet_v2_coco_2018_03_29.tar.gz
(2)解压后的文件内容

(3)根据pb模型生成pbtxt文件 运行 tf_text_graph_ssd.py以生成pptxt文件 在cmd中运行: python tf_text_graph_ssd.py --input ssd_mobilenet_v1_coco_2017_11_17/frozen_inference_graph.pb --config ssd_mobilenet_v1_coco_2017_11_17/ssd_mobilenet_v1_coco.config --output ssd_mobilenet_v1_coco_2017_11_17.pbtxt
(1)程序源码如下:

(2)运行结果如下:

链接:https://pan.baidu.com/s/1zwbLQe0VehGhsqNIHyaFRw?pwd=8888 提取码:8888
可以使用Yolov3训练自己的数据集,具体训练方法可参考博客:https://blog.csdn.net/qq_38915710/article/details/97112788 可实现案例:口罩佩戴识别、肺炎分类、CT等,如口罩佩戴检测
更多关于LabVIEW与人工智能技术,可添加技术交流群进一步探讨。qq群号:705637299,请备注暗号:LabVIEW 机器学习
我正在学习如何使用Nokogiri,根据这段代码我遇到了一些问题:require'rubygems'require'mechanize'post_agent=WWW::Mechanize.newpost_page=post_agent.get('http://www.vbulletin.org/forum/showthread.php?t=230708')puts"\nabsolutepathwithtbodygivesnil"putspost_page.parser.xpath('/html/body/div/div/div/div/div/table/tbody/tr/td/div
我有一个Ruby程序,它使用rubyzip压缩XML文件的目录树。gem。我的问题是文件开始变得很重,我想提高压缩级别,因为压缩时间不是问题。我在rubyzipdocumentation中找不到一种为创建的ZIP文件指定压缩级别的方法。有人知道如何更改此设置吗?是否有另一个允许指定压缩级别的Ruby库? 最佳答案 这是我通过查看rubyzip内部创建的代码。level=Zlib::BEST_COMPRESSIONZip::ZipOutputStream.open(zip_file)do|zip|Dir.glob("**/*")d
类classAprivatedeffooputs:fooendpublicdefbarputs:barendprivatedefzimputs:zimendprotecteddefdibputs:dibendendA的实例a=A.new测试a.foorescueputs:faila.barrescueputs:faila.zimrescueputs:faila.dibrescueputs:faila.gazrescueputs:fail测试输出failbarfailfailfail.发送测试[:foo,:bar,:zim,:dib,:gaz].each{|m|a.send(m)resc
很好奇,就使用rubyonrails自动化单元测试而言,你们正在做什么?您是否创建了一个脚本来在cron中运行rake作业并将结果邮寄给您?git中的预提交Hook?只是手动调用?我完全理解测试,但想知道在错误发生之前捕获错误的最佳实践是什么。让我们理所当然地认为测试本身是完美无缺的,并且可以正常工作。下一步是什么以确保他们在正确的时间将可能有害的结果传达给您? 最佳答案 不确定您到底想听什么,但是有几个级别的自动代码库控制:在处理某项功能时,您可以使用类似autotest的内容获得关于哪些有效,哪些无效的即时反馈。要确保您的提
假设我做了一个模块如下:m=Module.newdoclassCendend三个问题:除了对m的引用之外,还有什么方法可以访问C和m中的其他内容?我可以在创建匿名模块后为其命名吗(就像我输入“module...”一样)?如何在使用完匿名模块后将其删除,使其定义的常量不再存在? 最佳答案 三个答案:是的,使用ObjectSpace.此代码使c引用你的类(class)C不引用m:c=nilObjectSpace.each_object{|obj|c=objif(Class===objandobj.name=~/::C$/)}当然这取决于
我正在尝试使用ruby和Savon来使用网络服务。测试服务为http://www.webservicex.net/WS/WSDetails.aspx?WSID=9&CATID=2require'rubygems'require'savon'client=Savon::Client.new"http://www.webservicex.net/stockquote.asmx?WSDL"client.get_quotedo|soap|soap.body={:symbol=>"AAPL"}end返回SOAP异常。检查soap信封,在我看来soap请求没有正确的命名空间。任何人都可以建议我
关闭。这个问题是opinion-based.它目前不接受答案。想要改进这个问题?更新问题,以便editingthispost可以用事实和引用来回答它.关闭4年前。Improvethisquestion我想在固定时间创建一系列低音和高音调的哔哔声。例如:在150毫秒时发出高音调的蜂鸣声在151毫秒时发出低音调的蜂鸣声200毫秒时发出低音调的蜂鸣声250毫秒的高音调蜂鸣声有没有办法在Ruby或Python中做到这一点?我真的不在乎输出编码是什么(.wav、.mp3、.ogg等等),但我确实想创建一个输出文件。
我在我的项目目录中完成了compasscreate.和compassinitrails。几个问题:我已将我的.sass文件放在public/stylesheets中。这是放置它们的正确位置吗?当我运行compasswatch时,它不会自动编译这些.sass文件。我必须手动指定文件:compasswatchpublic/stylesheets/myfile.sass等。如何让它自动运行?文件ie.css、print.css和screen.css已放在stylesheets/compiled。如何在编译后不让它们重新出现的情况下删除它们?我自己编译的.sass文件编译成compiled/t
我想将html转换为纯文本。不过,我不想只删除标签,我想智能地保留尽可能多的格式。为插入换行符标签,检测段落并格式化它们等。输入非常简单,通常是格式良好的html(不是整个文档,只是一堆内容,通常没有anchor或图像)。我可以将几个正则表达式放在一起,让我达到80%,但我认为可能有一些现有的解决方案更智能。 最佳答案 首先,不要尝试为此使用正则表达式。很有可能你会想出一个脆弱/脆弱的解决方案,它会随着HTML的变化而崩溃,或者很难管理和维护。您可以使用Nokogiri快速解析HTML并提取文本:require'nokogiri'h
我想为Heroku构建一个Rails3应用程序。他们使用Postgres作为他们的数据库,所以我通过MacPorts安装了postgres9.0。现在我需要一个postgresgem并且共识是出于性能原因你想要pggem。但是我对我得到的错误感到非常困惑当我尝试在rvm下通过geminstall安装pg时。我已经非常明确地指定了所有postgres目录的位置可以找到但仍然无法完成安装:$envARCHFLAGS='-archx86_64'geminstallpg--\--with-pg-config=/opt/local/var/db/postgresql90/defaultdb/po