本文设计的 Spring Cloud 版本以及用到的 Spring Cloud 组件
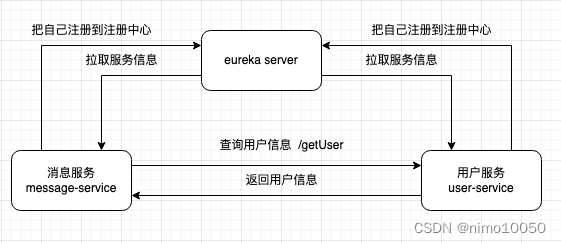
后面的内容都将围绕上面的图来分析.
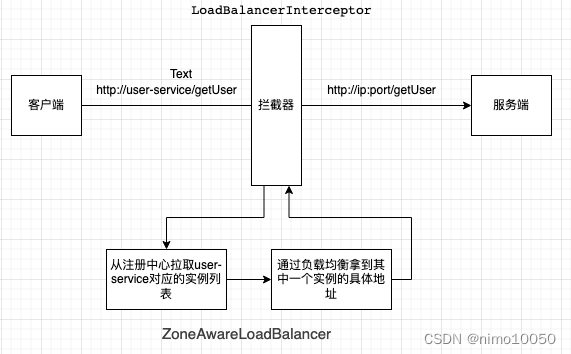
在 Spring Cloud 服务架构中, 一个服务可能部署多个实例, 通常情况下, 这个时候请求一个服务接口, 是需要通过 服务名 去调用的, 比如: http://user-service/getUser.
然后在 外力 的帮助下, 通过服务名拿到多个实例的地址列表, 再借助负载均衡算法, 从地址列表中选择一个具体的地址, 发送 HTTP 请求.
具体的做法分为如下三种:
RestTemplate 是 spring-web 包提供的, 用来调用 HTTP 接口的工具类, 它提供了 GET、POST 等常用的请求方法.使用方式如下:
@Bean
public RestTemplate restTemplate() {
  return new RestTemplate();
}
@Autowired
private RestTemplate restTemplate;
// 发送 GET 请求
restTemplate.getForObject(...)

// 发送 POST 请求
restTemplate.postForObject(...)

// 自定义
restTemplate.execute(...)
按照上面那种简单的写法, 我们只能调用有明确 IP 和 端口 的接口, 要想实现我们的需求, 至少要做两件事情:
根据服务名拿到服务实例的信息
负载均衡算法
RestTemplate 提供了拦截器的功能 ClientHttpRequestInterceptor, 开发者可以 手动编码 实现上面两个功能. Spring Cloud 已经帮我们实现了这个功能.使用方式如下:
@LoadBalanced 注解@Bean
@LoadBalanced
public RestTemplate restTemplate() {
return new RestTemplate();
}
User user = restTemplate.getForObject("http://user-service/getUser", User.class);
一个注解就帮我们完成了负载均衡.
org.springframework.cloud.client.discovery.DiscoveryClient 可以帮我们实现服务发现的功能, 只要我们拿到服务对应的实例信息, 后面 负载均衡 可以手动编码实现.
@Autowired
private DiscoveryClient discoveryClient;
List<ServiceInstance> instances = discoveryClient.getInstances("user-service");
@EnableFeignClients
@FeignClient("user-service")
public interface UserFeignClient {
@GetMapping("/getUser")
User getUser();
}
关于源码分析部分, 本文并不会逐行分析, 只会把 关键方法 注释说明(如果读者自行 debug, 是不会迷路的.), 中间很多无聊的方法跳转的过程都省略了.
先看一下大致的实现思路.
源码注释的大概意思是, 在 RestTemplate 上加上这个注解, 就能使用 LoadBalancerClient 接口做一些事情, 通过查看这个接口的注释, 它能提供的能力跟负载均衡相关.
所以,到这里我们已经清楚的了解到 @LoadBalanced 注解能为我们提供 负载均衡 的能力, 下面就需要弄清楚底层是如何实现负载均衡的.
Annotation to mark a RestTemplate or WebClient bean to be configured to use a LoadBalancerClient
通过查看源代码, 我们在如下两个地方看到了 @LoadBalanced 的使用, 通过调试发现, 断点根本没有走到第二个地方.
public class LoadBalancerAutoConfiguration {
@LoadBalanced
@Autowired(required = false)
private List<RestTemplate> restTemplates = Collections.emptyList();
}
public class LoadBalancerWebClientBuilderBeanPostProcessor implements BeanPostProcessor {
@Override
public Object postProcessBeforeInitialization(Object bean, String beanName)
throws BeansException {
if (bean instanceof WebClient.Builder) {
if (context.findAnnotationOnBean(beanName, LoadBalanced.class) == null) {
return bean;
}
((WebClient.Builder) bean).filter(exchangeFilterFunction);
}
return bean;
}
}
所以我们还是要把目光聚焦到下面的源代码:
public class LoadBalancerAutoConfiguration {
@LoadBalanced
@Autowired(required = false)
private List<RestTemplate> restTemplates = Collections.emptyList();
}
这里我通过描述这块代码的逻辑, 来引出一个有趣的 Spring 相关的知识点(关于这个知识点原理, 可以先直接跳到文末 Spring @Qualifier 注解的妙用):
首先, 我们应该知道, 通过如下方式, 我们可以把 Spring 容器中的所有 RestTemplate 类型的 Bean 对象添加到下面的集合中.
@Autowired
private List<RestTemplate> restTemplates = Collections.emptyList();
而我们在上面的基础上再加上 @LoadBalanced 注解, 那么这个集合收集的元素就加了一层限制条件, 集合中的 Bean 不仅要是 RestTemplate 类型, 而且 Bean 在声明时, 必须加上 @LoadBalanced 注解, 比如下面的声明方式:
@Bean
@LoadBalanced
public RestTemplate restTemplate() {
  return new RestTemplate();
}
然后我们接着看 Spring Cloud 如何对 RestTemplate 进行加工的
public class LoadBalancerAutoConfiguration {

	@LoadBalanced
	@Autowired(required = false)
	private List<RestTemplate> restTemplates = Collections.emptyList();

	@Autowired(required = false)
	private List<LoadBalancerRequestTransformer> transformers = Collections.emptyList();

  // 第一步: 遍历 restTemplates 集合
	@Bean
	public SmartInitializingSingleton loadBalancedRestTemplateInitializerDeprecated(
			final ObjectProvider<List<RestTemplateCustomizer>> restTemplateCustomizers) {
		return () -> restTemplateCustomizers.ifAvailable(customizers -> {
			for (RestTemplate restTemplate : LoadBalancerAutoConfiguration.this.restTemplates) {
        // RestTemplateCustomizer#customize
				for (RestTemplateCustomizer customizer : customizers) {
					customizer.customize(restTemplate);
				}
			}
		});
	}


	@Configuration(proxyBeanMethods = false)
	@ConditionalOnMissingClass("org.springframework.retry.support.RetryTemplate")
	static class LoadBalancerInterceptorConfig {

    // 第二步: 进行自定义操作, 也就是把 LoadBalancerInterceptor 这个我们文章开头提到的拦截器设置进去.
		@Bean
		@ConditionalOnMissingBean
		public RestTemplateCustomizer restTemplateCustomizer(
				final LoadBalancerInterceptor loadBalancerInterceptor) {
			return restTemplate -> {
				List<ClientHttpRequestInterceptor> list = new ArrayList<>(
						restTemplate.getInterceptors());
				list.add(loadBalancerInterceptor);
				restTemplate.setInterceptors(list);
			};
		}

	}
到此为止, 程序启动前的一些关键步骤已经搞清楚了, 下面继续分析调用流程.
源码入口:
User user = restTemplate.getForObject("http://user-service/getUser", User.class);
顺着 getForObject 进到关键方法
public class RestTemplate  {

  // doExecute
  protected <T> T doExecute(URI url, @Nullable HttpMethod method, @Nullable RequestCallback requestCallback,
			@Nullable ResponseExtractor<T> responseExtractor) throws RestClientException {

    	// 创建请求对象
      // 这里最终其实通过 InterceptingClientHttpRequestFactory#createRequest 方法
      // 创建了 InterceptingClientHttpRequest
			ClientHttpRequest request = createRequest(url, method);
			response = request.execute();

	}
}
紧接着 看 InterceptingClientHttpRequest 的 execute 方法
class InterceptingClientHttpRequest extends AbstractBufferingClientHttpRequest {


  // 第一步: 执行完父类的 execute 方法后, 会来到这里.
	@Override
	protected final ClientHttpResponse executeInternal(HttpHeaders headers, byte[] bufferedOutput) throws IOException {
		InterceptingRequestExecution requestExecution = new InterceptingRequestExecution();
		return requestExecution.execute(this, bufferedOutput);
	}


	private class InterceptingRequestExecution implements ClientHttpRequestExecution {

		private final Iterator<ClientHttpRequestInterceptor> iterator;

		public InterceptingRequestExecution() {
			this.iterator = interceptors.iterator();
		}

    // 第二步: 先 执行前面设置的拦截器 LoadBalancerInterceptor 通过 服务名, + 负载均衡 , 拿到其中一个实例的请求地址.
    // 然后根据真实的地址, 发送 http 请求.
		@Override
		public ClientHttpResponse execute(HttpRequest request, byte[] body) throws IOException {
        // 先 执行前面设置的拦截器 LoadBalancerInterceptor 通过 服务名, + 负载均衡 , 拿到其中一个实例的请求地址.
				nextInterceptor.intercept(request, body, this);
        // 然后根据真实的地址, 发送 http 请求.  AbstractClientHttpRequest#execute
				return delegate.execute();
			}
		}
	}

}
LoadBalancerInterceptor 的负载均衡处理
到这里, 我们就可以回答开头提到的问题: @LoadBalanced 是如何给 RestTemplate 提供负载均衡能力的, 众所周知 Ribbon 的能力就 负载均衡.
源码再往后看就是 Ribbon 的领域了, 我们不再继续深究. 后面可以单独写一篇文章对 Ribbon 的原理和源码进行分析.
public class LoadBalancerInterceptor implements ClientHttpRequestInterceptor {

  // 看到这里, 我们应该回想到一开始说的, @LoadBalanced 注解的相关注释说明.
  // 加上 @LoadBalanced 注解, 我们就能给 RestTemplate 赋予负载均衡的能力.
	private LoadBalancerClient loadBalancer;

	@Override
	public ClientHttpResponse intercept(final HttpRequest request, final byte[] body,
			final ClientHttpRequestExecution execution) throws IOException {

    // 因为我们集成了 Ribbon、 所以这里 loadBalancer 就是 RibbonLoadBalancerClient
		return this.loadBalancer.execute(serviceName,
				this.requestFactory.createRequest(request, body, execution));
	}

}
/**
 * This annotation may be used on a field or parameter as a qualifier for
 * candidate beans when autowiring. It may also be used to annotate other
 * custom annotations that can then in turn be used as qualifiers.
 */
@Target({ElementType.FIELD, ElementType.METHOD, ElementType.PARAMETER, ElementType.TYPE, ElementType.ANNOTATION_TYPE})
@Retention(RetentionPolicy.RUNTIME)
@Inherited
@Documented
public @interface Qualifier {

	String value() default "";

}
不管是根据上面的注释, 还是我们的使用经验来讲, 我们都应该知道 @Qualifier这个注解:它起到的是限定, “精确匹配”Bean 的作用,比如: 当同一类型的 Bean 有多个不同实例时,可通过此注解来做 筛选或匹配。
然后再来看下这个注解的一段注释:
It may also be used to annotate other custom annotations that can then in turn be used as qualifiers.
简单翻一下就是: @Qualifier 可以注解其他 自定义的注解, 然后这些 自定义注解 就可以反过来为我们注入 Bean 时, 起到限定的作用(上面已经讲过它限定了什么).
于是我们再回过头看下 @LoadBalanced 注解源码:
@Target({ ElementType.FIELD, ElementType.PARAMETER, ElementType.METHOD })
@Retention(RetentionPolicy.RUNTIME)
@Documented
@Inherited
@Qualifier
public @interface LoadBalanced {

}
从上可以看出, 这个自定义注解上是包含 @Qualifier, 所以 @LoadBalanced 注解是可以在我们注入 bean 时, 起到限定作用的.
关于 @Qualifier详细的源码和原理分析 可以围绕 QualifierAnnotationAutowireCandidateResolver 这个类做检索, 这里不再详细阐述.
我正在尝试使用ruby和Savon来使用网络服务。测试服务为http://www.webservicex.net/WS/WSDetails.aspx?WSID=9&CATID=2require'rubygems'require'savon'client=Savon::Client.new"http://www.webservicex.net/stockquote.asmx?WSDL"client.get_quotedo|soap|soap.body={:symbol=>"AAPL"}end返回SOAP异常。检查soap信封,在我看来soap请求没有正确的命名空间。任何人都可以建议我
我想安装一个带有一些身份验证的私有(private)Rubygem服务器。我希望能够使用公共(public)Ubuntu服务器托管内部gem。我读到了http://docs.rubygems.org/read/chapter/18.但是那个没有身份验证-如我所见。然后我读到了https://github.com/cwninja/geminabox.但是当我使用基本身份验证(他们在他们的Wiki中有)时,它会提示从我的服务器获取源。所以。如何制作带有身份验证的私有(private)Rubygem服务器?这是不可能的吗?谢谢。编辑:Geminabox问题。我尝试“捆绑”以安装新的gem..
我试图获取一个长度在1到10之间的字符串,并输出将字符串分解为大小为1、2或3的连续子字符串的所有可能方式。例如:输入:123456将整数分割成单个字符,然后继续查找组合。该代码将返回以下所有数组。[1,2,3,4,5,6][12,3,4,5,6][1,23,4,5,6][1,2,34,5,6][1,2,3,45,6][1,2,3,4,56][12,34,5,6][12,3,45,6][12,3,4,56][1,23,45,6][1,2,34,56][1,23,4,56][12,34,56][123,4,5,6][1,234,5,6][1,2,345,6][1,2,3,456][123
我主要使用Ruby来执行此操作,但到目前为止我的攻击计划如下:使用gemsrdf、rdf-rdfa和rdf-microdata或mida来解析给定任何URI的数据。我认为最好映射到像schema.org这样的统一模式,例如使用这个yaml文件,它试图描述数据词汇表和opengraph到schema.org之间的转换:#SchemaXtoschema.orgconversion#data-vocabularyDV:name:namestreet-address:streetAddressregion:addressRegionlocality:addressLocalityphoto:i
最近,当我启动我的Rails服务器时,我收到了一长串警告。虽然它不影响我的应用程序,但我想知道如何解决这些警告。我的估计是imagemagick以某种方式被调用了两次?当我在警告前后检查我的git日志时。我想知道如何解决这个问题。-bcrypt-ruby(3.1.2)-better_errors(1.0.1)+bcrypt(3.1.7)+bcrypt-ruby(3.1.5)-bcrypt(>=3.1.3)+better_errors(1.1.0)bcrypt和imagemagick有关系吗?/Users/rbchris/.rbenv/versions/2.0.0-p247/lib/ru
在Rails4.0.2中,我使用s3_direct_upload和aws-sdkgems直接为s3存储桶上传文件。在开发环境中它工作正常,但在生产环境中它会抛出如下错误,ActionView::Template::Error(noimplicitconversionofnilintoString)在View中,create_cv_url,:id=>"s3_uploader",:key=>"cv_uploads/{unique_id}/${filename}",:key_starts_with=>"cv_uploads/",:callback_param=>"cv[direct_uplo
我正在尝试编写一个将文件上传到AWS并公开该文件的Ruby脚本。我做了以下事情:s3=Aws::S3::Resource.new(credentials:Aws::Credentials.new(KEY,SECRET),region:'us-west-2')obj=s3.bucket('stg-db').object('key')obj.upload_file(filename)这似乎工作正常,除了该文件不是公开可用的,而且我无法获得它的公共(public)URL。但是当我登录到S3时,我可以正常查看我的文件。为了使其公开可用,我将最后一行更改为obj.upload_file(file
question的一些答案关于redirect_to让我想到了其他一些问题。基本上,我正在使用Rails2.1编写博客应用程序。我一直在尝试自己完成大部分工作(因为我对Rails有所了解),但在需要时会引用Internet上的教程和引用资料。我设法让一个简单的博客正常运行,然后我尝试添加评论。靠我自己,我设法让它进入了可以从script/console添加评论的阶段,但我无法让表单正常工作。我遵循的其中一个教程建议在帖子Controller中创建一个“评论”操作,以添加评论。我的问题是:这是“标准”方式吗?我的另一个问题的答案之一似乎暗示应该有一个CommentsController参
如何在ruby中调用C#dll? 最佳答案 我能想到几种可能性:为您的DLL编写(或找人编写)一个COM包装器,如果它还没有,则使用Ruby的WIN32OLE库来调用它;看看RubyCLR,其中一位作者是JohnLam,他继续在Microsoft从事IronRuby方面的工作。(估计不会再维护了,可能不支持.Net2.0以上的版本);正如其他地方已经提到的,看看使用IronRuby,如果这是您的技术选择。有一个主题是here.请注意,最后一篇文章实际上来自JohnLam(看起来像是2009年3月),他似乎很自在地断言RubyCL
我想在Ruby中创建一个用于开发目的的极其简单的Web服务器(不,不想使用现成的解决方案)。代码如下:#!/usr/bin/rubyrequire'socket'server=TCPServer.new('127.0.0.1',8080)whileconnection=server.acceptheaders=[]length=0whileline=connection.getsheaders想法是从命令行运行这个脚本,提供另一个脚本,它将在其标准输入上获取请求,并在其标准输出上返回完整的响应。到目前为止一切顺利,但事实证明这真的很脆弱,因为它在第二个请求上中断并出现错误:/usr/b