目录
      <dependency>
            <groupId>org.springframework.boot</groupId>
            <artifactId>spring-boot-starter-security</artifactId>
        </dependency>
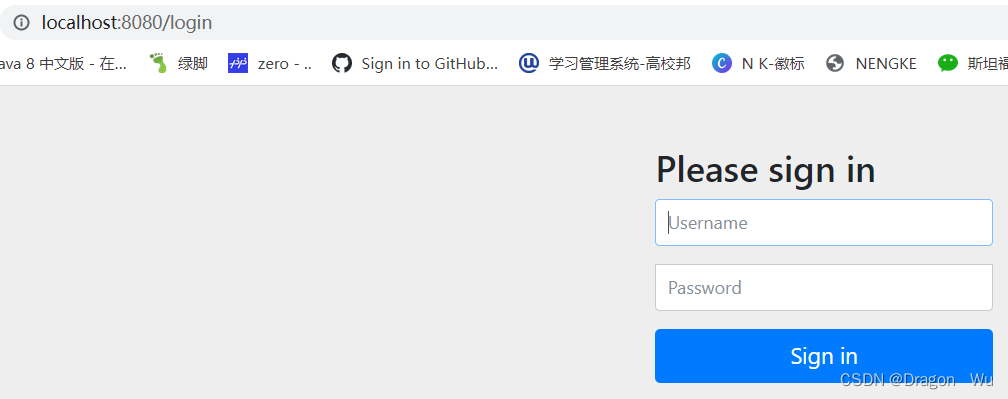
此时我们在启动项目时会发现对于的页面都需要登录才能访问!默认用户名、密码是user,密码是控制台启动时打印的密码。
官方推荐使用BCryptPasswordEncoder这是一个基于Hash单向加密的加密类
    @Test
    public void contextLoads(){
        BCryptPasswordEncoder bCryptPasswordEncoder = new BCryptPasswordEncoder();
        //密码加密
        String encode = bCryptPasswordEncoder.encode("123");
        System.out.println(encode);
        System.out.println("==========================");
        //密码匹配,匹配成功返回true,否则返回false
        boolean matches = bCryptPasswordEncoder.matches("123", encode);
        System.out.println(matches);

    }
打印结果:

在项目使用时一般将其放到Spring容器中
@Configuration
public class SecurityConfig {

    @Bean
    public PasswordEncoder getPw(){
        return new BCryptPasswordEncoder();
    }
}实现SpringSecurity里的UserDetailsService接口的LoadUserByUsername方法便可以实现自定义登录逻辑。以下代码将实现用户名为admin,密码为123的登录。一旦使用了自定义登录逻辑,原本的user和打印的password登录将不再生效。此时,通过admin 123便可登录。
对于登出SpringSecurity也提供了一个/logout的接口。
SpringSecurity框架以为我们提供了一个需要username和passsword参数的登录接口/login 的post请求,需要登录时框架调用的便是该接口。
@Service
public class UserDetailsServiceImpl implements UserDetailsService {

    @Autowired
    private PasswordEncoder passwordEncoder;

    @Override
    public UserDetails loadUserByUsername(String username) throws UsernameNotFoundException {
        //查询数据库判断用户名是否操作,如果不存在就会抛出UsernameNotFoundException异常
        if (!"admin".equals(username)) {
            throw new UsernameNotFoundException("用户名不存在!");
        }
        //2、把查询出来的密码(注册时已经加密过)进行解析,或者直接把密码放入构造方法
        String password = passwordEncoder.encode("123");
        return new User(username, password, AuthorityUtils.commaSeparatedStringToAuthorityList("admin,normal,ROLE_abc"));
    }
}@Configuration
public class SecurityConfig extends WebSecurityConfigurerAdapter {
@Bean
public PasswordEncoder getPw() {
return new BCryptPasswordEncoder();
}
@Override
protected void configure(HttpSecurity http) throws Exception {
//授权认证
http.authorizeRequests()
//error.html不需要被认证
.antMatchers("/error.html").permitAll()
//login.html不需要被认证
.antMatchers("/login.html").permitAll()
//指定角色访问
.antMatchers("/main.html").hasRole("abc")
//指定权限访问
.antMatchers("/main.html").hasAuthority("admin")
//多个权限都可访问
.antMatchers("/main.html").hasAnyAuthority("admin,normal")
//多个角色都可以访问
.antMatchers("/main.html").hasAnyRole("ABC,abc")
//通过指定ip地址进行访问,注意这里的ip与localhost转换的ip是不一样的,线上一般为服务器ip
.antMatchers("/main.html").hasIpAddress("127.0.0.1")
//所有请求都必须被认证,必须登录之后被访问
.anyRequest().authenticated();
//关闭csrf防护
http.csrf().disable();
}
}
在访问限制配置时,我们只需要集成WebSecurityConfigurerAdapter配置类configure(HttpSecurity http)方法即可。

多个角色也类似:注意角色这里不要加前缀ROLE_

对应之前服务实现类的权限和角色:
首先添加异常处理类实现AccessDeniedHandler接口的handle方法,handle方法里可自定义处理SpringSecurity的403等异常的处理。
@Component
public class MyAccessDeniedHandler implements AccessDeniedHandler {
    @Override
    public void handle(HttpServletRequest httpServletRequest, HttpServletResponse httpServletResponse, AccessDeniedException e) throws IOException, ServletException {
        //设置响应状态码
        httpServletResponse.setStatus(HttpServletResponse.SC_FORBIDDEN);
        httpServletResponse.setHeader("Content-Type", "application/json;charset=utf-8");
        PrintWriter writer = httpServletResponse.getWriter();
        writer.write("{\"status\":\"error\",\"msg\":\"权限不足,请联系管理员\"}");
        writer.flush();
        writer.close();
    }
}
之后在SpringSecurity配置类里添加如下:
@Configuration
public class SecurityConfig extends WebSecurityConfigurerAdapter {

    //注入异常处理类
    @Autowired
    private MyAccessDeniedHandler myAccessDeniedHandler;

    ......

    @Override
    protected void configure(HttpSecurity http) throws Exception {
        ......

        //异常处理的配置
        http.exceptionHandling()
                .accessDeniedHandler(myAccessDeniedHandler);
    }
}
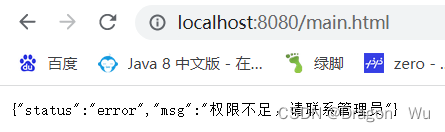
当权限不足报403时,这里会调用我们自定义的方法:
角色控制访问:注意这里的ROLE_前缀不能去
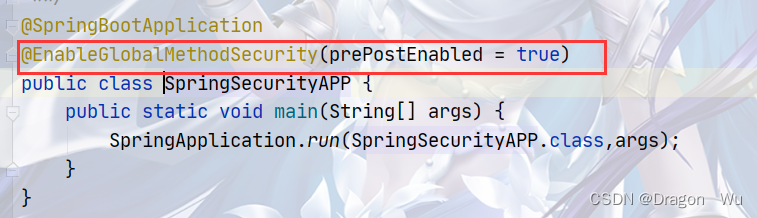
其他类开启注解@EnableGlobalMethodSecurity(securedEnabled = true)

控制类里添加@Secured(角色名)注解进行角色访问控制

当用户有ROLE_abC角色时会被允许访问,否则会报500错误!
使用@PreAuthorize注解来进行访问控制
类似的,启动类里的参数不同而已:
进行角色访问控制:@PreAuthorize("hasRole('abc')") //此时,有无ROLE_前缀都是可以被访问到的。要注意的时配置类里的hasRole方法是不允许以ROLE_前缀开头的这里有些差别。
同时也可用于权限控制访问:@PreAuthorize("hasAuthority('admin')")

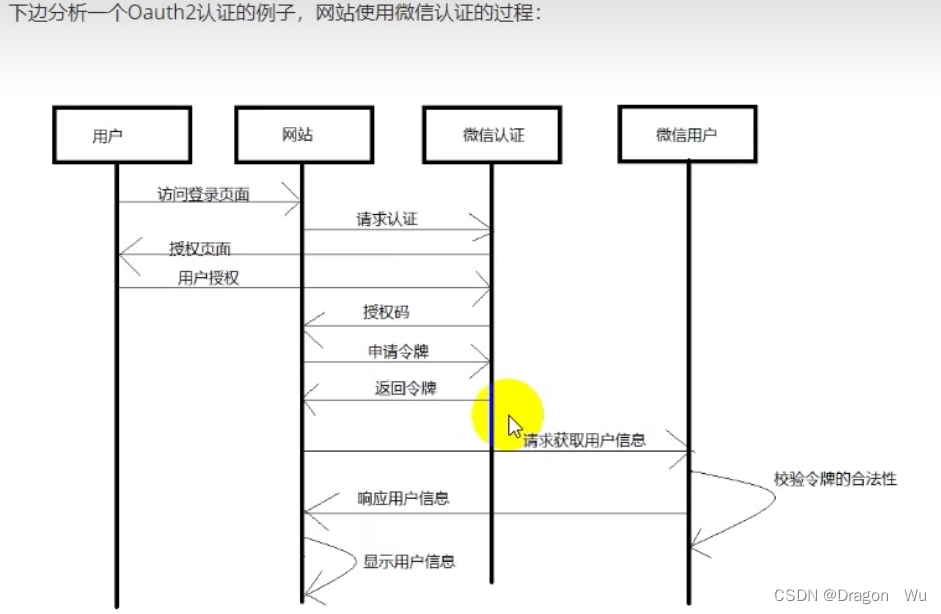
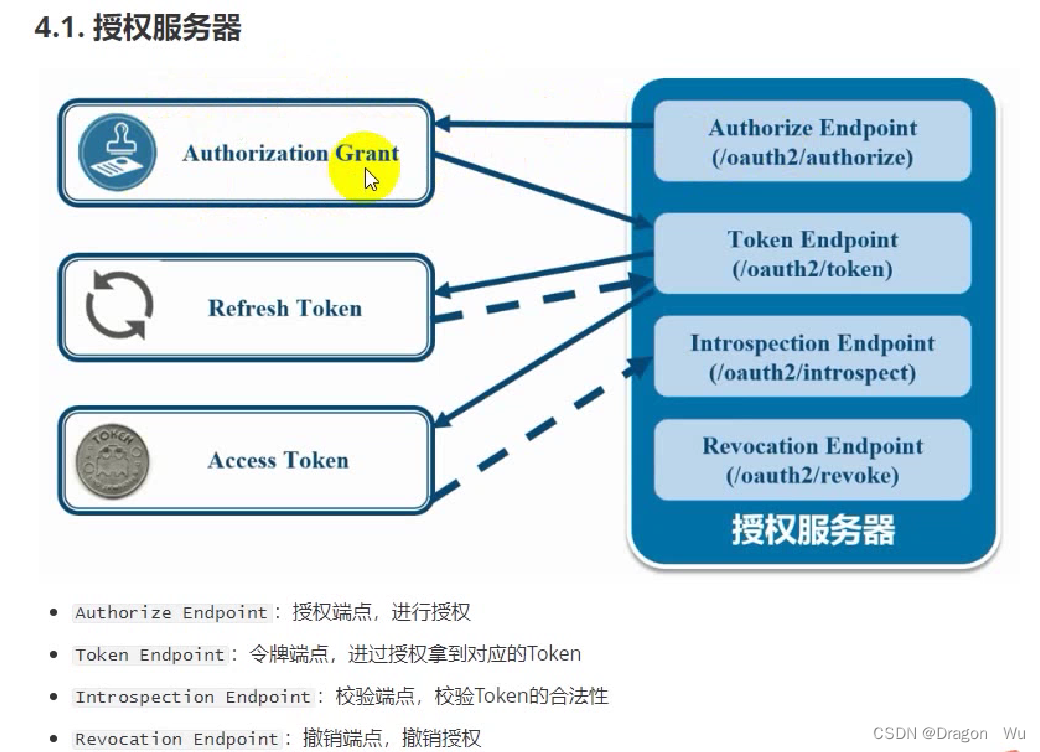
使用Oauth2时我们在SpringSecurity的依赖上添加如下依赖:
       <dependency>
            <groupId>org.springframework.cloud</groupId>
            <artifactId>spring-cloud-starter-oauth2</artifactId>
</dependency>(1)授权模式的配置类如下
SpringSecuirty的配置类:
@Configuration
@EnableWebSecurity
public class SecurityConfig extends WebSecurityConfigurerAdapter {

    @Bean
    public PasswordEncoder getPw() {
        return new BCryptPasswordEncoder();
    }

    @Override
    protected void configure(HttpSecurity http) throws Exception {
        http.csrf().disable()
                .authorizeRequests()
                .antMatchers("/oauth/**","/login/**","/logout/**").permitAll()
                .anyRequest().authenticated()
                .and()
                .formLogin().permitAll();
    }
}
Oauth2的授权服务器配置:
@Configuration
@EnableAuthorizationServer  //开启授权服务器
public class AuthorizationServerConfig extends AuthorizationServerConfigurerAdapter {

    @Autowired
    private PasswordEncoder passwordEncoder;

    @Override
    public void configure(ClientDetailsServiceConfigurer clients) throws Exception {
        clients.inMemory()
                //配置client-id
                .withClient("admin")
                //配置client-secret
                .secret(passwordEncoder.encode("112233"))
                //配置访问token的有效期
//                .accessTokenValiditySeconds(3600)
                //配置redirect_uri,用于授权成功后跳转
                .redirectUris("http://www.baidu.com")
                //配置申请的权限范围
                .scopes("all")
                //配置grant_type,表示授权类型
                .authorizedGrantTypes("authorization_code");

    }
}
Oauth2的资源服务器的配置类:
@Configuration
@EnableResourceServer  //开启资源服务器
public class ResourceServerConfig extends ResourceServerConfigurerAdapter {
    @Override
    public void configure(HttpSecurity http) throws Exception {
        http.authorizeRequests()
                .anyRequest()
                .authenticated()
                .and()
                .requestMatchers()
                .antMatchers("/user/**");
    }
}
密码模式的配置类如下:
SpringSecurity配置类:
@Configuration
@EnableWebSecurity
public class SecurityConfig extends WebSecurityConfigurerAdapter {

    @Bean
    public PasswordEncoder getPw() {
        return new BCryptPasswordEncoder();
    }

    //用于密码认证
    @Override
    @Bean
    public AuthenticationManager authenticationManagerBean() throws Exception{
        return super.authenticationManagerBean();
    }

    @Override
    protected void configure(HttpSecurity http) throws Exception {
        http.csrf().disable()
                .authorizeRequests()
                .antMatchers("/oauth/**","/login/**","/logout/**").permitAll()
                .anyRequest().authenticated()
                .and()
                .formLogin().permitAll();
    }
}
授权服务器配置:
@Configuration
@EnableAuthorizationServer  //开启授权服务器
public class AuthorizationServerConfig extends AuthorizationServerConfigurerAdapter {

    @Autowired
    private PasswordEncoder passwordEncoder;

    @Autowired
    private AuthenticationManager authenticationManager;

    @Autowired
    private UserDetailsServiceImpl userDetailsService;

    //使用密码模式配置所需配置
    @Override
    public void configure(AuthorizationServerEndpointsConfigurer endpoints) throws Exception {
        endpoints.authenticationManager(authenticationManager)
                .userDetailsService(userDetailsService);
    }

    @Override
    public void configure(ClientDetailsServiceConfigurer clients) throws Exception {
        clients.inMemory()
                //配置client-id
                .withClient("admin")
                //配置client-secret
                .secret(passwordEncoder.encode("112233"))
                //配置访问token的有效期
//                .accessTokenValiditySeconds(3600)
                //配置redirect_uri,用于授权成功后跳转
                .redirectUris("http://www.baidu.com")
                //配置申请的权限范围
                .scopes("all")
                //配置grant_type,表示授权类型
                .authorizedGrantTypes("password");

    }
}
资源服务器配置:
与授权获取token时的一样
启动服务器
授权模式获取接口资源的步骤
(1)获取授权码:
选择支持认证。
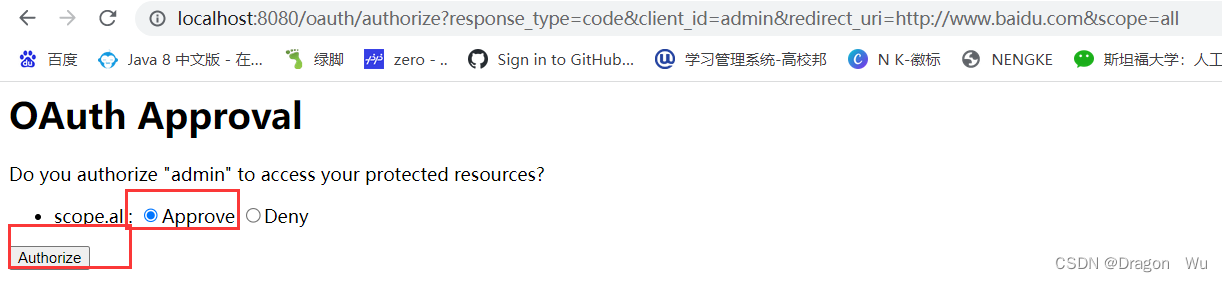
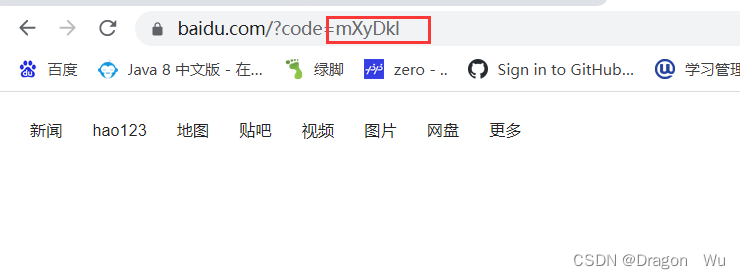
认证后记录下这个code里的值:
(2)获取令牌

用户名、密码就是授权服务器里的用户名密码

填写对应参数:
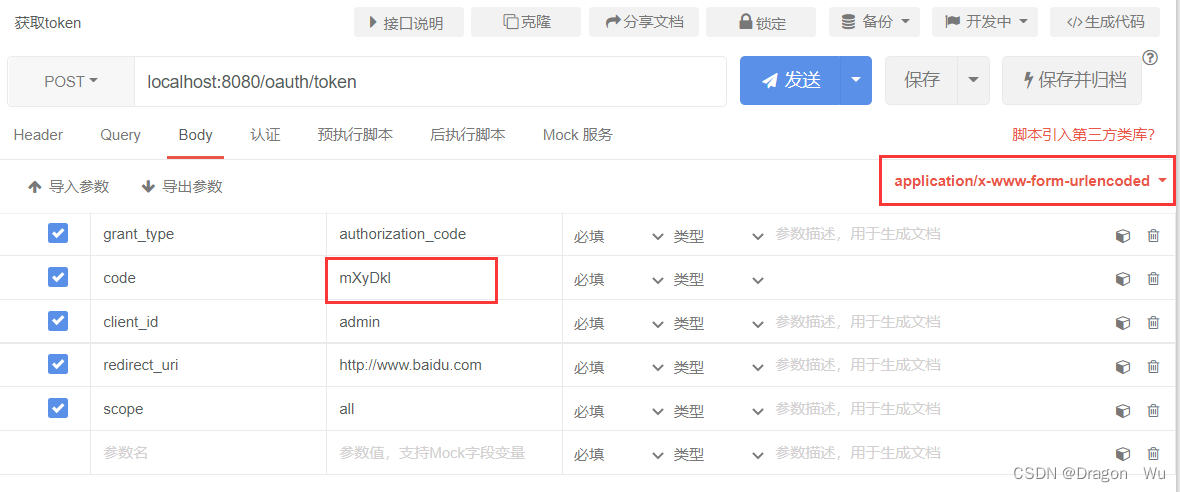
发生请求:
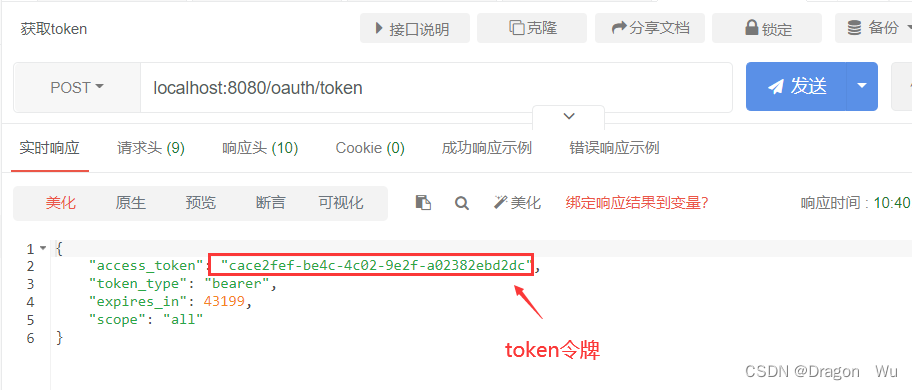
(3)获取我们自己写的接口的数据:
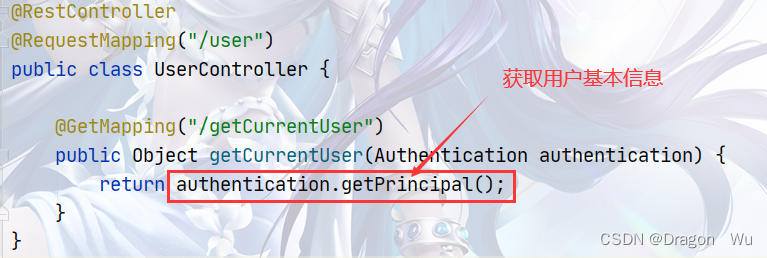
选择Bearer auth认证填入对应token
获取到对应用户信息:

加密模式获取资源的步骤
(1)通过授权服务获取token
认证配置与授权时一样
传入参数有所不同:
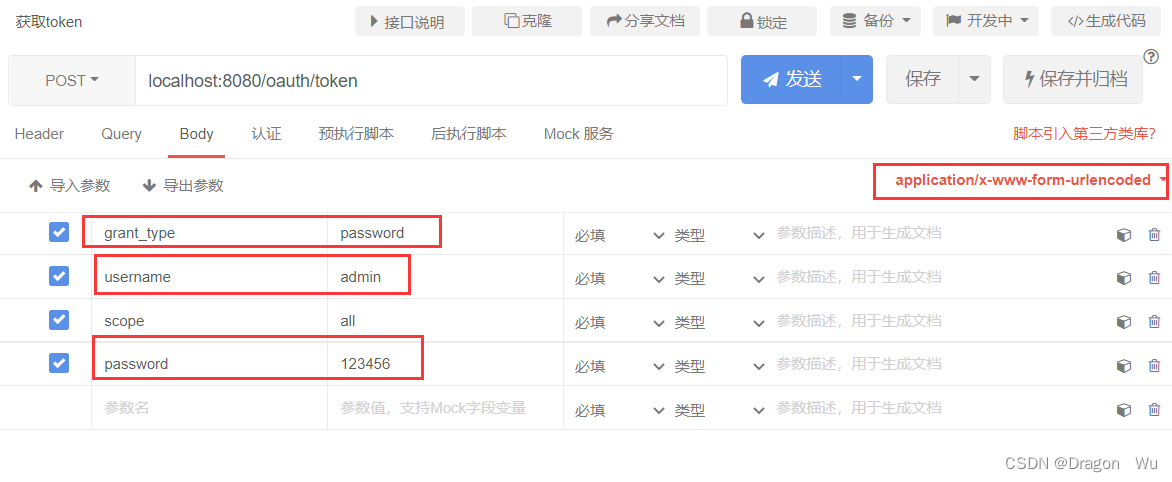
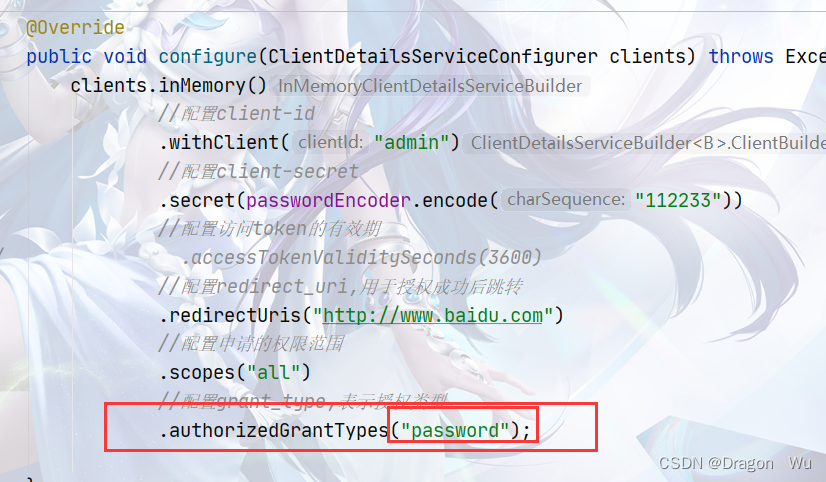
通过用户名密码获取到对应token
 (2)获取对应接口资源,与之前授权模式获取接口之源一样
以上授权的数据是放到内存中的实际开发过程中应将其放到redis里
(1)添加redis依赖与配置
       <dependency>
            <groupId>org.springframework.boot</groupId>
            <artifactId>spring-boot-starter-data-redis</artifactId>
        </dependency>
spring:
redis:
database: 1
host: my-server
port: 6380
password: (2)配置类
@Configuration
public class RedisConfig {

    @Autowired
    private RedisConnectionFactory redisConnectionFactory;

    @Bean
    public TokenStore redisTokenStore(){
        return new RedisTokenStore(redisConnectionFactory);
    }
}
@Configuration
@EnableAuthorizationServer //开启授权服务器
public class AuthorizationServerConfig extends AuthorizationServerConfigurerAdapter {
@Autowired
private PasswordEncoder passwordEncoder;
@Autowired
private AuthenticationManager authenticationManager;
@Autowired
private UserDetailsServiceImpl userDetailsService;
@Autowired
@Qualifier("redisTokenStore")
private TokenStore tokenStore;
//使用密码模式配置所需配置
@Override
public void configure(AuthorizationServerEndpointsConfigurer endpoints) throws Exception {
endpoints.authenticationManager(authenticationManager)
.userDetailsService(userDetailsService)
.tokenStore(tokenStore);
}
@Override
public void configure(ClientDetailsServiceConfigurer clients) throws Exception {
clients.inMemory()
//配置client-id
.withClient("admin")
//配置client-secret
.secret(passwordEncoder.encode("112233"))
//配置访问token的有效期
// .accessTokenValiditySeconds(3600)
//配置redirect_uri,用于授权成功后跳转
.redirectUris("http://www.baidu.com")
//配置申请的权限范围
.scopes("all")
//配置grant_type,表示授权类型
.authorizedGrantTypes("password");
}
}
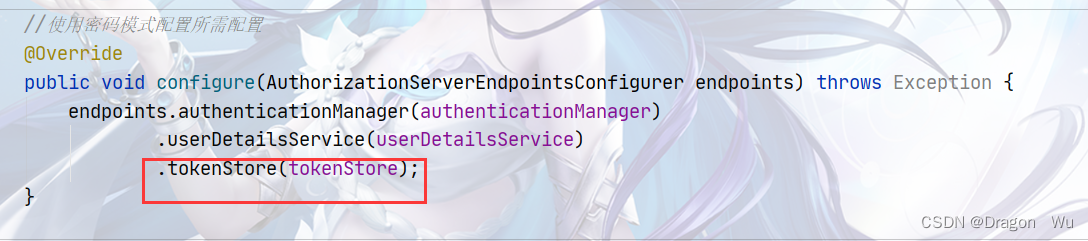
放到获取token的接口后可以看到:数据已存在redis中去了


JWT是由.分割的如下三部分组成:
头部(Header)
Header 一般由两个部分组成:
alg是是所使用的hash算法,如:HMAC SHA256或RSA,typ是Token的类型,在这里就是:JWT。
{
  "alg": "HS256",
  "typ": "JWT"
}
然后使用Base64Url编码成第一部分:
eyJhbGciOiJIUzI1NiIsInR5cCI6IkpXVCJ9.<second part>.<third part>
载荷(Payload)
这一部分是JWT主要的信息存储部分,其中包含了许多种的声明(claims)。
Claims的实体一般包含用户和一些元数据,这些claims分成三种类型:
一个简单的Pyload可以是这样子的:
{
  "sub": "1234567890",
  "name": "John Doe",
  "admin": true
}
这部分同样使用Base64Url编码成第二部分:
eyJhbGciOiJIUzI1NiIsInR5cCI6IkpXVCJ9.eyJzdWIiOiIxMjM0NTY3ODkwIiwibmFtZSI6IkpvaG4gRG9lIiwiYWRtaW4iOnRydWV9.<third part>
签名(Signature)
Signature是用来验证发送者的JWT的同时也能确保在期间不被篡改。
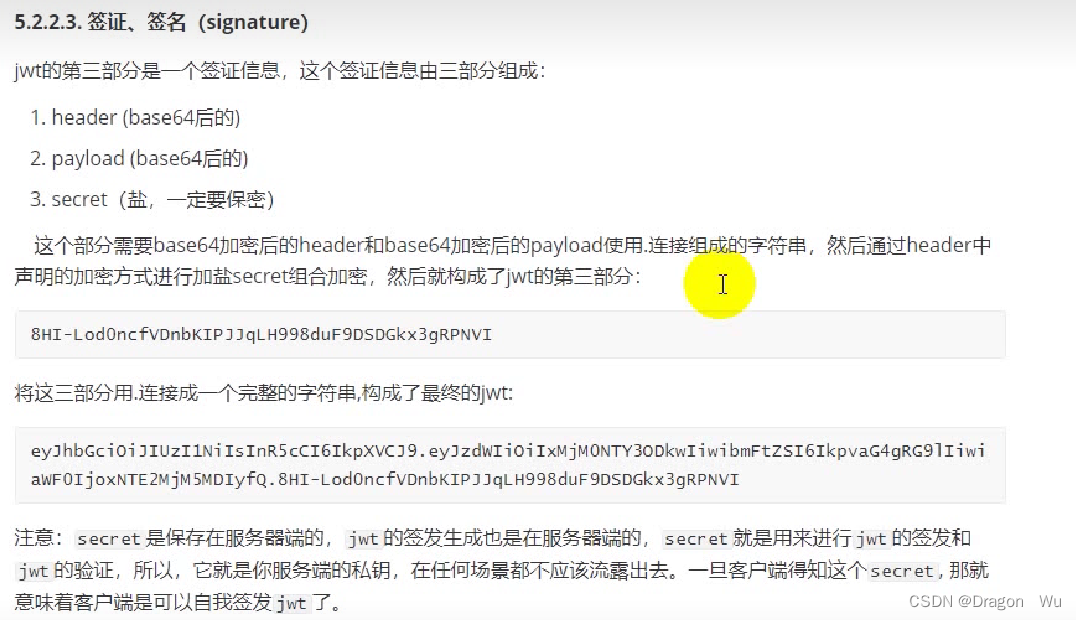
在创建该部分时候你应该已经有了编码后的Header和Payload,然后使用保存在服务端的秘钥对其签名,一个完整的JWT如下:
eyJhbGciOiJIUzI1NiIsInR5cCI6IkpXVCJ9.eyJzdWIiOiIxMjM0NTY3ODkwIiwibmFtZSI6IkpvaG4gRG9lIiwiYWRtaW4iOnRydWV9.TJVA95OrM7E2cBab30RMHrHDcEfxjoYZgeFONFh7HgQ
因此使用JWT具有如下好处:
        <dependency>
            <groupId>io.jsonwebtoken</groupId>
            <artifactId>jjwt</artifactId>
            <version>0.9.1</version>
</dependency> private void createToken() {
//当前系统时间
long now = System.currentTimeMillis();
//过期时间,1分钟
long exp = now + 60 * 1000;
//创建JwtBuilder对象
JwtBuilder jwtBuilder = Jwts.builder()
//声明的标识{“jti”:"8888"}
.setId("8888")
//主体,用户{“sub”:"Rose"}
.setSubject("Rose")
//创建日期{“ita”:“xxxxxx”}
.setIssuedAt(new Date())
.signWith(SignatureAlgorithm.HS256, "xxxxxx")
//设置过期时间
.setExpiration(new Date(exp));
//获取jwt的token
String token = jwtBuilder.compact();
System.out.println(token);
System.out.println("=======================================");
String[] split = token.split("\\.");
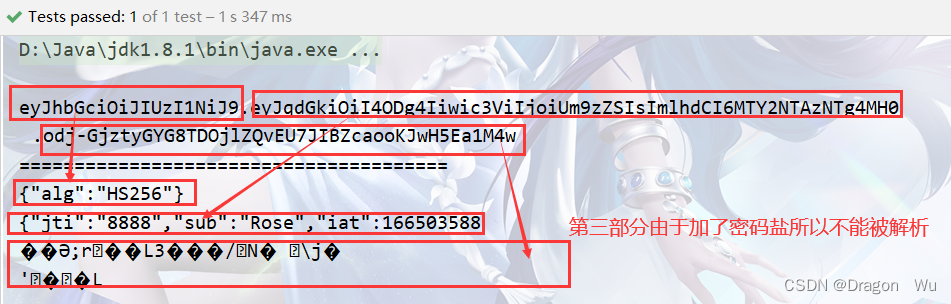
System.out.println(Base64Codec.BASE64.decodeToString(split[0]));
System.out.println(Base64Codec.BASE64.decodeToString(split[1]));
//无法解密
System.out.println(Base64Codec.BASE64.decodeToString(split[2]));
}打印如下:密码盐一般为服务器的私钥
    private void parseJWT() {
        String jwt = "eyJhbGciOiJIUzI1NiJ9.eyJqdGkiOiI4ODg4Iiwic3ViIjoiUm9zZSIsImlhdCI6MTY2NTAzNzc0MSwiZXhwIjoxNjY1MDM3ODAxfQ.jGZrGW0sYyfuatsi1xtYXI8pPflRZR4DY3BbwmSKN0M";
        //解析token获取负载中声明的对象
        Claims claims = Jwts.parser()
                .setSigningKey("xxxxxx")
                .parseClaimsJws(jwt)
                .getBody();
        System.out.println("id:" + claims.getId());
        System.out.println("subject:" + claims.getSubject());
        System.out.println("issuedAt:" + claims.getIssuedAt());
        SimpleDateFormat simpleDateFormat = new SimpleDateFormat("yyyy-MM-dd HH:mm:ss");
        System.out.println("签发时间:" + simpleDateFormat.format(claims.getIssuedAt()));
        System.out.println("过期时间:" + simpleDateFormat.format(claims.getExpiration()));
        System.out.println("当前时间:" + simpleDateFormat.format(new Date()));
} 
    //自定义声明
    private void createJWTByClaims() {
        //当前系统时间
        long now = System.currentTimeMillis();
        //过期时间,1分钟
        long exp = now + 60 * 1000;

        //创建JwtBuilder对象
        JwtBuilder jwtBuilder = Jwts.builder()
                //声明的标识{“jti”:"8888"}
                .setId("8888")
                //主体,用户{“sub”:"Rose"}
                .setSubject("Rose")
                //创建日期{“ita”:“xxxxxx”}
                .setIssuedAt(new Date())
                .signWith(SignatureAlgorithm.HS256, "xxxxxx")
                //设置过期时间
                .setExpiration(new Date(exp))
                //自定义声明的使用
                .claim("roles", "admin")
                .claim("logo", "xxx.jpg");
        //直接传入Map
//                .setClaims(map)
        //获取jwt的token
        String token = jwtBuilder.compact();
        System.out.println(token);
    }
解析:
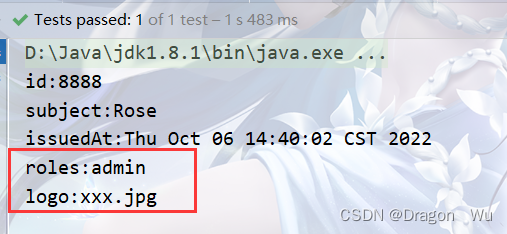
private void parseJWTClaims() {
        String jwt = "eyJhbGciOiJIUzI1NiJ9.eyJqdGkiOiI4ODg4Iiwic3ViIjoiUm9zZSIsImlhdCI6MTY2NTAzODQwMiwiZXhwIjoxNjY1MDM4NDYxLCJyb2xlcyI6ImFkbWluIiwibG9nbyI6Inh4eC5qcGcifQ.fzyWQ_HG725kDoZ0zljHkIiIrO1mhl_u77r81ZeT1FA";
        //解析token获取负载中声明的对象
        Claims claims = Jwts.parser()
                .setSigningKey("xxxxxx")
                .parseClaimsJws(jwt)
                .getBody();
        System.out.println("id:" + claims.getId());
        System.out.println("subject:" + claims.getSubject());
        System.out.println("issuedAt:" + claims.getIssuedAt());
        System.out.println("roles:" + claims.get("roles"));
        System.out.println("logo:" + claims.get("logo"));
    }
Jwt的配置类
@Configuration
public class JwtTokenStoreConfig {

    @Bean
    public TokenStore jwtTokenStore() {
        return new JwtTokenStore(jwtAccessTokenConverter());
    }

    @Bean
    public JwtAccessTokenConverter jwtAccessTokenConverter() {
        JwtAccessTokenConverter accessTokenConverter = new JwtAccessTokenConverter();
        //配置jwt使用的密钥
        accessTokenConverter.setSigningKey("test_key");
        return accessTokenConverter;
    }

    @Bean
    public JwtTokenEnhancer jwtTokenEnhancer(){
        return new JwtTokenEnhancer();
    }
}
Jwt内容增强器的配置类:
public class JwtTokenEnhancer implements TokenEnhancer {


    @Override
    public OAuth2AccessToken enhance(OAuth2AccessToken oAuth2AccessToken, OAuth2Authentication oAuth2Authentication) {
        Map<String, Object> info = new HashMap<>();
        //放入jwt里的内容
        info.put("enhance", "enhance info");
        ((DefaultOAuth2AccessToken) oAuth2AccessToken).setAdditionalInformation(info);
        return oAuth2AccessToken;
    }
}
授权服务器配置类:
@Configuration
@EnableAuthorizationServer  //开启授权服务器
public class AuthorizationServerConfig extends AuthorizationServerConfigurerAdapter {

    @Autowired
    private PasswordEncoder passwordEncoder;

    @Autowired
    private AuthenticationManager authenticationManager;

    @Autowired
    private UserDetailsServiceImpl userDetailsService;

    @Autowired
    @Qualifier("jwtTokenStore")
    private TokenStore tokenStore;

    @Autowired
    private JwtAccessTokenConverter jwtAccessTokenConverter;

    @Autowired
    private JwtTokenEnhancer jwtTokenEnhancer;

    //使用密码模式配置所需配置
    @Override
    public void configure(AuthorizationServerEndpointsConfigurer endpoints) throws Exception {
        //配置JWT内容增强器
        TokenEnhancerChain enhancerChain = new TokenEnhancerChain();
        List<TokenEnhancer> delegates = new ArrayList<>();
        delegates.add(jwtTokenEnhancer);
        delegates.add(jwtAccessTokenConverter);
        enhancerChain.setTokenEnhancers(delegates);

        endpoints.authenticationManager(authenticationManager)
                .userDetailsService(userDetailsService)
                //配置存储令牌策略
                .tokenStore(tokenStore)
                .accessTokenConverter(jwtAccessTokenConverter)
                //配置内容增强器
                .tokenEnhancer(enhancerChain);
    }

    @Override
    public void configure(ClientDetailsServiceConfigurer clients) throws Exception {
        clients.inMemory()
                //配置client-id
                .withClient("admin")
                //配置client-secret
                .secret(passwordEncoder.encode("112233"))
                //配置访问token的有效期
                .accessTokenValiditySeconds(3600)
                //配置刷新令牌的有效期
                .refreshTokenValiditySeconds(864000)
                //配置redirect_uri,用于授权成功后跳转
                .redirectUris("http://localhost:8081/login")
                //配置申请的权限范围
                .scopes("all")
                //配置grant_type,表示授权类型, 刷新令牌
                .authorizedGrantTypes("password","refresh_token");
    }
}
重启项目:
使用正确密码模式的访问接口进行测试:可以看到目前的token已经是JWT的token了
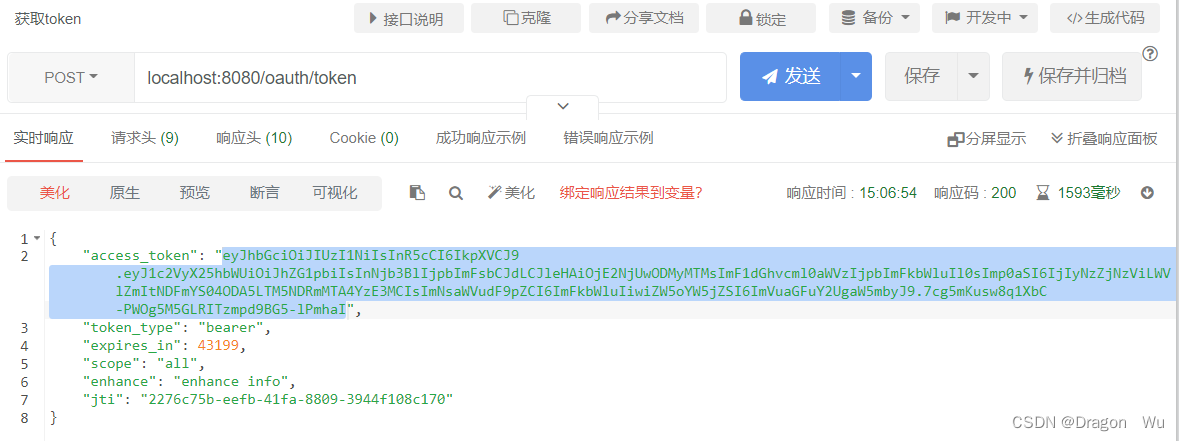
将此token放到官网解析可以看到对应增加的信息:

这里需要引入之前集成JWT的依赖
添加访问接口进行测试
    @GetMapping("/getCurrentUser")
    public Object getCurrentUser(Authentication authentication, HttpServletRequest request) {
        String head = request.getHeader("Authorization");
        String token = head.substring(head.indexOf("bearer") + 7);
        return Jwts.parser()
                .setSigningKey("test_key".getBytes(StandardCharsets.UTF_8))
                .parseClaimsJws(token)
                .getBody();
    }
访问该接口,仅需传入请求头Authorization和对应的bearer+JWT即可:
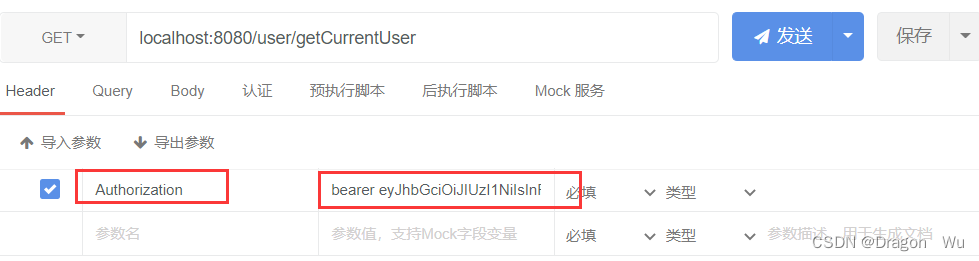
解析完毕:

3、刷新token
授权服务器配置如下:

再次测试:可以看到刷新时的token

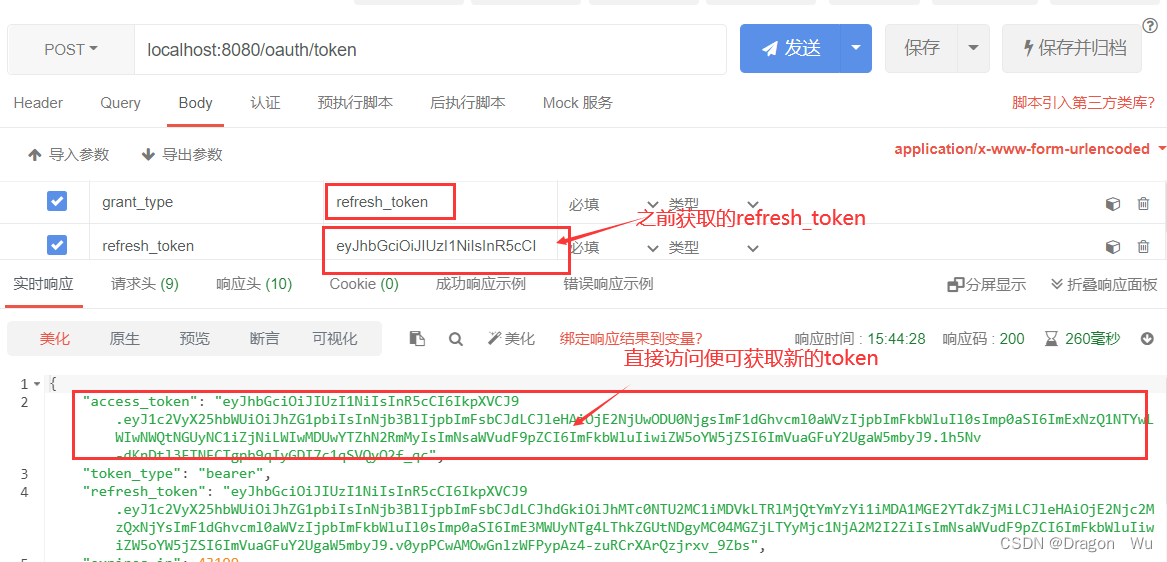
我以之前的授权服务器作为授权服务器,现在在创建一个服务器作为单点请求登录的服务器客户端。依赖与授权服务器相同。
server:
  port: 8081
  servlet:
    session:
      # 防止Cookie冲突,冲突会导致登录验证不通过
      cookie:
        name: OAUTH2-CLIENT-SESSIONID01
# 授权服务器地址
oauth2-server-url: http://localhost:8080
# 与授权服务器对应的配置
security:
  oauth2:
    client:
      client-id: admin
      client-secret: 112233
      user-authorization-uri: ${oauth2-server-url}/oauth/authorize
      access-token-uri: ${oauth2-server-url}/oauth/token
    resource:
      jwt:
        key-uri: ${oauth2-server-url}/oauth/token_key
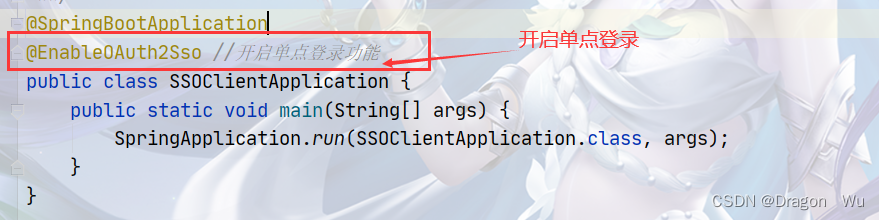
使用单点登录时授权服务器的授权配置类:
@Configuration
@EnableAuthorizationServer  //开启授权服务器
public class AuthorizationServerConfig extends AuthorizationServerConfigurerAdapter {

    @Autowired
    private PasswordEncoder passwordEncoder;

    @Autowired
    private AuthenticationManager authenticationManager;

    @Autowired
    private UserDetailsServiceImpl userDetailsService;

    @Autowired
    @Qualifier("jwtTokenStore")
    private TokenStore tokenStore;

    @Autowired
    private JwtAccessTokenConverter jwtAccessTokenConverter;

    @Autowired
    private JwtTokenEnhancer jwtTokenEnhancer;

    //使用密码模式配置所需配置
    @Override
    public void configure(AuthorizationServerEndpointsConfigurer endpoints) throws Exception {
        //配置JWT内容增强器
        TokenEnhancerChain enhancerChain = new TokenEnhancerChain();
        List<TokenEnhancer> delegates = new ArrayList<>();
        delegates.add(jwtTokenEnhancer);
        delegates.add(jwtAccessTokenConverter);
        enhancerChain.setTokenEnhancers(delegates);

        endpoints.authenticationManager(authenticationManager)
                .userDetailsService(userDetailsService)
                //配置存储令牌策略
                .tokenStore(tokenStore)
                .accessTokenConverter(jwtAccessTokenConverter)
                //配置内容增强器
                .tokenEnhancer(enhancerChain);
    }

    @Override
    public void configure(ClientDetailsServiceConfigurer clients) throws Exception {
        clients.inMemory()
                //配置client-id
                .withClient("admin")
                //配置client-secret
                .secret(passwordEncoder.encode("112233"))
                //配置访问token的有效期
                .accessTokenValiditySeconds(3600)
                //配置刷新令牌的有效期
                .refreshTokenValiditySeconds(864000)
                //配置redirect_uri,用于授权成功后跳转
                .redirectUris("http://localhost:8081/login")
                //自动授权配置
                .autoApprove(true)
                //配置申请的权限范围
                .scopes("all")
                //配置grant_type,表示授权类型, 刷新令牌
                .authorizedGrantTypes("password", "refresh_token", "authorization_code");
    }

    @Override
    public void configure(AuthorizationServerSecurityConfigurer security) throws Exception {
        //获取密钥需要身份认证,使用单点登录时必须配置
        security.tokenKeyAccess("isAuthenticated()");
    }
}
访问客户端的接口:
http://localhost:8081/user/getCurrentUser
此时,会跳转到授权服务器的登录页面:

登录成功访问到对应接口资源:

总结到此。
我正在使用i18n从头开始构建一个多语言网络应用程序,虽然我自己可以处理一大堆yml文件,但我说的语言(非常)有限,最终我想寻求外部帮助帮助。我想知道这里是否有人在使用UI插件/gem(与django上的django-rosetta不同)来处理多个翻译器,其中一些翻译器不愿意或无法处理存储库中的100多个文件,处理语言数据。谢谢&问候,安德拉斯(如果您已经在rubyonrails-talk上遇到了这个问题,我们深表歉意) 最佳答案 有一个rails3branchofthetolkgem在github上。您可以通过在Gemfi
我在app/helpers/sessions_helper.rb中有一个帮助程序文件,其中包含一个方法my_preference,它返回当前登录用户的首选项。我想在集成测试中访问该方法。例如,这样我就可以在测试中使用getuser_path(my_preference)。在其他帖子中,我读到这可以通过在测试文件中包含requiresessions_helper来实现,但我仍然收到错误NameError:undefinedlocalvariableormethod'my_preference'.我做错了什么?require'test_helper'require'sessions_hel
我一直很高兴地使用DelayedJob习惯用法:foo.send_later(:bar)这会调用DelayedJob进程中对象foo的方法bar。我一直在使用DaemonSpawn在我的服务器上启动DelayedJob进程。但是...如果foo抛出异常,Hoptoad不会捕获它。这是任何这些包中的错误...还是我需要更改某些配置...或者我是否需要在DS或DJ中插入一些异常处理来调用Hoptoad通知程序?回应下面的第一条评论。classDelayedJobWorker 最佳答案 尝试monkeypatchingDelayed::W
我安装了ruby版本管理器,并将RVM安装的ruby实现设置为默认值,这样'哪个ruby'显示'~/.rvm/ruby-1.8.6-p383/bin/ruby'但是当我在emacs中打开inf-ruby缓冲区时,它使用安装在/usr/bin中的ruby。有没有办法让emacs像shell一样尊重ruby的路径?谢谢! 最佳答案 我创建了一个emacs扩展来将rvm集成到emacs中。如果您有兴趣,可以在这里获取:http://github.com/senny/rvm.el
是否有简单的方法来更改默认ISO格式(yyyy-mm-dd)的ActiveAdmin日期过滤器显示格式? 最佳答案 您可以像这样为日期选择器提供额外的选项,而不是覆盖js:=f.input:my_date,as::datepicker,datepicker_options:{dateFormat:"mm/dd/yy"} 关于ruby-on-rails-事件管理员日期过滤器日期格式自定义,我们在StackOverflow上找到一个类似的问题: https://s
前置步骤我们都操作完了,这篇开始介绍jenkins的集成。话不多说,看操作1、登录进入jenkins后会让你选择安装插件,选择第一个默认的就行。安装完成后设置账号密码,重新登录。2、配置JDK和Git都需要执行路径,所以需要先把执行路径找到,先进入服务器的docker容器,2.1JDK的路径root@69eef9ee86cf:/usr/bin#echo$JAVA_HOME/usr/local/openjdk-82.2Git的路径root@69eef9ee86cf:/#whichgit/usr/bin/git3、先配置JDK和Git。点击:ManageJenkins>>GlobalToolCon
大家好,我正在尝试设置一个开发环境,并且我一直在关注以下教程:Linktotutorial我做得不是很好,除了最基本的版本控制内容外,我对终端命令没有任何实际经验。我点击了第一个链接并尝试运行source~/.bash_profile我得到了错误;mkdir:/usr/local/rbenv/shims:权限被拒绝mkdir:/usr/local/rbenv/versions:权限被拒绝现在每次我加载终端时都会出现错误。bash_profile的内容;exportPATH=/usr/local/rbenv/bin:$PATHexportRBENV_ROOT=/usr/local/rbe
我想用这两种语言中的任何一种(最好是ruby)制作一个窗口管理器。老实说,除了我需要加载某种X模块外,我不知道从哪里开始。因此,如果有人有线索,如果您能指出正确的方向,那就太好了。谢谢 最佳答案 XCB,X的下一代API使用XML格式定义X协议(protocol),并使用脚本生成特定语言绑定(bind)。它在概念上与SWIG类似,只是它描述的不是CAPI,而是X协议(protocol)。目前,C和Python存在绑定(bind)。理论上,Ruby端口只是编写一个从XML协议(protocol)定义语言到Ruby的翻译器的问题。生
这是我在ActiveAdmin中的自定义页面ActiveAdmin.register_page"Settings"doaction_itemdolink_to('Importprojects','settings/importprojects')endcontentdopara"Text"endcontrollerdodefimportprojectssystem"rakedataspider:import_projects_ninja"para"OK"endendend我想做的是,当我单击“导入项目”按钮时,我想在Controller中执行rake任务。但是我无法访问该方法。可能是什
我正在寻找用于Rails的优质管理插件。似乎大多数现有的插件/gem(例如“restful_authentication”、“acts_as_authenticated”)都围绕着self注册等展开。但是,我正在寻找一种功能齐全的基于管理/管理角色的解决方案——但不是简单地附加到另一个非基于角色的解决方案。如果我找不到,我想我会自己动手......只是不想重新发明轮子。 最佳答案 RyanBates最近做了两个关于授权的railscast(注意身份验证和授权之间的区别;身份验证检查用户是否如她所说的那样,授权检查用户是否有权访问资源
